thermo 贺立式烘箱 操作手册 使用说明书

Valid: 09.2005 / 50042749 C
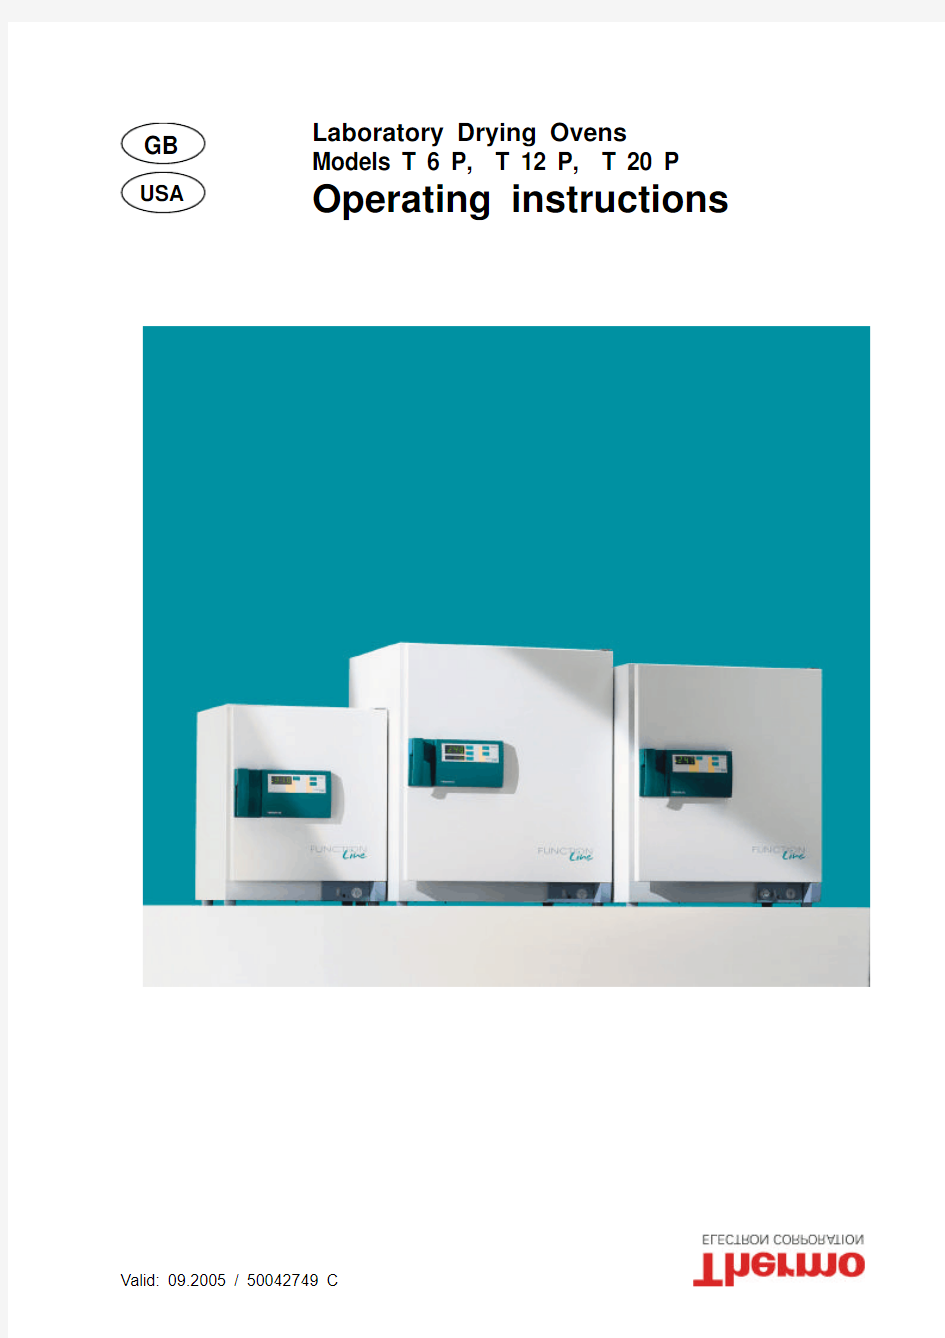
Laboratory Drying Ovens
Models T 6 P, T 12 P, T 20 P
Operating instructions
Below is a list of the international Thermo marketing organizations.
Postal address Germany Thermo Electron LED GmbH D – 63505 Langenselbold Robert-Bosch-Strasse 1Postal address USA Thermo Electron Corporation. 275 Aiken Road
Asheville, NC 28804
USA
Enquiries from Germany
Phone
Sales 0800 1 536376 Service 0800 1 112110 Fax
Sales/Service 0800 1 112114
https://www.360docs.net/doc/0712634848.html,bequipment.de@https://www.360docs.net/doc/0712634848.html, Enquiries from North America Phone + 1 800-879 7767
Fax + 1 828-658 0363
https://www.360docs.net/doc/0712634848.html,bequipment@https://www.360docs.net/doc/0712634848.html,
Enquiries from Europe, Middle East and Africa
Phone + 49(0) 6184 / 90-6940
Fax+ 49(0) 6184 / 90-7474
https://www.360docs.net/doc/0712634848.html,bequipment.de@https://www.360docs.net/doc/0712634848.html, Enquiries from Latin America Phone + 1 828-658 2711
Fax + 1 828-645 9466
https://www.360docs.net/doc/0712634848.html,bequipment@https://www.360docs.net/doc/0712634848.html, Enquiries from Asia Pacific Phone + 1 852-2711 3910 Fax + 1 852-2711 3858
https://www.360docs.net/doc/0712634848.html,bequipment@https://www.360docs.net/doc/0712634848.html,
Internet: https://www.360docs.net/doc/0712634848.html,
1a
Thermo Electron LED GmbH, 63505 Langenselbold, Germany
function line? is a registered trademark of Thermo Electron LED GmbH.
If translated versions of this manual are used, the German version is the authoritative basis. Subject to technical modifications.
This instruction manual applies for the following models:
Order No. Model Equipment
50 042 294 T 6 P
Drying oven, programmed controller, 1/PE AC, 230 V; 50/60 Hz
50 042 296 T 6 P Drying oven, programmed controller, 1/PE AC, 120 V; 50/60 Hz
50 042 304 T 12 P Drying oven, programmed controller, 1/PE AC, 230 V; 50/60 Hz
50 043 407 T 12 P Drying oven, programmed controller, 1/PE AC, 208 V; 50/60 Hz
50 042 310 T 20 P Drying oven, programmed controller, 1/PE AC, 230 V; 50/60 Hz
50 043 309 T 20 P Drying oven, programmed controller, 1/PE AC, 208 V; 50/60 Hz
The safety concerning the protection of persons, environment and material to be treated mainly depends on the behavior of the operating personnel of these units.
Please read and observe the following instructions carefully before starting the unit in order to avoid faults and resulting damage, especially adverse health effects.
2a
2b
Information according EN 61010
AMBIENT OPERATING CONDITIONS
? For indoor use only
? For altitudes up to 2000 m above sea level ? Temperature range from 5 °C to 40 °C
? Maximum relative humidity: 80 %, for temperatures up to 31 °C, decreasing linearly to
50 % relative humidity at 40 °C
? Main power supply: Voltage fluctuations not to exceed +/- 10 % of the nominal value
ELECTRICAL DATA
? Overvoltage category: II ? Contamination level: 2
WEEE Compliance:
This product is required to comply with the European Union`s Waste Electrical & Electronic Equipment (WEEE) Directive 2002/96/EC. It is marked with the following symbol:
Thermo Electron has contracted with one or more recycling/disposal companies in each EU Member State, and this product should be disposed of or recycled through them. Further information on Thermo Electron`s compliance with these Directives, the recyclers in your country, and information on Thermo Electron products wich may assist the detection of
substances subject to the RoHS Directive are available at https://www.360docs.net/doc/0712634848.html,/WEEERoHS .
CONTENTS
1.GENERAL SAFETY INSTRUCTIONS....................................................4 - 6
Explanation of icons (4)
General information (5)
Operating instructions (5)
Field of application (5)
Safety instructions (6)
2.SETUP AND INSTALLATION............................................................7 - 9
Transport (7)
Unpacking the unit (7)
Installation (7)
Room ventilation (8)
Mains connection (8)
Noise insulation (8)
Connecting to an air extraction system (9)
3.UNIT SPECIFICATION...............................................................10 - 16
Overview of the control elements (10)
Switchgear unit (10)
On / Off switch (10)
Overtemperature protection feature.................................................10 - 11 Automatic control unit. (11)
Signal lamps, status function (11)
Basic functions: temperature control, time switch (12)
Added-feature programming functions, fixed programs (12)
Fixed program segments (13)
Compilation of a fixed program (13)
Example of a fixed program hot-air sterilization prozess (14)
Programmed controller function (15)
Termination commands (15)
Example of a temperature/time program, definitions (15)
What happens if ... ?.. (16)
4.OPERATION........................................................................17 - 26
Starting up with
Basic functions - temperature control, time switch....................................17 - 18
Added-feature programming functions, example.....................................19 - 20
Programmed controller functions, example..........................................21 - 25 Operating guidelines (26)
Loading (26)
Shutdown (26)
5.MAINTENANCE......................................................................27 - 28
Decontamination / disinfection (27)
Cleaning (27)
Servicing (28)
Tests (28)
Repairs (28)
Approved spare parts / accessories (28)
6.TECHNICAL DATA...................................................................29 - 31
Oven...............................................................................29 - 30 Control unit (31)
Materials used (31)
LOG BOOK (33)
50 042 7493
1GENERAL SAFETY INSTRUCTIONS EXPLANATION OF ICONS
450 042 749
General information
The unit fulfils the following safety standards:
DIN EN 61 010 - 1 / 03.′94, VDE 0411 Part 1 / 03.′94, E DIN VDE 0411 Part 111, DIN 12 880 Part 1 / 11.′78 and DIN EN 60 335 - 1, VDE 0700 Part 1DIN EN 55 011 Part 3, DIN VDE 0875 Part 11 / 07.′92
Always quote the data on the rating plate when requesting information or ordering spare parts
Operating instructions
The operator must provide anybody working on or with this equipment with written instructions for any operations to be performed. Such instructions must be easy to understand and must be available in the language of the respective personnel (FRG: UVV VBG 1 § 7 (2)).Log book
We recommend that a log book is kept, which records any tests and calibration operations performed on the unit and any other work (repairs, modifications etc.).
Field of application
The drying oven has been designed as an item of laboratory equipment for technical applications.
Heat treatment of samples or materials with operating temperatures of between room temperature + approx. 10°C and 250 °C ,
e.g. for drying, ageing, analysis, fusing, burning in, oxidizing, reducing, preheating, etc.Hot-air sterilization, sterilization by heating the article up to a temperature of at least 160 °C (FRG: also refer to DIN 58 947).
Note: The sterilization temperature usually required in the field of medical laboratory work is 180 °C.
The unit has been designed for installation and operation in the following fields :
Laboratories, e.g. in the commercial or industrial sector, schools, universities, hospitals and biology
The unit is equipped with an independent overtemperature protection device, which means that it does not require constant supervision.
The drying oven has been designed for continuous use.
Make sure that an adequate clearance is maintained between the inside walls of the inner compartment and the loaded articles, and between the various layers of loaded articles, to prevent uneven heating of the materials.
Protective gloves, goggles etc. must be made available to the operator because of the potentially high operating temperatures.
The unit must not be used to dry or heat substances which may release combustible
gases or vapours into the atmosphere, which could burn or explode when mixed with air.The drying oven is equally unsuitable for the heat treatment of combustible dusts or
fibrous materials.
1GENERAL SAFETY INSTRUCTIONS
50 042 7495
Safety instructions
Comply with the instructions in this manual and keep it in the vicinity of the unit.
These unit must be operated in accordance with the instruction manual and may only be used for their intended applications in order to ensure the safety of personnel, the environment and the processed items and materials.
Read the instruction manual carefully and comply with the instructions that it contains to avoid making mistakes and to prevent any personal injury or damage to property.Unit must be operated by instructed personnel.Keep unit out of reach of children.
Apart from the instructions in this manual, the respective national regulations must also be observed for the installation and operation of this unit (FRG: ZH 1/119, DIN 12 880 Part 1).The applicable national environmental regulations must be observed for the extraction of exhaust gases that are produced during heat treatment. Suitable measures must be implemented to
ensure that such gases are safely led outside (FRG: BImSchG, UVPG, AbfG, WHG, ChemG, ...).The unit must not be used to dry or heat substances which may release combustible gases or vapours into the atmosphere, which could burn or explode when mixed with air. The heating is equally unsuitable for the heat treatment of combustible dusts or fibrous materials.
Check the mains lead and connector for damage before using the unit. If there are any signs of damage, do not connect the unit up to the mains.
The voltage quoted on the rating plate (rated voltage) must agree with the mains supply voltage.Protective gloves, goggles etc. must be made available to the operator because of the potentially high operating temperatures.
The surfaces around the opening of the inner compartment become hot at high operating temperatures - RISK OF BURNING - Avoid contact with these surfaces.
Ensure that the overtemperature protection device works properly by conducting a functional check at regular intervals, every 3 months at least, and check the electrical equipment at least once a year.
Any work to be conducted on the electrical equipment of the unit may only be performed by a qualified electrician. The unit must be disconnected from the mains supply before commencing service or repair work.
Only use approved accessories and approved genuine spare parts. The use of any other parts may result in unforeseen problems and should be avoided under all circumstances.
The serviceability and safety of the unit can only be guaranteed if the necessary tests,
maintenance, servicing and repair work is carried out by the Thermo service personnel or other agencies who are authorized to act on our behalf.
Thermo Electron LED GmbH cannot accept any liability for any damage that occurs as a
result of improper use or repair work, which has not been performed by Thermo service centers,
or if parts other than the approved genuine spare parts / accessories are used.
1GENERAL SAFETY INSTRUCTIONS
6 50 042 749
Transport
Handle the unit with care. Avoid jarring and protect against damage. Do not lift by the door handle, the door itself, the control unit, the spacer or the power lead.Refer to the TECHNICAL DATA for dimensions and weight .Unpacking the unit:
Unpack the unit, remove the transport safety fixtures from the inner compartment and remove any dirt or dust which may have accumulated in transit.
Installation
The unit must be installed in a dry environment.
The relative humidity should be between 60 and 70 % under normal conditions.
Condensation should be avoided . If condensation has formed on the unit following a change of location or during transporation, for example, wait until the unit has dried out completely before putting into operation.
The ambient air should not contain excessive amounts of dust . (Comply with the instructions in the MAINTENANCE section).
Do not cover or obstruct the ventilation or exhaust vents in the unit housing, remove any dust or dirt with a vacuum cleaner.
The ambient temperature should not exceed 40 °C .
Place the unit on a firm, fireproof surface (e.g. laboratory table, support frame) in a stable,perfectly upright position.
Keep the unit away from direct sunlight (UV radiation).
If you wish to stack two units on top of one another, use the stacking frame (available as an option). Never stack more than two units on top of one another. When stacking units of different types, make sure that e.g. an incubator is always at the bottom, and prevent any mutual
influence. Only units of the same size are stackable. In case of stacking two units inside a niche the clearance to adjacent surfaces has to be increased on minimum one side to 200mm.
Fig. 1/2: Clearances to adjacent surfaces / objects:
Maintain a distance from back wall:T 6 P: at least 8 cm T 12 P:at least 8 cm T 12 P:at least 8 cm
The wall spacer may only be removed if the unit is connected up to an extraction system. The exhaust gases must be led through / past adjacent surfaces / objects located above or behind the unit with heat insulation to avoid the danger of fire.
If the unit T 6 Pis to be fitted under a table or into a laboratory fixture , it must be connected to an exhaust air extraction system. The top clearance may only be reduced to min. 5 cm under such circumstances. Ensure adequate ventilation.
Types T 12 P and T 20 P are not suitable to be fitted under a table.
2SETUP AND INSTALLATION
50 042 749 7
2SETUP AND INSTALLATION
Room ventilation
Adequate ventilation must be provided wherever the unit is installed.
Do not operate the unit in non-ventilated enclosed spaces.
Special ventilation measures (e.g. ventilation of designated work areas, FRG: also refer to VDI 1946 Part 7) when several units are installed in one room.
The unit is supplied with a permanently connected, flexible mains power lead with connector
(grounded).
The connector serves to disconnect the unit from the mains power supply.
Examine the power lead and connector for damage before using the unit. If there are any signs of damage, do not connect the unit to the mains supply.
The voltage quoted on the rating plate (rated voltage) must agree with the nominal mains
voltage.
The unit may only be connected up to the mains via a properly installed socket outlet with PE conductor (protection class I) or a permanent terminal connection.
In the event of a permanent terminal connection, a master switch (lockable in the "Off"
position) must also be installed to disconnect the unit from the mains.
An earth-leakage circuit-breaker should also be fitted in the supply system to provide
additional protection against electric shocks.
Rubber-sheathed flexible cable of at least 2.5 mm2 diameter (H 07 RN-F ...) should be used for any extensions that may be required to connect the unit.
Refer to the TECHNICAL DATA section for the rated power consumption, circuit protection with a T 16 A fusible link or a B 16 circuit-breaker.
Noise insulation
The unit does not develop any constant noise load.
Refer to the TECHNICAL DATA section for the noise level.
The unit may produce higher noise levels in unfavorable installation conditions. Supplementary measures may have to be implemented to improve the sound insulation in the room.
850 042 749
Connecting to an exhaust air system
Comply with the applicable national environmental regulations for the extraction of exhaust gases released during the heat treatment. Suitable measures must be
implemented to ensure that such gases are safely led outside (FRG: BImSchG). Such measures may involve thermal or catalytic treatment of flue gases.
Refer to the TECHNICAL DATA section for the volume flow and temperature of the exhaust gases .
Fig. 2/2: Example of an installation
1Inlet air flow 2Unit
3Adjacent surface / object 4Exhaust-air blower 5Exhaust air flow 6Draft breaker
Implementation instructions:
A draft breaker must be used to connect the unit to an extraction system.All flue ducts must be made of fireproof materials .
Apertures must be provided to enable the removal of residue and condensate. The flue ducts must be thermally insulated (recommendation: half-shell sleeves made of laminated mineral fiber).
The exhaust air / gases from the unit must never come into contact with combustion ex-haust gases .
Use the draft breaker to adjust the air flow volume in such a way that exhaust gases can be extracted reliably without producing any eddying at the unit's exhaust-gas connector .Technical measures should be implemented to monitor the flow of air and flue gases and to prevent operation of the heating unit if the ventilation system is switched off / defective (electrical interlock).
2SETUP AND INSTALLATION
50 042 749
9
Fig. 1/3: Overview of the control elements
C
A
B
A Switchgear unit
B Automatic control unit
C Door handle
Item A:Switchgear unit
Fig. 2/3: Switchgear unit control panel
1ON / OFF switch:
To switch the unit on and off:
"on" = Unit switched on, the temperature inside the unit appears on the display panel
of the control unit.
"off" = Unit switched off, temperature display off.
2 & 3Overtemperature protection device / signal lamp:
The unit is equipped with an electronic upper-limit cut-out device (TWB) of protection class 2 as defined by DIN 12 880 Part 1. It is electrically and functionally independent of the temperature control system. In the event of a fault in the unit heating system, the operational TWB shuts
down the unit heating across all poles as soon as the temperature exceeds the preset value.
The red signal lamp indicates activation of the protection function (Fig. 2/3: Item 3).
The unit must be reset manually, by pressing the control element
.
Allow the unit to cool down (by approx. 30 °C), press the control element, the red signal lamp
will go out.
The operate value is adjusted with the help of a
tool (coin, screwdriver...).
Adjust to the required protection level:
to upper temperature limit = unit protection
(protects the unit and its environment).
to approx. 10 °C higher than the operating temperature set on the control unit =
material protection (protects the unit, its environment and the loaded material).
Ensure that the overtemperature protection device works properly by conducting a
functional check at regular intervals, every 3 months at least, and check the electrical
equipment at least once a year.
3.UNIT SPECIFICATION
1050 042 749
1
2
3
1On / Off switch
2Overtemperature protection,
control element
3"Fault signal lamp
2 & 3Overtemperature protection device / signal lamp:
Functional test of the TWB
(Prerequisite: required working temperature (control unit) has been reached /remains constant) Set the TWB to approx. 10 - 20 °C below the temperature displayed on the control unit. The TWB must respond, the red signal lamp indicates "Fault".
The TWB is working properly. Press the control element to release the TWB.
Now set the TWB to the temperature limit for the required type of protection.
If "Fault" is signalled during operation:
Check the settings of the TWB and the control unit and correct if necessary. If the problem persists, contact the service center.
Item B:Automatic control unit
The automatic control unit contains the basic functions of a 2-position controller with PD/PID control response, time switch to switch the heating on / off after the set time, the added features of permanently programmed heating process programs and the programmed controller functions of a freely programmable process controller.
Fig. 3/3: Control unit control panel
1Signal lamp - heating status
2Signal lamp - control unit status
3Display panel
4Control key
5"Increase displayed value" key
6"Reduce displayed value" key
7"Programming function" key
The status of the control unit is indicated by signal lamps in the display panel.
THE YELLOW SIGNAL LAMP (Item 1) indicates the current status of the heating control sy-
stem:
Lamp switched on =
unit heating activated
Lamp switched off = heating off
Rhythmic flashing of this signal lamp indicates that the temperature controller is regulating the operating temperature.
THE GREEN SIGNAL LAMP
(Item 2) indicates the status of the control unit:
Lamp on =control unit switched on: heating enabled.
The heating is activated when the unit is switched on
(On / Off switch).
Lamp off =control unit switched off: heating disabled.
The heating is not activated when the unit is switched on
.
Lamp flashes=
time-switch function activated.
3.UNIT SPECIFICATION
50 042 74911
Basic functions
The control unit is equipped with the "temperature control" and "time switch" basic
functions. The unit can set an operating temperature of up to 250 °C and switching times of between 0:01 and 99:00 hours.
Refer to STARTING UP WITH BASIC FUNCTIONS for information about the commands for the basic functions.
Added-feature programming functions, fixed programs
The control unit is capable of running heating process programs with fixed, preselected parameters from a database. The program segment and the parameters are stored in the database .
The fixed program contains a maximum of four program segments and a status command .Only one fixed program can be stored. In the programmed controller function one arbitrary difined program can be stored independend of the fixed program.
Fig. 4/3: Example of a temperature/time process, controlled by the fixed program
Each program segment , P I - P 4, is assigned to a typical temperature / time response . 10selectable sets of parameters are permanently stored in the database for each program segment . These sets of parameters can be assigned within the program.
A status command is provided as the fifth program segment. This determines the subsequent action with the program selected from the fixed program memory:Program on standby, do not execute yet = Select " P. o F "Program on standby, wait for program start
= Select " P. o n "
Delete program from memory completely = Select " P. r E "
The program memory is erased on delivery . If the operator interrogates the program segments,"Parameter set off" appears in the display panel = e.g. " P. I - ".
When compiling a program, selecting "parameter set off" within the selected program segment causes the control unit to bypass this segment for the fixed program function.
The selected program always runs from program segment P I. n to program segment P 4. n.If program segment P 3. n is combined with program segment P 4. n, the heating and blower are only switched off following termination of segment P 4. n.
If a program is interrupted and started again, the sequence commences at segment P I. n.
The previously selected operating temperature cannot be changed once the program has started.
The heating is switched off in the event of a power failure (> 20 ms) with subsequent restoration of the power supply, the temperature inside the unit is displayed as a flashing value and the program must be started again.
3.UNIT SPECIFICATION
12 50 042 749
3.UNIT SPECIFICATION
Fixed program segments:
Program segment " P 1. n " (n = -, 0 ... 9):
Assigning a parameter ( 0 ... 9 ) from the database causes the unit to switch on heating on expiry of a preset period.
Selectable parameters in this program segment:
P I. -P I. 0P I. I P I. 2P I. 3P I. 4P I. 5P I. 6P I. 7P I. 8P I. 9 off 2 h 4 h 6 h8 h10 h12 h16 h20 h24 h 72 h
Program segment " P 2. n " (n = -, 0 ... 9):
Assigning a parameter ( 0 ... 9 ) causes the unit to heat up to the preset operating temperature at a specific rate of temperature change per hour.1)
Selectable parameters in this program segment:
P 2. -P 2. 0P 2. I P 2. 2P 2. 3P 2. 4P 2. 5P 2. 6P 2. 7P 2. 8P 2. 9 off10°C/h20°C/h30°C/h40°C/h50°C/h60°C/h80°C/h100°C/h120°C/h200°C/h
Program segment " P 3. n " (n = -, 0 ... 9):
Assigning a parameter ( 0 ... 9 ) causes the unit to heat up to the preset operating temperature, to maintain this temperature for the preset period and to subsequently switch off heating
Selectable parameters in this program segment:
P 3. -P 3. 0P 3. I P 3. 2P 3. 3P 3. 4P 3. 5P 3. 6P 3. 7P 3. 8P 3. 9 off15 min.30 min. 1 h 1.5 h 2 h 4 h 6 h8 h12 h24 h
Program segment " P 4. n " (n = -, 0 ... 9):
Assigning a parameter ( 0 ... 9 ) causes the unit to cool down from the previously reached inside temperature at a specific rate of temperature change and to subsequently switch off heating.1) Selectable parameters in this program segment:
P 4. -P 4. 0P 4. I P 4. 2P 4. 3P 4. 4P 4. 5P 4. 6P 4. 7P 4. 8P 4. 9 off1°C/h2°C/h5°C/h10°C/h20°C/h30°C/h40°C/h50°C/h60°C/h80°C/h
1)according to model and load
Compilation of a fixed program
After activating the added-feature function, the sequence is compiled by marking the required
program segments.
Example: Fixed program comprising P I. 2; P 2. -; P 3. 7; P 4. 4 and P. o n :
50 042 749 13
Example of a fixed program
Example E1:Hot-air sterilization process
The heating should switch on in 8 hours, the unit should heat up to an operating temperature of 190 °C (sterilization temperature) at a rate of 200 °C/h, maintain this temperature for 4 hours
(equalization phase and sterilization period) and should subsequently cool down at a rate of 20°C/h.
The program should start following program selection (status command: P. on).
Fig. 5/3:Program profile - hot-air sterilization process E1
T
Sequence E1:
After sketching the process characteristic, select the segments which correspond to the
required sequence from the matrix .
Mark the program segments and the " P. o n " status command. Leave program input mode.
Select 190 °C as the required operating temperature. Start the fixed program.
While the program is running the display alternates between the temperature inside the unit
and the current program segment.
Refer to STARTING UP WITH ADDED-FEATURE PROGRAMMING FUNCTIONS for further information.
3.UNIT SPECIFICATION
1450 042 749
Programmed controller function
The programmed controller function enables the arbitrary definition of temperature / time processes.
You may select up to 9 program segments. Operating temperature and period can be selected for each segment.
Termination commands
A termination command can be selected as the last program segment beginning at the second segment. The termination command determines the function to be performed by the unit after running through the program.
There are three optional termination commands:
" hold " = Once the program has terminated, the operating temperature set for the last
program segment is maintaned until a new operating temperature has been
selected." StOP "= Once the program has terminated, the heating is switched off
until the "stop" command is cancelled.
" CYCL "= Once the program has terminated, it returns to the beginning and is repeated
continuously until the "CYCL" command is cancelled.A termination command must always be entered at the end of every program.Fig. 6/3: Example of a temperature / time program with "CYCL" termination command
Definitions n 1 ... n 9Program segments
n 10
Termination commands (hold, StOP or CYCL)T 1 ... T 9Specified operating temperature (50 - 250 °C)t 1 ... t 9
Specified time - program segment (0:01 - 99:0 h)
After a power failure >20ms up to approx. 2h the program will be continued at the last temperature/time-values.
Refer to STARTING UP WITH PROGRAMMED CONTROLLER FUNCTIONS for details.
3.UNIT SPECIFICATION
50 042 749 15
What happens if ... ?
Possible display Explanation
8 8 8Control unit test phase
o F F Status of the control unit, heating disabled, possibly time-switch-
funktion has been aktivated
signal lamp - control unit status
flashes
time-switch function activated
One digit in the display flashes The flashing value can be changed
P 1.3Program segment when entering an added-feature program function P 1.3 alternating with inside
temperature
Program segment while the added-feature program is in progress
P. o n Status command for an added-feature program:
Program on standby, wait for program start
P. o F Status command for an added-feature program:
Program on standby, do not execute yet
P. r E Status command for an added-feature program:
Delete program from memory completely
P r o alternating with inside temperature Entered program on standby
Power failure (> 20 ms) with subsequent restoration: the heating switches off, "P r o" alternates with the temperature inside the unit on the display, if a program is in progress it is interrupted and must be started again.
n I Program segment when entering and activating the programmed
controller function.
hold Termination command when entering the programmed controller
function: the temperature set for the last program segment is
maintained on termination of the program
StOP Termination command when entering the programmed controller
function: the heating and ventilation is switched off on termination of
the program
CYCL Termination command when entering the programmed controller
function: when the program is terminated, it returns to the beginning
and starts again
- - - A termination command is entered for this program segment when
entering the programmed controller function. The termination
command must be changed to a time value to enable the input of a
temperature value.
E - 3Stored data defective
Switch the unit off and on again. If the problem persists, contact the
service center
E - 4Error of measurement in the reference values
- contact the service center -
E - 5Upper-limit violation of actual temperature tolerance
- contact the service center -
E - 6Lower-limit violation of actual temperature tolerance
- contact the service center -
E - 7Temperature sensor or input defective - contact the service center -E - 8Stored data defective - contact the service center -
E - 9Erroneous reference values - contact the service center -
3.UNIT SPECIFICATION
1650 042 749
4OERATION
After setup and installation, proceed as follows to start up:
I50 042 749 17
4OPERATION
1850 042 749
实验室干燥箱安全操作规程标准范本
操作规程编号:LX-FS-A62353 实验室干燥箱安全操作规程标准范 本 In The Daily Work Environment, The Operation Standards Are Restricted, And Relevant Personnel Are Required To Abide By The Corresponding Procedures And Codes Of Conduct, So That The Overall Behavior Can Reach The Specified Standards 编写:_________________________ 审批:_________________________ 时间:________年_____月_____日 A4打印/ 新修订/ 完整/ 内容可编辑
实验室干燥箱安全操作规程标准范 本 使用说明:本操作规程资料适用于日常工作环境中对既定操作标准、规范进行约束,并要求相关人员共同遵守对应的办事规程与行动准则,使整体行为或活动达到或超越规定的标准。资料内容可按真实状况进行条款调整,套用时请仔细阅读。 1、本设备为电加热高温干燥设备,操作不当将会产生爆炸、高温烫伤等安全事故。 2、每次拿取样品时严禁直接用手拿取,应采用镊子等辅助工具拿取,以防高温烫伤。 3、干燥箱温度设置时应根据试验样品所需的试验温度进行设置,过高的温度将会使试验样品燃烧、爆炸。 4、每次实验烘烤的样板数量为大烘箱≤20张板或6个测固含的盖,小烘箱≤10张板或3个测固含的盖。
5、易燃易爆的物品严禁放入干燥箱内烘烤。 6、严禁用湿手直接操作电源开关,以免触电。 7、干燥箱周围不得放置易燃易爆品。 8、干燥箱内、外应及时清扫,保持清洁。 9、每天下班前应切断设备的电源,以免设备长时间通电而造成事故。 10、设备维护,维修时应在切断电源的情况下进行。 11、设备有异常情况时应及时通知相关人员前来处理,严禁私自拆启。 12、做稳定性测试用的干燥箱,统一使用玻璃瓶装样品,进行储存稳定性试验。 请在该处输入组织/单位名称 Please Enter The Name Of Organization / Organization Here
中控考勤机详细操作说明书
中控考勤机说明书 1考勤机的使用 1.1登记指纹 1.2考勤机功能介绍(通讯,参数设置,系统信息,U盘管理) 2考勤软件的使用 2.1 软件的安装 2.2 软件使用 2.2.1 增加设备 2.2.2 从设备下载人员信息 2.2.3 修改人员信息(改名字,调动部门等) 2.2.4 上传人员信息到设备 2.2.5 下载考勤数据 2.2.6 时间段设置 2.2.7 班次管理 2.2.8 人员排班 2.2.9 统计报表 一考勤机快速使用 1.1登记指纹(分彩屏跟黑白屏) 从设备上采集指纹: (1)彩屏:长按M/OK键--“用户管理”点OK--“新增用户”点OK--选择工号,- 往下翻在“指纹登记”上点OK,同一个手指按三次,完成后再点击OK键,再放上另一个手指按三次--往下翻到完成上点OK。(如果要再登记指纹可在‘用户管理‘点OK--’管理用户‘点M/OK---点M/OK选择’---- 查找用户‘—输入工号点OK—点M/OK选择“编辑用户”然后选择登记指纹,登记完成后---往下翻到完成上点M/OK。 (2)黑白屏录指纹的跟彩屏类似就不再说了。录备用指纹的话跟彩
屏有点区别:按M/OK—用户登记—指纹登记—提示新登记—按ESC键—跳出备份登记—输入工号—登记指纹。。 1.2机器的功能介绍 (1)通讯设置—设置通讯方式有RS232/485通讯,TCP/IP,USB 通讯 (2)系统设置—参数设置(包含提示声音,键盘声音,时间设置算法切换(高端机器如iclock360, S20等)--数据维护(删除考勤机上的记录数据【记录要定时去删除】,清除管理权限【管理员破解】,清除全部数据----恢复设置(恢复出厂设置【不会删除考勤机上的数据只是恢复机器出厂的通讯设置等】; (3)系统信息—可以查看设备的人员登记数跟指纹数及考勤记录数-------设备信息可以查看设备的序列号、算法版本、MAC地址、出厂时间等。 (4)U盘功能(包含下载跟上传的功能) <1>(1)把U盘插到考勤机上--长按M/OK键进入菜单--选择U盘管理--下载数据--下载用户数据--下载完成后退出然后把U盘拿下来插到电脑上。 <2> (1)打开考勤软件--点击软件最左上角数据--选择菜单里“USB闪盘管理”,然后选择菜单里对应的选项(黑白屏机器选择第一项,彩屏机器选择第三项)--在对话框的左上角第一栏“导入用户数据到电脑”上点击--最后再点击“从U盘导入用户数据”--导入完成后关闭。
电热恒温鼓风干燥箱使用说明书
电热恒温干燥箱 使 用 说 明 书
一、用途 本产品适用于大专院校、科研部门及工矿企业实验室进行各种物品的烘焙、干燥、热处理及恒温加热实验用。 三、结构及工作原理 电热恒温鼓风干燥箱外壳由钢板冲压折制、焊接成型,外壳表面采用高强度的静电喷塑涂装处理,漆膜光滑牢固。工作室采用碳钢板或镜面不锈钢板折制而成,工作室与外壳之间填充保温棉。工作室的内部放有试品搁板,用来放置各种试验物品。工作室的背部装有电热元件和离心式的风扇叶轮,由风机将被加热的空气通过后风道在工作室内进行循环,故工作室温度较均匀。门封条采用硅橡胶条密封,箱门上设有可供观察用的视镜,外壳的后背部设有进、排气孔,排气量的大小可以自行调节。电热恒温鼓风干燥箱外壳左侧为电器箱,电器箱的前面板上装有温度控制仪表、电源开关等,电器箱内装有电器元件。
为满足不同用户的需求,该系列干燥箱有三种温控系统可供用户选用:1.经济型系列干燥箱采用电子温度调节仪进行温度的设定与控制,从干燥箱的顶部插入水银温度计进行温度显示,该温控系统属位式控温,性能可靠,使用方便。 2.基本型与不锈钢型系列干燥箱采用智能型数字温度调节仪进行温度的设定、显示与控制。该温度调节仪采用计算机技术对工作室内的温度信号进行采集、处理,可使工作室内的温度自动保持恒温。该温控系统属智能控温,性能可靠、使用方便。 3.不锈钢型系列干燥箱还可选用智能程序温度调节仪进行温度的设定、显示与控制。该温控系统可在多个温度段进行工作温度、恒温温度、升温时间及恒温时间的设定与控制。该温度调节仪采用计算机技术对工作室内的温度信号进行采集、处理,可使工作室内的温度自动保持恒温。该温控系统属智能控温,性能可靠、使用方便。并可根据实验需要进行编程。 智能型温度调节仪均有超温保护功能。在设备工作过程中如果工作室内的温度超过设定温度值时,超温保护电路动作,切断加热回路。 四、设备的安装及使用 1.设备使用前应将电热恒温鼓风干燥箱放在平整的工作台上,先进行外观的检查:设备外观无破损,仪表外观完好,设备绝缘良好,电源插头完好,电源开关按动灵活。每台设备的电源线都接有单相三极插头,其中插头的最上方的电极为接地极,用户使用时必须使用单相三极的电源插座,电源插座的接地极上应有可靠的保护接地、保护接零。电源插座应能提供大于所使用的电热恒温鼓风干燥箱额定功率的电流。 2.经济型系列干燥箱的使用方法: 3.仔细阅读电子温度调节仪的使用说明书进行温度设定。 4.开启电源开关,接通设备电源,将电子温度调节仪的设定旋钮拨到所需温度刻度值上,将标准水银温度计插入箱体顶部的风帽中间孔内用于显示温度。此时加热器开始加热,工作室内的温度开始上升。电子温度调节仪上的绿灯亮表示加热,红灯亮表示停止加热,红绿灯交替亮灭表示进入恒温段。当箱内温度稳定后,标准水银温度计的指示值即为工作室内的温度值。当标准水银温度计的指示值与要求的设定温度值有差异时,可将电子温度调节仪的设定旋钮略做微调使标准水银温度计的指示值满足工艺要求即可。 5.举例:以TED-4001温控仪为例,设定工作温度为150℃,其操作方法如下: 6.打开电源开关→将电子温度调节仪温度设定旋钮定在150℃→电子温度调节仪的绿灯亮,加热器开始加热,工作室温度缓慢上升→到达150℃绿灯灭→红绿灯交替闪亮表示进入恒温段。 7.基本型与不锈钢型系列干燥箱的使用方法: 8.仔细阅读智能型温度调节仪的使用说明书进行温度设定。
中控系统操作手册
中控系统操作手册 前言 会议系统为集成度高且设备集中的一个弱电子系统,为保证此系统能长时间、稳定运行及请用户单位指派专门管理人员及操作人员进行管理和操作,非相关操作人员禁止动用会议室设备(包括各种遥控器),操作人员请严格遵守以下操作流程进行操作,以免误操作而影响整个会议系统的稳定性,甚至导致设备损坏。 详细操作说明如下: 第一部分:3楼外事会议室操作说明 ` (1号和2号外事会议室和新闻发布中心设备操作一样,下面以1号外事会议室为例说 明) 操作流程 第一步:进入设备间,检查调音台推子是否都拉到最底端,如没在最底端,请全部拉到最底端;然后开启系统电源(中控电源、时序控制器电源、强电控制模块电源及其 它电源)用触摸屏开启系统,点击触摸屏起始页,所有设备即可自行按顺序打开。 系统开启后说明:机柜内所有设备电源开启,投影机供电。。。 · 第二步:检查机柜内设备及调音台的电源开关是否打开,若没打开请手动开启。判断开启与否请通过设备指示灯观察。 第三步:根据实际会议内容需求,通过触摸屏依次开启相应的设备、切换相应的信号(详见“、ST-7600C触摸屏的操作”)推起调音台推子。 注:1、触摸屏方向请指向机房,保证最佳的接收信号 第四步:当会议结束,离开操作间时,首先将调音台推至最底端,然后通过触摸屏关闭系统,待时序电源关闭(关闭系统后3分钟)后方可关闭机房,然后离开。 注:1、中控主机及继电器模块无需关闭,请保持常供电状态 ~ 注:1、开启系统前,确保调音台推子拉到最下面,以免造成设备损伤甚至烧毁。 2、音频信号处理设备,如:调音台,均衡器等设备的相关设置已经调试完毕。如无特 殊需求,请勿随意调整原设备的设置,以免影响会议系统的声效。
Galanz格兰仕 KWS1523-307 电烤箱说明书下载
1.仔细阅读您所有的使用说明。 2.去掉电烤箱保护膜,除去电烤箱内所有包装物料。 3.检查电烤箱的功能旋钮和定时器旋钮都对应在“关”的位置。 4.检查您的电源应与烤箱标明的额定电压相符。 5.使用电烤箱之前必须将电烤箱内外表面及零部件擦干后再插上电源。 6.在使用电烤箱之前,将温控器设置到最大, 先预热5~10分钟。 操作指南: 使用说明: 温控器旋钮(B):可根据不同的食物,选择不同的温度.可选择范围(80~230℃)。 定时器旋钮(C):按顺时针方向旋转,可以设置烹调的时间.听到一声清脆铃声,表示电烤箱工作结束。 电源指示灯(E):工作过程中,电源指示灯会一直亮。 烤网(P):用来放各种烧烤的食物及食物盘。 食物盘(O):用来放各种烧烤的食物。 取食叉(R):用来取食物盘和烤网。 可移动屑盘(Q):用来接收烤食物时的油脂及面包屑等。 功能旋钮(A):包括三种不同的加热模式(上发热管、下发热管、上发热管+下发热管)及控制炉灯。 功能旋钮(D):包括三种不同的功能模式(对流、旋转和对流+旋转) 。 操作方法: 根据不同的食物,选择不同的温度.选择范围(80~230℃) 烧烤功能(适合烤面包、鸡肉、排骨、鱼等食物) 操作步骤: 将温控器旋钮(B)调到230℃的位置。 将功能旋钮(A)旋转到 将电烤箱预热5~10分钟。 将烤网放在层架上,食物放在食物盘上,再将食物盘放在烤网上进行烧烤, 烤面包时直接将面包放在烤网上。 根据食物的大小、厚薄及烘烤色泽效果,顺时针方向旋转定时器旋钮(C)设定烘烤时间。
设置完毕即进入烧烤阶段。 注:为了将烧烤的食物烤得均匀一些,在烧烤的过程中需将食物进行一次翻转。烘烤功能(适合烤肉片、土豆片等易熟的食物) 操作步骤: 将温控器旋钮(B)调到230℃的位置。 将功能旋钮(A)旋转到或 将电烤箱预热5~10分钟。 将烤网放在层架上,食物放在食物盘上,再将食物盘放在烤网上进行烘烤。 根据食物的大小、厚薄及烘烤色泽效果,顺时针方向旋转定时器旋钮(C)设定烘烤时间。 设置完毕即进入烧烤阶段。 解冻功能(适合解冻肉片、鸡肉、排骨、鱼等食物) 操作步骤: 将温控器旋钮(B)调到80℃的位置。 将功能旋钮(A)旋转到,功能旋钮(D)旋到 将烤网放在层架上,食物放在食物盘上,再将食物盘放在烤网上进行解冻。 根据食物的大小、厚薄及烘烤色泽效果,顺时针方向旋转定时器旋钮(C)设定解冻时间。 设置完毕即进入解冻阶段。 旋转烤功能(适合烤整鸡、玉米棒和热狗等食物) 操作步骤: 将温控器旋钮(B)调到230℃的位置。 将功能旋钮(A)旋转到,功能旋钮(D)旋到 将电烤箱预热5~10分钟。 将食物串在烤叉上,然后将烤叉放在旋转烤叉架上进行烘烤。 根据食物的大小、厚薄及烘烤色泽效果,顺时针方向旋转定时器旋钮(C)设定烘烤时间。 设置完毕即进入烧烤阶段。 保养及清洁: 1.在清洁电烤箱前首先应拔掉电源插头,确保电烤箱完全冷却后方可进行清洁或收藏。
Hauswirt海氏HORC家用电烤箱说明书中文版
HO-30RC 目录 产品特点 电器原理图 技术规格 产品构件 安全注意事项 操作指南 功能介绍 清洁及维护保养 疑难解答 参考食谱 产品特点 新颖 1.透明 采用高强度、耐高温的大透明钢化玻璃门设计,炉内食物清晰可见,新颖别致。
2.自锁门 玻璃门开关具有自锁定位功能,方便放置和取出食物。 方便 1.操作自如 采用“旋钮”操作,可以更方便地选择温度、加热方式和加热时间。 2.自动恒温 内置高灵敏度的温控器,可保持烤箱内的加热温度稳定。 3.定时功能 60分钟定时,以配合各种烘焙需要。 4.常通功能 当所需工作时间超过60分钟,可选用常通功能,主要用于配合发酵。 5.发酵解冻 适用于馒头、面包、披萨等前期发面,对冷冻肉类的解冻,制作酸奶。 6.独立温控 上下发热管可独立控温,专业满足各种烘焙需求。 7.旋转烤叉
旋转烤叉,专业烘烤整鸡、鸭、鱼,达到最佳烘烤效果。 8.热风循环 特有热风循环功能,平衡烤箱内部热量,让烘烤更加均匀。 9.多温控选择 温度可设定在100℃—250℃范围内,以满足不同食物对温度的不同要求。 10.便捷清洗 不沾油内胆,配备可拆卸接渣盘,清洗方便。 耐用 1.全钢外壳 采用全不锈钢外壳,经久耐用,美观大方。 2.优质面板 烤箱面板选用优质不锈钢,强度好。 3.钢制烤网 表面精度硬铬,方便清洁,不易磨损。 4.不锈钢发热管 采用长寿命不锈钢发热管加热,加热快、功效高、省时间。
节能 1.双层箱体 内外双层壳体,能有效减少内腔的热量散失,节约能源。 2.省电模式 多种灵活的加热档位设定,选择合适的加热方式和加热时间,省时节电。 多用性 上下管独立温控,且拥有“旋转烤叉”“热风循环”“发酵”等功能,满足各种不同烘焙、烘烤需求。 电器原理图 技术规格 产品型号:HO-30RC 电压频率:220V~50Hz 额定功率:1600w 额定容量:30L 技术参数如有调整,恕不另行通知
电热鼓风干燥箱操作使用说明书
电热鼓风干燥箱操作使用说明书 一、电热鼓风干燥箱简介 电热鼓风干燥箱又名烘箱,采用电加热方式进行鼓风循环干燥试验。目前是大多数实验室常用的仪器设备之一,主要用来对产品进行干燥试验。现已广泛应用于化工,医药,铸造,汽车,食品,机械等各个行业。 二、电热鼓风干燥箱分类 1、电热鼓风干燥箱按照工作原理的不同,大致上分类2大类,鼓风干燥箱和真空干燥箱 2、按照内箱的材质可以分为碳钢和不锈钢两种不同材质电热鼓风干燥箱。 三、电热鼓风干燥箱特点 ■电热鼓风干燥箱箱体结构 1、设计完美,箱体采用数控机床加工成型,箱门采用上开式,操作容易。 2、内胆采用SUS304不锈钢板或者碳钢的,具体可以更具客户的要求进行定制,外壳为A3板喷塑处理,更显光洁、美观。
3、电路系统侧采用门式开启,方便维护和检修。 4、箱门闭合松紧能调节,整体成型的硅橡胶门封圈,确保箱内高度。 5、储存、加热、试验和干燥都是在没有氧气或者充满惰情气体环境里进行,所以不会氧化。 ■电热鼓风干燥箱控制执行系统 1、温度控制器采用触摸按键、数显LED显示、PID智能控制仪表 2、Pt100铂电阻测温传感器; ■电热鼓风干燥箱保护系统: 1、整机保护系统由超温保护及报警装置构成。 2、保证了执行元器件及试件的完好。 三、电热鼓风干燥箱工作原理 电热鼓风干燥箱采用电加热方式进行鼓风循环干燥试验,鼓风干燥就是通过循环风机吹出热风,保证箱内温度平衡,真空干燥是采用真空泵将箱内的空气抽出,让箱内大气压低于常压,使产品在一个很干净的状态下做试验。
四、电热鼓风干燥箱操作说明 1、通电前,先检查电热鼓风干燥箱的电气性能,注意是否有断路或漏电现象。 2、准备就绪后,可放入样品,关上箱门,在箱顶排气阀孔中,插入温度计,同时开启排气阀,排气阀空隙约10mm左右。 3、接上电源后,开启2组加热开关,再将控温器旋钮由“0”位按顺时针方向旋至所需温度的对应刻度处,加热指示灯亮,箱内开始升温。 4、当温度升到所需工作温度时,将旋纽按逆时针方向旋回,直至指示灯灭。然后调节微调使指示灯明灭交替,实现恒温。在刚恒定时,由于热惯性影响,温度仍可能继续上升,在约半小时后才能处于稳定状态。如箱体内恒定温度超出或低于所需温度,可将旋钮再稍作调整,直至恒定在选定温度上为止。 5、注意控温器调节旋钮铭牌读数并非实际温度,箱内温度应以温度计实测为准,铭牌刻度仅供恒温定位参考,每次恒定时,应记下旋钮刻线位置,供以后选温时用。 6、温度恒定时,应关闭一组加热元件,以保证恒温的波动度和节约能源。 7、样品放置箱内不宜过挤,以利冷热空气对流不受阻塞,保持箱内温度均匀。
实验室加热设备介绍及使用说明
实验室加热设备介绍及使用说明 一、电热恒温水浴锅 电热恒温水浴用于用于医疗单位、大专院校、科研部门和生产单位进行蒸发、干燥、浓缩、恒温加热等。 使用电热恒温水浴时应留意下列事项: 1) 恒温水浴使用前一定先要注入适量净水。使用过程中要留意及时增补净水,因炉丝套管是焊接密封的,无水时加热会烧坏套管,使水进入套管毁坏炉丝或发生漏电现象 2) 温度自动控制盒中有双金属片弹簧式装置,通过双金属片的膨胀或收缩或接通或堵截电源,达到控制温度的目的。留意勿使盒溅上水或受潮,以防控制失灵、漏电或损坏。 3) 水浴箱内要保持清洁,按期洗刷、防止生锈和防止漏水、漏电。箱内水要常常更换。如较长时间听用,箱内水要全部放掉并用布擦干,以免生锈。 二、电热恒温箱 实验室中常用的电热恒温箱最高温度可达200℃或300℃,称为干燥箱或工业烘箱。最常使用的温度为100—150℃,多用于烘干试样或干燥玻璃容器。 使用电热恒温箱时应留意下列事项: 1. 干燥箱应放在室内工作,安装平稳水平处,要保持干燥,做好防潮和防湿,并要防止腐蚀. 2. 干燥箱放置处要有一定的距离,四面离墙体建议要有2M以上。 3. 干燥箱使用前要检查电压,较小的烘箱所需电压为220V,较大的烘箱所需电压为380V(三相四线),根据烘箱耗电功率安装足够容量的电源闸刀。并且选用合适的电源导线。还应做好接地线工作。 4. 以上工作准备就绪后方可将试品放入干燥箱内,然后连接电源,开启烘箱开关,带鼓风装置的烘箱,在加热和恒温的过程中必须将鼓风机开启,否则影响工作室温度的均匀性,并且可能损坏加热元件。随后调节好适宜试品烘赔的温度.烘箱即进入工作状态。 5. 烘赔的物品排列不能太密。干燥箱底部(散热板)上不可放物品,以免影响热风循环。禁止烘赔易燃、易爆物品及有挥发性和有腐蚀性的物品。 6. 烘赔完毕后先切断电源,然后方可打开工作室门,切记不能直接用手接触烘赔的物品,要用专用的工具或带隔热手套取烘赔的物品,以免烫伤。 7. 干燥箱工作室内要保持干净。 8. 使用干燥箱时,温度不能超过烘箱的最高使用温度。 三、箱式电阻炉的安全技术操作规程 1. 使用时切勿超过电阻炉的最高温度。 2. 装取试样时一定要切断电源,以防触电。 3. 装取试样时炉门开启时间应尽量短,以延长电炉使用寿命。 4. 禁止向炉膛内灌注任何液体。 5. 不得将沾有水和油的试样放入炉膛;不得用沾有水和油的夹子装取试样。 6. 装取试样时要戴专用手套,以防烫伤。 7. 试样应放在炉膛中间,整齐放好,切勿乱放。 8. 不得随便触摸电炉及周围的试样。
电烤箱使用规定
电烤箱使用规定 1.电烤箱是加工制作烤面点、小吃、点心类的电器设备,要求专人使用、专 人保管、操作人员要保持其内外干净,不得有杂物。 2.烤箱是利用电阻丝传热,通过矽板转射远红外线,在操作过程中开关要轻,码放烤盘时不要用力碰撞,以免电阻丝受震后与金属外壳接触烧断电阻丝或外壳 带电伤人。 3.其电器设备严禁用水刷洗,清理时断开电源开关,发生故障或有漏电现象 时,应断电及时向主管领导汇报或找修理工修理,他人不得拆卸。 4.使用烤箱的温度要随食品的要求灵活控制温度,切勿太高,造或食品变焦。 5.严禁在烤箱内煮制食品和空运行。 6.未经领导和管理人员同意,烤箱不得烤私人食品或其它食品。 电烤箱使用常识 一、先空烤去除异味 烤箱在正式使用前,要先高温空烤一次,以排出新烤箱的加热异味。 使用前先以干净湿布将烤箱内外擦拭一遍,将烤箱门打开至半开状态,然后将烤箱功能开关旋至上、下发热管全开位置,温度调至最高温度250 度,空烤1 5分钟。在这过程中烤箱会有一些异味甚至白色烟雾散发出来(属正常现象)。 在这过程中室内要保持空气畅通,15分钟后可将烤箱门全开以加速散热,之后烤箱便可依照使用说明书操作程序使用。 二、注意事项 1、在使用电烤箱前,请认真阅读使用说明书,严格按照使用说明的操作规 程进行操作。 2、烤箱预热:在烘烤任何食物前,烤箱都需先预热至指定温度,才能符合食谱上的烤箱时间。烤箱预约需十分钟。若预约时间不足烤箱可能达不到指定温度,若烤箱预热空烤太久,会影响烤箱的使用寿命。 3、使用专业的耐高温器皿,不能随便使用普通的玻璃或陶瓷的盘子或盖子。 4、烧烤高温:烤箱通常含有上、中、下三层高度可供选择。若食谱上没特别注明温度范围时,可将烤盘置于中层位置,若上火温度高而下火温度低时,除非烤箱的上、下火可单独调温,不然此时通常都是蒋上、下火温度相加除以二,然后将烤盘置于上层即可,但仍需随时留意表面是否过焦。
电热恒温鼓风干燥箱的使用说明与故障处理
. . . . . 电热恒温鼓风干燥箱(智能型带定时) 聚同电子使用说明书
目录 一、示意图 (2) 二、适用围 (3) 三、技术指标 (3) 四、结构概述 (3) 五、操作步骤 (4) 六、智能型温度控制器使用说明 (4) 七、注意事项 (8) 八、故障处理 (9)
九、装箱单 (10) 一、示意图: 1 2 3 4 5 6
。 。。。。 11 10 1、箱体 2、铭牌 3、控制面板 4、门拉手 5、搁板 6、箱门
7、温度控制器8、电源指示灯9、风门调节旋钮 10、电源开关11、风机开关 感您购买仪器,在您启用鼓风干燥箱前,请仔细阅读使用说明书,相信它能使您的鼓风干燥箱发挥最大的功用。阅读完本说明书后,请将其妥善保管,以便随时查阅。 二、适用围: 供厂矿企业、大专院校、科研及各类实验室等作物品干燥、烘焙、熔腊、灭菌之用。 三、技术指标: 注:带“A”为镜面不锈钢胆,不带“A”为镀锌板。
上表术参数的测试条件:环境温度25℃、相对湿度不大于85%RH、无试样负荷。 测试工具:精度为0.1℃的标准水银温度计(水银头位于工作室几何中心) 四、结构概述: DHG系列台式鼓风干燥箱是系列产品,容积有30、50、70、140、240升五种规格。干燥箱外壳体均采用优质钢板表面烘漆,工作室采用一般镀锌钢板或镜面不锈钢板,工作室配有两层不锈钢丝制成的搁板,中间层充填超细玻璃棉隔热。箱门上采用双层钢化玻璃作为观察窗,能清晰观察到箱物品。工作室与箱门连接处装有耐热硅橡胶密封圈,以保证工作室与箱门之间密封。干燥箱电源开关、电源指示灯、风门调节旋钮、控温仪等操作件均集中于箱体前面的控制面板处,位于箱体的左前侧。箱加热恒温系统主要由装有离心式叶轮的电动机、电加热器、合理的风道结构和温度控制器组成。当接通干燥箱电源,并打开风机开关时,电动机即运转,直接将位于箱后部的电加热器产生的热量通过风道向上排出,经过工作室干燥物品再吸入风机,以此不断循环,从而使工作室温度达到均匀。智能型温度控制器,具有自动风速调节功能,在升温过程中,电动机高速运行,温度接近恒定时,自动调整为低速运行,从而降低由于风速过快所造成的使用问题。用户也可以通过简单的操作,取消此功能。风门调节器能通过开启风门调节旋钮,调节箱进出空气量。 五、操作步骤: 1.把需干燥处理的物品放入干燥箱,关好箱门。 2.根据被干燥物品的潮湿程度将风门调节旋钮调到“MIN”或“MAX”处。 3.打开电源开关,电源指示灯亮,温度控制器有显示。 4.打开风机开关,风机按要求自动运行。
实验室烘箱使用安全规程
实验室烘箱使用安全规程 鼓风干燥箱又名“烘箱”,顾名思义,采用电加热方式进行鼓风循环干燥试验,分为鼓风干燥和真空干燥两种,鼓风干燥就是通过循环风机吹出热风,保证箱内温度平衡。干燥箱应用于化工、医药、环境、材料、食品等等各个行业。 操作注意事项 1样品放置:物料均匀放入样品架上。 注意事项: ①不可在烘箱加热状态下放置样品,需在确保加热关闭状态下放置样品; ②放置样品时,上下四周应留存一定空间,保持箱内气流畅通; ③箱内底部加热丝上置有散热板,不可将样品放置其上,以免影响热量上流导致热量积累; ④若样品在高温状态下会产生相态变化,必须装在托盘中,避免污染其他样品(例如加热后会渗油或由固态转变为液态等); ⑤含易燃易爆等有机挥发性溶剂或助剂禁止放入箱内。 2关紧箱门:将箱门轻轻关闭。 注意事项:
①关闭时不可太用力,避免造成箱体大幅振动; ②箱门上有螺栓,关闭时需确认箱门与硅胶密封条紧密结合。 3开机:打开电源及加热开关。 注意事项: 电源指示灯及加热指示灯正常显示,若指示灯不亮需及时关闭电源并联系仪器负责人。 4温度设置:设置所需温度。 注意事项: ①设置温度不可超过额定温度; ②具体设定温度由实验需要及烘烤物料属性而定; ③数显温度需正常指示,若不显示或出现闪烁、跳跃等异常需及时关闭电源并联系仪器负责人。 5关机取样:戴隔热手套取样。 注意事项: ①取样时缓慢打开箱门,切勿在高温状态下快速或急速开启箱门; ②取样时避免头部直接正对箱门开口,需待箱内热量散失10秒后方可取样;
③烘箱内样品按时取走,保证烘箱内无样品残留。废弃样品不可随手弃置于烘箱周围; ④取样完毕后,及时关闭箱门(若需继续使用,需再次确认以上4点)。 安全注意事项 【1】该设备属大功率高温设备,使用时要注意安全,防止火灾、触电及烫伤等事故。 【2】该设备应安放在室内干燥、水平处,防止振动。电源线不可设置在金属器物旁,不可置于湿润环境中,避免橡胶老化导致漏电。 【3】该设备周围严禁滞留、囤放易燃易爆等低燃点及酸性腐蚀性等易挥发性物品(例如有机溶剂、压缩气体、油盆、油桶、棉纱、布屑、胶带、塑料、纸张等易燃物品)。 【4】严禁易燃、易爆、酸性、挥发性、腐蚀性等物品入箱。 注:使用人员在不确定烘烤物料属性情况下,需得到研发人员确认后才可进行烘烤,否则严禁自行烘烤。纸片、标签、胶瓶、塑料杯等常见易燃物禁止入箱。【5】为防止烫伤,取放物品时要戴手套等专门工具。 【6】烘箱在工作时不得在烘箱旁进行洗涤、刮漆和喷酒精等工作。
中控考勤机详细操作说明书
中控考勤机详细操作说 明书 The manuscript was revised on the evening of 2021
中控考勤机说明书 1考勤机的使用 1.1登记指纹 1.2考勤机功能介绍(通讯,参数设置,系统信息,U盘管理) 2考勤软件的使用 软件的安装 软件使用 2.2.1 增加设备 2.2.2 从设备下载人员信息 2.2.3 修改人员信息(改名字,调动部门等) 2.2.4 上传人员信息到设备 2.2.5 下载考勤数据 2.2.6 时间段设置 2.2.7 班次管理 2.2.8 人员排班 2.2.9 统计报表 一考勤机快速使用 登记指纹(分彩屏跟黑白屏) 从设备上采集指纹: (1)彩屏:长按M/OK键--“用户管理”点OK--“新增用户”点OK--选择工号,- 往下翻成后再点击OK键,再放上另一个手指按三次--往下翻到完成上点OK。(如果要再登记点M/OK选择’---- 查找用户‘—输入工号点OK—点M/OK选择“编辑用户”然后选择登(2)黑白屏录指纹的跟彩屏类似就不再说了。录备用指纹的话跟彩屏有点区别:ESC键—跳出备份登记—输入工号—登记指纹。。 机器的功能介绍 (1)通讯设置—设置通讯方式有RS232/485通讯,TCP/IP,USB通讯 (2)系统设置—参数设置(包含提示声音,键盘声音,时间设置算法切换(高端机上的记录数据【记录要定时去删除】,清除管理权限【管理员破解】,清除全部数据--数据只是恢复机器出厂的通讯设置等】; (3)系统信息—可以查看设备的人员登记数跟指纹数及考勤记录数-------设备信息可厂时间等。 (4)U盘功能(包含下载跟上传的功能) <1>(1)把U盘插到考勤机上--长按M/OK键进入菜单--选择U盘管理--下载数据--下插到电脑上。 <2> (1)打开考勤软件--点击软件最左上角数据--选择菜单里“USB闪盘管理”,然后选择
电热恒温鼓风干燥箱使用说明书
电热恒温鼓风干燥箱使用说明书 二、适用范围 供厂矿企业、大专院校、科研单位及各类实验室等作物品干燥、烘培、熔蜡、灭菌之用。 三、技术指标 台式DHG-9003型 型号9023A 9053A 9123A 9203A 电源电压220V,50HZ 消耗功率530W 800W 1300W 1700W 控制范围50——200℃ 温度波动±1℃ 跟踪报警+10℃ 工作室尺寸 300×280×275 400×355×350 550×355×550 600×550×645 (mm) 四、结构概述 DHG型鼓风干燥箱是系列产品,按外型分为台式和立式二类,由不同的工作室材料,工作室尺寸和控制范围分为不同规格、品种。干燥箱外壳体均采用优质钢板表面烘漆,工作室采用涂有耐高温银粉漆的优质钢板或不锈钢钢板,工作室内设有二层涂有耐高温银粉漆的优质钢板或不锈钢丝制成的搁板,搁板间距可任意调节,中间层充填超细玻璃棉隔热。台式箱门采用双层钢化玻璃门或观察窗,立式箱门中上方设有双层钢化玻璃观察窗,能清晰观察到箱内加热物品。工作室与箱门连接处装有耐高温硅橡胶密封圈,以保证工作室与箱门之间密封。干燥箱带指示灯电源开关、控制仪等操作件均集中与箱体前面下方的控制面板处,台式设置于箱体左前侧,立式设置箱体下前方。 箱内加热恒温系统主要由装有离心式叶轮的烘箱专用低噪声电动机、电加热器、合适的风道结构和控温仪组成。当接通干燥箱电源时,电动机即同时运转,将直接置于箱内底部或背部的电加热器产生的热量通过风道向上或向前排出,经过工作室内干燥物品再吸入风机,如此不断循环使温度达到均匀。 台式和立式大容积鼓风干燥箱风门调节器能通过开启风门调节旋钮,调节箱内进入空气量。 微电脑智能控制仪,采用自整定PID技术,与传统PID控制相比具有控温迅速,响应快,超调小,精度高的特点,设定温度和箱内温度同时均有数字显示,具有上限跟踪报警和带数字定时器功能,定时可长达9999分钟。使用轻触按键设定参数,操作方便。 五、只能控温仪的面板功能及操作流程
实验室干燥箱安全操作规程(新编版)
The prerequisite for vigorously developing our productivity is that we must be responsible for the safety of our company and our own lives. (安全管理) 单位:___________________ 姓名:___________________ 日期:___________________ 实验室干燥箱安全操作规程(新 编版)
实验室干燥箱安全操作规程(新编版)导语:建立和健全我们的现代企业制度,是指引我们生产劳动的方向。而大力发展我们生产力的前提,是我们必须对我们企业和我们自己的生命安全负责。可用于实体印刷或电子存档(使用前请详细阅读条款)。 1、本设备为电加热高温干燥设备,操作不当将会产生爆炸、高温烫伤等安全事故。 2、每次拿取样品时严禁直接用手拿取,应采用镊子等辅助工具拿取,以防高温烫伤。 3、干燥箱温度设置时应根据试验样品所需的试验温度进行设置,过高的温度将会使试验样品燃烧、爆炸。 4、每次实验烘烤的样板数量为大烘箱≤20张板或6个测固含的盖,小烘箱≤10张板或3个测固含的盖。 5、易燃易爆的物品严禁放入干燥箱内烘烤。 6、严禁用湿手直接操作电源开关,以免触电。 7、干燥箱周围不得放置易燃易爆品。 8、干燥箱内、外应及时清扫,保持清洁。 9、每天下班前应切断设备的电源,以免设备长时间通电而造成事故。
10、设备维护,维修时应在切断电源的情况下进行。 11、设备有异常情况时应及时通知相关人员前来处理,严禁私自拆启。 12、做稳定性测试用的干燥箱,统一使用玻璃瓶装样品,进行储存稳定性试验。 XX设计有限公司 Your Name Design Co., Ltd.
中控ZKTime 考勤管理系统使用说明书
Z K T i m e5.0考勤管理系统使用说明软件的快速使用流程 1、将在设备上登记好的用户的指纹或卡下载到软件中(连接设备-从设备下载人员数据) 2、在员工维护中将员工的姓名和其他资料修改后上传到设备中(连接设备-上传人员信息到设备) 3、给员工分部门(进入部门管理) 4、设置班次时间段(进入班次时间段维护) 5、设置班次(进入班次管理) 6、给员工排班(进入员工排班) 7、将设备上的考勤数据下载至软件中(连接设备-从设备下载记录数据) 8、查看考勤报表(进入考勤报表) 添加设备 软件要从设备中下载数据时,需要与设备建立通讯。因此首先将要连接的设备添加到系统中,输入相应的连接参数,连接机器后进行数据的上传与下载。 1.设备维护 在软件主界面上点击按钮设备维护或在“我的设备列表”区域内单击鼠标右键选择设备维护,在这里对设备进行添加、删除、修改。 系统有2个默认设备通讯参数,一个是RS232/RS485方式,一个是以太网方式。 某些特定机器还具有USB通讯方式(如XU500等),具体机型请参见相应的产品《用户指南》,使用方法请查询本说明。 2.添加 单击此按钮,弹出如下图所示的新增设备窗口: 用户可在此窗口中设置该设备的相关信息。输入相应设备的连接参数,保存即可,在左边的设备列表中会显示设备名称。
【删除】 如果设备已经不需要使用了,在左边的设备列表中单击要删除的机器名,再点击【删除】按钮,就可以从系统中删除该设备。 【保存】 如果对选中的设备的连接参数修改之后,需点击【保存】按钮,来将信息保存下来。 3.连接设备 已添加到系统的设备都会显示在“我的设备列表”中,在要连接的设备上单击选中,再点击连接设备按钮;或者在要连接的设备上单击鼠标右键,在出现的菜单中选择连接设备。 当系统开始连接设备时,在界面的右下方的连接状态栏中会显示“正在连接设备,请稍候”,然后会给出是否连接成功的信息。 如果连接失败,请检查 1)设备的连接参数是否与设备的菜单中的通讯参数相符。 2)通讯线是否连接好。 上传下载数据 这是管理软件与设备之间进行数据交换的窗口。通过此菜单,可以将设备上的用户信息和记录数据下载到软件中,也可以将软件中保存的用户信息和上传到设备中。进行下列操作时,需首先连接好设备。 从设备下载记录数据:下载设备中的全部验证通过的记录; 从设备下载人员信息:员工信息的下载,可以同时下载员工指纹; 上传人员信息到设备:员工信息的上传,可以同时上传员工指纹; 1、从设备下载记录数据 当系统与设备处于连接状态时,才可以进行下载数据的操作。直接点击主界面的右边“有关设备操作”栏的从设备下载记录数据;或进入设备管理菜单,选择从设备下载记录数据。 系统会提示“正在读取数据”,这时请稍等片刻,当数据下载完成后在页面右下方的状态栏中提示下载数据完成之后,设备与软件的通讯已经结束。下载之后的数据需要添加到系统,如果数据比较多时,可能需要的时间稍长。
daogrsD10嵌入式烤箱中文使用说明
D10 嵌入式电烤箱 说明手册 ATLAN 注意: 本使用手册包含重要信息,有安全须知和安装说明等,这些将帮助你熟悉设备。请将本使用手册放置在安全地点以方便日后查阅。或者随时给你及任何不熟悉如何使用本设备的人员查阅。 重要安全信息 本产品仅适合整体安装在厨房内。请遵守专用的安装说明。 目录
重要安全信息 (3) 一般安全性 (3) 从事电力工作时的安全性 (4) 儿童安全 (4) 损坏原因 (4) 安装 (5) 安装前 (5) 安装与连接 (6) 处置 (7) 处置包装材料 (7) 处置废旧产品 (7) 您的新烤箱 (7) 烤箱概况 (7) 技术规格 (8) 附件...........................................................................8-9 控制面板 (10) 显示部分 (10) 按键操作部分............................................................... 11-13 在第一次使用烤箱之前 (14) 加热烤箱 (14) 清洁附件 (14)
节能小贴士 (14) 如何操作烤箱 (14) 有关烘焙、烘烤和烧烤的一般信息 (14) 保养和清洁 (15) 一般信息 (15) 清洁烤箱 (15) 拆卸和安装烤箱门 (16) 拆卸和安装门面板 (16) 更换烤箱灯 (17) 故障检修 (17) 故障表 (18) 烘焙和烘烤 (19) 烘焙和烧烤技巧………………………………………………………… 测试食谱………………………………………………………………… 重要安全信息 一般安全性 ·请认真阅读本手册。只有这样才能安全正确地使用电器。请保管好说明手册和安装说明,以
DHGA电热鼓风干燥箱操作规程
D H G A电热鼓风干燥箱 操作规程 集团标准化办公室:[VV986T-J682P28-JP266L8-68PNN]
文件名称: DHG-9070A电热鼓风干燥箱使用操作规程 目的: 规范电热鼓风干燥箱操作规程,正确使用仪器,保证检测工作顺利进行。 适用范围: 适用于生产技术人员、质检人员。 职责: 1)本仪器操作人员负责执行本操作规程,并负责仪器设备的日常维护和操作使用登记。? 2)仪器设备管理员负责监督仪器操作是否符合规程,对仪器进行定期维护、保养。? 3)科室负责人负责仪器综合管理。 规程: 1、使用方法 1)物品放进干燥箱后,将干燥箱门关上。? 2)接通电源开启电源开关,红灯即亮,表示接通电源。? 3)调节数显温控仪。根据烘干物品的要求设定温度和时间。?
温度的设定:在工作模式下,按一下“SET”键,使PV屏显示“5P”,按住↑或↓键,将SV屏显示的数值修改为所需要的工作温度值后放开。? 时间的设定:再按一下“SET”键,使PV屏显示“5P”,按住↑或↓键,将SV屏显示的数值修改为所需要的时间值。? 温度和时间设置好以后,在定时状态(如果只需设定温度不需要定时,此处应在设置温度状态下)再按一下“SET”键,回到工作模式,进入工作状态。? 4)温度设置好以后,绿灯即亮,表示开始升温,当温度升到需要温度时,绿灯熄灭,温控仪自动控温,并能自动恒温。? 5)为使箱内空气对流,可开启鼓风开关。? 6)干燥完毕后,关上电源开关,等箱内温度降低后物品拿出。? 2、使用注意事项 1)干燥箱使用前检查电源,要有良好地线,?使用完毕后,应将电源关闭,以保证使用安全。? 2)干燥箱应置于5℃~40℃,相对环境湿度不大于85%的室内,大气压力在86~106Kpa的环境内,应放置在平稳、水平,无严重粉尘,无阳光直射,无腐蚀性气体存在的室内。室内通风条件应良好,在其周围不可放置易燃、易爆物品。?
实验室干燥箱安全操作规程
编号:CZ-GC-09688 ( 操作规程) 单位:_____________________ 审批:_____________________ 日期:_____________________ WORD文档/ A4打印/ 可编辑 实验室干燥箱安全操作规程 Laboratory drying oven safety operating procedures
实验室干燥箱安全操作规程 操作备注:安全操作规程是要求员工在日常工作中必须遵照执行的一种保证安全的规定程序。忽视操作规程在生产工作中的重要作用,就有可能导致出现各类安全事故,给公司和员工带来经济损失和人身伤害,严重的会危及生命安全,造成终身无法弥补遗憾。 1、本设备为电加热高温干燥设备,操作不当将会产生爆炸、高温烫伤等安全事故。 2、每次拿取样品时严禁直接用手拿取,应采用镊子等辅助工具拿取,以防高温烫伤。 3、干燥箱温度设置时应根据试验样品所需的试验温度进行设置,过高的温度将会使试验样品燃烧、爆炸。 4、每次实验烘烤的样板数量为大烘箱≤20张板或6个测固含的盖,小烘箱≤10张板或3个测固含的盖。 5、易燃易爆的物品严禁放入干燥箱内烘烤。 6、严禁用湿手直接操作电源开关,以免触电。 7、干燥箱周围不得放置易燃易爆品。 8、干燥箱内、外应及时清扫,保持清洁。 9、每天下班前应切断设备的电源,以免设备长时间通电而造成
事故。 10、设备维护,维修时应在切断电源的情况下进行。 11、设备有异常情况时应及时通知相关人员前来处理,严禁私自拆启。 12、做稳定性测试用的干燥箱,统一使用玻璃瓶装样品,进行储存稳定性试验。 这里填写您的公司名字 Fill In Your Business Name Here
DZF6020真空烘箱使用说明
DZF6020真空干燥箱使用说明书 一、适用范围 本产品适用于厂矿企业、大专院校、科研单位等实验室在真空条件下对物品进行干燥、加热处理。在真空干燥箱内对物品真空加温,真空干燥箱具有以下优点:①可降低干燥温度、缩短干燥时间。②避免一些物品在常规条件下加热氧化、尘粒破坏以及加热空气杀死生物细胞。 二、结构特点 真空干燥箱外形为卧式,箱体采用优质钢板经冲压、焊接制成。箱体表面喷塑处理。隔热层采用硅酸铝棉填充;箱门采用双层钢化玻璃门,可调节箱门的闭合松紧;工作室与玻璃门之间用模压耐高温硅橡胶密封圈,以保证箱门与工作室密封,大幅度提高了真空度。DZF 型为方形工作室。 三、安装调试 1、安装:真空干燥箱应放置在具有良好的通风条件,无强烈震动的室内,在本仪器周围不可放有易然、易爆和腐蚀性气体。 2、调试:将箱门关闭并将门拉手旋紧,关闭回气阀开启真空阀,将箱体侧面的导气管用真空橡胶管与真空泵连接,接通真空泵电源,开始抽气,当真空表指示值达到要求时。关闭真空阀和真空泵电源。此时箱内处于真空状态。如无加热功能真空干燥箱调试结束。 四、主要技术数据 五、使用方法 1、把需要干燥的物品放入箱内,将箱门关闭并旋紧门拉手,关闭回气阀,开启真空阀,把真空干燥箱侧面的导气管用真空橡胶管与真空泵连接,接通真空泵电源,开始抽气,当真空表指示达到您需要的真空度时,先关闭真空阀,再关闭真空泵,此时箱内处于真空状态。 2、接通电源后,打开电源开关,指示灯亮,表示工作正常,仪表显示工作室温度,然后将控制仪表调节到设定温度,工作室开始加热,控制仪表上绿灯亮表示通电升温,当仪器恒温60 分钟后仪表显示温度应和设定温度基本一致。 3、不同物品、不同温度选择不同的干燥时间,如干燥时间较长,真空度下降需要再抽气恢复真空度,应先开启真空泵,再开启真空阀。 4、干燥结束后,应先关闭电源,旋动回气阀,解除箱内真空状态后,打开箱门取出物品(接触真空后胶圈与玻璃门吸紧,不易打开箱门,要过段时间,才能方便开启)。 5、在真空状态下,控制温度不得低于50℃。如果低于50℃时,标准温度计测试的数值与仪表显示值不一致,是正常现象。此现象不影响50℃以上控温及温度。