车牌识别源代码部份流程
车牌识别源代码部份流程(供参考一)
2009年12月21日星期一 09:11
实际上车牌识别代码量并不是很大,如果不停的手工输入;用不到一天的时间,即可大功告成。但是程序需试,才可以走向成熟。所以工作量是很大的。另外车牌识别还有其本身的特点——理论并不成熟。这就给车牌识别多的工作量。一般来说,开发车牌识别程序,先按照最原始最朴素的思想编码,然后是不断地优化。这将贯彻到整别的开发过程中去。
车牌识别最基本的流程是:将采集后的图像二值化,然后依次经过车牌定位、字符分割、去除干扰,最后是有时还会加入本节前面部分所叙述的思想(比如回溯)。
下面将分五章具体介绍每一个模块。
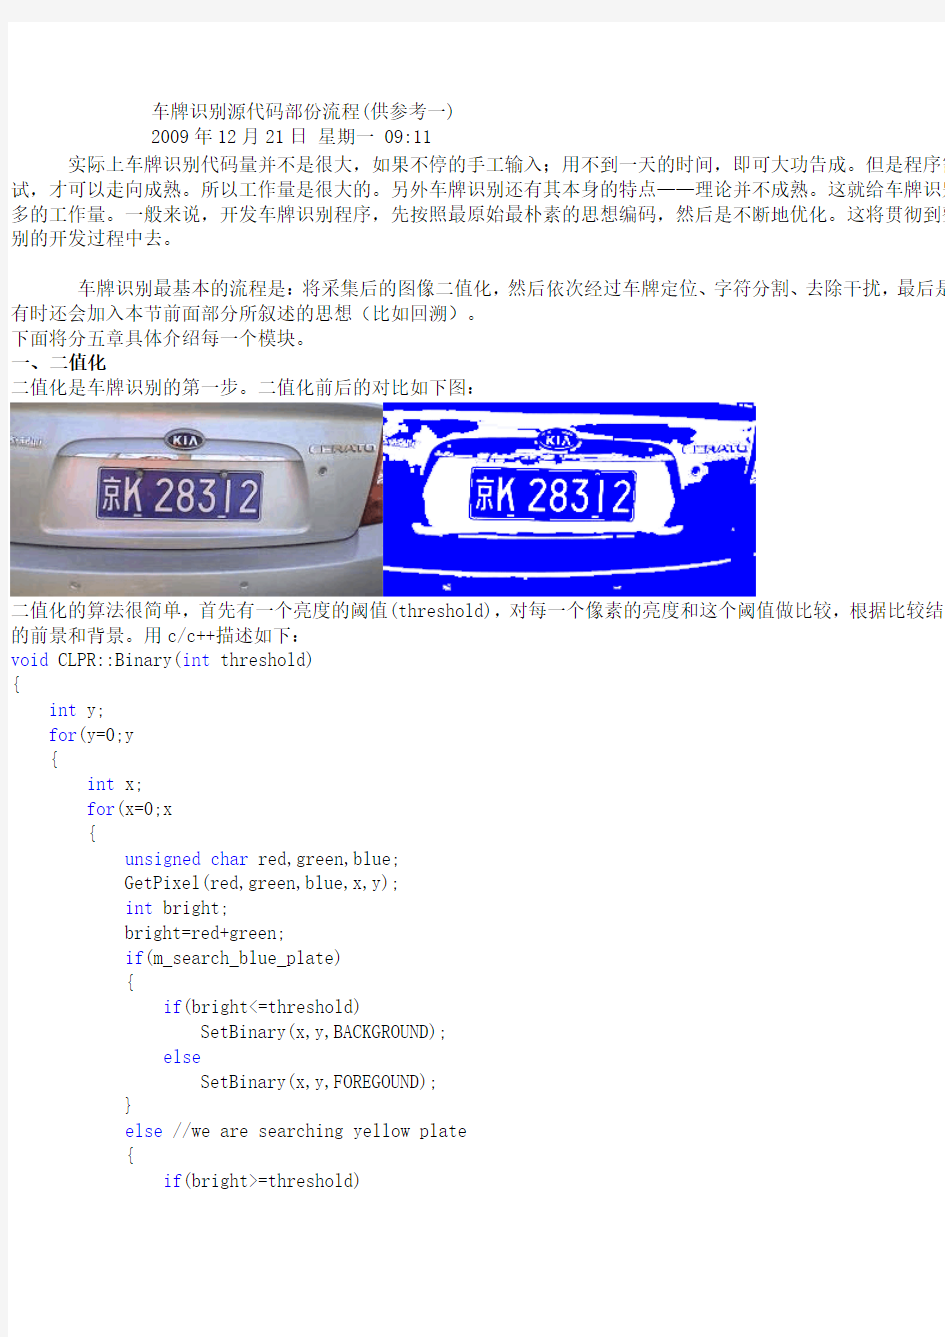
一、二值化
二值化是车牌识别的第一步。二值化前后的对比如下图:
二值化的算法很简单,首先有一个亮度的阈值(threshold),对每一个像素的亮度和这个阈值做比较,根据比较结果的前景和背景。用c/c++描述如下:
void CLPR::Binary(int threshold)
{
int y;
for(y=0;y { int x; for(x=0;x { unsigned char red,green,blue; GetPixel(red,green,blue,x,y); int bright; bright=red+green; if(m_search_blue_plate) { if(bright<=threshold) SetBinary(x,y,BACKGROUND); else SetBinary(x,y,FOREGOUND); } else //we are searching yellow plate { if(bright>=threshold) SetBinary(x,y,FOREGOUND); else SetBinary(x,y,BACKGROUND); } } } } 二值化算法虽然简单,但是阈值却不容易寻找。本章后面的部分,将重点介绍各种求解阈值的算法。 1、OTSU算法 OTSU算法的思想是:把输入图像首先转换成灰度图象,然后对图像进行直方图分析。如果直方图呈双峰分布。那么的“谷”就是阈值。从统计学角度讲,阈值两边的距离最大。 由于车牌识别的特殊性,图象象素点的亮度为该象素点的红色分量和绿色分量的和,并且忽略蓝色分量。这一点对和黄色车牌都是适用的。 OTSU算法仅对直方图呈双峰分布的图像有效。 全部代码如下: void LPR::OTSU() { //直方图统计 { int index; for(index=0;index m_pixel_number[index]=0; } { int y; for(y=0;y<=m_height;y++) { int x; for(x=0;x<=m_width;x++) { int bright; bright=Bright(x,y); m_pixel_number[bright]++; } } } //真正求阈值 double sum; sum=0; int n; n=0; int k; for(k=0;k<=(m_bright_level_count-1);k++) { sum+=k*m_pixel_number[k]; n+=m_pixel_number[k]; } double c_sum; c_sum=0.0; double f_max; f_max=-1.0; int n1; n1=0; for(k=0;k<(m_bright_level_count-1);k++) { n1+=m_pixel_number[k]; if (n1==0) continue; int n2; n2=n-n1; if(n2==0) break; c_sum+=(double)k*m_pixel_number[k]; double m_1,m_2; m_1=c_sum/n1; m_2=(sum-c_sum)/n2; double sb; sb=(m_1-m_2)*(m_1-m_2)*(double)n1*(double)n2; if (f_max { f_max=sb; m_prepare_threhold=(int)(k+0.5); } } } 2、Matlab算法 使用Matlab进行车牌识别,也是一个比较好的选择。在Matlab的环境中首先把输入的彩色图像使用命令rgb2gray 度图像。有了灰度图像就可以使用命令graythresh获得阈值了。最后使用命令im2bw对图像进行二值化。十分方便下: I=imread('blood1.tif'); imhist(I); % 人工观察灰度直方图,发现灰度120处有谷,确定阈值T=120 I1=im2bw(I,120/255); % im2bw函数需要将灰度值转换到[0,1]范围内 figure,imshow(I1); 改进为 I=imread('blood1.tif'); imhist(I); I1=graythresh(I); % im2bw函数需要将灰度值转换到[0,1]范围内 figure,imshow(I1); 二、车牌定位 图像二值化,占用车牌识别中的大部分时间,也是最难的。在二值化之后,车牌识别将变得比较难。车牌定位为二第一步。下面分小节分别介绍各种车牌定位算法。 车牌识别过程中,角点定位的基本思想是。在所有的边界点中,如果某些点的曲率半径比较小,那么这些点叫做“如下图所示(角点用红点表示): 图中字符上和车牌的四角都有角点。但是这并不影响车牌的定位。 根据距离最大的四个角点,得到了车牌的四个角,从而定了车牌。从角点定位的原理看出,如果经过旋转后车牌并角点定位的成功率和速度。 该算法的实现可以采取遍历匹配的算法,实现如下: void LPR::GetConere() { int y; for(y=0;y { int x; for(x=0;x { if(Line(x,y,x+4,y)>=3) { if(Line(x,y,x,y+4)>=3) { if(Line(x+1,y+1,x+4,y+4)<=1) Add(x,y,LEFT_TOP_CONNER); } if(Line(x,y,x,y-4)>=3) { if(Line(x+1,y-1,x+4,y-4)<=1) Add(x,y,LEFT_DOWN_CONNER); } } if(Line(x,y,x-4,y)>=3) { if(Line(x,y,x,y+4)>=3) { if(Line(x-1,y+1,x-4,y+4)<=1) Add(x,y,RIGHT_TOP_CONNER); } if(Line(x,y,x,y-4)>=3) { if(Line(x-1,y-1,x-4,y-4)<=1) Add(x,y,RIGHT_DOWN_CONNER); } } } } } 函数Line(x1,y1,x2,y2)返回过两点(x1,y1),(x2,y2)的直线,前景的象素个数。 注意这里的4,是检验角点的区域范围,如果区域过大,图像旋转时就会影响车牌定位的成功率。 1、上下定位方法 仔细观察二值化后的图像,在车牌的上边和下边各有一条较长的背景线(上图用红线表示)。根据这两条背景线可定位车牌。定位算法如下: int LPR::HorizontalLine(int x,int y,int count) { int ret; ret=0; int x_loop; for(x_loop=0;x_loop if(!IsForegournd(x+x_loop,y)) ret++; return ret; } IsForegournd(x,y)为询问点(x,y)是不是前景点的函数。 该算法比角点定位算法要快,但是不适合经过旋转后的车牌。虽然经过改进后也可以识别出旋转后的车牌,但是速不能出现在成熟的产品中。 2、变化率定位法 根据尺寸分割 从理论上讲,图片和实物相比,尺寸上有了很大的变化。并不一定图片和实物几何意义上的相似。也就是说和实物成比例。但是实验证实,在一到两个像素范围内,在水平方向上,实物和图像基本上成比例。 请观察下图: 这个是来自于《GA36-2007中华人民共和国机动车号牌》的车牌尺寸说明。根据这幅图片,我们可以在一定位的车到各个字符的坐标。请看下面的代码: void GetCharacterPosition(int character_position[7],int plate_left,int plate_right) { static const int mm[]= { 3+45/2, character_position_mm[0]+12+45, character_position_mm[1]+12+10+12+45, character_position_mm[2]+12+45, character_position_mm[3]+12+45, character_position_mm[4]+12+45, character_position_mm[5]+12+45, character_position_mm[6]+45/2+1, }; int index; for(index=0;index character_position[index]=plate_left+(-plate_left+plate_right)*mm[index]/mm[sizeof(mm)/sizeof(mm[0] } 上面的代码技巧性很大,还需大家认真揣摩。 去除干扰 干扰车牌识别的因素很多。比如车牌旋转、污染、固定螺丝和车牌边框等等。下面分小节分别介绍去除各种干扰的去除噪音 去除噪音的原理是:每一个字符,都是很大的一个连续块,但是噪音确是比较小的多个连续块。通过递归算法得到中各个块的大小,保留最大的块,其余块当作噪音删掉。算法很简单,这里不再列出代码。 去除螺丝干扰 去除螺丝的工作要和字符本身的特征联系在一起。对不同的字符、相同字符不同部位的螺丝,都要分别编码。工作下面分小节举几个例子: 10986等左上方螺丝 这种情况如下图所示: 在比较圆的9的上部出现了一个螺丝,比较明显。可以删掉,代码如下: void CLPR::DeleteLeftUpSmallScrewCharacterRound() { bool possible_screw; int possible_screw_start; int possible_screw_end; if(m_character_index==5) { possible_screw=false; { int seek; for(seek=0;seek<=1;seek++) { possible_screw_start=m_min_y+seek; int screw_right; if(ExpandHorizontal(screw_right,possible_screw_start,possible_screw_start,m_max_x,S { if(screw_right>=m_delta_x/2) { possible_screw=true; break; } } } } int delta_x; if(possible_screw) { possible_screw=false; for(possible_screw_end=possible_screw_start+1;possible_screw_end delta_x=RecognizeCharacterLocateVeritcalSmallSideScrewGetDeltaX(true,possible_screw_end,true); int left; if(!ExpandHorizontal(left,possible_screw_end,possible_screw_end,m_min_x,ADD)) continue; if(left>m_delta_x/2) continue; int right; if(!ExpandHorizontal(right,possible_screw_end,possible_screw_end,m_max_x,SUB)) continue; if(right>delta_x/2) continue; if(possible_screw_end+4>m_center_y) continue; int distance1; distance1=HorizontalDistance(possible_screw_end,possible_screw_end); int distance2; distance2=HorizontalDistance(possible_screw_end+2,possible_screw_end+2); int distance3; distance3=HorizontalDistance(possible_screw_end+4,possible_screw_end+4); if(!(distance1<=distance2&&distance2<=distance3&&distance1 if(distance3 continue; int seek; for(seek=2;seek<=4;seek++) { if(ChangeTimeHorizontal(possible_screw_end+seek,possible_screw_end+seek)==4) { possible_screw=true; break; } } if(possible_screw) break; } } if(possible_screw) { int left; if(!ExpandHorizontal(left,possible_screw_end-1,possible_screw_end-1,m_min_x,ADD)) possible_screw=false; else { if(left>=m_delta_x/2) possible_screw=false; } } if(possible_screw) { bool known_letter; known_letter=false; if(!known_letter) { m_min_y=possible_screw_end; RecognizeCharacterAdjustVertical(); } } } } 以上代码拷贝自深职院张教授车牌识别工程(索威尔),实际上是2003年的版本。读者可以进行修改,并放入自 2EFT5等右上方螺丝 这种情况如下图所示: 图中有三条直线,如果沿着这三条直线扫描的话,会发现:黑色的扫描线前景占很大的比例,绿色的扫描线背景占例;红色的扫描线前景背景比例都不突出,但是前景背景交替较为频繁。这说明根据前景背景变化率可以定位车牌这种算法可以有效防止车牌旋转的干扰。 获得变化率的代码如下: double CLPR::ScanLine(int x,int y,int count) { bool current_foreground; current_foreground=IsForeground(x,y); int change_times; change_times=0; int loop; for(loop=1;loop { if(current_foreground) { if(!IsForeground(x+loop,y)) { change_times++; current_foreground=false; } } else { if(IsForeground(x+loop,y)) { change_times++; current_foreground=true; } } } double ret; ret=change_times; ret/=(count+1);//do not div 0 return ret; } 三、字符分割 在车牌识别过程中,车牌定位后的工作便是分割字符。本章将分若干节介绍字符分割的算法。 连续点分割法 对于一个数字或者字母,前景的点是连续的。用填充算法对种子点填充即可得到整个字符。 当然汉字就不是了,所以这种分割算法仅仅适合数字或者字母。但是当整个车牌的数字和字母都得到之后,剩下的是汉字。 这个思想用c/c++描述如下: void LPR::Scan() { int y; for(y=m_plate_top;y<=m_plate_bottom;y++) { int x; for(x=m_plate_left;x<=m_plate_right;x++) { if(IsForeGround(x,y)&&!IsVisited(x,y)) { Fill(x,y); } } } } Fill是种子填充,算法有多种。下面分别介绍。 1、递归填充算法 递归填充算法的基本思想是,首先访问当前点,然后访问当前点的四个邻居。 每次访问时,要做一个记号,否则递归过程无法结束。 具体到车牌识别,每访问一个点,还要记录该点的坐标,从而得到当前字符点的集合。 void LPR::Fill(int x,int y) { if(!IsForground(x,y)) return ; if(IsVisited(x,y)) return ; AddPixelToCharacter(x,y); MarkPixelVisited(x,y); Fill(x+1,y); Fill(x,y+1); Fill(x-1,y); Fill(x,y-1); } 可以看出用c/c++描述的填充算法十分简单。 2、递归扫描线算法 基本的递归填充算法,函数递归调用较为频繁,引起系统资源消耗巨大。人们后来又提出了改进了的“扫描线种子填 其基本思想是:在种子的左右两边水平扫描暂时不需要递归,以减少不必要的函数调用。水平扫描结束后,仅仅考两个端点即可。 算法如下: void LPR::Fill(int x,int y) { int (*stack)[2]; stack=(int (*)[2])new int [m_width*2]; int stack_length; stack_length=0; stack[stack_length][0]=x; stack[stack_length][1]=y; stack_length++; while(true) { if(stack_length==0) break; x=stack[stack_length-1][0]; y=stack[stack_length-1][1]; stack_length--; int left_x; for(left_x=x-1;left_x>=0;left_x--) if(!IsForeGround(left_x,y)||IsVisited(left_x,y)) break; left_x++; for(x=left_x;x { if(!IsForeGround(x,y)||IsVisited(left_x,y)) break; Visit(x,y); } int right_x; right_x=x; if(right_x>=m_width) right_x=m_width-1; left_x--; if(left_x<0) left_x=0; int down_y; down_y=y+1; if(down_y { for(x=left_x;x<=right_x;x++) { if(IsForeGround(x,down_y)&&!IsVisited(left_x,y)) { stack[stack_length][0]=x; stack[stack_length][1]=down_y; stack_length++; } } } int up_y; up_y=y-1; if(up_y>=0) { for(x=left_x;x<=right_x;x++) { if(IsForeGround(x,up_y)&&!IsVisited(left_x,y)) { stack[stack_length][0]=x; stack[stack_length][1]=up_y; stack_length++; } } } } delete [] (int*)stack; } 虽然扫描线种子填充算法,比基本的种子填充算法复杂一些,但是在车牌识别测试后发现,扫描线种子填充算法比算法要快三分之一左右。 边界法 边界法和连续点分割法很相似,只不过连续的边界点,而不是所有的前景点。边界法需要事先得到前景像素中的边这可能会花费一些时间。但是这样会加速得到连续点的递归操作。边界点如下图: 得到边界点的算法如下: void CLPR::GetEdge() { int y; for(y=0;y { int x; for(x=0;x { if(IsForeground(x,y)) { if(!IsForeground(x-1,y)) SetEdge(x,y); else if(!IsForeground(x+1,y)) SetEdge(x,y); else if(!IsForeground(x,y-1)) SetEdge(x,y); else if(!IsForeground(x,y+1)) SetEdge(x,y); } } } } 待续~~~~~~~~~~ 牌识别源代码部份流程(供参考二) 2009年12月21日星期一 09:52 根据尺寸分割 从理论上讲,图片和实物相比,尺寸上有了很大的变化。并不一定图片和实物几 何意义上的相似。也就是说未必图像和实物成比例。但是实验证实,在一到两个 像素范围内,在水平方向上,实物和图像基本上成比例。 请观察下图: 这个是来自于《GA36-2007中华人民共和国机动车号牌》的车牌尺寸说明。根据 这幅图片,我们可以在一定位的车牌上,找到各个字符的坐标。请看下面的代码: void GetCharacterPosition(int character_position[7],int plate_left,int plate_right) { static const int mm[]= { 3+45/2, character_position_mm[0]+12+45, character_position_mm[1]+12+10+12+45, character_position_mm[2]+12+45, character_position_mm[3]+12+45, character_position_mm[4]+12+45, character_position_mm[5]+12+45, character_position_mm[6]+45/2+1, }; int index; for(index=0;index character_position[index]=plate_left+(-plate_left+plate_right)*mm[ind ex]/mm[sizeof(mm)/sizeof(mm[0])-1]; } 上面的代码技巧性很大,还需大家认真揣摩。 四、去除干扰 干扰车牌识别的因素很多。比如车牌旋转、污染、固定螺丝和车牌边框等等。下面分小节分别介绍去除各种干扰的方法。 1、去除噪音 去除噪音的原理是:每一个字符,都是很大的一个连续块,但是噪音确是比较小的多个连续块。通过递归算法得到每个字符中各个块的大小,保留最大的块,其余块当作噪音删掉。算法很简单,这里不再列出代码。 1、去除螺丝干扰 去除螺丝的工作要和字符本身的特征联系在一起。对不同的字符、相同字符不同部位的螺丝,都要分别编码。工作量很大。下面分小节举几个例子: 10986等左上方螺丝 如下图所示: 在比较圆的9的上部出现了一个螺丝,比较明显。可以删掉,代码如下: void CLPR::DeleteLeftUpSmallScrewCharacterRound() { bool possible_screw; int possible_screw_start; int possible_screw_end; if(m_character_index==5) { possible_screw=false; { int seek; for(seek=0;seek<=1;seek++) { possible_screw_start=m_min_y+seek; int screw_right; if(ExpandHorizontal(screw_right,possible_screw_start,possible_screw_s tart,m_max_x,SUB)) { if(screw_right>=m_delta_x/2) { possible_screw=true; break; } } } } int delta_x; if(possible_screw) { possible_screw=false; for(possible_screw_end=possible_screw_start+1;possible_screw_end { delta_x=RecognizeCharacterLocateVeritcalSmallSideScrewGetDeltaX(true, possible_screw_end,true); int left; if(!ExpandHorizontal(left,possible_screw_end,possible_screw_end,m_min _x,ADD)) continue; if(left>m_delta_x/2) continue; int right; if(!ExpandHorizontal(right,possible_screw_end,possible_screw_end,m_ma x_x,SUB)) continue; if(right>delta_x/2) continue; if(possible_screw_end+4>m_center_y) continue; int distance1; distance1=HorizontalDistance(possible_screw_end,possible_screw_end); int distance2; distance2=HorizontalDistance(possible_screw_end+2,possible_screw_end+ 2); int distance3; distance3=HorizontalDistance(possible_screw_end+4,possible_screw_end+ 4); if(!(distance1<=distance2&&distance2<=distance3&&distance1 continue; if(distance3 continue; int seek; for(seek=2;seek<=4;seek++) { if(ChangeTimeHorizontal(possible_screw_end+seek,possible_screw_end+se ek)==4) { possible_screw=true; break; } } if(possible_screw) break; } } if(possible_screw) { int left; if(!ExpandHorizontal(left,possible_screw_end-1,possible_screw_end-1,m _min_x,ADD)) possible_screw=false; else { if(left>=m_delta_x/2) possible_screw=false; } } if(possible_screw) { bool known_letter; known_letter=false; if(!known_letter) { m_min_y=possible_screw_end; RecognizeCharacterAdjustVertical(); } } } } 以上代码拷贝自深职院张教授研发团队的车牌识别工程(索威尔在运营),实际上是2003年的版本。读者可以进行修改,并放入自己工程中。 2EFT5等右上方螺丝 如下图所示: 在比较平的5的上部出现了一个螺丝,十分明显。删掉螺丝的代码如下: void CLPR::RightUpSmallSideScrewCharacterWide() { if(!(m_character_index==1||m_character_index==4)) return ; int possible_screw_start; possible_screw_start=RecognizeCharacterLocateVeritcalRightUpSmallSide ScrewGetStart(); if(possible_screw_start==-1) return ; bool possible_screw; int possible_screw_end; possible_screw=false; int delta_x; for(possible_screw_end=possible_screw_start+1;possible_screw_end { int distance; distance=HorizontalDistance(possible_screw_end,possible_screw_end); delta_x=RecognizeCharacterLocateVeritcalSmallSideScrewGetDeltaX(false ,possible_screw_end,true); if(distance>delta_x*0.63) { int seek; for(seek=1;seek<=3;seek++) { int left; if(ExpandHorizontal(left,possible_screw_end-seek,possible_screw_end-s eek,m_min_x,ADD)) { if(left>=delta_x/2) { possible_screw=true; break; } } } } if(possible_screw) break; } if(!possible_screw) return ; { int y; y=possible_screw_end-1; int left; if(ExpandHorizontal(left,y,y,m_min_x,ADD)) { if(left { int distance; distance=HorizontalDistance(y,y); if(distance>delta_x*0.25) return ; } } } if(possible_screw_end>m_locate_up_contrack_limit) return ; bool known_letter; known_letter=false; if(!known_letter) { m_min_y=possible_screw_end; RecognizeCharacterAdjustVertical(); }