A10-TechNote_VRRP-A_aVCS_Quick_Install_Guide
Introduction:
This document provides detailed information as to how the AX device can provide High-Availability (HA) support across two or more AX de-vices using A10 Networks with VRRP-A and AX Virtual Chassis System (aVCS) technology. The aVCS technology allows multiple AX devices to function as a single “virtual chassis”. aVCS is a management tool and for high availability functionality on the AX, we would rely on VRRP-A or Legacy HA.
In an aVCS chassis, there is a single point of management, and the vMaster acts as a controller for vBlades. The vMaster controller is the centralized storage of the entire AX configuration. Any changes from the controller will automatically updates the vBlade for any changes. The AX Virtual Chassis can be expanded up to 7 additional blades de-pending on the AX Series model using VRRP-A.
Level of Complexity:
Medium
Audience:
This technical guide applies to all systems engineers, managers and customers responsible for managing or maintaining the A10 Networks AX Series device.
Configuration Requirements:
This configuration guide is based on Release 2.7.0. For VRRP-A/Legacy H A, we only require that AX devices in the same virtual switch must have the same number of CPUs. If aVCS is used, they must use the same model of device.
A pair of AX devices with different models or different software versions will not work. By clustering the devices in an HA configuration, the sys-tem runs as one virtual system.
HA Options:
VRRP-A aVCS can support up to 8 devices and Legacy HA aVCS can sup-port up to 2 devices.
Connection Requirements:
aVCS can be connected via Management, Ethernet (10G or 1G) or trunk-ing with multiple path capability. Example: Primary data: Management and Secondary path: Ethernet port or trunk (must be on the same Layer 2 broadcast domain)
Device Election within aVCS:
Every AX device has a unique ID and the device that has the lowest ID becomes the vMaster. The scenario described above only applies if all devices have the same static priority and boot at the same time. There are two scenarios to consider during the aVCS election process: Election Process A: If all the AXs within the virtual chassis boot up at the same time, the device with the lowest ID becomes the vMaster.
Election Process B: However, if one of the AXs boots earlier than others (i.e. 20 seconds earlier), then the earliest AX to boot be-comes the vMaster. The lowest ID becomes vMaster only because there is a tie in priority and dynamic priority. This is the only way the aVCS can break the tie.
Note: The AX with the highest priority becomes the vMaster but default Priority is 0. Best practices dictate that you should select the AX device that you wish to become a vMaster by increasing the priority number. Election Process:
Best practices dictate that you should select the AX device that you wish to become a vMaster by increasing the priority number of that device. Alternatively, you can decrease the priority of the device to be-come a vMaster or you can manually configure “vMaster- take-over”. Software Image Synchronization:
When a new vBlade is introduced within the chassis, the vBlade gets up-graded with the same software image as the vMaster. Once the vBlade is upgraded, the AXs will sync configuration and image and reboot once. If both AXs have the same software version and only the configu-ration is different, vBlade only reloads itself instead of rebooting. Management Limitations:
The only way to manage the vMaster and vBlades are within the Float-ing IP Address or from the vMaster Management IP Address. Staggered Upgrade:
The aVCS staggered upgrade procedure will allow the AX units to be upgraded for the following support.
1. Allow the services behind the SLB to be active without up-
grading all of the AX units at the same time.
Note:
The vBlades will be upgraded while a vMaster is always ac-tive.
2. Upgrade a vBlade in order to run a different version than the
vMaster.
Note: Normally, when you upgrade the code on the vMaster, the
vMaster will push the new code to the vBlades and reboot the
vBlades with the new code. In scenarios where you want to up-
grade only a vBlade to a different version within aVCS, use the
staggered option so that the vMaster will not push its version of
code to the vBlade. Since the staggered flag is set while upgrad-
ing the vBlade, the vMaster will allow the slave to run a different
version.
Example:
AX1: VCS = vMaster + VRRP-A=Active
AX2: VCS = vBlade + VRRP-A=Standby
From vMaster (AX1)
1. Save the configuration to the other partition.
AX1#write memory sec all-partitions
2. Check the AX running partition and version.
AX1#show bootimage
AX1#show version
3. Upgrade the running partition of the vBlade (AX2).
AX1(conf)# upgrade hd sec
upgrade-mode device 2
Note: AX2 will reboot and remain “VCS=vBlade +
HA=Standby”
4. Force an HA transition to the vBlade (AX2).
AX1(conf)# vrrp-a vrid default
AX1(conf-vrid-#)# priority 255 device 2
Note: Don’t use the force-self-standby option
Note: AX1 is now “VCS=vMaster + VRRP-
A=Standby” and AX2 is now “VCS=vBlade + VRRP-
A=Active”
1. Validate services are working on AX2 using the
new code.
2. Reboot AX1
AX1# reboot
When the AX1 reboot occurs, the following steps happen automatically:
1. AX2 vBlade becomes vMaster, (note that AX2 was
already VRRP-A = Active => no HA transition)
2. After reboot, AX1 becomes vBlade + VRRP-A =
Standby
3. vMaster (AX2) detects that the new vBlade (AX1)
doesn’t have the new AX release and upgrades
and reboots it
4. After the second AX1 reboot, AX1 becomes a
vBlade + HA-Standby
5. (Optional) Force VCS + HA transition to AX1
From AX1:
AX1# vcs vmaster-take-over 255
From vMaster (AX1) :
AX1(conf)# vrrp-a vrid default
AX1(conf-vrid-#)# priority
Provide a level of control to the virtual chassis by using the same device as a vMaster whenever possible. Dynamic priority is not configurable. The device that has the dynamic priority will always become the vMas-ter.
aVCS Configuration Section:
Before you start configuring the aVCS feature within the AX devices, A10 strongly suggest performing a full system backup such as aFleX, data files, etc.
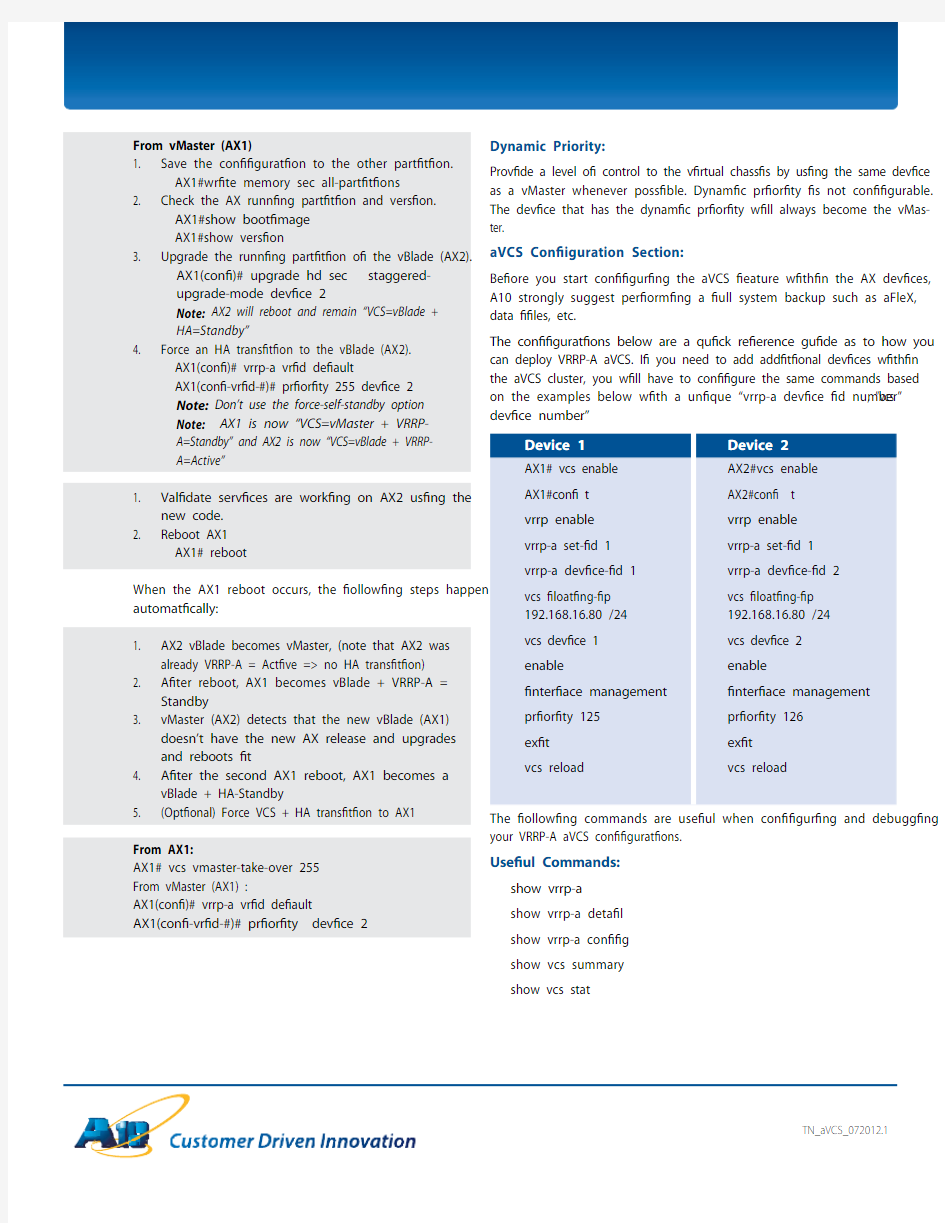
The configurations below are a quick reference guide as to how you can deploy VRRP-A aVCS. If you need to add additional devices within the aVCS cluster, you will have to configure the same commands based on the examples below with a unique “vrrp-a device id number”, ”vcs device number”
.
The following commands are useful when configuring and debugging your VRRP-A aVCS configurations.
Useful Commands:
show vrrp-a
show vrrp-a detail
show vrrp-a config
show vcs summary
show vcs stat