GNU Radio的安装
GNU Radio和USRP的安装
by DZZ, WDL, 2014.4.29
1. 安装GNU Radio的基本概念和安装尝试
GNU Radio是Linux环境中运行的程序,官网建议的Linux系统是Fedora和Ubuntu。在Windows OS下可以采取下列形式安装GNU Radio:
Windows OS + VMWare(虚拟机)+ Linux(Ubuntu或Fedora)+ GNU Radio
因此、要安装GNU Radio,首先需要安装虚拟机,在虚拟机上安装Linux(Ubuntu或Fedora)。
对于GNU Radio本身的安装,官网建议了三种安装方法:
(1)直接安装GNU Radio的可执行文件。也就是说不下载源码和进行源码编译。显然、这种安装适合于仅仅使用GNU Radio提供的模块搭建通信系统。关于官网的安装建议参见:https://www.360docs.net/doc/5715766993.html,/redmine/projects/gnuradio/wiki/InstallingGR
但是,安装尝试表明在Ubuntu下键入下列命令
apt-get install gunradio
并不能进行安装,执行apt-get时显示找不到有gnuradio的源。下载源是可以调整的,有待哪位同学研究一下,如何改变相应的文件调整源,再尝试一下。
(2)采用安装工具安装。这种情况下,源码下载和编译均由安装工具负责,最重要的是检查package和library的相互依赖关系,对于非专业开发人员和对GNU Radio了解不足的人来说,是比较困难的事,因为GNU Radio包含的文件很多。安装工具完成了这一任务。
对于这种安装,官网(https://www.360docs.net/doc/5715766993.html,/redmine/projects/gnuradio/wiki/InstallingGRFromSource)又给出了两种方法:
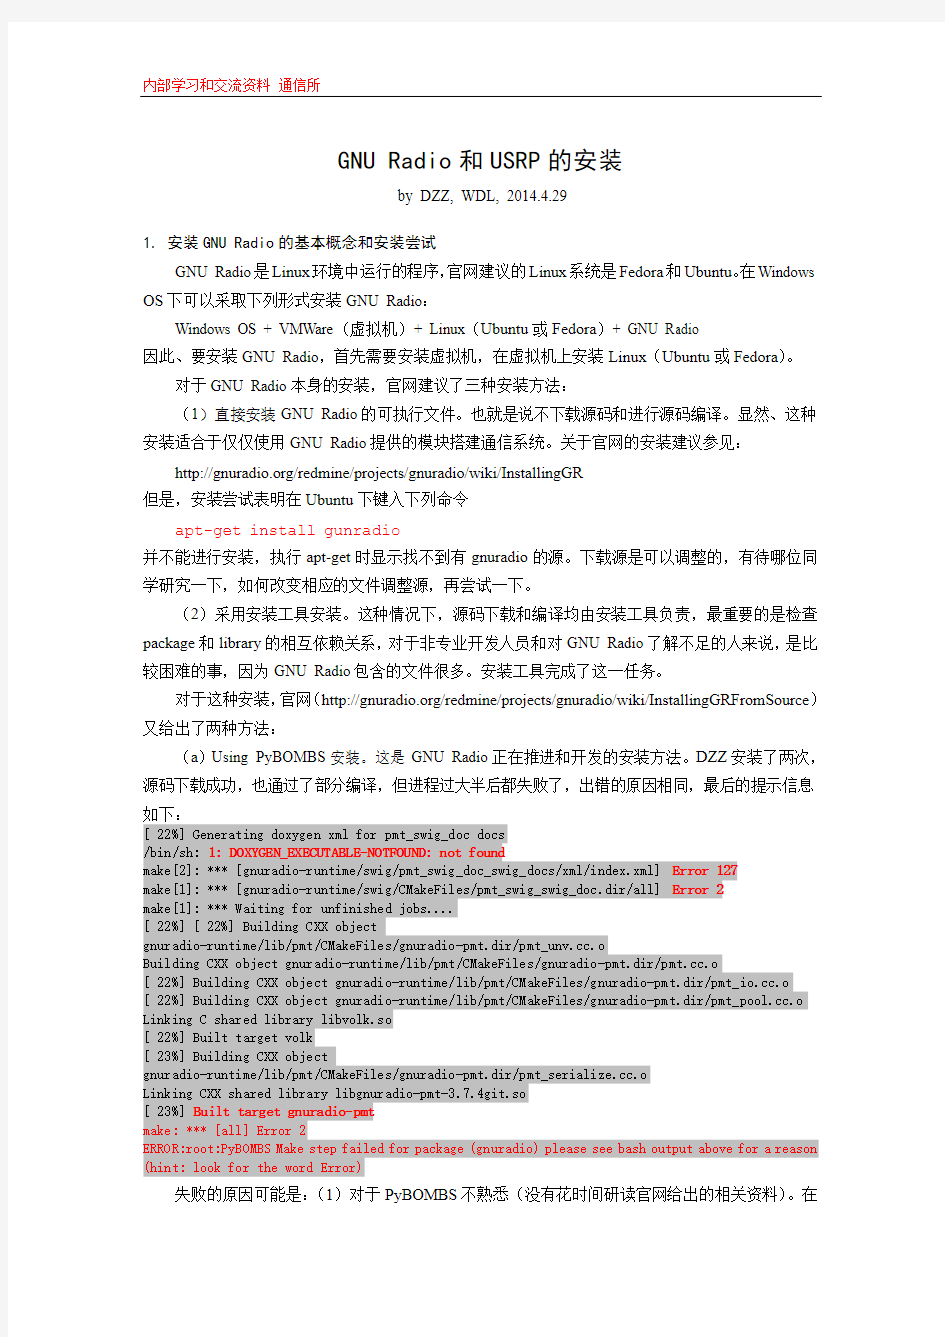
(a)Using PyBOMBS安装。这是GNU Radio正在推进和开发的安装方法。DZZ安装了两次,源码下载成功,也通过了部分编译,但进程过大半后都失败了,出错的原因相同,最后的提示信息
如下:
[ 22%] Generating doxygen xml for pmt_swig_doc docs
/bin/sh: 1: DOXYGEN_EXECUTABLE-NOTFOUND: not found
make[2]: *** [gnuradio-runtime/swig/pmt_swig_doc_swig_docs/xml/index.xml] Error 127
make[1]: *** [gnuradio-runtime/swig/CMakeFiles/pmt_swig_swig_doc.dir/all] Error 2
make[1]: *** Waiting for unfinished jobs....
[ 22%] [ 22%] Building CXX object
gnuradio-runtime/lib/pmt/CMakeFiles/gnuradio-pmt.dir/pmt_https://www.360docs.net/doc/5715766993.html,.o
Building CXX object gnuradio-runtime/lib/pmt/CMakeFiles/gnuradio-pmt.dir/https://www.360docs.net/doc/5715766993.html,.o
[ 22%] Building CXX object gnuradio-runtime/lib/pmt/CMakeFiles/gnuradio-pmt.dir/pmt_https://www.360docs.net/doc/5715766993.html,.o [ 22%] Building CXX object gnuradio-runtime/lib/pmt/CMakeFiles/gnuradio-pmt.dir/pmt_https://www.360docs.net/doc/5715766993.html,.o Linking C shared library libvolk.so
[ 22%] Built target volk
[ 23%] Building CXX object
gnuradio-runtime/lib/pmt/CMakeFiles/gnuradio-pmt.dir/pmt_https://www.360docs.net/doc/5715766993.html,.o
Linking CXX shared library libgnuradio-pmt-3.7.4git.so
[ 23%] Built target gnuradio-pmt
make: *** [all] Error 2
ERROR:root:PyBOMBS Make step failed for package (gnuradio) please see bash output above for a reason (hint: look for the word Error)
失败的原因可能是:(1)对于PyBOMBS不熟悉(没有花时间研读官网给出的相关资料)。在
开始安装时需要输入一些选项,但估计不输入会采用缺省值安装,因此安装过程中基本都是直接回
(2)GNU Radio 车。有个估计和doxygen有关的ON/OFF选项,两次安装时分别选择的是OFF和ON;
的PyBOMBS安装工具尚未成熟。希望有同学根据错误信息作些调研,再尝试一下这种方法。因为该方法是GNU Radio未来的推荐安装方法,并且安装过程中,交互很好,感觉速度也快些。而下面介绍的成功安装方法,其最大的问题是:安装过程中交互性太差,没有进度显示,“一停”就是几个小时,一般安装者都会怀疑安装出问题了。DZZ成功安装之前,曾经启动安装2-3次,每次到check...等上2-3分钟,一点动静没有,以为“死了”,按ctrl+c退出。(3)也可能是未安装依赖包doxygen。
(b)Using Marcus Leech的building script安装(官网链接同上)。DZZ先采用了PyBOMBS 安装,只是到building阶段出错,需要的packages安装是成功的。因此没有再重新下载所需的packages,所以不是全程在此方法下安装。该方法的最大问题是安装过程显示信息太少,交互性差,但优点是安装全程全自动化。
(3)下载源码,自己编译。本方法没有尝试。
2.安装步骤(全新安装成功案例)
(1)成功安装案例的环境说明和用时情况(供参考)
DZZ的安装环境:
主机:PC = DELL机(4核,CPU主频2.2GHz,最高可达3.2GHz);内存=8G;OS=win8.0 虚拟机:VMWare 10.01 build-1379776,虚拟机内存分配=2G;虚拟机内核分配=2核;
虚拟机硬盘分配=30G;
Linux操作系统(虚拟机下):Ubuntu 12.04.1
安装用时:5-6小时(网速:360加速球显示在下载文件时多为100K/s左右,WiFi连接)WDL的安装环境:
(由WDL补充)
(2)安装前注意事项和说明
(a)关闭主机操作系统和虚拟机操作系统的节能休眠模式(休眠会导致安装停止);
(b)安装GNU Radio时会自动安装USRP所需要的文件UHD,同时不需要连接USRP 硬件设备。
(c)适当熟悉Linux操作系统命令和目录结构,例如cd;cd.;ls;
(d)Marcus Leech building script安装方法需要用户以普通用户身份运行安装命令。
(3)安装步骤(很简单,过程几乎全自动)
预先安装VMWare(详细步骤参见XXX.doc)
预先安装Linux操作系统(详细步骤参见XXX.doc)
第一步:安装Marcus Leech building script所要求的packages
参照前面apt-get命令的使用格式,使用sudo apt-get install命令安装如下依赖包:
libfftw3-dev
libfontconfig1-dev libxrender-dev libpulse-dev
swig
g++
automake autoconf
libtool
python-dev libcppunit-dev libboost1.48-all-dev libusb-dev
libusb-1.0-0-dev
fort77
libsdl1.2-dev python-wxgtk2.8
git-core
libqt4-dev
python-numpy ccache
python-opengl libgsl0-dev
python-cheetah python-lxml doxygen
qt4-dev-tools
libqwt5-qt4-dev libqwtplot3d-qt4-dev pyqt4-dev-tools python-qwt5-qt4 cmake
wget
libxi-dev
python-docutils
gtk2-engines-pixbuf r-base-dev
python-tk
liborc-0.4-0
liborc-0.4-dev
libasound2-dev
python-gtk2
第二步:在桌面系统左栏点击Home Folder,打开后点鼠标右键,建立一个目录(例如gnuradiosrc),以存放安装的GNU Radio的源码。该安装目录的绝对路径为
/home/zzding61/gnuradiosrc/
其中zzding61是安装Ubuntu时建立的home目录下的子目录,因人而易,gnuradiosrc刚建立的zzding61下的子目录名。
GNU Radio所安装的文件主要存放在两处:系统目录下(待明确)(主要存放GNU的package, library, 命令等)和新建的目录下(主要存放源码和例子)
第三步:键入下列命令,则可以进入安装过程:
$ wget https://www.360docs.net/doc/5715766993.html,/files/build-gnuradio && chmod a+x ./build-gnuradio && ./build-gnuradio
下面是输入上述命令后,安装过程中的全部屏幕信息(网上的:https://www.360docs.net/doc/5715766993.html,/2013a/ 1120/21042.html,DZZ的安装显示信息和这个几乎完全相同)。红色字符是安装过程需要输入的内容,只是几个y(yes)和密码,蓝色字体是DZZ的加注。
--2013-11-20 13:44:05-- https://www.360docs.net/doc/5715766993.html,/files/build-gnuradio
正在解析主机 https://www.360docs.net/doc/5715766993.html, (https://www.360docs.net/doc/5715766993.html,)... 67.212.80.242
正在连接 https://www.360docs.net/doc/5715766993.html, (https://www.360docs.net/doc/5715766993.html,)|67.212.80.242|:80... 已连接。
已发出 HTTP 请求,正在等待回应... 200 OK
长度: 36545 (36K) [text/plain]
正在保存至: “build-gnuradio”
100%[======================================>] 36,545 58.3K/s 用时 0.6s
2013-11-20 13:44:26 (58.3 KB/s) - 已保存“build-gnuradio” [36545/36545])
This script will install Gnu Radio from current GIT sources
You will require Internet access from the computer on which this
script runs. You will also require SUDO access. You will require
approximately 500MB of free disk space to perform the build.
This script will, as a side-effect, remove any existing Gnu Radio
installation that was installed from your Linux distribution packages.
It must do this to prevent problems due to interference between
a linux-distribution-installed Gnu Radio/UHD and one installed from GIT source.
The whole process may take up to two hours to complete, depending on the
capabilities of your system.
!!!!!!!!!!!!!!!!!!!!!!!!!!!!!!!!!!!!!!!!!!!!!!!!!!!!!!!!!!!!!!!!!!!!!!!!!!!!!!!!
NOTE: if you run into problems while running this script, you can re-run it with the --verbose option to produce lots of diagnostic output to help debug problems.
This script has been written to anticipate some of the more common problems one might encounter building ANY large, complex software package. But it is not pefect, and there are certainly some situations it could encounter that it cannot deal with
gracefully. Altering the system configuration from something reasonably standard, removing parts of the filesystem, moving system libraries around arbitrarily, etc, it likely cannot cope with. It is just a script. It isn't intuitive or artificially intelligent. It tries to make life a little easier for you, but at the end of the day if it runs into trouble, a certain amount of knowledge on your part about
system configuration and idiosyncrasies will inevitably be necessary.
Proceed?y
Starting all functions at: 2013年 11月 20日星期三 13:44:28 CST
SUDO privileges are required
Do you have SUDO privileges?y
Continuing with script
[sudo] password for holic:
Installing prerequisites.(下列40多个packages需在运行命令前已经安装,check才能成功)====> THIS MAY TAKE QUITE SOME TIME <=====(耐心等待)
Checking for package libfontconfig1-dev
Checking for package libxrender-dev
Checking for package libpulse-dev
Checking for package swig
Checking for package g++
Checking for package automake
Checking for package autoconf
Checking for package libtool
Checking for package python-dev
Checking for package libfftw3-dev
Checking for package libcppunit-dev
Checking for package libboost1.48-all-dev
Checking for package libusb-dev
Checking for package libusb-1.0-0-dev
Checking for package fort77
Checking for package libsdl1.2-dev
Checking for package python-wxgtk2.8
Checking for package git-core
Checking for package libqt4-dev
Checking for package python-numpy
Checking for package ccache
Checking for package python-opengl
Checking for package libgsl0-dev
Checking for package python-cheetah
Checking for package python-lxml
Checking for package doxygen
Checking for package qt4-dev-tools
Checking for package libusb-1.0-0-dev
Checking for package libqwt5-qt4-dev
Checking for package libqwtplot3d-qt4-dev
Checking for package pyqt4-dev-tools
Checking for package python-qwt5-qt4
Checking for package cmake
Checking for package git-core
Checking for package wget
Checking for package libxi-dev
Checking for package python-docutils
Checking for package gtk2-engines-pixbuf
Checking for package r-base-dev
Checking for package python-tk
Checking for package liborc-0.4-0
Checking for package liborc-0.4-dev
Checking for package libasound2-dev
Checking for package python-gtk2
Done checking packages
Checking for library libusb ...Found library libusb
Checking for library libboost ...Found library libboost
Checking for library libcppunit ...Found library libcppunit
Checking for library libfftw ...Found library libfftw
Checking for library libgsl ...Found library libgsl
Done
This script will fetch Gnu Radio version 3.7/maint from the repositories, along with compatible
extras.
Is this OK?y
Fetching various packages (Gnu Radio, UHD, gr-osmosdr, gr-iqbal, etc)
via the Internet
=======> THIS MAY TAKE QUITE SOME TIME <=========
Fetching Gnu Radio via GIT...Done
Fetching UHD via GIT...Fetching rtl-sdr (rtl-sdr, gr-osmosdr, gr-iqbal, hackrf and bladeRF) via GIT
Done
Starting function uhd_build at: 2013年 11月 20日星期三 13:54:30 CST
Building UHD...(DZZ机子上进行了约半小时)
=============> THIS WILL TAKE SOME TIME <=============
Done building/installing UHD
Done function uhd_build at: 2013年 11月 20日星期三 14:04:26 CST
Starting function firmware at: 2013年 11月 20日星期三 14:04:26 CST
Downloading images to: /usr/local/share/uhd/images
Downloading images from:
https://www.360docs.net/doc/5715766993.html,/binaries/maint_images/archive/uhd-images_003.006.000-release.zip
13.34 MB/13.34 MB (100.00%)
Images successfully installed!
Done downloading firmware to /usr/local/share/uhd/images
Done function firmware at: 2013年 11月 20日星期三 14:04:49 CST
Starting function gnuradio_build at: 2013年 11月 20日星期三 14:04:49 CST
/usr/local/lib already in ld.so.conf.d
Doing ldconfig...
Building Gnu Radio...(在DZZ的安装中,此步经历了约2个小时,期间屏幕上一点动静没有)
=========> THIS WILL TAKE QUITE A WHILE <=============
...Doing cmake
...Cmaking
...Building
...Installing
Done building and installing Gnu Radio
GRC freedesktop icons install ...Done
Done function gnuradio_build at: 2013年 11月 20日星期三 14:48:44 CST
Starting function rtl_build at: 2013年 11月 20日星期三 14:48:44 CST
Building rtl-sdr...Done building rtl-sdr
Building hackrf...Done building hackrf
Building gr-iqbal...Done building gr-iqbal
Building bladeRF...Done building bladeRF
Building gr-osmosdr...Done building gr-osmosdr
Done building/installing rtl-sdr/gr-osmosdr
Done function rtl_build at: 2013年 11月 20日星期三 14:50:43 CST
Starting function extras at: 2013年 11月 20日星期三 14:50:43 CST
Doing GIT checkout for extra module gr-baz
Building extra module gr-baz
Doing GIT checkout for extra module grextras
Building extra module grextras
Done function extras at: 2013年 11月 20日星期三14:52:20 CST
Starting function mod_groups at: 2013年 11月 20日星期三 14:52:20 CST
******************************************************************************** This script has just modified /etc/group to place your userid '('$USER')' into group 'usrp' In order for this change to take effect, you will need to log-out and log back
in again. You will not be able to access your USRP1 device until you do this.
If you wish to allow others on your system to use the USRP1 device, you will need to use: sudo usermod -a -G usrp userid
For each userid you wish to allow access to the usrp
******************************************************************************** Further
Done function mod_groups at: 2013年 11月 20日星期三 14:52:20 CST
Starting function mod_udev at: 2013年 11月 20日星期三 14:52:20 CST
Done function mod_udev at: 2013年 11月 20日星期三 14:52:20 CST
Starting function mod_sysctl at: 2013年 11月 20日星期三 14:52:20 CST
Applying updates to /etc/sysctl.conf
Group 'usrp' now has real-time scheduling privileges
You will need to log-out and back in again for this to
take effect
Done function mod_sysctl at: 2013年 11月 20日星期三 14:52:21 CST
Starting function pythonpath at: 2013年 11月 20日星期三 14:52:21 CST
************************************************************
You should probably set your PYTHONPATH to:
/usr/local/lib/python2.7/dist-packages
Using:
export PYTHONPATH=/usr/local/lib/python2.7/dist-packages
in your .bashrc or equivalent file prior to attempting to run
any Gnu Radio applications or Gnu Radio Companion.
*************************************************************
Done function pythonpath at: 2013年 11月 20日星期三 14:52:21 CST
Done all functions at: 2013年 11月 20日星期三 14:52:21 CST
All Done
Send success/fail info to https://www.360docs.net/doc/5715766993.html,?y
Thanks
第四步:增加屏幕信息所要求的环境变量
在terminal中运行命令gedit .bashrc,会打开bashrc文件,在该文件末尾添加如下语句:export PYTHONPATH=$PYTHONPATH:/usr/local/lib/python2.7/site-packages
然后保存文件。(这个有待论证,DZZ安装实践表明:2.7.3的安装目录不是python2.7) 也可以使用另一种方法,即运行命令vi /etc/profile,在末尾添加同样的语句,之后按ctrl+冒号,输入wq,回车。
第五步:运行GNU Radio的GUI:gnuradio-compainon (简称grc)
在terminal中输入命令:
$ gnuradio-companion
grc是一个用可视化GNU Radio模块搭建通信系统的环境,不需用Python和C++编写代码。该环境下只能使用GNU Radio现有的模块,其特点和NI提供的LabView非常相似。
3.采用虚拟机文件拷贝形式的安装
这一安装方法的最大特点是简单省事。缺点是:拷贝过来的虚拟Ubuntu完全是别人的一个环境,如果自己原来有虚拟机Ubuntu环境且也安装了一些东西,则本机上将有两个Ubuntu系统。占用硬盘空间较大,且可能会带来不便。该方法比较适合本机上原来没有安装虚拟Ubuntu的情况。
成功案例安装的环境如下:
拷贝源机的安装环境:上述WDL的安装环境
拷贝目的机的环境:PC = 联想笔记本G640,CPU = Intel Pentium P6000,OS = Win XP;虚拟机内存1G,硬盘=20G,CPU核=1
安装过程如下:
第一步:预装VMWare
第二步:將虚拟机文件拷贝到目的机硬盘(随便放在哪个盘),虚拟机文件是vmx格式的,例如WDL电脑上的虚拟机文件位置是:
C:\Users\wdl\Documents\Virtual Machines\Ubuntu12\Ubuntu12.vmx
第三步:运行VMware,选择文件菜单下的打开命令打开Ubuntu12.vmx,VMware会自动导入该虚拟机文件并在左侧“我的电脑”目录下显示该虚拟机。
4.半新安装方法(未实验,希望有同学实践,并记录安装过程)
将需要预装的40多个packages拷贝到Linux系统的相应目录下。此方法的优点:免去下载和安装这些packages。Marcus Leech的building script 检测到这些包后将不在下载和安装。可能的缺点:packages可能不是最新的,和最新的GNU Radio源码可能会有兼容性不好的问题。