JavaFX2.0 表格框TableView

JavaFX SDK API在的好几个类都被设计来以表格形式呈现数据。在JavaFX应用中创建表格的最重要类是TableView, TableColumn , 和TableCell。可以通过实现数据模型或者应用一个细胞工厂来产生表格。
表格的类提供了内置的功能来在必要的时候进行数据排序和重置大小。
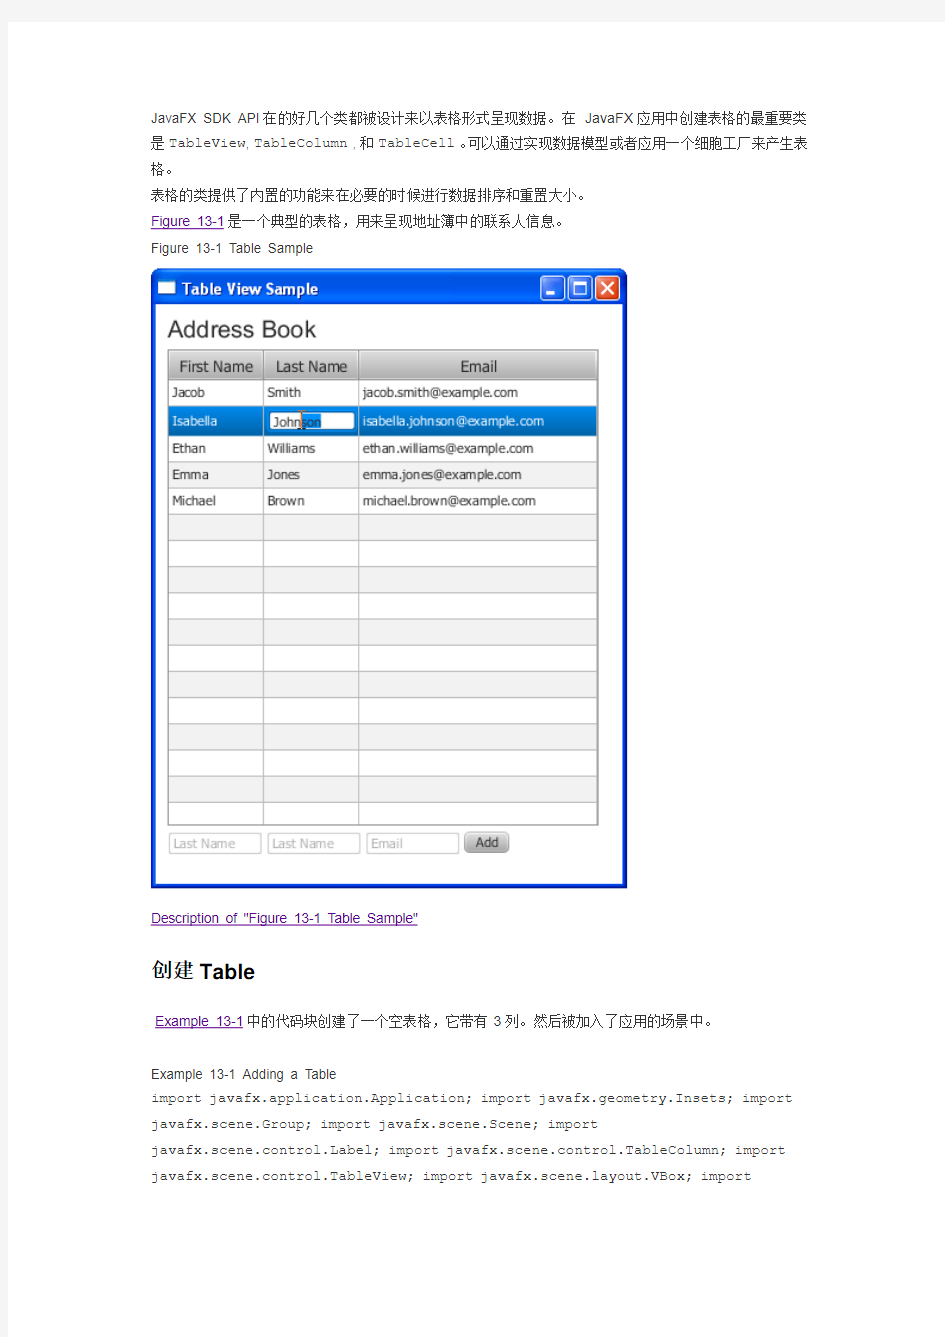
Figure 13-1是一个典型的表格,用来呈现地址簿中的联系人信息。
Figure 13-1 Table Sample
Description of "Figure 13-1 Table Sample"
创建Table
Example 13-1中的代码块创建了一个空表格,它带有3列。然后被加入了应用的场景中。
Example 13-1 Adding a Table
import javafx.application.Application; import javafx.geometry.Insets; import javafx.scene.Group; import javafx.scene.Scene; import
https://www.360docs.net/doc/7218201039.html,bel; import javafx.scene.control.TableColumn; import javafx.scene.control.TableView; import https://www.360docs.net/doc/7218201039.html,yout.VBox; import
javafx.scene.text.Font; import javafx.stage.Stage; public class Main extends Application { private TableView table = new TableView(); public static void main(String[] args) { launch(args); } @Override public void start(Stage stage) { Scene scene = new Scene(new Group()); stage.setTitle("Table View Sample"); stage.setWidth(400); stage.setHeight(500); final Label label = new
Label("Address Book"); label.setFont(new Font("Arial", 20)); TableColumn firstNameCol = new TableColumn("First Name"); TableColumn lastNameCol = new TableColumn("Last Name"); TableColumn emailCol = new TableColumn("Email"); table.getColumns().addAll(firstNameCol, lastNameCol, emailCol); final VBox vbox = new VBox(); vbox.setSpacing(5); vbox.getChildren().addAll(label, table); vbox.setPadding(new Insets(10, 0, 0, 10)); ((Group)
scene.getRoot()).getChildren().addAll(vbox); stage.setScene(scene);
stage.show(); } }
表格控件是通过实例化TableView类创建的。在Example 13-1中,它被加入到了VBox布局容器中,然而,你可以直接把它加入应用场景中。
Example 13-1定义了三列来存储地址簿中的以下信息:某个联系人的名和姓还有电邮地址。列是用TableColumn类创建的。
TableView类的getColumns方法把前面创建的列加入到表格中。在应用中,可以用这个方法动态的添加和移除列。
编译运行的效果如下Figure 13-2 .
Figure 13-2 Table Without Data
Description of "Figure 13-2 Table Without Data"
可以通过调用setVisible方法来管理列的可视性。比如说,你应用的逻辑要求隐藏用户电邮地址,可以这样达到目的:emailCol.setVisible(false) .
如果数据要求更复杂的数据呈现结构,可以创建内嵌的列。
比如,如果地址簿中的联系人有两个email账户,就需要两列来展示首选和次要地址了。创建两个子列,然后在emailCol上调用getColumns方法,见Example 13-2 .
Example 13-2 Creating Nested Columns
TableColumn firstEmailCol = new TableColumn("Primary"); TableColumn secondEmailCol = new TableColumn("Secondary");
emailCol.getColumns().addAll(firstEmailCol, secondEmailCol);
把这些代码加入到Example 13-1 , 然后编译运行,表格的呈现效果如Figure 13-3 .
Figure 13-3 Table with Nested Columns
Description of "Figure 13-3 Table with Nested Columns"
尽管表格被加入到了应用中,标准标题依然显示的是"No content in table" 因为没定义数据。为了不显示这个标题,可以使用setPlaceholder方法指定一个Node对象来显示在空表格中。
定义Data Model
当在JavaFX应用中创建表格时,最佳实践是实现一个定义了数据模型、提供了方法和字段的类来扩展表格的工作。Example 13-3创建了一个Person类来定义地址簿中的数据。
Example 13-3 Creating the Person Class
public static class Person { private final SimpleStringProperty firstName; private final SimpleStringProperty lastName; private final SimpleStringProperty email; private Person(String fName, String lName, String email) { this.firstName = new SimpleStringProperty(fName); https://www.360docs.net/doc/7218201039.html,stName = new SimpleStringProperty(lName); this.email = new SimpleStringProperty(email); } public String getFirstName() { return firstName.get(); } public void setFirstName(String fName)
{ firstName.set(fName); } public String getLastName() { return lastName.get(); } public void setLastName(String fName) { lastName.set(fName); } public String getEmail() { return email.get(); } public void setEmail(String fName)
{ email.set(fName); } }
firstName , lastName , 和email字符串属性(string property)是创建来引用特定的数据元素的。
另外,get和set方法是提供给每个数据元素的。这样,比如说,getFirstName方法返回了firstName 属性的值,而setFirstName方法为这个属性指定了值。
当数据模型在Person类中形成时,可以创建一个ObservableList数组来定义足够多的行来在表格中显示你的数据。看Example 13-4中的代码。
Example 13-4 Defining Table Data in an Observable List
final ObservableList
"emma.jones@https://www.360docs.net/doc/7218201039.html,"), new Person("Michael", "Brown",
"michael.brown@https://www.360docs.net/doc/7218201039.html,") );
下一步是将数据和表格列相关联。可以通过为每个数据元素定义的属性来实现,见Example 13-5 . Example 13-5 Setting Data Properties to Columns
firstNameCol.setCellValueFactory( new
PropertyValueFactory
lastNameCol.setCellValueFactory( new
PropertyValueFactory
emailCol.setCellValueFactory( new
PropertyValueFactory
setCellValueFactory方法为每列指定了一个细胞工厂。细胞工厂是通过使用
PropertyValueFactory类来实现的,该类使用了表格列的firstName , lastName和email属性来引用Person相应的方法。
定义了数据模型、加入数据并和列相关联后可以把数据加入表格了。使用TableView类的setItems方法:table.setItems(data) .
由于ObservableList对象可以跟踪元素的任何改变,TableView的内容在数据改变后是自动更新的。查看Example 13-6中的代码。
Example 13-6 Creating a Table and Adding Data to It
import javafx.beans.property.SimpleStringProperty; import
javafx.scene.control.cell.PropertyValueFactory; import
javafx.application.Application; import javafx.collections.FXCollections; import javafx.collections.ObservableList; import javafx.geometry.Insets; import javafx.scene.Group; import javafx.scene.Scene; import
https://www.360docs.net/doc/7218201039.html,bel; import javafx.scene.control.TableColumn; import javafx.scene.control.TableView; import https://www.360docs.net/doc/7218201039.html,yout.VBox; import javafx.scene.text.Font; import javafx.stage.Stage; public class Main extends Application { public static class Person { private final SimpleStringProperty firstName; private final SimpleStringProperty lastName; private final SimpleStringProperty email; private Person(String fName, String lName, String email) { this.firstName = new SimpleStringProperty(fName); https://www.360docs.net/doc/7218201039.html,stName = new
SimpleStringProperty(lName); this.email = new SimpleStringProperty(email); } public String getFirstName() { return firstName.get(); } public void setFirstName(String fName) { firstName.set(fName); } public String getLastName() { return lastName.get(); } public void setLastName(String fName)
{ lastName.set(fName); } public String getEmail() { return email.get(); } public void setEmail(String fName) { email.set(fName); } } private TableView
"jacob.smith@https://www.360docs.net/doc/7218201039.html,"), new Person("Isabella", "Johnson",
"isabella.johnson@https://www.360docs.net/doc/7218201039.html,"), new Person("Ethan", "Williams",
"ethan.williams@https://www.360docs.net/doc/7218201039.html,"), new Person("Emma", "Jones",
"emma.jones@https://www.360docs.net/doc/7218201039.html,"), new Person("Michael", "Brown",
"michael.brown@https://www.360docs.net/doc/7218201039.html,") ); public static void main(String[] args)
{ launch(args); } @Override public void start(Stage stage) { Scene scene = new Scene(new Group()); stage.setTitle("Table View Sample"); stage.setWidth(400); stage.setHeight(500); final Label label = new Label("Address Book");
label.setFont(new Font("Arial", 20)); TableColumn firstNameCol = new TableColumn("First Name"); firstNameCol.setCellValueFactory( new PropertyValueFactory
emailCol.setCellValueFactory( new
PropertyValueFactory
table.getColumns().addAll(firstNameCol, lastNameCol, emailCol); final VBox vbox = new VBox(); vbox.setSpacing(5); vbox.getChildren().addAll(label, table); vbox.setPadding(new Insets(10, 0, 0, 10)); ((Group)
scene.getRoot()).getChildren().addAll(vbox); stage.setScene(scene);
stage.show(); } }
编译运行的效果如图Figure 13-4所示。
Figure 13-4 Table Populated with Data
Description of "Figure 13-4 Table Populated with Data"
新增行
Figure 13-4中的表格包含了5行,目前还无法更改。
可以使用文本框来输入First Name, Last Name和Email 列中的内容。Text Field控件使你的应用能够接收用户的输入。Example 13-7创建了三个文本框并分别定义了提示语,还创建了一个Add按钮。
Example 13-7 Using Text Fields to Enter New Items in the Table
final TextField addFirstName = new TextField(); addFirstName.setPromptText("Last Name"); addFirstName.setMaxWidth(firstNameCol.getPrefWidth()); final TextField addLastName = new TextField();
addLastName.setMaxWidth(lastNameCol.getPrefWidth());
addLastName.setPromptText("Last Name"); final TextField addEmail = new TextField(); addEmail.setMaxWidth(emailCol.getPrefWidth());
addEmail.setPromptText("Email"); final Button addButton = new Button("Add"); addButton.setOnAction(new EventHandler
addLastName.getText(), addEmail.getText() )); addFirstName.setText(""); addLastName.setText(""); addEmail.setText(""); } });
点击Add按钮后,文本框中的值就包含进一个Person的构造方法并加入到data可见列表( observable list)中。这样,新输入的联系人信息就显示在表格中了。
查看Example 13-8中的代码。
Example 13-8 Table with the Text Fields to Enter New Items
import javafx.application.Application; import
javafx.beans.property.SimpleStringProperty; import
javafx.beans.property.StringProperty; import javafx.collections.FXCollections; import javafx.collections.ObservableList; import javafx.event.ActionEvent; import javafx.event.EventHandler; import javafx.geometry.Insets; import javafx.scene.Group; import javafx.scene.Scene; import
javafx.scene.control.Button; import https://www.360docs.net/doc/7218201039.html,bel; import
javafx.scene.control.TableColumn; import javafx.scene.control.TableView; import javafx.scene.control.TextField; import
javafx.scene.control.cell.PropertyValueFactory; import
https://www.360docs.net/doc/7218201039.html,yout.HBox; import https://www.360docs.net/doc/7218201039.html,yout.VBox; import
javafx.scene.text.Font; import javafx.stage.Stage; public class Main extends Application { public static class Person { private final StringProperty firstName; private final StringProperty lastName; private final StringProperty email; private Person(String fName, String lName, String email) { this.firstName = new SimpleStringProperty(fName); https://www.360docs.net/doc/7218201039.html,stName = new SimpleStringProperty(lName); this.email = new SimpleStringProperty(email); } public String getFirstName() { return firstName.get(); } public void setFirstName(String fName)
{ firstName.set(fName); } public String getLastName() { return lastName.get(); } public void setLastName(String fName) { lastName.set(fName); } public String getEmail() { return email.get(); } public void setEmail(String fName)
{ email.set(fName); } } private TableView
FXCollections.observableArrayList( new Person("Jacob", "Smith",
"jacob.smith@https://www.360docs.net/doc/7218201039.html,"), new Person("Isabella", "Johnson",
"isabella.johnson@https://www.360docs.net/doc/7218201039.html,"), new Person("Ethan", "Williams",
"ethan.williams@https://www.360docs.net/doc/7218201039.html,"), new Person("Emma", "Jones",
"emma.jones@https://www.360docs.net/doc/7218201039.html,"), new Person("Michael", "Brown",
"michael.brown@https://www.360docs.net/doc/7218201039.html,") ); private HBox hb = new HBox(); public static void main(String[] args) { launch(args); } @Override public void start(Stage stage) { Scene scene = new Scene(new Group()); stage.setTitle("Table View Sample"); stage.setWidth(400); stage.setHeight(500); final Label label = new
Label("Address Book"); label.setFont(new Font("Arial", 20)); TableColumn firstNameCol = new TableColumn("First"); firstNameCol.setCellValueFactory( new PropertyValueFactory
new TableColumn("Last"); lastNameCol.setCellValueFactory( new PropertyValueFactory
emailCol.setCellValueFactory( new
PropertyValueFactory
table.getColumns().addAll(firstNameCol, lastNameCol, emailCol); final TextField addFirstName = new TextField(); addFirstName.setPromptText("Last Name"); addFirstName.setMaxWidth(firstNameCol.getPrefWidth()); final TextField addLastName = new TextField();
addLastName.setMaxWidth(lastNameCol.getPrefWidth());
addLastName.setPromptText("Last Name"); final TextField addEmail = new TextField(); addEmail.setMaxWidth(emailCol.getPrefWidth());
addEmail.setPromptText("Email"); final Button addButton = new Button("Add"); addButton.setOnAction(new EventHandler
hb.getChildren().addAll(addFirstName, addLastName, addEmail, addButton);
hb.setSpacing(3); final VBox vbox = new VBox(); vbox.setSpacing(5);
vbox.getChildren().addAll(label, table, hb); vbox.setPadding(new Insets(10, 0, 0, 10)); ((Group) scene.getRoot()).getChildren().addAll(vbox);
stage.setScene(scene); stage.show(); } }
应用并没有提供任何过滤器来检查输入(比如输入的电邮地址并不符合正确形式)。你可以在开发的时候自己加上这些功能。
当前应用也不能检查十分输入了空值。如果没输入内容,点击Add按钮会加入空行。
Figure 13-5演示了用户如何新增行。
Figure 13-5 Adding Contact Information to the Address Book
Description of "Figure 13-5 Adding Contact Information to the Address Book"
Figure 13-6是上图点击Add按钮后的效果。联系人Emma White的信息现在在表格中显示了。Figure 13-6 Newly Added Entry
Description of "Figure 13-6 Newly Added Entry"
数据排序
TableView类提供了内置的数据排序能力。。用户可以点击列标题来改变数据顺序。点击一次是递增排序,点击两次是递减排序,点击三次是不能排序。默认地,是没有排序。
用户可以万恶表格中的多个列进行排序,并在排序操作中指定各列的优先级。要排序多列,在点击列标题的时候按住Shift键即可。
在Figure 13-7中,第一列应用了升序,第二列是降序。注意第一列的优先级要高于第二列。
Figure 13-7 Sorting Multiple Columns
Description of "Figure 13-7 Sorting Multiple Columns"
作为开发者,可以通过setSortType方法为应用中的每一列设置排序参数。可以指定是升序还是降序。比如,下面这行代码设置了emailCol列是降序排序:
emailCol.setSortType(TableColumn.SortType.DESCENDING);
可以通过从TableView.sortOrder可见列表增加或删除TableColumn实例来指定要排序哪些列。该
列表中列的顺序就是排序的优先级 (比如,0项目的优先级高于第一个项目。)
使用setSortable(false)方法可以阻止列的排序。
编辑Table中的数据
TableView类不仅显示表格数据,也提供了编辑数据的功能。可以使用TableView.edit(int row, TableColumn
column)方法开始编辑。也可以使用TableCell类的方法编辑表格数据。见Example 13-9 .
Example 13-9 Implementing Cell Editing
class EditingCell extends TableCell
setContentDisplay(ContentDisplay.GRAPHIC_ONLY); } @Override public void cancelEdit() { super.cancelEdit();
setContentDisplay(ContentDisplay.TEXT_ONLY); } @Override public void
updateItem(String item, boolean empty) { super.updateItem(item, empty); if
(!isEmpty()) { if (textField != null) { textField.setText(item); }
setText(item); } } private void createTextField() { textField = new
TextField(getItem()); textField.setMinWidth(this.getWidth() -
this.getGraphicTextGap() * 2); textField.setOnKeyReleased(new
EventHandler
(t.getCode() == KeyCode.ENTER) { commitEdit(textField.getText()); } else if (t.getCode() == KeyCode.ESCAPE) { cancelEdit(); } } }); } }
在Example 13-9中,createTextField方法使用了textField变量来分析输入串并调
用commitEdit或cancelEdit方法(取决于按下了Enter还是Escape键)
setCellFactory方法能用来建立定制的细胞工厂。定制细胞工厂的首要任务是无论何时请求多返回一
个新建的TableCell实例。Example 13-10展示了如何为firstNameCol , lastNameCol和
emailCol列实现细胞工厂。
Example 13-10 Using a Cell Factory
Callback
lastNameCol.setCellFactory(cellFactory);
emailCol.setCellFactory(cellFactory);
用setOnEditCommit方法,如Example 13-11所示,这样表格能处理项目的任何改变。该方法标识了
一个编辑过的项目,取回了新数据,代替了data可见列表的相应数据。
Example 13-11 Processing Edited Data in the Table
//Enabling editing table.setEditable(true); //Modifying the firstName property firstNameCol.setOnEditCommit(new EventHandler
{ ((Person)t.getTableView().getItems().get( t.getTablePosition().getRow())). setFirstName(t.getNewValue()); } }); //Modifying the lastName property lastNameCol.setOnEditCommit(new EventHandler
{ ((Person)t.getTableView().getItems().get( t.getTablePosition().getRow())). setLastName(t.getNewValue()); } }); //Modifying the email property
emailCol.setOnEditCommit(new EventHandler
{ @Override public void handle(CellEditEvent
{ ((Person)t.getTableView().getItems().get( t.getTablePosition().getRow())). setEmail(t.getNewValue()); } });
在Figure 13-8中,用户编辑了Michael Brown的姓,输入了新值并按了回车。回车后就不能再编辑了,
这种行为由TextField类的实现决定。
Figure 13-8 Editing a Table Cell
Description of "Figure 13-8 Editing a Table Cell"