ASTM D4772-2009毛巾吸水性
Designation:D4772–09
Standard Test Method for
Surface Water Absorption of Terry Fabrics(Water Flow)1
This standard is issued under the?xed designation D4772;the number immediately following the designation indicates the year of original adoption or,in the case of revision,the year of last revision.A number in parentheses indicates the year of last reapproval.A superscript epsilon(′)indicates an editorial change since the last revision or reapproval.
1.Scope
1.1This test method determines the ability of a terry fabric to rapidly absorb and retain liquid water from surfaces such as human skin,dishes,and furniture.
1.2This test method is not applicable to non-terry fabrics such as huck towels,waffle-weave towels,crash towels,?our-sack towels,and nonwoven wipes.The steep angle of the specimen on the apparatus may cause a large amount of water to runoff these non-pile fabrics,or the lightweight/open struc-ture of these fabrics may allow a large amount of water to completely pass through the specimen;thus the test result may not be a valid measure of a non-terry fabric’s ability to absorb water.
1.3This test method is not applicable to decorative terry fabrics that will not be used to absorb water from surfaces.
1.4This test method is written in SI units.The inch-pound units that are provided are not necessarily exact equivalents of the SI units.Either system of units may be used in this test method.In case of referee decisions the SI units will prevail.
1.5This standard does not purport to address all of the safety concerns,if any,associated with its use.It is the responsibility of the user of this standard to establish appro-priate safety and health practices and determine the applica-bility of regulatory limitations prior to use.
2.Referenced Documents
2.1ASTM Standards:2
D123Terminology Relating to Textiles
D1776Practice for Conditioning and Testing Textiles
D2904Practice for Interlaboratory Testing of a Textile Test Method that Produces Normally Distributed Data
D2906Practice for Statements on Precision and Bias for Textiles3
D3136Terminology Relating to Care Labeling for Apparel,
Textile,Home Furnishing,and Leather Products
D5433Performance Speci?cation for Towel Products for Institutional and Household Use
2.2AATCC Standard:
Test Method135Dimensional Changes in Automatic Home Laundering of Woven and Knit Fabrics4
3.Terminology
3.1De?nitions:
3.1.1absorption,n—a process in which one material(the absorbent)takes in or absorbs another(the absorbate);as the absorption of moisture by?bers.
3.1.2pile,n—in pile fabric,the raised loops or tufts(cut loops)that form all or part of the surface.
3.1.3surface water absorption,n—by a fabric,the process of removing liquid water from a surface such as human skin, dishes,or furniture.
3.1.4terry fabric,n—a material with a woven warp pile or
a knitted pile,with uncut loops on a single side or uncut loops on both sides,and which is used for such products as toweling, beachwear,and bathrobes.
3.1.5For de?nitions of other textile terms used in this test method,refer to Terminologies D123and D3136.
4.Summary of Test Method
4.1A terry fabric product with hems or with both hems and selvages(such as a bath towel),or a terry fabric without hems or without both hems and selvages(such as a terry fabric cut from a roll)is prepared for testing by preconditioning and conditioning.Specimens are placed one at a time in an embroidery hoop and then the hoop/specimen assembly is placed at an angle on the base of the apparatus.After water ?ows down the surface of each specimen,the amount of water retained by each specimen is measured.Six specimens are tested,three on the face of the fabric and three on the back of the fabric.The six observations are averaged to determine the surface water absorption of the fabric.
5.Signi?cance and Use
5.1This test method may be used to test the surface water absorption of terry fabrics for bath towels,bath sheets,hand
1This test method is under the jurisdiction of ASTM Committee D13on Textiles and is the direct responsibility of Subcommittee D13.59on Fabric Test Methods, General
Current edition approved Jan.15,2009.Published February2009.Originally approved https://www.360docs.net/doc/812920320.html,st previous edition approved in2008as D4772–97(2008)′1.
2For referenced ASTM standards,visit the ASTM website,https://www.360docs.net/doc/812920320.html,,or contact ASTM Customer Service at service@https://www.360docs.net/doc/812920320.html,.For Annual Book of ASTM Standards volume information,refer to the standard’s Document Summary page on
the ASTM website
3Withdrawn.The last approved version of this historical standard is referenced on https://www.360docs.net/doc/812920320.html,.
4Available from American Association of Textile Chemists and Colorists (AATCC),P.O.Box12215,Research Triangle Park,NC27709,http:// https://www.360docs.net/doc/812920320.html,.
Copyright?ASTM International,100Barr Harbor Drive,PO Box C700,West Conshohocken,PA19428-2959,United States.
towels,kitchen towels,dishcloths,washcloths,beachwear, bathrobes,and the like.Different speci?cations may be needed for each of these fabrics because of different applications.5 5.2It is recognized that surface water absorption is only one of the characteristics that the ultimate consumer may use in determining which terry fabric is acceptable.Consult Speci?-cation D5433for other characteristics that may be applicable to terry fabrics.
5.3This test method is recommended for quality control testing of terry fabrics during manufacturing and product comparisons of different terry fabrics by manufacturers,retail-ers,and users.
5.4This test method may be used for the acceptance testing of commercial shipments of terry fabrics,but caution is advised since interlaboratory precision is known to be poor. Comparative tests as directed in5.4.1may be advisable.
5.4.1In case of a dispute arising from differences in reported test results when using this test method for acceptance testing of commercial shipments,the purchaser and the sup-plier should conduct comparative tests to determine if there is a statistical bias between their https://www.360docs.net/doc/812920320.html,petent statis-tical assistance is recommended for the investigation of bias. As a minimum,the two parties should take a group of laboratory sampling units(such as towels)that are as homo-geneous as possible and that are from a lot of material of the type in question.The laboratory sampling units should then be randomly assigned in equal numbers to each laboratory for testing.The average results from the two laboratories should be compared using appropriate statistical analysis for unpaired data and an acceptable probability level chosen by the two parties before the testing is begun.If a bias is found,either its cause must be found and corrected or the purchaser and supplier must agree to interpret future test results with consid-eration of the known bias.
6.Apparatus and Materials
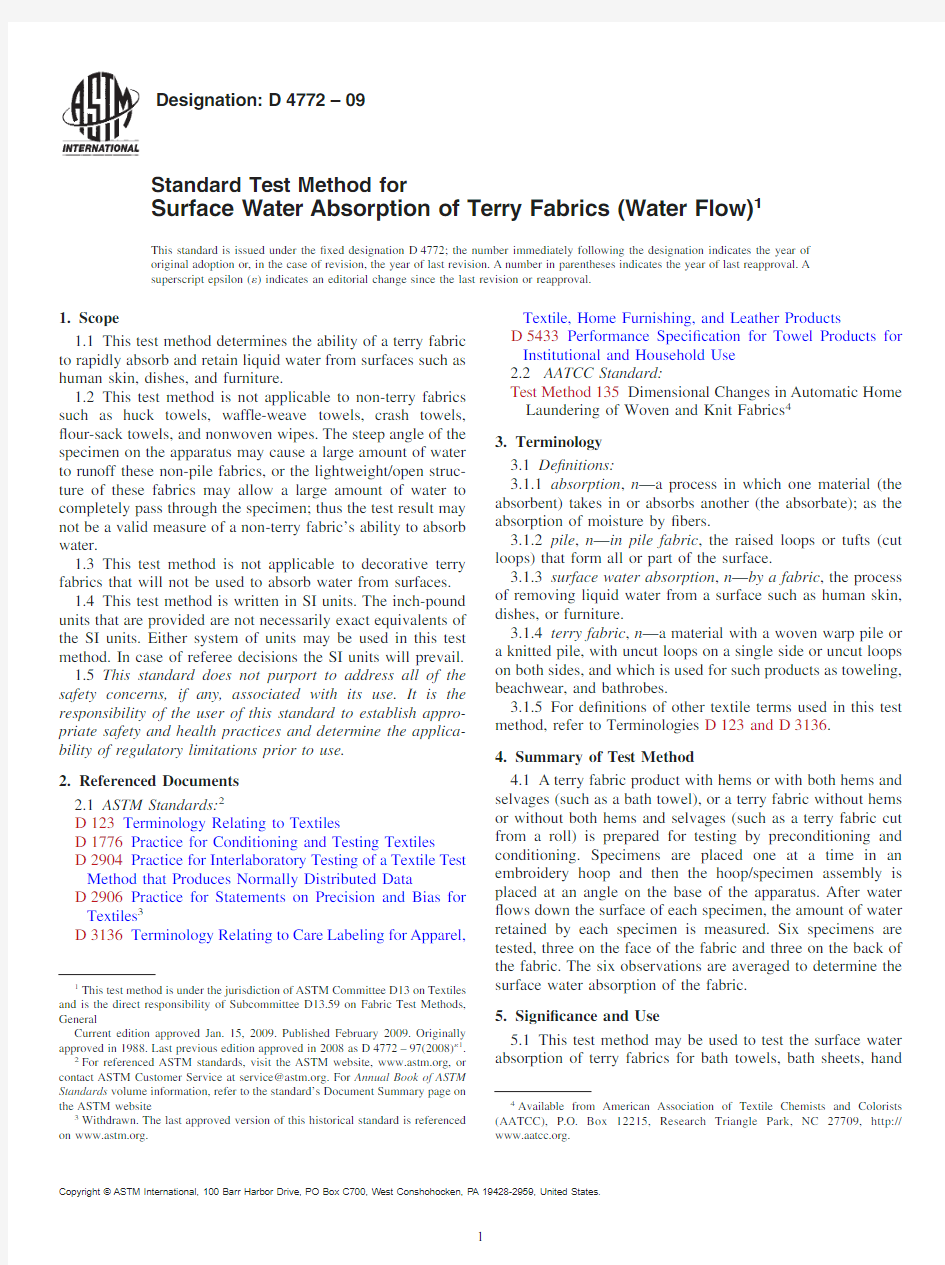
6.1Water Flow Tester—This tester is not commercially available,but it is not difficult or expensive to build.The tester shown in Figs.1-3can be made from the parts and the series of steps described in Annex A1;however,there are other acceptable ways to build the tester.Sections6.1.1-6.1.4indi-cate the critical factors which must be incorporated into the design of the tester.
6.1.1The hoop/specimen assembly must be at1.1rad(60°) to the table top(see Fig.1and Fig.3).
6.1.2The50-mL graduate mounted on the apparatus must be parallel to the table top(see Figs.1and2).The pour spout on this graduate must be3.060.2cm(1.1860.08in.)down from where the adjustment screw bracket joints the outer hoop and0.660.4cm(0.2460.16in.)away from the hoop/ specimen assembly(see Fig.1and Fig.3).
6.1.3The funnel,valve,?ttings,tubing,and graduate mounted on the apparatus(see Fig.2)must not restrict the?ow of water.The time between the opening of the valve and the time the water has exited the graduate(except for a few drops) must be less than8.0s.(The tester shown in Figs.2and3has
a mean of5.7s and a standard deviation of0.5s).
6.1.4The hoop/specimen assembly must be mounted on the base in a manner to direct all water not absorbed by the specimen toward the pan(see Figs.1-3).It is especially important that any water that passes completely through the specimen is directed toward the pan and is not allowed to be absorbed by the lower portion of the specimen,or the edge of the laboratory sampling unit,or held where the hoop contacts the base.
6.2Embroidery Hoop,15.3-cm(6-in.)outer diameter of inner hoop.If the hoop is made of wood,it must have a water-resistant?nish(such as a marine varnish).
6.3Graduate,Polymethylpentene(PMP)50mL.
6.4Distilled or Deionized Water,at2161°C(7062°F).
6.5Laboratory Sampling Unit Conditioning Equipment, facilities such as a multiple shelf/rod conditioning rack(for example see Practice D1776)or a clothesline and clothespins. For more information see9.2.
6.6Tumble Dryer,equivalent to the one described in AATCC Test Method135.
5The relationship between water and textiles is complex.For information on the different forms of interaction between water and textiles see:Zeronian,S.H.“Analysis of the Interaction Between Water and Textiles,”pages117–128in Analytical Methods for a Textile Laboratory,American Association of Textile Chemists and Colorists,third edition,1984,edited by J.W.
Weaver.A=Hoop,
B=Base,
C=Funnel,
D=Valve,
E=Graduate,
F=Pour Spout,
G=Pan,and
H=Adjustment Screw.
FIG.1Schematic Diagram of a Typical Water Flow
Tester
6.7Washing Machine ,equivalent to the one described in AATCC Test Method 135.
6.8Detergent ,heavy duty granule,equivalent to The 1993AATCC Standard Reference Detergent described in AATCC Test Method 135or any detergent agreed upon by the pur-chaser and the supplier that does not include fabric softener or bleach.
7.Sampling
7.1Lot Sample —As a lot sample for acceptance testing,take at random the number of shipping cartons or the number of rolls of fabric directed in an applicable material speci?cation or other agreement between the purchaser and the supplier.Consider shipping cartons or rolls of fabric to be the primary sampling units,see Note 1.
N OTE 1—Any agreement between the purchaser and supplier must take into account the variability between rolls,bolts,or pieces of fabric and between specimens from a swatch of fabric from a roll,bolt,or piece,or between cartons of garments and between garments within a carton,to provide a sampling plan with a meaningful producer’s risk,consumer’s risk,acceptable quality level,and limiting quality level.
7.2Laboratory Sample —As a laboratory sample for accep-tance testing,take the number of laboratory sampling units
speci?ed in the agreement between the purchaser and the supplier.Take the laboratory sampling units as follows:
7.2.1Recommended Laboratory Sampling Unit —Because this is a nondestructive test method,the recommended labora-tory sampling unit is a terry fabric product with hems or with both hems and selvages (such as a bath towel).The fabric should be dyed and ?nished as the consumer would purchase it.A fabric approximately 112(lengthwise direction)by 56cm (44by 22in.)or larger is easier to test than a small fabric as all six observations can be made on one fabric,but the procedure allows for testing a small fabric such as a hand towel (see Note 2).
N OTE 2—A 20.0by 20.0-cm (7.87by 7.87-in.)fabric is the smallest laboratory sampling unit that can be tested on the apparatus.Six of these small laboratory sampling units will be needed to provide the six observations.In choosing the size of the laboratory sampling unit,keep in mind that terry fabric has a high degree of shrinkage during washing and drying.
7.2.2Alternate Laboratory Sampling Unit —As an alterna-tive to the procedure described in 7.2.1,a terry fabric without hems or without both hems and selvages can be used (such as a terry fabric cut from a roll).The fabric should be dyed
and
FIG.2A Typical Water Flow
Tester
FIG.3The Water Flow Tester with the Laboratory Sampling Unit
in
Place
?nished as the consumer would purchase it.A fabric approxi-mately112(lengthwise direction)by56cm(44by22in.)or larger is easier to test than a small fabric as all six observations can be made on one fabric,but the procedure allows for testing
a small fabric(see Note2).
7.3Specimens—After the laboratory sampling unit(s)has been prepared as directed in Section8and conditioned as directed in Section9,take six specimens(the area inside the hoop)by locating the hoop on the laboratory sampling unit(s) as follows:
7.3.1For a laboratory sampling unit(s)that is approximately 112(lengthwise direction)by56cm(44by22in.)or larger, locate the hoop as shown in Fig.4.
7.3.2For a laboratory sampling unit(s)that is not large enough to locate the hoop so that all six specimens are on one laboratory sampling unit,alternate the hoop from face to back using as many laboratory sampling units as needed to obtain the six specimens.
8.Preparation of the Laboratory Sampling Unit
8.1Recommended Preparation of the Laboratory Sampling Unit—The recommended preparation of the laboratory sam-pling unit uses a dryer to precondition the laboratory sampling unit and raise the pile so it is not matted down.See6.6for a description of the dryer.The procedure is as follows:
8.1.1If fabric softener has recently been used in the dryer, dry a3.6-kg(8-lb)dummy load of desized unsoftened fabrics which will not be tested,and then repeat this procedure with a different dummy load of3.6kg(8lb)of desized unsoftened
fabrics.6
8.1.2Clean the lint?lter.
8.1.3Load the dryer with laboratory sampling units that comprise a homogeneous load(for example,same manufac-turer,same line,same?nishing,and same previous care).It is not necessary to have a full load in the dryer,so it is acceptable to load only one laboratory sampling unit into the dryer.
8.1.4Select normal cycle,medium temperature(see Termi-nology D3136,and AATCC Test Method135),and run the dryer for20min.Do not use fabric softener during this procedure.
8.1.5If the laboratory sampling unit(s)was originally damp, keep drying it for10-min cycles until the fabric(s)is dry to the touch.Do not overdry the fabric(s).
8.2Alternate Preparation of the Laboratory Sampling Unit—The alternate preparation of the laboratory sampling unit uses one cycle of washing and drying.This preconditions the laboratory sampling unit,raises the pile so it is not matted down,and removes some chemicals.Other numbers of wash-ing and drying cycles,such as three or?ve,may be used.The purchaser and the supplier,however,must agree on the number of washing and drying cycles.This procedure may cause more variation in the test result than the procedure described in8.1 and it is not recommended for acceptance testing unless there has been an agreement between the purchaser and the supplier. This procedure uses the equipment and the supplies described in6.6-6.8.The procedure is as follows:
8.2.1If fabric softener has recently been used in the washer or dryer,wash or dry or both a3.6-kg(8-lb)dummy load of desized unsoftened fabrics which will not be tested,and then repeat this procedure with a different dummy load of3.6kg(8 lb)of desized unsoftened fabrics.6
8.2.2If the washer has a lint?lter,clean the lint?lter. 8.2.3Load the washer with a3.6-kg(8-lb)load of labora-tory sampling units that comprise a homogeneous load(for example,same manufacturer,same line,same?nishing,and same previous care)or a homogeneous group of laboratory sampling units for testing and a desized unsoftened group of dummy fabrics to make a3.6-kg(8-lb)load.
8.2.4Select normal cycle,warm water temperature,and The 1993AATCC Standard Reference Detergent or equivalent detergent(see Terminology D3136,and AATCC Test Method135).If agreed upon by the purchaser and the supplier, other detergents and conditions are possible.Run one machine cycle and do not use softener.
8.2.5Load the dryer with the washed fabrics.Clean the lint ?lter.Select normal cycle,medium temperature,and run the dryer for20min or until the fabrics are dry to the touch.Do not use softener in the dryer.Do not overdry the fabrics.
9.Conditioning
9.1Both preconditioning and conditioning are required.The dryer in8.1and8.2will precondition the laboratory sampling unit(s).Conditioning of the laboratory sampling unit(s)is described in9.2.
9.2Immediately after taking the laboratory sampling unit(s) out of the dryer,place it in the conditioning room.If the
6Dummy loads of fabrics may be comprised of desized unsoftened non-terry fabrics or terry
fabrics.FIG.4Location of the Hoop for a Large Laboratory Sampling
Unit Such as a Bath
Towel
laboratory sampling unit(s)is to be cut to a smaller size agreed upon by the purchaser and the supplier(optional),the labora-tory sampling unit(s)must be cut before conditioning.Remove lint from the laboratory sampling unit(s)by lightly brushing the surface with a clothes brush.During conditioning,hang the laboratory sampling unit(s)on a line or rod,or lay it?at on a shelf,or place it on a conditioning rack in a conditioning room so that at least one side is fully exposed to the standard atmosphere for testing textiles,which is2161°C(7062°F) and6562%relative humidity.At no time during condition-ing should the laboratory sampling unit(s)be folded or stacked. About halfway through conditioning,turn over the laboratory sampling unit(s)so both sides will have had contact with the conditioned air.Allow the laboratory sampling unit(s)to condition for a minimum of24h and a maximum of48h before testing.The reason for the maximum time is terry fabric is able to pick up excess moisture from humid moving air and thus it can achieve a somewhat damp condition.If the maximum time has been exceeded,the procedure directed in 8.1and Section9must be repeated.
10.Procedure
10.1Test the conditioned laboratory sampling unit(s)in the standard atmosphere for testing textiles,which is2161°C (7062°F)and6562%relative humidity.
10.2Place the apparatus(Figs.1-3)on a?at surface where spilled water will not cause a problem.
10.3With no laboratory sampling unit on the base,pre-wet the graduate attached to the apparatus by using the following procedure.While the valve is in a closed position,pour506 1mL of distilled or deionized water at2161°C(7062°F) in the graduate which is not attached to the apparatus and then pour this water into the funnel.Open the valve and allow the water to run through the apparatus and into the pan.Thor-oughly dry the base,the hoop,and the pan.
10.4Place the hoop on the laboratory sampling unit so that no more than1.0cm(0.39in.)of the laboratory sampling unit extends past the bottom of the hoop(see Figs.3and4).Do not include borders,hems,stitches,or selvages in the area of the specimen(the area inside the hoop).Position the adjustment screw on the hoop so it will later be in an upward position and it will be visible to the operator(see Figs.3and4).In other words,when the hoop/specimen assembly is later placed on the base and the operator looks at the area of the specimen inside the hoop,an imaginary line that represents the lengthwise (warp or wale)direction of the specimen will be parallel to the table top.Position the specimen in relation to the hoop so that the lengthwise direction of the specimen will be parallel to the table top when the test is conducted(see Figs.3and4).Adjust the adjustment screw to securely hold the fabric in place while being neither tight enough to distort the fabric nor loose enough that the fabric sags.Position the outer ring of the hoop so it is not higher than the specimen and thus it does not trap water between it and the specimen.
10.5Mount the hoop/specimen assembly on the base.Ex-cess laboratory sampling unit must be allowed to drape over the sides and the back of the base(see Fig.3).
10.6Position the hoop/specimen assembly(see Figs.1and 3)so that the bottom of the pour spout is0.660.4cm(0.2460.16in.)away from the specimen,3.060.2cm(1.186 0.08in.)down from where the adjustment screw bracket joins the outer hoop,and centered between the sides of the hoop.
10.7Push the pan against the base so all the water will go into the pan.
10.8While the valve is in a closed position,pour5061mL of distilled or deionized water at2161°C(7062°F)into the graduate which is not attached to the apparatus and then pour this water into the funnel.Open the valve and allow the water to run down the surface of the specimen held in the hoop. Collect the water in the pan.Allow2565s to elapse between the time the water stops coming out of the graduate attached to the apparatus and the removal of the pan.Do not tap on or tilt the graduate attached to the apparatus to try to get all the drops of water out.
10.9Pour the runoff water,which is now in the pan,into the 50-mL graduate not attached to the apparatus and record the number of millilitres of runoff water to the nearest1.0mL. Subtract the number of millilitres of runoff water from50and record this value as the observation.Also record the side of the laboratory sampling unit on which this observation was taken. Discard the water now in the graduate not attached to the apparatus.Do not reuse this water.
10.10Remove the laboratory sampling unit from the hoop. Do not allow the tested wet area(s)of the laboratory sampling unit to contact untested dry area(s).Thoroughly dry the hoop, the base,and the pan.If any water has missed the pan and is now on the surface below the apparatus,this observation is not valid and the procedure will have to be repeated on a dry area of the laboratory sampling unit or a new laboratory sampling unit.
10.11Repeat procedures10.4-10.10for all specimens of the laboratory sampling unit(s);three face specimens(side A)and three back specimens(side B)are needed(see Fig.4for the order of testing).Specimens(the area inside the hoop)must be 6.0cm(2.36in.)or more apart to avoid wicking from one specimen to another.If one laboratory sampling unit is not of sufficient size to obtain all six specimens,alternate face and back specimens on as many laboratory sampling units as needed to obtain the six observations.
10.12If testing is interrupted for more than30min,repeat procedure10.3to re-wet the apparatus.
11.Calculation
11.1Calculate the average absorption of side A(face)to the nearest1.0mL by averaging the observations taken on side A of the laboratory sampling unit(s)(see Note3).
N OTE3—If small or multiple laboratory sampling units(such as hand towels)are being tested,it may not be possible to identify a corresponding side A or side B for all of the laboratory sampling units.In that case,do not calculate the absorption of side A and side B.
11.2Calculate the average absorption of side B(back)to the nearest1.0mL by averaging the observations taken on side B (see Note3).
11.3Calculate the overall absorption of the laboratory sampling unit(s)to the nearest1.0mL by averaging all of the observations taken on the laboratory sampling
unit(s).
12.Report
12.1State that the specimens were tested as directed in Test Method D4772.Describe the material or product being sampled and the method of sampling used.
12.2Report the following information:
12.2.1The number of observations from each laboratory sampling unit.
12.2.2The number of laboratory sampling units used to obtain the overall absorption.
12.2.3The size of each laboratory sampling unit.
12.2.4The method of preparation of each laboratory sam-pling unit.
12.2.5The average absorption of side A(face).
12.2.6The average absorption of side B(back).
12.2.7The overall absorption of the laboratory sampling unit(s).
13.Precision and Bias
13.1Summary—The terminology and procedures in Prac-tices D2904and D2906were used to determine the precision and bias of this test method and to write this statement.For this test method,the test result is an average of six observations of the water absorbed by a terry fabric.In comparing two averages from this test method,the difference should not exceed 2.3mL in95cases out of100when all of the observations are taken by the same well-trained operator using the same piece of test equipment and specimens drawn randomly from the same sample of material and tested on the same day.The size of the difference is likely to be affected adversely by different circumstances.The true value of the water absorbed by terry fabric can be de?ned only in terms of a speci?c test method.Within this limitation,the procedure in this test method has no known bias.Sections13.2-13.4explain the basis for this summary and for evaluations made under other conditions.
13.2Interlaboratory Test Data7,8—An interlaboratory test was run in1982in which randomly drawn samples of nine materials were tested in each of?ve laboratories.Each labo-ratory had one operator who tested six specimens of each material.The nine materials were terry towels supplied by three producers.The components of variance expressed as standard deviations were calculated to be the values listed in Table1(see Note4).
N OTE4—The square roots of the components of variance are being reported to express the variability in the appropriate units of measure rather than as the squares of those units of measure.
13.3Critical Differences—For the components of variance listed in Table1,two averages of observed values should be considered signi?cantly different at the95%probability level if the difference equals or exceeds the critical differences listed in Table2(see Note5).
N OTE5—The tabulated values of the critical differences should be considered to be a general statement,particularly with regard to interlabo-ratory precision.Before a meaningful statement can be made about two speci?c laboratories,the amount of statistical bias,if any,between them must be established,with each comparison being based on recent data obtained on specimens from a lot of material of the type being evaluated so as to be as nearly homogeneous as possible,and then randomly assigned in equal numbers to each of the laboratories.
13.4Bias—The procedure in this test method for measuring the water absorbed by terry fabric has no bias because the value of this property can be de?ned only in terms of a test method.
14.Keywords
14.1absorption;surface water absorption;terry fabric;tow-eling;water
7Supporting data have been?led at ASTM International Headquarters and may be obtained by requesting Research Report RR:D13–1083.
8Cary,R.T.,“The Development of ASTM D4772:The Water Flow Test Method”,Journal of Testing and Evaluation,V ol.35,No.5,2007,pp.533–538.TABLE1Components of Variance as Standard Deviations(Units are mL of Water Absorbed by Fabric)
Single-Operator
Component
Interlaboratory
Component Single-material comparisons 2.0 1.4 Multimaterial comparisons 2.0
2.0
ANNEX
(Mandatory Information)
A1.CONSTRUCTION OF THE WATER FLOW TESTER
A1.1Introduction
A1.1.1This annex describes the parts needed to construct the water ?ow tester and the sequence of steps for assembly of the tester.
A1.1.2Most of the parts are standard laboratory equipment.Changes in the assembly of the tester and the substitution of parts may be made so long as the critical factors listed in 6.1of the test method are incorporated into the design of the tester.A1.2Parts of the Water Flow Tester
A1.2.1Two Sets of Embroidery Hoops (one set is a spare),made of wood,plastic,or metal.If the hoops are made of wood,they must be treated with a water-resistant ?nish (see A1.2.21and A1.3.11).The outer diameter of the inner hoop is 15.3cm (6in.).9
A1.2.2Pan ,for catching the water that ?ows off or goes through the specimen (see Fig.A1.1).The size of the pan is not critical,but it must ?t under the 1.1rad (60°)face of the base so all the water not absorbed by the specimen goes into the pan.The size of the aluminum pan shown in Fig.A1.1is 20.3(length)by 20.3(width)by 5.1(height)cm (8by 8by 2in.).10A1.2.3Ring Stand Base ,as shown in Fig.2of the test method,has a 1.3cm (0.5in.)hole for the vertical rod (see A1.2.4).The dimensions of this base are 22.0(length)by 13.3(width)by 1.6(height)cm (8.7by 5.24by 0.63in.).11
A1.2.4Vertical Rod ,as shown in Fig.2of the test method,is 61.0by 1.3cm (24by 0.5in.).11
A1.2.5Two Collars ,each with a 1.3-cm (0.5-in.)inner diameter and a set screw,on the vertical rod provide extra support for the clamp holder (see A1.2.6)and the cast-iron ring with integral clamp (see A1.2.9).12
9
These hoops can be purchased at fabric and discount stores.10This pan can be purchased where baking pans are sold.11
Laboratory supplies can be obtained from a scienti?c company store.12
Plumbing and hardware supplies can be obtained from a large hardware store or plumbing supply.
TABLE 2Critical Differences for the Conditions Noted,95%Probability Level (Units are mL of Water Absorbed by Fabric)A
Number of
Observations in
Each Average
Single-Operator Precision Interlaboratory
Precision
Single-material comparisons
1 5.5 6.83 3.
2 5.06 2.
3 4.59 1.9 4.3Multimaterial comparisons
1 5.57.83 3.
2 6.46 2.
3 6.09
1.9
5.8
A
The critical differences were calculated using z =
1.960.
N OTE 1—There is a gap for water drainage between the hoop and the face of the base.
FIG.A1.1The Base,Hoop,and
Pan
A1.2.6Clamp Holder,to hold the horizontal rod(see A1.2.7)to the vertical rod.11
A1.2.7Horizontal Rod,which holds the combination utility clamp(see A1.2.8)and the graduate(see A1.2.15),is30.5by 1.3cm(12by0.5in.).This length was obtained by cutting a 61-cm(24-in.)rod with a hacksaw.11
A1.2.8Combination Utility and“Burette”Clamp,to hold the graduate to the horizontal rod.The clamp is16.5-cm (6.5-in.)long and has a“?at jaw”with neoprene sleeves.11 A1.2.9Cast-Iron Ring with Integral Clamp,to hold the funnel(see A1.2.10)to the vertical rod(see A1.2.4).The center of the ring is11.0cm(4.3in.)from the center of the clamp.The inside diameter of the ring is11.0cm(4.3in.).11
A1.2.10Funnel(Polypropylene),with a top diameter of 14.0cm(5.5in.),14.6-cm(5.75-in.)length,and a stem inner diameter of0.95cm(3?8in.)at the smallest part of the taper. The only critical dimension of the funnel is the inner diameter of the stem,as the hose connector?tting(see A1.2.11)must have a tight?t.Because the stem is tapered,the stem can be cut with a hacksaw to provide the proper?t.11,12
A1.2.11Two-Hose Connector Fittings,brass or plastic?t-tings to connect the tubing to the funnel and the graduate.On the tubing side of the?tting,the end is for0.64-cm(0.25-in.) inner diameter tubing.On the other side of the?tting is a threaded male connector which is0.95cm(3?8in.).The bore should be large enough to allow a0.36cm(9?64in.)drill bit to pass through the center.12
A1.2.12Tubing,made of clear plastic or rubber with an inner diameter of0.64cm(0.25in.).A length of about30.5cm (12.0in.)is needed.11,12
A1.2.13Four Tubing Clamps,for the tubing described in A1.2.12.11,12
A1.2.14Valve or Stopcock,with two integral tapered hose ends for the tubing described in A1.2.12.The minimum bore is
0.4cm(0.16in.).The bore must be large enough to allow a 0.36-cm(9?64in.)drill bit to pass through the center.11
A1.2.15Two Graduated Cylinders(Polymethylpentene50 mL),with one graduate for the tester and one graduate for measuring the millilitres of water placed in the funnel and the millilitres of water not absorbed by the specimen.11,13
A1.2.16Glue,water resistant.12
A1.2.17Pine Wood for the Base,as shown in Fig.A1.2. This wood is called“6by1,”the actual size of the wood that was used to make the base was61(length)by14.0(width)by 1.9(depth)cm(24by5.5by0.75in.).Because the exact size of wood may vary,some changes may have to be made in the dimensions of the base.See A1.3.7.12
A1.2.18Carriage Bolts,Washers,and Nuts—Three car-riage bolts,which are15.24(length)by0.64(diameter)cm(6.0 by0.25in.)number20,nine washers0.64cm(0.25in.),and nine nuts0.64cm(0.25in.).12
A1.2.19Two Round-Head Brass Wood Screws,which are 1.6(length)cm(5?8in.)number5.These screws support the hoop when it is placed on the face of the base.12
A1.2.20Two Steel Flat-Head Wood Screws,which are3.2 cm(length)(1.25in.)number8.On the base these screws hold the face to the two sides.12
A1.2.21Finish,water resistant,for the wooden base and the wooden hoops if wooden hoops are used.12,14
A1.3Assembly of the Water Flow Tester
A1.3.1As shown in Figs.2and3in the test method,and Fig.A1.3,assemble the ring stand,funnel support,and gradu-ate support using the parts listed in A1.2.3-A1.2.9.The exact location of the clamps will be determined in a later step.
A1.3.2For the graduate which will be attached to the apparatus,locate the hole for the?tting described in A1.2.11. The hole is on the opposite side of the graduate from the pour spout and is4.0cm(1.57in.)from the base of the graduate(see Fig.A1.3).Using a progression of drill bits0.28,0.64,0.79, and0.95cm(7?64,1?4,5?16,3?8in.)and then a rat-tail?le(if needed),make a hole in the graduate for the0.95cm(3?8in.) end of the?tting.This?tting should not be forced in with a wrench,but keep trying to thread the?tting by turning it clockwise with your?ngers.After the?tting will screw into the
13The brand of graduate used on the tester in Fig.2,Fig.3,and Fig.A1.3was Nalgene(Nalgene part number3663-0050).
14The?nish used on the base and hoops shown in the?gures was Clear Super Valspar Gloss Varnish number
10.
FIG.A1.2Close-up of the Back Side of the
Base
graduate,remove the ?tting,clean the parts,and coat the hole in the graduate and the threaded part of the ?tting with the glue.Then rescrew the ?tting into the graduate and allow this assembly to dry.
A1.3.3If the tapered stem of the funnel is too small,cut it with a hacksaw so the 0.95cm (3?8in.)end of the other ?tting threads or slips into the tip of the stem.Coat the threaded part of the ?tting and the inside of the stem with glue and reassemble the ?tting and the funnel.Fill the tapered area between the inside of the stem of the funnel and the ?tting with glue so that water put in the funnel at a later time will not be retained between the stem of the funnel and the ?tting.Allow this assembly to dry.
A1.3.4As shown in Fig.A1.3,place the graduate/?tting assembly in the “burette”clamp.Be sure the pour spout points downward.
A1.3.5Using two tubing clamps and about 9.0cm (3.5in.)of tubing,attach the valve or stopcock to the tubing and then attach the tubing to the ?tting on the graduate.
A1.3.6Attach the other piece of tubing (about 21.6cm or 8.5in.)to the ?tting on the funnel and then place the funnel in the cast iron ring attached to the ring stand.This tubing will be attached to the valve or stopcock in A1.3.16.
A1.3.7With a saw,cut side A,side B,and the face of the base to the dimensions shown in Figs.A1.4and A1.5.If the wood being used is less than 14.0-cm (5.5-in.)wide or the wood is wider and no adequate means of cutting the wood along its length is available,some adjustments will need to be made (draw a full-size drawing similar to Fig.A1.4and then use a protractor,or a 1.1rad (60°)angle drafting tool,or trigonometry,or subtract 14.0from the actual width of the wood in centimetres and add the result to 8.3to get the dimension that replaces 8.3in Fig.A1.4)to obtain the correct dimensions so 1.1rad (60°)is obtained.The critical factors are the face must be at 1.1rad (60°)angle,the face must overhang the sides (see Fig.A1.5)by at least 3.0cm (1.18in.),and the bottom of the hoop must overhang the face (approximately a 0.5cm or 0.2in.air gap must exist between the inside of the hoop and the edge of the face)to allow the water that has passed through the specimen to get to the pan (see Fig.2in the test method,and Fig.A1.1).
A1.3.8Drill the holes for the carriage bolts in sides A and B as shown in Fig.A1.4(see symbol A).
A1.3.9Drill the holes to attach the face to the sides as shown in Fig.A1.5(see symbol B).The holes must be counter sunk so the head of the ?at screw is below the upward plane of the face.
A1.3.10As shown in Fig.A1.5,drill the pilot holes for the round-head wood screws that will retain the hoop at the proper location (see symbol C).Insert the screws so the heads are 0.8cm (0.32in.)above the upper plane of the face.Two of the round-head screws can be seen holding up the hoop in Fig.A1.1
.
FIG.A1.3Close-up of the Graduate Attached to the
Tester
N OTE 1—A =0.79cm (5?16in.)hole for the carriage bolt which is 3.0cm (1.2in.)away from the adjacent sides.
Inch Pound Equivalents
cm in.cm in.10.410 3.93 1.214 5.53.5 1.4187.05.5 2.120
7.8
8.3
3.2
FIG.A1.4Schematic Diagram for Both Sides of the
Base
A1.3.11Apply two coats of a water-resistant ?nish to side A,side B,the face,and all the parts of the hoops if the hoops are made of wood.Allow all of the coated parts to dry.
A1.3.12Insert the three carriage bolts through the holes in side A and then side B.As shown in Fig.A1.2,each bolt uses three sets of washers and nuts to space the sides about 10.5-cm (4.1-in.)apart (measure from the inner dimensions of the wood;the exact distance depends on the exact location of the
holes in the face).Bolts,nuts,and washers must be loose at this point so the two sides can slide on the bolts.
A1.3.13As shown in Fig.A1.2,place the face on the sides so that the top back edge of the face is lined up with the top of the sides (if the wood is not the speci?ed width some adjustments can be made here,the critical factors are the face must overhang the pan and the hoop must overhang the face as described in A1.3.7).This will produce a 3.0-cm (1.2-in.)overhang of the face over the sides (see the overhang line on Fig.A1.5).Push the ?at-head screws through the holes in the face and tap the head of the screws with a hammer to mark the location of the holes on the 1.1rad (60°)sides A and B.This mark must be centered in relation to the 1.9cm depth (0.75)of side A and side B.Drill these marks with a 0.20-cm (5?64-in.)drill bit to obtain the necessary pilot holes.Bolt the face to the sides using the ?at-head wood screws.
A1.3.14Tighten the nuts on the carriage bolts to obtain two sides which are parallel.Check the angle of the face to be sure the face is 1.1rad (60°).Shims can be placed between the face and the sides to make small adjustments in this angle.
A1.3.15As shown in Fig.4in the test method,and Fig.A1.3,place a laboratory sampling unit between the inner and outer hoops and then place the hoop/specimen assembly on the base so the round-head wood screws support the hoop/specimen assembly in the proper location.Slide the base/hoop/specimen assembly near the pour spout on the graduate attached to the apparatus (see Fig.A1.3).Using the clamp holder on the horizontal rod and the combination utility and “burette”clamp,position the pour spout so it is located as shown in Fig.1in the test method.
A1.3.16Slide two tubing clamps on the tubing attached to the funnel.Cut the tubing attached to the funnel to the proper length and attach it to the valve or stopcock.Fasten the tubing to the ?tting on the funnel and the valve or stopcock with the two tubing clamps.
A1.3.17Recheck all the clamps,bolts,and screws to be sure they are tight.
ASTM International takes no position respecting the validity of any patent rights asserted in connection with any item mentioned in this https://www.360docs.net/doc/812920320.html,ers of this standard are expressly advised that determination of the validity of any such patent rights,and the risk of infringement of such rights,are entirely their own responsibility.
This standard is subject to revision at any time by the responsible technical committee and must be reviewed every ?ve years and if not revised,either reapproved or withdrawn.Your comments are invited either for revision of this standard or for additional standards and should be addressed to ASTM International Headquarters.Your comments will receive careful consideration at a meeting of the responsible technical committee,which you may attend.If you feel that your comments have not received a fair hearing you should make your views known to the ASTM Committee on Standards,at the address shown below.
This standard is copyrighted by ASTM International,100Barr Harbor Drive,PO Box C700,West Conshohocken,PA 19428-2959,United States.Individual reprints (single or multiple copies)of this standard may be obtained by contacting ASTM at the above address or at 610-832-9585(phone),610-832-9555(fax),or service@https://www.360docs.net/doc/812920320.html, (e-mail);or through the ASTM website
(https://www.360docs.net/doc/812920320.html,).
A =Distance the face overhangs the sides,\
B =0.44cm (11?64in.)hole,\
C =0.20cm (5?64in.)pilot hole,and\
D =Centerline of face.
Inch Pound Equivalents
cm in.cm in.10.410 3.93 1.214 5.53.5 1.4187.05.5 2.120
7.8
8.3
3.2
FIG.A1.5Schematic Diagram of the Face of the
Base
美标缩水率测试方法0420
美标测试程序 1.取样准备:试样应具有代表性,取样时应避免已变形区。 2.选定合适的缩水板,取样时应避免布边 1/10 之内的样品,每一布 样应选取 3 块试样,试样应含不同的长度方向和宽度方向的纱线。 洗前尺寸准备试样大小为 380*380mm( 15*15inch)。 3.平行于布边或织物长度方向作洗前标记,用记号笔和钢尺在试样 上分别作3对平行于长度或和宽度方向距离为 250mm的洗前标记 点。每一个标记点应离试样边不可少于 50mm,同一方向的标记点间距离不可少于 120mm。 4.选择2:试样大小为610*610mm (24*24inch),两标记点之间长度为 500mm(18inch),在试样上分别作3对平行于长度和宽度方向距离为500mm 的洗前标记点,每一个标记点离布边应至少为 50mm,同一方向的标记点间距离不可少于 240mm。 5.称取试样和搭布总共约为 1.8 ±.1kg(4.0 0±5lbs),选择中水位为 18±15gal,厚重棉织物循环方式,水温41 ± 3C,放置66±).1g AATCC 1993 标准参考洗涤剂。 6.将试样和搭布一起置于洗衣机,根据设定的洗涤程序和时间启动洗衣 机。(将布样放入洗衣机后,经历的自动程序及时间为:进水 4mi ns—打匀 3 mi ns—洗涤 6 mi ns—排水 3 mi ns—脱水 3 mi ns —进
水4 mins—打匀3 mins—排水3 mins—脱水6 mins—结束报警 合计 35mins) 7.打开缩水机,取出试样。如试样缠在一起,请小心地分开,注意 需防止变形。将洗后试样和搭布一起置于烘干机中,设置好温度 以产生规定的排气温度,启动烘干机直至所有样品烘干为止。当烘干机停了以后,立即取出所有样品。 8.将试样自由置于水平平整的台面上,冷却半小时以上。 9.测量并记录两标记点之间的距离,同时精确到mm。将第一次、第 三次数据,每一方向分别平均,分别测出长度和宽度方向的结果 并精确到 0.1%。其缩水率计算如下: 缩水率 = 100* (平均洗后尺寸 - 平均洗前尺寸) / 平均洗前尺寸洗前、洗后尺寸是试样长度或宽度方向的平均值,如果洗后尺寸较洗前尺寸大,则以“ +表”示其缩水率伸长。 9.出具报告分别注明长度和宽度方向的尺寸变化,并精确到 0.1%
小班科学活动教案:会吸水的纸
设计意图: 各种各样的纸是幼儿生活中最常见的,经常接触的物品之一、有几次,我经常看到小班幼儿把几张小纸片放在水里,看着它慢慢浸湿、慢慢沉到水底,并且高兴得拍手欢叫。我就充分利用幼儿喜欢玩纸吸水的兴趣,设计了科学活动《会吸水的纸》,通过幼儿的几次自由自主的操作,在游戏的过程中探索出不同纸的不同的吸水性,并把此经验迁移于生活中,逐渐培养小班幼儿对科学活动的兴趣及探索欲望。 活动目标 1:在操作中探索几种纸的不同特性,并初步探索,发现几种纸不同的吸水性。 2:能大胆说出自己的发现,发展口语表达能力。 3:大胆地参与科学活动,培养探索发现能力, 活动准备 1:每人一个小盆,小盆里有餐巾纸、报纸、挂历纸若干张。 2:每桌一个小方盘,盘里放有红色的颜料水,另准备好的若干份小棒,小棒上贴有3种纸,纸的长度一样。 3:黑板上贴三种纸,五角星若干。 活动过程 一:认识三种纸,并探索其不同特性。 1:你们前面的小盆里有什么呀?有些什么纸呀? 2:请小朋友用手摸摸,发现这些纸有什么不同? 3:师生共同总结:餐巾纸是毛乎乎的,报纸是光滑的,挂历纸是最光滑的。 二:认识纸的吸水特性 1:(出示一方盘红颜色的水)这里有一盘红水,今天这些纸要和红水做个游戏,请小朋友把纸像老师这样一头捏在手中,一头浸在水中,仔细看看,水会怎样?纸有什么变化?等一会儿来告诉大家。 2:集中幼儿提问 a:刚才你发现了什么?
b:水怎么会到纸的上面的? 引导幼儿总结出:纸有吸水的本领。 三:探索三种纸的不同吸水性 1:餐巾纸、报纸、挂历纸的吸水本领是不是一样大呢?我们来举行个吸水比赛。 2:引导幼儿探索比赛方法:把小棒上的三张纸同时放在红水里,观察哪张纸吸红水吸得快?3:幼儿操作,引导幼儿仔细观察纸上颜色不断上升的变化状态。 4:组织幼儿交流 谁得吸水本领最大,是第一名?谁是第二名?谁是最后一名。 5:师生共同总结:餐巾纸吸水最快,报纸吸水慢,挂历吸水最慢,并把黑板上的三种纸标3星、2星、1星,以示第一、第二、第三。
高吸水性树脂的制备性能测试及其应用研究
高吸水性树脂用做水晶泥的研究 高吸水性树脂用做水晶泥的研究 刘力、罗威 摘要:以环己烷为连续相,Span-60为悬浮稳定剂,过硫酸铵为引发剂,N,N'- 亚甲基双丙烯胺为交联剂,对反相悬浮聚合制备聚丙烯酸钠高吸水性树脂进行研究。结果表明,影响合成树脂吸水率的主要因素是交联剂质量分数,当交联剂质 量分数为0.015%时,合成树脂的吸水率出现极大值,而且当反应温度控制在75℃,引发剂质量分数为18%时所得树脂的吸水率可达500g/g。对合成树脂吸水、保水性能的进一步测试发现,树脂的初始阶段吸水速率较快,随着吸水时间的延长逐步下降,当树脂吸水饱和后水分损失很慢,在120℃下100min仅损失17.2%。 关键词:高吸水性树脂,聚丙烯酸钠,Span-60,吐温-40,交联剂,分散剂,引发剂。 一、背景介绍 高吸水性树脂( super absorbent polymer, SAP),自上世纪70年代开 发成功以来,已经得到了深入的研究和广泛的应用。在美国等发达国 家,高吸水性树脂的历史已有近40年,而在我国,它仅有10余年 的发展史,对国内市场来说是一种新产品,虽然国内有许多单位已研 究开发出产品并建立了生产装置,但是国产超强吸水剂产品尚未形成 规模生产,其原因是由于生产技术落后而导致产品生产成本较高,产 品性能没有及时改进而且产品的应用研究较少。 高吸水性树脂是一种轻度交联结构的高分子, 其分子链上具有很多 亲水基团,如羟基、羧基、酰胺基、磺酸基等, 故吸水能力很强, 能
吸收自身重量的几百倍甚至几千倍的水, 并且加压不淌出。由于高吸水性树脂与常见的1 高吸水性树脂用做水晶泥的研究 吸水性材料如纸, 布等相比, 具有很多优点, 是一种新型的功能性高分子材料, 因而它被广泛应用于工业、农林业、医疗卫生和日常生活中。高吸水性聚丙烯酸钠含有- COONa 基团, 其亲水性要比含-OH、- COOH、- CONH 2等亲水基团的高分子要强, 其吸水性能优良, 且是高安全性化合物,并具有一定的生物降解性。因此,高吸水性树脂的研究与应用就显得十分重要。本文主要综述作者经过实验室研究改进的聚丙烯酸钠高吸水性树脂的制备方法,并通过实验对其吸水性能进行测定, 对其吸水机理以及其功能与应用方面进行试探性研究。二、实验意义 高吸水性树脂在当今各个领域发挥着它不可替代的作用,我们在实验室中以丙烯酸和丙烯酸铵作为单体,以过硫酸钾为引发剂,以N-N'亚甲基双丙烯酰胺作为交联剂制备高吸水性树脂,对其性能进行了测试,并考虑各种影响因素,对制备方案进行了改进,使产品吸水率、凝胶强度和吸水速度、抗盐性等性能得到提高,以利于其产物的美观和实用性。同时我们将产物应用于不同的领域,结果发现其功能很好。我们实验的目的就是要将产物的性能达到最优化,同时,能将其吸水的特性广泛而普遍的应用于各个领域。 三、高吸水性树脂的制备 (一)、主要原材料及仪器、用品:
高吸水性树脂在日用化学工业中的应用
高吸水性树脂在日用化学工业中的应用 作者:齐葳芊 摘要:高吸水性树脂是一种新型的高分子材料,这种材料有很强的吸水性和保水性,它的吸水能力是可以达到自身重量的百倍以上的,而且是一种无毒无害无污染的材料。以前人们在使用高吸水性树脂的时候主要是在医疗用品和儿童的玩具上,但是随着科学技术手段的不断发展,这种高分子材料在使用的时候范围更加的广阔,已经不断应用到了日用化学工业中,例如日用化妆品的生产、除臭剂的生产和留香材料的生产。在日用化工中应用高吸水性树脂是非常有前景的,在应用的过程中要不断进行分析,使其发挥最佳的效果。 关键词:高吸水性树脂;日用化学工业;分析 高吸水性树脂因为自身的特点,它的发展速度是非常快的,而且在种类上也是非常多的,而且在原料商也是非常丰富的。科学技术的不断进步,人们对高吸水性树脂的研究也在不断的深入,这样就使得这种材料在很多的领域都得到了应用,其中在日用化学工业中的应用就是很有成果的。在日用化学工业中,应用这种材料主要是因为这种材料在吸水性方面是非常的突出,而且这种材料是无害的,在生产和使用中不会对人体带来影响。日用化学工业中,这种材料主要进行日用化妆品的生产、医疗用品的生产、杀菌剂的生产和儿童玩具的生产。在日用化学工业中,应用这种材料也是要进行一定的研究的,在进行生产的时候对出现的问题要及时进行解决,避免出现不必要的问题。 1 高吸水性树脂在日用化学工业中应用特点 在日用化学工业中应用高吸水性树脂进行生产可以达到不一样的效果,在进行化妆品的生产时,应用这种材料可以使化妆品在使用的时候感觉更加的湿润,而且在使用的时候可以更加的凉快。在进行化妆品生产的时候,经常会使用到水溶性凝胶,这种材料在空气中非常容易受到空气干燥环境的影响,出现无润滑性的凝胶。而在进行化妆品的生产时,使用高吸水性树脂就不会出现这种情况,而且在生产出来的产品中,它还可以起到油性物质的作用。高吸水性树脂在应用的过程中和其他的物质在相容方面是非常好的,这样的效果可以对化妆品的增稠效果进行提高。在应用高吸水性树脂进行医用水溶性润滑剂生产的时候,这种材料可以代替油性润滑脂,在使用的时候,避免出现油脂的污垢,影响使用效果。使用高吸水性树脂进行生产,生产出来的产品在储藏的时候,安全性更高,而且不容易出现变质的情况。 2 高吸水性树脂在日用化学工业上的应用 2.1 在化妆品生产中的应用 在化妆品生产中,高吸水性树脂可以作为化妆品的添加剂来进行应用。在制造化妆品的时候,一定要加入一些添加剂,使得化妆品的效果更好,同时对皮肤起到保湿的效果。在进行花露水的生产时,一定要加入人工香料,同时还要加入酒精溶液,这样是为了更好的使花露水达到清凉消毒的作用。但是在花露水生产
纸张吸水性测定指导书
1目的:为使厂内纸张吸水性检验时有所依据。 2范围:厂内使用的卡纸、铜版纸、(原纸)皆适用。 3职责: 3.1品保人员:测试 3.2设备部:保养、维修。 4定义:无 5内容: 5.1取样:将要测试的纸张使用可勃专用取样器切成直径为125mm的圆形试片。 5.2用分辨率不低于0.001g的天平称量试样质量g1. 5.3反时针方向旋松锁紧旋钮,取开杯盖,向杯内倒入100ml±5ml温度为20°c 的蒸馏水或去离子水。 5.4将试样置于杯口井盖上杯盖,顺时针方向旋紧锁紧旋钮压紧杯盖,左手提起 滚花提帽,右手摇动手柄,使杯口向下并放下滚花提帽定位锁,同时启动秒表 开始计时。 5.5根据选定时实验时间,在下表推荐的移去剩余水的时间内,提起滚花提帽, 将杯口转至向上并锁定,迅速旋松锁紧旋钮松开杯盖,取下试样,将试样与 水接粗的一面向上,放在仪器底板预先准备好的吸水滤纸上,然后再盖上另 一张吸水滤纸,并用压辊向前和向后各压一次。将试样与水接触的一面向内 折叠并迅速称量吸水后的试样质量g2. 5.6根据两次称量的试样质量之差计算可勃吸水值: C=(g2-g1)*100(g/㎡)其中: C—可勃值即cobb值; G1—样品吸水前质量; G2—样品吸水后质量;
5.7擦净杯口边缘和杯盖胶垫表面的水,以水位螺钉面为参考补足杯内水量,按 上述步骤进行下一次试样。 5.8注意事项: 5.8.1每组试样完毕后,应更换新水。实验用水规定使用蒸馏水或去离子水。 5.8.2吸水滤纸定量规定为200-250g/㎡。 5.8.3根据试验标准方法GB1540第4.3.1条规定:“当吸水滤纸单层定量小 于200-250g/㎡时,可用多层叠加满足要求。 5.8.4测试瓦楞纸板时,压辊碾压过程中,压辊轴线应与瓦楞方向平行。 5.8.5使用压辊碾压时,不得向压辊施加垂直方向的外力。 5.8.6每张试片只能测试一次,不得重复使用。 5.9维护保养: 5.9.1保养仪器日常清洁、干燥。 5.9.2使用中应防止仪器与压辊表面碰撞损伤。 5.9.3各转动或滑动部位应不定期加润滑油。 5.9.4严防碰伤杯口及杯盖平面,以免影响密封。 5.9.5杯体内保持清洁,实验完毕后应将水倒尽擦干,以防锈蚀。 6相关之参考文件:产品《用户手册》 7表单记录:无
高吸水树脂的用途
第1节医药卫生用品方面的应用 由于高吸水性树脂无毒、无刺激和高度生物相容的特性,在医疗卫生用品领域得到了最为广泛的应用。人们利用高吸水性树脂作为吸收材料吸收尿液、血液、药物,制作如卫生巾、尿布、餐巾纸、失禁垫片、医用药棉等。 高吸水性树脂的超强吸水能力和保水能力使得生理卫生方面的产品大大轻薄化、小型化、舒适化,消除了人们很多苦恼。经过最近20年来的高速发展,高吸水性树脂在全球范围实际产量已达年产100万吨以上,其中80%~90%左右用于卫生领域。在美国、日本、欧洲等发达国家和地区用高吸水性树脂作卫生材料已经普及,成为日常生活的一种基本材料。用于卫生材料的高吸水性树脂要求吸水速度快,吸水量大,吸水后形成的凝胶有一定强度,加压保水性好、尽可能高的生理盐水的吸液倍率,并且吸水树脂吸水后表面干爽性好。水溶液聚合法经粉碎得到的高吸水性树脂一般粒径在100μm—1000μm之间,粗细粉末混杂在一起,在吸水时,细的颗粒由于表面积更大,吸水速度快,优先膨胀形成凝胶,这些凝胶包裹在粒径较大的树脂颗粒周围,形成“生面团”,阻止水快速向大粒径颗粒内部渗透,既影响了吸水速度,也降低了吸水后颗粒的干爽性。这种粉碎所得的“初产品”基本不具备满意的使用价值。虽然有文献表明改变交联剂可以增加树脂的吸水速率,但这种方法对卫生材料用的树脂增加的吸水速率是不明显的。国内外的研究表明,通过引入表面处理的工艺,对吸水树脂颗粒的表面进行第二次交联,形成外部交联度高,内部交联度低的“核壳”结构,可以极大地改善吸水后颗粒的干爽性、保水性。在增加的这种后处理过程中使用亲水性的小分子物质,同时加快了水在颗粒间和颗粒内的传导速度,使吸水速度提高很多。虽然这种后处理对粒子表面交联形成“核壳”结构,限制了树脂颗粒自由膨胀能力,但能够使树脂在压力下吸收能力提高而得到补偿。 近年来在缓控释药物中作为药物的骨架载体的合成类亲水性高分子有相当一部分属于高吸水性树脂。在该领域享有盛名的美国古立德公司(Goodrich Corp)的系列交联丙烯酸聚合物carbopol就是缓控释骨架材料的典范。聚丙烯酸类的高吸水性树脂有良好的生物相容性、生物粘附性,发达国家近十几年来采用这类材料制备的靶向给药系统(targeting drugsystem.TDS or Targeted Drug
ASTMD无纺布吸水速率测试方法
无纺布吸水速率和容水能力的测试标准 ——ASTM D6651-01 1、范围 1.1包括织物面料的吸收速率测试 1.2包括所有用作除尘抹布材料 1.3测试的单位用英寸 2、相关文件 ASTM标准: D123 关于织物的相关术语 3、术语 3.1定义 3.1.1 外在吸收速率:n——在特定条件下,每单位面积的织物吸收的液体速率。 3.1.1.1 外在吸收能力是指单位面积吸收液体的体积,内在吸收能力是用于描述单位质量 吸收液体的体积。 3.1.2 内在吸收速率:n——在特定条件下,每单位质量的织物吸收的液体速率。 3.1.3 吸收:n——液体分子通过吸收或吸附、或两者同时作用在织物中转移的速率。 3.1.4 吸收能力:在特定条件下,织物的吸收或吸附液体的最大量。 3.1.5 抹布:织物样品用于保持室内清洁、尘埃和污渍的去处。 4、测试方法概括 4.1一堆已知质量和半径的抹布材料方形物,在表面上热稳定性控制液体的容器。要求 被湿。吸收速率通过抹布计算处理。 5、重点和应用 无译 6、试剂与仪器 6.1 天平,灵敏度至少0.01g。 6.2 水槽,热稳定控制在25±1℃,面积至少400mm×300mm,湿抹布样品能放下,深 度必须达到液体表面25mm。 6.3 液体通常用水,除非特殊使用才用其它溶剂。 6.4 测试尺子为金属材料,刻度为1mm。 6.5 秒表,数显电子,刻度0.01s。 6.6 压力裁断刀,同等于 7.3中测试样品大小。 6.7 用刀 7、测试样品和制样 7.1 主要样品单位——考虑卷的、螺旋的预包封的织物是主要样品单位。 7.2 实验室样品材料——如果样品长度或宽度不够,用完整的尺寸来做成样品。 7.3 测试样品的尺寸——将样品材料做成正方形或长方形的布料样条,样条面积至少 25600mm2,小于64500 mm2,也就是小于160mm宽,250mm长。 7.3.1 无论如何,样品长宽比不能大于2:1. 注:超出大小范围限制后,会得到错误的结果。 7.4 测试样品堆的数量,是多个的。至少要准备两个样品,一个样品需要10织物层,或 这两个样品更少用5层,更多用15层。这是为了以便确定在吸收速率上每一个织物层的独立性。 7.4.1 预包覆抹布样品规格为229mm×229mm,在这种情况下,使用整个织物做为样品。
毛巾的标准知识
毛巾的标准知识 特邀嘉宾:纤维检验工程师葛琼 热心读者杜一非 丽华苑小区住户薛阿姨 主持人:毛巾是我们日常生活中不可缺少的用品。也许是太过平常的缘故,人们一般对毛巾的挑选、使用、放置等方面都显得过于随意。殊不知,一块小小的毛巾中还藏着不少学问,如不加以注意,不仅会降低生活质量,甚至会影响到您的身体健康。今天就为大家介绍一些毛巾的相关标准知识,帮助大家科学地选购和使用毛巾。 知识点 ◆毛巾的相关标准: 《毛巾》GB/T 22864-2009 《抗菌毛巾》FZ/T 62015-2009 《国家纺织产品基本安全技术规范》GB 18401-2003 ◆名词解释: 毛巾:以纺织纤维为原料,表面起毛圈或毛圈经割绒的织物,用于日常生活洗擦、保暖、装饰等用途(如方巾、面巾、浴巾、毛巾被等)。 割绒毛巾:表面毛圈经割绒处理的毛巾。
抗菌毛巾:具有抑制细菌在其表面生长、繁殖和使细菌失活的功能的毛巾。 ◆毛巾的质量要求: (1)毛巾产品质量分为优等品、一等品和合格品。 (2)毛巾产品质量包括内在质量和外观质量要求。 ①毛巾产品的内在质量包括重量偏差率、断裂强力、吸水性、脱毛率、纤维含量偏差和色牢度。 ②毛巾产品外观质量包括规格尺寸偏差率、疵点、缝制质量和整烫质量。 ◆毛巾疵点的详细规定: (1)线状疵点:粗细程度为一根纱线及以内,长度不小于1 cm的织疵。每3 cm及以内为一处,超过3 cm的累计计算,一处疵点长度不得超过6 cm。 (2)条状疵点:粗细程度为两根纱线及以内,长度不小于0.5 cm的织疵。每1.5 cm及以内为一处,超过1.5 cm的累计计算,一处疵点长度不得超过4.5 cm。 (3)块状疵点:脱毛露底、梯形毛。 (4)散步性疵点:疵点包括平布反毛、反提毛环、割绒不净、螺旋不旋、毛环不齐等。 (5)印染疵点:疵点包括刷花、拖版、色萎、渗色、错色、套版不准、掉版、印反、花位不正、搭色等。 (6)破损性疵点为经纬共计断3根纱及以上。
面料美标四分制检验标准
面料美标<四分制>检验标准 布匹的检验方法常见的是"四分制评分法"。在这个"四分制评分法"中,对于任何单一疵点的最高评分为四分。无论布匹存在多少疵点,对其进行的每直线码数(Linear yard)疵点评分都不得超过四分。 对于经纬和其他方向的疵点将按以下标准评定疵点分数: 一分: 疵点长度为3寸或低于3 寸 两分: 疵点长度大于3寸小于6 寸 三分: 疵点长度大于6寸小于9 寸 四分: 疵点长度大于9寸 对于严重的疵点,每码疵点将被评为四分。例如: 无论直径大小,所有的洞眼都将被评为四分。对于连续出现的疵点,如: 横档、边至边色差、窄封或不规则布宽、折痕、染色不均匀等的布匹,每码疵点应被评为四分。 每码疵点的评分不得超过四分。 美国四分制标准 美国四分制标准是出口坯布或者印染布的外观质量的检验标准,具体规定如下:
一、织物疵点评分标准: 织物疵点按“四分制”(FOUR POINT SYSIEM)评分 1、评分方法 疵点在3寸或以下评一分 疵点超过3英寸而到6英寸评二分 疵点超过6英寸到9英寸评三分 疵点超过9英寸评四分 2、连续性疵点,每1码计四分: 3、较大的疵点(有破洞等)不计大小,每1码计四分; 4、横档、中边色、不对色、幅不足、幅不同、有皱、整理不良等,连续发生时,每1码计四分。 二、以平方码为单位的计算方法 1、每匹布:(常用) 总评分数×36×100 评分 = 码数×有效幅度(寸)100平方码 2、每单货:(整批布) 每码总分数×36×100 评分 = 总码数×有效幅度100平方码 三、验收标准(以100平方码为基准)适用欧洲、美国、日本等国家。 每匹布 1组15分/100平方码 2组20分/100平方码 3组25分/100平方码 4组40分/100平方码 5组60分/100平方码 现通用标准是选用2组、3组、4-5组不用 四、全面疵点的评分标准 ☆连续性疵点 1、连续有规律性疵点,1码计四分 2、连续性3码以上,作不合格品对待。 ☆整幅疵点 3、合格品内不允许有以下疵点存在: A.长度超过6英寸全幅疵点。 B.较细小的全幅疵点,100码内超过5处。 C.以100码为单位,每10码中严重疵点平均2处以上。 D.布头、布尾3码内有严重疵点或整幅疵点的。 E.在平放裁床时,有边绉、预缩皱、波浪皱、折皱、皱条等疵布。 ☆幅宽 4、每匹布最少测三次。
材料的吸水性与沉浮
材料的吸水性与沉浮 教材分析: 材料的吸水性与沉浮本来是安排在两个课时,我将教材进行了整合,本节课先研究材料的吸水性与沉浮这两个重点知识,并了解纸和木头的特性,将它们进行对比研究,从对比中掌握知识的联系。下节课再研究造纸过程,自己动手造纸、自然资源的再利用与保护。教学目标: 知识与技能:认识吸水性与沉浮能力是材料的重要的物理性质。(物理性质可以用来描述材料;物体的吸水性与在水中的沉浮与构成的材料有关) 过程与方法:能用简单的方法检测材料的物理性质,并通过观察、比较发现材料不同物理特性。 能用适当的词语定性描述材料。 情感态度价值观:培养学生对物质世界的探究兴趣。 教学重、难点: 认识吸水性与沉浮能力是材料的重要的物理性质 教学准备: 为每组准备水槽、水、放大镜、滴管、红墨水、塑料、金属、纸、木头(各三种,一种片状,另两种大小、形状不同的实心物品);课件 教学过程: 一、材料的吸水性 1、创设情境(音乐:啦啦歌) 师:各位观众朋友大家好,这里是材料大PK的现场,欢迎来到由萸江学校冠名播出的“材料大PK”,我是主持人王玲。掌声有请今天的参赛选手闪亮登场,让我们一起喊出它们的名字好吗——(生:纸、塑料、木头、金属)。到底谁能成为今天“材料大PK”的冠军呢,让我们拭目以待。 2、演示实验 下面让我们进入第一轮PK ,PK的内容是,一起说——材料的吸水性。比赛规则:谁的吸水性最强,谁就获胜。 师:请大家仔细观察水滴的变化和材料遇水的变化,你会有怎样的发现。 师:你发现了什么? 生:纸的吸水性最强。(评价:你的表述很科学、很精准,第一颗智慧星送给你。)师:谁还有不同的发现? 木头也可以吸水(在科学上叫渗透,与纸相比,它的吸水性稍弱),金属和塑料不吸水。(评价:你们都有一双会发现的眼睛) 师:我们一起来完成表格。(师板书:吸水性、强、弱、无、无)
高吸水性树脂在卫生用品上的应用_倪靖滨
收稿日期:2008-12-24 作者简介:倪靖滨(1968-),男,高级工程师,主要从事辐射加工研发 工作。 文章编号:1002-1124(2009)04-0046-03 高吸水性树脂又称高分子吸水材料(SAP ),是 一种含有羧基、羟基等强亲水性基团,并具有一定交联度网络结构的高分子聚合物[1],是一类新型的功能高分子材料。它具有吸水量大和保水性强两大特点,它可以吸收比自身重量高几百到几千倍的水,而且所吸入的水在适当的压力下也不会被挤出。这是传统的吸水材料如纸、海绵、泡沫塑料等所无法比拟的。SAP 的研究与开发只有几十年的历史。目前,在国内主要还是用于卫生巾和纸尿布。 随着经济的发展和人民生活水平的不断提高,对SAP 的需求量大大增加。2000年,中国卫生巾消费量将达310亿片,其中超薄型卫生巾占卫生巾总量的30%,每条超薄型卫生巾用量按1g 计,需要1万t SAP 。中国每年出生婴儿2000万人,有30%的婴儿使用布及片,每人一年用300片,每片用6g SAP ,则需要1万t SAP 。60岁以上老人1.2亿,加上失禁病人,所需成人垫片数量不断增加,至少需要600t SAP 。我国农作物种子年需求量700万t ,其中商品种子350万t ,生产种子包衣的企业约60家,种衣剂年产量达1万多吨,其中需要SAP 1500t ,水稻旱育秧苗需500~1000t 。我国人多地大,又是一个缺水国家,今后加大西部开发,对SAP 的需 求量将会迅速增加。 在SAP 性能方面,由于SAP 是一种高分子电解质,吸液率受离子强度影响较大,普遍存在耐盐性能差,通常只有吸纯水的10%甚至更低,而且随盐溶液浓度增加吸液率显著降低,在实际应用中S A P 接触的几乎都是离子溶液,提高SAP 耐盐能力是急需解决的问题;吸水倍率和吸水速度是SAP 的主要性能指标,离子型SAP 吸水倍率高,但吸水速度慢,而非离子型SAP 则正相反。二者性能均优的SAP 也是目前研究的方向;另外,SAP 吸水时颗粒间渗透性差、易形成内干外湿的“面粉团”而影响使用。因此,综合性能好的SAP 成为研究人员的主要研究内容。 1SAP 的种类 SAP 可以根据各种各样基准进行分类[2]。从原料方面大致可分为淀粉、纤维素、合成聚合物等;从离子种类可分为阴离子(聚丙烯酸、聚磺酸盐、丙烯酸的接枝、丙烯酸共聚合等)、阳离子(季铵盐等)、两性、非离子(聚乙烯醇、聚丙酰胺、聚氧乙烯等)4个类型;从交联方法上可分为交联共聚、自交联、辐射交联、水溶性聚合物交联或引入疏水性基团或结晶结构等;从产品形态上可分为:粉末状、球形、无定形、膜状、纤维状等。 现在市售的SAP 大都属于阴离子和非离子型, 高吸水性树脂在卫生用品上的应用 倪靖滨1,李红2,张晓东1,高德玉1 (1.黑龙江省科学院技术物理研究所,黑龙江哈尔滨150086;2.黑龙江大学化学化工与材料学院,黑龙江哈尔滨150080) 摘要:本文综述了高吸水性树脂在卫生用品方面的应用,分类,合成方法、国内外发展现状,最新发展 动向以及应用前景。 关键词:高吸水性树脂;卫生用品;儿童尿布;卫生巾中图分类号:TQ320.79 文献标识码:A Superabsorbent polymer for sanitary application NI Jing-bin 1,LI Hong 2,ZHANG Xiao-dong 1,GAO De-yu 1 (1.Technical Physics Institute of Heilongjiang Academy of Sciences,Harbin 150086,China; 2.College of Chemistry and Chemical Engineering Material , Heilongjiang University,Harbin 150080,China)Abstract:This article reviewed the application of superabsorbent polymer in sanitary field.The classifica -tion,preparation method,the present statues and future development of SAP in the world were introduced. Key words :superabsorbent pelymer;sanitary;diaper;sanitary towel Sum 163No.04 化学工程师 Chemical Engineer 2009年第4期 DOI:10.16247/https://www.360docs.net/doc/812920320.html,ki.23-1171/tq.2009.04.009
吸水机理
高吸水树脂的特点是含有羧基、羟基等强亲水 性基团, 具有三维空间网络结构,不溶于水和 有机溶剂,能吸收自重几百倍乃至上千倍的 水,吸水膨胀后所生成的凝胶具有良好的保水 性和耐候性。 2.吸水机理 高吸水树脂对水的吸附可分为物理吸附和化学吸附。所谓物理吸附是指通过毛细管来吸附水份,因而吸水能力有限,水在一定的压力下会很快逸出;化学吸附是指树脂中的亲水性基团通过化学键将水牢牢地吸附,吸附能力很强,水份在较高的压力下也难逸出。高吸水树脂内所吸附的水份可分成结合水、束缚水和自由水。结合水以很强的化学键与聚合物离子相结合,测不出熔点,所以又称不冻水;自由水含量最多,约占98%。 3.吸水过程 (见结构图讲解)吸附水份时,高吸水树脂表面的亲水性基团首先与水分子进行水合作用,形成氢键,这部分水是结合水。由于Na+在水中为可移动离子,而羧基负离子与树脂分子链相连,不能自由向水中扩散,所以高吸水树脂网络骨架上均为带负电荷的羧基离子。羧基离子间由于同性电荷之间产生排斥力,这是使树脂网络结构扩张的动力。在排斥力的作用下,高分子网束随之扩展,亲水性离子基团水解,产生可移动的Na+ 离子。Na+ 虽然具备一定的活动性,但由于受网络骨架上相反电荷的吸引、束缚,使得Na+ 只能存在于树脂空间网络中。因此,树脂网络内部的Na+ 浓度大于外部Na+浓度,使得树脂网络内外产生渗透压。在渗透压的作用下,水分子向树脂网络内渗透,进入网络。渗透进入网络的是自由水,与网络内部亲水性基团作用,形成氢键,进一步导致离子基团水解和渗透压差产生,水份就源源不断地进入了网络。因此高吸水性树脂吸水过程包含三个部分:氢键形成、水解、渗透压差引起的 扩散。
高吸水性树脂的制备和应用
苏州大学本科生毕业设计(论文) 高吸水性树脂的制备和应用 目录 中文摘要 (1) ABSTRACT (1) 第一章前言 (2) 1.1 高吸水性树脂简介 (2) 1.2 高吸水性树脂分类 (3) 1.3 高吸水性树脂主要的聚合方法 (3) 第二章实验部分 (4) 2.1 实验试剂及仪器 (4) 2.2 主要实验 (4) 第三章结果与讨论 (4) 3.1 反应温度对反应时间的影响 (5) 3.2 引发剂用量对高吸水性树脂吸水倍率的影响 (5) 3.3 交联剂用量对高吸水性树脂吸水率的影响 (6) 3.4 丙烯酸和丙烯酰胺的单体比例对高吸水性树脂吸水率的影响 (7) 3.5 丙烯酸中和程度对高吸水性树脂吸水率的影响 (7) 3.6 反应温度对高吸水性树脂吸水率的影响 (8) 3.7 是否通氮气保护对反应的影响 (8) 3.8 结构表征 (8) 第四章高吸水性树脂的应用和发展方向 (9) 4.1高吸水性树脂的特殊而又广泛的应用领域 (9) 4.2高吸水性树脂未来的发展方向 (10) 第六章结论 (11) 参考文献 (12) 致谢 (13)
中文摘要 采用水溶液聚合法,以N,N 一亚甲基双丙烯酰胺(NMBA)为交联剂,过硫酸钾(KPS)或过硫酸铵(APS)为引发剂合成了高吸水性树脂聚(丙烯酸一丙烯酰胺)(P(AA—AM)),研究了单体配比、丙烯酸中和度、引发剂及交联剂用量、反应温度对树脂在去离子水和0.9%盐水和自来水中吸水率的影响.最佳条件下制备的树脂在去离子水中吸水率为1200 。 关键词:水溶液聚合丙烯酸丙烯酰胺合成吸水率 ABSTRACT By solution polymerization ,using N,N一methylenebisacrylamide (NMBA ) as crosslinking agent,Potassium persulfate (KPS) , Ammonium persulfate(APS) as an initiator Synthesis of superabsorbent poly (acrylic acid a acrylamide)(P(AA-AM)), study the monomer ratio, and the degree of acrylic acid, initiator and crosslinker, the reaction temperature on the resin in deionized water and 0.9% saline and tap water in the water absorption. Resins prepared under optimal conditions in deionized water absorption is 1200. Keywords: Solution polymerization Acrylic acid Acrylamide Synthesis Water absorption
高吸水性树脂的制备与应用研究
高吸水性树 脂的制备与应用研究 高材1203 庞进20120221172 摘要:本文介绍了淀粉类、纤维素类、共聚合类、复合类以及可生物降解类高吸水性树脂及其发展、结构以及吸水理论,并对目前的研究现状进行了分析。高吸水性树脂是一种新型功能高分子材料,由于它能吸收自身质量几百至上千倍的水,且吸水膨胀后生成的凝胶具有优良的保水性,因而广泛地应用于农业、林业、园艺等领域。 关键词:高吸水树脂;吸水机理;结构 1 高吸水性树脂的分类 高吸水性树脂发展迅速,品种繁多,根据现有的品种及其发展可按以下几个方面进行分类。 1.1 按原料来源主要分类 1淀粉系:包括淀粉接枝、羧甲基化淀粉、磷酸酯化淀粉、淀粉黄原酸盐等。 2纤维素系:包括纤维素接枝、羧甲基化纤维素、羟丙基化纤维素、黄原酸化纤维素等。 3合成树脂系:包括聚丙烯酸盐类、聚乙烯醇类、聚氧化烷烃类、无机聚合物类等。 1.2 按亲水基团的种类分类 ①阴离子系:羧酸类、磺酸类、磷酸类等; ②阳离子系:叔胺类、季胺类等; ③两性离子系:羧酸-季胺类、磺酸-叔胺类等; ④非离子系:羟基类、酰胺基类等; ⑤多种亲水基团系:羟基-羧酸类、羟基-羧酸基-酰胺基类、磺酸基-羧酸基类等。 1.3 按制品形态可分四类:粉末状;纤维状;膜状;圆颗粒状。 2 高吸水性树脂的发展
2.1国外发展 上世纪50年代前,人们使用的吸水材料主要是天然产物和无机物,如多糖类、纤维素、硅胶、氧化钙及磷酸等。50年代,科学家通过大量的实验研究,建立了高分子吸水理论,称为Flory吸水理论[1],为吸水性高分子材料的发展奠定了理论基础。 高吸水性树脂是20世纪60年代末发展起来的,最早在1961年由美国农业部北方研究所Russell等[2]从淀粉接枝丙烯腈开始研究,其目的是在农业和园艺中作为植物生长和运输时的水凝胶,保持周围土壤的水份;其后Fanta等接着进行研究,于1966年首先发表了关于淀粉改性的物质具有优越的吸水能力的论文,指出淀粉衍生物具有优越的吸水能力,吸水后形成的膨润凝胶体保水性很强,即使加压也不与水分离,甚至具有吸湿保湿性,这些特性都超过了以往的高分子材料。首次开发成功后,世界各国对高吸水性树脂在体系、种类、制备方法、性能改进、应用领域等方面进行了大量的研究工作,并取得了一系列的研究成果。 1975年美国谷物加工公司成功研究出淀粉接枝丙烯腈高吸水性树脂,但直到1978 年才由日本的三洋化成工业率先进行了商业化生产,将高吸水性树脂用于一次性尿布,于1979年在日本名古屋投产了1000吨/年的生产设备,产品远销欧美各国,使其市场潜力和应用研究受到人们的重视。高吸水性树脂的发展也随之进入了一个新的时代。 70 年代末美国UCC公司用放射法交联各种氧化烯烃聚合物,合成了非离子型的高吸水性树脂,其吸水能力高达2000倍,从而打开了合成非离子型高吸水性聚合物的大门。 80年代出现了以天然化合物及其衍生物为原料(藻酸盐、聚氨基酸、壳聚糖、蛋白质等)制取的高吸水性材料,同时,出现了高吸水性复合材料,由于它能改善吸水性材料的耐盐性、吸水速度、水凝胶的强度等许多性能,所以发展迅速。 90年代初,吸水性树脂的研究更是突飞猛进。最新开发了对环境友好的聚氨基酸系高吸水性树脂、可生物降解的复合纤维或无纺布材料、高吸水性树脂泡沫、芳香性卫生用品、室内装饰性凝胶材料等。目前,日本触媒、三洋化成及德国Stockhausen 三大生产集团掌握了全球高吸水树脂70%的市场,他们之间均以技术合作方式,进行着世界性国际联合经营,占居了世界主要技术和市场。 在过去将近20年中,世界高吸水性树脂的市场需求持续强劲增长是全球高吸水性树脂的生产能力和趋势,从1986年世界高吸水性树脂产量不足0.5万吨/年,到2001年为125万吨/年。目前全球对高吸水性树脂生产和需求几乎是直线上升趋势。在本世纪,随着北美、西欧高吸水性树脂市场逐渐进入成熟期,以及亚太和拉美等新兴市场的快速发展,全球对高吸水性树脂的需求将急剧膨胀,全世界对高吸水性树脂的需求将不断增加。 2.2国内发展 我国从80年代才开始研制高吸水性树脂,1982 年中科院化学研究所的黄美玉等在国内最先合成出聚丙烯酸钠类高吸水性树脂,80年代后期己有20多个单
吸水剖面测试的基本内容与解释方法
吸水剖面测井基本常识 一、何为吸水剖面以及主要用途 随着油田开发时间的推移,油层压力逐渐下降,为了实现长期稳定的开发,需要给地层补充能量,保持油层的压力。目前主要的方法是采用注水保持油层压力。因此在一个油田开发时除了钻一批采油井外,还要钻一批注水井。通过注水井给井下油层注水,维持油层压力使油井产量保持稳定。为了了解注水井注水状况,就需要测吸水剖面,了解个小层的绝对注入量。 主要用途:了解注入井各小层的吸水状况,检查井下工具到位及工作情况,检查调剖效果,检查管外窜流,分析油井出水情况,分析油层水淹状况,进行浅部找漏。 二、测井原理 目前吸水剖面主要用示踪法进行测井(即同位素吸水剖面测井)。在注水条件下将同位素注入井内,随着注入水的流入,同位素滤积在注水层表面,用伽马仪测取示踪曲线,曲线上显示的放射性强度的差异就代表了注入量的大小。 该工艺采用放射性核素释放器携带放射性核素载体在预定的井深位置释放,载体与井筒内的注入水形成活化悬浮液,油层吸水时也吸收活化悬浮液。而放射性载体滤积在井壁地层表面。此时所测的伽马曲线与释放核素前的自然伽马曲线对比,对应吸水层中二者的幅度差,即反映该地层的吸水状况。
三、吸水剖面测井资料解释方法 由于Q=△J/△I,即进入地层的水量Q与滤积的放射性活度△J成正比,测井曲线上反映即是吸水量与吸水层上的同位素伽马曲线与自然伽马曲线的包络面积成正比。图1所示: 图1 放射性同位素示踪载体法测井原理示意图 如1图所示:图中1、2、3三个层为注水层,深度校齐后,把自然伽马曲线与同位素曲线叠合,并使其在非目的层段重合,在三个注水层位分别求出这两条曲线的包络面 积S 1、S 2 、S 3 ,则这三层的吸水量之比即为:S 1 ∶S 2 ∶S 3 。因此,只要求出各注水层的异 常面积和各注水层总的异常面积,即可得到各注水层的相对吸水量: n βi=(S i /∑S i)×100% (1-2) n=1 式中β i 为i层相对吸水量;S i 为i层的异常面积。 层1、层2、层3三个层的相对吸水量β 1、β 2 、β 3 分别为: β1=S1/(S1+S2+S3)×100% (1-3)β2=S2/(S1+S2+S3)×100% (1-4)β3=S3/(S1+S2+S3)×100% (1-5)假设该井日注量为Q,则计算分层绝对日吸水量Q i 为: Q i =Q×β i (1-6)
毛巾高吸水性柔软剂,高吸水性柔软剂,柔软剂,整理剂
高吸水性柔软剂 SF8800不同于普通硅油类拒水柔软剂;本品属阳离子型瞬间吸水型柔软剂,能与抗皱树脂同浴整理而又不影响其吸水、吸汗功能。整理后的织物具有优良的手感,柔软飘逸,表面平滑及优异的吸水性;适合于纤维素纤维、合成纤维(锦纶、腈纶、涤纶)的毛巾、针织物及机织物;可以与固色剂拼用而不影响固色效果;可替代常规的阳离子柔软剂,使得毛巾等直接与肌肤接触的织物极具吸水、吸汗性;高温条件下不黄变,请放心使用;耐酸碱、耐硬水,良好的溶液稳定性。韩笑 亲水柔软剂的复配与高浓乳化技术研究 胡元元,李飞,马永才烟台市开发区金宏化工有限公司,山东烟台264006 【摘要】筛选了三只硅油复配柔软剂,以E0数分别为5和9的两支脂肪醇乙氧基化物和乙二醇单甲醚为乳化剂,转相法制备硅油微乳液。重点考察了硅油的配比对织物亲水、手感、白度的影响,乳化剂的配比对硅油微乳液性能的影响。结果表明,8600:8803:1800=5:3:2,EM50:EM9:乙二醇单丁醚=3.2:4.8:2,硅油用量为微乳液质量的53.3%,乳化剂总用量为微乳液质量的26.7%时,可制得高浓、稳定、透明的硅油微乳液,配制的柔软剂整理效果较好。 【关键词】硅油;乳化剂;亲水柔软剂;高浓;微乳液 【中图分类号】TSl95.23文献标识码:B文章编号:1005-9350(2009)09-0033-03 自20世纪60年代以来,柔软剂一直是硅油应用中最为广泛的领域。在众多的硅油柔软整理剂中,氨基硅油具有其它柔软剂无法比拟的“超柔软”效果。使织物柔软、滑爽、亲水,同时具有良好的抗静电性和一定的耐洗性。但是传统的氨基硅油柔软剂一般会导致织物泛黄,并且变得具有极强的疏水性。经亲水性有机硅柔软剂整理的织物虽然不会改变织物原有的亲水性,但其柔软性与单纯的氨基改性有机硅柔软剂相比略显不足[1-2]。本文针对目前纺织品亲水后整理的品质要求,选用新一代有机官能硅酮柔软剂8600、8803与手感柔软剂1800进行复配,通过应用试验寻求最佳的复配比例。同时为了降低生产成本,运输成本,应用方便,探索三支硅油高浓含量的乳化工艺。 1 实验 1.1 材料及仪器 1.1.1 材料 65/35涤/棉机织物、纯棉机织物 1.1.2 药品 有机硅酮8600(氨值0.65—0.7,粘度3000~12000,道康宁)、有机硅酮8803(氨值0.20-0.25,粘度2000-10000,道康宁)、氨基硅油CS-l800(氨值0.60-0.65。粘度15000,自产)、脂肪醇乙氧基化物EM50(E0=5,HLB=10.5)、脂肪醇乙氧基化物EM9(E0=9,HLB=13)、乙二醇单甲醚、HAC、NaOH、Na2C03、MgCl2·6H20、去离子水。 1.1.3 仪器 JJ-1电动搅拌器、l0l-lA电热鼓风干燥箱、SPN302F电子天平、SL-N电子天平、WSB-3白度仪、80-2B低速台式离心机、PHS-3C酸度计。 1.2 复配柔软剂的应用试验 将三支硅油乳液按照一定的配比进行复配,三支硅油均是采用2:l油相法乳化的30%含量的乳液。复配的柔软剂分别用于整理涤棉、纯棉织物,测试整理后织物的亲水、白度、手感指标。 整理工艺为:织物→浸轧20 g/L的柔软剂(80%轧余率,二浸二轧)→100℃烘干→160℃定型
美标ASTM标准的中文对照大全
ASTM A6/A6M-2004 a结构用轧制钢板、型钢、板桩和棒钢通用要求 ASTM A36/A36M2004碳结构钢标准规范 ASTM A106-2002a高温用无缝碳钢公称管规范 ASTM A143-2003热侵镀锌结构钢制品防脆化的标准实施规程和催化探测方法 ASTM A179/A179M-1990a(R2001)热交换器和冷凝器用无缝冷拉低碳钢管标准规范 ASTM A192-2002高压设备用无缝碳钢锅炉管标准规范 ASTM A209/A209M-2003锅炉和过热器用无缝碳钼合金钢管标准规范 ASTM A210/A210M-2003锅炉和过热器用无缝中碳钢管技术条件 ASTM A213/A213Mb-2004锅炉过热器和换热器用无缝铁素体和奥氏体合金钢传热管技术条件 ASTM A234/A234M-2004中、高温用锻制碳钢和合金钢管道配件 ASTM A252-98(R2002)焊接钢和无缝钢管桩的标准规范 ASTM A262-2002a探测奥氏体不锈钢晶间腐蚀敏感度的标准实施规范 ASTM A269/A269-2004通用无缝和焊接奥氏体不锈钢管标准规范 ASTM A333/A333M-2004低温设备用无缝和焊接钢管的规范标准 ASTM A334/A334M-2004低温设备用无缝和焊接碳素和合金钢管的标准规范ASTM A335-2003高温设备用无缝铁素体合金钢管标准规范 ASTM A370/A370M-2003a钢制品力学性能试验方法和定义标准 ASTM A387/A387M-2003压力容器用铬钼合金钢板的标准规范 ASTM A403/A403M-2004锻制奥氏体不锈钢管配件的标准规范 ASTM A450/A450M-2004碳素钢管、铁素体合金钢管及奥氏体合金钢管一般要求的标准规范 ASTM A500-2003a圆形与异型冷成型焊接与无缝碳素钢结构管标准规范