IBM E-config 最新升级方法

IBM E-config 最新升进入连接https://www.360docs.net/doc/8518101095.html,/partnerworld
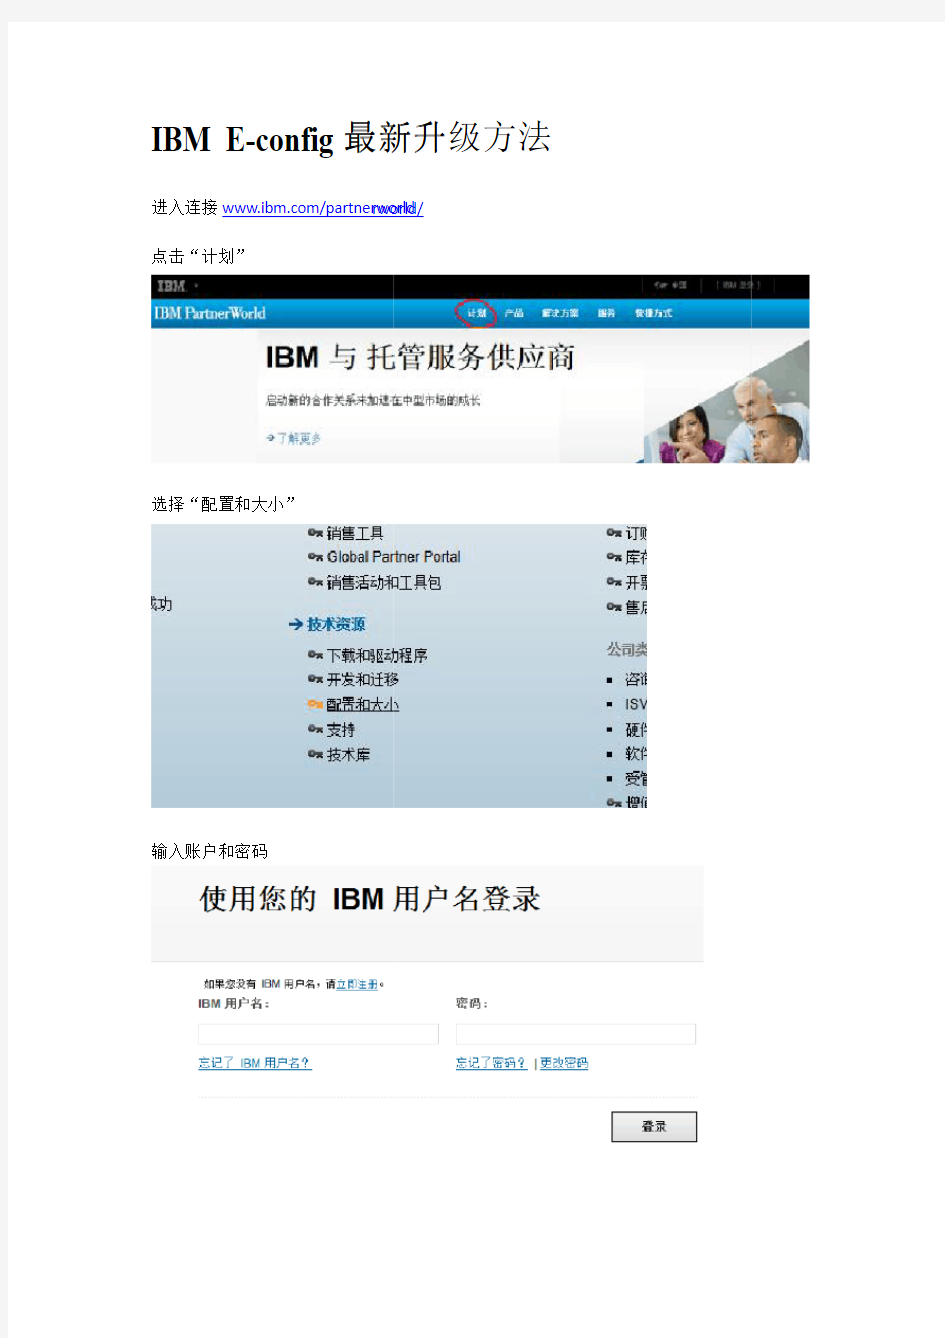
点击“计划”
选择“配置和大小”
输入账户和密码
最新升级方法 rworld/
点击“配置器”选项
选择第一个选项
点击蓝色链接
以上是E-config
更新网址路径的选择的选择
最终更新的路径
https://https://www.360docs.net/doc/8518101095.html,/usrsrvc/account/userservic es/jsp/login.jsp?persistPage=true&page=/partnerworld /wps/servlet/mem/ContentHandler/pw_com_cas_index &PD-REFERER=none&error=
V7000微码升级傻瓜教程
V7000微码升级实施方案 2014-1-21
目录 V7000微码升级实施方案 (1) 2014-1-21 (1) 1时间安排 (1) 2微码升级步骤 (1) 3应急预案 (8)
1时间安排 每一个结点的软件升级耗时大约30 – 40 分钟。GUI会显示“Complete”。整个V7000的软件升级耗时大约90-120分钟。 注意:微码升级过程中,可能会导致主机意外的硬件或是软件故障,需要为修复这些故障预留足够的服务时间窗口,并制定好相应的主机意外故障恢复策略。 2微码升级步骤 升级方式:在线或者停机 备注: 1、如果选择在线升级微码,请尽量安排在业务量相对较小的时候进行; 2、如果选择在线升级微码,请检查所有服务器链路状态,保证两条链路均连接 到V7000; 软件升级步骤如下: 1.选择Configuration 下面的“Advanced”:
2. 选择“Upgrade Software”, 点击“Launch Upgrade Wizard” 选择本地微码补丁包。 3. 会弹出一个对话框,提示下载或者选择Upgrade Test Utility软件升级健康检查工具。。
4. 点击“浏览”,选择V7000的Upgrade Test Utility软件升级健康检查工具文件,点击“Next”,会出现对话框,提示Upgrade Test Utility软件升级健康检查工具已经上传到V7000。点击“Next”继续。 5. 需要手动输入微码升级的目标版本,例如 6.2.0.1,点击“Next” 6. Upgrade Test Utility软件升级健康检查工具会自动开始对V7000做一个微码升级前的健康预检查。等待几分钟直到检查结束,确认检查没有发现问题,点击“Next”
DS3000微码升级指南
DS3000微码v06.70.24.00升级指南 【注1】:本文档主要针对目前DS3000系列最新微码v06.70.24.00版本。 【注2】:如没有特别说明,文档中出现的DS3000微码版本均指v06.70.24.00。 【注3】:升级微码前请详细阅读该版本微码的升级README。 一.相关链接: 1.DS3000系列存储产品在线支持: DS3200: https://https://www.360docs.net/doc/8518101095.html,/systems/support/myview/supportsite.wss/supportresources ?brandind=5000028&familyind=5348412&taskind=1 DS3300: https://https://www.360docs.net/doc/8518101095.html,/systems/support/myview/supportsite.wss/supportresources ?brandind=5000028&familyind=5356498&taskind=1 DS3400: https://https://www.360docs.net/doc/8518101095.html,/systems/support/myview/supportsite.wss/supportresources ?brandind=5000028&familyind=5348409&taskind=1 2.DS3000系列存储产品微码更新: https://www.360docs.net/doc/8518101095.html,/systems/support/storage/disk/ds3400/firmware1.html 3.DS3000系列存储产品红皮书: https://www.360docs.net/doc/8518101095.html,/abstracts/sg247065.html?Open 4.DS3000系列存储产品硬件兼容性列表: https://www.360docs.net/doc/8518101095.html,/systems/storage/disk/ds3000/pdf/interop.pdf 5.DS3000系列存储产品Storage Manager管理程序下载: https://https://www.360docs.net/doc/8518101095.html,/systems/support/storage/disk/ds3400/stormgr1.html 二.微码v06.70.24.00新特性: 1.移除原有作为optional feature的软件特性包(Software Feature Pack upgrade key), 将软件特性包包含在DS3000基本产品配置中。 2.移除原扩展EXP3000时需要的扩展许可(Expansion License),扩展许可作为DS3000 基本产品配置的一部分。 3.升级微码后,DS3300,DS3400默认的存储分区(storage partitions)数量从2曾加到 4。DS3000全系列产品默认存储分区数量均为4个。 三.限制及注意事项: 1.升级微码v06.70.24.00后的DS3000存储需要Storage Manager 版本 2.70.xx.15进行 管理。(低版本storage manager不能用来升级v06.70.24.00微码,会报错) 2.AIX5.2,5.3目前仅支持DS3400。 3.DS3000系列支持的lun容量最大为2TB,正确创建2TBlun的方法为:
IBM小型机微码升级详细的升级过程
微码升级详细的升级过程如下: Special Instructions for Models 9117-570, 9116-561 and 9406-570 下面三个菜单是让你确认设备配置是否给Deconfigured 。 是做升级微码前的准备确认工作。 Model 9117-570, 9116-561 and 9406-570 systems with any level of SF240 installed must be checked for GARDed out nodes, processors and memory before applying a new level of SF240 firmware. Following are instructions to determine if any nodes, processors or memory is GARDed out. If any hardware resource are found to be GARDed, contact your next level of support and have the situation corrected before applying this service pack. 1. Log on to ASM as "admin". 2. Click on the "Expand all menus" link to make all options visible. 3. Navigate down to the options under "System Configuration" followed by "Hardware Deconfiguration". 4. Click on the link "Processor Deconfiguration" to bring up the page that shows the number of processors present and whether or not they are configured. 5. Click on the link "Memory Deconfiguration" to bring up the page that shows the total amount of memory present and if any is presently deconfigured. 6. Click on the link "Processing unit Deconfiguration" to bring up the page that shows the processing units in the system and if any is presently deconfigured. 7. Log off. 从IBM官网下载最新的01SF240_338_201版本的微码,文件下载下来是一个rpm包,01SF240_338_201.rpm,FTP 到AIX系统上 找到AIX下微码的目录,进入,在命令行下运行命令: rpm -Uvh --ignoreos 01SF240_338_201.rpm 微码文件会被解压到/tmp/fwupdate目录下,文件名是01SF240_338_201 到/tmp/fwupdate目录下,运行命令: /usr/lpp/diagnostics/bin/update_flash -f 01SF240_338_201
VNX 微码升级方案 V 1.0
主要内容 1.0 微码升级方案及应急预案 微码升级目标版本为BlockOE 05.32.000.5.219; Unified 系统(Block OE & File OE): 6 小时左右 Block 系统(Block OE): 4小时左右 注:具体升级时间会因为客户设备环境的不同而变化 1.1 微码升级方案 关于升级,我们通常有两种做法,一种是在线升级,这种方法不会影响生产,但是需要一些前提条件;另外一种方法是离线升级,这种方法需要停止主机端的应用,会影响到生产。若是Unified(既有block又有file,也就是含NAS),则在线升级过程中会有10分钟左右的停机. 2.1.1 在线升级 在线升级需要的前期准备: 1. 客户需要检查所有的主机上是否安装多路径管理软件,要确保每台主机到SPA/SPB都有可用的路径; 2. 客户需要检查/确保主机端的多路径管理软件和升级后的flare code版本兼容; 3. 在线升级需要交替升级/重启两个SP,因此一定要选择一个业务不忙的时间窗口(两个SP的使用率加起来不能超过 40%); 在线升级的风险: 由于两个SP需要交替的升级/重启,在这个过程中,SP是没有冗余的,如果另外一个SP发生故障的话,可能会导致主机端暂时不能访问数据的情况。
2.1.2 离线升级 1.2 升级失败预案 如果在升级微码的过程中出现问题,现场可以立即联系EMC800工程师做微码回滚操作。 注:对于Unifiled 系统 Block端:在新的flare code 没有commit之前,是可以roll back到之前的code 版本的。 File端:file端code不能roll back。 建议客户升级Block端后,先在主机端检查无误后,再升级File端的flare code。 工程师按照如下步骤操作收集数据。 ?BEFORE PERFORMING ANY ATTEMPTS TO DIAGNOSE AND ADDRESS THE ISSUE, do the following: ?Capture the diagnostic data file created by USM as the very first step in the NDU process. This will be on the station from which USM was run, in the C:\EMC\repository\DiagnosticData\
IBM-x3650-M4微码升级immv2uefiimmupdate
第一步,要按照如下方法把IMM2的IP改成下图中的规格。 启动服务器后, 可以使用BIOS设置工具管理IMM 网络连接. 开启服务器, 通电大约两分钟后, 电源控制按钮将会激活, 按下开机按钮, 就会显示IBM System x Server Firmware 欢迎界面.按下F1键. 在Setup utility主窗口中, 选择System Settings - Integrated Management Module - Network Configuration. 在DHCP Control中有三个IMM 网络连接选项(Static IP,DHCP Enabled,DHCP with Failover (default). 选择其中一种网络连接方式.如果选择static IP, 须指定IP地址,子网掩码,网关.(IP address,subnet mask and default gateway).设置完后选择Save Network Settings保存, 退出Setup utility. 第二步,要在IBM官网上下载以下两个文件(分别是UEFI和IMM2的升级文件)
第三步,升级(以下是升级过程) 1.升级IMM primary和backup bank到1.85 1)网线连到服务器IMM端口和笔记本网口,笔记本网络做好如下配置,如已经做好,则跳过第一步。
2)上电开机,等待大概5-6分钟之后,IMM能ping 通。可以通过以下步骤测试,打开CMD命令行 敲入ping 192.168.70.125,如果能连上服务器的Imm,则可以ping通,就是出现下图方框里面的信息。
IBM 3584磁带库微码升级指导手册v2.1
IBM 3584磁带库微码升级指导手册v2.0 安图特(北京)科技有限公司范翔 注:1.本文档摘录南京交行3584-L52微码升级的相关信息 2.建议通过IBM Tape Library Specialist进行微码升级 3.如果3584磁带库微码不低于6050,微码升级可以在生产环境中进行,即无需停止相 关作业。 升级步骤 1.下载微码 最新的微码可以在如下地址获得: ftp://https://www.360docs.net/doc/8518101095.html,/storage/358x/3584/ https://www.360docs.net/doc/8518101095.html,/servers/storage/support/lto/ 2.在升级前停止有关3584的使用 3.操作3584的液晶触摸屏,按MENU —> Settings —> Network —> Ethernet —> ENTER 屏幕将显示Frame1的以太网设置,记录IP地址为10.1.1.1 4.用网线将笔记本连入3584背部的网口,并且配置笔记本IP与其在同一网段 5.打开浏览器,输入10.1.1.1,进入如下界面 6.确认3584的VPD
7.选择Service —> Firmware Update,根据提示逐步操作
8.至此,微码升级正式开始。操作触摸屏会显示微码升级的进度,大约30分钟后,升级 完毕。操作触摸屏显示新的微码版本Version 7379。 9. 对3584磁带库进行健康检查,确认没有问题。
附录IBM 3584/TS3500 UltraScalable Tape Library Firmware Readme Firmware level 7379: Library code version 7379 adds the following new functions: - Support for new calibration/offset mode (enabled using CE Tool v4.6 or higher) Significant fixes from previous code version 7369: - Fixed problem where failures of redundant parts, such as gripper, would not be correctly reported through callhome. - Fixed problem for libraries with Cartridge Assignment Policy set to "all other volser" that would intermittently fail cartridge exports with ASC/ASCQ 3B81 indicating a wrong logical library gets accessed. - Fixed problem where a HA library could report "Not Ready" to the host after a new frame got added using the reduced disruptive frame add method. - Fixed problem where a library would also prevent any media type from being inserted because it was insert limited on one media type. - Fixed problem where a library with encryption enabled can fail an encryption job when the cartridge memory volser did not match the barcode label volser and neither volser was in a barcode encryption policy. - Fixed problem where incorrect error codes would be displayed for problems with redundant components such as gripper. - Fixed problem where the MCP card could reset when SNMP is used. - Fixed problem for libraries static configured or with ALMS with VIO disabled; where an I/O station was set locked, but when a cartridge was sent to the I/O station, it unlocked. - Fixed problem for libraries with ALMS enabled where only unassigned cartridges get exported even so both unassigned and shared cartridges were selected for export at the same time. - Fixed problem for libraries static configured or with ALMS with VIO disabled, that has two I/O stations in the L-frame; where only one I/O station gets locked during cartridge export, even though both I/O stations are actually used. - Fixed problem where the user could not change the number of VIO slots in a logical library to 16. - Fixed problem where failures of redundant parts were not sent out via Call Home or SNMP trap. - Fixed problem where the drive error sense key was reported as 0000 via SNMP. - Fixed problem where drive Tape Alerts were not cleared after logging it in the Mount History file. Firmware level 7369: Significant fixes from previous code version 7368: - Fixed problem where drive S/Ns could be incorrect after drive FRU replacement, resulting in
HBA卡微码升级
今天做了一次在小型机上升级HBA卡的微码的工作,在升级前,要检查小型机的HBA卡的型号,这个型号可以从小型机硬件配置文档里查找; 其次,要确定当前HBA卡的版本,可以用如下的命令查看: --查看系统当前所有的HBA卡: test_db:/@root>#lsdev -C | grep fcs fcs0 Available 09-08 FC Adapter fcs1 Available 0E-08 FC Adapter --查看HBA卡微码的版本,注意lscfg命令的Z9字段,那里即为微码版本信息: test_db:/etc/microcode@root>#lscfg -vl fcs0 fcs0 U5791.001.99200CK-P2-C01-T1 FC Adapter Part Number.................80P4543 EC Level....................A Serial Number...............1F4400AF85 Manufacturer................001F Feature Code/Marketing ID...280B FRU Number.................. 80P4544 Device Specific.(ZM) (3) Network Address.............10000000C9402F8B ROS Level and ID (02881914) Device Specific.(Z0)........1001206D Device Specific.(Z1) (00000000) Device Specific.(Z2) (00000000) Device Specific.(Z3) (03000909) Device Specific.(Z4)........FF801315 Device Specific.(Z5) (02881914) Device Specific.(Z6) (06831914) Device Specific.(Z7) (07831914) Device Specific.(Z8)........20000000C9402F8B Device Specific.(Z9)........TS1.90A4 --微码版本信息,当前版本1.90A4 Device Specific.(ZA)........T1D1.90A4 Device Specific.(ZB)........T2D1.90A4 Device Specific.(YL)........U5791.001.99200CK-P2-C01-T1 test_db:/etc/microcode@root>#lscfg -vl fcs1 fcs1 U5791.001.99200CK-P2-C05-T1 FC Adapter Part Number.................80P4543 EC Level....................A Serial Number...............1F4530ABC9 Manufacturer................001F Feature Code/Marketing ID...280B
升级AIX系统微码
升级系统微码 一、获得现在机器的微码 #lscfg -vp|grep alterable --find the system microcode level 查看机器微码 ROM Level.(alterable).......M2P060505_condor_ 系统电源控制网络版本SPCN ROM Level.(alterable).......0000CMD02252 服务处理器(Service Processor FW)的版本ROM Level.(alterable).......CM060505 firmware level (installed firmware)的版本 可通过SMS获得 3. System Information Menu ----1. Read VPD Images from Last System Boot---30. Platform Firmware-----RM ...................... CM060505 CM060505 或#prtconf |more Platform Firmware level: CM060505 二、获得机器的型号 # prtconf |grep 'System Model' System Model: IBM,7026-H80 #lsattr -El sys0 |grep modelname 三、下载微码软件 https://www.360docs.net/doc/8518101095.html,/server/mdownload/download.html 选择对机型 选择system Firmware中的AIX 注:Desc (Instructions document) AIX (For downloading to an AIX server or system) DOS (For downloading to a Windows workstation) 一定要注意看Desc文档的说明(在下载行的最后一列),告诉你操作步骤及注意事项、命令、firmware文件大小等重要信息。 如https://www.360docs.net/doc/8518101095.html,/ibmdl/pub/software/server/firmware/7026H80F.html 四、ftp及解压、校验下载的升级文件 ftp>bin -----一定要加此命令,否则解压时会有错误。 ftp>put 7026HM80.BIN 解压升级文件 #cd /tmp/fwupdate # chmod +x 7026HM80.BIN # ./7026HM80.BIN CM_MM_060505.img 校验升级文件 #sum CM_MM_060505.img 28838 4985 CM_MM_060505.img --28838就是校验码, 校验码要跟Desc (Instructions document) 文档中提示的表Firmware Levels, File Sizes and Checksums要一致,否则不要更新。 五、升级 当校验没有问题后,就可以升级了。不过要确保在升级过程中不能掉电。 #cd /usr/lpp/diagnostics/bin
HP服务器微码升级步骤
HP 全系列服务器微码更新方法 对于HP DL580G5 服务器的最新微码官方只提供到FW10.10的HP ProLiant Firmware Maintenance CD光盘,该微码光盘包含了全系列ProLiant服务器的硬件固件,并且该光盘中集成了固件升级软件。 HP ProLiant Firmware Maintenance CD v10.10支持升级ProLiant G7全系列之前的所有型号服务器(含x86架构BL刀片服务器)。 升级方法: 1、将HP ProLiant Firmware Maintenance CD v10.10光盘放入光驱 2、重启服务器按F12键,选择CD-ROM启动 3、引导从光驱启动后,会启动HP ProLiant Firmware Maintenance CD v10.10 光盘内自带的固件升级软件 4、固件升级提供两种方式,包括自动升级和手动升级 自动升级工具:是完全自动对整机硬件微码进行分析,然后选择微码光盘内最适合的微码版本进行升级,此种方法是最简单、最安全。在自动升级工具中会自动将不匹配的微码忽略,减小了升级的风险。 手动升级工具:首先会对整机的微码进行扫描,然后列出本机的硬件,手动选择升级那些硬件的微码,选择后升级工具会对选中的硬件微码进行分析,选择出所选硬件最适合的微码版本然后进行升级。 大多数升级建议采用自动升级工具,因为有些硬件的微码是需要成套升级,自动升级会将所有硬件的微码综合分析,选择最佳微码版本,确保了升级的成功性。 5、开始升级后的过程不能中断,大约15分钟升级完成 6、升级结束后服务器会自动重新启动,弹出光驱。 注意事项: 1、微码升级过程中不可断电、人为终止、人为重启,否则造成硬件损坏。 2、微码升级后不可降级,无法回退。 3、微码升级软件会自动控制服务器进行重启。
V7000硬盘微码升级方法
V7000微码升级方法 北京深思天成科技有限公司 2014/5/23
目录 V7000硬盘微码升级方法 (1) 1实验目的 (1) 2实验环境 (1) 3参考资料 (1) 4实验步骤 (2) 4.1总体步骤 (2) 4.2详细步骤及说明 (3) 4.2.1准备阶段 (3) 4.2.2实验一:使用命令行模式一次升级一块硬盘微码 (7) 4.2.3实验二:使用工具方式一次升级多块硬盘微码 (10) 4.2.4验证阶段 (12) 北京深思天成科技有限公司 1
V7000硬盘微码升级方法 1实验目的 验证V7000存储硬盘微码升级方法 升级公司实验机上的硬盘到IBM2076_DRIVE_20131022版本,与索爱客户使用的版本一致 2实验环境 公司实验环境v7000 连接主机P720(10.1.0.72) 3参考资料 IBM v7000硬件信息中心(upgrading – upgrading – upgrading drive firmware) 升级一块硬盘方法 https://www.360docs.net/doc/8518101095.html,/infocenter/storwize/ic/index.jsp
使用utility一次性升级多块硬盘方法: https://www.360docs.net/doc/8518101095.html,/support/docview.wss?uid=ssg1S4001077 4实验步骤 4.1总体步骤 北京深思天成科技有限公司 2
4.2详细步骤及说明 4.2.1准备阶段 4.2.1.1验证微码可行性 4.2.1.2查看当前硬盘信息 使用lsdrive命令查看存储硬盘状态 IBM_Storwize:deeplogic_v7000:superuser>lsdrive id status error_sequence_number use tech_type capacity mdisk_id mdisk_name member_id enclosure_id slot_id node_id node_name 北京深思天成科技有限公司 3
DS8000微码升级步骤
DS8000微码升级步骤 1系统情况检查 (1) 1.1运行end of call. (1) 1.2检查当前微码版本,确定微码升级方式 (2) 2数据备份及应急方法 (2) 3停DS8000 COPY SERVICE服务 (2) 3.1升级灾备中心DS8000前PPRC操作 (2) 3.2升级生产中心DS8000前PPRC操作 (2) 4微码升级 (3) 4.1当前版本与目标版本 (3) 4.2 code升级时间需求 (3) 4.3升级顺序 (3) 4.4升级步骤 (3) 5 COPY SERVICE的恢复 (5) 5.1升级灾备中心DS8000后PPRC操作 (5) 5.2升级生产中心DS8000后PPRC操作 (5) 1系统情况检查 1.1运行end of call. 检查是否有open call。如存在问题需先行解决,再进行微码升级。 Run end of call From WebSM, Select: Service Applications 1) Select: Service Focal Point 2) Select: Service Utilities Highlight the SF: (2107-9xx---) Choose: “Selected” from the tool bar 3)Select: View Storage Facility State All sections should report with passed in the status column. Failed status can be viewed by highlighting the System Check Type and then select details. 4)If this is a multiple SF machine return to step A. above and check that SF’s resources.
IBM_P550小型机升级微码详细过程
先介绍一下背景信息: 客户是西安市内的一家大型连锁商场,有一台Power550小型机,出现报错。 IBM POWER6 550 型号:8204-E8A;序列号:XXXXXXX 设备情况:2C,3.5GHz Power550,4G内存,146x4硬盘; AIX版本:6100-03-01-0921; 微码版本号:EL340_075; 用途:POS机数据备份。 分析过程: 1、机器前面板显示报错B181F126,当前的FW是340-075。从错误日志上看是一个未知的系统平台错误。 2、联系IBM工程师被告知可能是微码问题或机器主板问题,建议先升级系统微码,然后观察,如果继续报错就的更换主板了。 3、经过IBM工程师确认,“建议您升级机器的fw到340的最新版即可解决,该错误属于fw误报,不会对机器运行产生任何影响。” 操作过程
我先去IBM网站下载合适的微码版本 (https://www.360docs.net/doc/8518101095.html,/support.fixcentral/) 发现有2个版本:Power6 System Firmware EL340_122、Power6 System Firmware EL340_132,都下载下来,计划安装132版本。 经过和客户交流,发现前面板无HMC的连接,在服务器上没有保留与HMC连接的记录信息,OK,升级变简单了。 一、首先查看目前微码的版本 AIX Version 6 # lsmcode -c The current permanent system firmware image is SF340_075 The current temporary system firmware image is SF340_075 The system is currently booted from the permanent firmware image. 二、将微码的RPM文件上传到/tmp/fwupdate目录中,用FTP工具的BIN模式。 [root@p520:/]# pwd / [root@p520:/]# cd tmp [root@p520:/tmp]# cd fwupdate [root@p520:/tmp/fwupdate]# ls
EMC DD610微码升级
嘉兴烟草DD610 微码升级 1.确定原来版本为4.7.30 sysadmin@localhost# system show version Data Domain OS 4.7.3.0-140348 2.打开/ddvar 共享,将升级文件拷贝到/ddvar/releases 目录里面 sysadmin@localhost# cifs add /ddvar clients * 3.升级system upgrade 4.9.2.0-222697.rpm 系统会重启,重启以后就是新版本了。 sysadmin@localhost# system show version Data Domain OS 4.7.3.0-140348 sysadmin@localhost# system upgrade 4.9.2.0-222697.rpm
The 'system upgrade' command upgrades the Data Domain OS. File access is interrupted during the upgrade. The system reboots automatically after the upgrade. Are you sure? (yes|no|?) [no]: yes ok, proceeding. [UPGRADE]: Check DDOS rpm .........[success] [UPGRADE]: Finish DDOS version check........[UPGRADABLE] [UPGRADE]: DDOS is upgraded to a version require On-Disk Format Upgrade [UPGRADE]: Pre-upgrade Checking .........[success] [UPGRADE]: Format Upgrade Partition .........[success] Preparing... ########################################### [100%] 1:ddr ########################################### [100%] Copy RPM package to link_to_new_rpmfile.rpm in /ddr/var/releases [UPGRADE]: RPM upgrade..........[success] [UPGRADE]: Syncing boot image..........[success] [UPGRADE]: Switch Partition .........[success] [UPGRADE]: DDOS Upgrade Finished ..........[success] [UPGRADE]: Upgrade succeeded. Rebooting the system... sysadmin@localhost# Broadcast message from root (console) (Wed Apr 13 14:55:51 2011): The system is going down for reboot NOW!
IBM X3850 服务器微码升级步骤
IBM X3850 服务器微码升级步骤 一、CMOS 1、升级主板bios,有2 种方法,软盘升级(*.img)和光盘升级(*.iso) A、将带有微码程序的光盘和软盘放进光驱和软驱中,机器可以自动识别从光驱和软驱 中启动(如果识别不到软盘或光盘,开机按F12 键加载)。 B、启动后出现如下界面时,选择1,升级bios C、接下来是提示更改产品,编号,标识等,遇到需要更改的选项,一律“N” D、出现如下界面,选择1 ,回车
E、读取软盘或光盘的文件,并进行清除和更新微码程序 F、升级结束,提示取出光盘或软盘,按回车进行重起 2、BMC(bmc 是服务器的逻辑部件之一,和系统日志有关) A、同样把光盘或软盘放进指定的驱动器,从软盘或光盘启动 B、读取软盘或光盘微码文件,后提示是否要清除老的微码程序,选择“Y”,并进行升级,升级过程中有风扇响动,是正常现象,直到响声停止,出现C:,升级完毕
3、CPLD(cpld 也是计算机的逻辑部件,是和硬盘较关联,硬盘黄灯闪烁,阵列掉线,可 能是此服务器的微码版本过低所致) A、把软盘放进指定的驱动器,从软盘启动(IBM 官网没有光盘版的升级文件) B、拷贝文件,提示是否清除原来的数据,选择Y,然后选择A 进行升级 C、升级过程中不要断电,升级完毕后,提示c:,拔掉电源2-3 分钟后开启,这样CPLD 程序就能生效了。
4、DIAG(服务器的一个诊断工具,可以不升级,此升级程序没有光盘版) A、把升级bios 软盘或者光盘放进指定驱动器中引导,出现升级桌面,选择2,然后把diag 软盘插入软驱。 B、把指定软盘放进软驱,进行升级,完毕后重新启动计算机 二、DERVER RAID 8I(阵列卡的微码程序,同步更新对阵列卡的稳定性有帮助,特别是阵 列掉线重建的问题) A、把升级阵列卡的软盘或者光盘放进指定驱动器中引导,机器在开机过程中可以看到原来 的老的版本程序
AIX微码升级全过程
AIX微码升级全过程 首先是把微码补丁从IBM网站下到个人电脑里(微码下载地址: https://www.360docs.net/doc/8518101095.html,/webapp/set2/firmware/gjsn),假设该文件为123.bin并储存在C盘根目录下,然后进入小机的cd /tmp目录,在用LS命令查看该目录下的所有文件: # cd /tmp # ls .X11-unix aaa.jlfEa baaNDlfMb dpi_socket reconfig1 .ctinst.log aaaM9lfMa baaajlfEb lost+found reconfig2 .sr_migrate.log aaat2jwaa baau1jwab https://www.360docs.net/doc/8518101095.html,.out reconfig3 .strload.mutex auiml.tmp bos https://www.360docs.net/doc/8518101095.html,.serial.out xlogfile 再在该目录下创建firmware文件夹,在用ls命令查看是否创建成功。 # mkdir firmware # ls .X11-unix aaa.jlfEa baaNDlfMb dpi_socket https://www.360docs.net/doc/8518101095.html,.serial.out xlogfile .ctinst.log aaaM9lfMa baaajlfEb firmware reconfig1 .sr_migrate.log aaat2jwaa baau1jwab lost+found reconfig2 .strload.mutex auiml.tmp bos https://www.360docs.net/doc/8518101095.html,.out reconfig3 文件创建成功。 然后在个人电脑的运行中进“ftp”,进入到cd /tmp/firmware目录下, ftp> cd /tmp/firmware 再用lcd命令进入补丁存放的当前目录(我们前面说过补丁存在C盘根目录下)。 ftp> lcd C:\ 二进制传输模式执行传输 ftp> bin 200 Type set to I. 然后使用PUT命令把补丁从C盘中复制到小机的cd /tmp/firmware文件夹中 ftp> put 123.bin 然后进入小机的cd /tmp/firmware目录,再LS查看是否复制成功。 # cd /tmp/firmware # ls 123.bin 然后查看文件的权限,ls -l -rw-r-r--- 1 root system 0 Jan 03 18:50 123.bin 没有执行权限就要用chmod命令添加该权限。 # chmod u+x 123.bin 在查看是否成功 # ls -l total 8 -rwxr--r-- 1 root system 0 Jan 03 18:56 123.bin 权限添加成功后,开始本地执行该文件(相当于解压),执行后文件变成img格式。 # ./123.bin 然后使用sum命令查看补丁序号和ibm网站的对照看是否正确 # sum 123.img