SourceGrid应用中文帮助
1.简介
SourceGrid 是一个完全以C# 托管代码编写的.NET Windows 窗体网格控件. SourceGrid 可用于显示或改变表格形式的数据。
SourceGrid 可用于绑定到一个数据源(以DataView 为代表),或者直接建立每个单元格。
SourceGrid 仅使用托管代码(无API 或Interop),可以用于任何与.NET 2 兼容的环境中。
2.安装
要使用SourceGrid,你必须有与.NET 2 兼容的开发环境(如Visual Studio 2005)。要下载控件的最新版,请访问https://www.360docs.net/doc/9e14186448.html,/projects/sourcegrid. 解压缩该文件后,可参考项目中的这些程序集:
SourceGrid.dll - SourceGrid 内核库
DevAge.Core.dll - 共用的辅助功能库
DevAge.Windows.Forms.dll - Windows 窗体库
[SourceGrid.Extensions.dll - 可选库,有SourceGrid 扩展功能(如DataGrid, PlanningGrid)]
典型地,我总是建议把它们复制到与*.xml文件相同的位置,你可以在程序集相同的目录中找到,以便使用IDE的智能感应录入功能。
打开你想要添加网格控件的表单,打开IDE的工具箱,工具箱->右键->选择项->浏览并增加SourceGrid.dll 和SourceGrid.Extensions.dll 程序集到IDE的工具箱中。这些程序集是运行时刻所需的,需要随同你的应用程序一起分发给最终用户。
3.SourceGrid 控件
有2 种主要的控件包含在SourceGrid.dll 程序集中:
GridVirtual 控件- 使用虚单元格(ICellVirtual)的网格控件
Grid 控件- 使用实体单元格(ICell)的网格控件
因此有 2 种不同的基础对象:虚单元格和实体单元格。虚单元格是确定外观和行为,但不包含值的单元格。实体单元格与虚单元格有相同的属性,但也包含单元格的值,因此在网格中与特定位置相关联。
在不需要显示大量单元格(典型地,应少于50,000 个单元格)时,可以使用任何类型的Grid 控件。如果需要显示大量单元格,通常你必须使用一个派生于GridVirtual 的控件。
典型地,在本文中,我将使用Grid 控件,因为它更简单,尤其是作为简单的示例。但是,同样的代码基本上也能用于GridVirtual 控件。
Grid 控件也用作需要最大弹性的那些特殊的网格。
拖动Grid 控件到你的窗体中,就如同添加其它任何.NET 控件一样,然后开始使用它。
4.基础示例
目前,SourceGrid 仅有少量的设计时刻支持,因此通常你必须人工编写代码操作网格。
假定你已经有一个名为grid1 的Grid 控件,你可以在Form.Load 事件中编写如下代码:
grid1.BorderStyle = BorderStyle.FixedSingle;
grid1.ColumnsCount = 3;
grid1.FixedRows = 1;
grid1.Rows.Insert(0);
grid1[0,0] = new SourceGrid.Cells.ColumnHeader("String");
grid1[0,1] = new SourceGrid.Cells.ColumnHeader("DateTime");
grid1[0,2] = new SourceGrid.Cells.ColumnHeader("CheckBox");
for (int r = 1; r < 10; r++)
{
grid1.Rows.Insert(r);
grid1[r,0] = new SourceGrid.Cells.Cell("Hello " + r.ToString(), typeof(string));
grid1[r,1] = new SourceGrid.Cells.Cell(DateTime.Today, typeof(DateTime));
grid1[r,2] = new SourceGrid.Cells.CheckBox(null, true);
}
grid1.AutoSizeCells();
可以看到,你能像使用 2 维数组一样来使用grid。在上面的代码中,我已经设置了网格的边框,列数,固定行数,建立了一个标头行。对此标头,我使用了一种ColumnHeader 单元格。我已经为每列使用了特定类型,从而以一种简单的外观建立了其他单元格。Cell 类自动为指定类型建立了一个适当的编辑器(在本例中为一个文本框和一个日期时间选择器)。对最后一列,我使用了一个复选框单元格(CheckBox cell),允许在单元格中直接显示复选框。每种单元格定义了它自己的可视外观和行为。
建立的网格支持排序,可改变列宽和编辑单元格。
下面是一些重要的功能:
如果你想读取或改变单元格中的值,可以使用grid1[r,c].V alue 属性,r 和 c 是单元格的行和列。
删除某行,可以编写代码如:grid1.Rows.Remove(r)
改变列宽,可以编写代码如:grid1.Columns[c].Width = 100
如果你想改变某些单元格的可视属性,你必须使用View 类。
让我们看看下一个示例:
grid1.BorderStyle = BorderStyle.FixedSingle;
grid1.ColumnsCount = 3;
grid1.FixedRows = 1;
grid1.Rows.Insert(0);
SourceGrid.Cells.Views.ColumnHeader boldHeader =
new SourceGrid.Cells.Views.ColumnHeader();
boldHeader.Font = new Font(grid1.Font, FontStyle.Bold | FontStyle.Underline); SourceGrid.Cells.Views.Cell yellowView = new SourceGrid.Cells.Views.Cell(); yellowView.BackColor = Color.Y ellow;
SourceGrid.Cells.Views.CheckBox yellow ViewCheck =
new SourceGrid.Cells.Views.CheckBox();
yellowViewCheck.BackColor = Color.Y ellow;
grid1[0, 0] = new SourceGrid.Cells.ColumnHeader("String");
grid1[0, 0].View = boldHeader;
grid1[0, 1] = new SourceGrid.Cells.ColumnHeader("DateTime");
grid1[0, 1].View = boldHeader;
grid1[0, 2] = new SourceGrid.Cells.ColumnHeader("CheckBox");
grid1[0, 2].View = boldHeader;
for (int r = 1; r < 10; r++)
{
grid1.Rows.Insert(r);
grid1[r, 0] = new SourceGrid.Cells.Cell("Hello " + r.ToString(), typeof(string));
grid1[r, 0].View = yellowView;
grid1[r, 1] = new SourceGrid.Cells.Cell(DateTime.Today, typeof(DateTime));
grid1[r, 1].View = yellowView;
grid1[r, 2] = new SourceGrid.Cells.CheckBox(null, true);
grid1[r, 2].View = yellowViewCheck;
}
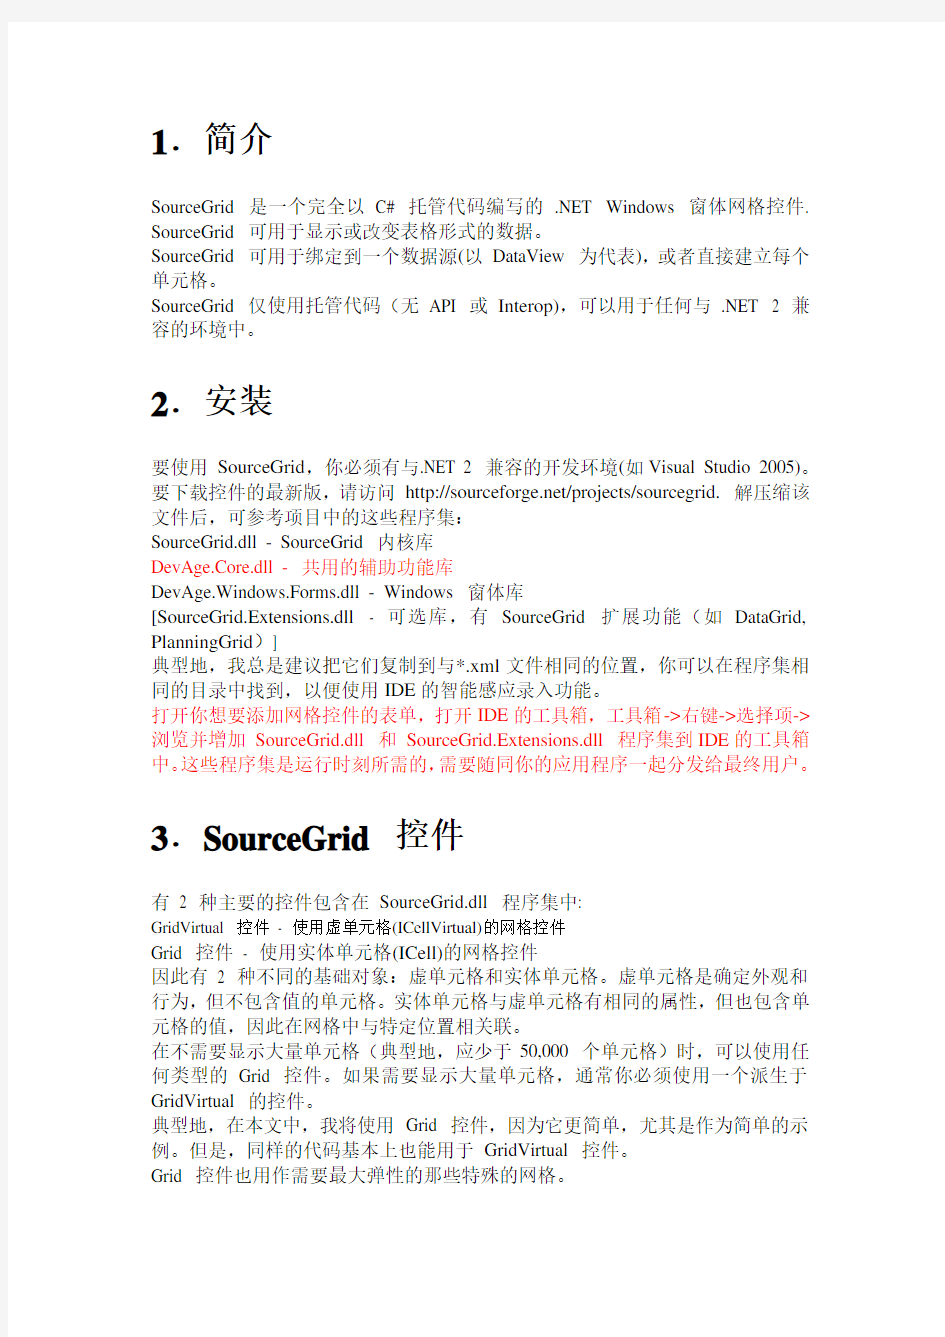
我使用FontStyle.Bold | FontStyle.Underline 建立了一个列标头外观,其中标准单元格的外观为黄色背景,复选框单元格的外观为黄色背景。然后我把它们的实例指派到了每个单元格的View 属性中。
窗体看起来应该像下图所示的一样:
你可以注意到,我已经为许多单元格指派了View 类的同一个实例。这对于优化所耗用的系统资源是有用的。
每个单元格可以有一个编辑器(Editor 属性) 相关。编辑器用于编辑单元格的值。你可以人工建立一个编辑类(参阅SourceGrid.Cells.Editors 命名空间),或者使用SourceGrid.Cells.Editors.Factory 类建立基于某种类型(Type)的编辑器。如果指定了Type 参数,你也可以使用Cell 构造函数自动调用
SourceGrid.Cells.Editors.Factory 。
下面是一个示例,建立一些单元格,并且使用上面所述的某一种方法把单元格与
编辑器相关联。
//A DateTime editor
grid1[r, c] = new SourceGrid.Cells.Cell(DateTime.Today, typeof(DateTime));
//A string editor
grid1[r, c] = new SourceGrid.Cells.Cell("Ciao", typeof(string));
//A double editor
grid1[r, c] = new SourceGrid.Cells.Cell(58.4);
grid1[r, c].Editor = SourceGrid.Cells.Editors.Factory.Create(typeof(double));就像View 类一样,编辑器也可以在一个或数个单元格之间被共用。
现在,你可以开始使用SourceGrid 工作了。
5.基础概念
5.1Grid 控件
如果你需要最有弹性的, 简易而没有太多单元格的网格, Grid 控件是理想的选择. 事实上, 此控件中每个单元格都作为一个.NET 类来描述, 因此也占用一定数量的资源. 此外, 这是唯一支持RowSpan 和ColumnSpan(单元格合并)功能的网格.
在一个Windows 窗体中Grid 控件是最普通不过的事. 这正如增加其他控件(如按钮, DataGrid)一样. 首先,建立或者打开一个Windows 应用程序项目, 然后从设计器打开一个Windows 窗体。现在你要准备好使定制工具箱: 以鼠标右键单击“工具箱—.NET Framework 组件—浏览”,选中“DevAge.SourceGrid.dll”。现在,网格控件被添加到工具箱中,可以像其他控件一样增加到Windows 窗体中。
在增加控件到窗体后,我们就可以开始编写代码使用网格控件. 例如,在窗体的Load 事件中,编写如下代码:
grid1.Redim(2, 2);
grid1[0,0] = new SourceGrid.Cells.Cell("Hello from Cell 0,0");
grid1[1,0] = new SourceGrid.Cells.Cell("Hello from Cell 1,0");
grid1[0,1] = new SourceGrid.Cells.Cell("Hello from Cell 0,1");
grid1[1,1] = new SourceGrid.Cells.Cell("Hello from Cell 1,1");
上述代码建立一个2 行 2 列(Redim 方法) 的表,以单元格装入各个位置。我已经使用了包含实体单元格的SourceGrid.Cells 命令空间。
可以使用V alue 属性读取特定单元格的值,就像这样:object val = grid1[1,0].V alue;.
5.2GridVirtual 控件
当需要显示大量的单元格, 并且已经有可用的结构化数据(例如数据集, 数组, XML文档或其他数据结构)时, 使用GridVirtual 控件是理想的选择.
除了自动排序(这是因为在复制任何外部数据结构的内容之前, grid 不能进行自动排列), 以及RowSpan 和ColumnSpan 这类允许单元格交叉跨越其它邻近单元格的功能(例如合并单元格功能)以外, 这种GridVirtual 网格控件与Grid 控件有同样的功能.
另一个缺点是建立虚网格稍显困难.
虚网格主要的概念是, 每个单元格从一个外部的数据结构读取和写入值, 以及网格不持有所有行和列, 而通常是直接从数据源中读取.
此观点以一个抽象的GridVirtual 类实现, 并且有抽象的方法: CreateRowsObject, CreateColumnsObject 和GetCell. 你可以使用特定的IV alueModel (接口)直接从数据源中读取值.
因此对于GridVirtual , 需要建立一个派生于GridVirtual 的类, 并且定制CreateRowsObject, CreateColumnsObject 和GetCell 方法读取数据源是首要的. GetCell 方法的主要目的是返回一个给定的位置(行或列), 选定的单元格, 以及用于建立列和行对象CreateRowsObject 和CreateColumnsObject 方法使用的数据源。这样允许很大的弹性, 因为你可以返回任何ICellVirtual 给一个特定的类型; 举例来说, 当行号为0 时, 你可以返回单元格的标头类型.
通常, 你不需要直接使用GridVirtual , 而是需要使用一个从它派生的控件.
目前, 我已经完成两个可以直接使用虚网格功能的控件:
DataGrid - 绑定到DataView 对象的网格.
ArrayGrid - 绑定到一个Array 对象的网格
如果你需要建立自定义控件, 从特定数据源读取数据, 你可以参阅ArrayGrid 类的示例.
6.单元格概述
每个单元格由 4 个基本部分组成, 它们基于改进的“模式-外观-控制器(Model-View-Controller)”模型:
模式(Model): 模式是管理单元格取值的类, 它包含相关的取值或属性, 并且与其他组件相联系.
外观(View) : 外观是绘制单元格, 并包含可视属性的类.
控制器(Controller) : 控制器是提供单元格行为的类.
编辑器(Editor) : 编辑器是定制单元格的编辑器的类.
这种划分为代码提供了很大的弹性和可重用性, 可节约时间, 为每种定制类型提供可靠的基础。
为了较通用的要求,一些类已经被准备和配置, 但是, 可能会需要以某些代码行建立个性化单元格。
6.1行和列
网格主要的组成是行和列. 为处理这些信息, SourceGrid 应用 2 个属性:
Rows - 管理行信息, 基础类是RowsBase 类.
Columns - 管理行信息, 基础类是ColumnsBase 类.
当使用一个实体网格时, 基础类被以RowInfoCollection 和ColumnInfoCollection 扩展, 它们是RowInfo 类和ColumnInfo 类的集合. 当使用一个虚网格时, 你必须以自己的代码提供数据源的信息, 从而扩展基础类.
在实体网格上操作行和列
注意: 仅对实体网格有效.
这是RowInfo 类的一部分属性: Height, Top, Bottom, Index, Tag. 与之相反, ColumnInfo 类的一部分属性为:Width, Left, Right, Index, Tag.
有多种方式建立行和列:
示例1:grid1.Redim(2,2);
示例2:grid1.RowsCount = 2;
grid1.ColumnsCount = 2;
示例3:grid1.Rows.Insert(0);
grid1.Rows.Insert(1);
grid1.Columns.Insert(0);
grid1.Columns.Insert(1);
上面这三个示例完成同样的任务: 建立一个2 行 2 列的表.
可以使用下列代码改变行或列的宽度或高度:
grid1.Rows[0].Height = 100;
grid1.Columns[0].Width = 100;
使用行或列的宽度及高度时, 属性Top, Bottom, Left 和Right 被自动计算.
在分配行和列后, 你必须为网格建立所需单元格的各个位置, 就像这些代码一样:
grid1.Redim(2,2);
grid1[0, 0] = new SourceGrid.Cells.Cell("Cell 0, 0");
grid1[1, 0] = new SourceGrid.Cells.Cell("Cell 1, 0");
grid1[0, 1] = new SourceGrid.Cells.Cell("Cell 0, 1");
grid1[1, 1] = new SourceGrid.Cells.Cell("Cell 1, 1");
7.模式(Model)
命名空间: SourceGrid.Cells.Models
模式类(Model classes)的目的是把单元格对象和单元格数据分离出来, 这有两个主要的原因:
在值只需要被存储在原始数据源的情况下, 执行虚网格。在此情况下, 如果以正确的方式选择模式, 可以从数据源直接地读取数据。
需要扩充单元格类, 但是维持代码的易于重用性。这是因为你不一定要改变基
本的单元格类(Cell class)来增加新的功能,而是可以只增加一个新的模式。
每个单元格都有Model 属性, 用于返回或设置一个ModelContainer 对象. 此类是IModel 接口的一个集合. 每个IModel 接口包含所有用于特定功能的属性.
主要的模式(Model) 是值模式(V alueModel), 包含单元格的值, 但也有其他模式供你建立定制的模式. 下面是默认的模式:
IV alueModel
IToolTipText
ICheckBox
ISortableHeader
每种模式包含各自特定功能的属性, 例如IToolTipText 包含提示条字符串.
每个单元格都有一个模式的集合, 允许使用单个单元格上的众多功能.
通常, 使用实体单元格时, 你可以使用一种模式简单实现以适当的接口直接存储所需的数据; 使用虚网格时, 你可以实现直接从外部数据源绑定值的接口. 8.外观(View)
命名空间: SourceGrid.Cells.Views
每个单元格都有一个View 属性, 返回或设置一个IView 类型的接口. 单元格使用此接口绘制和定制单元格的可视属性.
外观(View)的目的是从代码的其余部分中把绘图代码分离出来, 并且允许在单元格之间共用相同的可视特性。事实上,外观的同一实例可同时用于多个单元格, 这样, 可实现对系统资源使用的优化.
在SourceGrid.Cells.Views 命名空间中, 默认的外观类(View classes) 如下: SourceGrid.Cells.Views.Cell - 用于标准的单元格, 在此种外观下, 可以定制颜色, 字体, 边框和许多属性.
SourceGrid.Cells.Views.Button - 用于按钮风格的单元格, 有主题(theme)支持. SourceGrid.Cells.Views.Link - 用于链接风格的单元格.
SourceGrid.Cells.Views.CheckBox* - 用于复选框类型的单元格. 复选框可被选中, 禁止和包含标题文本.
SourceGrid.Cells.Views.Header* - 用于一般的标头单元格.
SourceGrid.Cells.Views.ColumnHeader* - 用于列标头单元格, 有主题(theme)支持.
SourceGrid.Cells.Views.RowHeader - 用于行标头单元格, 有主题(theme)支持SourceGrid.Cells.Views.MultiImages - 允许在单元格中绘制多个图像.
*星号标识的外观需要特定的组件恰当工作, 例如复选框外观(CheckBox view)需要一个ICheckBoxModel.
上面的某些类包含一个或数个有便捷默认实例的静态属性.
下面的代码演示如何建立一个外观类(View class), 改变单元格的某些属性, 并把它指派到上面建立的单元格中:
SourceGrid.Cells.Views.Cell view = new SourceGrid.Cells.Views.Cell();
view.BackColor = Color.Khaki;
grid1[0,0].View = view;
grid1[2,0].View = view;
编写一些代码行,你可以建立定制的外观,在此情况下,建议从已经拥有某些默认方法的Cell 派生类。在下面的示例中,建立这样一个外观——在单元格上绘制一个红色椭圆:
public class MyView : SourceGrid.Cells.Views.Cell
{
protected override void DrawCell_Background(SourceGrid.Cells.ICellVirtual p_Cell, SourceGrid.Position p_CellPosition, PaintEventArgs e, Rectangle p_ClientRectangle)
{
base.DrawCell_Background (p_Cell, p_CellPosition, e, p_ClientRectangle);
e.Graphics.DrawEllipse(Pens.Red, p_ClientRectangle);
}
}
以下列代码使用新的外观(View):
MyView myView = new MyView();
//填充网格代码
grid1[r, c].View = myView;
9.使用控制器(Controller)
命名空间: SourceGrid.Cells.Controllers
每个单元格都有一个Controller 属性,返回或设置为一个ControllerContainer 对象. 该类是一个IController 接口的集合。通过使用多个事件(如Click, MouseDown, KeyPress, ...), 每个IController 接口都可以被用于扩展单元格行为. 下面是默认的类:
SourceGrid.Cells.Controllers.Cell - 单元格的共有行为.
SourceGrid.Cells.Controllers.Button - 单元格作为按钮.
SourceGrid.Cells.Controllers.CheckBox* - 单元格有复选框行为(需要ICheckBox 模式)
SourceGrid.Cells.Controllers.ColumnFocus - 当单击标头单元格时, 用于设置列的焦点.
SourceGrid.Cells.Controllers.ColumnSelector - 当单击标头单元格时, 用于选中列. SourceGrid.Cells.Controllers.CustomEvents - 用于触发一系列事件, 而无须建立新的控制器
SourceGrid.Cells.Controllers.FullColumnSelection - 用于允许列选区模式. SourceGrid.Cells.Controllers.FullRowSelection - 用于允许行选区模式. SourceGrid.Cells.Controllers.MouseCursor - 用于显示在单元格上的鼠标指针. SourceGrid.Cells.Controllers.MouseInvalidate - 当接收到一个鼠标事件时, 用于使用单元格区失效.
SourceGrid.Cells.Controllers.Resizable - 用于建立可调整大小(宽度和高度)的单元
SourceGrid.Cells.Controllers.RowFocus - 当单击标头单元格时, 用于设置行的焦点.
SourceGrid.Cells.Controllers.RowSelector - 当单击标头单元格时, 用于选中行. SourceGrid.Cells.Controllers.SortableHeader* - 用于建立可排序的列标头单元格(需要ISortableHeader 模式)
SourceGrid.Cells.Controllers.ToolTipText* - 用于建立带提示条的单元格(需要IToolTipText 模式)
SourceGrid.Cells.Controllers.Unselectable - 用于建立不可选的单元格.
*星号标识的控制器(Controller), 需要特定的模式执行其任务.
上面的某些类包含一个或数个有便捷默认实例的静态属性.
下面是可用于控制器内部的事件:
鼠标事件: OnMouseDown, OnMouseUp, OnMouseMove, OnMouseEnter, OnMouseLeave
键盘事件: OnKeyUp, OnKeyDown, OnKeyPress
点击事件: OnDoubleClick, OnClick
焦点事件: OnFocusLeaving, OnFocusLeft, OnFocusEntering, OnFocusEntered, CanReceiveFocus
单元格取值事件: OnV alueChanging, OnV alueChanged
编辑事件: OnEditStarting, OnEditStarted, OnEditEnded
编写一些代码行,你可以建立定制的控制器(custom Controller),在此情况下,建议类从已经拥有某些默认方法的ControllerBase 派生。
在下列示例中,当用户在单元格之上移动鼠标时,建立一个改变单元格背景色的一个控制器:
public class MyController : SourceGrid.Cells.Controllers.ControllerBase
{
private SourceGrid.Cells.Views.Cell MouseEnterView = new SourceGrid.Cells.Views.Cell();
private SourceGrid.Cells.Views.Cell MouseLeaveView = new SourceGrid.Cells.Views.Cell();
public MyController()
{
MouseEnterView.BackColor = Color.Green;
}
public override void OnMouseEnter(SourceGrid.CellContext sender, EventArgs e)
{
base.OnMouseEnter (sender, e);
sender.Cell.View = MouseEnterView;
sender.Grid.InvalidateCell(sender.Position);
}
public override void OnMouseLeave(SourceGrid.CellContext sender, EventArgs e)
base.OnMouseLeave (sender, e);
sender.Cell.View = MouseLeaveView;
sender.Grid.InvalidateCell(sender.Position);
}
}
使用下面的代码, 在单元格格中使用新的控制器(Controller):
MyController myController = new MyController();
//...... code to populate the grid
grid1[r, c].AddController(myController);
你也可以添加一个控制器到整个网格中, 实现把同一控制器应用到所有的单元格中:
grid1.Controller.AddController(new MyController());
考虑下面的示例: 每次当用户单击单元格时, 下面的控制器就打开一个对话框(显示单元格取值):
class ClickController : SourceGrid.Cells.Controllers.ControllerBase
{
public override void OnClick(SourceGrid.CellContext sender, EventArgs e)
{
base.OnClick(sender, e);
object val = sender.Value;
if (val != null)
MessageBox.Show(sender.Grid, val.ToString());
}
}
你可以用下代码, 将此控制器添加到所有的单元格:
grid1.Controller.AddController(new ClickController());
下面是另一个实例, 演示当单元格改变时, 如何使用一个控制器检查, 它使用OnV alueChanged 事件:
public class V alueChangedEvent : SourceGrid.Cells.Controllers.ControllerBase
{
public override void OnValueChanged(SourceGrid.CellContext sender, EventArgs e)
{
base.OnV alueChanged(sender, e);
string val = "Value of cell {0} is '{1}'";
MessageBox.Show(sender.Grid, string.Format(val, sender.Position, sender.V alue));
}
}
你可以用下列代码, 将此控制器添加到所有的单元格:
grid1.Controller.AddController(new V alueChangedEvent());
这样, 每次当单元格的值改变时, 上面的控制器就使用单元格的位置和新的取值, 显示出一个信息对话框.
10.使用编辑器(Editor)
命名空间: SourceGrid.Cells.Editors
每个单元格都有属性Editor ,用于返回或设置一个EditorBase 对象。该类用于提供单元格编辑器。如果该属性为null,则不允许编辑单元格。
通常编辑器(Editor)使用Model 类来管理必要的转换, 特别是字符串转换(用于描述单元格取值).
下面是默认的类:
ComboBox - 组合框编辑器.
DateTimePicker - 日期时间选择编辑器
NumericUpDown - NumericUpDown 编辑.
TextBox - 文本框编辑. 这是比较常用的编辑器, 可被所有支持字符串转换的类型调用(string, int, double, enum,....).
TextBoxCurrency - 数值货币专用的文本框编辑器
TextBoxNumeric - 数值数据专用的文本框编辑器.
TimePicker - 时间值专用的DateTimePicker 编辑器.
TextBoxUITypeEditor - 提供给拥有UITypeEditor 的全部类型单元格使用. 这是一个非常有用的类, 因为许多类型都支持该类: DateTime, Font, enums, 也可以建立自定义的UITypeEditor.
ImagePicker - 一个可用于选择图像文件并且编辑byte[] 值的编辑器
在同一网格的多个单元格之间, 一个编辑器(Editor)可被共用; 举例来说,对一列中的每个单元格, 你可以使用同一个编辑器, 但是需要在同一网格中。
每个编辑器类(Editor class)都有一个Control 属性, 返回用于编辑单元格的Windows 窗体控件的一个实例. 你可以使用此实例来定制编辑器控件或实现高级功能.
下面是建立一个可被编辑的单元格的方式:
建立指定值类型的单元格. 这样, 单元格自动调用功能函数
SourceGrid.Cells.Editor.Factory.Create, 为指定类型或null 返回一个有效的编辑器(Editor).
//String cell
grid1[0, 0] = new SourceGrid.Cells.Cell("Hello", typeof(string));
//Double cell
grid1[0, 1] = new SourceGrid.Cells.Cell(0.7, typeof(double));分别建立编辑器(Editor), 然后把它指派到单元格:
//String editor
SourceGrid.Cells.Editors.IEditor editorString = SourceGrid.Cells.Editor.Factory.Create(typeof(string));
//Double editor
SourceGrid.Cells.Editors.IEditor editorDouble = SourceGrid.Cells.Editor.Factory.Create(typeof(double));
//String cell
grid1[0, 0] = new SourceGrid.Cells.Cell("Hello");
grid1[0, 0].Editor = editorString;
//Double cell
grid1[0, 1] = new SourceGrid.Cells.Cell(0.7);
grid1[0, 1].Editor = editorDouble;
当你需要为多个单元格使用相同的编辑器时, 推荐使用此方法。
人工建立适当的编辑器, 然后把它指派到单元格:
SourceGrid.Cells.Editors.TextBox txtBox =
new SourceGrid.Cells.Editors.TextBox(typeof(string));
grid1[2,0].Editor = txtBox;
如果你需要更强大的编辑器控件,或者有特别的需求时, 我建议人工建立编辑器. 举例来说明在此种情况下,人工建立类EditorTextBox , 然后设置属性MaxLength.
//String 型编辑器
SourceGrid.Cells.Editors.TextBox editorString = new SourceGrid.Cells.Editors.TextBox(typeof(string));
editorString.Control.MaxLength = 10;
//字符串单元格
grid1[0, 0] = new SourceGrid.Cells.Cell("Hello");
grid1[0, 0].Editor = editorString;编辑器也可以被用作定制单元格的格式, 在下面的代码中举例来说明(使用一种定制的数值格式):
//Double 型编辑器
SourceGrid.Cells.Editors.TextBoxNumeric editorDouble = new SourceGrid.Cells.Editors.TextBoxNumeric(typeof(double));
editorDouble.TypeConverter = new https://www.360docs.net/doc/9e14186448.html,ponentModel.Converter.NumberTypeConverter(typeof(double),
"#,###.00");
//字符串单元格
grid1[0, 0] = new SourceGrid.Cells.Cell(9419.3894);
grid1[0, 0].Editor = editorDouble;我已经用TypeConverter 属性定制了转换为字符串值, 以及从字符串转换的过程。
有许多其他的类型转换(TypeConverter)可用:
https://www.360docs.net/doc/9e14186448.html,ponentModel.Converter.NumberTypeConverter - 用于数值型, 如: double, decimal, int, float
https://www.360docs.net/doc/9e14186448.html,ponentModel.Converter.PercentTypeConverter - 用于以百分比格式表示的数值型, 如: double, decimal 和float.
https://www.360docs.net/doc/9e14186448.html,ponentModel.Converter.CurrencyTypeConverter - 用于以货币格式表示的Decimal 和double 类型.
https://www.360docs.net/doc/9e14186448.html,ponentModel.Converter.DateTimeTypeConverter - DateTime 类型.
下面是建立定制格式的DateTime 编辑器的另一个实例:
//有定制格式的DateTime 编辑器
string[] dtParseFormats = new string[] { dtFormat2 };
System.Globalization.DateTimeStyles dtStyles = System.Globalization.DateTimeStyles.AllowInnerWhite |
System.Globalization.DateTimeStyles.AllowLeadingWhite |
System.Globalization.DateTimeStyles.AllowTrailingWhite |
System.Globalization.DateTimeStyles.AllowWhiteSpaces; TypeConverter dtConverter = new https://www.360docs.net/doc/9e14186448.html,ponentModel.Converter.DateTimeTypeConverter(dtFormat2, dtParseFormats, dtStyles);
SourceGrid.Cells.Editors.TextBoxUITypeEditor editorDt2 = new SourceGrid.Cells.Editors.TextBoxUITypeEditor(typeof(DateTime));
editorDt2.TypeConverter = dtConverter;
grid[currentRow, 1] = new SourceGrid.Cells.Cell(DateTime.Today);
grid[currentRow, 1].Editor = editorDt2;
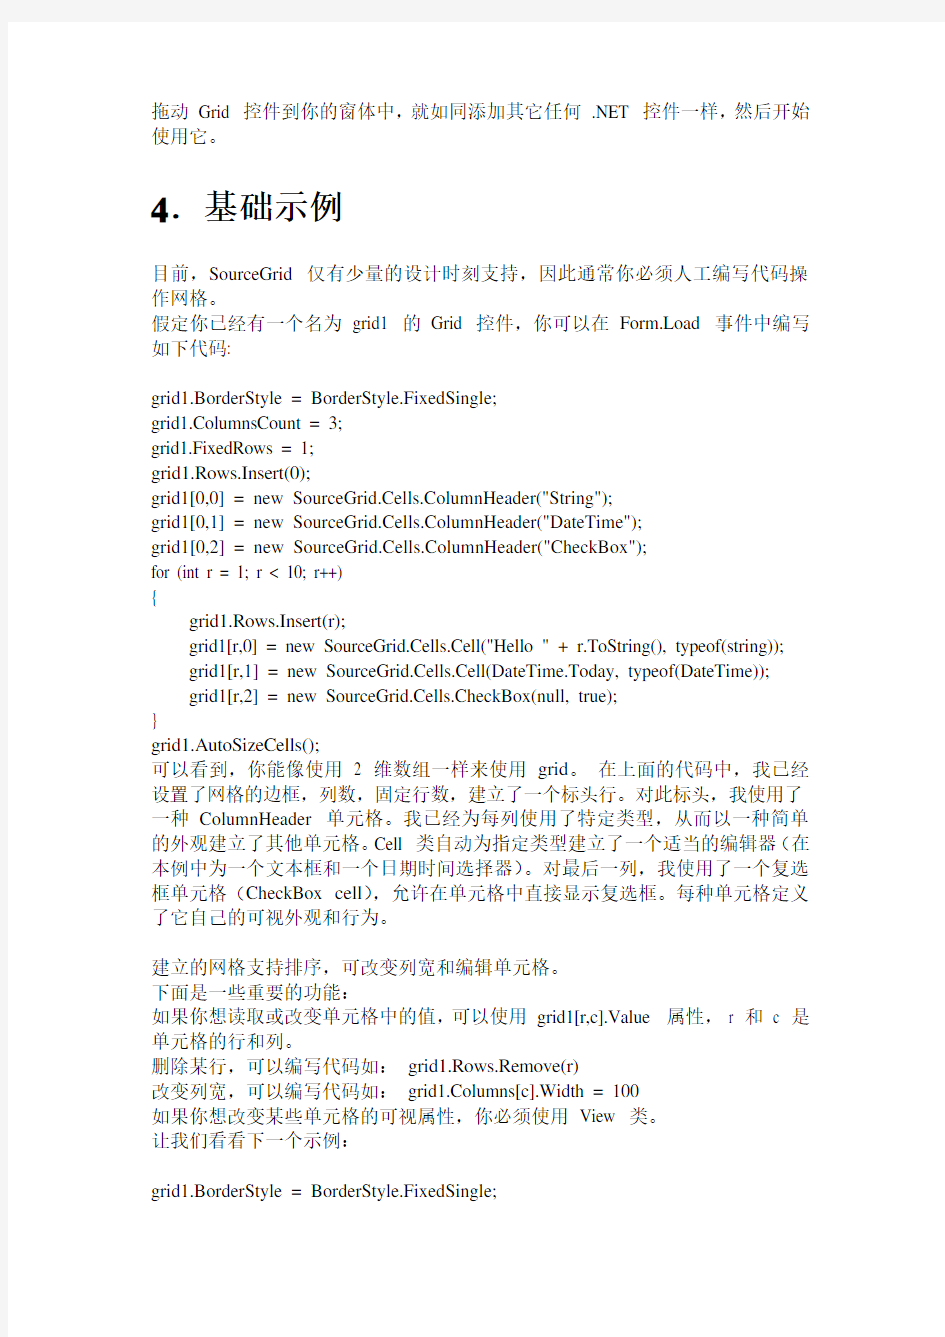
下图表示大部份可用的编辑器和一些特定单元格(图片从例 3 取得):
以用户控件或特定行为的少量代码行, 来建立一个定制的编辑器(Editor)是可行的。
你可以从EditorControlBase 派生自定义类, 并建立任何Windows 窗体控件。下面是使用DateTimePicker 控件的一个编辑器的示例:
public class DateTimePicker : EditorControlBase
{
public DateTimePicker():base(typeof(System.DateTime))
{
}
protected override Control CreateControl()
{
System.Windows.Forms.DateTimePicker dtPicker =
new System.Windows.Forms.DateTimePicker();
dtPicker.Format = DateTimePickerFormat.Short;
dtPicker.ShowCheckBox = AllowNull;
return dtPicker;
}
protected override void OnChanged(EventArgs e)
{
base.OnChanged(e);
if (Control != null)
Control.ShowCheckBox = AllowNull;
}
public new System.Windows.Forms.DateTimePicker Control
{
get
{
return (System.Windows.Forms.DateTimePicker)base.Control;
}
}
protected override void OnStartingEdit(CellContext cellContext,
Control editorControl)
{
base.OnStartingEdit(cellContext, editorControl);
System.Windows.Forms.DateTimePicker dtPicker =
(System.Windows.Forms.DateTimePicker)editorControl;
dtPicker.Font = cellContext.Cell.View.Font;
}
public override void SetEditV alue(object editV alue)
{
if (editV alue is DateTime)
Control.V alue = (DateTime)editV alue;
else if (editV alue == null)
Control.Checked = false;
else
throw new SourceGridException
("Invalid edit value, expected DateTime");
}
public override object GetEditedV alue()
{
if (Control.Checked)
return Control.V alue;
else
return null;
}
protected override void OnSendCharToEditor(char key)
{
}
}
思考:对于有许多单元格但只有一个网格控件时, 你可以共用同一个编辑器的实例。基本上每个编辑器都只与一个网格相关。
因为每个编辑器只与一个Windows 窗体控件相关(因此它是非常繁重的?), 所以对于大型网格,共用编辑器总是一个好主意.
11.高级单元格应用
命名空间: SourceGrid.Cells
可用的默认单元格有:
SourceGrid.Cells.Virtual ——此命名空间包含可以与GridVirtual 控件一起使用的所有的虚单元格。
CellVirtual - 基本单元格;用于大部分常规的虚单元格类型.
Header - 标头单元格.
ColumnHeader - 列头单元格.
RowHeader - 行头单元格.
Button - 按钮单元格.
CheckBox - 复选框单元格.
ComboBox - 组合框单元格
Link - 链接风格的单元格.
Image - 图象单元格.
SourceGrid.Cells ——此命名空间包含可以与Grid 控件一起使用的所有的实体单元格.
Cell - 所有其他类型的基本单元格, 用于最普通类型的实体单元格。
Header - 标头单元格.
ColumnHeader - 列头单元格.
RowHeader - 行头单元格.
Button - 按钮单元格.
CheckBox - 复选框单元格.
ComboBox - 组合框单元格.
Link - 链接风格的单元格.
Image - 图象单元格.
这些类的目的是简化外观(View)、模式(Model)、控制器(Controller)和编辑器(Editor)类的使用。如果我们看一下任一个单元格类的代码, 我们就能明白这些类是按照单元格的角色使用这些组件的。
举例来说,SourceGrid.Cells.CheckBox 单元格的代码如下:
public class CheckBox : Cell
{
public CheckBox(string caption, bool checkV alue):base(checkValue)
{
if (caption != null && caption.Length > 0)
View = Views.CheckBox.MiddleLeftAlign;
else
View = Views.CheckBox.Default;
Model.AddModel(new Models.CheckBox());
AddController(Controllers.CheckBox.Default);
AddController(Controllers.MouseInvalidate.Default);
Editor = new Editors.EditorBase(typeof(bool));
Caption = caption;
}
private Models.CheckBox CheckBoxModel
{
get{return
(Models.CheckBox)Model.FindModel(typeof(Models.CheckBox));}
}
public bool Checked
{
get{return CheckBoxModel.GetCheckBoxStatus(this, Range.Start).Checked;}
set{CheckBoxModel.SetCheckedV alue(this, Range.Start, value);}
}
public string Caption
{
get{return CheckBoxModel.Caption;}
set{CheckBoxModel.Caption = value;}
}
}
12.焦点和选区
一个单元格能被选定, 或者能取得焦点。当许多单元格被选中的时候, 只有一个单元格能取得被Grid.Selection.ActivePosition 属性标识的焦点。在网格的Selection 对象中, 有一个单元格被选中。
取得焦点的单元格接收所有的鼠标和键盘事件, 选中单元格可以接收复制、粘贴和清除的操作。
你可以使用Grid.Selection.Focus(Position pos) 方法设置焦点到指定的单元格上, 使用输入的单元格位置将获取焦点, 使用Position.Empty 作为参数则移除焦点. 使用Grid.Selection.SelectCell 方法或SelectRange 方法增加指定单元格到选区, 或从选区移除单元格
要列示所有选中的单元格, 你可以使用Grid.Selection.GetRanges() 方法返回选区的列表, 或使用IsSelectedCell 方法检查特定的单元格是否被选中. 通过使用Grid.Selection.BackColor, Grid.Selection.Border, Grid.Selection.FocusBackColor 等属性,你可以定制选区的各种外观.
你也可以使用这些事件响应用户的特定操作: Grid.Selection.FocusRowEntered, Grid.Selection.FocusRowLeaving, Grid.Selection.FocusColumnEntered, Grid.Selection.FocusColumnLeaving, Grid.Selection.CellLostFocus, Grid.Selection.CellGotFocus, Grid.Selection.SelectionChanged, ...
你可以使用Grid.SelectionMode 属性设定选区的模式。可用的选项有: GridSelectionMode.Cell, GridSelectionMode.Row 和GridSelectionMode.Column. 这样,你就能设置网格选中整行、整列, 或者只是一个单元格。
允许或禁止多个选区, 必须使用Grid.Selection.EnableMultiSelection 属性. 按下Ctrl 或Shift 键, 你可以使用鼠标选中多个单元格。
13.Position 和Range 结构
项目中最常用的 2 个对象是结构Position 和Range. 结构Position 以一个行(Row)和一个列(Column) 标识位置, 结构Range 从一个起始Position 和一个结
束Position 标识一组单元格.
你可以使用grid.PositionToRectangle 方法读取指定单元格的实际位置. 因此产生的矩形相对于网格的用户区域。你可以使用grid.PointToScreen 把产生的矩形转换为绝对的屏幕坐标.
你可以使用grid.PositionAtPoint 方法, 为特定的用户区域点(Point)获取位置(Position).
14.CellContext结构
CellContext 是由一个Cell 和一个Position 组成的结构, 包含所有操作单元格的方法.
最重要的方法是:
StartEdit/EndEdit ——在特定的单元格上开始/停止编辑
DisplayText ——返回单元格的文本(string)
V alue ——返回单元格的值(object)
下面是一个普通的示例,演示如何使用CellContext 类:
SourceGrid.CellContext context = new SourceGrid.CellContext(grid, new SourceGrid.Position(r, c));
context.V alue = "hello";
context.StartEdit();
通常以一个CellContext 实例作为controller 事件的参数被自动创建,这样你总是可以访问主要的单元格属性。
15.高级功能
15.1使用边框(Border)
每个View 类都有一个DevAge.Drawing.IBorder 类型的Border 属性. DevAge.Drawing.IBorder 是一个泛型接口, 可用于绘制单元格的边框.
通常IBorder 接口被DevAge.Drawing.RectangleBorder 结构执行.
下面是一个改变单元格边框的示例:
DevAge.Drawing.Border border = new DevAge.Drawing.Border(Color.Red, 1); DevAge.Drawing.RectangleBorder cellBorder = new DevAge.Drawing.RectangleBorder(border, border);
SourceGrid.Cells.Views.Cell view = new SourceGrid.Cells.Views.Cell();
view.Border = cellBorder;
grid[r, c].View = view;
默认的边框设置只是右边框和底边框, 这样, 当有一组单元格时, 你会看见一个双边框.
你也可以使用Grid.BorderStyle 属性设置网格的边框.
15.2使用单元格提示条(ToolTip)
你可以在每个单元格上绑定一个提示条(ToolTip). 必须建立一个SourceGrid.Cells.Controllers.ToolTipText 控制器, 并把它关联到单元格中.示例如下:
SourceGrid.Cells.Controllers.ToolTipText toolTipController = new SourceGrid.Cells.Controllers.ToolTipText();
toolTipController.ToolTipTitle = "ToolTip example";
toolTipController.ToolTipIcon = https://www.360docs.net/doc/9e14186448.html,;
toolTipController.IsBalloon = true;
grid1[r, c] = new SourceGrid.Cells.Cell("Hello");
grid1[r, c].ToolTipText = "Example of tooltip, bla bla bla ....";
grid1[r, c].AddController(toolTipController);
单元格的ToolTipText 属性自动把一个SourceGrid.Cells.Models.IToolTipText 接口绑定到标准单元格上.
备注: 在GridVirtual 上使用提示条, 必须定义自己的
SourceGrid.Cells.Models.IToolTipText 执行, 从数据源中读取数据, 然后添加控制器和模式到虚单元格.
15.3使用上下文菜单(ContextMenu)
使用下列代码, 你可以为单元格建立一个上下文菜单(快捷菜单) . 首先以ContextMenu 定义一个控制器(controller):
//以ContextMenu 定义一个controller
public class PopupMenu : SourceGrid.Cells.Controllers.ControllerBase
{
ContextMenu menu = new ContextMenu();
public PopupMenu()
{
menu.MenuItems.Add("Menu 1", new EventHandler(Menu1_Click));
menu.MenuItems.Add("Menu 2", new EventHandler(Menu2_Click));
}
public override void OnMouseUp(SourceGrid.CellContext sender, MouseEventArgs e)
{
base.OnMouseUp (sender, e);
if (e.Button == MouseButtons.Right)
menu.Show(sender.Grid, new Point(e.X, e.Y));
}
private void Menu1_Click(object sender, EventArgs e)
{
//TODO Y our code here
}
private void Menu2_Click(object sender, EventArgs e)
{
//TODO Y our code here
}
}
然后增加控制器到单元格中:
PopupMenu menuController = new PopupMenu();
...
grid1[r, c] = new SourceGrid.Cells.Cell("Hello");
grid1[r, c].AddController(menuController);
15.4剪贴板操作(Clipboard)
SourceGrid 支持剪贴板复制, 粘贴和剪切操作. 使用下面代码允许使用这些功能:
grid1.ClipboardMode = SourceGrid.ClipboardMode.All;
用户可以使用Ctrl+C, Ctrl+V , Ctrl+X 键复制, 粘贴和剪切选定单元格, 使用Delete 键清除单元格内容.
15.5拖放操作(drag and drop)
不被支持: 从 4.5 版开始, 拖放(drag and drop)不再被支持, 我将尝试以后再次增加此功能.
16.使用建议
通常, 使用SourceGrid 时, 你必须以代码完成所有工作, 为此, 一个重要的建议是以一种良好的可重用的习惯组织代码.下面是一些小贴士:
如果你需要定制某些单元格的外观, 建议建立一个新类, 并在此类编写定制代码.
以这种习惯, 你可以在所有应用程序和窗体中重用类. 举例来说, 假如你需要指定所有单元格的背景色为灰色, 可以新建下面的类:
public class GrayView : SourceGrid.Cells.Views.Cell
{
public new static readonly GrayView Default = new GrayView();
public GrayView()
{
BackColor = Color.LightGray;
}
}
public class GrayCell : SourceGrid.Cells.Cell
{
public GrayCell(object val):base(val)
{
View = GrayView.Default;
}
}
此规则可以应用在网格的任何外观, 举例来说, 你可以建立一个新的Controller 类, 并在单元格中使用它
我们可以在上面的代码中看到的另一个重要的特色是, 我从一个static 变量指定了View 属性. 以这种方式, 你可以共用相同的实例到众多单元格中, 使系统资源最优化.
另一个小建议是关于使用命名空间的. 许多SourceGrid 类与系统类有着相同的名称. 举例来说, 有一个CheckBox 单元格, System.Windows.Forms 中CheckBox 控件与此同名, 出于此种原因, 某一时刻正常使用using 语句有些困难. 如果你不喜欢使用长命名空间, 希望可读性更好的代码, 我建议在using 语句中改变命名空间的名称. 举例来说, 你可以把下列代码:
SourceGrid.Cells.Button bt = new SourceGrid.Cells.Button();
替换为::
using Cells = SourceGrid.Cells;
.................
Cells.Button bt = new Cells.Button();
17.扩展功能
另外, 默认的Grid 控件有一些控件功能, 可用于某些情况. 你可以直接使用这些扩展功能之一, 或复制代码建立你自己的扩展功能.