cisco思科。经典VLAN .ACL等3层交换机配置实力。图解, 命令。
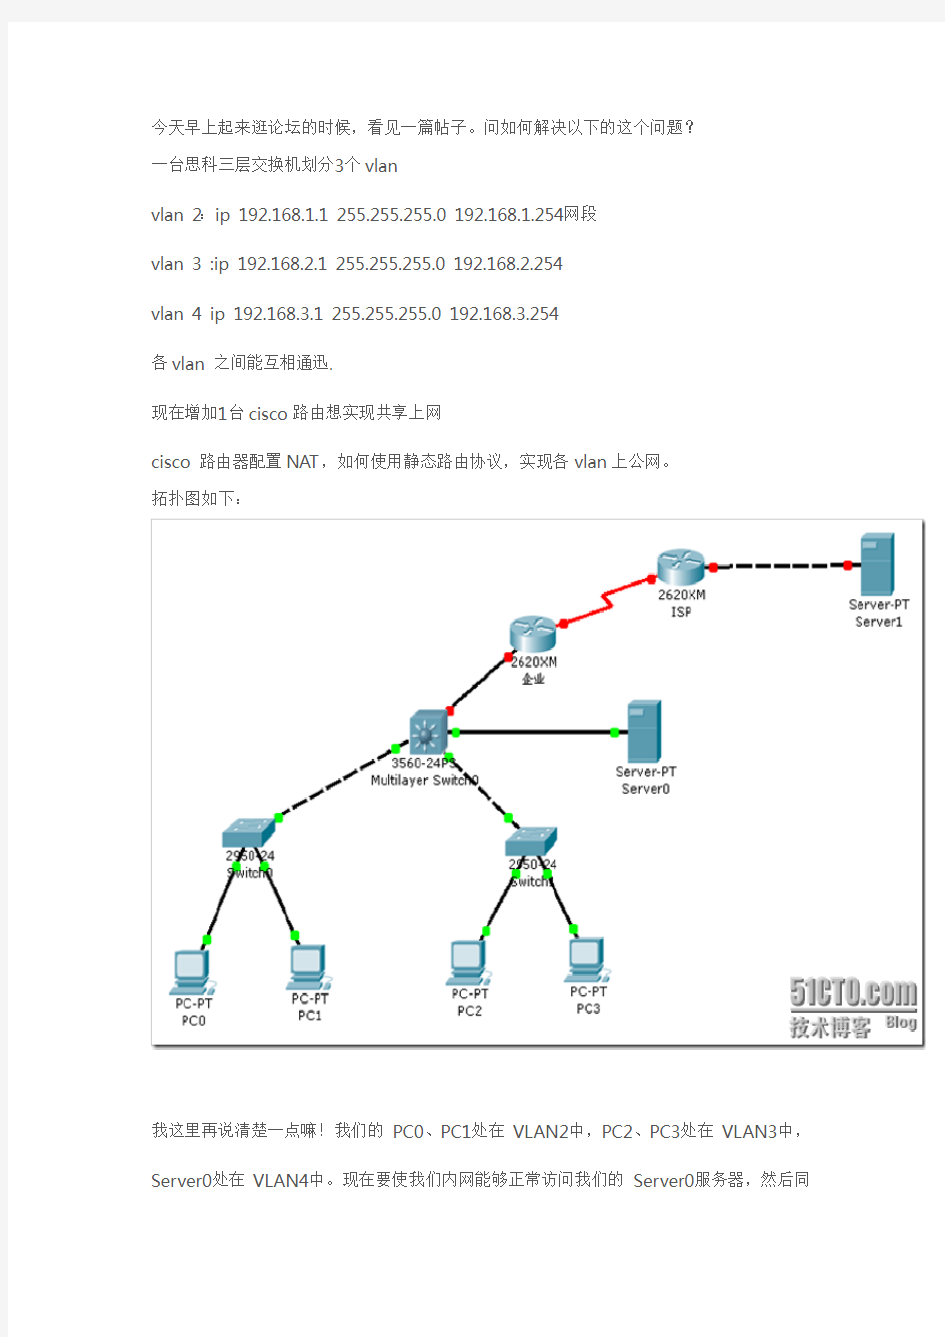

今天早上起来逛论坛的时候,看见一篇帖子。问如何解决以下的这个问题?
一台思科三层交换机划分3个vlan
vlan 2:ip 192.168.1.1 255.255.255.0 192.168.1.254 网段
vlan 3 :ip 192.168.2.1 255.255.255.0 192.168.2.254
vlan 4 ip 192.168.3.1 255.255.255.0 192.168.3.254
各vlan 之间能互相通迅.
现在增加1台cisco路由想实现共享上网
cisco 路由器配置NAT,如何使用静态路由协议,实现各vlan上公网。
拓扑图如下:
我这里再说清楚一点嘛!我们的PC0、PC1处在VLAN2中,PC2、PC3处在VLAN3中,Server0处在VLAN4中。现在要使我们内网能够正常访问我们的Server0服务器,然后同
时还要能够访问我们的ISP外网的WWW服务器。
那么我们现在从三层交换机开始来配置,我们现在来看看如何配置呢?Switch#conf t
Enter configuration commands, one per line. End with CNTL/Z.
Switch(config)#vlan 2 创建VLAN2
Switch(config-vlan)#exi
Switch(config)#vlan 3 创建VLAN3
Switch(config-vlan)#exi
Switch(config)#vlan 4 创建VLAN4
Switch(config-vlan)#exit
Switch(config)#int fa0/1 将我们的fa0/1添加到VLAN2中
Switch(config-if)#sw mo ac
Switch(config-if)#sw ac vlan 2
Switch(config-if)#exit
Switch(config)#int fa0/2 将我们的FA0/2添加到VLAN3中
Switch(config-if)#sw mo ac
Switch(config-if)#sw ac vlan 3
Switch(config-if)#exit
Switch(config)#int fa0/3 将我们的FA0/3添加到VLAN4中
Switch(config-if)#sw mo ac
Switch(config-if)#sw ac vlan 4
Switch(config-if)#exit
Switch(config)#int vlan 2 给我们的VLAN2添加一个IP地址,用于不同网段之间互相访问Switch(config-if)#ip add 192.168.1.1 255.255.255.0
Switch(config-if)#exit
Switch(config)#int vlan 3 给我们的VLAN3添加一个IP地址
Switch(config-if)#ip add 192.168.2.1 255.255.255.0
Switch(config-if)#exit
Switch(config)#int vlan 4给我们的VLAN4添加一个IP地址
Switch(config-if)#ip add 192.168.3.1 255.255.255.0
Switch(config-if)#no shut
Switch(config-if)#exit
以下几行是用给给我们不同的VLAN内的主机自动分配我们的IP地址。
Switch(config)#ip dhcp pool VLAN2
Switch(dhcp-config)#network 192.168.1.0 255.255.255.0
Switch(dhcp-config)#default-router 192.168.1.1
Switch(dhcp-config)#exit
Switch(config)#ip dhcp pool VLAN3
Switch(dhcp-config)#network 192.168.2.0 255.255.255.0
Switch(dhcp-config)#default-router 192.168.2.1
Switch(dhcp-config)#exit
Switch(config)#
我们现在去PC0上面看看能够分配到IP地址不?
我们服务器的IP地址一般都得手工配置,如果使用DHCP来自动分配的话,到最后那台服务器的IP地址是那一个我们都不太添楚呢?所以我们一般都是手工输入。
我们现在来测试一下看看我们内网,通过三层交换机在不同的VLAN间互相访问有没有问题?
从PC0上在我们可以看见,从PC0可以到达VLAN3与VLAN4,这就说明我们通过三层交换机,可以实现VLAN间路由,那么我们加一台路由器以后,我们怎么来解决呢?
Switch(config)#int fa0/24
Switch(config-if)#no switchport 关闭二层端口,这样就可以配置IP地址了
Switch(config-if)#ip add 192.168.5.1 255.255.255.0 它现在是一个三层端口,它可以配置IP地
址
Switch(config-if)#no shut
Switch(config-if)#exit
Switch(config)#ip routing 开启路由功能,如果不开启路由功能就不能使用路由协议
Switch(config)#router rip 我们这里运行一个rip协议
Switch(config-router)#ver 2
Switch(config-router)#no au
Switch(config-router)#net 192.168.1.0
Switch(config-router)#net 192.168.2.0
Switch(config-router)#net 192.168.3.0
Switch(config-router)#net 192.168.5.0
Switch(config-router)#exit
Switch(config)#
我们现在去路由器上面来看看它的配置。
Router(config)#int fa0/0
Router(config-if)#ip add 192.168.5.2 255.255.255.0
Router(config-if)#no shut
Router(config-if)#exit
Router(config)#int s0/0
Router(config-if)#ip add 202.1.1.1 255.255.255.0
Router(config-if)#no shut
Router(config-if)#exit
Router(config)#router rip
Router(config-router)#ver 2
Router(config-router)#no au
Router(config-router)#net 192.168.5.0
Router(config-router)#default-information originate 它的作用是给我们三层路由器分配一条默认路由出去!
Router(config-router)#exit
Router(config)#
我们在我们的路由器上面查看一下我们的路由表。
Router#sh ip route
Codes: C - connected, S - static, I - IGRP, R - RIP, M - mobile, B -
BGP
D - EIGRP, EX - EIGRP external, O - OSPF, IA - OSPF inter area
N1 - OSPF NSSA external type 1, N2 - OSPF NSSA external type 2
E1 - OSPF external type 1, E2 - OSPF external type 2, E - EGP
i - IS-IS, L1 - IS-IS level-1, L2 - IS-IS level-2, ia - IS-IS inter area
* - candidate default, U - per-user static route, o - ODR
P - periodic downloaded static route
Gateway of last resort is not set
R 192.168.1.0/24 [120/1] via 192.168.5.1, 00:00:17,
FastEthernet0/0
R 192.168.2.0/24 [120/1] via 192.168.5.1, 00:00:17,
FastEthernet0/0
R 192.168.3.0/24 [120/1] via 192.168.5.1, 00:00:17,
FastEthernet0/0
C 192.168.5.0/24 is directly connected, FastEthernet0/0
Router#
我们可以看见上面三条是我们在三层交换机上面配置的SVI接口。我们在PC0上面再来测试一下看看能够ping通我们的路由器呢?
我们可以看见,能够正常访问我们的路由器,那我们在路由器上面来做NAT访问我们的ISP 以及公网的WWW服务器。
Router(config)#access-list 1 permit 192.168.1.0 0.0.0.255
Router(config)#access-list 1 permit 192.168.2.0 0.0.0.255
Router(config)#access-list 1 permit 192.168.3.0 0.0.0.255
Router(config)#ip nat inside source list 1 interface s0/0
overload
Router(config)#int s0/0
Router(config-if)#ip nat outside
Router(config-if)#exit
Router(config)#int fa0/0
Router(config-if)#ip nat inside
Router(config-if)#end
Router(config)#ip route 0.0.0.0 0.0.0.0 s0/0
以上这几条是允许192.168.1.0/24、192.168.2.0/24、192.168.3.0/24这三个网段可以通过NAT出去。
我们现在把ISP端配置起来!
Router#conf t
Enter configuration commands, one per line. End with
CNTL/Z.
Router(config)#host ISP
ISP(config)#int s0/0
ISP(config-if)#ip add 202.1.1.2 255.255.255.0
ISP(config-if)#no shut
ISP(config-if)#clock rate 64000
ISP(config-if)#exit
ISP(config)#int fa0/0
ISP(config-if)#ip add 202.1.2.1 255.255.255.0
ISP(config-if)#no shut
ISP(config-if)#exit
ISP(config)#
下面我们来看看ISP端的WWW服务器的IP地址。
好了,我们现在基本上配置都完成了。我们去PC0上面来测试一下看看。
看看我们现在能够正常访问我们的ISP端的WWW服务器。
思科设备交换机vlantrunk配置
本次讲解vlan trunk配置方法: 本例配置模型图 命令行: 以下为switchA配置: Switch> Switch>enable Switch#vlan database % Warning: It is recommended to configure VLAN from config mode, as VLAN database mode is being deprecated. Please consult user documentation for configuring VTP/VLAN in config mode.
Switch(vlan)#vlan 2 name TztA VLAN 2 added: Name: TztA Switch(vlan)#vlan 3 name TztB VLAN 3 added: Name: TztB Switch(vlan)#exit APPLY completed. Exiting.... Switch#wr Building configuration... [OK] Switch#config t Enter configuration commands, one per line. End with CNTL/Z. Switch(config)#int f0/1 Switch(config-if)#sw mo ac Switch(config-if)#sw acc vlan 2 Switch(config-if)#int f0/2 Switch(config-if)#sw mo ac Switch(config-if)#sw acc vlan 3 Switch(config-if)#exit Switch(config)#exit
思科交换机实用配置步骤详解
1.交换机支持的命令: 交换机基本状态: switch: ;ROM状态,路由器是rommon> hostname> ;用户模式 hostname# ;特权模式 hostname(config)# ;全局配置模式 hostname(config-if)# ;接口状态交换机口令设置: switch>enable ;进入特权模式 switch#config terminal ;进入全局配置模式 switch(config)#hostname ;设置交换机的主机名 switch(config)#enable secret xxx ;设置特权加密口令 switch(config)#enable password xxa ;设置特权非密口令switch(config)#line console 0 ;进入控制台口 switch(config-line)#line vty 0 4 ;进入虚拟终端 switch(config-line)#login ;允许登录 switch(config-line)#password xx ;设置登录口令xx switch#exit ;返回命令
交换机VLAN设置: switch#vlan database ;进入VLAN设置 switch(vlan)#vlan 2 ;建VLAN 2 switch(vlan)#no vlan 2 ;删vlan 2 switch(config)#int f0/1 ;进入端口1 switch(config-if)#switchportaccess vlan 2 ;当前端口加入vlan 2 switch(config-if)#switchport mode trunk ;设置为干线 switch(config-if)#switchport trunk allowed vlan 1,2 ;设置允许的vlan switch(config-if)#switchport trunk encap dot1q ;设置vlan 中继switch(config)#vtp domain ;设置发vtp域名 switch(config)#vtp password ;设置发vtp密码 switch(config)#vtp mode server ;设置发vtp模式 switch(config)#vtp mode client ;设置发vtp模式 交换机设置IP地址: switch(config)#interface vlan 1 ;进入vlan 1 switch(config-if)#ipaddress ;设置IP地址 switch(config)#ip default-gateway ;设置默认网关
三层交换机划分个vlan实现其互相通迅
综合实验 一台思科三层交换机划分3个vlanvlan2:ip网段vlan3:ipvlan4ip各vlan之间能互相通迅.现在增加1台cisco路由想实现共享 我们的PC0、PC1处在VLAN2中,PC2、PC3处在VLAN3中,Server0处在VLAN4中。现在要使我们内网能够正常访问我们的Server0服务器,然后同时还要能够访问我们的ISP外网的WWW服务器。 三层交换机的配置 Switch#configt Switch(config)#vlan2创建VLAN2 Switch(config-vlan)#exi Switch(config)#vlan3创建VLAN3 Switch(config-vlan)#exi Switch(config)#vlan4创建VLAN4 Switch(config-vlan)#exit Switch(config)#intfa0/2将我们的fa0/2添加到VLAN2中 Switch(config-if)#swmoac
Switch(config-if)#swacvlan2 Switch(config-if)#exit Switch(config)#intfa0/3将我们的FA0/3添加到VLAN3中 Switch(config-if)#swmoac Switch(config-if)#swacvlan3 Switch(config-if)#exit Switch(config)#intfa0/4将我们的FA0/4添加到VLAN4中 Switch(config-if)#swmoac Switch(config-if)#swacvlan4 Switch(config-if)#exit Switch(config)#intvlan2给我们的VLAN2添加一个IP地址,用于不同网段之间互相访问 Switch(config-if)#ipadd Switch(config-if)#exit Switch(config)#intvlan3给我们的VLAN3添加一个IP地址 Switch(config-if)#ipadd
CISCO配置VLAN
CISCO配置VLAN ?在交换机S1上配置VLAN ? VLAN编号 1、默认情况下,VLAN 1为本机VLAN和管理VLAN。 2、VLAN 1&&VLAN 1002-1005被预留,不能使用、修改、重命名或删除。 3、编号大于1005的被称为扩展VLAN,一般不会被保存到数据库中。 4、默认情况下,所有端口都属于VLAN 1 ? ?
将交换机端口分配给VLAN 步骤: 1、打开端口(interface f0/3) 2、告诉交换机这是一个非中继第二层端口(switchport mode access) 3、将端口分配给VLAN(switchport access vlan 3)
? ?配置中继端口 1、switchport mode access 将接口设置为永久非中继模式,且将链路设置为非中继链路。(无论另一端是否是非中继接口) 2、switchport mode trunk 将接口设置为永久中继模式,且将链路设置为中继链路。(无论另一端是否是中继接口) (注:一方为trunk,另一方为access,则链路为有限的连接) 3、switchport mode dynamic auto 当另一边为trunk或desirable时:链路为trunk。 当另一边为access或auto时:链路为access。 4、switchport mode dynamic desirable 只有另一边为access,链路方为access。 5、switchport nonegotiate 防止接口生成DTP帧。 只有接口模式为access或trunk时,才可以使用此命令。
思科交换机VLAN配置
配置C i s c o交换机V L A N配置 进入特权模式 Switch#en 进入配置模式 Switch#config 创建VLAN: Switch(config)# vlan10 (创建VLAN) 给VLAN 起名字 Switch#config Switch(config)# valn 20 Switch(vlan)# name neiwang Switch(vlan)#ex 分配端口(将f 0/1-f 0/10端口划归vlan20,f 0/11-f 0/24端口划归vlan30): Switch(config)#int range f0/1-10(多端口) Switch(config-if-range)#switchport mode access(必须) Switch(config-if-range)#switchport access vlan 20 Switch(config-if-range)#ex Switch(config)#int range f0/11-24 Switch(config-if-range)#switchport mode access Switch(config-if-range)#switchport access vlan 30 Switch(config-if-range)#ex 设置VLAN的IP地址 Switch#config Switch(config)#int vlan 20 1 Switch(config-if)#no shutdown Switch(config-if)#ex Switch(config)#int vlan 30 Switch(config-if)#ip address shutdown Switch(config-if)#ex Switch(config)#ex Switch#ex 保存设置 Switch#wr 设置一台交换机VLAN之间互通写路由
cisco三层交换机vlan间路由配置实例
cisco三层交换机vlan间路由配置实例 下面以cisco3560实例说明如何在一个典型的快速以太局域网中实现VLAN。所谓典型局域网就是指由一台具备三层交换功能的核心交换机接几台分支交换机(不一定具备三层交换能力)。我们假设核心交换机名称为:COM;分支交换机分别为:PAR1、PAR2、PAR3,分别通过Port 1的光线模块与核心交换机相连;并且假设VLAN名称分别为COUNTER、MARKET、MANAGING…… 需要做的工作: 1、设置VTP DOMAIN(核心、分支交换机上都设置) 2、配置中继(核心、分支交换机上都设置) 3、创建VLAN(在server上设置) 4、将交换机端口划入VLAN 5、配置三层交换 1、设置VTP DOMAIN。 VTP DOMAIN 称为管理域。 交换VTP更新信息的所有交换机必须配置为相同的管理域。如果所有的交换机都以中继线相连,那么只要在核心交换机上设置一个管理域,网络上所有的交换机都加入该域,这样管理域里所有的交换机就能够了解彼此的VLAN列表。 COM#vlan database 进入VLAN配置模式 COM(vlan)#vtp domain COM 设置VTP管理域名称 COM COM(vlan)#vtp server 设置交换机为服务器模式 PAR1#vlan database 进入VLAN配置模式 PAR1(vlan)#vtp domain COM 设置VTP管理域名称COM PAR1(vlan)#vtp Client 设置交换机为客户端模式 PAR2#vlan database 进入VLAN配置模式 PAR2(vlan)#vtp domain COM 设置VTP管理域名称COM PAR2(vlan)#vtp Client 设置交换机为客户端模式 PAR3#vlan database 进入VLAN配置模式 PAR3(vlan)#vtp domain COM 设置VTP管理域名称COM PAR3(vlan)#vtp Client 设置交换机为客户端模式 注意:这里设置核心交换机为Server模式是指允许在该交换机上创建、修改、删除VLAN 及其他一些对整个VTP域的配置参数,同步本VTP域中其他交换机传递来的最新的VLAN 信息;Client模式是指本交换机不能创建、删除、修改VLAN配置,也不能在NVRAM中存储VLAN配置,但可同步由本 VTP域中其他交换机传递来的VLAN信息。 2、配置中继为了保证管理域能够覆盖所有的分支交换机,必须配置中继。Cisco交换机能够支持任何介质作为中继线,为了实现中继可使用其特有的ISL标签。ISL (Inter-Switch Link)是一个在交换机之间、交换机与路由器之间及交换机与服务器之间传递多个VLAN信息及VLAN数据流的协议,通过在交换机直接相连的端口配置 ISL封装,即可跨越交换机进行整个网络的VLAN分配和进行配置。 在核心交换机端配置如下: COM(config)#interface gigabitEthernet 2/1 COM(config-if)#switchport COM(config-if)#switchport trunk encapsulation isl 配置中继协议 COM(config-if)#switchport mode trunk COM(config)#interface gigabitEthernet 2/2 COM(config-if)#switchport COM(config-if)#switchport trunk encapsulation isl 配置中继协议 COM(config-if)#switchport mode trunk COM(config)#interface gigabitEthernet 2/3 COM(config-if)#switchport COM(config-if)#switchport trunk encapsulation isl 配置中继协议 COM(config-if)#switchport mode trunk 在分支交换机端配置如下: PAR1(config)#interface gigabitEthernet 0/1
思科2960交换机配置命令
思科2960交换机配置命令 交换机的端口工作模式一般可以分为三种:Access(普通模式),Multi(多vlan模式),Trunk(中继模式)。1、允许多个vlan的是multi模式,而不是trunk 模式。2、两个都设为trunk模式:一:如果在同一交换机上,则决不会在同一vlan;二:如果是两个交换机上,且两端口物理连接的话,共享vlan信息。但是这两个端口已经被使用,所以只能说,使用与这两个端口相同vlan的端口的计算机是同一虚拟局域网。3、access和multi模式下,端口用于计算机;trunk 模式下,端口用于交换机间连接。所以access和trunk没有可比性。 交换机基本状态: switch ;ROM状态,路由器是rommon hostname ;用户模式 hostname# ;特权模式 hostname(config)# ;全局配置模式 hostname(config-if)# ;接口状态 交换机口令设置: switchenable ;进入特权模式 switch#config terminal ;进入全局配置模式 switch(config)#hostname ;设置交换机的主机名 switch(config)#enable secret xxx ;设置特权加密口令 switch(config)#enable password xxa ;设置特权非密口令 switch(config)#line console 0 ;进入控制台口 switch(config-line)#line vty 0 4 ;进入虚拟终端 switch(config-line)#login ;允许登录 switch(config-line)#password xx ;设置登录口令xx switch#exit ;返回命令
CISCO交换机配置操作学习教程
CISCO交换机配置操作学习教程 1.注意事项 1.交换机启动需要大约4-5分钟; 2.网线插入交换机接口从黄变为绿需要大约1-2分钟,即进入正常工作模式; 3.建议使用XP系统进行操作,2003默认没有安装超级终端,需要使用安装光盘添加该工具才有; 4.请严格按照以下步骤进行,背景灰色字体为交换机显示信息,蓝色字体为配置命令。 2.准备工作 先保持交换机断电状态; 使用调试串口线连接笔记本电脑的串口与交换机背面的CONSOLE 接口; 打开超级终端: 开始-所有程序-附件-超级终端; 配置超级终端: 名称-cisco 选择com1或com2(请依照实际情况进行选择) 修改每秒位数为9600 应用-确定-回车; 3.初始配置 给交换机通电;
片刻后会看到交换机的启动信息,直到出现以下配置选项: Wouldyouliketoterminateautoinstall?[yes]:no Wouldyouliketoentertheinitialconfigurationdialog?[yes/no ]:no Wouldyouliketoterminateautoinstall?[yes]:no 4.出现命令窗口 Switch> 5.备份出厂配置 Switch>en进入特权模式 Switch#copyrunning-configsfbak-config Destinationfilename[sfbak-config]?回车 片刻后会出现: 1204bytescopiedin0.529secs(2276bytes/sec) 表示文件备份成功。 6.配置账号密码 Switch#configureterminal进入配置子模式 Switch(config)#enablepasswordcisco设置PASSWORD密码为cisco Switch(config)#enablesecretcisco设置SECRET密码为cisco Switch(config)#exit 片刻后会出现: 00:11:26:%SYS-5-CONFIG_I:Configuredfromconsolebyconsole
CISCO三层交换机VLAN配置说明
CISCO三层交换机VLAN配置说明。 实验目标: (1) 第一步实现划分4个vlan,将相应port置入到vlan号中 (2) 第二步实现4个vlan间可以相互ping (3) 第三步实现sales,tech,manage不可以相互通讯,但允许和server通讯实现过程: 第 一步划分vlan如下: Switch#vlan data Switch(vlan)#vlan 10 name sales VLAN 10 added: Name: sales Switch(vlan)#vlan 20 name tech VLAN 20 added: Name: tech Switch(vlan)#vlan 30 name manage VLAN 30 added: Name: manage
Switch(vlan)#vlan 40 name server VLAN 40 added: Name: server Switch(vlan)# Switch(config)#int range fa 0/0 - 3 Switch(config-if-range)#switchport access vlan 10 Switch(config-if-range)#exit Switch(config)#int range fa 0/4 - 6 Switch(config-if-range)#switchport access vlan 20 Switch(config-if-range)#exit Switch(config)#int range fa 0/7 - 8 Switch(config-if-range)#switchport access vlan 30 Switch(config-if-range)#exit Switch(config)#int fa 0/9 Switch(config-if)#swit Switch(config-if)#switchport acce Switch(config-if)#switchport access vlan 40 Switch(config-if)#exit
Cisco交换机常用配置命令
Cisco交换机常用配置命令 CISCO交换机基本配置 switch>ena 進入特权模式 switch#erasenvram 全部清除交换机的所有配置 switch#reload 重新启动交换机(初始提示符为switch> ) ------------------------------------------------------------------------------------ CISCO交换机基本配置:Console端口连接 用户模式hostname>; 特权模式hostname(config)# ; 全局配置模式hostname(config-if)# ; 交换机口令设置: switch>enable ;进入特权模式 switch#config;进入全局配置模式 switch(config)#hostname cisco ;设置交换机的主机名 switch(config)#enable secret csico1 ;设置特权加密口令 switch(config)#enable password csico8 ;设置特权非密口令 switch(config)#line console 0 ;进入控制台口 switch(config-line)#line vty 0 4 ;进入虚拟终端 switch(config-line)#login ;虚拟终端允许登录 switch(config-line)#password csico6 ;设置虚拟终端登录口令csico6 switch#write 保存配置設置 switch#copy running-config startup-config 保存配置設置,與write一樣switch#exit;返回命令 配置终端过一会时间就会由全局配置模式自动改为用户模式,将超时设置为永不超时 switch#conf t switch(config)#line con 0 switch(config-line)#exec-timeout 0 --------------------------------------------------------------------------------- 交换机显示命令: switch#write;保存配置信息 switch#showvtp;查看vtp配置信息 switch#show run ;查看当前配置信息 switch#showvlan;查看vlan配置信息 switch#showvlan name vlan2 switch#show interface ;查看端口信息
思科模拟器基本命令(交换机)
知识归纳 思科模拟器命令: 设置交换机名字为yzh Switch> 进入超级终端控制台 Switch>enable 进入交换机特权模式 Switch# Switch#configure terminal 进入交换机全局配置模式 Switch(configure)#hostname yzh 改变名字为XXX yzh(configure)# 显示改名成功 yzh(configure)#exit 退回上级操作模式,即返回特权模式 yzh# yzh#exit 返回到用户模式 yzh> 参看交换机有关信息 yzh# yzh#configure terminal 进入交换机全局配置模式 yzh#show version 查看交换机的版本信息 yzh#show vlan 查看交换机的VLAN信息,默认情况下所有借口均属于VLAN yzh#show running-config 查看交换机当前生效的配置信息 配置交换机接口f0/2 yzh> yzh>enable yzh# yzh#configure terminal 进入交换机配置模式 yzh(config)#interface fastEthernet 0/2 进入交换机接口fa0/2 yzh(config-if)# 进入接口配置模式 yzh(config-if)#speed 100 设置接口F0/2速率为100M yzh(config-if)#duplex half 配置接口的双工模式是半双工 yzh(config-if)#no shutdown 开启接口,使得处于工作状态,等待转发数据。yzh(config-if)#exit 输入exit返回全局模式 yzh(config)#exit 返回特权模式 yzh# 位于特权模式 yzh#show interfaces fastEthernet 0/2 查看刚才对接口f0/2配置情况 设置交换机Enable特权密码为admin yzh> 进入超级终端控制台 yzh>enable 进入交换机特权模式 yzh#configure terminal 进入交换机配置模式 yzh(config)#enable secret admin 设置Enable密码为admin 注:验证密码自己思考。 查看设备配置信息 yzh#show running-config
思科交换机vlan配置和划分
命令行讲解: Switch〉 Switch>e nable Switch# Switch#vlan database // 进入vlan 配置模式 % Warning: It is recomme nded to con figure VLAN from config mode, as VLAN database mode is being deprecated. Please con sult user docume ntati on for con figuri ng VTP/VLAN in config mode. Switch(vla n) #vla n 2 name TztA // 划分vlan 2 名字为TztA VLAN 2 added: Name: TztA // 显示已划分的vlan名 Switch(vla n) #vla n 3 name TztB // 划分vlan 3 名字为TztB VLAN 3 added:
Switch(vlan)#exit // 推出 vlan 配置 APPLY completed. Exiting . Switch#wr // 保存已有配置(此处为 write 的缩写) Building configuration... [OK] // 提示已保存成功 Switch#config t Enter configuration commands, one per line. End with CNTL/Z. Switch(config-if)#sw ac vlan 3 // Switch(config-if)#exit Switch(config)#exit %SYS-5-CONFIG_I: Configured from console by console Switch#wr Switch(config)#interface f0/1 // 进入端口 f0/1 Switch(config-if)#switchport mode access // 将端口 fO/1设置为静态VLAN 模式 Switch(config-if)#switchport access vlan 2 // 将将端口 fO/1 分配给 VLAN2 Switch(config-if)#exit Switch(config)#int fO/1 Switch(config-if)#exit Switch(config)#int fO/2 Switch(config-if)#switchport mode access // 将端口 fO/2设置为静态VLAN 模式 Switch(config-if)#switchport access vlan 2 // 将将端口 fO/2 分配给 VLAN2 Switch(config-if)#exit Switch(config)#int fO/3 Switch(config-if)#sw mo ac // 将端口 fO/3 设置为静态VLAN 模式(此处为命令行缩写模式) Switch(config-if)#sw ac vlan 3 // 将将端口 fO/3 分配给 VLAN2 Switch(config-if)#exit Switch(config)#int fO/4 Switch(config-if)#sw mo ac // 将端口 fO/4设置为静态VLAN 模式 将将端口 fO/4 分配给 VLAN2
CISCO三层交换机+二层交换机配置VLAN的实例
CISCO三层交换机+二层交换机配置VLAN的实例 Cisco的VLAN实现通常是以端口为中心的。与节点相连的端口将确定它所驻留的VLAN。将端口分配给VLAN的方式有两种,分别是静态的和动态的. 形成静态VLAN的过程是将端口强制性地分配给VLAN的过程。即我们先在VTP (VLAN Trunking Protocol)Server上建立VLAN,然后将每个端口分配给相应的VLAN的过程。这是我们创建VLAN最常用的方法。 动态VLAN形成很简单,由端口决定自己属于哪个VLAN。即我们先建立一个VMPS(VLAN Membership Policy Server)VLAN管理策略服务器,里面包含一个文本文件,文件中存有与VLAN映射的MAC地址表。交换机根据这个映射表决定将端口分配给何种 VLAN。这种方法有很大的优势,但是创建数据库是一项非常艰苦而且非常繁琐的工作。 下面以实例说明如何在一个典型的快速以太局域网中实现VLAN。所谓典型的局域网就是指由一台具备三层交换功能的核心交换机接几台分支交换机(不一定具备三层交换能力)。我们假设核心交换机名称为:COM;分支交换机分别为:PAR1、PAR2、PAR3……,分别通过Port1的光线模块与核心交换机相连;并且假设VLAN名称分别为 COUNTER、MARKET、MANAGING……。 1、设置VTP DOMAIN :称为管理域。交换VTP更新信息的所有交换机必须配置为相同的管理域。如果所有的交换机都以中继线相连,那么只要在核心交换机上设置一个管理域,网络上所有的交换机都加入该域,这样管理域里所有的交换机就能够了解彼此的VLAN列表。 COM#vlan database 进入VLAN配置模式 COM(vlan)#vtp domain COM 设置VTP管理域名称COM COM(vlan)#vtp server 设置交换机为服务器模式 PAR1#vlan database 进入VLAN配置模式 PAR1(vlan)#vtp domain COM 设置VTP管理域名称COM PAR1(vlan)#vtp Client 设置交换机为客户端模式 PAR2#vlan database 进入VLAN配置模式 PAR2(vlan)#vtp domain COM 设置VTP管理域名称COM PAR2(vlan)#vtp Client 设置交换机为客户端模式 PAR3#vlan database 进入VLAN配置模式 PAR3(vlan)#vtp domain COM 设置VTP管理域名称COM PAR3(vlan)#vtp Client 设置交换机为客户端模式 注意:这里设置交换机为Server模式是指允许在本交换机上创建、修改、删除VLAN 及其他一些对整个VTP域的配置参数,同步本VTP域中其他交换机传递来的最新的VLAN信息;Client模式是指本交换机不能创建、删除、修改VLAN配置,也不能在NVRAM中存储VLAN配置,但可以同步由本VTP域中其他交换机传递来的VLAN信息。 2、配置中继 为了保证管理域能够覆盖所有的分支交换机,必须配置中继。Cisco交换机能够支持任何介质作为中继线,为了实现中继可使用其特有的ISL标签。 ISL(Inter-Switch link)是一个在交换机之间、交换机与路由器之间及交换机与服务器之间传递多个VLAN信息及VLAN 数据流的协议,通过在交换机直接相连的端口配置 ISL封装,即可跨越交换机进行整个网络的VLAN分配和进行配置。在核心交换机端配置如下: COM(config)#interface gigabitEthernet 2/1 COM(config-if)#switchport COM(config-if)#switchport trunk encapsulation isl COM(config-if)#switchport mode trunk
思科 交换机vlan配置和划分
本次主要讲解的是二层交换机中vlan的划分,讲解如下: 配置模型图 命令行讲解: Switch> Switch>enable Switch# Switch#vlan database //进入vlan配置模式 % Warning: It is recommended to configure VLAN from config mode, as VLAN database mode is being deprecated. Please consult user documentation for configuring VTP/VLAN in config mode. Switch(vlan)#vlan 2 name TztA //划分vlan 2 名字为TztA VLAN 2 added: Name: TztA //显示已划分的vlan名 Switch(vlan)#vlan 3 name TztB //划分vlan 3 名字为TztB VLAN 3 added: Name: TztB //显示已划分的vlan名
Switch(vlan)#exit //推出vlan配置 APPLY completed. Exiting.... Switch#wr //保存已有配置(此处为write的缩写) Building configuration... [OK] //提示已保存成功 Switch#config t Enter configuration commands, one per line. End with CNTL/Z. Switch(config)#interface f0/1 //进入端口f0/1 Switch(config-if)#switchport mode access //将端口f0/1设置为静态VLAN模式Switch(config-if)#switchport access vlan 2 //将将端口f0/1分配给VLAN2 Switch(config-if)#exit Switch(config)#int f0/1 Switch(config-if)#exit Switch(config)#int f0/2 Switch(config-if)#switchport mode access //将端口f0/2设置为静态VLAN模式 Switch(config-if)#switchport access vlan 2 //将将端口f0/2分配给VLAN2 Switch(config-if)#exit Switch(config)#int f0/3 Switch(config-if)#swmo ac //将端口f0/3设置为静态VLAN模式(此处为命令行缩写模式)Switch(config-if)#sw ac vlan 3 //将将端口f0/3分配给VLAN2 Switch(config-if)#exit Switch(config)#int f0/4 Switch(config-if)#swmo ac //将端口f0/4设置为静态VLAN模式 Switch(config-if)#sw ac vlan 3 //将将端口f0/4分配给VLAN2 Switch(config-if)#exit Switch(config)#exit %SYS-5-CONFIG_I: Configured from console by console Switch#wr
思科交换机配置口令
CISCO交换机配置命令大全 switch> 用户模式 1:进入特权模式 enable switch> enable switch# 2:进入全局配置模式 configure terminal switch> enable switch#configure terminal switch(conf)# 3:交换机命名 hostname aptech2950 以aptech2950为例 switch> enable switch#configure terminal switch(conf)#hostname aptch-2950 aptech2950(conf)# 4:配置使能口令 enable password cisco 以cisco为例 switch> enable switch#configure terminal switch(conf)#hostname aptch2950 aptech2950(conf)# enable password cisco 5:配置使能密码 enable secret ciscolab 以cicsolab为例 switch> enable switch#configure terminal switch(conf)#hostname aptch2950 aptech2950(conf)# enable secret ciscolab 6:设置虚拟局域网vlan 1 interface vlan 1 switch> enable switch#configure terminal switch(conf)#hostname aptch2950 aptech2950(conf)# interface vlan 1 aptech2950(conf-if)#ip address 192.168.1.1 255.255.255.0 配置交换机端口ip 和子网掩码 aptech2950(conf-if)#no shut 是配置处于运行中 aptech2950(conf-if)#exit aptech2950(conf)#ip default-gateway 192.168.254 设置网关地址
思科 Cisco 3550 交换机配置手册 配置教程
配置接口特性 这一章详细说明交换机上的接口和描述怎么配置他们。这章有以下这些内容: ●理解接口类型 ●使用接口命令 ●配置二层接口 ●监控和维护第二层接口 ●配置第三从接口 注意:需要完整的有关该章的语法和应用信息,请参考Catalyst 3550 Multilayer Switch Command Reference和Cisco IOS Interface Command Reference for Release 12.1. 理解接口类型 这个部分描述了不同的接口类型,以及其它章节所包括的详细配置这些接口的一些参考内容。其他章节描述了物理接口特性的配置过程。 这部分包括: ?基于端口的VLAN (Port-Based VLANs) ?交换端口(Switch Ports) ?以太网通道端口组(EtherChannel Port Groups) ?交换虚拟接口(Switch Virtual Interfaces) ?被路由端口(Routed Ports) ?连接接口(Connecting Interfaces) 基于端口的VLAN (Port-based Vlans) 一个Vlan是一个按功能、组、或者应用被逻辑分段的交换网络,并不考虑使用者的物理位置。要更多关于Vlan的信息请看“Configuring VLANS”。一个端口上接受到的包被发往属于同一个Vlan的接收端口。没有一个第三层的设备路由Vlan间的流量,不同Vlan的网络设备无法通讯。 为了配置普通范围(Normal-range) Vlan(Vlan IDs 1-1005),使用命令:config-vlan模式 (global) vlan vlan-id 或vlan-configuration模式 (exec) vlan database 针对Vlan ID 1-1005的vlan-configration模式被保存在vlan数据库中。为配置扩展范围(extended-range) Vlans (Vlan ID 1006-4094),你必须使用
思科设备三层交换机的vlan间通信配置
本次主要讲解三层交换实现vlan间的相互通信: 本例配置模型图 命令行: swA配置命令: Switch>enable Switch#vlan database //进入vlan配置模式 % Warning: It is recommended to configure VLAN from config mode, as VLAN database mode is being deprecated. Please consult user documentation for configuring VTP/VLAN in config mode. Switch(vlan)#vlan 2 name TztA //在swA上创建vlan 2 名为TztA VLAN 2 added: Name: TztA Switch(vlan)#vlan 3 name TztB //在swA上创建vlan 3 名为TztB VLAN 3 added: Name: TztB Switch(vlan)#exit APPLY completed. Exiting.... Switch#conf t Enter configuration commands, one per line. End with CNTL/Z. Switch(config)#int f0/2 Switch(config-if)#switchport mode access
Switch(config-if)#switchport access vlan 2 //将f0/2划分给vlan 2 Switch(config-if)#exit Switch(config)#int f0/3 Switch(config-if)#switchport mode access Switch(config-if)#switchport access vlan 3 //将f0/3划分给vlan 3 Switch(config-if)#exit Switch(config)#int f0/1 Switch(config-if)#switchport mode trunk //配置与三层设备连接的f0/1为trunk模式 %LINEPROTO-5-UPDOWN: Line protocol on Interface FastEthernet0/1, changed state to down %LINEPROTO-5-UPDOWN: Line protocol on Interface FastEthernet0/1, changed state to up Switch(config-if)#switchport trunk allowed vlan all //允许所有vlan通过f0/1端口Switch(config-if)#exit Switch(config)#exit Switch# %SYS-5-CONFIG_I: Configured from console by console Switch#wr Building configuration... [OK] Switch# (三层交换机)M sw命令配置: Switch> Switch>enable Switch#vlan database //进入vlan配置模式 % Warning: It is recommended to configure VLAN from config mode, as VLAN database mode is being deprecated. Please consult user documentation for configuring VTP/VLAN in config mode. Switch(vlan)#vlan 2 name TztA //在Msw上创建vlan 2 名为TztA VLAN 2 added: Name: TztA