jsxgraph_refcard
jsx语法 内联样式

jsx语法内联样式全文共四篇示例,供读者参考第一篇示例:JSX(JavaScript XML)是一种在React中用来描述界面的语法扩展。
它允许我们在JavaScript 中编写类似HTML 的代码,使得我们可以更加方便地构建用户界面。
而内联样式则是一种在JSX 中设置元素样式的方法,通过它我们可以直接在JSX 中定义元素的样式,而不需要通过外部样式表或者行内样式来实现。
在传统的前端开发中,通常会使用CSS来为元素设置样式,通过类名或者ID来关联样式规则。
而在React中,除了可以使用传统的CSS外,还可以使用内联样式来为元素设置样式。
这种方法的优点是可以避免CSS的书写和管理,将样式直接嵌入到组件中,使得组件更加独立,便于维护和调试。
在使用内联样式时,我们可以直接在JSX 元素中通过style属性来设置样式,示例代码如下:```const style = {color: 'blue',fontSize: '16px',backgroundColor: 'yellow'};在上面的代码中,我们定义了一个style对象来表示元素的样式,然后将其赋值给div元素的style属性。
这样就可以通过内联样式来设置元素的颜色、字体大小和背景颜色。
除了直接设置样式外,我们还可以使用JavaScript的表达式来动态设置样式。
示例代码如下:```const isUserLoggedIn = true;在上面的代码中,我们根据isUserLoggedIn的值来动态设置元素的颜色和文本内容。
这样我们可以根据组件的状态来动态改变样式,从而实现更丰富的交互效果。
需要注意的是,在使用内联样式时,需要遵循一些规则:1. 样式属性名需要使用驼峰命名法,如fontSize代表font-size。
2. 样式的值需要用引号包裹,如'16px'。
3. 如果样式值是对象或者数组,则需要使用{}来包裹。
vue3 指令的jsx写法 -回复

vue3 指令的jsx写法-回复Vue 3是一种用于构建用户界面的JavaScript框架,它引入了许多新功能和改进。
其中之一是对指令的支持。
指令是用于扩展模板语法的一种特殊语法,它允许我们在视图中添加特殊行为和逻辑。
在Vue 3中,我们可以使用JSX语法来编写指令,这使得编写指令更加直观和灵活。
在本文中,我们将一步一步地介绍Vue 3指令的JSX写法。
首先,我们需要创建一个Vue 3应用程序。
我们可以使用Vue CLI来快速生成一个Vue 3项目。
如果你还没有安装Vue CLI,可以使用以下命令安装:bashnpm install -g vue/cli安装完成后,我们可以通过运行以下命令来创建一个新的Vue 3项目:bashvue create vue3-directives-jsx接下来,我们需要在Vue 3应用程序中设置JSX支持。
在Vue CLI创建的项目中,默认情况下并不支持JSX。
为了启用JSX支持,我们需要修改`.eslintrc.js`文件。
找到`rules`对象,并添加以下配置:javascriptmodule.exports = {...rules: {..."vue/jsx-uses-vars": "warn"},...}这样,我们就可以在Vue 3应用程序中使用JSX了。
现在,让我们来创建一个简单的指令,并使用JSX语法来编写它。
假设我们要创建一个名为"highlight"的指令,它可以将指定元素的背景颜色设置为黄色。
首先,我们需要在`main.js`文件中导入`createApp`函数和`defineDirective`函数,如下所示:javascriptimport { createApp, defineDirective } from 'vue';然后,我们可以使用`defineDirective`函数来定义我们的指令。
Additel ADT681数字压力仪说明书

ModelADT681: Regular gaugeADT681IS: ATEX certified intrinsically safe Accuracy681(IS)-02: 0.025% of full scale 681(IS)-05: 0.05% of full scale 681(IS)-10: 0.1% of full scale 681(IS)-20: 0.2% of full scale(For detailed accuracy, please see pressure range table)Gauge TypesGauge pressure Compound pressure Absolute pressure Differential pressureFan-shaped Graph ScaleSimilar to analog dials, including pressure swing, % indication with fan-shaped graph scale for visual reference, low/high alarm.DisplayDescription: 5 full digit FSTN LCDDisplay rate: 3 readings per second (Default setting).Adjustable from 10 readings per second to 1 reading every ten secondsNumeral display height: 16.5mm (0.65")OVERVIEWGauge pressure Differential pressureWith advanced microprocessor technology and state-of-the-art silicon pressure sensors, the 681 series digital pressure gauges provide an accurate, reliable, and economic solution for a wide range of pressure applications. They are loaded with functionality and remarkably easy to use. To reach the best performance, every silicon pressure sensor in our gauges is specially aged, tested and screened before assembly. The 681 series digital pressure gauges are unmatched in performance and reliability. Best of all, they are very affordableFEATURESPressure ranges to 36,000 psi (2500 bar) 0.025% full scale accuracy (681-02) 0.05% full scale accuracy (681-05) 0.1% full scale accuracy (681-10) 0.2% full scale accuracy (681-20)Fully temperature compensated accuracy from 14°F to 122°F (-10°C to 50°C) Up to eleven selectable pressure unitsLarge, easy to read display with 5-digit resolution Backlit display% pressure indication with fan-shaped graph scale for visual referenceDisplay flash warning when pressure over 120% of FSBottom mount or panel mountATEX certified intrinsically safe (Model 681IS) NIST traceable calibration with data(included)9V battery power or AC adapter (optional)SPECIFICATIONSPressure ranges to 36,000 psi (2500 bar)0.025%, 0.05%, 0.1% or 0.2% FS accuracy% pressure indication with fan-shaped graphscale for visual referenceFully temperature compensated accuracy Panel mount gauges are availableDigital Pressure GaugesAdditel 681Pressure RangesNote: [1]. Sealed gauge pressure for above 1000 psi[2]. G=Gas, L=Liquid (please specify media type when place order) [3]. 0.025% FS for gas media onlyPressure UnitsPa, kPa, MPa, psi, bar, mbar, kgf/cm 2, inH 2O@4°C mmH2O@4°C, inHg@0°C, mmHg@0°CEnvironmentalCompensated Temperature: 14°F to 122°F (-10°C to 50°C)Operating Temperature*: 14°F to 122°F(-10°C to 50°C)*0.025%FS accuracy guaranteed only over the ambient temperature range of 68°F to 79°F (20°C to 26°C)Storage Temperature: -4°F to 158°F (-20°C to 70°C)Humidity: <95%SPECIFICATIONS681 with rubber bootSPECIFICATIONSORDERING INFORMATIONPressure Port1/4NPT male, 1/4BSP male, M20×1.5 male (≤15,000 PSI)1/4HP female or 1/4HP male(≥15,000 PSI)*1/4HP female: Autoclave F-250-C, 9/16" - 18 UNF-2B *1/4HP male: Autoclave M-250-C, 9/16" - 18 UNF-2A0.236 inch (Ø6 mm) test hose (for differential pressure)Other connections available per requestPowerBattery: One 9V alkaline battery (included)Battery life: 300 hours (10 readings/s), 600 hours (3 reading/s), or 6000 hours (1 reading/10s)Power auto-off: 60 minutes power auto-off. Auto-off may be disableExternal power: 110/220V external power adapter (optional)*(Do not use the external power adapter in a hazardous atmosphere)Model NumberModel:ADT681ADT681ISAccuracy:02-0.025% of full scale 05-0.05% of full scale 10-0.1% of full scale 20-0.2% of full scaleRange type:PSI-range by psi BAR-range by bar H 2O-range by inH 2OPressure port type:N- 1/4NPT male N2- 1/2NPT male B-1/4BSP male M-M20X1.5 maleAF-Autoclave F-250-C female AM-Autoclave M-250-C malePressure range P/N:See pressure range table PB:Panel mount with back pressure portEnclosureCase material: Aluminum alloy Wetted parts: 316L SS Dimension:Ø110mm X 35mm depth X 176mm height(panel mount gauge: Ø140mm X 86mm depth)Weight: 0.6kgIntrinsic Safety and European Compliance CE markedATEX certified intrinsically safe (ADT681IS)Communication: RS232*(Do not use the RS-232 connector in a hazardous atmosphere)Warranty: 1 yearAccessories includedRubber boot (Except panel mount gauges)9V alkaline battery (1 pc)ManualNIST traceable calibration certificateOptional AccessoriesGP300PSI PB02N 681 Panel mount with back pressure port。
Autodesk Nastran 2023 参考手册说明书

FILESPEC ............................................................................................................................................................ 13
DISPFILE ............................................................................................................................................................. 11
File Management Directives – Output File Specifications: .............................................................................. 5
BULKDATAFILE .................................................................................................................................................... 7
el-upload jsx写法

在React中,使用Element UI库的`el-upload`组件可以通过以下方式进行JSX写法:首先,确保你已经安装了Element UI库。
如果没有安装,可以使用以下命令进行安装:```bashnpm install element-ui --save```然后,在你的React组件中引入Element UI库并注册为全局组件:```jsximport Vue from 'vue';import ElementUI from 'element-ui';import 'element-ui/lib/theme-chalk/index.css';e(ElementUI);```接下来,你可以在你的React组件中使用`el-upload`组件,如下所示:```jsximport React, { useState } from 'react';import { ElUpload } from 'element-ui';const App = () => {const [fileList, setFileList] = useState([]);const handleChange = (e) => {const file = e.target.files[0];setFileList([...fileList, file]);};return (<div><ElUploadaction="/upload"list-type="text":on-change="handleChange"><el-button size="small" type="primary">点击上传</el-button></ElUpload></div>);};export default App;```在上面的代码中,我们使用了`el-upload`组件,并通过`action`属性指定了上传文件的服务器地址。
MD-012 Disciplined Oscillator Module商品说明书
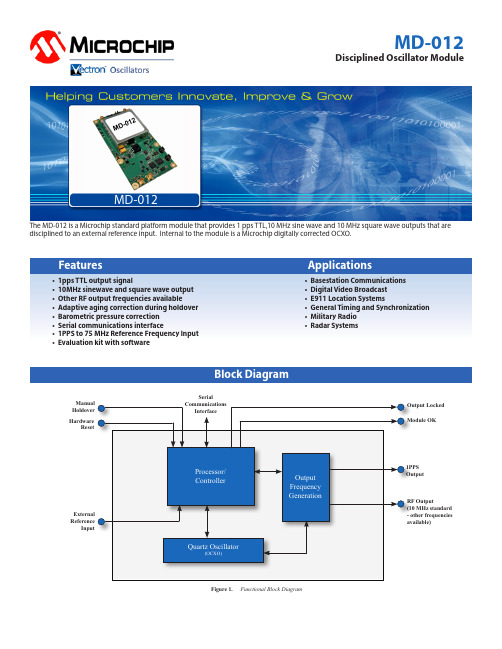
MD-012Disciplined Oscillator ModuleThe MD-012 is a Microchip standard platform module that provides 1 pps TTL,10 MHz sine wave and 10 MHz square wave outputs that are disciplined to an external reference input. Internal to the module is a Microchip digitally corrected OCXO.•1pps TTL output signal• 10MHz sinewave and square wave output • Other RF output frequencies available• Adaptive aging correction during holdover • Barometric pressure correction • Serial communications interface• 1PPS to 75 MHz Reference Frequency Input • Evaluation kit with software• Basestation Communications • Digital Video Broadcast • E911 Location Systems• General Timing and Synchronization • Military Radio • Radar SystemsFeaturesBlock DiagramApplicationsQuartz Oscillator(OCXO)Processor/ControllerOutput Frequency Generation1PPS OutputRF Output(10 MHz standard - other frequencies available)SerialFigure 1. Functional Block DiagramOutput Locked Module OKHardwareResetManual Holdover External ReferenceInputNotes:• RF and 1pps input and output connectors are MCX type (SMA, SMB, MMCX connectors require additional part numbers).• Keyed connector is Samtec FTSH-108-01LDVK type.• Dimensions: mm• Module height in part number is the sum of oscillator height, board, and clearancePackage OutlineAlthough ESD protection circuitry has been designed into the MD-012 proper precautions should be taken when handling and mounting.Microchip employs a human body model (HBM) and a charged-device model (CDM) for ESD susceptibility testing and design protectionReliabilityMicrochip qualification includes aging various extreme temperatures, shock and vibration, temperature cycling, and IR reflow simulation. The MD-012 family is capable of meeting the following qualification tests:Ordering Information InstructionsCustomization to unique customer requirements is available and is common for this level of integration. Common customizations include alternate output frequencies, temperature ranges, differing values and methods of hold over specification, and holdover optimization in the frequency domain. The table below lists exisiting combinations available as of the date of publication of this data sheet. Please contact the factory for additional options.Ordering InformationMD - 012 3 - B X E - 15E7 - 10M0000000Product FamilyMD: Precision ModulesPackage 65x115mm Height 3: 19.5 mmSupply Voltage B: +12VHold Over15E7: 1.5 µs hold over option 40E7: 4.0 µs hold over optionFrequencyRF Output Code X: standard outputs per specificationTemperature Range E: -40°C to +85°C1) Holdover and aging performance is after 7 days of power-on time. Temperature and aging rates are whendevice is not locked. Performance measured in still air.2) After customer applies correct offset using cable delay command while locked, after 24 hours of locked opera-tion3) ADEV at t =86400s while locked, after 24 hours of locked operation4) The status locked indicator is intended to indicate when the module is fully locked to a reference.5) The Hardware OK indicator is intended to indicate when the module is operating properly without any failures, including hardware, software or parameter out of range.6) The Rx pin is the serial interface input and the Tx pin is the serial interface output. The serial interface shall operate at 115,200 baud with eight (8) data bits, one (1) stop bit and no parity.USA:100 Watts StreetMt Holly Springs, PA 17065Tel: 1.717.486.3411Fax: 1.717.486.5920Europe:Landstrasse74924 NeckarbischofsheimGermanyTel: +49 (0) 7268.801.0Fax: +49 (0) 7268.801.281Information contained in this publication regarding device applications and the like is provided only for your convenience and may be superseded by updates. It is your reasonability to ensure that your application meets with your specifications. MICRO-CHIP MAKES NO REPRESENTATION OR WARRANTIES OF ANY KIND WHETHER EXPRESS OR IMPLIED, WRITTEN OR ORAL, STATUTORY OR OTHERWISE, RELATED TO THE INFORMATION INCLUDING, BUT NOT LIMITED TO ITS CONDITION, QUALITY, PERFORMANCE, MERCHANTABILITY OR FITNESS FOR PURPOSE. Microchip disclaims all liability arising from this information and its use. Use of Microchip devices in life support and/or safety applications is entirely at the buyer’s risk, and the buyer agrees to defend, indemnify and hold harmless Microchip from any and all damages, claims, suits, or expenses resulting from such use. No licenses are conveyed, implicitly, or otherwise, under any Microchip intellectual property rights unless otherwise stated.。
jsx语法渲染的步骤

jsx语法渲染的步骤
JSX是一种JavaScript的语法扩展,主要用于在React应用中定
义UI组件结构。
本文将为读者详细介绍JSX语法的渲染步骤,帮助读
者更好地理解它的工作原理。
1. 创建一个元素
JSX语法渲染的第一步是创建一个元素。
JSX元素是由两部分组成:类型和属性。
类型是一个标识符,代表着元素的类型,比如“div”、“span”等。
属性是一个JavaScript对象,其中包含了元素的所有属性,比如“class”、“style”等。
2. 转换为React元素
创建JSX元素后,React将会把它转化为React元素。
JSX元素是
一种描述UI结构的声明性语法,而React元素是一种对UI结构的具
体描述。
React元素包含了JSX元素的所有信息,并且可以被React渲染引擎所识别和处理。
3. 渲染组件
渲染组件是JSX语法渲染的最后一步。
在React中,JSX元素可以被使用在组件的渲染过程中。
当组件被渲染时,React会先把JSX元素转换为React元素,再通过算法计算出组件需要的最终UI结构,并最
终呈现在用户的屏幕上。
总之,JSX语法渲染的实现过程是:创建JSX元素、把它转化为React元素、最终渲染组件并呈现在用户的屏幕上。
熟练掌握JSX语法的渲染步骤,对于开发高质量的React应用非常重要。
jsx使用方法

jsx使用方法(原创实用版)目录1.介绍 JSX2.JSX 的基本语法3.JSX 的组件4.JSX 的高阶组件5.JSX 的实践应用正文一、介绍 JSXJSX(JavaScript XML)是一种由 Facebook 开发的用于构建用户界面的 JavaScript 语法扩展。
它允许开发人员使用类似于 HTML 的语法来描述用户界面组件,从而简化了 React 应用的开发。
二、JSX 的基本语法JSX 的基本语法包括以下三个部分:1.标签:JSX 中的标签与 HTML 中的标签相似,如`<div>`、`<p>`等。
2.属性:JSX 中的属性与 HTML 中的属性一致,如`href`、`class`等。
3.子元素:JSX 中的子元素可以通过`<>`或`{}`来表示。
以下是一个简单的 JSX 示例:```jsximport React from "react";function App() {return (<div><h1>Hello, world!</h1><p className="intro">Hello, world! This is a JSX example.</p></div>);}export default App;```三、JSX 的组件JSX 的组件是通过 React 来创建的。
组件可以封装 HTML 结构、样式和逻辑。
组件的定义和使用如下:```jsximport React from "react";// 定义一个组件function MyComponent() {return (<div><h2>My Component</h2></div>);}// 使用一个组件function App() {return (<div><MyComponent /></div>);}export default App;```四、JSX 的高阶组件高阶组件是指接收其他组件作为参数的组件。
- 1、下载文档前请自行甄别文档内容的完整性,平台不提供额外的编辑、内容补充、找答案等附加服务。
- 2、"仅部分预览"的文档,不可在线预览部分如存在完整性等问题,可反馈申请退款(可完整预览的文档不适用该条件!)。
- 3、如文档侵犯您的权益,请联系客服反馈,我们会尽快为您处理(人工客服工作时间:9:00-18:30)。
– brd.create('curve',[parents],{attributes}); · Parameter curve, t → (f (t), g (t)): [function(t){return 5*t;},function(t){return t*t;},0,2] x function, y function, optional: start, end · Polar curve: Defined by the equation r = f (φ). [function(phi){return 5*phi;},[1,2],0,Math.PI] Defining function, optional: center, start, end · Data plot: [[1,2,3],[4,-2,3]] array of x- and y -coordinates, or [[1,2,3],function(x){return x*x;}] array of x-coordinates, function term – brd.create('spline',[p1,p2,...],{attributes}); [p1,p2,...] Cubic spline: array of points – brd.create('riemannsum',[f,n,type],{atts}); Riemann sum of type ’left’, ’right’, ’middle’, ’trapezodial’, ’upper’, or ’lower’ – brd.create('integral’,[[a,b],f],{atts}); b f (x)dx. Display the area a
Polygon
brd.create('polygon',[p1,p2,...],{attributes}); [p1,p2,...] The array of points is connected by line segments and the inner area is filled. brd.create('regularpolygon',[p1,p2,n],{attributes});
Circle
brd.create('circle',[parents],{attributes}); Parent elements: [p1,p2] 2 points: center and point on circle line [p,r] center, radius (constant or function) [p,c],[c,p] center, circle from which the radius is taken [p,l],[l,p] center, line segment for the radius [p1,p2,p3] circle through 3 points Points may also be specified as array of coordinates.
Point
brd.create('point',[parents],{attributes}); Parent elements: [x,y] Euclidean coordinates [z,x,y] Homogeneous coordinates (z in first place) [function(){return p1.X();}, function(){return p2.Y();}] Functions for x, y , (and z ) [function(){return [a,b];}] Function returning array [function(){return new JXG.Coords(...);}] Function returning Coords object
பைடு நூலகம்
Basic commands
var el = brd.create('type',[parents],{attributes}); el.setProperty({key1:value1,key2:value2,...});
Slider
var s = brd.create('slider',[[a,b],[c,d],[e,f,g]],{atts}); [a,b],[c,d]: visual start and end position of the slider [e,f,g]: the slider returns values between e and g , the initial position is at value f snapWidth:num minimum distance between 2 values s.Value(): returns the position of the slider ∈ [e, g ]
Glider
Point on circle, line, curve, or turtle. brd.create('glider',[parents],{attributes}); Parent elements: [x,y,c] [c] Initial coordinates and object to glide on Object to glide on (initially at origin)
Initializing the board
var brd = JXG.JSXGraph.initBoard('box',{attributes}); – Attributes of the board [x1 , y1 , x2 , y2 ] user coordinates of the upper left and bottom right corner keepaspectratio:true/false default: false zoomX,zoomY: zoom factor in x/y -axis direction zoomfactor: overall zoom factor in both directions axis,grid,showNavigation,showCopyright: true/false show axis, grid, zoom/navigation buttons, display copyright boundingbox: Properties and methods of the board: brd.snapToGrid:true/false: grid mode brd.suspendUpdate() stop updating (if speed is needed) brd.unsuspendUpdate() restart updating brd.addChild(brd2) Connect board brd2 to board brd
Conic sections
– ellipse, hyperbola: defined by the two foci points and a point on the conic section or the length of the major axis. brd.create('ellipse',[p1,p2,p3],{attributes}); brd.create('ellipse',[p1,p2,a],{attributes}); brd.create('hyperbola',[p1,p2,p3],{attributes}); brd.create('hyperbola',[p1,p2,a],{attributes}); – parabola: defined by the focus and the directrix (line). brd.create('parabola',[p1,line],{attributes}); – conic section: quadratic form defined by 5 points or by the (symmetric)
JSXGraph Reference Card
Include JSXGraph in HTML
Three parts are needed: Include files containing the software, an HTML element, and JavaScript code. Include files: Two files have to be included: jsxgraph.css, and jsxgraphcore.js. - <link rel="stylesheet" type="text/css" href="domain/jsxgraph.css"/> - <script type="text/javascript" src="domain/jsxgraphcore.js"></script> domain is the location of the files. This can be a local directory or http://jsxgraph.uni-bayreuth.de/distrib/ HTML element containing the construction: <div id="box" class="jxgbox" style="width:600px; height:600px;"></div> JavaScript code: <script type="text/javascript"> var brd = JXG.JSXGraph.initBoard('box',{axis:true}); <script>