FM8PC71AS在触控按键的应用
八路 调音台使用图解
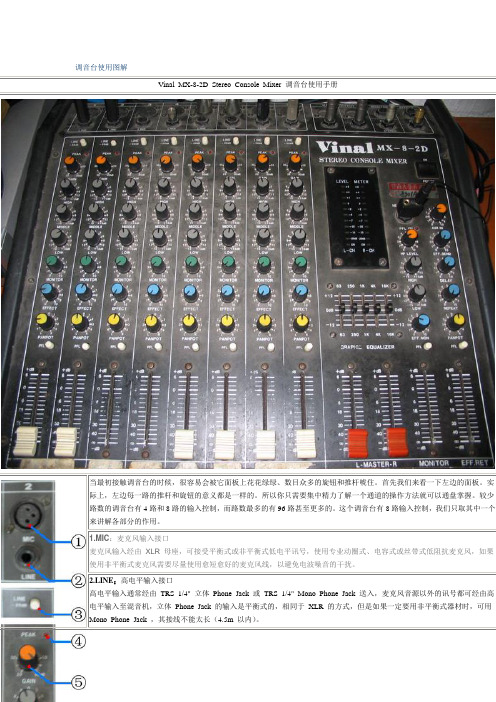
调音台使用图解
Vinal MX-8-2D Stereo Console Mixer 调音台使用手册
11.FADER:衰减器(音量推子)
决定该通道信号发送给总线输出的音量大小。
音量推子实际上是一个衰减器,用于对该通道的输出信号进行衰减。
当推子位
于最下端(或音量旋钮位于最左端)时,信号被无穷衰减。
这时,该通道没有信号输出。
调节范围-∞ ~+6 分贝,一般
以推到0 处适宜,超过0 则会使声音产生一定程度的失真。
如果一定要提高电平讯号,一般采用适当提高Gain的办法,而
不会将衰减器提升超过0 。
由于音乐输入为连续,而人声输入为间断,故在操作上有一定区别。
在对音乐的输入轨道操作时,一般使用“淡入”、“淡出”效
果。
即操作时先缓缓推拉衰减器,再慢慢加快操作速度,切忌匀速推拉或者瞬间大幅度的操作,这样会使听众感觉很不舒服。
而在对人声输入通道进行操作时,一般采用“一步到位”操作。
即在需要人声的时候,将推子一下推到大概合适的位置,再根
据监听和电平表显示进行细微调节。
而不需要人声时,要马上把推子拉到最底部,以避免不必要的声音被输入进去。
接下来,我们再看看调音台右面的控制面板。
之前左面的面板是用来调节输入信号的,而右面的则主要负责调节输出信号。
美得理mc300按键说明
美得理mc300按键说明以美得理MC300按键说明为标题,写一篇文章。
一、外观设计美得理MC300的外观设计简洁大方,整体呈现出黑色的金属质感。
按键部分采用了人性化的设计,每个按键都有明显的凹槽和凸起,便于用户操作时找到目标按键。
按键表面采用了防滑处理,手感舒适,不易滑动,提高了按键的精准度。
二、按键布局美得理MC300的按键布局合理,按键之间的间距适中,不会误触其他按键。
整体分为数字键区、功能键区和控制键区三个部分。
1. 数字键区:位于键盘的中央部分,包括0-9十个数字按键,方便用户进行数值输入。
每个按键都有明显的数字标识,方便用户快速找到目标按键。
2. 功能键区:位于数字键区的上方,包括字母按键、符号按键和功能键。
字母按键用于输入英文字母,符号按键用于输入各种符号,功能键用于完成特定的操作,例如回车键、删除键等。
3. 控制键区:位于功能键区的两侧,包括Shift键、Ctrl键、Alt键等。
这些键可以与其他按键组合使用,实现更多的功能,提高操作效率。
三、按键功能美得理MC300的按键功能丰富多样,能够满足用户各种需求。
1. 基本输入功能:包括数字输入、字母输入、符号输入等,满足用户日常的文字输入需求。
2. 系统控制功能:包括回车键、删除键、空格键等,用于控制光标的移动、删除文本等操作。
3. 快捷键功能:美得理MC300支持一些常用的快捷键,例如Ctrl+C复制、Ctrl+V粘贴等,方便用户进行快速操作。
4. 多媒体控制功能:美得理MC300配备了音量调节键、播放/暂停键、上一曲/下一曲键等多媒体控制按键,方便用户在使用电脑时调节音量、切换音乐等操作。
5. 功能切换功能:美得理MC300还配备了功能切换按键,可以切换键盘的工作模式,例如切换为数字键盘模式、游戏模式等,满足不同场景下的使用需求。
四、使用注意事项在使用美得理MC300按键时,需要注意以下几点:1. 避免过度用力:按键需要轻触即可触发,不需要用力按下。
F8000系列液晶电视如何使用伴音复位功能
Last Update date : 2013.08.27
伴音复位功能是指将所有伴音菜单的参数恢复为出厂默认设置,具体操作方法如下:
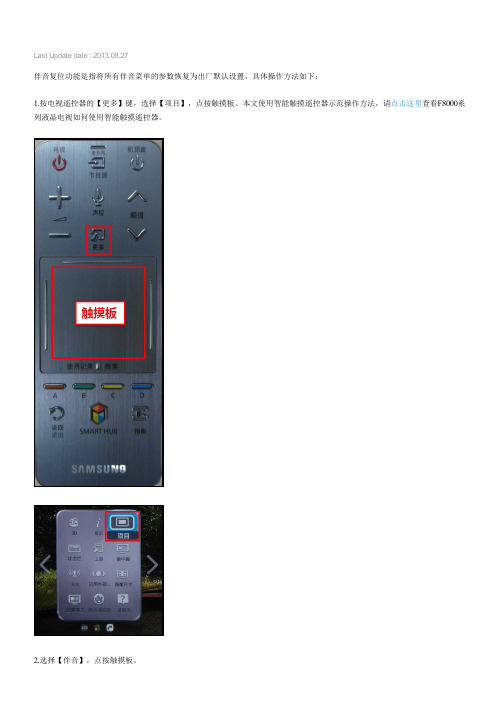
1.按电视遥控器的【更多】键,选择【项目】,点按触摸板。
本文使用智能触摸遥控器示范操作方法,请点击这里查看F8000系列液晶电视如何使用智能触摸遥控器。
2.选择【伴音】,点按触摸板。
3.选择【伴音复位】,点按触摸板。
4.当屏幕提示“是否复位伴音设置?”时,选择【是】,点按触摸板。
5.当屏幕提示“声音设置已重设为默认设置”时,选择【确定】,点按触摸板即可。
更多内容
F8000系列液晶电视支持哪些3D格式?
F8000系列液晶电视连接电脑不能全屏显示,如何处理?
F8000系列液晶电视如何设置外部音频设备发声?
F8000系列液晶电视如何开启BD Wise?
F8000系列液晶电视如何自动设置时钟?
相关型号信息
UA65F8000AJXXZ , UA60F8000AJXXZ , UA55F8000AJXXZ。
波士恰7英寸触摸屏LCD说明书

Supports various systems7inch HDMI LCD (B) (with bicolor case)Working with Raspberry PiFor the Windows OS on PC, the resolution of the LCD is automatically identified. Hence, you do not need to make the relative settings. When working with Raspberry Pi, you should set the resolution of the LCD by yourself, or else the LCD screen will not work. For more detail information, please read the following section.Turn on the "backlight" switch then connect the LCD to your Pi (HDMI Port of LCD -> HDMI Port of Pi; USB Port of LCD -> USB Port of Pi; 5V~2A power supply). Download the Raspbian image from Raspberry Pi web site (https:///downloads/). Write the image to a TF card and append the following lines to the config.txt file which is located in the root of your TF card:max_usb_current=1hdmi_group=2hdmi_mode=87hdmi_cvt 800 480 60 6 0 0 0hdmi_drive=1You must make sure that there are no spaces on either side of the equal sign.Save and connect the TF card to your Pi then power up.(Touch input working well means that the LED firmware is Rev2.1. If the LCD firmware is 1.1, see#About LCD revision)Note: Resolution of Ubuntu Mate OS or Windows 10 IoT Core OS can also be set properly by editing config.txt.RotationDisplay RotatingTo rotating the display, you can append this statement to the config filedisplay_rotate=1 #1: 90; 2: 180; 3: 270Reboot the Raspberry Pisudo rebootTouch rotatingWith the operation above. The screen could rotate in display. However, the touch works improperly. To rotate the touch as display, you could do as below:1. install libinputsudo apt-get install xserver-xorg-input-libinput2. create an xorg.conf.d foldersudo mkdir /etc/X11/xorg.conf.d3. copy file 40-libinput-conf to the folder which we createdsudo cp /usr/share/X11/xorg.conf.d/40-libinput.conf /etc/X11/xorg.conf.d/4. Append a statement to touchscreen part of the file as below:sudo nano /etc/X11/xorg.conf.d/40-libinput.conf5. save and reboot your Pisudo rebootAfter completing these steps. The LCD could rotate 90 degree both display and touch.Note:90 degree: Option "CalibrationMatrix" "0 1 0 -1 0 1 0 0 1"180 degree: Option "CalibrationMatrix" "-1 0 1 0 -1 1 0 0 1"270 degree: Option "CalibrationMatrix" "0 -1 1 1 0 0 0 0 1"About LCD revisionAn LCD with Rev 2.1 firmware does not require any drivers, that is, touch function works properly without installing any software. So we did not provide any drivers and images for Rev 2.1 LCDs. The following drivers are only available for the LCD with Rev 1.1 firmware. But if you install the driver for the Rev 2.1 one, it will lead touch function not to work.Rev2.1 New FeaturesStandard HID protocol, easy to be integrated into your system.For the Raspberry Pi, supports Raspbian, Ubuntu Mate, single touch, and driver free.When work as a computer monitor, supports Windows 10/8.1/8/7, five-points touch, and driver free.Rev1.1 and beforeFor the Raspberry Pi, comes with Raspbian driver (works with your Raspbian directly), andUbuntu imageWhen work as a computer monitor, touch function is unavailableHow to distinguishSee the backside of your LCD. The Revision number "Rev2.1" printed means that the LCDfirmware is Rev 2.1.However, "Rev1.1" printed on the backside doesn't mean that the LCD firmware must be Rev 1.1.Generally speaking, a LCD shipped after January 1, 2016 may be a Rev 2.1 one, although it was printed "Rev1.1".Note: The only difference between Rev 1.1 and Rev 2.1 is the firmware, but hardware solutions, placement and routing are all the same. (PCB printings might be different due to different production batches.)You can verify the firmware by these steps:1. Using Raspberry Pi: Connect the LCD to your Pi (HDMI Port of LCD -> HDMI Port of Pi; USB Port of LCD -> USB Port of Pi; 5V~2A power supply). Download the image, e.g. Raspbian 2015-11-21 jessie or Raspbian 2015-05-05 wheezy, from Raspberry Pi web site (https:///downloads/). Write the image to a TF card and add the following code to the end of /boot/config.txt:max_usb_current=1hdmi_group=2hdmi_mode=87hdmi_cvt 800 480 60 6 0 0 0hdmi_drive=1You must make sure that there are no spaces on either side of the equal sign.Save and connect the TF card to your Pi then power up. If touch works, that means the firmware revision is Rev 2.1.2. Without Raspberry Pi: A PC (Windows 10/8.1/8/7) is required which cannot connect with other display device. Connect the LCD to your PC (USB Port of LCD -> USB Port of PC; HDMI Port of LCD -> HDMI Port of PC. Please first connect the USB Ports then connect the HDMI Port). If a new touch drive is recognized by Windows, that means the firmware revision is Rev 2.1. In this case, after the driver successfully installed, you can use the LCD as a human interface device.If the touch function doesn't work properly after these steps, the firmware revision is often Rev1.1, which can also work by other methods, see Rev 1.1 Manual.Detailed informationDepending on the firmware, please view the instructions of different revision:[Expand] [Expand]7inch HDMI LCD (B) (Firmware Rev 2.1) User Manual7inch HDMI LCD (B) (Firmware Rev 1.1) User Manual(Not support Raspberry Pi 3 Model B)(/wiki/7inch_HDMI_LCD_(B)_(Firmware_Rev_1.1)_User_Manual)How to install 7inch Bicolor caseResourcesAn LCD with Rev 2.1 firmware does not require any drivers, that is, touch function works properly without installing any software. So we did not provide any drivers for Rev 2.1 LCDs.7inch HDMI LCD (B) image - used for the LCD with firmware Rev2.17inch HDMI LCD (B) image - used for the LCD with firmware Rev1.1Drivers (only support Rev1.1 LCD)Out of date, Not available for any Raspbian OS later than 27-May-2016.RPI2B_B_B+_USB_TOUCH_CAP_7.0_RASPBIAN.tar.gz(https:///file/d/0B5ceUb50sIDnOFhsZ3IteGVGXzA/view?usp=sharing) (For Raspberry Pi 2 Model B)RPIB_B+_USB_TOUCH_CAP_7.0_RASPBIAN_20150605.tar.gz(https:///file/d/0B5ceUb50sIDnbndweF9PMGQ3UHc/view?usp=sharing) (For Raspberry Pi B+/A+/B)3D Drawings7inch HDMI LCD B/C DrawingsLCD Panel Dimension7inch HDMI LCD (B) panel dimension (/w/upload/3/34/7inch-hdmi-lcd-b-panel-dimension.pdf)Anti-PiracySince the first-generation Raspberry Pi released, Waveshare has been working on designing,developing, and producing various fantastic touch LCDs for the Pi. Unfortunately, there are quite a few pirated/knock-off products in the market. They're usually some poor copies of our early hardware revisions, and comes with none support service.To avoid becoming a victim of pirated products, please pay attention to the following features when purchasing:。
鸿合i学软件用户手册

2.1 标题栏....................................................................................................................................12 2.1.1 下载移动端产品............................................................................................................................. 12 2.1.2 设置 ................................................................................................................................................ 13 2.1.3 意见反馈......................................................................................................................................... 13 2.1.4 版本信息......................................................................................................................................... 14 2.1.5 自动更新......................................................................................................................................... 14 2.1.6 用户手册......................................................................................................................................... 15 2.1.7 下载设置......................................................................................................................................... 16 2.1.8 关于 ................................................................................................................................................ 16
贵州多媒体智慧讲台使用方法
贵州多媒体智慧讲台使用方法
贵州多媒体智慧讲台使用方法
贵州多媒体智慧讲台是一种现代化教学工具,它集成了多种功能,包括投影仪、电子白板、音响系统、电脑等,使得教师可以更方便地展示教学内容,同时也使学生更容易获得知识。
使用贵州多媒体智慧讲台的步骤如下:
1. 打开电源开关:多媒体智慧讲台需要电源供电,首先需要打开设备所在位置的电源开关。
2. 打开投影仪:多媒体智慧讲台上的投影仪是展示教学内容的主要工具,需要将其打开。
投影仪可以通过设备上的开关,或遥控器上的按钮进行操作。
3. 打开电脑:多媒体智慧讲台上的电脑用于展示教学内容,需要将其打开。
电脑可以通过设备上的开关,或遥控器上的按钮进行操作。
4. 打开音响系统:多媒体智慧讲台上的音响系统用于播放声音,需要将其打开。
音响系统可以通过设备上的开关,或遥控器上的按钮进行操作。
5. 使用电子白板:多媒体智慧讲台上的电子白板可以作为一种互动性工具,可以让教师在屏幕上写字、画图等。
使用电子白板时,需要选择白板模式,可以通过设备上的按钮或遥控器上
的按钮进行操作。
6. 展示教学内容:在设备启动之后,教师可以通过电脑、投影仪等工具展示课件、视频、图片等教学内容。
此外,教师还可以通过电子白板与学生互动,进行课堂演示等。
7. 关闭设备:当教学结束时,需要关闭设备,依次关闭电子白板、音响系统、投影仪和电脑,最后关闭电源开关即可。
总之,贵州多媒体智慧讲台是现代化高科技教学设备,使用方法相对简单,一般具有自动化控制功能,并有备用系统,这使得贵州多媒体智慧讲台成为许多学校及机构教育教学中不可缺少的一种工具,大大提高了教学质量和教学效率。
会议平板操作说明手册
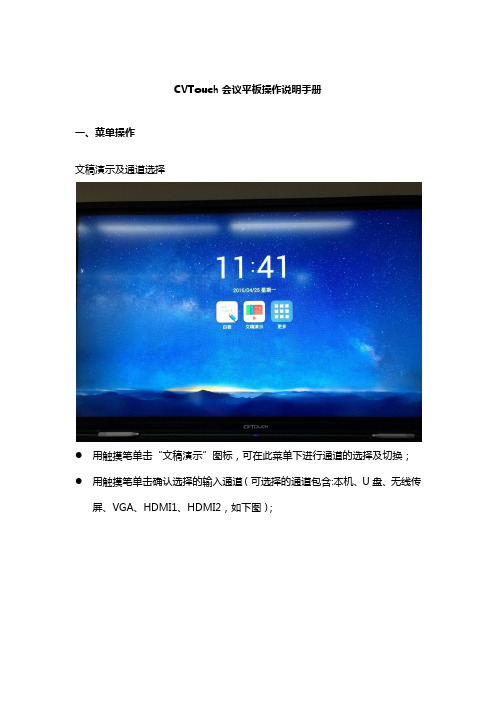
CVTouch会议平板操作说明手册一、菜单操作文稿演示及通道选择●用触摸笔单击“文稿演示”图标,可在此菜单下进行通道的选择及切换;●用触摸笔单击确认选择的输入通道(可选择的通道包含:本机、U盘、无线传屏、VGA、HDMI1、HDMI2,如下图);用触摸笔单机屏幕左右两侧图标,可打开或隐藏快捷选择菜单;二、白板操作说明用触摸笔单击”白板”图标,直接进入白板页面;在电子白板页面可进行书写、修改字体颜色、粗细。
使用橡皮图标、或者手背可修改清除写错的文字。
右下角的+号,可新增第二页、第三页。
使用左右”<””>”图标进行前后页面切换。
在电子白板左下角可进行保存记录、扫码分享、更换背景、插入图片、关闭。
会议记录,扫码带走:使用微信等扫描工具进行扫码,直接记录下会议内容。
三、ppt、word、excel等常用文档操作说明单击“更多”图标,点击里面的文件浏览器可以看到本机和U盘(如果接入U 盘)的文档信息,双击打开本机存储或外接U盘中的文稿、图片、视频等等进行演示。
Ppt、word、excel、图片可直接在上面进行批注与保存。
四、EShare手机传屏操作说明苹果用户:第一步:手机连接CVTOUCH-2b5b热点。
第二步:底边上滑进入快速设置点击airplay,点击设备john,打开镜像,即可实现手机传屏功能。
支持图片、视频、app等,相当于手机界面完全投放到平板上。
安卓用户:第一步:手机连接CVTOUCH-2b5b热点。
第二步:使用微信等扫一扫工具扫描二维码,或者通过ip(http://192.168.53.1:8000)下载EShare客户端。
第三步:打开ESHare客户端,可以传屏手机中的图片、视频。
五、无线传屏操作使用说明:无线传屏设备,可以实现电脑端与会议平板的双向操作,也可在会议平板上逆向操作电脑,轻松完成文件的切换展示。
步骤一、首次使用,将发射器接入智能平板的USB接口进行配对(再次使用无需配对)步骤二、配对后,将发射器接入个人电脑的USB接口,打开“我的电脑”点击运行无线传屏软件(首次使用时才需要,再次使用无需此步操作)步骤三:根据电脑界面提示,按下发射器按钮即可实现传屏。
Windows 8 平板计算机用户手势操作教程
Windows 8是桌面系统与平板系统的综合体,无论是UI还是操作方式,与传统桌面都有所不同。
这里介绍一下Windows 8 平板用户交互指南:
标准操作:
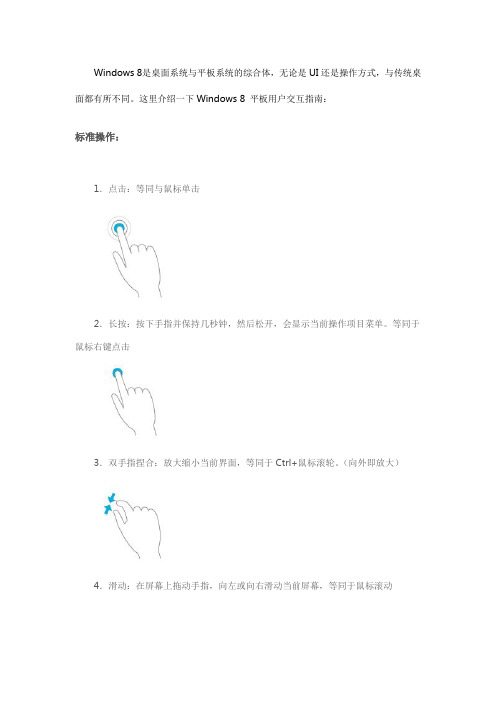
1.点击:等同与鼠标单击
2.长按:按下手指并保持几秒钟,然后松开,会显示当前操作项目菜单。
等同于鼠标右键点击
3.双手指捏合:放大缩小当前界面,等同于Ctrl+鼠标滚轮。
(向外即放大)
4.滑动:在屏幕上拖动手指,向左或向右滑动当前屏幕,等同于鼠标滚动
5.由边缘向内轻扫(例如在不抬起手指的情况下从上向下轻扫,然后将应用拖动到屏幕底部可以关闭应用。
)
A.从右边缘向内轻扫:唤出超级按钮,等同于Windows 键+C
B.从左边缘向内轻扫:默认情况下切换为上一个应用。
当从左边缘向中间轻扫并拖动该应用,直至出现边框,然后将该应用移动到目标位置可以运行贴靠模式
C.从顶/底部边缘向内扫动:显示命令,如“保存”、“编辑”和“删除”
特定操作:
1.旋转:将两个或更多手指放在一个项目上,然后旋转你的手。
(部分特定项目会沿着你手的旋转的方向旋转)
2.拖动:在“开始屏幕”按住某个磁贴然后用手指随意拖动以改变位置,等同于鼠标拖动
转载请注明:Win 8 平板馆» Windows 8 平板计算机用户手势操作教程。