D20S06L03
20S206 安装图集

20S206 安装图集本文档旨在介绍《20S206 安装图集》的目的和背景。
20S206 安装图集》是为了方便使用者正确安装和维护20S206产品而编制的图集。
该图集包含了详细的安装步骤和技术要求,以确保安装过程准确可靠。
在使用《20S206 安装图集》之前,请确保您具备相关的安装知识和技能,以及必要的工具和材料。
同时,请在安装过程中严格按照图集中的指导进行操作,以避免出现错误或安全隐患。
通过正确使用《20S206 安装图集》,您可以更加轻松和高效地完成20S206产品的安装工作,并确保产品的正常运行和长期可靠性。
祝您安装顺利!20S206 安装图集》是一个包含了详细安装图示和相关信息的图册。
该图集为20S206产品的安装过程提供了全面的指导和参考,旨在帮助用户正确安装该产品。
该图集主要由以下内容组成:安装图示:图册中包含了大量的安装图示,图示详细展示了20S206产品的安装步骤和注意事项,帮助用户准确理解和执行安装过程。
安装说明:图集中附有详细的文字说明,解释了每个安装步骤的具体操作方法和要求。
配件清单:图册中列出了安装所需的全部配件清单,用户可以根据清单核对和准备所需配件。
安装注意事项:图册中还包含了一些安装的注意事项和常见问题的解答,帮助用户避免可能出现的问题并解决常见疑惑。
该图集以简洁清晰的语言和直观的图示呈现,力求帮助用户顺利完成20S206产品的安装过程。
本文档提供了关于如何正确使用《20S206 安装图集》的详细说明和注意事项。
以下是使用该图集的步骤和注意事项:选择正确的图集版本。
确保你使用的是与你的设备或项目相适应的图集版本。
如果有多个版本可供选择,请根据你的具体需求进行选择。
选择正确的图集版本。
确保你使用的是与你的设备或项目相适应的图集版本。
如果有多个版本可供选择,请根据你的具体需求进行选择。
熟悉图集结构。
在开始使用前,建议先仔细研究图集的结构和组织方式。
了解图集中不同部分的内容和其相互关系,这有助于你更方便地使用和查找特定的安装指导。
Sugatsune 玻璃支持硬件及配件说明书

SHELF & SUPPORT HARDWAREGLASS CLAMPSGLASS SHELF SUPPORTSSOAP HOLDERSBRACKETSMIRROR SUPPORTSGLASS STANDOFFSSHELF STANDARDS & ACCESSORIESSHELVING SYSTEMSMIRROR SUPPORTS PictureSMB-15RSPM-20BSP-1820(HEAVY DUTY)SPN-1820(NARROW PROFILE)496SPE-FB20S330lbs/4pcsSPHL-25SPN-15FSL-MBFSL-LSPN-17ECSPH-20SPH-5286lbs/4pcsSPH-1511lbs/pc SPB-35220lbs/4pcs 99lbs/4pcs 176lbs/4pcsSPF-20SPB-15R SPB-20SPW-20Item No.Glass Thickness (mm)Weight (g)Box (pcs)Carton (pcs) 9303VA21032410100Material Finish 316 Stainless Steel SatinItem No.Glass Thickness (mm)Weight (g)Box (pcs)Carton (pcs) 9344VA21022910100Material Finish316 Stainless Steel Satin • 316 stainless steel clamp.• F or flat surface.• O ptional Parts: 4820VA (Safety Pin)• S ee page 466 for load capacity.• T empered Glass Recommended.• 316 stainless steel clamp.• F or flat surface.• O ptional Parts: 9320VA (Safety Pin)4849VA (Safety Plate)• S ee page 466 for load capacity.• T empered Glass Recommended.GLASS CLAMP9303VA2 GLASS CLAMP9344VA2ZN1ZN1ZN5Item No.4846ZN14846ZN5GLASS CLAMPZN1ZN1ZN1 ZN54846ZN5 (P.463)Item No.Glass Thickness (mm)2878ST86~10MOUNTING SCREWMS7 MS15ZN1ZN5ZN1ZN5ZN1Item No.D LDSP-S/1212 (15/32")120 ( 4-45/64" ) DSP-S/1512 (15/32")150 ( 5-57/64" ) DSP-S/2012 (15/32")200 ( 7-55/64" ) DSP-M/1514 (35/64")150 ( 5-57/64" ) DSP-M/2014 (35/64")200 ( 7-55/64" ) DSP-M/2414 (35/64")240 ( 9-7/16" ) DSP-M/3014 (35/64")300 (11-51/64") DSP-L/2020 (25/32")200 ( 7-55/64" ) DSP-L/2520 (25/32")250 ( 9-53/64" )SU-B80/MSU-B65/MSU-B50/MXL-SA01-120/SXL-SA01-150/SXL-SA01-180/SXL-SA01-240/SStainless Steel WhiteBlackApplication ExampleEBDFolding BracketDamper unit477.21-3/16"(30 mm)12-1/2" (317 mm)P1*6-3/4" (171 m m )1/16"(2 m m )15/16"(24 m m )2-5/8"(67 m m )1-3/4"(45 m m )1-1/2"(38 m m )6-1/8" (156 mm)3-7/8"(98 mm)1-7/16"(36 mm)1-7/16"(36 m m )FOLDING BRACKET WITH SOFT-CLOSETo find your Min./Max. table weight per single damper, please reference the formula shown next to the charts above and 18” depth examples below.EB-303/EP-DMaximum weight 7.2 lbs = 130/18 in.Minimum weight 2.8 lbs = 52/18 in.EB-317/EP-DMaximum weight 19.1 lbs = 345/18 in.Minimum weight 12.5 lbs = 225/18 in.Stainless SteelBlackTT EB-317/EP-D• A utomatically locks when flap is in open position.• P ress lever to release the lock.• A dditional hinges not required.• D amper unit with a soft-closing feature which makes bracket smoother and safer.• R efer to DAMPER WEIGHT CHART below for appropriate table weight and depth when softly folding down the table. • F or panel thickness 9/16" ~ 1-3/8" (15 ~ 35 mm).• D urability tested 50,000 cycles (private).Side Levers Connecting RodSafety Lock ScrewHolding BracketSpringConnecting LeverFor EB-2000-3 onlyNo.Part Name Material Finish1Connecting LeverAluminum AnodizedAluminum 2Side Lever3Spring Stainless Steel4Washer Plastic5Holding BracketAluminum AnodizedAluminum 6Connecting RodStainless Steel477.4Item No.Rod QtyRod Length (L)Side Lever QtySafety Lock QtyHolding Bracket QtySpring QtyEB-1000-2139-3/8" (1000 mm)2131EB-1500-2159-1/16" (1500 mm)2131Item No.Rod QtyRod Length (L)Side Lever QtyConnecting Lever QtySafety Lock Qty Holding Bracket Qty Spring QtyEB-2000-3239-3/8" (1000 mm) each 21161Connecting LeverLEVER RELEASE FOR EB SERIES FOLDING BRACKETSLEVER RELEASE for EB Folding Bracket LEVER RELEASE for EB Folding Bracket EB-1000-2/1500-2EB-2000-3SHELF & SUPPORT HARDWARERecommended Hinge: 388H38830-25-DDamper388HDo not lift up the shelf forcibly. It may result in breakage.Z058* S pecial wrench Z058 required for installation. (Sold Separately)Cut Out DimensionCut Out DimensionMaterialFinish 302 Stainless Steel/Aluminum SatinItem No.Glass Thickness (mm)Weight (g)Box (pcs)Carton (pcs)7005VA 8~12192440MaterialFinish 302 Stainless Steel/Aluminum SatinItem No.Glass Thickness (mm)Weight (g)Box (pcs)Carton (pcs)7000VA 8~12167440Z058• F lush mount type glass standoff.• R ecommended Screw Size: M8 bolt • L onger base 80~180 mm (3-5/32"~7-3/32") available as special order.• R ecommended for use with tempered glass.* S pecial wrench Z058 required for installation. (Sold Separately)• G lass standoff with round face plate.• R ecommended Screw Size: M8 bolt • L onger base 80~180 mm (3-5/32"~7-3/32") as special order.• R ecommended for use with tempered glass.GLASS STANDOFF 7000VAGLASS STANDOFF 7005VAItem No.Glass Thickness (mm) Item No.Glass Thickness (mm) 7015VA8~12Item No.Glass Thickness (mm)7061VA6~12GLASS STANDOFF Item No.Glass Thickness (mm)7062VA6~12Z057* S pecial wrench Z057 required for installation. (Sold Separately)Item No.Glass Thickness (mm)7083VA 6~12Finish GLASS STANDOFFItem No.Glass Thickness (mm)7120VA8GLASS STANDOFFSMB-15RSPM-20BSP-1820(HEAVY DUTY)SPN-1820(NARROW PROFILE)496SPE-FB20S330lbs/4pcsSPHL-25SPN-15FSL-MBFSL-LSPN-17ECSPH-20SPH-5286lbs/4pcsSPH-1511lbs/pc SPB-35220lbs/4pcs 99lbs/4pcs 176lbs/4pcsSPF-20SPB-15R SPB-20SPW-20Item No.Item No.Load Capacity (kg)SPH-15130 (286 lbs)/4 pcs END CAPWeight (g)1.3StandardAP-DM1820WT AP-DM1820AP-DH1820Item No.D E Weight (g)AP-DM1820178017113 AP-DM1820WT AP-DM1820BL AP-DM2600250047161 AP-DH1820178017131 AP-DH2600250047187Item No.Screw TypeAP-SC3-16 AP-SC3-16WT AP-SC3-16BL AP-SC3-30 AP-SC3-30WT AP-SC3-30BL • A luminum shelf standard.• E asy to cut to desired length.• T hin profile (3 mm, 1/8") suitable for surface mount.• S crew hole located every 120 mm (4-23/32").• N ew slot shape to prevent shelf support from falling off.• S pecial screw with silver finish available. (AP-SC3-16)• S crews and accessories sold separately.• A luminum shelf standard.• E asy to cut to desired length.• D esigned for press-fit mount without using screws.• N ew slot shape to prevent shelf support from falling off.• S crews and accessories sold separately.* Install the standard with concave slot(located every 120 mm) pointing upward.* Fit tightness may vary depending on the panel/wall material. Use adhesive if loose.Bore Dimension (In case of Plywood)SHELF STANDARDHolds in any height。
某地19米地中海风格多层住宅建筑施工图

LG 壁挂空调说明书

MODELS : ASNW096WSA0 - ASUW096WSA0(AS-W096WSA0)ASNW096WSA3 – ASUW096WSA3(AS-W096WSA3)ASNW126BSA0 – ASUW126BSA0(AS-W126BSA0)ASNW126BSA3 – ASUW126BSA3(AS-W126BSA3)ASNW186CSA0 – ASUW186CSA0(AS-W186CSA0)ASNW186CSA3 – ASUW186CSA3(AS-W186CSA3)ASNW246CSA0 – ASUW246CSA0(AS-W246CSA0)ASNW246CSA3 – ASUW246CSA3(AS-W246CSA3)P/NO : MFL67399706Please read this manual carefully before operating your set and retain it for future reference.TYPE : WALL MOUNTED2TIPS FOR SAVING ENERGYTIPS FOR SAVING ENERGYHere are some tips that will help you minimize the power consumption when you use the air conditioner. You can use your air conditioner more efficiently by referring to the instructions below:• Do not cool excessively indoors. This may be harmful for your health and may consume more electricity.• Block sunlight with blinds or curtains while you are operating the air conditioner.• Keep doors or windows closed tightly while you are operating the air conditioner.• Adjust the direction of the air flow vertically or horizontally to circulate indoor air.• Speed up the fan to cool or warm indoor air quickly, in a short period of time.• Open windows regularly for ventilation as the indoor air quality may deteriorate if the air con-ditioner is used for many hours.• Clean the air filter once every 2 weeks. Dust and impurities collected in the air filter may block the air flow or weaken the cooling / dehumidifying functions.For your recordsStaple your receipt to this page in case you need it to prove the date of purchase or for warranty purposes. Write the model number and the serial number here:Model number :Serial number :You can find them on a label on the side of each unit.Dealer’s name :Date of purchase :SAFETY PRECAUTIONSIMPORTANT SAFETY INSTRUCTIONSREAD ALL INSTRUCTIONS BEFORE USING THE APPLIANCE.Always comply with the following precautions to avoid dangerous situations and ensure peak performance of your productWARNING It can result in serious injury or death when the directions are ignoredCAUTIONIt can result in minor injury or product damage when the directions are ignoredWARNING• Installation or repairs made by unqualified persons can result in hazards to you and others.• Appliance shall be installed in accordance with national wiring regulations.• The information contained in the manual is intended for use by a qualified service technician familiar with safety procedures and equipped with the proper tools and test instruments.• Failure to carefully read and follow all instructions in this manual can result in equipment mal-function, property damage, personal injury and/or death.• When the power cord is to be replaced, replacement work shall be performed by authorized personnel only using only genuine replacement parts.Installation• Use a standard circuit breaker and fuse conforming with the rating of the air conditioner. Fail-ure to do so may result in electric shock or product failure.• Contact an authorized service center when you install or relocate the air conditioner. Failure to do so may result in serious injury or product failure.• Always use a power plug and socket with a ground terminal.Failure to do so may result in electric shock or product failure• Install the panel and the cover of the control box safely. Failure to do so may result in explo-sion or fire.• Install a dedicated electric outlet and circuit breaker before you use the air conditioner. Failure to do so may result in electric shock or product failure.• Use a standard circuit breaker and fuse conforming with the rating of the air conditioner. Fail-ure to do so may result in electric shock or product failure.• Do not modify or extend the power cable. If the power cable or cord has scratches or skin peeled off or deteriorated then it must be replaced. It may result in fire or electric shock.• Be cautious when you unpack or install the air conditioner. Failure to do so may result in seri-ous injury or product failure.• Contact an authorized service center when you install or relocate the air conditioner. Failure to do so may result in serious injury or product failure.• Do not install the air conditioner on an unstable surface or where there may be a danger of it falling. It may result in death, serious injury, or product failure.• Use inflammable gas (nitrogen) to inspect leak and to purge air, using compressed air or flam-mable gas may cause fire or explosion.!34SAFETY PRECAUTIONSOperation• Do not let the air conditioner run for a long time when the humidity is very high or when a door or window has been left open. Failure to do so may result in product failure.• Make sure that the power cord is not pulled or damaged while the air conditioner is operating. Fail-ure to do so may result in fire, electric shock, or product failure.• Do not place any objects on the power cord. It may result in electric shock or product failure.• Do not turn on or off the air conditioner by plugging in or unplugging the power plug. It may result in fire or electric shock.• Do not touch, operate or repair the air conditioner with wet hands. It may result in electric shock or product failure.• Do not place a heater or other heating appliances near the power cable. It may result in fire, electric shock, or product failure.• Do not allow water to run into the air conditioner. It may result in explosion or fire.• Do not leave flammable substances such as gasoline, benzene and thinner near the air conditioner.It may result in explosion or fire.• Do not use the air conditioner for an extended period of time in a small place without ventilation.Ventilate the place regularly. Failure to do so may result in explosion or fire.• When there is a gas leak, ventilate sufficiently before using the air conditioner again. Failure to do so may result in explosion or fire.• Unplug the power plug if there is a noise, smell or smoke coming from the air conditioner. Failure to do so may result in explosion or fire.• Stop operating and close the window in Storm or hurricane.If possible remove the product from the window before hurricane arrives• Do not touch the electrostatic filter after opening the front grille. Failure to do so may result in elec-tric shock or product failure.• Contact an authorized service center when the air conditioner is submerged into water due to flood-ing. Failure to do so may result in explosion or fire.• Be cautious water could not enter the product• Make sure to ventilate sufficiently when this air conditioner and a heating appliance such as a heater are used simultaneously. Failure to do so may result in fire, serious injury, or product failure.• Turn the main power off and unplug the power plug when you clean or repair the air conditioner.Failure to do so may result in death, serious injury, or product failure.• Unplug the power plug when the air conditioner is not used for an extended period of time. Failure to do so may result in product failure.• Do not place any objects on the air conditioner. It may result in product failure.• For inner cleaning, contact an Authorized Service Center or a dealer.Do not use harsh detergent that causes corrosion or damage on the unit.Harsh detergent may also cause failure of product, fire, or electronic shock.SAFETY PRECAUTIONSCAUTIONInstallation• Make sure to check if there is a refrigerant leak after you install or repair the air conditioner. Failure to do so may result in product failure.• Install the drain hose properly for smooth drainage of condensed water. Failure to do so may result in product failure.• Keep level even when installing the product.• Install the air conditioner where the noise from the outdoor unit or the exhaust gas will not incon-venience the neighbors. Failure to do so may result in conflict between neighbors.• When transporting the equipment, there should be at least 2 or more people, or a forklift. It may re-sult in serious injury.• Do not install the air conditioner where it will be exposed to sea wind (salt spray) directly. It may re-sult in product failure.Operation• Do not expose people, animals or plants to the cold or hot wind from the air conditioner. It may re-sult in serious injury.• Do not use the product for special purposes, such as preserving foods, works of art, etc. It is a con-sumer air conditioner, not a precision refrigeration system. It may result in death, fire or electric shock.• Do not block the inlet or outlet of air flow. It may result in explosion or product failure.• Do not use strong cleaning agents or solvents when you clean the air conditioner, or spray e a smooth cloth. It may result in serious injury or product failure.• Never touch the metal parts of the air conditioner when you remove the air filter. It may result in se-rious injury or product failure.• Do not place any objects on the air conditioner. It may result in product failure.• Always insert the filter securely after cleaning. Clean the filter every two weeks or more often if necessary.• Do not insert hands or other objects through the air inlet or outlet while the air conditioner is operat-ing. It may result in electric shock.• Do not drink the water drained from the air conditioner. It may result in serious health complications.• Use a sturdy stool or ladder when you clean, maintain or repair the air conditioner at a height. Failure to do so may result in serious injury or product failure.• Do not mix the batteries for the remote control with other types of batteries or mix new batteries with used batteries. Failure to do so may result in product failure.• Do not recharge or disassemble the batteries. Failure to do so may result in explosion, fire or serious injury.• Stop using the remote control if there is a battery fluid leak. If your cloth or skin is exposed to the battery fluid from a leak, wash it off with clean water. Failure to do so may result in serious injury.• If you swallow the battery fluid from a leak, wash out the inside of your mouth thoroughly and then consult a doctor. Failure to do so may result in serious health complications.• This appliance is not intended for use by persons (including children) with reduced physical, sensory or mental capabilities, or lack of experience and knowledge unless they have been given supervision or instruction concerning use of the appliance by a person responsible for their safety.• Children should be supervised to ensure that they do not play with the appliance.!5TABLE OF CONTENTS2TIPS FOR SAVING ENERGY 3IMPORTANT SAFETYINSTRUCTIONS7BEFORE USE7Components8Using the remote control9- Inserting batteries9- Installing the remote control holder 10BASIC FUNCTIONS10Cooling your room10Heating your room10Removing humidity11Airing your room11Adjusting the fan speed11Adjusting the air flow direction11Setting the timer11- Setting the current time12- Turning on the air conditionerautomatically at a set time12- Turning off the air conditionerautomatically at a set time12- Canceling the timer setting12Setting sleep mode 13ADVANCED FUNCTIONS 13Changing room temperature quickly13Indoor air purification13- Auto Clean operation14Auto operation14Auto Changeover operation15Energy saving cooling mode15Display screen brightness15Operating the air conditioner without the remote control16Restarting the air conditionerautomatically17MAINTENANCE18Cleaning the air filter19TROUBLESHOOTING19Self-diagnosis function19Before requesting serviceTA B LE OF CONTENTS 6Coolant piping Connection wireDrain hose BEFORE USEComponentsOutdoor unit7B EFORE USEIndoor unitOperation rangesThe table below indicates the temperature ranges the air conditioner can be operated within.Using the remote controlYou can operate the air conditioner more conveniently with the remote control. You will find the buttons for the additional functions under the cover of the remote control.BEFORE USE8* Some functions may not be supported, depending on the model.Inserting batteriesInsert batteries before using the remote control. The battery type used is AAA (1.5 V).1 Remove the battery cover.2Insert the new batteries and make sure that the + and – terminals of the batteries are installed correctly.3Reattach the battery cover.Installing the remote control holder Install the holder where there is no direct sun-light to protect the remote control.1Choose a safe and easily-accessible place. 2Remove the adhesive sticker protection film from the back of the holder before at-taching it to the wall.3Fix the holder by fastening the 2 screws firmly with a screwdriver.4Slide the remote control into the holder. Point the remote control towards the signal receiver at the bottom of the air conditioner tooperate it.Operating method9BEFORE USEBASIC FUNCTIONSB ASIC FUNCTIONS10Cooling your room(Cool ing o p e ra t i o n )1 Press d to turn on the power.2 Press f repeatedly to select the coolingoperation.- A is displayed on the display screen.3Press u or v to set the desired tempera-ture.- The temperature range is 18°C - 30°C.Heating your room(Heating operation)1 Press d to turn on the power.2 Press f repeatedly to select the heatingoperation.- B is displayed on the display screen.3 Press u or v to set the desired tempera-ture.- The temperature range is 16°C - 30°CRemoving humidity(Dehumidifying operation)This mode removes excess moisture from an environment with high humidity or in the rainy season, in order to prevent mold from setting in. This mode adjusts the room temperature and the fan speed automatically to maintain the optimal level of humidity.1 Press d to turn on the power.2 Press f repeatedly to select the dehu-midifying operation.- Dis displayed on the display screen.11B ASIC FUNCTIONSAiring your room(Air Circulation operation)This mode only circulates the indoor airwithout changing the room temperature. The cooling lamp lights up in air circulation mode.1 Press d to turn on the power.2 Press /to select the air circulation opera-tion.- E is displayed on the display screen.3Press g to adjust the fan speed.Adjusting the fan speed1Press g repeatedly to adjust the fanspeed.- Select 5if you want natural air. The fan speed adjusts automatically.Adjusting the air flow direc-tion1 To adjust the direction of the air flow hori-zontally, press i repeatedly and select the desired direction.- Select H to adjust the direction of the air flow automatically.Setting the timerYou can use the timer function to save energy and to use the air conditioner more efficiently.Setting the current time1onds.B ASIC FUNCTIONS122Press o or q to select the minutes.3Press p to finish.T urning on the air conditioner auto-12Press o or q to select the minutes.3Press p to finish.T urning off the air conditioner auto-12Press o or q to select the minutes.3Pressp to finish.Canceling the timer setting1Press m.2Press m or n to select the timer settingto cancel.3Press p .- To cancel all timer settings, press p .Setting sleep modeUse the sleep mode to turn off the air condi-tioner automatically when you go to sleep. 1Press d to turn on the power.2Press l3Press o or q to select the hour (up to 7 hours).4Press p to finish.- T is displayed on the display screen in sleep mode.ADVANCED FUNCTIONSThe air conditioner offers some additional ad-vanced functions.Changing room temperature quickly(Jet Cool/Heat operation)This mode allows you to cool indoor air quickly in summer or warm it quickly in winter.1Press d to turn on the power.2Press h.- In jet cooling mode, strong air blows outat a temperature of 18°C for 30 minutes.- In jet heating mode, strong air blows outat a temperature of 30°C for 30 minutes.Indoor air purificationAuto Clean operationIn the cooling and dehumidifying operations, moisture is generated inside the indoor unit. Use the auto cleaning function to remove such moisture.1Press d to turn on the power.2Press c.- J is displayed on the display screen.- If you turn off the power, the fan oper-ates for 30 minutes and cleans the inside of the indoor unit.13 ADVANCED FUNCTIONSAuto operation(Artificial intelligence)In this mode, the fan speed and the tempera-ture adjust automatically, based on the room temperature.1Press d to turn on the power.2Press f repeatedly to select auto opera-tion.3Press ]or [to select the desired opera-tion code if the temperature is higher or lower than the desired temperature.Auto Changeover operationThis mode changes the operation mode auto-matically to maintain the set temperature at ±2°C.1Press d to turn on the power.2Press f repeatedly to select the auto changeover operation.- C is displayed on the display screen.3Press ]or [to set the desired tempera-ture.- The temperature range is 18°C - 30°C.4Press g repeatedly to select the fan speed.Cooling-only modelsADVANCED FUNCTIONS1415ADVANCED FUNCTIONS Energy saving cooling modeThis mode minimizes power consumption dur-ing cooling and increases the set temperature to the optimal level for a more comfortable en-vironment.1Press d to turn the power on.2Press f repeatedly to select the cooling operation.3Press b .- G is displayed on the display screen.unit display screen.1Press \to turn on/off the lamp on the front grill.Operating the air conditioner without the remote controlYou can use the On/Off button of the indoor unit to operate the air conditioner when the remote control is unavailable. However, the fan speed is set to high.1Open the front grille.- Lift up both sides of the cover slightly.2Press the On/Off button.* The feature can be changed according a type of model.- For cooling-only models, the temperature is set to 22°C (71.6°F).Restarting the air conditioner automaticallyWhen the air conditioner is turned on again after a power failure, this function restores the previous settings. This function is a factory de-fault setting.1Open the front grille.- Lift up both sides of the cover slightly.2Press the On/Off button and hold it for 6seconds.- The unit will beep twice and the lamp will blink 6 times.- To re-enable the function, press the On/Off button and hold it for 6 seconds. The unit will beep twice and the blue lamp will blink 4 times.* The feature can be changed according atype of model.Disabling auto restartADVANCED FUNCTIONS16ADVANCED FUNCTIONS17 MAINTENANCEClean the product regularly to maintain optimal performance and to prevent possible breakdown. * This may not be provided, depending on the model.Cleaning the air filterClean the air filter once every 2 weeks or more if necessary.1Turn off the power and unplug the power cord.2Open the front grille.- Lift up both sides of the cover slightly.3Hold the knob of the air filter, lift it upslightly and remove it from the unit.4Clean the filter with a vacuum cleaner orwith warm water.- If dirt is difficult to remove, wash the filter in lukewarm water with detergent.5Dry the filter in the shade.MAINTENANCE18MAINTENANCE19TROUBLESHOOTINGSelf-diagnosis functionThis product has a built-in self-diagnosis function. If an error occurs, the lamp of the indoor unit will blink in 2 second intervals. If this occurs, contact your local dealer or service center.Before requesting servicePlease check the following before you contact the service center. If the problem persists, contact your local service center.TROU B LESHOOTING 20İTHALATÇI FİRMABosch T ermoteknik Isıtma ve Klima Ticaret A.Ş. Ankara Asfaltı Üzeri, Acıbadem Mah.Onur Sokak No:18/AKoşuyolu-Kadıköy / İstanbul / TÜRKİYETel: (0 216) 544 11 00ÜRETİCİ FİRMALG Electronics Inc.76, Seongsan-dong, Changwon City, Gyeongnam 641-713, Republic of Korea 。
Resistor.Today-RNP20S系列TO-220封装平面无感功率电阻规格书

RNP20S
平面无感功率电阻
0.01
0.1
1.0
阻值 (Ohms )
250 200 150 100 50 0 TO-220封装,符合AEC -Q200认证,厚膜和薄膜技术功率可达35W ,热阻3.3℃/W ,极好的频率特性
使用厚膜和薄膜两种电阻技术的TO -220封装功率电阻
阻值 (ohm )
1K
100
10
1
100k
1M
10M
100M
1G
频率 (Hz)
10n 100n 1u 10u 100u 1m 10m 100m 1
100
脉冲宽度 (秒)
100k 10k
1k 100
10
10 0
10 20 30
40
50
加载功率 (W )
100 80 60 40
20 0 温升 ()
℃法兰温度
℃-50
50
100
150 200
100806040200额定功率%
温飘ppm/℃(0~100)℃尺寸单位:mm
相比较厚膜电阻技术,薄膜电阻可以提供更好的温飘和精度。
RNP20S 系列产品在10R-51KΩ的阻值范围内使用金属化薄膜电阻技术,不仅可以实现高达35W 的功率,而且可以提供50ppm 的温飘和1%的阻值精度。
本系列在0.02-510KΩ的阻值范围内也可以提供标准厚膜电阻技术。
【诺瓦科技】智慧城市LED灯杆屏联网播放器TB6规格参数参考说明书

多媒体播放器TB6规格书文档版本:V1.3.2文档编号:NS120000360版权所有 © 西安诺瓦电子科技有限公司2018。
保留一切权利。
非经本公司书面许可,任何单位和个人不得擅自摘抄、复制本文档内容的部分或全部,并不得以任何形式传播。
商标声明声明欢迎您选用西安诺瓦电子科技有限公司(以下简称诺瓦科技)的产品,如果本文档为您了解和使用产品带来帮助和便利,我们深感欣慰。
我们在编写文档时力求精确可靠,随时可能对内容进行修改或变更,恕不另行通知。
如果您在使用中遇到任何问题,或者有好的建议,请按照文档提供的联系方式联系我们。
对您在使用中遇到的问题,我们会尽力给予支持,对您提出的建议,我们衷心感谢并会尽快评估采纳。
i 目录目录目录 .....................................................................................................................................................ii1 概述 (1)1.1产品简介 (1)1.2应用场景 (1)2产品特点 (3)2.1支持多屏播放同步机制 (3)2.2处理性能强大 (3)2.3全方位控制方案 (3)2.4支持同步异步双模式 (4)2.5支持双WiFi 模式 (4)2.5.1WiFi AP 模式....................................................................................................................................... (5)2.5.2WiFi Sta 模式 ...................................................................................................................................... (5)2.5.3WiFi AP+Sta 模式 ......................................................................................................................................52.6支持冗余备份 (6)3硬件结构 (7)3.1外观图 ..................................................................................................................................................... (7)3.1.1前面板 ...................................................................................................................................... (7)3.1.2后面板 ...................................................................................................................................... (8)3.2尺寸图 ..................................................................................................................................................... (9)4软件结构 (10)4.1系统软件 ....................................................................................................................................................104.2相关配置软件 (10)5产品规格 ........................................................................................................................................ 116 音视频解码规格 (13)6.1图片 (13)6.1.1解码器 ..................................................................................................................................................... 136.1.2编码器 ..................................................................................................................................................... 136.2音频 (14)6.2.1解码器 (14) ii 目录 (3)6.2.2编码器 (21)6.3视频 (21)6.3.1解码器 (21)6.3.2编码器 (16)iii1概述TB6 规格书 2 产品特点TB6 规格书●更高效:采用云服务模式,通过统一的平台处理业务,例如VNNOX 用来统一编辑和发布节目,NovaiCare 用来统一监控屏体状态。
某循环水泵房设计图纸(共10张)

LED软灯条的类型、规格及安装介绍
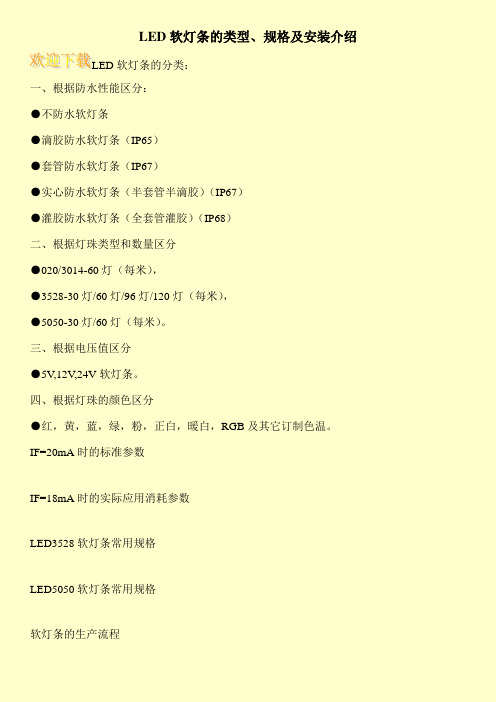
LEDபைடு நூலகம்灯条的分类:
一、根据防水性能区分:
●不防水软灯条
●滴胶防水软灯条(IP65)
●套管防水软灯条(IP67)
●实心防水软灯条(半套管半滴胶)(IP67)
●灌胶防水软灯条(全套管灌胶)(IP68)
二、根据灯珠类型和数量区分
●020/3014-60灯(每米),
●3528-30灯/60灯/96灯/120灯(每米),
LED3528软灯条
LED软灯条
LED软灯条用途
广泛用于楼体轮廓、台阶、展台、桥梁、酒店、KTV装饰照明,建筑物装饰照明、边缘照明装饰、走廊照明、楼梯照明、隐蔽位置照明、水下工程照明、酒柜、鞋柜、天花暗格、衣柜、展示柜、珠宝柜台、以及
●5050-30灯/60灯(每米)。
三、根据电压值区分
●5V,12V,24V软灯条。
四、根据灯珠的颜色区分
●红,黄,蓝,绿,粉,正白,暖白,RGB及其它订制色温。
IF=20mA时的标准参数
IF=18mA时的实际应用消耗参数
LED3528软灯条常用规格
LED5050软灯条常用规格
软灯条的生产流程
LED 5050软灯条
- 1、下载文档前请自行甄别文档内容的完整性,平台不提供额外的编辑、内容补充、找答案等附加服务。
- 2、"仅部分预览"的文档,不可在线预览部分如存在完整性等问题,可反馈申请退款(可完整预览的文档不适用该条件!)。
- 3、如文档侵犯您的权益,请联系客服反馈,我们会尽快为您处理(人工客服工作时间:9:00-18:30)。
Sample Problem: Cannot Ping Remote Host
© 2002, Cisco Systems, Inc. All rights reserved.
• Use debug commands to identify events and anomalies in the NAT configuration, given an operational router
© 2002, Cisco Systems, Inc. All rights reserved.
© 2002, Cisco Systems, Inc. All rights reserved. ICND v2.0—6-8
Dynamic Address Translation Example
© 2002, Cisco Systems, Inc. All rights reserved.
ICND v2.0—6-9
Router#show ip nat translations
• Displays active translations
Router#show ip nat translation Pro Inside global Inside local --- 172.16.131.1 10.10.10.1
Scaling the Network 来自ith NAT and PAT
©© 2002, Cisco Systems, Inc. All rights reserved. 2002, Cisco Systems, Inc. All rights reserved.
ICND v2.0—6-1
1
Objectives
Outside local --Outside global ---
Router#show ip nat statistics
• Displays translation statistics
Router#show ip nat statistics Total active translations: 1 (1 static, 0 dynamic; 0 extended) Outside interfaces: Ethernet0, Serial2.7 Inside interfaces: Ethernet1 Hits: 5 Misses: 0 …
Port Address Translation
© 2002, Cisco Systems, Inc. All rights reserved.
ICND v2.0—6-4
Translating Inside Source Addresses
© 2002, Cisco Systems, Inc. All rights reserved.
ICND v2.0—6-2
Network Address Translation
• •
An IP address is either local or global. Local IP addresses are seen in the inside network.
ICND v2.0—6-3
© 2002, Cisco Systems, Inc. All rights reserved.
• Defines a standard IP access list permitting those inside local addresses that are to be translated
Router(config)#ip nat inside source list access-list-number interface interface overload
Overloading an Inside Global Address Example
© 2002, Cisco Systems, Inc. All rights reserved.
ICND v2.0—6-12
Clearing the NAT Translation Table
Router#clear ip nat translation *
Router(config-if)#ip nat inside
• Marks the interface as connected to the inside
Router(config-if)#ip nat outside
• Marks the interface as connected to the outside
Router(config)#access-list access-list-number permit source [source-wildcard]
• Defines a standard IP access list permitting those inside local addresses that are to be translated
Router#clear ip nat translation outside local-ip global-ip
• Clears a simple dynamic translation entry containing an outside translation
Router#clear ip nat translation protocol inside global-ip global-port local-ip local-port [outside local-ip local-port global-ip global-port]
• Clears an extended dynamic translation entry
© 2002, Cisco Systems, Inc. All rights reserved. ICND v2.0—6-13
Displaying Information with show Commands
ICND v2.0—6-15
Solution: New Configuration
© 2002, Cisco Systems, Inc. All rights reserved.
ICND v2.0—6-16
Using the debug ip nat Command
Router#debug ip nat NAT: s=192.168.1.95->172.31.233.209, d=172.31.2.132 [6825] NAT: s=172.31.2.132, d=172.31.233.209->192.168.1.95 [21852] NAT: s=192.168.1.95->172.31.233.209, d=172.31.1.161 [6826] NAT*: s=172.31.1.161, d=172.31.233.209->192.168.1.95 [23311] NAT*: s=192.168.1.95->172.31.233.209, d=172.31.1.161 [6827] NAT*: s=192.168.1.95->172.31.233.209, d=172.31.1.161 [6828] NAT*: s=172.31.1.161, d=172.31.233.209->192.168.1.95 [23313] NAT*: s=172.31.1.161, d=172.31.233.209->192.168.1.95 [23325]
© 2002, Cisco Systems, Inc. All rights reserved.
ICND v2.0—6-17
Translation Not Installed in the Translation Table?
• Verify that: – The configuration is correct.
© 2002, Cisco Systems, Inc. All rights reserved.
ICND v2.0—6-6
Enabling Static NAT Address Mapping Example
© 2002, Cisco Systems, Inc. All rights reserved.
Overloading an Inside Global Address
© 2002, Cisco Systems, Inc. All rights reserved.
ICND v2.0—6-10
Configuring Overloading
Router(config)#access-list access-list-number permit source source-wildcard
ICND v2.0—6-5
Configuring Static Translation
Router(config)#ip nat inside source static local-ip global-ip
• Establishes static translation between an inside local address and an inside global address
– There are not any inbound access lists denying the packets from entering the NAT router.
• Clears all dynamic address translation entries
Router#clear ip nat translation inside global-ip local-ip [outside local-ip global-ip]