瞄准镜技术参数说明
军用夜视瞄准镜

微光夜视瞄准镜
品牌:浦喆
微光夜视瞄准镜,是为95式步枪而特别研制,该产品使用夜间或微弱光线环境下,对10米至无穷远距离的单个或群体目标进行观察或者快速瞄准。
微光夜视瞄准镜使用全新超二代夜视管以及配有95式步枪专用装夹方式的底座。
该产品还具有外形尺寸小、重量轻、性能稳定、操作简便等特点。
性能参数:
像管: 2+倍率:5X
视场:14°出瞳距:45mm
出瞳直径: 8mm 分辨率:64lp/mm
物镜调焦: 10m~∞调节范围:≥±60MOA
咔嚓值: 10mm/100m 电池:CR123A, X1
抗冲击:500G(95步枪6000发)防水:0~35℃,水深0.5米,1小时镜体材料:AL6061A-T6 验收级别:GJB5815-2006
尺寸: 223x90x70mm 重量:805g。
周视瞄准镜设计说明书

周视瞄准镜设计说明书080116-05-尚磊周视瞄准镜设计说明书一、周视瞄准镜概述周视瞄准镜是周视望远镜的一种。
周视瞄准镜的目镜位置不动而镜头能够绕垂直轴在水平方向一定角度围进行观察。
对于周视瞄准镜,常见的一般利用上直角棱镜绕垂直轴做转动时,道威棱镜绕其自身光轴按一定关系互相配合互相转动角,可实现水平周视。
另外,上直角棱镜能绕水平轴俯仰,实现俯仰观察。
但也有少部分采用立方棱镜绕垂直轴转动实现水平周视或者一些光学元件组合实现。
按观察围划分,周视瞄准镜可以分为水平半周视和水平全周视。
其中,观察围小于360°的为水平半周视,达到360°的为水平全周视。
有周视性能的瞄准镜,可以扩大观察围,同时,俯仰时目镜不动,方便观察者不用改变自己的位置和方向,观察到四周的景物。
这个镜子最有意思的是眼睛位置不动,转动转螺可观察360°,因为它有特殊的光学结构。
二、光路设计由于系统用于对远距离目标进行观察,具有的视觉放大率,因此它必然是一个开普勒望远镜,要使用正光焦度的物镜和目镜。
为了便于观察,系统应成正像,所以必须加入倒像系统。
由于系统要求有一定的潜望高度,所以可以采用使光轴改变90°的棱镜或平面镜,但平面镜的安装、固定十分困难,而且所镀的反光膜易变质、脱落,还会在反射时造成百分之十左右的光能损失,所以用平面镜进行反射并不理想。
而棱镜则可以克服这些缺点,所以采用使光轴改变90°的棱镜形成前往高。
考虑到系统的简单易携性,两个棱镜都选用直角棱镜。
为了在水平面和垂直面改变光轴的方向,可以在光轴上端01点的直角棱镜绕水平和垂直轴转动。
当棱镜绕经过01点的垂直于主截面的水平轴转动时,像的方向不会发生旋转。
但当棱镜绕0102轴转动时,如果物平面相对主截面不动,像平面也将随之转动。
如果要求像平面不转,就必须使像面产生一个相反方向的转动。
这样就必须加入一个棱镜,利用它的转动来补偿像平面的转动,而不使光轴的方向改变。
瞄准镜调节说明1

有枪友问,瞄准镜安装上去以后,高低调节出现了问题,具体表现是:高度调节钮拧到了极限,子弹仍然偏高于瞄准点的中心,或偏低于瞄准点的中心。
是不是瞄准镜的质量有问题?解决问题首先要找出问题的根源,其实这种情况的原因主要在于瞄准镜和枪身的轴线不同轴。
理想的状态下,瞄准镜的光轴应和枪管轴线平行。
这样调校容易,可以打出比较理想的散布如图:点击看大图如果瞄准镜安装时出现问题,如:镜子物镜部分太高,或目镜部分安装太高,光轴和枪管的关系会出现如下情况:如图:点击看大图出现这种安装误差的根源在于导轨的在枪上的安装误差,另外夹具因为生产于不同的批次也会产生高低不同的情况,解决的办法是,用纸片或铜片铝片在前后夹具的下部放置垫片,调节瞄准镜的水平度,比如在瞄准镜产生抬头时,可以在后夹具(*近目镜的那个夹具)上放置垫片,一点点校平。
又比如在瞄准镜产生低头时,可以在前夹具(*近物镜的那个夹个)上放置垫片,一点点校平。
这样以来,瞄准镜和枪管的轴线可以接近于平行了。
校枪也变得容易。
第一个问题:校好后,打着打着不准了答:先拆掉镜子,用机械瞄具试打一下,如果弹着点还是乱,可能是子弹问题,如果弹孔群很正常,说明光学瞄具的安装或瞄具本身有问题。
第二个问题:一天要校很多次答:压簧式气枪根据夹具和瞄具夹持力的不同,会产生瞄具后退的情况,如果瞄具滑动和夹具产生了碰撞冲突时,瞄具会产生移位。
或者射击的震动导致螺丝松动后,瞄具产生偏移。
瞄具因射击震动而偏移,这在射击时是一种正常情况,世界上再好的瞄具用这种民用型分离式夹具时都会有这种问题的产生,根据笔者的经历,用弹簧枪在40-70枪后,一般瞄具会后退至少0.5MM-1MM左右。
200发的射击后,一般会产生较大的偏差,正常情况下是夹具的螺丝松动引起的。
螺丝的松动分三种:第一种是夹持瞄具的螺丝松布,第二种原因是夹具夹导轨的螺丝产生松动。
第三种和瞄具无关,但也很重要,是枪身和木托的结合螺丝产生了松动。
这个也是要注意的。
通用微光瞄准镜

通用微光瞄准镜
品牌:浦喆
主要战术技术指标
2.1微光瞄准镜
a)放大倍率:≥3.6倍
b)视场角:13°
c)视度调节:-4到+2屈光度
d)连续工作时间:60h(CR2电池)
e)使用寿命:≥10000h
f)识别距离:200米看清人体,50米分辨人脸(环境照度10-2lx)g)工作环境唯独:-40℃到50℃
h)重量:0.88kg
i)分划调节范围:≥±10密位
j)零位走位量(含重复装夹精度):≤0.5密位
k)出瞳直径:7mm
m)出瞳距离:30mm
2.2 红外辅助照明性能指标
a)作用距离:≥50米
b)波长:850nm
c)功率:1w
d)重量:190g
3、成套性
通用微光瞄准镜1具
红外辅助照明1具
88转接燕尾组1具
携行盒1具
电池CR2(一次性) 2枚
电池CR2(可充电) 2枚
充电器1具
M4 内六角扳手1件
白色绒布100×100 1张
毛刷1把
使用维护说明书1份
合格证及质量记载卡合1张。
全息式瞄准具原理详解及其主流型号介绍
瞄准具大介绍之光学瞄具———全息瞄准具部分主页君今天为大家带来的是全息光学瞄具的一个比较系统完整的介绍,作为一个比较新奇的技术,大家想必对这种听起来就十分酷的装备的原理和历史比较好奇,主页君到处查找求证,写出这篇文章。
由于今天的内容涉及的东西比较复杂,但又十分关键的,主页君也不是专业的物理系学生,所以肯定会有解释不详细甚至错误的地方,到时候欢迎大家指出。
我们最常见到的全息瞄准具的外形和前一篇文章介绍的反射式瞄准具(红点镜)十分相像,甚至使用的方法都是一样的,都是通过“两像重叠”的方式来瞄准,所以有很多朋友都把它们混淆,实际上它们有很大的不同,相信各位看官只要仔细的看懂了今天这篇文章,就不会认为它们是同一个东西了。
先看看这个全息瞄准具的宣传视频。
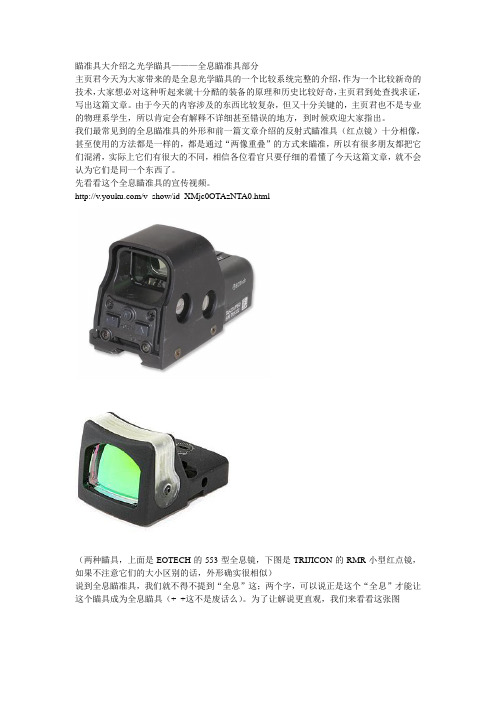
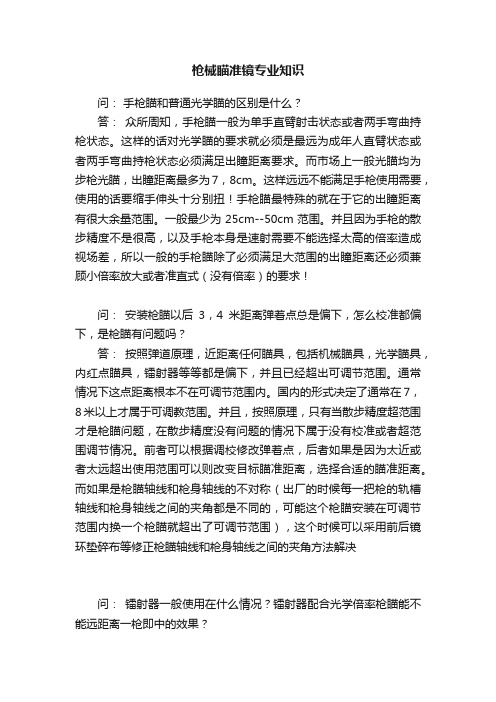
/v_show/id_XMjc0OTAzNTA0.html(两种瞄具,上面是EOTECH的553型全息镜,下图是TRIJICON的RMR小型红点镜,如果不注意它们的大小区别的话,外形确实很相似)说到全息瞄准具,我们就不得不提到“全息”这;两个字,可以说正是这个“全息”才能让这个瞄具成为全息瞄具(+_+这不是废话么)。
为了让解说更直观,我们来看看这张图这个图是全息瞄准具的光路图,看起来似乎很复杂?实际上准直反射镜、平面反射镜甚至那个反射衍射光栅我们可以暂时忽略,就把这幅图片简化成下面这个模型。
看到这一步,你就会发现这个光路与前面介绍的反射式瞄具有些不同了。
为了解说方便我们把这两个光路放在一起对比一下。
如上面两张图,左边的图为反射式瞄准具的光路,右边为全息瞄具的光路,仔细比较,我们可以发现,反射式瞄具中我们看到红点的实际上是一个处于析光镜焦点处激光管的像,光线在经过反射后并没有实质上的变化,而全息瞄具中,我们看不到类似于红点的东西,光线在穿过全息板前和全息板后是不一样的,如果我们直接看那束平行激光,想必会亮瞎狗眼,但是透过全息板,准确的说是经过全息板“处理”后,我们却看到了分划的图像。
瞄镜基础知识

基础知识一、角度:分射击术语:1、9点钟方向有6分的风2、着弹点低了2又1/2分3、目标A 1分4、这个瞄准镜有1/4分的高度调节5、这个是1/2分步枪首先了解关于分的定义。
一个圆周有360度。
每度等于60分。
也就是说,一个圆周有360×60=21,600分。
圆周长与半径的关系为L=2πR,而1分在固定半径R的位置对应的弧长越为l=0.0002908R。
这样,在100码(yard)的距离,所对应的弧长为1.047英寸(inch)。
(注:1码=3英尺=36英寸)。
这样,我们就有了一个距离、视角与偏移量的关系,如图1:图1显然,在100码的位置,视角1分,偏移量为1.047英寸在500码的位置,视角1分,偏移量为5.235英寸在100码的位置,视角1分,偏移量为10.47英寸我们可以比较精确的使用视角1分对应100码处的1英寸偏移。
当然,在超长距离计算时,使用1.047英寸肯定更准确。
以上,也是为什么在狙击射击时,使用英制单位的原因。
后面还会提到,望远镜上的密位标尺都是使用英制单位,便于射击计算。
实用举例:假设你有杆步枪,在100码处归零。
现在要求射击450码处的目标。
根据这杆枪的射程卡(如图2),在450码处子弹将下降9.25moa(Minute of Angle)。
显然,在450码处,1moa等于4.5英寸,因此,需要瞄准靶子上方41.6英寸(9.25×4.5)的位置,才能准确击中450码处的靶心。
距离(码)=偏移量(英寸)÷视角(分)×100……………………………………公式1也就是说,射程卡上提供的moa就是我们需要调整的标尺量,单位为分。
有些枪瞄的最小校准单位为1分,或者1/2分,或者1/4分,或者1/8分。
显然,1分或者1/2分的枪瞄过于粗糙,不利于长程精准射击。
图2要习惯使用分作为单位来校准射击。
例如,在800码处着弹点偏移靶心8英寸,应理解为着弹点偏移了1分。
华视森 HS507C X2 红点瞄准镜用户手册说明书

12User's ManualHS507C X2Red Circle DotFig 1 HS507C X2 Reflex sightThank you for purchasing the HOLOSUN HS507C X2 Open Reflex sight. This open reflex red dot sight is sized for use on either a pistol or rifle. The stream lined design, Shake Awake™ technology and our Solar Fail Safe™ dual power system combine to make it the ideal sight for small arms. Before operation, please read the User's Manual carefully.1. Operates with our Solar Fail Safe™ dual power system (solar cell and internal battery). One high quality CR1632 Lithium battery is included with purchase. Caution: Do not use a rechargeable battery.2. A high quality battery can power this device for up to 10000 hours (dot+circle) or 50000 hours (dot)at setting 6. 1. Ensure the firearm is unloaded and safe by removing all ammunition and magazines from firearm and verifying an empty chamber before installation and battery replacement.2. Please keep the packaging should you need to make a warranty claim.1) Three Operational Modes:Auto,Manual,Lockout.2) Three Reticle Options: 32MOA circle and dot,2MOA dot only and 32MOA circle only.TM 3) Shake Awake - Motion on with last setting recall.4) Parallax free, unlimited eye relief.5) Drain holes on both sides of the optic allow for excess water to drain in wet conditions.6) CNC milled 7075 Aluminum Housing.7) 10 day light and 2 night vision compatible brightness settings.8) Window Size 0.63x0.91 inches.9) IP67 Certified.The default reticle for this sight is a 2MOA dot centered in a 32MOA circle with four positioning points.NOTE: HS507C is compatible with some standard mounting interfaces currently available. For a footprint drawing, contact Holosun.1.Place the HS507C on a compatible slide cut or adapter plate.2. Use either the included screws or screws supplied with your slide or from your gunsmith and tighten to 15 INCH/lbs using a non-permanent (medium/blue) thread locker. (Fig5)3. Verify proper clearances and firearm function prior to use.A canted objective lens is part of the design ofIn order to create a proper reflection of the reticle/dotthe objective lens must be perpendicular to the LED. Because the LED is mounted to the side of the internal tube the objective lens will be canted in that direction.The diameter of the circle reticle represents approximately 32" at 100 yards (81cm at 100 meters).Hold the "-" button down 3 seconds to switch between the three reticles (Circle +Dot, Dot, or Circle) in that order.Caution:The loss or damage of the seal ring may cause water to leak into the compartment which could damage the product.3.Battery Replacement(Fig4):a. Remove the battery :I. Remove the battery tray screw.ii. Use the included tool as a lever in the battery tray slots to remove the battery trayand battery.b. Battery installation :I. Insert the battery into the battery tray with the POSITIVEside facing DOWN.ii. Insert and press the tray into the battery compartment.iii. Tighten the battery tray screw.Silicon Solar CellDrain Hole34Fig 6Three operation modes are available: Auto mode,manual mode and lockout mode.See Fig 6.1.Power ON: Press and release either brightness button ("+"or"-") to turn on the sight.2.Power OFF:Press the"+"and"-" buttons simultaneously to turn the power and motion sensor off.Press and Hold the "-" button for 3 second to switch reticle between circle +dot, dot, or circle.3.Operation Mode: Three modes are available in thefollowing order: Auto Mode -> Manual Mode -> Lockout Mode.1) Auto mode - operates with a solar cell and internal battery two-way power supply: Based upon the ambient lighting level, the sight will switch between battery and solar cell power automatically. Accommodates operation in all lighting conditions. Auto mode is the default setting.a) In auto mode, the brightness of the reticle is automatically adjusted to match ambient lighting.b) The battery will compensate for power if the solar cell cannot drive the reticle alone.c) If lighting is low enough, the sight will automatically switch to battery power. While running on battery power, you can adjust the reticle brightness using the "+"and "-" buttons to switch between higher and lower brightness levels.2) Manual mode:a) Switch to Manual mode from Auto mode by holding the “+” button for about 3 seconds, until the reticle blinks once.b) Brightness adjustment: There are 12 reticle brightness setting levels in manual mode. Settings 1 and 2 are NVcompatible and setting 12 is the brightest. Press ”+” or ”-” to increase or decrease the brightness.3) Lockout Mode:Switch to Lockout mode from Manual mode by holding the “+” button for about 3 seconds, until the LED blinks once. Inlockout mode, momentary presses of the “+” or "-" button will not change settings. To exit the lockout mode, press and hold the + button again for 3 seconds, the LED will blink once then switch to Auto Mode.4. Sleep time setting:1) Please note that your red dot will automatically enter into sleep mode after 10 minutes of no movement.2) The sight will instantaneously wake up and turn on with any motion detected to last saved settings.3) The default sleep timer setting is 10 min, but there 4 settings to select from.i. Press and hold the “+” button for 10 seconds to enter sleep time adjustment mode. There are 4 options: 10 min, 1h, 12h or the sleep mode is disabled.ii. Press and release the “+” or “-” button to select a sleep timer setting. The LED will blink to show which setting is selected: 1=10 min, 2=1h, 3=12h, or 4=sleep mode disabled.iii. Press the “+” and “-” buttons simultaneously to save the sleep timer setting (this will power off the sight).5. Special operation:1) Solar cell power: If the battery voltage is below 2.2Vdc, please replace it. The sight will still operate if there is sufficient ambient light for the solar cell.2) To reduce power consumption when you have low battery and/or low ambient light, you can toggle the 32MOA circle OFF by holding the “-” button for about 3 seconds.6. Note:1) Memory function: The sight will remember the last saved Caution: If you feel the knobs can no longer be rotated, you may have reached the mechanical limit of theadjustment turret. Do not try to rotate the knobs further if you feel a bind or you may cause damage.Fig 71) This sight has been factory adjusted to an approximate 25 yard zero and should require minimal adjustment to achieve zero.2) The Elevation adjustment is located on top of the tail section of the housing and the Windage adjustment islocated on the right side of the housing. Adjustment can be performed by inserting the flat-tipped end of the included tool into the turret slot and rotating, See Fig 7.3) Windage and Elevation adjustments are approximately 1 MOA per click.4) Each adjustment click has a value of approximately 1 MOA or 1 inch at 100 yards (1/2" at 50y; 1/4" at 25y). Whenzeroing at 25 yard, if your impacts are 2 inches low and 1 inch right, you will need to adjust Elevation 8 clicks UP (counterclockwise) and 4 clicks LEFT (clockwise)5) The maximum adjustment range is ±50MOA from center.HS507C X2Reflex SightWe provide a limited lifetime warranty from the date of purchase on parts and workmanship to the originalpurchaser. At our sole discretion, we will repair or replace products found to be defective under normal use without charge, excluding any delivery costs, which will be born by purchaser. We will not be liable for incidental, consequential, or special damages arising out of or in any connection with the use or performance of this product. This warranty is void if the product has been misused, modified, neglected, or disassembled prior to its return. Please refer to for current and complete warranty information and other conditions.This device is a precision instrument that deservesreasonably cautious care. The following tips are provided to ensure a long product life. The optical lenses are multicoated optical glass. When cleaning the lenses, blow away any dust on the surface, wet the lens with lens cleaner or clean water, then wipe away smudges with lens tissue, soft cotton or a microfiber cloth. Avoid touching the glass surface with dry cloth or tissue paper. Do not use organic solvents such as alcohol or acetone. No special maintenance is needed for the housing surface. Do not try to dismantle the device as the internal parts are specially cleaned and sealed and with an anti-fog treatment. Any such attempt will void the warranty.Phone: (909) 594-2888Fax: (909) 598-4888E-mail:********************Tools: wrench1. Flat tab is used to adjust the Windage & Elevation.2. T10 Torx wrench for screws.Fig 8Ver A0brightness setting when powered on and off.2) Low battery Warning: If the battery voltage is below 2.2Vdc, the reticle will blink slowly.Brightness IncreaseBrightness DecreaseWindage Adjustment ScrewElevation Adjustment Screw②①。
枪械瞄准镜专业知识
枪械瞄准镜专业知识问:手枪瞄和普通光学瞄的区别是什么?答:众所周知,手枪瞄一般为单手直臂射击状态或者两手弯曲持枪状态。
这样的话对光学瞄的要求就必须是最远为成年人直臂状态或者两手弯曲持枪状态必须满足出瞳距离要求。
而市场上一般光瞄均为步枪光瞄,出瞳距离最多为7,8cm。
这样远远不能满足手枪使用需要,使用的话要缩手伸头十分别扭!手枪瞄最特殊的就在于它的出瞳距离有很大余量范围。
一般最少为25cm--50cm范围。
并且因为手枪的散步精度不是很高,以及手枪本身是速射需要不能选择太高的倍率造成视场差,所以一般的手枪瞄除了必须满足大范围的出瞳距离还必须兼顾小倍率放大或者准直式(没有倍率)的要求!问:安装枪瞄以后3,4米距离弹着点总是偏下,怎么校准都偏下,是枪瞄有问题吗?答:按照弹道原理,近距离任何瞄具,包括机械瞄具,光学瞄具,内红点瞄具,镭射器等等都是偏下,并且已经超出可调节范围。
通常情况下这点距离根本不在可调节范围内。
国内的形式决定了通常在7,8米以上才属于可调教范围。
并且,按照原理,只有当散步精度超范围才是枪瞄问题,在散步精度没有问题的情况下属于没有校准或者超范围调节情况。
前者可以根据调校修改弹着点,后者如果是因为太近或者太远超出使用范围可以则改变目标瞄准距离,选择合适的瞄准距离。
而如果是枪瞄轴线和枪身轴线的不对称(出厂的时候每一把枪的轨槽轴线和枪身轴线之间的夹角都是不同的,可能这个枪瞄安装在可调节范围内换一个枪瞄就超出了可调节范围),这个时候可以采用前后镜环垫碎布等修正枪瞄轴线和枪身轴线之间的夹角方法解决问:镭射器一般使用在什么情况?镭射器配合光学倍率枪瞄能不能远距离一枪即中的效果?答:镭射器一般作为室内cqb等近距离作战,而不使用在远距离的精度射击上。
故此镭射器一般在国外多数用于近战的手枪,冲锋枪,近战场合的自动步枪等。
而极少用于远距离精度射击的狙击类上。
这里有一个镭射器的特性决定:镭射器存在一个锥形原理,即;持枪的同时肯定存在一定程度上的抖动,近距离镭射点抖动幅度小,距离越远镭射点在目标处抖动幅度成倍增加。
- 1、下载文档前请自行甄别文档内容的完整性,平台不提供额外的编辑、内容补充、找答案等附加服务。
- 2、"仅部分预览"的文档,不可在线预览部分如存在完整性等问题,可反馈申请退款(可完整预览的文档不适用该条件!)。
- 3、如文档侵犯您的权益,请联系客服反馈,我们会尽快为您处理(人工客服工作时间:9:00-18:30)。
枪瞄的技术参数说明
光学镀膜(Coating):在镜片表面镀膜可以减少镜片带来的反光和光的损失,并减少眼睛疲劳程度。
镀膜一般是氟镁化物。
镀膜的层数越多光学性能越好。
镀膜的种类分为下面几种:
镀膜:至少在一块透镜上进行单层镀膜
全镀膜:在所有空气接触的镜片上进行单层镀膜
多层镀膜:至少在一块透镜上多层镀膜,所有镀膜至少镀一次
多层全镀膜:在所有接触空气的镜面上多层镀膜
出瞳直径(Exit Pupil):瞄准镜目镜前,可视范围直径,出瞳直径越大映像越明亮。
测量的方法就是物镜大小除以放大倍数,例如:3-9x40的出瞳直径就是4.44mm-13.33mm。
(可以忽略不用)
出瞳距(Eye Relief):也叫出瞳距离,它是眼睛距离目镜之间的距离。
有这个距离主要有两个原因,第一是因为瞄准镜主要用于真铁,存在巨大的后坐力,如果眼睛直接接触目镜的话那就会受到损伤;第二,瞄准镜采用倒像和开普勒望远系统,只有眼睛离开目镜一定的距离,观测时眼睛、目镜和物镜尽量保持在一直线上,大倍率观测时尽量不要直接手持(瞄准镜并不是望远镜),这样才能获得最大、最圆和最亮的观察效果;眼睛间隙会随着倍数的变化会稍有改变。
视场(Filed of View):瞄准镜所能看到的视野范围,一般以100码或100米作参照。
大的视场可以在体育竞技和运动目标提供更多的支持。
视场值以角度单位表示,通常越高的倍率的情况视场越小。
精度调节(Precision Adjustment):MOA(Mintune of Anger的缩写)是调节螺钉咔嚓值的单位,瞄准镜中间部位的两个旋钮是精度调节,一般有Up标记的是调节垂直上下方向,学术上称之为“仰角调节”,另一个印有R的是调节水平左右方向,称之为“风偏调节”。
一般说来,有3种形式的调节手轮,即100码一个咔塔声移动1/2英寸、1/4和1/8英寸,1/2主要用于内红点和低倍瞄准镜,而需要精确瞄准的大变倍瞄准镜一般都采用1/8手调。
材质(Material):好的枪瞄采用高强度耐久的铝合金材质,并做阳极化处理,每支枪瞄都不会生锈、防刮同时外表美观。
密封性、防水性和防雾(Seal, Water-proof and Fog-proof):充分的氮气填充可以完全排出瞄准镜内部的湿气,良好的O型密封圈防止外部的湿气或者灰尘进入瞄准镜内部。
内部如果有湿气和灰尘,很容易在瞄准镜内部镜片上结尘、起雾,从而导致霉变影响瞄准镜性能和寿命。
视差(Parallax):视差发生在目标影像不能精确清晰地反映到刻线分划平面上。
当射击者的头
部发生偏移或者在一些极端的情况下,分划和目标间就会发生明显的位移从而产生视差,使焦点没有对准并造成映像模糊。
一般瞄准镜工厂设置在100码处无视差,散弹等近距离用的瞄准镜的无视差设置在50码。