DDR2 布线要求
DDR走线规则

1.时钟信号(1)差分布线,差分阻抗100欧姆,差分线误差±5mil。
(2)与其它信号的间距要大于25mil,而且是指edge to edge的间距(3)CLK等长,误差±10mil。
2.数据信号:(1)数据信号分为八组,每组单独分开走线,第一组为DDR_DQ[0:7]、DDR_DQSP0、DDR_DQSN0、DDR_DQM0,以此类推,同组信号在同一层走线。
(2)DQ和DQM为点对点布线,(3)DQS为差分布线。
差分线误差±5mil,差分阻抗100欧姆。
(4)组内间距要大于12mil,而且是指edge to edge的间距,同组内DQ与DQM以DQS为基准等长,误差±5mil。
(5)DQS与DDR2_CLKP等长,误差±5mil。
(6)不同组信号间距:大于20mil(edge to edge的间距)(7)DDR_CKN/P之间的并联100欧姆电阻,需要放置在信号一分二的分叉地方(8)尽可能减少过孔(9)叠层设计的时候,最好将每一层阻抗线宽,控制在差不多宽度(10)信号走线长度,不超过2500mil3.控制信号和地址信号:(1) 组内间距要大于12mil,而且是指edge to edge的间距(2) 所有控制线须等长,误差±10mil。
(3 不同组信号间距:大于20mil(edge to edge的间距)4.其它信号DDR_VREF走线宽度20mil以上。
无论是PCB上使用芯片还是采用DIMM条,DDR和DDRx(包括DDR2,DDR4等)相对与传统的同步SDRAM的读写,我认为主要困难有三点:1,时序。
由于DDR采用双沿触发,和一般的时钟单沿触发的同步电路,在时序计算上有很大不同。
DDR之所以双沿触发,其实是在芯片内部做了时钟的倍频(因为按照耐奎斯特准则,时钟频率应该至少是信号频率的2倍),对外看起来,数据地址速率和时钟一样。
为了保证能够被判决一组信号较小的相差skew,DDR对数据DQ信号使用分组同步触发DQS信号,所以DDR上要求时序同步的是DQ和DQS之间,而不是一般数据和时钟之间。
DDR布线规则与过程

,by xfireDDR布线通常是一款硬件产品设计中的一个重要的环节,也正是因为其重要性,网络上也有大把的人在探讨DDR布线规则,有很多同行故弄玄虚,把DDR布线说得很难,我在这里要反其道而行之,讲一讲DDR布线最简规则与过程;如果不是特别说明,每个步骤中的方法同时适用于DDR1,DDR2和DDR3;PCB设计软件以CadenceAllgro16.3为例;文章目录第一步,确定拓补结构仅在多片DDR芯片时有用首先要确定DDR的拓补结构,一句话,DDR1/2采用星形结构,DDR3采用菊花链结构;拓补结构只影响地址线的走线方式,不影响数据线;以下是示意图;星形拓补就是地址线走到两片DDR中间再向两片DDR分别走线,菊花链就是用地址线把两片DDR“串起来”,就像羊肉串,每个DDR都是羊肉串上的一块肉,哈哈,开个玩笑;第二步,元器件摆放确定了DDR的拓补结构,就可以进行元器件的摆放,有以下几个原则需要遵守:原则一,考虑拓补结构,仔细查看CPU地址线的位置,使得地址线有利于相应的拓补结构原则二,地址线上的匹配电阻靠近CPU原则三,数据线上的匹配电阻靠近DDR原则四,将DDR芯片摆放并旋转,使得DDR数据线尽量短,也就是,DDR芯片的数据引脚靠近CPU原则五,如果有VTT端接电阻,将其摆放在地址线可以走到的最远的位置;一般来说,DDR2不需要VTT 端接电阻,只有少数CPU需要;DDR3都需要VTT端接电阻;原则六,DDR芯片的去耦电容放在靠近DDR芯片相应的引脚以下是DDR2的元器件摆放示意图未包括去耦电容,可以很容易看出,地址线可以走到两颗芯片中间然后向两边分,很容易实现星形拓补,同时,数据线会很短;以下是带有VTT端接电阻的DDR2元器件摆放示意图,在这个例子中,没有串联匹配电阻,VTT端接电阻摆放在了地址线可以到达的最远距离;以下是DDR3元器件摆放示意图,请注意,这里使用的CPU支持双通道DDR3,所以看到有四片参考设计是8片DDR3,其实是每两个组成一个通道,地址线沿着图中绿色的走线传递,实现了菊花链拓补;地址线上的VTT端接电阻摆放在了地址线可以到达的最远的地方;同样地,数据线上的端接电阻也放置在了靠近DDR3芯片的位置,数据线到达CPU的距离很短;同时,可以看到,去耦电容放置在了很靠近DDR3相应电源引脚的地方;第三步,设置串联匹配电阻的仿真模型摆放完元器件,建议设置串联匹配电阻的仿真模型,这样对于后续的布线规则的设置是有好处的;点击Analyze->SI/EMISim->ModelAssignment,如下图;然后会出来ModelAssignment的界面,如下图然后点击需要设置模型的器件,通常就是串联匹配电阻,分配或创建合适的仿真的模型,如果不知道如何创建,请在互联网上搜索或发邮件给无线时代Beamsky;分配好仿真模型之后的网络,使用ShowElement命令,可以看到相关的XNET属性,如下图;第四步,设置线宽与线距1.DDR走线线宽与阻抗控制密切相关,经常可以看到很多同行做阻抗控制;对于纯数字电路,完全有条件针对高速线做单端阻抗控制;但对于混合电路,包含高速数字电路与射频电路,射频电路比数字电路要重要的多,必须对射频信号做50欧姆阻抗控制,同时射频走线不可能太细,否则会引起较大的损耗,所以在混合电路中,本人往往舍弃数字电路的阻抗控制;到目前为止,本人设计的混合电路产品中,最高规格的DDR是DDR2-800,未作阻抗控制,工作一切正常;2.DDR的供电走线,建议8mil以上,在Allegro可以针对一类线进行物理参数的同意设定,我本人喜欢建立PWR-10MIL的约束条件,并为所有电源网络分配这一约束条件,如下图;3.线距部分主要考虑两方面,一是线-线间距,建议采用2W原则,即线间距是2倍线宽,3W很难满足;二是线-Shape间距,同样建议采用2W原则;对于线间距,也可以在Allegro中建立一种约束条件,为所有DDR走线XNET分配这样的约束条件,如下图;4.还有一种可能需要的规则,就是区域规则;Allegro中默认的线宽线距都是5mil,在CPU引脚比较密集的时候,这样的规则是无法满足的,这就需要在CPU或DDR芯片周围设定允许小间距,小线宽的区域规则,如下图;第五步,走线走线就需要注意的内容比较多,这里只做少许说明;所有走线尽量短走线不能有锐角尽量少打过孔保证所有走线有完整的参考面,地平面或这电源平面都可以,对于交变信号,地与电源平面是等电位的尽量避免过孔将参考面打破,不过这在实际中很难做到走完地址线和数据后,务必将DDR芯片的电源脚,接地脚,去耦电容的电源脚,接地脚全部走完,否则在后面绕等长时会很麻烦的下图是完成的DDR走线,但尚未绕等长;第六步,设置等长规则对于数据线,DDR1/2与DDR3的规则是一致的:每个BYTE与各自的DQS,DQM等长,即DQ0:7与DQS0,DQM;等长,DQ8:15与DQS1,DQM1等长,以此类推;DDR2数据线等长规则举例DDR3数据线等长规则举例地址线方面的等长,要特别注意,DDR1/2与DDR是很不一样的;对于DDR1/2,需要设定每条地址到达同一片DDR的距离保持等长,如下图;对于DDR3,地址线的等长往往需要过孔来配合,具体的规则均绑定在过孔上和VTT端接电阻上,如下图;可以看到,CPU的地址线到达过孔的距离等长,过孔到达VTT端接电阻的距离也等长;补充一点,很多时候,地址线的等长要求不严格,这一点我还没有尝试过;在本人设计的这些产品中,地址线,数据线都做了25mil的RelativePropagationDelay的等长规则设定;关于等长规则设定的细节在这里不再赘述,有兴趣的话,可以发邮件给无线时代Beamsky;第七步,绕等长完成等长规则的设定后,最后一步也是工作量最大的一步:绕等长;在这一步,我认为只有一点规则需要注意:尽量采用3倍线宽,45度角绕等长,如下图;绕等长完成后,最好把DDR相关网络锁定,以免误动;到这里,DDR走线就已经完成了,在本人设计过的三,四十种产品中,都是按照上面的规则与过程完成的,DDR2最高规格是DDR2-800,512MB,DDR3最高规格是DDR3-1600,1GB,都可以很稳定的工作,无论性能还是可靠性,都未曾出过问题;。
DDR2 DDR3 SDRAM的PCB布线规则指导

Signal Integrity and PCB layout considerations for DDR2-800 Mb/s and DDR3 MemoriesFidus Systems Inc.900, Morrison Drive, Ottawa, Ontario, K2H 8K7, CanadaChris Brennan, Cristian Tudor, Eric Schroeter, Heike Wunschmann, and Syed BokhariSession # 8.13AbstractThe paper addresses the challenge of meeting Signal Integrity (SI) and Power Integrity (PI) requirements of Printed Circuit Boards (PCBs) containing Double Data Rate 2 (DDR2) memories. The emphasis is on low layer count PCBs, typically 4-6 layers using conventional technology. Some design guidelines have been provided.1. IntroductionDDR2 usage is common today with a push towards higher speeds such as 800 Mbps [1] and more recently, 1066 Mbps. DDR3 [2] targets a data rate of 1600 Mbps. From a PCB implementation standpoint, a primary requirement is delay matching which is dictated by the timing requirement. This brings into it a number of related factors that affect waveform integrity and delay. These factors are interdependent, but where a distinction can be made, they can be termed PCB layer stackup and impedance, interconnect topologies, delay matching, cross talk, PI and timing. Cadence ALLEGRO™SI-230 and Ansoft’s HFSS™ are used in all computations.Table 1: Comparison of DDR2 and DDR3 requirementsSignals common to both technologies and a general comparison of DDR2 and DDR3 is shown in Table 1. It must be noted that “matching” includes cases where the clock net may be made longer (termed DELTA in ALLEGRO SigXP). We have assumed a configuration comprising a Controller and two SDRAMs in most illustrations that follow.2. PCB Layer stackup and impedanceIn a layer constrained implementation, a 4 layer PCB (Figure 1) is a minimum with all routing on TOP and BOTTOM layers. One of the internal layers will be a solid ground plane (GND). The other internal plane layer is dedicated to VDD. Vtt and Vref can be derived from VDD. Use of a 6-layer PCB makes the implementation of certain topologies easier. PI is also enhanced due to the reduced spacing between power and GND planes. The interconnect characteristic impedance for DDR2 implementation can be a constant. A single-ended trace characteristic impedance of 50 Ohms can be used for all single-ended signals. A differential impedance of 100 Ohms can be used for all differential signals, namely CLOCK and DQS. Further, the termination resistor pulled up to VTT can be kept at 50 Ohms and ODT settings can be kept at 50 Ohms.In the case of DDR3 however, single ended trace impedances of 40 and 60 Ohms used selectively on loaded sections of ADDR/CMD/CNTRL nets have been found to be advantageous. Further, the value of the termination resistor pulled up to Vtt needs to be optimized in combination with the trace impedance through SI simulations. Typically, it is in the range 30 – 70 Ohms. The differential trace impedance can remain at 100 Ohms.Figure 1 : Four and Six layer PCB stackup3. Interconnect TopologiesIn both cases of DDR2 and DDR3, DQ, DM and DQS signals are point-to-point and do not need any topological consideration. An exception is in the case of multi-rank Dual In Line Memory Modules (DIMMs). Waveform integrity is also easily addressed by a proper choice of drive strengths and On Die Termination (ODT). The ADDR/CMD/CNTRL signals, and sometimes the clock signal will involve a multipoint connection where a suitable topology is needed. Possible choices are indicated in Figure 2 for cases involving two SDRAMs. The Fly-By Topology is a special case of a daisy chain with a very short or no stub.For DDR3, any of these topologies will work, provided that the trace lengths are minimized. The Fly-by topology shows the best waveform integrity in terms of an increased noise margin. This can be difficult to implement on a4-layer PCB and the need for a 6-layer PCB arises. The daisy chain topology is easier to implement on a 4 layer PCB. The tree topology on the other hand requires the length of the branch AB to be very close to that of AC (Figure 2). Enforcing this requirement results in the need to increase the length of the branches which affects waveform integrity. Therefore, for DDR3 implementation, the daisy chain topology with minimized stubs proves to be best suited for 4-layer PCBs.For DDR2-800 Mbps any of these topologies are applicable with the distinction between each other being less dramatic. Again, the daisy chain proves to be superior in terms of both implementation as well as SI.Where more than two SDRAMs are present, often, the topology can be dictated by constraints on device placement. Figure 3 shows some examples where a topology could be chosen to suit a particular component placement. Of these, only A and D are best suited for 4-layer PCB implementation. Again, for DDR2-800 Mbps operations all topologies yield adequate waveform integrity. For a DDR3 implementation, in particular at 1600 Mbps, only D appears to be feasible.Vtt RtRtRtTree topology Fly-By topologyFigure 2: ADDR/CMD/CNTRL topologies with 2 SDRAMS(A)Figure 3: ADDR/CMD/CNTRL topologies with four SDRAMS4. Delay matchingImplementing matched delay is usually carried out by bending a trace in a trombone shape. Routing blockage may require layer jumping. Unfortunately, while physical interconnect lengths can be made identical in layout, electrically, the two configurations shown in Figure 4 will not be the same.The case of trombone delay has been well understood, and the case of a via is obvious. The delay of a trombone trace is smaller than the delay of a straight trace of the same center-line length. In the case of a via, the delay is more than that of a straight microstrip trace of length equal to the via length. The problem can be resolved in two different ways. In the first approach, these values can be pre-computed precisely and taken into account while delay matching. This would become a tedious exercise which could perhaps be eased with userRtRtRt(B)(C)(D)Rtdefined constraints in ALLEGRO 16.0. In the second approach, one would use means to reduce the disparity to an acceptable level.Trombone traceStraight traceL 3L 2 L 4 ≠L 1L 5Figure 4: Illustration of Trombone traces and ViasFigure 5: Circuit for estimation of trombone effect and resulting waveforms.≠Straight traceVia cross sectional viewConsider the case of a trombone trace. It is known that the disparity can be reduced by increasing the length of L3 (Figure 4). Details can be found in reference [3]. A simulation topology can be set up in SigXP to represent parallel arms of a trombone trace as coupled lines. A sweep simulation is carried out with L3 (S in Figure 5) as a variable and the largest reasonable value that reduces the delay difference with respect to a reference trace is selected. For microstrip traces, L3 > 7 times the distance of the trace to ground is needed.Delay values are affected in a trombone trace due to coupling between parallel trace segments. Another way to reduce coupling without increasing the spacing is to use a saw tooth profile. The saw tooth profile shows better performance as compared to a trombone although it eventually ends up requiring more space. In either case, it is possible to estimate the effect on delay precisely by using a modified equation for the computation of the effective trace length [3]. This would need to be implemented as a user defined constraint in ALLEGRO.Consider the case of a through hole via on the 6 layer stackup of Figure 2. Ground vias placed close to the signal vias play an important role in the delay. For the illustration, the microstrip traces on TOP and BOTTOM layers are 150 mils long, and 4 mils wide. The via barrel diameter = 8 mils, pad diameter is 18 mils and the anti-pad diameter is 26 mils.Three different cases are considered. In the first case, the interconnect with via does not have any ground vias in its immediate neighborhood. Return paths are provided at the edges of the PCB 250 mils away from the signal via. In the second case, a reference straight microstrip trace of length = 362 mils is considered. The third case is the same as case 1 with four ground vias in the neighborhood of the signal via. Computed s-parameters with 60 Ohm normalization are shown in Figure 6. It can be seen that the use of 4 ground vias surrounding the signal via makes its behavior more like a uniform impedance transmission line and improves the s21 characteristic. In the absence of a return path in the immediate neighborhood, the via impedance increases. For the present purpose, it is important to know the resulting impact on the delay.A test circuit is set up similar to Figure 5. The driver is a linear source of 60 Ohms output impedance and outputs a trapezoidal signal of rise time = fall time = 100 ps and amplitude = 1V. It is connected to each of the 3 interconnects shown in Figure 6 and the far end is terminated in a 60 Ohm load. The excitation is a periodic signal with a frequency of 800 MHz. The time difference between the driver waveform at V = 0.5 V and the waveform at the receiver gives the switched delay.Results are illustrated in Figure 7 where only the rising edge is shown. It can be seen that the delay with four neighboring ground vias differs from that of the straight trace by 3 ps. On the other hand, the difference is 8 ps for the interconnect with no ground vias in the immediate neighborhood.It is therefore clear that increasing the ground via density near signal vias will help. However, in the case of 4 layer PCBs, this will not be possible as the signal traces adjacent to the Power plane will be referenced to a Power plane. Consequently, the signal return path would depend on decoupling. Therefore, it is very important that the decoupling requirement on 4 layer PCBs addresses return paths in addition to meeting power integrity requirements.The clock net is differential in both DDR2 and DDR3. In DDR2, DQS can be either single ended or differential although it is usually implemented as differential at higher data rates. The switched delay of a differential trace is less than that of a single ended trace of identical length. Where timing computations indicate the need, the clock and DQS traces may need to be made longer than the corresponding ADDR/CMD/CNTRL nets and DATA nets.and DQ nets.Since DQ and DM nets run at the maximum speed, it is desirable that all of these nets in any byte lane be routed identically, preferably without vias. Differential nets are less sensitive to discontinuities and where layer jumping is needed, the DQS and CLOCK nets should be considered first.Figure 6: s-parameters of interconnects with vias (60 Ohm normalization)Figure 7: Driver and Receiver waveforms for the 3 cases of Figure 6. (Plot colors correspond)5. CrosstalkCross talk contributes to delay uncertainty being significant for microstrip traces. This is generally reduced by increasing the spacing between adjacent traces for long parallel runs. This has the drawback of increasing the total trace length and therefore a reasonable value must be chosen. Typically the spacing should be greater than twice the trace distance to ground. Again, ground vias play an important role. Near and far end coupling levels are illustrated in Figure 8. Use of multiple ground vias reduces coupling levels by 7 dB. To derive the interconnect budget, a simulation of a victim trace with two aggressors on both sides is adequate. Using a periodic excitation on all nets will yield the cross talk induced jitter. Using a pseudo random excitation on all nets will show the effect of both cross talk as well as data dependencies. Time domain results are not shown here, but it is easily done by setting up a 5 coupled line circuit in SigXP with the spacing between traces set up for sweeping. Reasonable spacing values that keep the jitter in the waveform due to both cross talk as well as pattern dependence at an acceptable level are chosen.Figure 8: s-parameters of coupled traces (60 Ohm normalization)6. Power IntegrityPower Integrity here refers to meeting the Power supply tolerance requirement under a maximum switching condition. Failure to address this requirement properly leads to a number of problems, such as increased clock jitter, increased data dependent jitter, and increased cross talk all of which eventually reduce timing margins.The theory for decoupling has been very well understood and usually starts with the definition of a “target impedance” as [4]CurrentTransient tolerance Voltage Z et t =arg (1)An important requirement here is knowledge of the transient current under worst case switching condition. A second important requirement is the frequency range. This is the range of frequencies over which the decoupling network must ensure that its impedance value is equal to or below the required target impedance. On a printed circuit board, capacitance created by the Power-Ground sandwich and the decoupling capacitors needs to handle a minimum frequency of ~100 kHz up to a maximum frequency of ~100-200 MHz. Frequencies below 100 kHz are easily addressed by the bulk capacitance of the voltage regulator module. Frequencies above 200 MHz should be addressed by the on-die and in some cases on-package decoupling capacitance. Due to the finite inductance of the package, there is no need to provide decoupling on the PCB to handle frequencies greater than 200 MHz. The actual computation of power integrity can be very complex involving IC package details, simultaneously switched signals and the PCB power distribution network. For PCB design, the use of the target impedance approach to decoupling design is simpler and provides a practical solution with very little computational effort.The three power rails of concern are the VDD, VTT and Vref. The tolerance requirements on the VDD rail is ~ 5% and the transient current is determined as the difference between Idd7 and Idd2 as specified by JEDEC [1,4]. This is accomplished by using plane layers for power distribution and a modest number of decoupling capacitors. It is preferable to use decoupling capacitors of 10 different values distributed in the range of 10 nF to 10 uF. Further, the capacitor pad mounting structure should be designed for reduced mounted inductance.The Vref rail has a tighter tolerance, but it draws very little current. Its target impedance is easily met using narrow traces and one or two decoupling capacitors. It is important however that the capacitors be located very close to the device pins.The VTT rail proves to be challenging because it not only has a tighter tolerance, but it also draws a transient current close to that of the VDD rail. The transient current is easily calculated as described in reference [5]. Again, the target impedance requirement can be met using an increased number of decoupling capacitors.On a 4 layer PCB, the planes are too far apart and consequently the advantage of inter-plane capacitance is lost. The number of decoupling capacitors needs to be increased and higher frequency capacitors with values less than 10 nF may be needed. These computations are easily done using ALLEGRO SI Power Integrity option.7. TimingTiming computation is carried out as described in reference [6]. A table needs to be setup for the following eight cases: 1. 2. 3. 4. 5. 6. 7. 8. Write Setup analysis DQ vs. DQS Write Hold analysis DQ vs. DQS Read Setup analysis DQ vs. DQS Read Hold analysis DQ vs. DQS Write Setup analysis DQS vs. CLK Write Hold analysis DQS vs. CLK Write Setup analysis ADDR/CMD/CNTRL vs. CLK Write Hold analysis ADDR/CMD/CNTRL vs. CLKAn example is shown for the case of Write setup analysis in Table 2. Actual numbers have been omitted as they are not precisely known yet for DDR3. These numbers are obtained from data sheets of Controller and memory manufacturers. The numbers in the interconnect section are determined by SI simulations. All the eight cases need to be analyzed for DDR2. For DDR3, 5 and 6 are not needed due to its write leveling feature. In the PCB implementation, length match tolerances must ensure that the total margin is positive. ElementControllerSkew Componenta.)DQ vs. DQS skew at transmitter output b.) Data / Strobe PLL jitter a+b Setup requirement (tDSb @ Vih/Vil level) DQ slew rate DQS slew rateSetupUnitsps ps ps psCommentsFrom controller design data Used if not included in transmitter skewTotal Controller SDRAM (or DIMM)V/ns V/ns psTotal SDRAM setup requirement InterconnecttDSb + slew rate adjustmentFrom SDRAM datasheet; this number is to be adjusted based on DQ and DQS slew rates Measured as per JEDEC specification from SI simulation results Measured as per JEDEC specification from SI simulation results Includes slew rate adjustmenta.) Data Xtalk b.) DQS Xtalk c.) Length matching tolerance d.) Characteristic impedance mismatch Total Interconnect Min. Total Setup Budget Setup margin Interconnect skew (a + b + c + d) 0.24*tckps ps ps ps2 aggressors (one each side of the victim); victim – repetitive; aggressor- PRBS 2 aggressors (one each side of the victim); victim – repetitive; aggressor- PRBS Extracted from SI simulation results longest data net, worst case PVT corner can be omitted if routing of DQ and corresponding DQS signals are done on same layerps ps From SDRAM datasheet (includes clock duty cycle variation) Must be positiveMin. Total Setup Budget – (Total Controller + Total SDRAM + Total Interconnect )psTable 2: Illustration of DDR3 Write Setup timing analysis summary for DQ vs. DQS8. PCB LayoutImplementation on a PCB involves a number of tradeoffs to meet SI requirements. Often, the question is how far does one need to go? PCB layout tasks are facilitated using the following approach: 1. Set up topology and constraints in ALLEGRO Constraint Manager. 2. Design Controller BGA breakout. A controller pin arrangement with ADDR/CMD/CNTRL pins in the middle and DQ/DQS/DM byte lanes on either side is best suited. Within these groups, individual pins may need to be swapped to ensure routing with minimum cross-over. 3. Attempt routing with reduced stub length and a minimum trace spacing as obtained from cross talk simulation. Often, most stubs can be eliminated but it will not be possible for all the pins. One may try two traces between BGA pads of the memory devices. This would require narrow PCB traces which can increase manufacturing cost. Yet, it will not be possible for all signals unless micro via and via-in-pad technology is used. Complete routing with coarse length matching tolerances. 4. Place Vref decoupling capacitors close to the Vref pins. Vtt decoupling can be placed at the far end of the last SDRAM and will not come in the way of routing. VDD decoupling can be placed close to devices where possible without blocking routing channels. The smaller valued capacitors should be placed closer to the devices. With a proper decoupling design, it will not be necessary to cram all capacitors close to the devices. All decoupling capacitors should use a fan out for the footprint designed for reduced inductance. This is typically two short wide traces perpendicular to the capacitor length. This can be automated by using a user defined capacitor footprint that can be attached to all the decoupling capacitors in the schematic. 5. Implement fine length matching and insert multiple ground vias where signal traces jump layers. It is better to use the delay matching option in ALLEGRO and one must include z-axis delay. Typically, P and N nets of differential pairs should be matched with a tolerance of +/- 2ps and the tolerance for all other matched nets can be +/- 10 ps or more based on the timing margin computation.9. DIMMConsiderations described above apply to the case of PCBs containing one or more DIMMs. The only exception is that the decoupling requirement for the memories can be relaxed as it is already accounted for on the DIMM PCB. SI analysis of registered DIMMs is also much simpler where the DIMM is treated as a single load. While the routing topology for ADDR/CMD/CNTRL nets is usually a daisy chain with reduced stubs, tree topologies can also be used for registered DIMMs. Analysis of un-buffered DIMMs can become tedious as the timing requirement at all the SDRAMs must be analyzed. DIMM routing on 4-layer PCBs is relatively simpler compared to the case of SDRAMs.10. ExamplesThe detail described above has been used in the implementation of a DDR2 PCB, a DDR3 PCB and a DDR3 – DIMM PCB. The controller is from MOSAID [7] which is designed to provide both DDR2 as well as DDR3 functionality. For the SI simulations, IBIS models have been used. Models for the memories are from MICRON Technology, Inc [8]. The IBIS models for the DDR3 SDRAMs were available at 1333 Mbps speed. These were used at 1600 Mbps. For the unbuffered DDR3 DIMM (MT_DDR3_0542cc) EBD models from Micron Technology were used. All waveforms are for the typical case and are computed at the SDRAM die. The 6 layer PCB stackup of Figure 2 is used with routing on TOP and BOTTOM layers only. The memory consists of 2 SDRAMsrouted as a daisy chain. In the case of the DIMM, a single unbufferred DIMM is used. TOP/BOTTOM layer routing and Signal Integrity waveforms are shown in Figures. 9-11.Snapshots ofFigure 9: Illustration of TOP and BOTTOM layers of a DDR3 PCB with computed waveforms at the farthest SDRAM. Waveform on left is an ADDRESS net compared to that of the CLOCK net. Waveform on the right is a DATA net compared to that of a DQS net. Clock frequency = 800 MHz and data rate is 1600 Mbps.Figure 10: Illustration of TOP and BOTTOM layers of a DDR2 PCB with computed waveforms at the farthest SDRAM. Waveform on left is an ADDRESS net compared to that of the CLOCK net. Waveform on the right is a DATA net compared to that of a DQS net. Clock frequency = 400 MHz and data rate is 800 Mbps.Figure 11: Illustration of TOP and BOTTOM layers of a DDR3 – DIMM PCB with computed waveforms at the 8th (last) SDRAM on DIMM. Waveform on left is an ADDRESS net compared to that of the CLOCK net. Waveform on the right is a DATA net compared to that of a DQS net.Lastly, Figure 12 shows a comparison of computed and measured DATA eye patterns of an 800 Mbps DDR2. In all cases waveform integrity can be seen to be excellent.Figure 12: Computed (Red) and Measured (blue) waveforms of a data net of an 800 Mbps DDR2 PCB.11. ConclusionIn this paper, all aspects related to SI, and PI of DDR2 and DDR3 implementation have been described. Use of Constraint Manager in ALLEGROTM makes implementation easy. While a four layer PCB implementation of 800 Mbps DDR2 and DDR3 appears to be feasible, DDR3-1600 Mbps will prove to be challenging. It will become clearer as the memory devices become available and one has a good handle on timing numbers.References[1] DDR2 SDRAM Specification, JEDEC JESD79-2B, January 2005. [2] DDR3 SDRAM Standard, JEDEC JESD79-3, June 2007. [3] Syed Bokhari, “Delay matching on Printed Circuit Boards”, Proceedings of the CDNLIVE 2006, San Jose. [4] Larry D Smith, and Jeffrey Lee, “Power Distribution System for JEDEC DDR2 memory DIMM, Proc. IEEE EPEP conference, Princeton, N.J., pp. 121-124, October 2003. [5] Hardware and layout design considerations for DDR2 SDRAM Memory Interfaces, Freescale semiconductor Application Note, Doc. No. AN2910, Rev. 2, 03/2007. [6] DDR2 design guide for 2 DIMM systems, Technical Note, Micron Technology Inc. TN-47-01, 2003. [7] /corporate/products-services/ip/SDRAM_Controller_whitepaper_Oct_2006.pdf [8] /products/dram/ddr2/partlist.aspx?speed=DDR2-800 [9] /products/dram/ddr3/partlist.aspx?speed=DDR3-1066。
DDR2布线约束参考

布线约束参考路径分成三段? 路径 1(#1): 控制器到第一条 DIMM 的路径,包括 DQ/DQS 信号、地址信号和控制信号。
? 路径 2(#2): 第一条 DIMM到第二条 DIMM之间的路径,包括 DQ/DQS信号、地址信号和和控制信号。
? 路径 3(#3): 第二条 DIMM到VTT上拉电阻的路径,只有地址信号和控制信号。
数据信号有 ODT。
约束以下关键长度? #1典型长度在 1900mil至 4500mil 之间。
? #2 典型长度约为 425mil左右。
? #3典型长度在 200mil至 550mil 之间。
#3 丌需要时序约束。
? 同一个数据信号组(包括 DQ 及对应 DQS)需要精确的匹配长度,长度差异要求在+/‐50mil。
其中分配给#1度差异要求在+/‐30mil,分配给#2的长度差异要求在+/‐20mil。
? 所有数据信号组的组间长度差异要求在+/‐500mil。
? 地址信号间的长度差异要求在+/‐200mil。
DDR,DDR2的时序要求一般比较高,所以对于时钟、地址控制线、数据、DQS等的等长要求较高。
以下简单说一下DDR,DDR2的等长布线要求DDR 时钟(查分):一般要求差分阻抗100欧。
线宽、间距需要根据叠层结构计算出来,与其他走线的间距要满足3w规则;必需精确匹配差分对走线误差,允许在+30mil 以内。
DDR 地址、片选及其他控制线:单端阻抗50欧。
应走成菊花链状拓扑,可比ddrclk 线长1000-2500mil,绝对不能短。
DDR 数据线,ddrdqs,ddrdm 线:单端阻抗50欧。
最好在同一层布线。
数据线与时钟线的线长差控制在50mil 内。
其中要特别注意DQS的走线,要满足3W规则。
其中PCB走线阻抗都要根据实际的叠层结构计算。
2010年03月10日 星期三 22:57DDR SDRAM:严格的说DDR应该叫DDR SDRAM,人们习惯称为DDR,部分初学者也常看到DDR SDRAM,就认为是SDRAM。
DDR走线规则

1.时钟信号(1)差分布线,差分阻抗100欧姆,差分线误差±5mil。
(2)与其它信号的间距要大于25mil,而且是指edge to edge的间距(3)CLK等长,误差±10mil。
2.数据信号:(1)数据信号分为八组,每组单独分开走线,第一组为DDR_DQ[0:7]、DDR_DQSP0、DDR_DQSN0、DDR_DQM0,以此类推,同组信号在同一层走线。
(2)DQ和DQM为点对点布线,(3)DQS为差分布线。
差分线误差±5mil,差分阻抗100欧姆。
(4)组内间距要大于12mil,而且是指edge to edge的间距,同组内DQ与DQM以DQS为基准等长,误差±5mil。
(5)DQS与DDR2_CLKP等长,误差±5mil。
(6)不同组信号间距:大于20mil(edge to edge的间距)(7)DDR_CKN/P之间的并联100欧姆电阻,需要放置在信号一分二的分叉地方(8)尽可能减少过孔(9)叠层设计的时候,最好将每一层阻抗线宽,控制在差不多宽度(10)信号走线长度,不超过2500mil3.控制信号和地址信号:(1) 组内间距要大于12mil,而且是指edge to edge的间距(2) 所有控制线须等长,误差±10mil。
(3 不同组信号间距:大于20mil(edge to edge的间距)4.其它信号DDR_VREF走线宽度20mil以上。
无论是PCB上使用芯片还是采用DIMM条,DDR和DDRx(包括DDR2,DDR4等)相对与传统的同步SDRAM的读写,我认为主要困难有三点:1,时序。
由于DDR采用双沿触发,和一般的时钟单沿触发的同步电路,在时序计算上有很大不同。
DDR之所以双沿触发,其实是在芯片内部做了时钟的倍频(因为按照耐奎斯特准则,时钟频率应该至少是信号频率的2倍),对外看起来,数据地址速率和时钟一样。
为了保证能够被判决一组信号较小的相差skew,DDR对数据DQ信号使用分组同步触发DQS信号,所以DDR上要求时序同步的是DQ 和DQS之间,而不是一般数据和时钟之间。
DDR走线规则
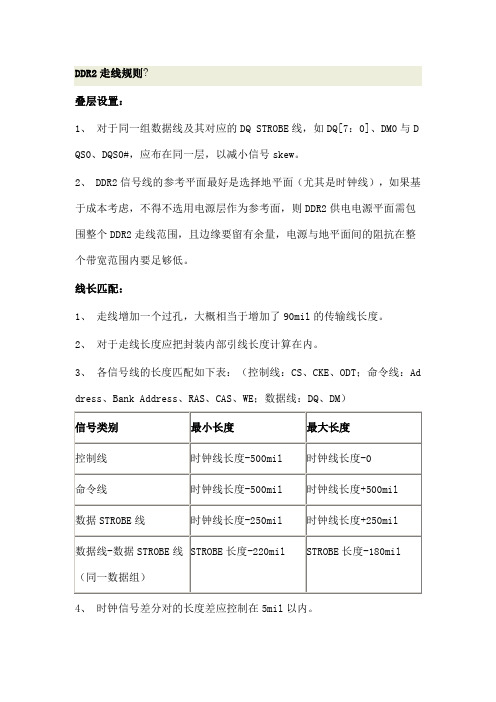
DDR2走线规则?叠层设置:1、对于同一组数据线及其对应的DQ STROBE线,如DQ[7:0]、DM0与D QS0、DQS0#,应布在同一层,以减小信号skew。
2、 DDR2信号线的参考平面最好是选择地平面(尤其是时钟线),如果基于成本考虑,不得不选用电源层作为参考面,则DDR2供电电源平面需包围整个DDR2走线范围,且边缘要留有余量,电源与地平面间的阻抗在整个带宽范围内要足够低。
线长匹配:1、走线增加一个过孔,大概相当于增加了90mil的传输线长度。
2、对于走线长度应把封装内部引线长度计算在内。
3、各信号线的长度匹配如下表:(控制线:CS、CKE、ODT;命令线:Ad dress、Bank Address、RAS、CAS、WE;数据线:DQ、DM)4、时钟信号差分对的长度差应控制在5mil以内。
5、在能够满足布线空间的情况下,走线长度越短越好,一般控制在500 0mil以内,可以以时钟线作为参考线。
串扰:1、对于蛇行走线,各线段之间的间距应至少为走线宽度的两倍(边沿到边沿)。
2、 DDR2信号线与非DDR2信号线之间的间距应大于25mil。
3、时钟、DQS等差分线与其它DDR2信号线的间距应大于20mil。
4、同一组命令线,同一组控制线或同一组数据线间的走线间距应大于走线宽度倍(最好2倍以上),而不同组间的信号线间距应大于走线宽度的2倍(最好3倍以上)。
5、在扇出线区域,由于空间限制,不能满足走线宽度和间距要求时,可适当减小走线宽度及减小走线间距,但该扇出线长度应小于500mil。
6、扇出线过孔应尽量靠近焊盘,如有可能,最好打焊盘孔。
7、每条信号线的过孔数最好不要超过两个。
8、 VREF参考电压线要有足够低的阻抗,且与其它DDR2信号线的间距大于25mil。
阻抗匹配:1、 DDR2 800信号走线单端阻抗应设置成50Ω2、对于控制命令线、时钟线要进行阻抗匹配,可采用源端串联匹配或末端并联匹配。
DDR2布线约束参考
布线约束参考路径分成三段? 路径 1(#1): 控制器到第一条 DIMM 的路径,包括 DQ/DQS 信号、地址信号和控制信号。
? 路径 2(#2): 第一条 DIMM到第二条 DIMM之间的路径,包括 DQ/DQS信号、地址信号和和控制信号。
? 路径 3(#3): 第二条 DIMM到VTT上拉电阻的路径,只有地址信号和控制信号。
数据信号有 ODT。
约束以下关键长度? #1典型长度在 1900mil至 4500mil 之间。
? #2 典型长度约为 425mil左右。
? #3典型长度在 200mil至 550mil 之间。
#3 丌需要时序约束。
? 同一个数据信号组(包括 DQ 及对应 DQS)需要精确的匹配长度,长度差异要求在+/‐50mil。
其中分配给#1度差异要求在+/‐30mil,分配给#2的长度差异要求在+/‐20mil。
? 所有数据信号组的组间长度差异要求在+/‐500mil。
? 地址信号间的长度差异要求在+/‐200mil。
DDR,DDR2的时序要求一般比较高,所以对于时钟、地址控制线、数据、DQS等的等长要求较高。
以下简单说一下DDR,DDR2的等长布线要求DDR 时钟(查分):一般要求差分阻抗100欧。
线宽、间距需要根据叠层结构计算出来,与其他走线的间距要满足3w规则;必需精确匹配差分对走线误差,允许在+30mil 以内。
DDR 地址、片选及其他控制线:单端阻抗50欧。
应走成菊花链状拓扑,可比ddrclk 线长1000-2500mil,绝对不能短。
DDR 数据线,ddrdqs,ddrdm 线:单端阻抗50欧。
最好在同一层布线。
数据线与时钟线的线长差控制在50mil 内。
其中要特别注意DQS的走线,要满足3W规则。
其中PCB走线阻抗都要根据实际的叠层结构计算。
2010年03月10日 星期三 22:57DDR SDRAM:严格的说DDR应该叫DDR SDRAM,人们习惯称为DDR,部分初学者也常看到DDR SDRAM,就认为是SDRAM。
DDR2设备的布局布线准则
DSP的DDR2布局布线准则文:曹永涛目次1. PCB叠层设计 (1)2. 阻抗匹配 (2)3. 布局 (2)4. DDR2的禁止布线区域设置及要点 (2)5. 低频分离旁路电容的布置 (3)6. 高频分离旁路电容的布置 (3)7. 时钟线和信号线 (4)8. VREF的布线 (4)9. CK时钟和ADDR_CTRL的走线拓扑与规则 (5)10. DQS和DQ的布线拓扑与规则 (6)11. DQGATE的走线拓扑与规则 (7)DSP的DDR2布局布线准则相比其它器件,DDR2设备在布局布线方面有其特殊性。
TI公司通过仿真设计及对EVM板的EMI测试,明确了其DSP产品与DDR2设备接口布局布线的准则。
我们可以直接照搬EVM板在DDR2处的布局布线,也可以按下面的准则灵活设计。
此文也可作其它控制器的DDR2设备接口部分布局布线的参考。
1. PCB叠层设计在DDR2的布局布线中,叠层最少设计为6层,为节省空间或其它电路有需要的话,可增加叠层。
叠层设计要求如下表:2. 阻抗匹配阻抗匹配分为源端匹配和终端匹配。
地址线和控制线为源端匹配(控制器端),数据线为终端匹配(存储器端)。
nDSDDQM0,nDSDDQM1,nDSDDQM2,nDSDDQM3采用源端匹配。
具体如下表:3. 布局DDR2控制器与DDR2设备的布局关系表示如图:图中:X最大值为1660MILS;Y最大值为1280MILS;Y偏移最大值为650MILS。
(注:所有数据均以器件中心为测量基点。
)4. DDR2的禁止布线区域设置及要点在DDR2的布局布线区域有其特殊性,先将这个区域称为DDR2的禁止布线区域,其位置设置大致如下图:布线要点:A.所有与DDR2相关的电路均必须布局布线在此区域;B.非DDR2电路、信号线不能在此区域内与DDR2信号线同层布线;C.非DDR2信号线在此区域布线时,必须与DDR2信号线布线层以完整地平面隔开;D.此区域的地平面与电源平面无分割,电源平面必须覆盖全区域。
DDR2布线要点总结
DDR2布线要点总结
陈玮思
1、时钟线、地址线、数据线控制严格等长,限制在10mil内。
2、所有线走线遵从3W原则。
在Altium中设置规则,让工具帮忙检查3W满足情况。
3、时钟线、地址线参考平面为地、地址线参考平面为电源。
其中top layer为时钟的优选布线层,根据-C板与之前版本的时钟波形对比,-C板的波形有很大的改善,接近于正弦波,之前版本有明显台阶。
Mid1和bottom层布数据线,mid2层布地址线。
4、芯片退耦电容、差分线尾端防反射电阻贴近管脚摆放。
根据波形实测,越靠近管脚摆放的电容在管脚上呈现的电源纹波和噪声越小。
5、条件允许下电源层要挨着地层,增加PI。
见第3点的图。
6、所有走线附近不覆铜。
不覆铜的原因在于减少覆铜对信号线特性阻抗的影响。
7、保证单端信号走线特性阻抗为50欧姆、差分信号走线特性阻抗为100欧姆。
为了减少反射,保证信号完整性。
8、走线不要出现小于135度的拐角。
9、电源层分割时保证走线部分不跨层走线。
10、走线时过孔不要超过3个。
DDR2设计原则(Altera&Freescale)
徐聪翻译整理的Altera手册本应用笔记提供了在连接Altera FPGA器件和DDR2 SDRAM器件时需要使用的Altera推荐的终结电路图。
然而,你还是应该通过对自己的设计进行仿真来得到针对你的设计最适合终结电路图,这是非常重要的。
本应用笔记也提供了仿真结果与实验测得的结果之间的比较,以便你能够自己总结出对于实现最佳信号质量的最佳设计方法。
对于终结电路的设计,Altera推荐使用接收器端的并联终结电阻来达到最佳的信号质量。
因此,对于双向信号,例如数据线DQ或数据选通脉冲DQS,推荐使用的终结电路形式是Class II方式。
你可以采用在FPGA一边和内存一边外接并联电阻或者启用内存的ODT功能和FPGA的OCT功能,或者组合使用DDR2 SDRAM的ODT功能和在FPGA一侧放置终结电阻,对于一个单向的信号,例如命令线或地址线,推荐的终结方式是Class I方式,在这种方式下终结电阻放置在内存一边。
选择何种FPGA的输出能力选项取决于采用何种终结方式——Class I或Class II——但是根据仿真结果显示,你应当将输出能力设置为与输出驱动器“看到”的负载相匹配的值。
对于Class II终结方式,Altera 推荐使用的输出能力设置为25ΩOCT。
这种设置能实现最好的结果,因为输出驱动器的输出阻抗与输出驱动器看到的阻抗相匹配。
而当采用Class I终结方式时,Altera推荐使用50ΩOCT 输出能力设定。
此外,本应用指南描述了不同的内存负载形式对于信号质量的影响。
从前文“单/双内存条对比”中可知,高负载值会降低信号的上升速度,延长信号的上升时间,因此会缩小接收端可以看到的信号读取窗口(“眼”)的宽度。
你可以通过提高输出能力设定来提高信号的上升速度,但是这回降低输出驱动器的阻抗造成阻抗不匹配。
最后,本应用指南给出了DDR2布局布线指导。
虽然本应用指南中的推荐方法是由仿真结果和在Stratix III 主机开发板与Stratix II内存电路板2上的实验结果基础上给出的,但对于任何其他的电路板,你可以应用同样的基本原理来确定最佳的终结方式、驱动能力设置和负载形式。
- 1、下载文档前请自行甄别文档内容的完整性,平台不提供额外的编辑、内容补充、找答案等附加服务。
- 2、"仅部分预览"的文档,不可在线预览部分如存在完整性等问题,可反馈申请退款(可完整预览的文档不适用该条件!)。
- 3、如文档侵犯您的权益,请联系客服反馈,我们会尽快为您处理(人工客服工作时间:9:00-18:30)。
引言
嵌入式DDR(Double Data Rate,双数据速率)设计是含DDR的嵌入式硬件设计中最重要和最核心的部分。
随着嵌入式系统的处理能力越来越强大,实现的功能越来越多,系统的工作频率越来越高,DDR的工作频率也逐渐从最低的133 MHz提高到200 MHz,从而实现了更大的系统带宽和更好的性能。
然而,更高的工作频率同时也对系统的稳定性提出了更高的要求,这需要硬件设计者对电路的布局走线有更多的约束和考虑。
而影响整个系统能否工作正常且稳定的最重要的部分就是DDR部分的电路设计。
嵌入式系统使用DDR内存,可以在传统的单数据数率内存芯片上实现更好的性能。
DDR允许在不增加时钟频率和数据位宽的条件下,一个时钟周期内能够处理两个操作。
增加的数据总线性能是由于源同步数据选通允许数据同时在选通脉冲的上升沿和下降沿被获取。
DDR虽然能够给嵌入式设计带来更好的性能,但是设计者必须比以往的SDR设计更小心地处理DDR部分的PCB布线部分,否则不仅不能实现好的性能,整个嵌入式系统的稳定性也会受到影响。
DDR比传统的SDR有更短的信号建立保持时间、更干净的参考电压、更紧密的走线匹配和新的I/O □信号,并且需要合适的终端电阻匹配。
这些都是要面对的新的挑战。
1 DDR总线结构
对于DDR内存,JEDEC建立和采用了一个低压高速信号标准。
这个标准称为“短截线串联终结逻辑(StubSeries Terminated Logic,SSTL)”。
SSTL能够改进数据通过总线传输的信号完整性,这种终端设计的目的是防止在高速传输下由于信号反射导致的数据错误。
在一个典型的内存拓扑结构中,如果使用了串联匹配电阻(Rs),那么它应该放在远离DDR控制器的位置。
这种方法能够节约控制器附近宝贵的电路板空间,避免布线拥塞和繁琐的引脚扇出;而且也优化了从控制器到内存芯片的信号完整性,在这些位置往往有很多地址和命令信号需要可靠地被多个内存接收。
最普通的SSTL终端模型是一种较好的单终端和并联终端方案,如图1所示。
这种方案包含使用一个串联终端电阻(Rg)从控制器到内存,以及一个并联终端电阻(RT)上拉到终端电压(VTT)。
这种方法常见于商用电脑的主板上,但目前的嵌入式主板上为了获得更好的信号完整性和系统稳定性,也常常使用。
Rs和RT的值是依赖于具体的系统的,应该由板级仿真确定具体的值。
2 嵌入式DDR布线分析
2.1 DDR的信号完整性问题
高速总线信号的传输往往需要考虑信号完整性问题。
DDR的信号线不是普通的信号线而是传输线,因而传输线上的过孔,或者连接器等不连续阻抗因素都会影响接收端的信号完整性。
主要有过冲和下冲、振铃及串扰等影响,交流噪声以及直流电压的一些不准确因素也同样影响信号传输的性能。
DDR为了实现更高的信号频率,SSTL高增益差分接收器的接收电平往往是偏置在参考电平(VREF)附近,使用这样的接收器允许更小的电压摆幅、更少的信号反射、更低的电磁干扰和更短的建立时间,比LVTTL能适应更高的时钟频率。
图2所示的是SSTL接口电平。
交流逻辑电平是在接收器端的接收电平,在接收器处交流逻辑参数(包括建立和保持时间)都必须最佳,而直流逻辑电平则提供一个滞后的接收电平点。
当输入电平穿过DC直流参考点时,接收器转变到新的逻辑电平并且保持这个新的状态,只要信号不低于门限电平。
因此,SSTL总线不易于受过冲、下冲和振铃的影响。
2.2 基于布线考虑的DDR信号分组
DDR控制器包括超过130个信号,并且提供直接的信号接口连接内存子系统。
这些信号根据信号的种类可以分为不同的信号组,如表1所列。
其中,数据组的分组应该以每个字节通道来划分,DMO、DQSO以及DQO~DQ7为第1字节通道,DMl、DQSl以及DQ8~DQl5为第2字节通道,以此类推。
每个字节通道内有严格的长度匹配关系。
其他信号走线长度应按照组为单位来进行匹配,每组内信号长度差应该严格控制在一定范围内。
不同组的信号间虽然不像组内信号那样要求严格,但不同组长度差同样也有一定要求。
具体布线要求见2.4小节。
2.3 信号组布线顺序
为了确保DDR接口最优化,DDR的布线应该按照如下的顺序进行:功率、电阻网络中的pin脚交换、数据信号线布线、地址/命令信号布线、控制信号布线、时钟信号布线、反馈信号布线。
数据信号组的布线优先级是所有信号组中最高的,因为它工作在2倍时钟频率下,它的信号完整性要求是最高的。
另外,数据信号组是所有这些信号组中占最大部分内存总线位宽的部分,也是最主要的走线长度匹配有要求的信号组。
地址、命令、控制和数据信号组都与时钟的走线有关。
因此,系统中有效的时钟走线长度应该满足多种关系。
设计者应该建立系统时序的综合考虑,以确保所有这些关系都能够被满足。
2.4 各组信号布线长度匹配
时钟信号:以地平面为参考,给整个时钟回路的走线提供一个完整的地平面,给回路电流提供一个低阻抗的路径。
由于是差分时钟信号,在走线前应预先设计好线宽线距,计算好差分阻抗,再按照这种约束来进行布线。
所有的DDR差分时钟信号都必须在关键平面上走线,尽量避免层到层的转换。
线宽和差分间距需要参考DDR控制器的实施细则,信号线的单线阻抗应控制在50~60Ω,差分阻抗控制在100~120 Ω。
时钟信号到其他信号应保持在20 mil*以上的距离来防止对其他信号的干扰。
蛇形走线的间距不应小于20 mil。
串联终端电阻Rs值在15~33Q,可选的并联终端电阻RT值在25~68 Ω,具体设定的阻值还是应该依据信号完整性仿真的结果。
数据信号组:以地平面为参考,给信号回路提供完整的地平面。
特征阻抗控制在50~60 Ω。
线宽要求参考实施细则。
与其他非DDR信号间距至少隔离20 mil。
长度匹配按字节通道为单位进行设置,每字节通道内数据信号DQ、数据选通DQS和数据屏蔽信号DM 长度差应控制在~25 mil内(非常重要),不同字节通道的信号长度差应控制在1 000 mi内。
与相匹配的DM和DQS串联匹配电Rs值为o~33 Ω,并联匹配终端电阻RT值为25~68其他DDR信号。
地址和命令信号组:保持完整的地和电源平面。
特征阻抗控制在50~60 Ω。
信号线宽参考具体设计实施细则。
信号组与其他非DDR信号间距至少保持20 mil以上。
组内信号应该与DDR时钟线长度匹配,差距至少控制在25 mil内。
串联匹配电阻Rs值为O~33 Ω,并联匹配电阻T,值应该在25~68 Ω。
本组内的信号不要和数据信号组在同一个电阻排内。
控制信号组:控制信号组的信号最少,只有时钟使能和片选两种信号。
仍需要有一个完整的地平面和电源平面作参考。
串联匹配电阻RS值为O~33 Ω,并联匹配终端电阻RT值为25~68 Ω。
为了防止串扰,本组内信号同样也不能和数据信号在同一个电阻排内。
2.5 电源部分的设计分析
通常情况下,DDR供电电压是2.3~2.7 V,典型值是2.5 V,工作频率的不同可能引起正常工作电压的不同。
参考电压VREF是1.13~1.38 V,典型值是1.25 V。
VTT以VREF为参考,电压范围是(VREF一O.4 V)一(VREF+O·4 V)。
由于VREF只是给差分接受器端提供一个直流参考电平所以电流比较小,最大的只有3mA.VTT的电流由于上拉的缘故,在输出端输出高电平时,VTT应能流入电流,在输出端输出低电时VTT电流输出.故VTT必须能同时有流入和流出电流,电流的大小依赖于总线上同时出现的电位状态,从常用
的设计来看最大可以从2.3A到3.2A.
由于VREF电压作为其他信号接收端的重要参考,故它的布线设计也是十分重要的。
叠加在VREF电压的串扰或噪声能直接导致内存总线发生潜在的时序错误、抖动和漂移。
很多电源芯片会把VREF和VTT从同一源输出,但是由于使用的目的不同,走线也完全不同。
VREF最好和VTT在不同平面,以免VTT产生的噪声干扰VREF。
而且无论是在DDR控制器端还是DDR存储器端,VREF脚附近都应放置去耦电容,消除高频噪声。
VREF的走线宽度应该越宽越好,最好为20~25 mil。
VTT电源应该单独划分一块平面来供应电流,且最好放在DDR存储器端。
如果并联终端匹配使用排阻的方式上拉,那么最好每个排阻都添加一个0.1μF或0·01 μF的去耦电容,这对于改善信号的完整性、提高DDR总线的稳定性都有很好的效果。
结语
在带有DDR的嵌入式系统主板中,设计PCB最难的部分莫过于DDR的走线设计。
好的走线就等于有了好的信号完整性和好的时序匹配,总线在高速输入/输出数据过程中就不会出错,甚至能够有更好的抗串扰和EMC能力。
DDR总线并行传输且速率较高,在设计过程中如果没有按照严格的约束进行布线,在设备后期调试过程中,将会出现各种各样异常问题,甚至是系统根本无法启动。
而这些问题在查找和调试中很难发现,以至于无法完成硬件的开发。
最好的方法就是在设计时就充分考虑信号完整性和时序匹配的问题,在走线时就把这些规则运用进去;如果有条件,可以做一下仿真,预先验证一下设计。
这样做出来的设计,系统的稳定性和可靠性才会更高。