Linux上安装GCC编译器过程
linux 0.11编译方法

linux 0.11编译方法
Linux 0.11是Linux内核的一个早期版本,其编译方法相比现代版本有所不同。
下面是大致的编译步骤:
1.获取源代码
获取Linux 0.11的源代码。
这个版本的代码可以在历史存档中找到。
你可以从网络上找到存档并下载,或者使用像GitHub等代码托管平台上的存档。
2.准备编译环境
确保你的系统拥有合适的编译环境。
Linux 0.11是早期版本,可能需要特定的编译器和工具链。
一般来说,你需要安装合适版本的GCC编译器和相关的开发工具。
3.编辑Makefile
进入Linux 0.11源代码目录,在Makefile中设置适当的编译选项。
你可能需要调整编译器参数和其他配置,以适应你的系统环境。
4.运行编译命令
在Linux 0.11源代码目录中,运行适当的编译命令。
在这个版本中,可能有一个名为make或make all的命令可以启动编译过程。
5.处理编译错误
如果出现编译错误,需要根据错误信息进行调试和修复。
这个过程可能需要查看源代码,理解错误原因,并进行相应的修改。
6.生成内核镜像
一旦编译成功,你将会得到一个内核镜像文件。
这个文件可以用于启动系统。
请注意,Linux 0.11是一个非常早期的版本,其编译和构建流程可能相当复杂和不稳定。
同时,这个版本可能并不适用于现代硬件,可能需要进行适当的修改才能在当前系统上运行。
在学习和尝试编译早期版本的Linux内核时,请确保备份数据和系统,以免造成不可逆的损失。
Linux超详细gcc升级全过程

Linux超详细gcc升级全过程⽬录前⾔1.当前gcc版本2.安装gcc3.gmp安装4.MPFR编译5.MPC编译6.GCC 配置7.GCC版本更新前⾔c c++ 等等需要这个编译器gcc,最近有DBA的朋友咨询RHEL7.6操作系统安装Mysql数据库时需要⾼版本的GCC,研究了下发现坑不少,总结本⽂分享给⼤家1.当前gcc版本[root@rhel76 ~]# gcc -vUsing built-in specs.COLLECT_GCC=gccCOLLECT_LTO_WRAPPER=/usr/libexec/gcc/x86_64-redhat-linux/4.8.5/lto-wrapperTarget: x86_64-redhat-linuxConfigured with: ../configure --prefix=/usr --mandir=/usr/share/man --infodir=/usr/share/info --with-bugurl=/bugzilla --enable-bootstrap --enable-shared --enable-threads=posix --enable-checking=release --with-system-zlib --enable-__cxa_at Thread model: posixgcc version 4.8.5 20150623 (Red Hat 4.8.5-36) (GCC)从以上可以看出当前版本为4.8.5,本次我们升级到10.1.02.安装gcc--下载地址:https:///gnu/gcc/gcc-10.1.0/[root@rhel76 ~]# tar -vxf gcc-10.1.0.tar.gz[root@rhel76 gcc-10.1.0]# mkdir build[root@rhel76 gcc-10.1.0]# cd build/[root@rhel76 build]# ../configure --prefix=/usr/local/gcc-10.1.0/ --enable-checking=release --enable-languages=c,c++ --disable-multilibchecking build system type... x86_64-pc-linux-gnuchecking host system type... x86_64-pc-linux-gnuchecking target system type... x86_64-pc-linux-gnuchecking for a BSD-compatible install... /usr/bin/install -cchecking whether ln works... yeschecking whether ln -s works... yeschecking for a sed that does not truncate output... /usr/bin/sedchecking for gawk... gawkchecking for libatomic support... yeschecking for libitm support... yeschecking for libsanitizer support... yeschecking for libvtv support... yeschecking for libhsail-rt support... yeschecking for libphobos support... yeschecking for gcc... gccchecking whether the C compiler works... yeschecking for C compiler default output file name... a.outchecking for suffix of executables...checking whether we are cross compiling... nochecking for suffix of object files... ochecking whether we are using the GNU C compiler... yeschecking whether gcc accepts -g... yeschecking for gcc option to accept ISO C89... none neededchecking for g++... g++checking whether we are using the GNU C++ compiler... yeschecking whether g++ accepts -g... yeschecking whether g++ accepts -static-libstdc++ -static-libgcc... nochecking for gnatbind... nochecking for gnatmake... nochecking whether compiler driver understands Ada... nochecking how to compare bootstrapped objects... cmp --ignore-initial=16 $$f1 $$f2checking for objdir... .libschecking for the correct version of gmp.h... noconfigure: error: Building GCC requires GMP 4.2+, MPFR 3.1.0+ and MPC 0.8.0+.Try the --with-gmp, --with-mpfr and/or --with-mpc options to specifytheir locations. Source code for these libraries can be found attheir respective hosting sites as well as athttps:///pub/gcc/infrastructure/. See also/install/prerequisites.html for additional info. Ifyou obtained GMP, MPFR and/or MPC from a vendor distribution package,make sure that you have installed both the libraries and the headerfiles. They may be located in separate packages.从⽇志总可以看出有如下报错,故下⾯每个都安装configure: error: Building GCC requires GMP 4.2+, MPFR 3.1.0+ and MPC 0.8.0+.3.gmp安装[root@jeames007 ~]# tar -vxf gmp-5.0.1.tar.bz2[root@jeames007 ~]# cd gmp-5.0.1/[root@jeames007 gmp-5.0.1]# ./configure --prefix=/usr/local/gmp-5.0.1[root@jeames007 gmp-5.0.1]# make[root@jeames007 gmp-5.0.1]# make installmake[4]: Leaving directory `/root/gmp-5.0.1'make[3]: Leaving directory `/root/gmp-5.0.1'make[2]: Leaving directory `/root/gmp-5.0.1'make[1]: Leaving directory `/root/gmp-5.0.1'4.MPFR编译[root@jeames007 ~]# tar -vxf mpfr-3.1.5.tar.xz[root@jeames007 ~]# cd mpfr-3.1.5/[root@jeames007 ~]#./configure --prefix=/usr/local/mpfr-3.1.5 --with-gmp=/usr/local/gmp-5.0.1[root@jeames007 mpfr-3.1.5]# make[root@jeames007 mpfr-3.1.5]# make install5.MPC编译[root@jeames007 ~]# tar -vxf mpc-1.0.1.tar.gz[root@jeames007 ~]# cd mpc-1.0.1[root@jeames007 ~]# ./configure --prefix=/usr/local/mpc-1.0.1 --with-gmp=/usr/local/gmp-5.0.1 --with-mpfr=/usr/local/mpfr-3.1.5[root@jeames007 mpc-1.0.1]# make[root@jeames007 mpc-1.0.1]# make install6.GCC 配置[root@rhel76 ~]# cd gcc-10.1.0[root@rhel76 gcc-10.1.0]# cd build/../configure --prefix=/usr/local/gcc-10.1.0/ --enable-checking=release --enable-languages=c,c++ --disable-multilib --with-gmp=/usr/local/gmp-5.0.1 --with-mpfr=/usr/local/mpfr-3.1.5 --with-mpc=/usr/local/mpc-1.0.1 checking build system type... x86_64-pc-linux-gnuchecking host system type... x86_64-pc-linux-gnuchecking target system type... x86_64-pc-linux-gnuchecking for a BSD-compatible install... /usr/bin/install -cchecking whether ln works... yeschecking whether ln -s works... yeschecking for a sed that does not truncate output... /usr/bin/sedchecking for gawk... gawkchecking for libatomic support... yeschecking for libitm support... yeschecking for libsanitizer support... yeschecking for libvtv support... yeschecking for libhsail-rt support... yeschecking for libphobos support... yeschecking for gcc... gccchecking whether the C compiler works... yeschecking for C compiler default output file name... a.outchecking for suffix of executables...checking whether we are cross compiling... nochecking for suffix of object files... ochecking whether we are using the GNU C compiler... yeschecking whether gcc accepts -g... yeschecking for gcc option to accept ISO C89... none neededchecking for g++... g++checking whether we are using the GNU C++ compiler... yeschecking whether g++ accepts -g... yeschecking whether g++ accepts -static-libstdc++ -static-libgcc... nochecking for gnatbind... nochecking for gnatmake... nochecking whether compiler driver understands Ada... nochecking how to compare bootstrapped objects... cmp --ignore-initial=16 $$f1 $$f2checking for objdir... .libschecking for the correct version of gmp.h... yeschecking for the correct version of mpfr.h... buggy but acceptablechecking for the correct version of mpc.h... yeschecking for the correct version of the gmp/mpfr/mpc libraries... yeschecking for isl 0.15 or later... norequired isl version is 0.15 or later*** This configuration is not supported in the following subdirectories:gnattools gotools target-libada target-libhsail-rt target-libphobos target-zlib target-libbacktrace target-libgfortran target-libgo target-libffi target-libobjc target-liboffloadmic(Any other directories should still work fine.)checking for default BUILD_CONFIG... bootstrap-debugchecking for --enable-vtable-verify... nochecking for bison... bison -ychecking for bison... bisonchecking for gm4... nochecking for gnum4... nochecking for m4... m4checking for flex... flexchecking for flex... flexchecking for makeinfo... no/root/gcc-10.1.0/missing: line 81: makeinfo: command not foundchecking for expect... nochecking for runtest... nochecking for ar... archecking for as... aschecking for dlltool... nochecking for ld... ldchecking for lipo... nochecking for nm... nmchecking for ranlib... ranlibchecking for strip... stripchecking for windres... nochecking for windmc... nochecking for objcopy... objcopychecking for objdump... objdumpchecking for otool... nochecking for readelf... readelfchecking for cc... ccchecking for c++... c++checking for gcc... gccchecking for gfortran... gfortranchecking for gccgo... nochecking for gdc... nochecking for ar... nochecking for ar... archecking for as... nochecking for as... aschecking for dlltool... nochecking for dlltool... nochecking for ld... nochecking for ld... ldchecking for lipo... nochecking for lipo... nochecking for nm... nochecking for nm... nmchecking for objcopy... nochecking for objcopy... objcopychecking for objdump... nochecking for objdump... objdumpchecking for otool... nochecking for otool... nochecking for ranlib... nochecking for ranlib... ranlibchecking for readelf... nochecking for readelf... readelfchecking for strip... nochecking for strip... stripchecking for windres... nochecking for windres... nochecking for windmc... nochecking for windmc... nochecking where to find the target ar... host toolchecking where to find the target as... host toolchecking where to find the target cc... just compiledchecking where to find the target c++... just compiledchecking where to find the target c++ for libstdc++... just compiledchecking where to find the target dlltool... host toolchecking where to find the target gcc... just compiledchecking where to find the target gfortran... host toolchecking where to find the target gccgo... host toolchecking where to find the target gdc... host toolchecking where to find the target ld... host toolchecking where to find the target lipo... host toolchecking where to find the target nm... host toolchecking where to find the target objcopy... host toolchecking where to find the target objdump... host toolchecking where to find the target otool... host toolchecking where to find the target ranlib... host toolchecking where to find the target readelf... host toolchecking where to find the target strip... host toolchecking where to find the target windres... host toolchecking where to find the target windmc... host toolchecking whether to enable maintainer-specific portions of Makefiles... noconfigure: creating ./config.statusconfig.status: creating Makefile[root@jeames007 ~]# make -j4make 时间很长,很长,耐⼼等待,本⼈编译了1个⼩时。
rk3399 编译 linux c代码

rk3399 编译linux c代码摘要:1.RK3399 介绍2.Linux 下C 语言编程基础3.RK3399 编译Linux C 代码的步骤4.总结正文:1.RK3399 介绍RK3399 是一款由Rockchip 公司推出的高性能、低功耗的六核64 位处理器,广泛应用于平板电脑、智能电视、迷你电脑等设备。
其强大的计算能力使得开发者可以进行各种编程尝试,如编写Linux 下的C 语言程序。
2.Linux 下C 语言编程基础C 语言是一种通用的、过程式的计算机程序设计语言,广泛应用于操作系统、编译器、嵌入式设备等领域。
在Linux 环境下,可以使用GCC(GNU Compiler Collection)编译器进行C 语言程序的编写、编译和运行。
GCC 支持多种处理器架构,如x86、ARM、MIPS 等,因此可以在不同的硬件平台上进行开发。
3.RK3399 编译Linux C 代码的步骤要使用RK3399 编译Linux 下的C 代码,需要进行以下几个步骤:(1) 安装交叉编译工具链:交叉编译工具链是在宿主机上编译目标处理器架构的程序,需要安装与RK3399 处理器架构对应的交叉编译工具链。
可以使用官方提供的SDK 或者第三方工具链,如OpenWRT。
(2) 编写C 代码:在Linux 环境下,使用文本编辑器(如Vim、Nano 等)编写C 语言代码。
(3) 编译C 代码:使用GCC 编译器对C 代码进行编译。
需要指定目标架构,如“-march=rk3399”,以及目标文件名。
编译命令如下:```gcc -march=rk3399 -o targetfile sourcefile.c```(4) 将编译好的程序烧写到RK3399 设备:使用烧写工具将编译好的程序烧写到RK3399 设备上,并在设备上运行。
4.总结通过以上步骤,我们可以使用RK3399 编译Linux 下的C 代码,并在RK3399 设备上运行。
Linux编程 使用gcc编译C程序
}
编译时可以使用如下命令:
gcc -o func main.c fun.c
编译完成后,使用下面的命令执行并显示结果:
./func 5
5的阶乘是:120
2.gcc的错误类型及对策
gcc编译器如果发现源程序中有错误,就无法继续进行,也无法生成最终的可执行文件。为了便于修改,gcc给出错误资讯,用户必须对这些错误资讯逐个进行分析、处理,并修改相应的语言,才能保证源代码的正确编译连接。gcc给出的错误资讯一般可以分为四大类,这里分别来讨论其产生的原因和对策。
排除编译、连接过程中的错误,应该说这只是程序设计中最简单、最基本的一个步骤,可以说只是开了个头。这个过程中的错误,只是在使用C语言描述一个算法中所产生的错误,是比较容易排除的。一个程序,到编译、连接通过为止,应该说刚刚开始,程序在运行过程中所出现的问题,还需要更加深入地测试、调试和修改。稍为复杂的程序,往往要经过多次的编译、连接和测试、修改,用户在学习中应该不断提高程序的维护和调试能力。
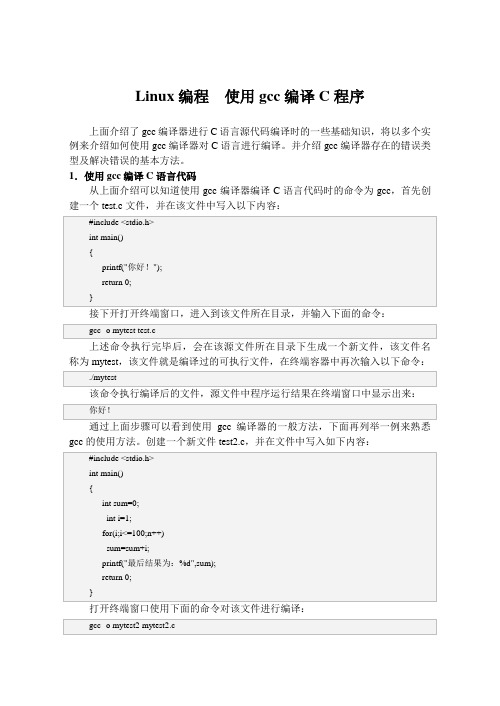
#include <stdio.h>
int main()
{
printf("你好!");
return 0;
}
接下开打开终端窗口,进入到该文件所在目录,并输入下面的命令:
gcc -o mytest test.c
上述命令执行完毕后,会在该源文件所在目录下生成一个新文件,该文件名称为mytest,该文件就是编译过的可执行文件,在终端容器中再次输入以下命令:
int i=1;
for(i;i<=100;n++)
sum=sum+i;
printf("最后结果为:%d",sum);
gcc 用法

gcc 用法GCC (GNU Compiler Collection) 是一套自由软件编译器,可以用于编译多种编程语言的源代码,包括 C、C++、Objective-C、Fortran、Ada 和其他一些语言。
GCC 是GNU计划的一部分,由自由软件基金会维护和发展。
本文将详细介绍 GCC 的使用方法。
一、环境准备在使用GCC之前,需要先安装好GCC。
GCC是开源软件,常见的Linux发行版都默认安装GCC,Windows下可以通过安装Cygwin或MinGW等方式安装GCC。
安装完成后,在命令行中输入gcc --version查看gcc的版本号确认是否安装成功。
除了GCC之外,还需要一个文本编辑器来编写源代码。
Windows下常用的文本编辑器有Notepad++,Linux下则使用vim或emacs等编辑器。
还需要了解一些基本的编程知识和语法。
二、GCC 编译 C 语言程序以下是一个简单的 C 语言程序,可以输出 "Hello, world!":```c#include <stdio.h>printf("Hello, world!\n");return 0;}```将上述代码保存为 helloworld.c 文件,然后在命令行中进入文件所在目录,输入以下命令编译该程序:```gcc helloworld.c -o helloworld```gcc是编译器的命令,helloworld.c是待编译的源代码文件名,-o helloworld是生成的可执行文件名。
执行上述命令后,GCC 会把源代码编译成可执行文件 helloworld。
运行该可执行文件,可以得到以下输出:```Hello, world!```三、GCC 编译 C++ 程序GCC 也可以编译 C++ 程序,以下是一个简单的 C++ 程序,可以输出 "Hello,world!":```c++#include <iostream>std::cout << "Hello, world!" << std::endl;return 0;}```将上述代码保存为 helloworld.cpp 文件,然后在命令行中进入文件所在目录,输入以下命令编译该程序:```g++ helloworld.cpp -o helloworld```g++是编译器的命令,helloworld.cpp是待编译的源代码文件名,-o helloworld是生成的可执行文件名。
arm-linux-gcc 常用参数讲解 gcc编译器使用方法

arm-linux-gcc常用参数讲解gcc编译器使用方法我们需要编译出运行在ARM平台上的代码,所使用的交叉编译器为arm-linux-gcc。
下面将arm-linux-gcc编译工具的一些常用命令参数介绍给大家。
在此之前首先介绍下编译器的工作过程,在使用GCC编译程序时,编译过程分为四个阶段:1. 预处理(Pre-Processing)2. 编译(Compiling)3. 汇编(Assembling)4. 链接(Linking)Linux程序员可以根据自己的需要让GCC在编译的任何阶段结束,以便检查或使用编译器在该阶段的输出信息,或者对最后生成的二进制文件进行控制,以便通过加入不同数量和种类的调试代码来为今后的调试做好准备。
和其它常用的编译器一样,GCC也提供了灵活而强大的代码优化功能,利用它可以生成执行效率更高的代码。
以文件example.c为例说明它的用法0. arm-linux-gcc -o example example.c不加-c、-S、-E参数,编译器将执行预处理、编译、汇编、连接操作直接生成可执行代码。
-o参数用于指定输出的文件,输出文件名为example,如果不指定输出文件,则默认输出a.out1. arm-linux-gcc -c -o example.oexample.c-c参数将对源程序example.c进行预处理、编译、汇编操作,生成example.0文件去掉指定输出选项"-o example.o"自动输出为example.o,所以说在这里-o加不加都可以2.arm-linux-gcc -S -o example.sexample.c-S参数将对源程序example.c进行预处理、编译,生成example.s文件-o选项同上3.arm-linux-gcc -E -o example.iexample.c-E参数将对源程序example.c进行预处理,生成example.i文件(不同版本不一样,有的将预处理后的内容打印到屏幕上)就是将#include,#define等进行文件插入及宏扩展等操作。
rk3399 编译 linux c代码
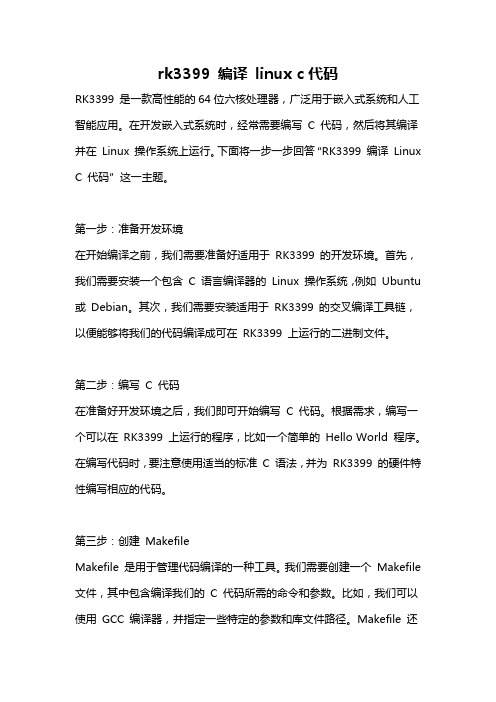
rk3399 编译linux c代码RK3399 是一款高性能的64位六核处理器,广泛用于嵌入式系统和人工智能应用。
在开发嵌入式系统时,经常需要编写C 代码,然后将其编译并在Linux 操作系统上运行。
下面将一步一步回答“RK3399 编译Linux C 代码”这一主题。
第一步:准备开发环境在开始编译之前,我们需要准备好适用于RK3399 的开发环境。
首先,我们需要安装一个包含C 语言编译器的Linux 操作系统,例如Ubuntu 或Debian。
其次,我们需要安装适用于RK3399 的交叉编译工具链,以便能够将我们的代码编译成可在RK3399 上运行的二进制文件。
第二步:编写C 代码在准备好开发环境之后,我们即可开始编写C 代码。
根据需求,编写一个可以在RK3399 上运行的程序,比如一个简单的Hello World 程序。
在编写代码时,要注意使用适当的标准C 语法,并为RK3399 的硬件特性编写相应的代码。
第三步:创建MakefileMakefile 是用于管理代码编译的一种工具。
我们需要创建一个Makefile 文件,其中包含编译我们的C 代码所需的命令和参数。
比如,我们可以使用GCC 编译器,并指定一些特定的参数和库文件路径。
Makefile 还需要指定编译生成的目标文件和可执行文件的名称。
第四步:执行编译命令在准备好Makefile 文件之后,我们可以执行编译命令,将我们的C 代码编译成可在RK3399 上运行的二进制文件。
通过运行一个名为make 的命令,Makefile 文件将被读取,并根据其中的指示执行编译操作。
在编译过程中,GCC 编译器将逐个编译源文件,并将它们连接在一起形成一个可执行文件。
第五步:将可执行文件传输到RK3399一旦编译成功,我们将得到一个可在RK3399 上执行的二进制文件。
最后一步是将这个可执行文件传输到RK3399 上。
可以通过网络传输,将其复制到RK3399 存储介质的特定目录中,或者通过其他适当的方式将文件传输到RK3399。
Linux内核编译过程详解
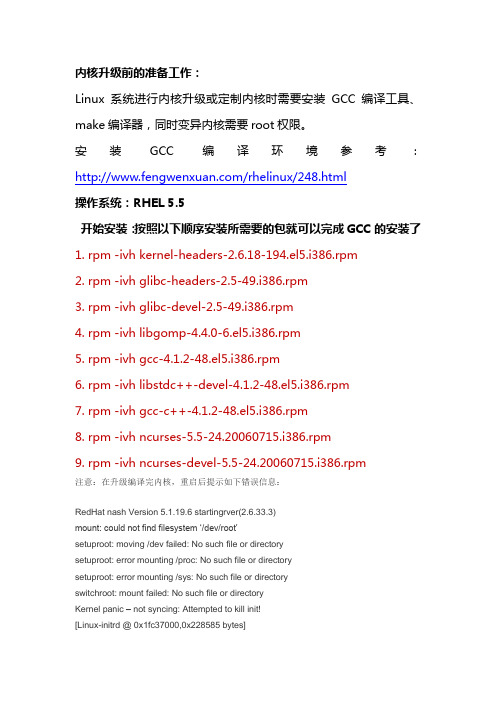
内核升级前的准备工作:Linux系统进行内核升级或定制内核时需要安装GCC编译工具、make编译器,同时变异内核需要root权限。
安装GCC编译环境参考:/rhelinux/248.html操作系统:RHEL 5.5开始安装:按照以下顺序安装所需要的包就可以完成GCC的安装了1. rpm -ivh kernel-headers-2.6.18-194.el5.i386.rpm2. rpm -ivh glibc-headers-2.5-49.i386.rpm3. rpm -ivh glibc-devel-2.5-49.i386.rpm4. rpm -ivh libgomp-4.4.0-6.el5.i386.rpm5. rpm -ivh gcc-4.1.2-48.el5.i386.rpm6. rpm -ivh libstdc++-devel-4.1.2-48.el5.i386.rpm7. rpm -ivh gcc-c++-4.1.2-48.el5.i386.rpm8. rpm -ivh ncurses-5.5-24.20060715.i386.rpm9. rpm -ivh ncurses-devel-5.5-24.20060715.i386.rpm注意:在升级编译完内核,重启后提示如下错误信息:RedHat nash Version 5.1.19.6 startingrver(2.6.33.3)mount: could not find filesystem …/dev/root‟setuproot: moving /dev failed: No such file or directorysetuproot: error mounting /proc: No such file or directorysetuproot: error mounting /sys: No such file or directoryswitchroot: mount failed: No such file or directoryKernel panic – not syncing: Attempted to kill init![Linux-initrd @ 0x1fc37000,0x228585 bytes]于是在网上找了很多,也尝试了很多加模块、重编译了N次、改fstab等方法,都不行。
- 1、下载文档前请自行甄别文档内容的完整性,平台不提供额外的编辑、内容补充、找答案等附加服务。
- 2、"仅部分预览"的文档,不可在线预览部分如存在完整性等问题,可反馈申请退款(可完整预览的文档不适用该条件!)。
- 3、如文档侵犯您的权益,请联系客服反馈,我们会尽快为您处理(人工客服工作时间:9:00-18:30)。
Linux上安装GCC编译器过程
20日最新版本的GCC编译器3.4.0发布了。
目前,GCC可以用来编译C/C++、FORTRAN、JAVA、OBJC、ADA等语言的程序,可根据需要选择安装支持的语言。
GCC 3.4.0比以前版本更好地支持了C++标准。
本文以在Redhat Linux上安装GCC3.4.0为例,介绍了GCC的安装过程。
安装之前,系统中必须要有cc或者gcc等编译器,并且是可用的,或者用环境变量CC指定系统上的编译器。
如果系统上没有编译器,不能安装源代码形式的GCC 3.4.0。
如果是这种情况,可以在网上找一个与你系统相适应的如RPM等二进制形式的GCC软件包来安装使用。
本文介绍的是以源代码形式提供的GCC软件包的安装过程,软件包本身和其安装过程同样适用于其它Linux和Unix系统。
系统上原来的GCC编译器可能是把gcc等命令文件、库文件、头文件等分别存放到系统中的不同目录下的。
与此不同,现在GCC建议我们将一个版本的GCC安装在一个单独的目录下。
这样做的好处是将来不需要它的时候可以方便地删除整个目录即可(因为GCC没有uninstall功能);缺点是在安装完成后要做一些设置工作才能使编译器工作正常。
在本文中我采用这个方案安装GCC 3.4.0,并且在安装完成后,仍然能够使用原来低版本的GCC编译器,即一个系统上可以同时存在并使用多个版本的GCC编译器。
按照本文提供的步骤和设置选项,即使以前没有安装过GCC,也可以在系统上安装上一个可工作的新版本的GCC编译器。
1. 下载
在GCC网站上(/)或者通过网上搜索可以查找到下载资源。
目前GCC的最新版本为 3.4.0。
可供下载的文件一般有两种形式:gcc-3.4.0.tar.gz和gcc-3.4.0.tar.bz2,只是压缩格式不一样,内容完全一致,下载其中一种即可。
2. 解压缩
根据压缩格式,选择下面相应的一种方式解包(以下的“%”表示命令行提示符):
% tar xzvf gcc-3.4.0.tar.gz
或者
% bzcat gcc-3.4.0.tar.bz2 | tar xvf -
新生成的gcc-3.4.0这个目录被称为源目录,用${srcdir}表示它。
以后在出现${srcdir}的地方,应该用真实的路径来替换它。
用pwd命令可以查看当前路径。
在${srcdir}/INSTALL目录下有详细的GCC安装说明,可用浏览器打开index.html阅读。
3. 建立目标目录
目标目录(用${objdir}表示)是用来存放编译结果的地方。
GCC建议编译后的文件不要放在源目录${srcdir]中(虽然这样做也可以),最好单独存放在另外一个目录中,而且不能是${srcdir}的子目录。
例如,可以这样建立一个叫gcc-build 的目标目录(与源目录${srcdir}是同级目录):
% mkdir gcc-build
% cd gcc-build
以下的操作主要是在目标目录${objdir} 下进行。
4. 配置
配置的目的是决定将GCC编译器安装到什么地方(${destdir}),支持什么语言以及指定其它一些选项等。
其中,${destdir}不能与${objdir}或${srcdir}目录相同。
配置是通过执行${srcdir}下的configure来完成的。
其命令格式为(记得用你的真实路径替换${destdir}):
% ${srcdir}/configure --prefix=${destdir} [其它选项]
例如,如果想将GCC 3.4.0安装到/usr/local/gcc-3.4.0目录下,则${destdir}就表示这个路径。
在我的机器上,我是这样配置的:
% ../gcc-3.4.0/configure --prefix=/usr/local/gcc-3.4.0 --enable-threads=posix
--disable-checking --enable--long-long --host=i386-redhat-linux --with-system-zlib --enable-languages=c,c++,java
将GCC安装在/usr/local/gcc-3.4.0目录下,支持C/C++和JAVA语言,其它选项参见GCC提供的帮助说明。
5. 编译
% make
这是一个漫长的过程。
在我的机器上(P4-1.6),这个过程用了50多分钟。
6. 安装
执行下面的命令将编译好的库文件等拷贝到${destdir}目录中(根据你设定的路径,可能需要管理员的权限):
% make install
至此,GCC 3.4.0安装过程就完成了。
6. 其它设置
GCC 3.4.0的所有文件,包括命令文件(如gcc、g++)、库文件等都在${destdir}目录下分别存放,如命令文件放在bin目录下、库文件在lib下、头文件在include下等。
由于命令文件和库文件所在的目录还没有包含在相应的搜索路径内,所以必须要作适当的设置之后编译器才能顺利地找到并使用它们。
6.1 gcc、g++、gcj的设置
要想使用GCC 3.4.0的gcc等命令,简单的方法就是把它的路径${destdir}/bin放在环境变量PATH 中。
我不用这种方式,而是用符号连接的方式实现,这样做的好处是我仍然可以使用系统上原来的旧版本的GCC编译器。
首先,查看原来的gcc所在的路径:
% which gcc
在我的系统上,上述命令显示:/usr/bin/gcc。
因此,原来的gcc命令在/usr/bin目录下。
我们可以把GCC 3.4.0中的gcc、g++、gcj等命令在/usr/bin目录下分别做一个符号连接:% cd /usr/bin
% ln -s ${destdir}/bin/gcc gcc34
% ln -s ${destdir}/bin/g++ g++34
% ln -s ${destdir}/bin/gcj gcj34
这样,就可以分别使用gcc34、g++34、gcj34来调用GCC 3.4.0的gcc、g++、gcj完成对C、C++、JAVA程序的编译了。
同时,仍然能够使用旧版本的GCC编译器中的gcc、g++等命令。
6.2 库路径的设置
将${destdir}/lib路径添加到环境变量LD_LIBRARY_PATH中,最好添加到系统的配置文件中,这样就不必要每次都设置这个环境变量了。
例如,如果GCC 3.4.0安装在/usr/local/gcc-3.4.0目录下,在RH Linux下可以直接在命令行上执行或者在文件/etc/profile中添加下面一句:
setenv LD_LIBRARY_PATH /usr/local/gcc-3.4.0/lib:$LD_LIBRARY_PATH
7. 测试
用新的编译命令(gcc34、g++34等)编译你以前的C、C++程序,检验新安装的GCC编译器是否能正常工作。
8. 根据需要,可以删除或者保留${srcdir}和${objdir}目录。
后记:
前两天刚安装好了GCC 3.4.0,把安装规划、安装过程、一些注意事项记录下来就形成了这篇文章。
希望对大家、特别是还没有安装过GCC的朋友在安装GCC的时候有所帮助。