如何在samba服务器上添加用户(修正版)
samba使用方法
samba使用方法
使用Samba有以下步骤:
1. 安装Samba。
可以通过运行适当的安装命令(例如 `sudo apt-get install samba`)来安装Samba软件包。
2. 配置Samba。
编辑Samba的配置文件 `/etc/samba/`,可以使用 `sudo vi /etc/samba/` 命令进行编辑。
根据需要进行配置,例如设置共享目录、用户权限等。
3. 添加Samba用户。
使用 `sudo smbpasswd -a username` 命令添加Samba用户,并设置相应的密码。
4. 重启Samba服务。
使用适当的命令(例如 `sudo systemctl restart smbd`)来重启Samba服务,使配置生效。
5. 在Windows中访问Samba共享。
在Windows资源管理器中输入相应的网络地址,例如 `\\ipaddress\sharename`,然后输入相应的用户名和密码即可访问共享。
以上是使用Samba的基本步骤,具体操作可能会因操作系统和版本而有所不同。
请根据具体情况进行调整。
经典samba服务器登录用户配置教程
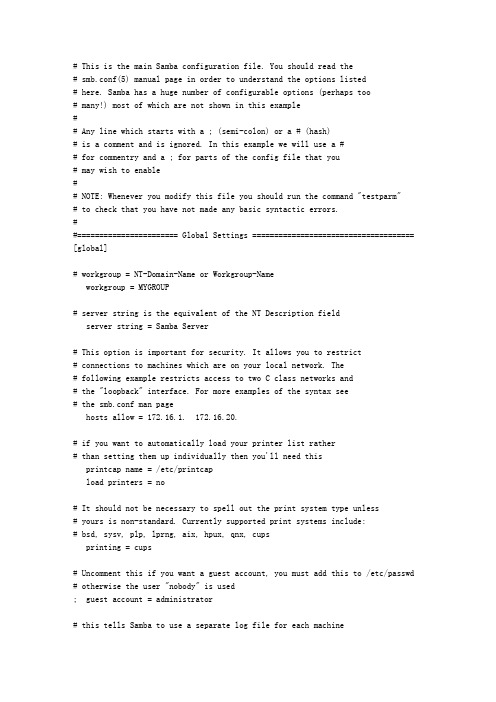
# This is the main Samba configuration file. You should read the# smb.conf(5) manual page in order to understand the options listed# here. Samba has a huge number of configurable options (perhaps too# many!) most of which are not shown in this example## Any line which starts with a ; (semi-colon) or a # (hash)# is a comment and is ignored. In this example we will use a ## for commentry and a ; for parts of the config file that you# may wish to enable## NOTE: Whenever you modify this file you should run the command "testparm"# to check that you have not made any basic syntactic errors.##======================= Global Settings ===================================== [global]# workgroup = NT-Domain-Name or Workgroup-Nameworkgroup = MYGROUP# server string is the equivalent of the NT Description fieldserver string = Samba Server# This option is important for security. It allows you to restrict# connections to machines which are on your local network. The# following example restricts access to two C class networks and# the "loopback" interface. For more examples of the syntax see# the smb.conf man pagehosts allow = 172.16.1. 172.16.20.# if you want to automatically load your printer list rather# than setting them up individually then you'll need thisprintcap name = /etc/printcapload printers = no# It should not be necessary to spell out the print system type unless# yours is non-standard. Currently supported print systems include:# bsd, sysv, plp, lprng, aix, hpux, qnx, cupsprinting = cups# Uncomment this if you want a guest account, you must add this to /etc/passwd # otherwise the user "nobody" is used; guest account = administrator# this tells Samba to use a separate log file for each machine# that connectslog file = /var/log/samba/%m.log# Put a capping on the size of the log files (in Kb).max log size = 0# Security mode. Most people will want user level security. See# security_level.txt for details.security = user# Use password server option only with security = server# The argument list may include:# password server = My_PDC_Name [My_BDC_Name] [My_Next_BDC_Name]# or to auto-locate the domain controller/s# password server = *; password server = <NT-Server-Name># Password Level allows matching of _n_ characters of the password for# all combinations of upper and lower case.; password level = 8; username level = 8# You may wish to use password encryption. Please read# ENCRYPTION.txt, Win95.txt and WinNT.txt in the Samba documentation.# Do not enable this option unless you have read those documentsencrypt passwords = yessmb passwd file = /etc/samba/smbpasswd# The following is needed to keep smbclient from spouting spurious errors# when Samba is built with support for SSL.; ssl CA certFile = /usr/share/ssl/certs/ca-bundle.crt# The following are needed to allow password changing from Windows to# update the Linux system password also.# NOTE: Use these with 'encrypt passwords' and 'smb passwd file' above.# NOTE2: You do NOT need these to allow workstations to change only# the encrypted SMB passwords. They allow the Unix password# to be kept in sync with the SMB password.; unix password sync = Yes; passwd program = /usr/bin/passwd %u; passwd chat = *New*password* %n\n *Retype*new*password* %n\n *passwd:*all*authentication*tokens*updated*successfully*# You can use PAM's password change control flag for Samba. If# enabled, then PAM will be used for password changes when requested # by an SMB client instead of the program listed in passwd program.# It should be possible to enable this without changing your passwd# chat parameter for most setups.; pam password change = yes# Unix users can map to different SMB User namesusername map = /etc/samba/smbusers# Using the following line enables you to customise your configuration # on a per machine basis. The %m gets replaced with the netbios name # of the machine that is connecting; include = /etc/samba/smb.conf.%m# This parameter will control whether or not Samba should obey PAM's # account and session management directives. The default behavior is # to use PAM for clear text authentication only and to ignore any# account or session management. Note that Samba always ignores PAM# for authentication in the case of encrypt passwords = yes; obey pam restrictions = yes# Most people will find that this option gives better performance.# See speed.txt and the manual pages for detailssocket options = TCP_NODELAY SO_RCVBUF=8192 SO_SNDBUF=8192# Configure Samba to use multiple interfaces# If you have multiple network interfaces then you must list them# here. See the man page for;; interfaces = 192.168.12.2/24 192.168.13.2/24# Configure remote browse list synchronisation here# request announcement to, or browse list sync from:# a specific host or from / to a whole subnet (see below); remote browse sync = 192.168.3.25 192.168.5.255# Cause this host to announce itself to local subnets here; remote announce = 192.168.1.255 192.168.2.44# Browser Control Options:# set local master to no if you don't want Samba to become a master# browser on your network. Otherwise the normal election rules apply local master = no# OS Level determines the precedence of this server in master browser# elections. The default value should be reasonable; os level = 33# Domain Master specifies Samba to be the Domain Master Browser. This# allows Samba to collate browse lists between subnets. Don't use this# if you already have a Windows NT domain controller doing this job; domain master = yes# Preferred Master causes Samba to force a local browser election on startup # and gives it a slightly higher chance of winning the election; preferred master = yes# Enable this if you want Samba to be a domain logon server for# Windows95 workstations.; domain logons = yes# if you enable domain logons then you may want a per-machine or# per user logon script# run a specific logon batch file per workstation (machine); logon script = %m.bat# run a specific logon batch file per username; logon script = %U.bat# Where to store roving profiles (only for Win95 and WinNT)# %L substitutes for this servers netbios name, %U is username# You must uncomment the [Profiles] share below; logon path = \\%L\Profiles\%U# Windows Internet Name Serving Support Section:# WINS Support - Tells the NMBD component of Samba to enable it's WINS Server ; wins support = yes# WINS Server - Tells the NMBD components of Samba to be a WINS Client# Note: Samba can be either a WINS Server, or a WINS Client, but NOT both ; wins server = w.x.y.z# WINS Proxy - Tells Samba to answer name resolution queries on# behalf of a non WINS capable client, for this to work there must be# at least one WINS Server on the network. The default is NO.wins proxy = yes# DNS Proxy - tells Samba whether or not to try to resolve NetBIOS names# via DNS nslookups. The built-in default for versions 1.9.17 is yes,# this has been changed in version 1.9.18 to no.dns proxy = no# Case Preservation can be handy - system default is _no_# NOTE: These can be set on a per share basis; preserve case = no; short preserve case = no# Default case is normally upper case for all DOS files; default case = lower# Be very careful with case sensitivity - it can break things!; case sensitive = no#============================ Share Definitions ============================== [homes]comment = Home Directoriesbrowseable = nowritable = yesvalid users = %Screate mode = 0664directory mode = 0775# If you want users samba doesn't recognize to be mapped to a guest user; map to guest = bad user# Un-comment the following and create the netlogon directory for Domain Logons ; [netlogon]; comment = Network Logon Service; path = /usr/local/samba/lib/netlogon; guest ok = yes; writable = no; share modes = no# Un-comment the following to provide a specific roving profile share# the default is to use the user's home directory;[Profiles]; path = /usr/local/samba/profiles; browseable = no; guest ok = yes# NOTE: If you have a BSD-style print system there is no need to# specifically define each individual printer[printers]comment = All Printerspath = /var/spool/sambabrowseable = no# Set public = yes to allow user 'guest account' to printguest ok = nowritable = noprintable = yes# This one is useful for people to share files;[tmp]; comment = Temporary file space; path = /tmp; read only = no; public = yes# A publicly accessible directory, but read only, except for people in# the "staff" group[public]comment = Public Stuffpath = /home/sambavalid users = kevinbrowseable = yespublic = yeswritable = yesprintable = no; write list = @staff# Other examples.## A private printer, usable only by fred. Spool data will be placed in fred's # home directory. Note that fred must have write access to the spool directory, # wherever it is.;[fredsprn]; comment = Fred's Printer; valid users = fred; path = /home/fred; printer = freds_printer; public = no; writable = no; printable = yes# A private directory, usable only by fred. Note that fred requires write# access to the directory.;[fredsdir]; comment = Fred's Service; path = /usr/somewhere/private; valid users = fred; public = no; writable = yes; printable = no# a service which has a different directory for each machine that connects# this allows you to tailor configurations to incoming machines. You could# also use the %U option to tailor it by user name.# The %m gets replaced with the machine name that is connecting.;[pchome]; comment = PC Directories; path = /usr/local/pc/%m; public = no; writable = yes# A publicly accessible directory, read/write to all users. Note that all files # created in the directory by users will be owned by the default user, so# any user with access can delete any other user's files. Obviously this# directory must be writable by the default user. Another user could of course # be specified, in which case all files would be owned by that user instead.;[public]; path = /usr/somewhere/else/public; public = yes; only guest = yes; writable = yes; printable = no# The following two entries demonstrate how to share a directory so that two# users can place files there that will be owned by the specific users. In this # setup, the directory should be writable by both users and should have the# sticky bit set on it to prevent abuse. Obviously this could be extended to# as many users as required.;[myshare]; comment = Mary's and Fred's stuff; path = /usr/somewhere/shared; valid users = mary fred; public = no; writable = yes; printable = no; create mask = 0765[mmt]comment = mmtbrowseable = yespath = /home/goodvalid users = root public = yeswritable = yes##[nice]comment = nice test browseable = yespath = /tmp/nicevalid users = bin public = yeswritable = yes。
samba权限设置
samba权限设置2009-06-09 11:46本来使用samba没有太大的要求,就是方便windows下能共享linux下的代码,好利用sourceinsight来编辑源代码,在linux编译。
可前不久发现自己的共享目录里多了好多东西,查看log文件才知道好多人在我的共享目录里进进出出。
“公共厕所嚒,想进就进,想出就出”,于是,不得不研究一下samba的权限管理,让共享即方便自己,也安全自己。
之前我是把每个目录允许guest访问,并将guest设置成我的linux登陆用户,并开启可写,因为我要在windows下对linux下的文件进行编辑,这样一来,共享目录权限完全开启,十分危险。
以下是一个linux下samba服务器的搭建实例,对理解samba的配置有很好的帮助。
做点补充:1.介绍的方法主要是命令行设置和对samba脚本进行配置,一些图形化的软件也可以实现类似功能。
2.测试smb.conf的命令为testparm3.设置读写权限的一个简便方法是在每个目录配置中添加write list和read list,如:[home]path =/homewrite list = user1read list = user1 user2当然前提是要有user1,user24.linux中用smbclient登陆和windows中输入路径\\ip\path来登录有些不一样,我在这里绕了好久。
windows中好像一次登录后就记录了用户名和密码,好像就不能改了,除非关机重启(这个现象我也不明白为什么,希望大牛们能指点一二),比如:有两个共享目录dir1,dir2.而dir1设置成只允许user1登录,dir2只允许user2登录;我现在用user1来登录dir1,再登陆dir2就不成功了,重启用user2登录dir2可以,再登陆dir1就不行了,不知能否是一个bug还是可以设置?5.smbclient,smbtree,smbstatus等一些小工具也是挺好用的,哈哈。
教案22.实验11.Samba服务器的配置
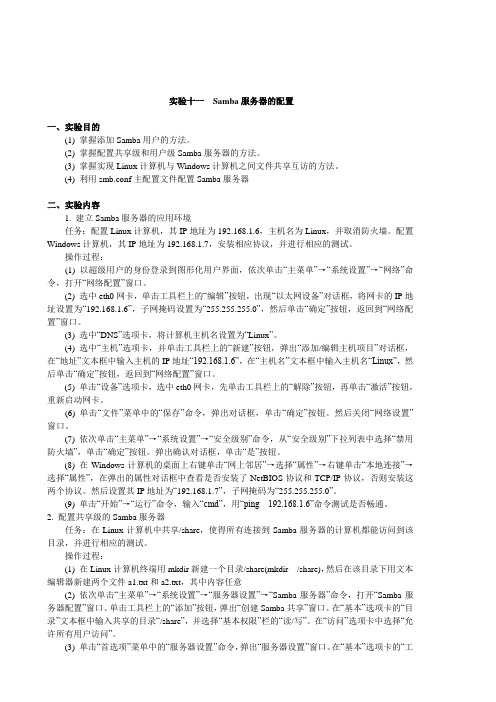
实验十一Samba服务器的配置一、实验目的(1) 掌握添加Samba用户的方法。
(2) 掌握配置共享级和用户级Samba服务器的方法。
(3) 掌握实现Linux计算机与Windows计算机之间文件共享互访的方法。
(4) 利用smb.conf主配置文件配置Samba服务器二、实验内容1. 建立Samba服务器的应用环境任务:配置Linux计算机,其IP地址为192.168.1.6,主机名为Linux,并取消防火墙。
配置Windows计算机,其IP地址为192.168.1.7,安装相应协议,并进行相应的测试。
操作过程:(1) 以超级用户的身份登录到图形化用户界面,依次单击“主菜单”→“系统设置”→“网络”命令,打开“网络配置”窗口。
(2) 选中eth0网卡,单击工具栏上的“编辑”按钮,出现“以太网设备”对话框,将网卡的IP地址设置为“192.168.1.6”,子网掩码设置为“255.255.255.0”,然后单击“确定”按钮,返回到“网络配置”窗口。
(3) 选中“DNS”选项卡,将计算机主机名设置为“Linux”。
(4) 选中“主机”选项卡,并单击工具栏上的“新建”按钮,弹出“添加/编辑主机项目”对话框,在“地址”文本框中输入主机的IP地址“192.168.1.6”,在“主机名”文本框中输入主机名“Linux”,然后单击“确定”按钮,返回到“网络配置”窗口。
(5) 单击“设备”选项卡,选中eth0网卡,先单击工具栏上的“解除”按钮,再单击“激活”按钮,重新启动网卡。
(6) 单击“文件”菜单中的“保存”命令,弹出对话框,单击“确定”按钮。
然后关闭“网络设置”窗口。
(7) 依次单击“主菜单”→“系统设置”→“安全级别”命令,从“安全级别”下拉列表中选择“禁用防火墙”,单击“确定”按钮。
弹出确认对话框,单击“是”按钮。
(8) 在Windows计算机的桌面上右键单击“网上邻居”→选择“属性”→右键单击“本地连接”→选择“属性”,在弹出的属性对话框中查看是否安装了NetBIOS协议和TCP/IP协议,否则安装这两个协议。
samba服务器搭建+权限设置
samba服务器搭建+权限设置⽬录第1章绪论. 11.1Linux的发展历史. 11.2Linux应⽤现状. 21.3Linux各版本的特⾊和应⽤领域. 2第2章 samba介绍. 42.1 samba总体概述. 42.2 samba功能介绍. 5第3章配置⽂件. 63.1 samba配置⽂件全局⽂件内容介绍. 63.2 samba配置⽂件每单项介绍. 8第4章实践内容. 94.1 实践要求. 94.2实践⽅法——⽤户创建. 94.3实践⽅法——⽂件创建. 104.4实践⽅法——⽂件权限管理. 114.5实践⽅法——对smb.conf配置. 124.6特⾊功能. 13第5章源程序解释. 145.1 Samba服务命令代码. 145.2 查看Samba服务器Ip地址. 145.3拷贝samba配置⽂件. 155.4 账户管理. 155.5 smbpasswd samba⽤户密码添加. 155.6对⽬标⽬录的添加 mkdir filename 165.7 chmod⽂件权限编辑. 175.8 ⽂件查看使⽤. 175.9 ⽤户以及⽤户组的查看. 185.10 对smb.conf⽂件进⾏配置. 185.10.1配置⽬录share 185.10.2配置⽬录private 185.10.3配置⽬录skh-A 195.10.4 配置⽬录skh-B 195.10.5⽬录skh-C、D、E、F配置. 20第6章课程设计⽇志. 21第7章佐证材料. 227.1功能1实现的截图. 227.2功能2实现的截图. 237.3功能3实现的截图. 257.4功能4实现的截图. 26结语. 31参考⽂献. 32第1章绪论1.1Linux的发展历史Linux 系统的诞⽣主要源于林纳斯个⼈,⽽ Linux 系统的成长则更多得益于所采⽤的开源模式。
林纳斯12岁开始接触计算机和编程,并从此狂热地爱上了编程。
因为这份热爱,林纳斯⾃学了⼤量的编程知识,并不断地将学到的新知识进⾏练习。
Samba服务及其配置

Samba服务及其配置Samba服务是一种网络文件共享服务,它可以使不同操作系统的计算机之间共享文件和打印机资源。
Samba服务最初由Andrew Tridgell于1992年开发,旨在实现与微软的SMB (Server Message Block)协议兼容,从而使Linux系统能够与Windows系统进行文件共享。
在过去的几十年中,Samba已经成为了一个功能强大且广泛应用的开源项目。
Samba服务的配置包括三个主要方面:共享目录、用户账户和安全设置。
共享目录定义了哪些文件或文件夹可以在网络上共享,用户账户用于控制用户对共享资源的访问权限,而安全设置则决定了用户如何进行身份验证和加密通信。
要开始配置Samba服务,首先需要安装Samba软件包,这可以通过命令行终端执行以下命令完成:```sudo apt install samba```安装完Samba后,默认的配置文件位于`/etc/samba/smb.conf`。
可以使用文本编辑器打开此文件,在其中进行配置。
以下是一个示例配置:```[global]workgroup = MYGROUPserver string = Samba Server %vnetbios name = myserversecurity = usermap to guest = Bad Userdns proxy = no[shared]comment = Shared Folderpath = /path/to/shared/folderbrowseable = yesread only = noguest ok = yescreate mask = 0765```在示例配置中,`[global]`部分用于定义全局参数,如工作组名称、服务器字符串、服务器名称、安全设置等。
`[shared]`部分用于定义共享目录的参数,如注释、路径、可浏览性、只读设置、是否允许匿名访问等。
添加samba用户
最后,在【资源管理器】里直接【映射网络驱动器】,连上开发机即可。
smbpasswd命令的常用方法
smbpasswd -a 增加用户(要增加的用户必须以是系统用户)
smbpasswd -d 冻结用户,就是这个用户不能在登录了
smbpasswd -e 恢复用户,解冻用户,让冻结的用户可以在使用
Failed to add entry fo须是Linux用户”,一下子豁朗开郎。
linux-06bq:/etc/samba # useradd sunjing
linux-06bq:/usr/local/services/samba/bin # ./smbpasswd -a sunjing
smbpasswd -n 把用户的密码设置成空.
Байду номын сангаас 要在global中写入 null passwords -true
smbpasswd -x 删除用户
New SMB password:
Retype new SMB password:
Added user sunjing.
接下来在Windows机器上【控制面板】→【凭证管理器】中添加Windows凭证:
网络地址:xxx.xxx.xxx.xxx(即需要连接的Linux开发机的IP)
用户名:sunjing
如何添加Samba用户
Window系统连上我们的开发机Linux,自然需要在Samba里添加一个新用户。
linux-06bq:/usr/local/services/samba/bin # ./smbpasswd -a sunjing
New SMB password:
Samba服务器安装及配置
Samba服务器安装及配置目录一、Samba安装 (2)Samba的用途: (2)安装Samba所需的包 (2)安装Samba命令 (2)Samba服务控制: (2)查看samba是否成功启动: (3)二、Samba账号 (3)1.添加用户组 (3)2.添加samba用户 (3)3.添加samba用户,并设置密码; (3)4.配置相关目录的权限和归属; (4)三、Samba服务器的配置 (4)配置文件: (4)1、全局设置 (5)2.用户共享文件夹设置 (5)3. 编辑配置文件 (6)四、samba的环境变量 (7)附近一 (8)全局参数相信列表: (8)一、Samba安装Samba的用途:1.文件及打印共享服务:根据服务的配置情况分发共享的文件与打印机2.计算机名与IP的解析服务:可以在客户端直接输入Samba服务器名字就能访问到Samba3.共享的文件或打印机4.WINS服务的支持:5.LMB服务的支持:6.身份验证与访问权限设置(如果配合Linux的Quota还可以实现用户磁盘空间配额):可以7.根据企业要求灵活设置相应的安全级别安装Samba所需的包samba-common-3.0.23c-2 它是samba通用库文件和工具包samba-3.0.23c-2 这个是samba的主程序包samba-client-3.0.10-1.4E.2.i386.rpm samba在Linux|unix下的客户端包文件(可选)system-config-samba-1.2.39-1.el5 这个是图形界面的samba服务配置包文件(可选)samba-swat-3.0.23c-2 这个包提供本地、远程利用浏览器来配置samba相关服务(可选)安装Samba命令samba(sudo apt-get install samba)smbclient(sudo apt-get install smbclient)smbfs(sudo apt-get install smbfs).Samba服务控制:1、/etc/rc.d/init.d/smb start/stop/restart/status/reload参数的详细介绍start启动服务stop停止服务restart 重启服务status 查看服务状态reload 重装载配置文件(Linux一切的服务都是基于配置文件工作的)查看samba是否成功启动:Samba安装后默认的是开机自启动1、sudo service smbd status 查看运行状态2、netstat -anp |grep 137查看是否开启了相应的端口及是否为samba程序开启的netstat -anp |grep 138netstat -anp |grep 139netstat -anp |grep 4453、netstat -ap |grep smbd 查看samba是否在运行二、Samba账号1.添加用户组如:[root@localhost ~]# /usr/sbin/groupadd cloudusers2.添加samba用户因为samba用户是基于系统用户的,所以必须先建立系统用户才能添加成samba用户[root@cuc03 ~]# useradd -G cloudusers -d /CloudSave/user1 -s /sbin/nologin user1-G: --groups GROUPS 将用户添加到组cloudusers-d: --home-dir HOME_DIR 设置用户的登录目录-s: --shell SHELL 登录时候的shell将用户添加进组:groupaddsmbpasswd -a user1输入两次samba密码即可3.添加samba用户,并设置密码;我们用的方法是先添加用户,但添加的这些用户都是虚拟用户,因为这些用户是不能通过SHELL登录系统的;另外值得注意的是系统用户密码和Samba用户的密码是不同的。
- 1、下载文档前请自行甄别文档内容的完整性,平台不提供额外的编辑、内容补充、找答案等附加服务。
- 2、"仅部分预览"的文档,不可在线预览部分如存在完整性等问题,可反馈申请退款(可完整预览的文档不适用该条件!)。
- 3、如文档侵犯您的权益,请联系客服反馈,我们会尽快为您处理(人工客服工作时间:9:00-18:30)。
如何在samba服务器上添加用户(修正版)
一、samba用户一般添加访求
一般的,你要先加个用户名,再设置密码。
添加用户的命名如下:
sudo useradd 要新添加的用户名
说明:useradd与adduser都表示添加系统用户,但两者有一个不同,使用useradd 添加系统用户时,只添加了用户名,系统不会询问你输入该用户的其它信息包括密码,由于没有提示设置密码,该用户是不能用于本地登录的,若要用该用户登录本地系统,必须再使用passwd命令为其设置一个密码;相反的,使用adduser 添加系统用户时,会提示输入密码等用户信息。
由于上述命令只是添加了一个没有密码的系统用户,所以既不能用来登录本地系统,也不能用作samba用户。
若要让该用户登录本地主机,必须使用passwd为其设置一个系统密码;若要让该用户可以访问samba服务,必须使用smbpasswd为其设置一个smb访问密码;上述两个密码是独立设置的,当然可以把它们设置成一样的密码。
设置smb访问密码
sudo smbpasswd –a 已有用户名
重启SMB服务器
Sudo service smb restart
二、利用用户名映射,来添加新用户
有时出于出于其它方面的考虑,比如:
1、为了方便,对于Windows用户来说,习惯于用自己熟悉的用户名,若真的想
用自己熟悉的用户名来访问samba服务,就可以使用账号映射,把常用的用户名映射为samba账号。
2、由于类Unix系统要账号名必须少于8个字符,虽然这个限制在目录的类Unix
系统已经得到解决,但是对于samba服务来说,解决这个问题的另一方面,就是启用账号映射,把多于8个字符的用户名映射为类Unix系统的用户名。
为了方便,可以利用用户名映射来添加新用户。
什么是映射
这里的映射类似于数学中映射的概念。
在数学中,对于y=f(x),我们说这是x到y的一个映射。
按照这个形式,对于式子A = B,我们就可以说“把B映射为A”。
对于samba来说,A才是系统里真正的系统用户,而B只是一个方便记忆的名字,并不存在于系统中。
SMB可以使用用户名列表,具体的吗,不怎么好说清楚,就是说SMB服务器可以设置账号映射,就是说SMB用户可以不是系统用户
启用账号映射
在SMB.conf文件中可以开启用户账号映射,就是启用username map选项,方法:
先打开smb.conf这个文件,找到:username map =/etc/samba/smbusers这一项,把前面的分号去掉,记住username map= 后面的路径;
如果没有username map这个选项,就在security = user(或share)下添加username map =/etc/samba/smbusers进去则可。
然后手动的编辑/etc/samba/smbusers:
使用命令:
vi /etc/samba/smbusers
这个命令是编辑 username map 所指定的那个文件
在这个文件里面添加虚拟用户名
如
root = administrator admin
这里的意思是说 root这个系统用户名有两个虚拟的SMB用户名,一个是administrator,一个是admin;或者说把administrator和admin映射为root.
按这个方法去添加新的用户名,比如你先在系统中添加一个系统用户
命令:
sudo useradd username
这个命令是添加一个系统用户账号,账号名是:username ,
接着,在/etc/samba/smbusers这个文件中添加虚拟账号:比如:
username = abc aaa aab
username是系统账号名 abc,aaa,aab这三个是SMB的虚拟账号,你公司有多少个用户就在这里添加,把他们的用户名都添加到这个文件里面。
在设置虚拟帐号时有一个问题要注意,那就是虚拟用户名如果带空格,那么要用双引号把整个用户括起来。
然后在你的smb.conf的文件中建立共享目录,比如
[tmp]
path=/tmp
public=no
valid users=username
保存退出
重启动SMB
sudo service smb restart
以下是关于username map的一篇英文资料,有参考意义
Mapping Different Usernames
There may be a requirement where the samba username being used to access the server does not match the same UNIX account username, or you would like to force a change between the two different account types. This can easily be done by implementing the "username map" directive into the [global] section of the main configuration file.
The username map feature is fairly simple, the file takes a UNIX account name on the left hand side and Samba account names on the right hand side (separated by "="). The username map allows those NT accounts listed on the RHS to be granted the access rights and file permissions of the UNIX account on the LHS when they connect to a resource.
In the following example:
∙The NT usernames "administrator" and "admin" will be mapped to the UNIX "root"
account,
∙The NT usernames "guest", "pcguest" and "smbguest" will be mapped to the UNIX "nobody" account,
∙The NT username "alice" will be mapped to the UNIX "alice.jones" account,
∙All four NT Users (glen, fred, terry and sarah) will be mapped to the single UNIX "readonly" account, and
∙The NT username "Lachlan Smith" will be mapped to the UNIX "lachlan" account.
The last example uses quotes around the NT username because there is a space separating the user's first and last names. Failure to use quotes on an NT username containing a space means that Samba will treat the user's name as two separate UNIX accounts; this will course the connections to fail.。