BGP路由协议的配置与应用实验
BGP实验手册

实验十、BGP实验实验要求:1、掌握BGP的基本配置方法。
2、掌握如何查看BGP的各种配置信息。
3、掌握基于回环口的BGP的邻居关系建立的配置方法。
4、理解需要使用回环口为目的。
5、理解BGP同步功能的作用和配置。
6、掌握使用指向NULL0接口的静态路由的汇总配置方法。
7、掌握使用聚合属性的路由汇总配置方法。
实验拓扑:根据实验要求,实验拓扑如图10-1所示。
图10-1 BGP实验拓扑注:R1和R2属于自治系统65001,R3属于自治系统65002实验步骤:1、根据实验拓扑,对路由器各接口配置IP地址,使直连链路相互间可以进行通信。
2、在R1和R2上配置EIGRP,关闭自动汇总。
参考命令如下:R1(config)#router eigrp 50 50修改为自己学号后两位R1(config-router)#network 192.168.1.0R1(config-router)#network 1.0.0.0R1(config-router)#no auto-summaryR2(config)#router eigrp 50 50修改为自己学号后两位R2(config-router)#network 192.168.1.0R2(config-router)#network 2.0.0.0R2(config-router)#no auto-summary3、首先在R1和R2配置BGP协议,使用回环口创建邻居关系,参考命令如下:R1(config)#router bgp 65001 65001修改为65000+自己学号后两位R1(config-router)#neighbor 2.2.2.2 remote-as 65001 65001修改为65000+自己学号后两位R1(config-router)#network 1.1.1.1 mask 255.255.255.255R1(config-router)#network 172.16.0.0 mask 255.255.255.0R1(config-router)#network 172.16.1.0 mask 255.255.255.0R1(config-router)#network 172.16.2.0 mask 255.255.255.0R1(config-router)#network 172.16.3.0 mask 255.255.255.0R1(config-router)#network 192.168.1.0R2(config)#router bgp 65001 65001修改为65000+自己学号后两位R2(config-router)#neighbor 1.1.1.1 remote-as 65001 65001修改为65000+自己学号后两位R2(config-router)#network 2.2.2.2 mask 255.255.255.255R2(config-router)#network 192.168.1.0R2(config-router)#network 192.168.2.04、配置后在路由器R1中查看BGP邻居关系和汇总信息,参考命令如下:R1#show ip bgp neighborsR1#show ip bgp summary问题1:R1中邻居关系的状态是什么?5、查看路由器R1和R2的BGP的路由链路数据库信息,参考命令如下:R1#show ip bgp ipv4 unicast问题2:在数据库中是否有非直连链路信息?6、在路由器R1和R2中分别指定回环接口建立邻居关系,参考命令如下:R1(config)#router bgp 65001 65001修改为65000+自己学号后两位R1(config-router)#neighbor 2.2.2.2 update-source lo1 lo1为地址1.1.1.1的接口R2(config)#router bgp 65001 65001修改为65000+自己学号后两位R2(config-router)#neighbor 1.1.1.1 update-source lo0 lo0为地址2.2.2.2的接口问题3:再次查看R1的邻居关系,邻居关系状态为什么?问题4:在路由器R2中查看路由链路数据库,能否看到R1上面的路由?如果能看到的话这些路由是否为最佳路由?(提示:最佳路由提示符为“*>”)问题5:查看R2路由表,能否看到172.16.1.0路由?7、在路由器R1、R2中关闭同步功能R1(config)#router bgp 65001 65001修改为65000+自己学号后两位R1(config-router)#no synchronizationR2(config)#router bgp 65001 65001修改为65000+自己学号后两位R2(config-router)#no synchronization问题6:过一段时间查看路由器R2的路由表,是否能看到172.16.1.0的路由?8、在路由器R2和R3中配置不同自治系统的BGP路由,参考命令如下:R2(config)#router bgp 65001 65001修改为65000+自己学号后两位R2(config-router)#neighbor 3.3.3.3 remote-as 65002 65002修改为65001+自己学号后两位R2(config-router)#neighbor 3.3.3.3 update-source lo0 lo0为地址2.2.2.2的接口R2(config-router)#neighbor 3.3.3.3 ebgp-multihop 2R2(config)#ip route 3.3.3.3 255.255.255.255 192.168.2.3注:添加静态路由,使得R2能够访问3.3.3.3R3(config)#router bgp 65002 65002修改为65001+自己学号后两位R3(config-router)#neighbor 2.2.2.2 remote-as 65001 65001修改为65000+自己学号后两位R3(config-router)#neighbor 2.2.2.2 update-source lo1 lo1为3.3.3.3的接口R3(config-router)#neighbor 2.2.2.2 ebgp-multihop 2R3(config-router)#network 192.168.2.0R3(config-router)#network 192.168.3.0R3(config-router)#network 192.168.4.0R3(config-router)#network 192.168.5.0R3(config-router)#network 192.168.6.0R3(config-router)#network 192.168.7.0R3(config)#ip route 2.2.2.2 255.255.255.255 192.168.2.2注:添加静态路由,使得R2能够访问2.2.2.2问题7:查看路由器R3的路由表,能否得到全网的路由信息?问题8:查看路由器R1的路由器,能否得到全网的路由信息?9、在路由器R1中添加静态路由,使得能够访问3.3.3.3R1(config)#ip route 3.3.3.3 255.255.255.255 192.168.1.2问题9:过一段时间后再查看路由器R1的路由表,能否看到全网路由信息?10、通过路由汇总配置,有效的减少路由表的大小,提高路由效率。
实验三十四、BGP的配置

1. 通过使用网络命令或重发布,BGP 进程必须能知道路由 2. 被通告的路由必须在路由表中 3. IGBP 与 IGP 必须同步才能出现在路由表中
八、 配置序列
Router-B#sh run 正在收集配置...
当前配置: ! !version 1.3.2E service timestamps log date service timestamps debug date no service password-encryption ! hostname Router-B ! ip host a 192.168.1.1 ip host c 192.168.2.2 ! ! ! ! ! ! interface FastEthernet0/0
Distance: external 20 internal 200 local 200
Timers: keepalive 60, holdtime 180
1 network entries using 120 bytes of memory
1 path entries using 68 bytes of memory
九、 共同思考
1. 什么是自治系统? 2. BGP 协议的作用是什么? 3. 如何才能是 IGP 与 IBGP 同步?
十、 课后练习
将地址改为 10.0.0.0/24 这个网段重复以上实验
十一、 相关命令详解
router bgp
使用 router bgp 命令启动 BGP 进程或进入 BGP 配置模式,用 no router bgp 命令关闭 BGP 进 程: router bgp as-number no router bgp as-number
第九步:相关的查看命令
个人总结的BGP心得包含大量实验环境和配置案例
<BGP(Border Gateway Protocol)理论部分>·BGP属于EGP,是高级DV协议,也被称为路径矢量协议,基于TCP 179端口。
·现在使用版本BGP4。
第一次做完整更新,以后就只增量更新·Autonomous Systems:运行同一种选路策略,由统一管理者管理。
1-64511 (公有)64512-65535 (私有)电信AS号:4134 网通AS号:9929 一个好的网站,可以了解到关于AS号的一些信息Telnet 这一地址可以看到公网上的路由条目数·IGP支持的路由条目有限运行IGP不利于管理,做路由聚合、选路。
·BGP路由器只能将其使用的路由通告给他的邻居。
BGP用Open报文建邻居,用KL报文做日常联系·Neighbor table :List of BGP neighbors·BGP forwarding table/databaseList of all networks learned from each neighborCan contain multiple pathways to destination networksDatabase contains BGP attributes for each pathway·IP routing tableList of best paths to destination networksBGP表和路由表是独立的,同样遵循AD小的进入路由表。
BGP默认不做负载均衡·Router-ID选举和OSPF一致。
四种报文:Open ---includes holdtime and BGP router ID(用于建立TCP连接后,发起BGP会话,每个邻居都用该消息来标识自己,并且规定自己的BGP运行参数)Keepalive —(用于保持BGP会话,每隔60秒发送一次,hold time为180S)Update ---information for one path only (could be to multiple networks)---Includes path attributes and networks·一个UPDATE 消息一次只能通告一条路由,但它可以携带多个属性。
bgp组网实验简单配置
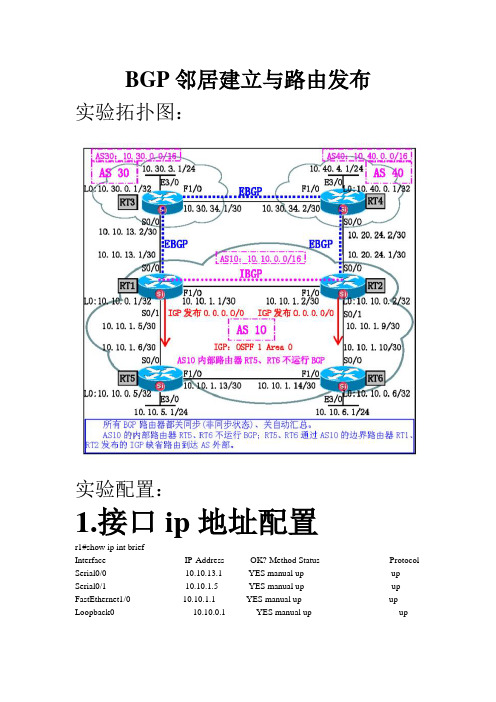
BGP邻居建立与路由发布实验拓扑图:实验配置:1.接口ip地址配置r1#show ip int briefInterface IP-Address OK? Method Status Protocol Serial0/0 10.10.13.1 YES manual up up Serial0/1 10.10.1.5 YES manual up up FastEthernet1/0 10.10.1.1 YES manual up up Loopback0 10.10.0.1 YES manual up upr2#show ip int briefInterface IP-Address OK? Method Status Protocol Serial0/0 10.20.24.1 YES manual up up Serial0/1 10.10.1.9 YES manual up up FastEthernet1/0 10.10.1.2 YES manual up up Loopback0 10.10.0.2 YES manual up upr3#show ip int briefInterface IP-Address OK? Method Status Protocol Serial0/0 10.10.13.2 YES manual up up FastEthernet1/0 10.30.34.1 YES manual up up Ethernet3/0 10.30.3.1 YES manual up up Loopback0 10.30.0.1 YES manual up upr4#show ip int briefInterface IP-Address OK? Method Status Protocol Serial0/0 10.20.24.2 YES manual up up FastEthernet1/0 10.30.34.2 YES manual up up Ethernet3/0 10.40.4.1 YES manual up up Loopback0 10.40.0.1 YES manual up upr5#show ip int briefInterface IP-Address OK? Method Status Protocol Serial0/0 10.10.1.6 YES manual up up FastEthernet1/0 10.10.1.13 YES manual up up Ethernet3/0 10.10.5.1 YES manual up up Loopback0 10.10.0.5 YES manual up upr6#show ip int briefInterface IP-Address OK? Method Status Protocol Serial0/0 10.10.1.10 YES manual up up FastEthernet1/0 10.10.1.14 YES manual up up Ethernet3/0 10.10.6.1 YES manual up up Loopback0 10.10.0.6 YES manual up up保证直连的连通性:r1#ping 10.10.13.2Type escape sequence to abort.Sending 5, 100-byte ICMP Echos to 10.10.13.2, timeout is 2 seconds:!!!!!Success rate is 100 percent (5/5), round-trip min/avg/max = 8/22/40 msr1#ping 10.10.1.6Type escape sequence to abort.Sending 5, 100-byte ICMP Echos to 10.10.1.6, timeout is 2 seconds:!!!!!Success rate is 100 percent (5/5), round-trip min/avg/max = 12/35/76 msr1#ping 10.10.1.2Type escape sequence to abort.Sending 5, 100-byte ICMP Echos to 10.10.1.2, timeout is 2 seconds:.!!!!Success rate is 80 percent (4/5), round-trip min/avg/max = 8/28/56 ms 2.IGP路由协议配置r1(config)#router ospf 1r1(config-router)#router-id 1.1.1.1r1(config-router)#net 10.10.1.0 0.0.0.255 area 0r1(config-router)#net 10.10.0.1 0.0.0.0 area 0r1(config-router)#net 10.10.13.1 0.0.0.3 area 0r1(config-router)#passive-interface s0/0//**配置被动接口,保护内部安全不被外部网络学习到自己自治系统的路由r1(config-router)#$ormation originate always metric 2000 metric-type 1//**下发缺省路由r2(config)#router ospf 1r2(config-router)#router-id 2.2.2.2r2(config-router)#net 10.10.0.2 0.0.0.0 area 0r2(config-router)#net 10.10.1.0 0.0.0.255 area 0r2(config-router)#redistribute connected metric 2000 metric-type 1 subnets//**重发布直连路由进ospf进程,让其他路由器学习到这条直连路由r2(config-router)#$ormation originate always metric 2000 metric-type 1//**同样也发布缺省路由,作为r1的备份r5(config)#router ospf 1r5(config-router)#net 10.10.0.5 0.0.0.0 area 0r5(config-router)#net 10.10.1.13 0.0.0.3 area 0r5(config-router)#net 10.10.1.6 0.0.0.3 area 0r5(config-router)#net 10.10.5.1 0.0.0.255 area 0r6(config)#router ospf 1r6(config-router)#router-id 6.6.6.6r6(config-router)#net 10.10.0.6 0.0.0.0 area 0r6(config-router)#net 10.10.1.14 0.0.0.3 area 0r6(config-router)#net 10.10.6.1 0.0.0.255 area 0r6(config-router)#net 10.10.1.10 0.0.0.3 area 0//**AS30和AS40里面只有一台路由器,无需运行IGP将自治系统内的接口配置成点对点类型且ospf cost值配置为100:r1(config)#int f1/0r1(config-if)#ip ospf net point-to-p //**接口配置成点对点,节省收敛时间r1(config-if)#ip ospf cost 100 //**链路cost值统一配成100r1(config)#int s0/1r1(config-if)#ip ospf net point-to-pr1(config-if)#ip ospf cost 100r2(config)#int f1/0r2(config-if)#ip ospf net point-to-pr2(config-if)#ip ospf cost 100r2(config)#int s0/1r2(config-if)#ip ospf net point-to-pr2(config-if)#ip ospf cost 100r5(config)#int s0/0r5(config-if)#ip ospf net point-to-pr5(config)#int f1/0r5(config-if)#ip ospf net point-to-pr5(config-if)#ip ospf cost 100r5(config-if)#int s0/0r5(config-if)#ip ospf cost 100r6(config)#int f1/0r6(config-if)#ip ospf net pr6(config-if)#ip ospf net point-to-pr6(config)#int s0/1r6(config-if)#ip ospf net point-to-pr6(config)#int f1/0r6(config-if)#ip ospf cost 100r6(config-if)#int s0/0r6(config-if)#ip ospf cost 100查看邻居关系的建立:r1#show ip ospf neiNeighbor ID Pri State Dead Time Address Interface2.2.2.2 0 FULL/ - 00:00:35 10.10.1.2 FastEthernet1/010.10.0.5 0 FULL/ - 00:00:32 10.10.1.6 Serial0/1r2#show ip ospf neiNeighbor ID Pri State Dead Time Address Interface1.1.1.1 0 FULL/ - 00:00:30 10.10.1.1 FastEthernet1/0 6.6.6.6 0 FULL/ - 00:00:34 10.10.1.10 Serial0/1r5#show ip ospf neiNeighbor ID Pri State Dead Time Address Interface6.6.6.6 0 FULL/ - 00:00:34 10.10.1.14 FastEthernet1/0 1.1.1.1 0 FULL/ - 00:00:36 10.10.1.5 Serial0/0r6#show ip ospf neiNeighbor ID Pri State Dead Time Address Interface 10.10.0.5 0 FULL/ - 00:00:33 10.10.1.13 FastEthernet1/0 2.2.2.2 0 FULL/ - 00:00:39 10.10.1.9 Serial0/0BGP邻居建立:r1(config)#router bgp 10 //**定义自治系统号为10r1(config-router)#no synchronization //**关同步r1(config-router)#no auto-summary //**关闭自动汇总r1(config-router)#neighbor 10.10.0.2 remote-as 10//**与自治系统为10的10.10.0.2建立邻居关系r1(config-router)#neighbor 10.10.0.2 update-source loopback 0//**使用loopback 0接口来建立邻居关系r1(config-router)#neighbor 10.10.13.2 remote-as 30//**与自治系统30的10.10.13.2建立邻居关系r2(config)#router bgp 10r2(config-router)#no synr2(config-router)#no aur2(config-router)#nei 10.10.0.1 remote-as 10r2(config-router)#neighbor 10.10.0.1 update-source loop 0r2(config-router)#nei 10.20.24.2 remote-as 40r3(config)#router bgp 30r3(config-router)#no synchronizationr3(config-router)#no aur3(config-router)#nei 10.10.13.1 remote-as 10r3(config-router)#nei 10.30.34.2 remote-as 40r4(config)#router bgp 40r4(config-router)#no synr4(config-router)#no aur4(config-router)#nei 10.20.24.1 remote-as 10r4(config-router)#nei 10.30.34.1 remote-as 30查看bgp邻居表:r1#show ip bgp sumBGP router identifier 10.10.0.1, local AS number 10BGP table version is 4, main routing table version 43 network entries using 351 bytes of memory5 path entries using 260 bytes of memory6/3 BGP path/bestpath attribute entries using 744 bytes of memory3 BGP AS-PATH entries using 72 bytes of memory0 BGP route-map cache entries using 0 bytes of memory0 BGP filter-list cache entries using 0 bytes of memoryBGP using 1427 total bytes of memoryBGP activity 3/0 prefixes, 5/0 paths, scan interval 60 secsNeighbor V AS MsgRcvd MsgSent TblVer InQ OutQ Up/Down State/PfxRcd 10.10.0.2 4 10 115 115 4 0 0 01:49:09 210.10.13.2 4 30 113 113 4 0 0 01:47:49 2r2#show ip bgp sumNeighbor V AS MsgRcvd MsgSent TblVer InQ OutQ Up/Down State/PfxRcd 10.10.0.1 4 10 115 115 7 0 0 01:49:43 210.20.24.2 4 40 116 114 7 0 0 01:47:12 2r3#show ip bgp sumNeighbor V AS MsgRcvd MsgSent TblVer InQ OutQ Up/Down State/PfxRcd 10.10.13.1 4 10 114 114 4 0 0 01:48:46 210.30.34.2 4 40 116 114 4 0 0 01:47:19 2r4#show ip bgp sumNeighbor V AS MsgRcvd MsgSent TblVer InQ OutQ Up/Down State/PfxRcd 10.20.24.1 4 10 115 117 6 0 0 01:48:23 210.30.34.1 4 30 115 117 6 0 0 01:48:08 2//** i表示network发布的igp//** e表示egp协议发布egp//** ?表示redistribute发布incompleteBGP路由发布(静态注入):r1(config)#ip route 10.10.0.0 255.255.0.0 null0 //**黑洞路由配置,当去往目标网段down 时,能够在本路由器上就丢包,不会在去往其他路由器而占用带宽r1(config)#router bgp 10r1(config-router)#network 10.10.0.0 mask 255.255.0.0 //**将10.10.0.0 网段手动静态注入BGP,使BGP能承载这些路由其他路由器也进行相应配置:r2(config)#ip route 10.10.0.0 255.255.0.0 null0r2(config)#router bgp 10r2(config-router)#net 10.10.0.0 mask 255.255.0.0r3(config)#ip route 10.30.0.0 255.255.0.0 null0r3(config)#router bgp 30r3(config-router)#net 10.30.0.0 mask 255.255.0.0r4(config)#ip route 10.40.0.0 255.255.0.0 null0r4(config)#router bgp 40r4(config-router)#net 10.40.0.0 mask 255.255.0.0查看bgp表和全局路由表:r1#show ip bgpBGP table version is 4, local router ID is 10.10.0.1Status codes: s suppressed, d damped, h history, * valid, > best, i - internal,r RIB-failure, S StaleOrigin codes: i - IGP, e - EGP, ? - incompleteNetwork Next Hop Metric LocPrf Weight Path* i10.10.0.0/16 10.10.0.2 0 100 0 i*> 0.0.0.0 0 32768 i*> 10.30.0.0/16 10.10.13.2 0 0 30 i* 10.40.0.0/16 10.10.13.2 0 30 40 i*>i 10.20.24.2 0 100 0 40 i//**Bgp表只选择最佳路由,*表示存在这样一条链路但是没有选择其进路由表,原因是选10.10.13.2作为下一跳要经过30 和40两个自治系统,而如果选择10.20.24.2为下一跳只需经过40这一个自治系统,路由器会选择AS_path最短的路由r1#show ip route10.0.0.0/8 is variably subnetted, 15 subnets, 4 masksS 10.10.0.0/16 is directly connected, Null0C 10.10.1.0/30 is directly connected, FastEthernet1/0C 10.10.0.1/32 is directly connected, Loopback0O 10.10.0.2/32 [110/101] via 10.10.1.2, 01:02:20, FastEthernet1/0O 10.10.5.0/24 [110/110] via 10.10.1.6, 01:02:20, Serial0/1C 10.10.1.4/30 is directly connected, Serial0/1O 10.10.0.5/32 [110/101] via 10.10.1.6, 01:02:20, Serial0/1O E1 10.20.24.0/30 [110/2100] via 10.10.1.2, 01:02:20, FastEthernet1/0O 10.10.6.0/24 [110/210] via 10.10.1.6, 01:02:20, Serial0/1[110/210] via 10.10.1.2, 01:02:20, FastEthernet1/0O 10.10.0.6/32 [110/201] via 10.10.1.6, 01:02:20, Serial0/1[110/201] via 10.10.1.2, 01:02:20, FastEthernet1/0O 10.10.1.8/30 [110/200] via 10.10.1.2, 01:02:21, FastEthernet1/0C 10.10.13.0/30 is directly connected, Serial0/0O 10.10.1.12/30 [110/200] via 10.10.1.6, 01:02:21, Serial0/1B 10.30.0.0/16 [20/0] via 10.10.13.2, 01:55:17B 10.40.0.0/16 [200/0] via 10.20.24.2, 01:54:25//**两条bgp路由一条管理距离为20,为外部r3学习到的,一条管理距离为200为自己自治系统r2发的。
bgp实验报告总结

bgp实验报告总结
BGP实验报告总结
背景
BGP(Border Gateway Protocol)是用于在互联网中交换路由信息的协议。
它是一种路径矢量协议,用于确定最佳路径,并且能够适应网络拓扑的变化。
在本次实验中,我们对BGP进行了实验,并对实验结果进行了总结和分析。
实验过程
在实验中,我们使用了模拟器来模拟网络环境,并配置了多个路由器和主机。
我们通过配置BGP协议来模拟网络中的路由器之间的路由信息交换。
我们还模拟了网络中的故障情况,以观察BGP协议对网络拓扑变化的适应能力。
实验结果
通过实验,我们观察到BGP协议在网络拓扑变化时能够快速地重新计算最佳路径,并更新路由表。
当网络中发生故障时,BGP能够及时地发现并通知其他路由器,从而保证了网络的稳定性和可靠性。
此外,我们还观察到BGP协议在处理大规模网络时的效率和性能表现良好。
总结与分析
通过本次实验,我们对BGP协议的工作原理和性能有了更深入的了解。
BGP作为互联网中最重要的路由协议之一,具有很强的稳定性和可靠性。
它能够适应网络拓扑的变化,并且能够处理大规模网络的路由信息交换。
因此,BGP协议在互联网中扮演着至关重要的角色。
结论
通过本次实验,我们对BGP协议有了更深入的了解,并且验证了其在网络中的
稳定性和可靠性。
BGP协议的高效性和性能表现使其成为互联网中不可或缺的一部分,对于构建稳定和可靠的互联网具有重要意义。
我们将继续深入研究BGP协议,并将其应用于实际网络中,以提高网络的稳定性和可靠性。
BGP配置实验案例

BGP配置实验案例BGP(边界网关协议)是一个用于在互联网中交换路由信息的协议。
在本篇文章中,我们将探讨一个BGP配置实验案例,其中包括两个自治系统(AS)之间的BGP邻居关系的建立和路由的传递。
这个实验案例可以帮助读者更好地理解BGP协议的工作原理和配置步骤。
在这个实验案例中,我们有两个自治系统:AS1和AS2、AS1拥有IP 地址段192.168.0.0/24,AS2拥有IP地址段10.0.0.0/24、我们的目标是在两个自治系统之间建立BGP邻居关系,并实现路由的传递。
首先,我们需要在两个自治系统中配置BGP路由器。
在AS1中,我们选择一个路由器作为BGP路由器,并配置其Loopback接口的IP地址为192.168.0.1、在AS2中,选择另一个路由器作为BGP路由器,并配置其Loopback接口的IP地址为10.0.0.1、这些Loopback接口的IP地址将用作BGP邻居之间的通信地址。
接下来,我们开始配置BGP邻居关系。
在AS1中,我们需要告诉BGP 路由器与AS2的BGP路由器建立邻居关系。
假设AS2的BGP路由器的IP 地址为10.0.0.2,我们将在AS1的BGP路由器上执行以下命令:``````同样地,在AS2的BGP路由器上,我们需要告诉其与AS1的BGP路由器建立邻居关系。
假设AS1的BGP路由器的IP地址为192.168.0.1,我们将在AS2的BGP路由器上执行以下命令:``````配置完BGP邻居关系后,我们可以开始传递路由信息。
在AS1中,我们希望将本地的IP地址段192.168.0.0/24传输给AS2、我们需要在AS1的BGP路由器上执行以下命令:```network 192.168.0.0 mask 255.255.255.0```这些命令告诉AS1的BGP路由器将地址段192.168.0.0/24传输给BGP邻居。
同样地,在AS2中,我们希望将本地的IP地址段10.0.0.0/24传输给AS1、我们需要在AS2的BGP路由器上执行以下命令:```network 10.0.0.0 mask 255.255.255.0```这些命令告诉AS2的BGP路由器将地址段10.0.0.0/24传输给BGP邻居。
BGP路由协议原理、配置与排错实验(中文版1.1)

实验10 BGP路由协议原理、配置与排错实验10.1 实验内容●BGP的基本配置;●BGP的聚合;●BGP属性简单应用;●BGP路由反射器的作用;●基于as-path的路由策略。
说明:本文所有实验环境共用一个组网图。
在不支持loopback的软件版本中,建议使用dialer口替代loopback口。
在本实验中,所有的实验都是沿用前面的配置,在进行下一个实验前请不要修改前面已完成的配置。
软件版本:Version 1.74 Release 0006。
10.2 BGP基本配置10.2.1 实验目的●掌握配置BGP的基本配置命令;●邻居关系的建立;●路由的引入,察看实验结果。
10.2.2 实验环境●Quidway 26 系列或更高性能路由器 4台,交叉网线2根,V35或V24DTE/DCE 线缆 2 对。
10.2.3 实验组网图图10-1实验组网图10.2.4 实验步骤1. 配置建立路由器RouterA RouterB RouterC 邻居关系RouterA:配置路由器A的接口地址,启动BGP协议,设置BGP邻居。
//配置路由器A的接口地址[RouterA-Serial0] ip address 11.1.1.1 255.255.0.0[RouterA-Ethernet0] ip address 11.2.1.1 255.255.0.0[RouterA-LoopBack1] ip address 10.1.1.1 255.0.0.0[RouterA-LoopBack2] ip address 1.1.1.1 255.0.0.0//启动BGP协议[RouterA]bgp 100//设置BGP邻居[RouterA-bgp]peer 11.1.1.2 as-number 200[RouterA-bgp]peer 11.2.1.2 as-number 200[RouterA] save配置路由器C:[RouterC-LoopBack1] ip address 3.3.3.3 255.0.0.0[RouterC-Ethernet0] ip address 11.2.1.2 255.255.0.0[RouterC] bgp 200[RouterC-bgp]peer 11.2.1.1 as-number 100[RouterC] save配置路由器B:[RouterB-Serial0] ip address 11.1.1.1 255.255.0.0[RouterB] bgp 200[RouterB-bgp]peer 11.1.1.2 as-number 100[RouterB] save在路由器A上执行:[RouterA]display bgp summaryNeighbor V AS MsgRcvd MsgSent OutQ Up/Down State11.1.1.2 4 200 2 3 0 00:00:09 Established11.2.1.2 4 200 11 12 0 00:09:23 Established两EBGP邻居已经建立。
如何配置BGP路由协议
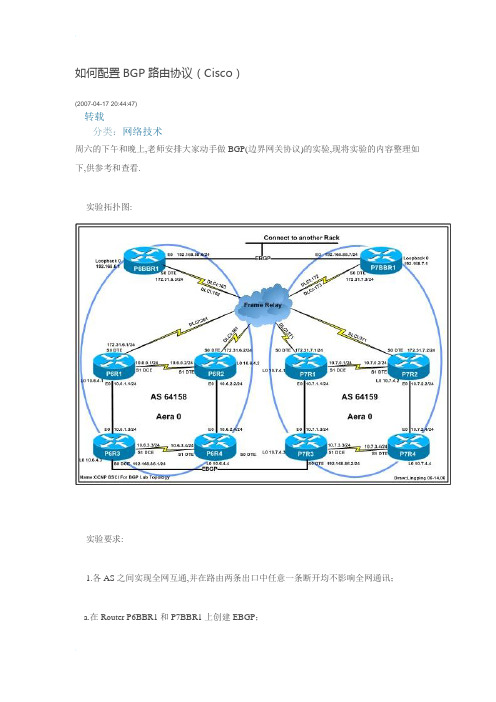
如何配置BGP路由协议(Cisco)(2007-04-17 20:44:47)转载分类:网络技术周六的下午和晚上,老师安排大家动手做BGP(边界网关协议)的实验,现将实验的内容整理如下,供参考和查看.实验拓扑图:实验要求:1.各AS之间实现全网互通,并在路由两条出口中任意一条断开均不影响全网通讯;a.在Router P6BBR1和P7BBR1上创建EBGP;b.在Router P6R3和P7R3之间创建EBGP;2.在PXR1、PXR2、PXR3、PXR4、PXBBR1之间配置IBGP;3.在PXR1、PXR2、PXR3、PXR4、PXBBR1之间可使用OSPF或RIP、EIGRP等协议完成各接口基本的互通性。
这里使用OSPF,并将其中五台路由器全部定义到Aera 0中。
4.验证BGP配置,使用show ip bgp summary来验证BGP邻居关系是否已建立,使用sh ip bgp显示BGP路由选择信息库.查看是否从核心路由器和另一台边缘路由器那里获悉了路由,查看边缘路由器的IP路由选择表,其中是否有BGP路由?5.最后,老师要求在每一台路由器上都要开启telnet访问,便于老师telnet到各个路由器检查我们的实验配置,方便帮助我们排错.因开启telnet需要设置密码,所有密码均设置cisco.实验步骤(以下将以P7BBR1、P7R1、P7R2、P7R3、P7R4作说明,在P6BBR1和P6的其它路由器则可参考以此骤):1.删除路由器中原来的配置(earse Start),以免被以前实验中的配置影响实验的顺利进行,然后重启各路由器(Reload),或针对接口使用default interface (s0)删除该接口的所有配置.2.按照网络拓扑图上所标示的IP地址在所有ROUTER的接口上按要求配置好IP Address,在DCE接口上配置好时钟频率(clock rate 64000),所有接口确保UP状态(NO shutdown).3.在所有Route中均需配置一个环回接口(Interface loopback 0),并配置相应的IP地址,用于BGP中宣告网络。
- 1、下载文档前请自行甄别文档内容的完整性,平台不提供额外的编辑、内容补充、找答案等附加服务。
- 2、"仅部分预览"的文档,不可在线预览部分如存在完整性等问题,可反馈申请退款(可完整预览的文档不适用该条件!)。
- 3、如文档侵犯您的权益,请联系客服反馈,我们会尽快为您处理(人工客服工作时间:9:00-18:30)。
BGP路由协议的配置与应用一、实验目的1.理解BGP路由协议的基本工作原理;2. 掌握BGP路由协议的基本配置方法;3. 掌握IGP路由和EGP路由相互之间的重新分发。
二、实验内容1. 根据网络拓扑图,组建网络;2. 配置设备互联地址及AS内部路由;3. 两个BGP发言人上分别配置BGP路由协议;4. 两个BGP发言人上分别配置IGP和EGP之间重新分发;5. 查看BGP路由表,及测试网络的连通性。
三、实验环境1. 三层交换机1台;2. 路由器 3台;3.连接电缆 若干。
四、实验步骤1、根据网络拓扑图,组建网络。
如图所示,AS100内部使用RIP互联,AS200内部使用OSPF互联,路由器R2和R3之间使用V.35 DTE/DCE线缆进行连接模拟广域网,R2和R3之间配置BGP,4台路由器上均设置一个loopback接口用于模拟连接网络的终端主机。
2. 自治系统AS100内部互联。
1).三层交换机R1的配置#直接登陆进入用户视图,清除原有配置,并且要重新启动设备。
<H3C >undo startup saved-configuration…….yes<H3C >reboot…….yes#从登陆的用户视图进入系统视图<H3C >system-view#修改三层交换机名称[H3C]sysname R1#设置设备环回接口loopback 1的IP地址[R1]interface loopback 1[R1-Loopback1]ip address 10.1.1.1 32#创建VLAN 10,并添加以太网接口Ethernet1/0/24[R1]vlan 10[R1-vlan10]port Ethernet 1/0/24#设置VLAN 10接口的IP地址[R1]interface vlan-interface 10[R1-Vlan-interface10]ip address 10.1.2.2 255.255.255.252#配置路由器Router-ID[R1]router id 1.1.1.1#创建RIP进程1并进入RIP视图[R1]rip 1#设置RIP进程的版本号2[R1-rip-1]version 2#禁止RIP进程1的路由汇总[R1-rip-1]undo summary#指定与路由器相连的网段加入RIP协议计算[R1-rip-1]network 10.0.0.02).路由器R2的配置#从登陆的用户视图进入系统视图<H3C >system-view#修改路由器名称[H3C]sysname R2#设置设备环回接口loopback 2的IP地址[R2]interface loopback 2[R2-Loopback2]ip address 10.3.1.1 32#设置以太网接口Ethernet 0/0的IP地址[R2]interface ethernet 0/0[R2-Ethernet0/0]ip address 10.1.2.1 255.255.255.252#设置广域网的串口端Serial 1/0的IP地址[R2]interface serial 1/0[R2-serial1/0]ip address 202.1.1.1 255.255.255.252#配置路由器Router-ID[R2]router id 2.2.2.2#创建RIP进程1并进入RIP视图[R2]rip 1#设置RIP进程的版本号2[R2-rip-1]version 2#禁止RIP进程1的路由汇总[R2-rip-1]undo summary#指定与路由器相连的网段加入RIP协议计算[R2-rip-1]network 10.0.0.03. 自治系统AS200内部互联。
1).路由器R3的配置#从登陆的用户视图进入系统视图<H3C >system-view#修改路由器名称[H3C]sysname R3#设置设备环回接口loopback 3的IP地址[R3]interface loopback 3[R3-Loopback3]ip address 172.16.1.1 32#设置以太网接口Ethernet 0/0的IP地址[R3]interface ethernet 0/0[R3-Ethernet0/0]ip address 172.16.2.1 255.255.255.252 #设置广域网的串口端Serial 1/0的IP地址[R3]interface serial 1/0[R3-serial1/0]ip address 202.1.1.2 255.255.255.252#配置路由器Router-ID[R3]router id 3.3.3.3#创建OSPF进程1并进入OSPF视图[R3]ospf 1#在OSPF视图下创建区域0并进入区域视图[R3-ospf-1]area 0.0.0.0#指定属于该区域的接口网段[R3-ospf-1-area-0.0.0.0]network 172.16.1.0 0.0.0.255[R3-ospf-1-area-0.0.0.0]network 172.16.2.0 0.0.0.32).路由器R4的配置#从登陆的用户视图进入系统视图<H3C >system-view#修改路由器名称[H3C]sysname R4#设置设备环回接口loopback 4的IP地址[R4]interface loopback 4[R4-Loopback4]ip address 172.16.3.1 32#设置以太网接口Ethernet 0/0的IP地址[R4]interface ethernet 0/0[R4-Ethernet0/0]ip address 172.16.2.1 255.255.255.252#配置路由器Router-ID[R4]router id 4.4.4.4#创建OSPF进程1并进入OSPF视图[R4]ospf 1#在OSPF视图下创建区域0并进入区域视图[R4-ospf-1]area 0.0.0.0#指定属于该区域的接口网段[R4-ospf-1-area-0.0.0.0]network 172.16.2.0 0.0.0.3[R4-ospf-1-area-0.0.0.0]network 172.16.3.0 0.0.0.2554. R2和R3之间配置BGP路由1).路由器R2的配置#创建BGP视图并配置AS号100[R2]bgp 100#创建外部BGP对等体组test1[R2-bgp]group test1 external#设置对等体202.1.1.2的AS号[R2-bgp]peer 202.1.1.2 as-number 200#向对等体组中加入对等体202.1.1.2[R2-bgp]peer 202.1.1.2 group test1#禁止路由同步[R2-bgp] undo synchronization#引入直连路由和RIP进程1的路由[R2-bgp] import-route rip 1[R2-bgp] import-route direct#RIP进程1路由引入直连路由和BGP路由[R2- rip-1]import-route bgp[R2- rip-1]import-route direct2).路由器R3的配置#创建BGP视图并配置AS号200[R3]bgp 200#创建外部BGP对等体组test2[R3-bgp]group test2 external#设置对等体202.1.1.1的AS号[R3-bgp]peer 202.1.1.1 as-number 100#向对等体组中加入对等体202.1.1.1[R3-bgp]peer 202.1.1.1 group test2#禁止路由同步[R3-bgp] undo synchronization#引入直连路由和OSPF进程1的路由[R3-bgp] import-route ospf 1[R3-bgp] import-route direct#OSPF进程1路由引入直连路由和BGP路由[R3-ospf-1]import-route bgp[R3-ospf-1]import-route direct5.实验结果验证1)查看路由器R2的路由表[R2] display ip routing-tableRouting Tables: PublicDestinations : 12 Routes : 12Destination/Mask Proto Pre Cost NextHop Interface10.1.1.1/32 RIP 100 1 10.1.2.2 Eth0/010.1.2.0/30 Direct 0 0 10.1.2.1 Eth0/010.1.2.1/32 Direct 0 0 127.0.0.1 InLoop010.1.3.1/32 Direct 0 0 127.0.0.1 InLoop0127.0.0.0/8 Direct 0 0 127.0.0.1 InLoop0127.0.0.1/32 Direct 0 0 127.0.0.1 InLoop0172.16.1.1/32 BGP 255 0 202.1.1.2 S1/0172.16.2.0/30 BGP 255 0 202.1.1.2 S1/0172.16.3.1/32 BGP 255 1 202.1.1.2 S1/0202.1.1.0/30 Direct 0 0 202.1.1.1 S1/0202.1.1.1/32 Direct 0 0 127.0.0.1 InLoop0202.1.1.2/32 Direct 0 0 202.1.1.2 S1/02) 查看路由器R3的路由表[R3] display ip routing-tableRouting Tables: PublicDestinations : 12 Routes : 12Destination/Mask Proto Pre Cost NextHop Interface10.1.1.1/32 BGP 255 1 202.1.1.1 S1/010.1.2.0/30 BGP 255 0 202.1.1.1 S1/010.1.3.1/32 BGP 255 0 202.1.1.1 S1/0127.0.0.0/8 Direct 0 0 127.0.0.1 InLoop0127.0.0.1/32 Direct 0 0 127.0.0.1 InLoop0172.16.1.1/32 Direct 0 0 127.0.0.1 InLoop0172.16.2.0/30 Direct 0 0 172.16.2.1 Eth0/0172.16.2.1/32 Direct 0 0 127.0.0.1 InLoop0172.16.3.1/32 OSPF 10 1 172.16.2.2 Eth0/0202.1.1.0/30 Direct 0 0 202.1.1.2 S1/0202.1.1.1/32 Direct 0 0 202.1.1.1 S1/0202.1.1.2/32 Direct 0 0 127.0.0.1 InLoop03) 在R1的用户视图下输入ping 172.16.3.1,输出结果如下所示;反之,从R4同样可以访问loopback 1接口。