软件狗驱动程序安装
microdog使用方法

microdog使用方法
Microdog是一种用于软件保护和授权管理的硬件加密狗。
它通
常用于保护软件免受未经授权的访问,并确保只有经过授权的用户
才能访问受保护的软件。
Microdog使用方法可以分为以下几个方面
来说明:
1. 安装驱动程序,首先,使用Microdog之前需要安装它的驱
动程序。
通常情况下,Microdog会附带一个安装光盘或者下载链接,里面包含了相应的驱动程序。
用户需要按照说明安装驱动程序,以
确保Microdog能够正确地被系统识别和使用。
2. 注册授权,在软件开发商提供的软件中,通常会有一个注册
授权的界面,用户需要在这个界面中输入Microdog提供的授权码,
以完成软件的注册授权过程。
这样一来,只有在插入Microdog的情
况下,软件才能够正常运行,从而实现了软件的保护和授权管理。
3. 硬件连接,使用Microdog时,需要将Microdog插入到计算
机的USB接口中。
一旦Microdog被正确地连接到计算机上,相应的
软件就可以被授权访问。
4. 管理工具,Microdog通常还配备了一个管理工具,用户可
以通过这个管理工具来管理Microdog的授权信息、查看授权状态等
操作。
通过管理工具,用户可以随时了解Microdog的工作状态,以
及进行必要的授权管理操作。
总的来说,Microdog的使用方法包括安装驱动程序、注册授权、硬件连接以及管理工具操作。
通过正确地使用Microdog,软件开发
商可以保护其软件不受未经授权的访问,同时也能够更好地进行授
权管理。
海迈工程量清单计价软件使用说明书

海迈⼯程量清单计价软件使⽤说明书海迈清单计价软件2006使⽤⼿册厦门海迈科技股份有限公司⼆○○⼋年⼗⼀⽉⽬录前⾔ (3)第⼀章软件安装 (4)1.安装软件 (4)2.卸载软件 (14)3.升级软件 (15)4.下载报告期 (17)第⼆章软件操作流程 (20)1.新建⼯程 (20)2.输⼊⼯程概况 (21)3.设置计价条件 (27)4.选择费⽤表 (28)5.分部分项⼯程量清单 (29)6.措施项⽬清单 (34)7.其他项⽬清单 (35)8.录⼊设备表 (37)9.规费 (39)10.造价汇总 (39)11.打印报表 (40)第三章软件重要功能介绍 (43)1.设置清单项⽬特征 (43)2.清单指引 (45)3.定额换算 (45)4.补充定额 (55)5.⾃动降效 (58)6.材料调价 (60)7.费率编辑 (62)8.费⽤表修改 (63)9.导⼊⼯程 (64)10.导⼊导出招投标清单 (66)11.导⼊海迈算量软件 (69)12.审核⼯程 (70)第四章软件其他功能简介 (72)1.复制粘贴 (72)2.调整顺序或优先级 (72)3.添加、插⼊、替换 (73)4.⽬录、索引、搜索 (74)5.查找功能 (76)第五章系统维护 (78)1.清单库维护 (80)2.定额库维护 (81)3.材料库维护 (83)4.费⽤列表维护 (86)5.系统默认参数 (86)前⾔2003年《建筑安装⼯程费⽤项⽬组成》(建标[2003]206号)、《建设⼯程⼯程量清单计价规范》(GB50500-2003)颁布,在此基础上,2004年福建省造价管理站颁布了《福建省建筑安装⼯程费⽤定额》(2003版)。
根据这些规定并结合福建省及厦门市建设⼯程综合单价计价办法及招投标评标管理办法,我公司研发出海迈清单计价软件2003。
海迈清单计价软件2003传承了“海迈⼯程预结算软件”的精髓,并进⾏了优化、拓展和创新,⾃上市以来,倍受客户好评。
GDP32软件安装的常规步骤

GDP32软件安装常规步骤GDP32软件常用的有四个:Datpro通用预处理软件免费Scs2D二维可控源软件STEMInv一维瞬变电磁软件收费TS2DIP一维激电软件其中Datpro不需要软件狗,可免费使用,其他软件不需要软件狗也可打开,但需要软件狗才能进行反演计算。
可以安装多台计算机,但同时只能一台使用。
暂时不支持网络许可。
安装他们大概分为四个步骤:一、安装软件安装时,建议首先安装Datpro,然后安装其他软件(顺序任意)官方的光盘上,每个光盘都包含两个文件夹:Software这个文件夹是软件内容(可复制下来作为备份)资料文件夹(这个文件夹四个光盘是一样的,没有必要复制多份保存)运行Software\Setup.exe进行安装。
推荐将四个软件都安装到C:\datpro文件夹!安装Datpro时,默认有一个安装到C:\lib的组件,这个是附赠的Viewcompanion软件,建议也放入C:\datpro中(具体可参考步骤三)。
安装Scs2D时,有些工具安装程序默认不复制。
安装完成后我们可以手动将光盘上以下文件夹里面的所有文件复制到C:\datpro:\Modeling\Su-ModSect\Modeling\Su-ScsPlot安装STEMInv时,复制:\Modeling\Su-TemTrim注意:不是复制文件夹,而是复制这些文件夹里面的所有内容到C:\datpro二、修改绘图单位由于国外软件默认的绘图单位是英寸,为了改成国内习惯的厘米,我们安装完四个软件以后,需要做一些修改:打开记事本(开始菜单,程序,附件中可以找到)。
找到C:\datpro\ModSect.cfg文件,将它拖动到记事本里打开(一般不要双击打开)。
打开后可以看到文件的最后部分有如下的段落:!Surfer page units,select one of two.$PageUnits=inch!$PageUnits=cm将$PageUnits=inch这一行最前面加一个“!”(感叹号)删除!$PageUnits=cm这一行前面的感叹号,变成如下的格式:!Surfer page units,select one of two.!$PageUnits=inch$PageUnits=cm同样的方法修改scsplot.cfg文件!执行完第二个步骤以后,您可以将C:\datpro文件夹压缩保存下来,以后再安装或者到其他计算机上安装,只需要解压后执行第三步和第四步既可,而不必再从光盘安装。
网络版安装和卸载说明

广厦结构CAD网络版安装说明
----------------------------------------------------------------------
安装一次即可,每次开机会自动加载。
7、与同采用赛孚耐(SafeNet)公司的同系列网络狗的其它公司软件冲突问题的解决办法
所谓冲突是指安装了广厦公司的网络版,其它公司的网络版产品不能用;或者安装了其它公司的网络版,广厦公司产品的网络版不能用。
所谓同系列网络狗是指安装网络服务程序后,服务器右下角都有一个"R"图标程序出现。
3、如何卸载软件狗驱动程序?
运行光盘上“gs13软件狗驱动程序\MicroDogInstdrv.exe”,再点按"卸载"按钮即可。
4、工作站如何跨网段访问到网络狗?
4.1 服务器上安装软件狗驱动程序;
4.2 以下为生成配置文件gsnetdog.ini的步骤,配置文件用以指定软件狗所插服务器的IP地址;
7.4 采用装在两个服务器上解决上述问题。客户端不应采用广播方式访问,因为网络上有两个服务程序,恐会有冲突。采用指定服务器ip,生成配置文件的方法解决。注意在生成配置文件的时候只选tcp协议。
8、插软件狗的服务器上不能访问软件狗而其它客户端机器能访问软件狗的问题的解决办法。
8.1 造成该问题的原因很可能是访问网络狗的硬件方式默认设置成了只在网络上查找网络狗。解决方法如下:
5、若原来已安装了旧版本的驱动程序,请运行旧版本光盘上server\remove.bat删除老的驱动程序;
JDPaintV5.50网络版安装须知

JDPaint V5.50网络版安装须知
JDPaint V5.50网络版安装包括软件安装、服务器加密狗驱动安装两步:
(1)安装JDPaint V5.50软件:须在服务器和客户端均得安装5.50设计软件;
(2)服务器加密狗驱动安装:加密狗驱动程序只需安装在做为服务器的计算机中;在客户端计算机中安装加密狗驱动程序可能使得软件启动速度变慢;
说明:
(1)目前总公司发的网络版加密狗暂时只支持两个节点,即在局域网环境中最多只能有两台计算机同时使用JDPaintV5.50软件;若需要有多个节点的授权,请与总公司联系进行相关升级事项;
(2)网络版软件安装后,可能会客户端软件无法启动的现象,此时应检查服务端网络防火墙的设置,现以XP系统中的Windows防火墙设置为例进行简单说明:
a). 启动Windows系统防火墙设置:在控制面板中点击”Windows防火墙”图标(如
图1所示);
b) 若起用了启动防火墙,则需设置如图:
c) 服务器设置完成后,重新启动客户端软件;。
网络加密狗安装使用说明

网络加密狗安装使用说明
网络加密狗作用:
网络加密狗是类似网银U盾一样的USB接口的硬件设备,是用于保护正版软件运行的设备,网络加密狗是插在主机电脑上的,软件运行需要识别加密狗,如果主机电脑上没有插加密狗,那么客户端分机电脑就无法打开软件使用。
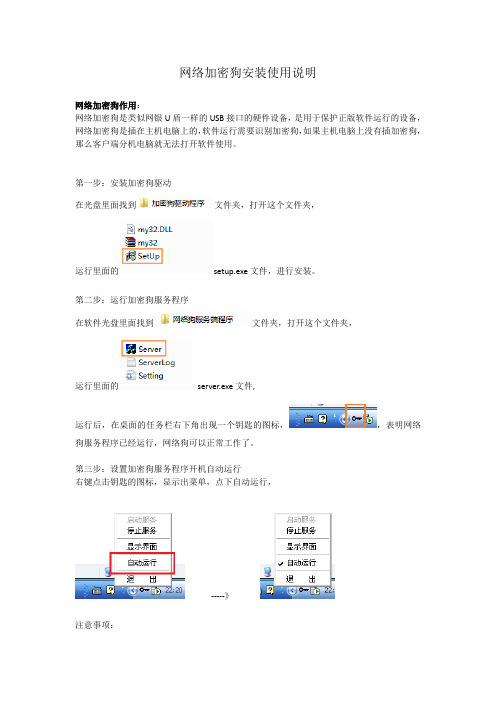
第一步:安装加密狗驱动
在光盘里面找到文件夹,打开这个文件夹,
运行里面的setup.exe文件,进行安装。
第二步:运行加密狗服务程序
在软件光盘里面找到文件夹,打开这个文件夹,
运行里面的server.exe文件,
运行后,在桌面的任务栏右下角出现一个钥匙的图标,,表明网络狗服务程序已经运行,网络狗可以正常工作了。
第三步:设置加密狗服务程序开机自动运行
右键点击钥匙的图标,显示出菜单,点下自动运行,
-----》
注意事项:
1.加密狗安装好后一般不要拔出,如果加密狗拔出,那么就要关闭加密狗服务程序后重新
运行加密狗服务程序。
2.如果加密狗拔出了,换了USB口插口,那么就要重新安装加密狗驱动程序。
TMA网络版安装说明

TMA网络版安装指南所有放样电脑均需要互相联网,组成一个小型局域网。
通过网线和集线器(hub)连接就可以。
无需专门安装服务器电脑。
总体步骤:1、安装加密狗驱动,选择其中的USB驱动即可。
(仅需服务器计算机)2、插上加密狗。
(仅需服务器计算机)3、安装TMA软件。
(服务器计算机、客户机)4、修改签名文件名为:TMA.sig,并拷贝到TMA软件的根目录下,缺省为:C:\Program Files\Xerofox\tma\。
(服务器计算机、客户机)5、安装网络版服务程序(仅需服务器计算机)6、双击桌面上的快捷方式,运行软件。
7、建议关闭XP自带的 windows防火墙(服务器计算机)。
所谓服务器计算机,是指在局域网内,各电脑都能迅速访问到的机子。
建议其配置相对其他电脑要高一些,插上了加密狗,我们就称为:服务器计算机。
TMA网络版安装分为客户机安装和服务器安装两部分。
一、服务器安装TMA服务器端应安装在所有TMA客户端都能访问到的计算机上。
TMA服务器端的安装包括加密狗驱动的安装、加密狗的安装,加密狗服务程序的安装。
1.加密狗狗驱动程序的安装和卸载在安装光盘中在相应版本安装目录下找DogDriver目录,在DogDriver目录下执行Instdrv.exe。
在弹出的窗口中,用户可以依界面提示安装或卸载。
2.硬件狗的安装安装USB狗USB狗是即插即用设备,支持热插拔,所以您安装USB狗时无需关闭计算机,只要将USB狗插入计算机的USB口就可以了。
计算机一般至少有两个USB口,您可以把USB狗插到任意一个口上,不会影响USB狗的使用。
安装USB狗前,请先双击开发套件安装光盘根目录下的Setup.exe安装USB狗的驱动程序,然后再插入USB狗。
注意事项:如果您在插入USB狗以前没有安装过USB狗的驱动程序,那么在您把USB狗插到计算机的USB口上后,一般情况下,Windows 98/ME/2000/XP操作系统会马上提示发现了一个叫“MicroDoc USB Device”的新设备,要求您安装该设备的驱动程序。
FactSage70软件狗驱动安装

FactSage Dongles – FactSage 7.0(Revised October, 2015)Missing or invalid FactSage HASP security key (dongle) Sometimes FactSage 7.0 issues the error message'Missing or invalid FactSage HASP security key (dongle) …'and then goes into the FactSage SetUp mode with a green screen. There are various factors that cause this to happen.There is a new feature in FactSage 7.0 which displays the status of the FactSage dongle attached to the computer. This helps you to diagnose the source of the error message. Try the following :Run FactSage 7.0. At the top of the FactSage Main Menu Window click on ‘Tools > FactSage dongle status > Explanation of dongle status... ' and follow the instructions.FactSage Dongles – FactSage 7.0(Revised October, 2015)Installation of Dongle Drivers(FactSage Menu > 'Tools > Sentinel Security Key > How to Install the drivers.')In order to activate a Standalone version of FactSage, a MemoHASP dongle (also known as a hardware lock or security key) must be inserted into a USB port of the PC. The MemoHASP dongles are also referred to as a Sentinel HASP and more recently Sentinel LDK keys. The dongles are supplied by SafeNet Inc.If the dongle is firmly attached to the computer but the red light or LED does not glow continuously then the drivers (files) have not been installed correctly.FactSage 7.0 employs new installation software from SafeNet Inc. and it is now fairly straight forward to install the drivers. There are two ways to install the drivers.1. Express driver installationThis is a fast and efficient way of installing the Sentinel dongles drivers. In most cases thefollowing instructions should work the first time.∙Make sure you logged in as administrator (it may also be necessary to disable any protection software such as antivirus and firewall). Remove any HASP or Sentinel key/dongle attached tothe computer. Disconnect the network cable and disable the wireless LAN connections ifapplicable.∙You are going to first remove any old dongle drivers from the computer and then you are going to install the new Sentinel drivers.∙Run FactSage 7.0 and click the Tools menu at the top:'Tools > Sentinel Security Key (dongle) > Express driver installation' and follow the instructions.∙Connect the dongle and see if the red light or LED is on. It may take a while to light, then blink a while and then finally glow constantly.∙If the dongle drivers have been successfully installed and the light is on then quit FactSage, turn on the antivirus and firewall that were disabled earlier, reconnect the network cables or thewireless LAN connections, and then run FactSage.∙If the dongle does not glow constantly or if the dongle status still displays 'dongle drivers NOT installed' then try the following 2. Manual driver installation.2. Manual driver installationThis is a step by step manual way of installing the Sentinel dongles drivers.∙Make sure you logged in as administrator (it may also be necessary to disable any protection software such as antivirus and firewall). Remove any HASP or Sentinel key/dongle attached tothe computer. Disconnect the network cable and disable the wireless LAN connections ifapplicable.∙You are going to first remove any old dongle drivers from the computer and then you are going to install the new Sentinel drivers.∙Run FactSage 7.0 and click the Tools menu at the top:'Tools > Sentinel Security Key (dongle) > Remove drivers'- you will get the message "Please wait ..." and then "Operation successfully completed" - thismay take several minutes.∙Reboot the computer.∙Run FactSage 7.0 and click the Tools menu at the top:'Tools > Sentinel Security Key (dongle) > Install drivers'- you will get the message "Please wait ..." and then "Operation successfully completed" - thismay take several minutes.∙Reboot the computer.∙Connect the dongle and see if the red light or LED is on. It may take a while to light, then blink a while and then finally glow constantly.∙If the dongle drivers have been successfully installed and the light is on then quit FactSage, turn on the antivirus and firewall that were disabled earlier, reconnect the network cables or thewireless LAN connections, and then run FactSage.If the FactSage dongle does not glow constantly or if the dongle status still displays 'dongledrivers NOT installed' check out the following section 3. Errors while installing drivers.3. Errors while installing driversFor any errors while installing the drivers:∙Open Control Panel > Programs and features and uninstall any HASP-based programs.∙Open Task Manager by right-clicking the taskbar (or by pressing Ctrl+Shift+Esc) and then clicking Start Task Manager. Select the Services window and stop any service (mouse-right-click > Stop Service) which starts with "Sentinel HASP", "Hasp", or "HLServer"∙Erase any aks*.* files, "hardlock.sys" and "haspnt.sys" from "c:\windows\system32\drivers". In 64 Bit OS check for these files in the folder: "c:\windows\sysWOW64\..."∙Change Device manager drivers:o Open Control Panel > Systemo Go to the Device Managero Select the menu "View > Show hidden devices"o Expand the part "Non-Plug and Play Drivers"o Uninstall (right-click) each of the following if they exist: "Hardlock", "Haspnt", "HASP fridge".o Reboot the machineo Try again to uninstall (1.7 or 2.4) and then to install (1.9 or 2.6) the drivers.For more information go to the SafeNet Admin Control Center Help at http://localhost:1947 for real time Diagnostics for Sentinel License Manager and other options.。
- 1、下载文档前请自行甄别文档内容的完整性,平台不提供额外的编辑、内容补充、找答案等附加服务。
- 2、"仅部分预览"的文档,不可在线预览部分如存在完整性等问题,可反馈申请退款(可完整预览的文档不适用该条件!)。
- 3、如文档侵犯您的权益,请联系客服反馈,我们会尽快为您处理(人工客服工作时间:9:00-18:30)。
软件狗驱动程序安装说明
软件狗Windows2000平台驱动程序安装过程如下:
1、用鼠标右键单击桌面上我的电脑,从弹出菜单中选择属性,就会出现如下对话框。
点击硬件向导。
2、出现下面的向导对话框后,点击下一步。
3、选择添加/排除设备故障,点击下一步。
4、Windows2000作新硬件检测。
5、选择添加新设备,点击下一步,如下图所示。
6、不要让Windows2000搜索新硬件。
请选择“否,我想从列表选择硬件。
”,然后,单击下一步。
7、硬件类型请选择其它类型。
单击下一步。
8、出现选择设备驱动程序的对话框时,选择从“磁盘安装”。
9、在“厂商文件复制来源”编辑框处,键入驱动程序所在的目录,或者通过单击旁边的浏览按钮选择驱动程序所在的目录。
然后单击确定按钮。
10、选择SoftDog,然后单击下一步。
11、出现开始安装画面,单击下一步。
12、Windows2000会进行文件复制和安装的工作,稍等片刻,出现安装完成提示。
这时选择完成按钮,软件狗的驱动程序就安装完成了。
