除湿机用户说明书
除湿机使用说明书

除湿机使用说明书【除湿机使用说明书】尊敬的用户:感谢您购买并选择使用我们的除湿机产品。
为了帮助您正确、安全地操作和维护除湿机,我们特别编写了这份使用说明书。
请在使用前仔细阅读,并按照指导进行操作。
一、产品概述我们的除湿机旨在为您提供舒适、干爽的室内环境。
它具有以下主要特点:1. 高效除湿:通过强大的除湿能力,有效清除室内湿气,降低室内湿度,防止霉菌滋生;2. 节能环保:采用先进的能效技术,能够高效运转并节省能源消耗;3. 操作简便:设备配置直观的控制面板,轻松调节湿度和风速;4. 安全稳定:具备过载保护、自动断电等安全措施,保证设备运行稳定可靠。
二、安全操作指南请在使用除湿机前,务必仔细阅读以下安全操作指南并严格遵守:1. 请将除湿机置于水平稳定的地面上,确保固定牢固,避免设备晃动或倾倒;2. 避免在潮湿的环境下使用除湿机,以免增加设备负担和安全风险;3. 在使用过程中不要将手指或其他物体伸入设备内部,以防止意外伤害;4. 请勿使用损坏的电源线插头,同时避免线缆过度拉扯,以确保电源供应正常;5. 注意避免将水或其他液体溅入设备内部,以免发生电器故障或短路;6. 使用过程中如发现设备异常情况(如异常噪音、烟雾等),请立即停止使用并联系售后服务。
三、操作指导1. 开机与关机按下电源按钮,除湿机即可启动工作。
再次按下电源按钮,则可以关闭设备。
在长时间不使用时,请拔掉电源插头。
2. 湿度设定旋转或按压控制面板上的湿度设定按钮,可以调节期望的室内湿度。
根据实际需要,选择合适的湿度设置。
3. 风速控制通过控制面板上的风速按钮,您可以选择低速、中速或高速风速模式,以适应不同湿度和房间大小的需求。
4. 定时开关机除湿机支持定时开关机功能。
您可以按照实际需求,设置设备在特定时间自动开关机,提升设备的智能化使用体验。
5. 过滤网清洗为了确保除湿机的正常运转和除湿效果,定期清洗过滤网至关重要。
请按照产品说明书的指导,正确、规范地进行过滤网清洗和维护。
智能除湿机怎么使用说明书

智能除湿机使用说明书一、产品介绍智能除湿机是一款专为家庭和办公场所设计的除湿设备。
它可以帮助去除空气中的多余水分,减少潮湿和霉菌滋生,提高空气质量,保持室内干燥舒适。
二、使用方法1.放置位置:将除湿机放置在通风良好的地方,远离墙角和障碍物,确保空气流通畅通。
2.电源连接:将电源线插入除湿机的电源插座,并插入电源插座。
3.开关机:通过控制面板或遥控器将除湿机启动,设定合适的湿度值和运行模式。
4.湿度设定:根据实际需要,设置合适的湿度值,除湿机在运行过程中会根据该设定值进行调节。
5.运行模式:除湿机通常有自动、手动、定时等运行模式,根据实际需求选择合适的模式。
6.水箱处理:当水箱中的水满时,除湿机会自动停止运行,此时需要将水箱取出倒掉水后重新安装,确保顺利运行。
三、注意事项1.电源:请确保电源连接正确,避免电源线受损或接触不良。
2.清洁:定期清洁除湿机的进风口、出风口和滤网,以确保除湿效果和空气质量。
3.安全:避免将除湿机放置在易燃材料附近,防止发生火灾等意外。
4.维护:定期检查除湿机零件是否正常运转,出现异常情况及时联系售后人员进行维修。
5.环境:避免在高温、高湿度环境下使用除湿机,影响除湿效果和机器寿命。
四、常见问题解决1.除湿机不工作:检查电源是否接通,湿度设定是否合适,水箱是否满。
2.除湿效果差:检查是否漏风,滤网是否需要更换,清洁除湿机内部灰尘。
3.噪音过大:检查除湿机是否放置平稳,滚轴是否运转不畅,清洁滚轴和风扇。
以上是智能除湿机的使用说明书,希望能帮助您正确合理地使用除湿机,提高室内空气质量,创造一个干燥舒适的生活环境。
除湿机设备操作说明书

設備操作說明書 第1页共1页 設備名稱
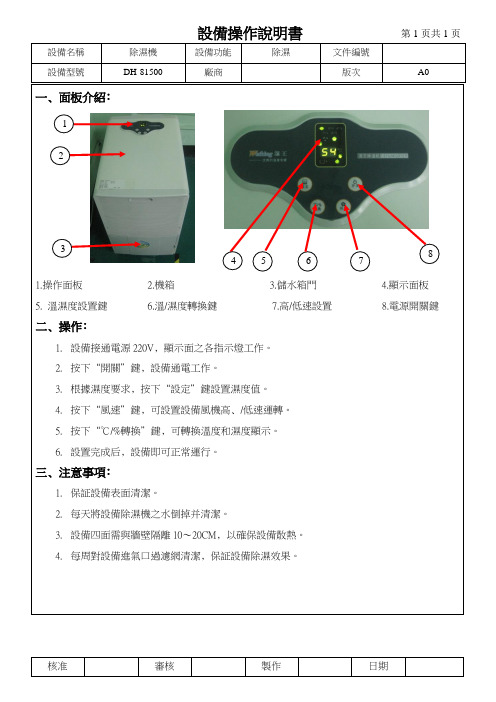
除濕機 設備功能 除濕 文件編號 設備型號 DH-81500 廠商 版次 A0 核准 審核 製作 日期 一﹑面板介紹﹕
1.操作面板
2.機箱
3.儲水箱門
4.顯示面板
5. 溫濕度設置鍵
6.溫/濕度轉換鍵
7.高/低速設置
8.電源開關鍵 二﹑操作﹕
1. 設備接通電源220V ﹐顯示面之各指示燈工作。
2. 按下“開關”鍵﹐設備通電工作。
3. 根據濕度要求﹐按下“設定”鍵設置濕度值。
4. 按下“風速”鍵﹐可設置設備風機高﹑/低速運轉。
5. 按下“℃/%轉換”鍵﹐可轉換溫度和濕度顯示。
6. 設置完成后﹐設備即可正常運行。
三﹑注意事項﹕
1. 保証設備表面清潔。
2. 每天將設備除濕機之水倒掉并清潔。
3. 設備四面需與牆壁隔離10~20CM ﹐以確保設備散熱。
4. 每周對設備進氣口過濾網清潔﹐保証設備除濕效果。
1 5 6
2 4
3 7 8。
智能除湿机的使用说明书

智能除湿机的使用说明书1. 前言感谢您选择使用我们的智能除湿机。
本使用说明书将为您提供详细的产品操作指南,确保您正确、安全地使用本产品,并最大限度地享受其便利和效益。
2. 产品概述智能除湿机是一种用于调节室内湿度的设备,适用于家庭、办公室、仓库等各类场所。
它采用先进的除湿技术,可快速除去空气中的湿气,提供干燥舒适的环境。
3. 安全须知在操作本产品之前,请仔细阅读以下安全须知:3.1 电源接插口必须符合产品额定电压,接地良好,以确保使用的安全性。
3.2 使用前请检查产品是否正常,如有异常现象(如电源线损坏、机身破裂等),请勿使用。
3.3 请勿将本产品置于潮湿的环境中,以免损坏机器内部零件。
3.4 请勿将本产品的电源线与其他电线混杂使用,避免电线过热引发安全事故。
4. 产品特点4.1 智能控制:本产品配备智能湿度控制系统,可根据室内湿度自动调节除湿机的运行状态。
4.2 高效除湿:本产品采用高效除湿技术,可在短时间内降低室内湿度。
4.3 干燥模式:本产品可选择不同的工作模式,包括“智能模式”、“强力模式”和“低噪音模式”,以满足用户的不同需求。
5. 使用方法5.1 将智能除湿机放置在需要除湿的室内位置,确保通风良好且无遮挡物。
5.2 插入电源线,选择合适的电源插口并接地。
5.3 打开电源开关,显示屏将显示当前湿度值。
5.4 如需调节湿度设定值,可通过显示屏上的设定按钮进行操作。
5.5 选择合适的工作模式:智能模式适用于大部分情况,强力模式适用于高湿度环境,低噪音模式适用于要求安静的场所。
5.6 操作完成后,可选择关闭电源开关并拔出电源插头。
6. 注意事项6.1 请勿将本产品置于过高温度或阳光直射的环境中,以防损坏机器。
6.2 长时间不使用本产品时,请清洁并拔出电源插头,以延长产品使用寿命。
6.3 不要向除湿机的进风出风口倾倒液体或放置湿物,以防止发生短路或损坏机器。
6.4 若发现异味或其他异常情况,请立即停止使用,并联系售后服务部门进行检修。
高效能除湿机除湿机使用说明书

高效能除湿机除湿机使用说明书高效能除湿机使用说明书一、引言此使用说明书旨在向用户介绍高效能除湿机的正确使用方法和注意事项,以确保用户能够充分利用产品功能并保持其良好运行状态。
请仔细阅读本手册并按照指示操作。
二、产品概述高效能除湿机是一种先进的设备,可帮助用户在潮湿的环境中降低湿度并提升室内舒适度。
本产品具有强大的除湿能力和多种智能功能,适用于家庭、办公室、商业场所等不同场景。
三、安全操作指引1. 请避免将除湿机接触到水或其他液体,以防触电或其他安全问题的发生。
2. 在插拔电源时,请务必将插头插入完全,并注意电源线的连接是否牢固。
3. 在清洁和维护除湿机之前,务必将其与电源断开。
4. 请确保使用本机时,插座能够承受其功率,避免过载使用而损坏插座。
四、使用步骤1. 将除湿机放置在需要除湿的房间中,确保周围没有任何阻碍物。
2. 打开除湿机的电源开关,并确保设备连接好电源。
3. 选择合适的湿度设定值,可通过面板上的功能按钮进行调节。
4. 按下“开/关”按钮,启动除湿机。
5. 在工作过程中,可以根据需要选择额外的功能,如定时开关或风速调节等。
五、常见问题及解决方法1. 除湿机在工作中发出异常噪音。
- 可能原因:除湿机未稳定放置在平坦表面上。
- 解决方法:将除湿机放置在平坦、稳固的表面上,并避免与其他物体接触。
2. 除湿机无法启动。
- 可能原因:电源插头未插入插座中。
- 解决方法:确保插头插入完全,并检查电源是否正常供电。
3. 除湿机除湿效果不佳。
- 可能原因:房间门窗未密封,湿气较为外泄。
- 解决方法:确保房间门窗关闭良好,以便最大程度地保留湿气。
六、清洁与维护1. 在清洁除湿机之前,请确保其与电源断开,并等待其完全降温。
2. 使用柔软的湿布清洁除湿机的外壳和面板,避免使用有腐蚀性的清洁剂。
3. 定期清洁除湿机的过滤器,以确保其除湿性能的有效发挥。
4. 若发现除湿机存在故障或异常情况,请及时联系专业维修人员进行修理。
FDH2814除湿机用户手册说明书

DehumidifierUser ManualModel: FDH2814*Before operating the appliance, please read this manual and all the safety instructions thoroughly and retain it for future reference.CONTENT PAGE SAFETY INSTRUCTION 1 PARTS DESCRIPTION 2 CONTROL PANEL 2 OPERATION INSTRUCTION 3 MAINTENANCE INSTRUCTION7 TROUBLESHOOTING 8 SPECIFICATION9 WARRANTY10SAFETY INSTURCTIONIMPORTANT SAFETY INSTRUCTIONS –READ CAREFULLY AND KEEP FOR FUTURE REFERENCE.1.To avoid electric shock, fire or injury, please read the user manual carefully before using theappliance and keep it for future reference.2.This appliance is for household use only. Please use suitable power source. (Please refer toSPECIFICATION)3.Never immerse the appliance in water or other liquids.4.Do not use the appliance under direct sunshine.5.Please turn off the appliance when not in use otherwise it may result in danger.6.Please turn off the appliance and unplug the socket when unattended otherwise it may result indanger.7.Keep the appliance away from children.8.This appliance can be used by children aged from 8 years and above and persons with reducedphysical, sensory or mental capabilities or lack of experience and knowledge if they have been given supervision or instruction concerning use of the appliance in a safe way and understand the hazards involved. Children shall not play with the appliance. Cleaning and user maintenance shall not be made by children without supervision.9.With any indication of malfunction, please stop using the appliance immediately to avoid hazard.Contact the authorized service center for repair. Do not attempt to repair or change any parts byyourself.10.If the supply cord is damaged, it must be replaced by the manufacturer, its service agent or similarlyqualified persons in order to avoid hazard.11.Please turn off and unplug the appliance before cleaning or maintenance.12.Clean the surface of the appliance with a dry cloth. Do not use corrosive detergent or solvent toclean. Do not swash the appliance with water.13.Please turn off and unplug the appliance when not in use. Make sure the power is off before pullingout the plug. Do not pull the cord.14.When the appliance is not in use for a prolonged period, please turn it off, unplug it, pack it well,and store it in dry cool place.15.Forbid to put flammable and explosive objects around the appliance, and do not use the appliance inan environment full of flammable gas and powder. Keep away from any fire and heat sources.16.Please put the power cord in the right place in order to avoid tripping the appliance over.17.Do not put any objects on the appliance or put the appliance below a socket-outlet.18.Please keep the air inlet and the air outlet unblocked to minimize the risk of fire and malfunction.19.Ensure no water or raindrop leak into the appliance in order to avoid electric shock. Do not putflammable objects or wet clothes on the air outlet in order to avoid short circuit or fire.20.Please do not place the air inlet or the air outlet near to curtains or walls when operation because itwill block the air current and cause fire. The appliance should be installed at minimum distant of 10 cm from the wall or other obstacles.21.To prevent spillage, please empty the water tank before relocating the appliance.22.Do not tip the appliance to any side as escaping water could damage the appliance.23.Please do not insert fingers or any objects into the air inlet or the air outlet in order to avoid electricshock.24.After a period of operation, abnormal noise and uneven air volume may appeared because of dustblocking airflow. It will disappear after cleaning the dustproof filter.25.Do not use any bug sprays or other flammable cleaners on the appliance.26.Do not use the appliance at any spillage area. When any water spilled/dropped into the applaince, itmay weaken the electical insulation, and may cause a fire or electric shock hazard.27.Do not use the appliance for a prolonged period at high humidity environment because it will affectthe operation and insulating ability.28.Please close windows before operation but make sure the appliance is located in a ventilated area inorder to help the appliance to release heat. Do not place the appliance in a narrow and confined space (such as closet).29.After the power is off, please wait for 3 minutes before restarting the appliance to protect thecompressor.30.Please perform regular maintenance such as cleaning the air filter, checking the water tube.31.The appliance must not be used to save the artwork, academic materials and other special purposes. Note: To avoid any malfunction or damage, do not tilt or crossing place the appliance under any operation.PARTS DESCRIPTIONCONTROL PANELOPERATION INSTRUCTION*Connect the power cord to the correct power supply.1.ON/OFF buttonPress the ON/OFF button to turn on the dehumidifier. “50%” will be displayed on the LCD display for 2 seconds, and the room humidity will be displayed afterwards. ,will be flashed in cycle and “” will be on at the same time.The preset mode is dehumidifying by 50%, medium wind speed and air deflector function on. Press the ON/OFF button again to turn off the dehumidifier.2.Humidity setting button %Press the humidity setting button to set the desired dehumidifying percentage. Press the Up/Down button to set the humidity (a range of CO, 30% to 80%). For each press, the set humidity will be increased / decreased by 5%. “CO” and “”will be displayed on the LCD display, and the dehumidifier will be operated continuously. The room humidity will be displayed after 5 seconds.Humidity setting will be completed.Effect of humidity setting to operation state:∙If the appliance is operated in continuous dehumidifying mode, its operation will not be influenced by the change of the ambient humidity.∙If the appliance is operated in non-continuous dehumidifying mode, humidity control system will be started in 5 minutes after start-up. If the setting-up humidity is 3% higher than the actual humidity, the compressor will be stopped with the fan keep working. If the setting-up humidity is 3% lower than actual humidity, the compressor will be restarted.3.Timer buttonAuto off timer (1-24 hours) can be set. Press the timer button, the timer indicator “” and “”will be on, and the setting-up time will be flashed on the LCD display. The original set value is 00.Press the Up/Down button in 5 seconds to set the auto off timer. For each press, the set auto off time will be increased / decreased by 1 hour. The room humidity will be displayed after 5 seconds. Auto off timer setting will be completed.Note: Press the timer button for 3 seconds continuously to cancel the timer.4.Mode buttonPress the mode button to select different operating modes, press once to change the modes among laundry drying (“”will be flashed on LCD display) →purifying (“”will be flashed on LCD display) → shoes drying function (“” will be flashed on LCD display).Laundry drying mode: the appliance runs with high fan speed and dehumidifying for 6 hours then switch off automatically. The fan speed can be selected.Purifying mode: the appliance runs with high fan speed without dehumidifying. The fan speed cannot be selected.Shoes drying mode: the appliance runs with medium fan speed and dehumidifying continuously.The fan speed can be selected.5.Wind direction buttonPress the wind direction button to set the direction of the air deflector and activate the movement of the air defector. will be flashed in cycle. Press again to deactivate it.Note: this function is invalid under shoes drying mode.6.Speed buttonPress the speed button to set the wind speed: high, medium, low. The wind speed icon “” will be shown on the LCD display. The flash frequency indicates the wind speed.7.Auto buttonPress the auto button to run in automatic operation mode:RH > 60%: the compressor will run with high wind speed.60% ≥ RH > 55%: the compressor will run with medium wind speed.RH ≤ 55%: the compressor will stop and run with low wind speed.8.Key lockPress the Up/Down key at the same time for 2 seconds to lock all the keys. The key lock icon “”will be shown on the LCD display. Press the Up/Down button again to cancel the key lock function.9.Memory Function•Press the ON/OFF button to turn off the appliance, then press the ON/OFF button again to turn it back on: the dehumidifier will run by the mode set before shutdown; timer function isnot applicable.•Unplug directly or power cut, then reconnect the power supply again: the appliance will run by the mode set before shutdown; the timer setting will continue to run.If press the ON/OFF button to turn off and unplug the appliance, then reconnect the power supply again, the appliance will run as factory setting mode.PRECAUTIONS1.The humidity setting should not be set higher than the ambient humidity to operation.2.When the water tank is full or the water tank full indicator “” turns on, drain the water, and installthe empty water tank back to its position. The appliance can continue its operation.3.The operational temperature range of this appliance is 5-32o C.4.If the plug and power supply are in normal condition, and the dehumidifier does not start, pleaseunplug to wait for 10 minutes and restart the appliance (as it takes around 10 minutes to reposition).If the appliance still does not start after 10 minutes, please contact the service center.5.When the dehumidifier is in operation, the running compressor will get hot and the roomtemperature will be increased. This is normal.6.The built-in defrosting sensor detects room temperature and will cease the operation of thecompressor for about 10 minutes when room temperature is below 15 o C. Defrost indicator “”will be on when the appliance is in the function of defrosting.DRAINAGE INSTRUCTIONWhile the water tank is full, the water tank indicator “” will be on. T he compressor and the fan will stop operating. Please empty the water tank.*Please turn off and unplug the appliance before removing the water tank.1.Remove the water tank carefully.2.Empty the water tank.3.Insert the water tank gently back into the appliance.CONTINUOUS DRAINAGE1.Turn off and unplug the appliance.2.Take off the hose stopper. (Fig. 1)3.Connect the drain hole with an 14mm inner diameter water tube. (Fig. 2)* Please purchase the water tube.Note•The water tube may be frozen in cold weather which will affect the drainage.•Please make sure to install the water tube properly and avoid bending. If the drainage is not smooth, it may cause water leakage and wet the floors or furnitures.4.Put the tank back to its position. Otherwise, operation cannot be started.Note•The dehumidifying function will stop immediately after shutdown, but there are a small amount of water will be discharged from the drain hole. When the appliance is not in use fora prolonged period, please place it for one day before package and storage.•Do not use the appliance continuously for a long time in order to avoid overheat and cause mechanical damage or hazard.Water tubeHose stopperFig.1 Fig.2SHOES DRYING MODE INSTRUCTION1.Span open the shoes drying outlet cover on the left of the appliance (Fig.1).2.Open the internal joint cover, pull out the extension tube in the machine. (Fig.2).3.Take an extension tube inserted into the swivel shackle of the external extension pipe (Fig.3).4.Put the external extension pipe into the shoes.5.Press mode button to select the shoes drying mode.Shoes DryingOutlet CoverExtensionTubeJointCover External Extension PipeFig.1 Fig.2 Fig.3MAINTENANCE INSTRUCTION*Please turn off and unplug the appliance before cleaning or maintenance.Cleaning the air filter Array1. Remove the air inlet grille.2. Remove the air filter from the air inlet grille.3. Remove the carbon filter from between the air inlet grilleand air filter.4. Clean the air filter with vacuum cleaner or waterfor cleaning and let it dry naturally.Note: Carbon filter cannot clean with water.5. Insert the air filter back into the appliance.6. Do not expose the filter to sunlight to avoid deformingthe filter.Cleaning the bodye soft cloths to clean the appliance.2.Do not use volatile chemicals, gasoline, detergents, chemically treated cloths, or other cleansingsolutions. All these could possibly hurt the cabinet.StorageIf the appliance is not used for a prolonged period of time, please:1.Empty the water tank completely and wipe it clean and dry.2.Unplug the appliance and tidy the power cord.3.Clean the air filter.4.Pack it well, and store it in dry cool place.Note: To avoid any malfunction or damage, do not tilt or place the appliance horizontally when storage.TROUBLESHOOTINGTHE APPLIANCE DOES NOT OPERATE:•Is the appliance plugged in?•Is the house electricity on?•Is the room temperature below 5 o C or above 32 o C? If so, it is out of the working range of theappliance.•Ensure the ON/OFF switch is turned on.•Check the water tank if it is positioned properly in the appliance, and make sure it is not full. •Make sure the air inlet and outlet are not obstructed.THE APPLIANCE SEEMS TO DO NOTHING:•Q: Is the filter dusty or contaminated?A: Remove the filter and clean it with warm water (below 40o C) every 2 weeks. Let it drynaturally and replace it.•Q: Is the air intake or outlet blocked up?A: Please move the object away from the air intake or outlet.•Q: Is the room humidity already quite low?A: The dehumidifier shall not operate if the humidity setting is higher than the ambienthumidity.THE APPLIANCE SEEMS TO OPERATE NON-STOP:•Q: Do windows or doors open?A: Please close the windows or doors when operating the dehumidifier.•Q: Is there something in the room producing lots of humidity?A: Please put these stuffs into another room, close the toilet lid and cover every glass of water.THE APPLIANCE IS TOO NOISY:•Check whether the appliance is standing on a level surface.THE APPLIANCE IS LEAKING:•Make sure the appliance is working in good condition and does not tilt in position.•If you are not using continuous drainage, make sure the water tank is empty or not full.WARRANTY1. The product has 2 years warranty from the date of purchase.2. The warranty shall not apply:A.to any product subjected to misuse, alteration, act of God, improper handling, impropertransport, improper testing or unauthorized repair;B.to cosmetic problems or defects which result from normal wear and tear under ordinary useyet not affecting the performance or use of the product;C.if the product is disassembled or altered;D.to any packing, transportation, export / import tax or any related expenses.3. CUSTOMER MUST PRESENT THE SALES INVOICE OR RECEIPT FOR 2 YEARSWARRANTY SERVICES.4. All require for service, please contact Fortress Service Centre Hotline, Tel: 2428-1500NOTES∙This appliance must be plugged into a specific 220-240V socket. Please make sure the plug is fully plugged-in before use. Do not use any adapter or extension cord.∙This appliance is a high energy consumption product, please do not use it with other high energy consumption products in the same supply socket.∙THE APPLIANCE IS FOR HOUSEHOLD USE ONLY.ENVIRONMENTDo not throw away the appliance with the normal household waste at the end of its life, buthand it in at an official collection point for recycling. By doing this, you help preserving the environment.IMPORTANT NOTICESIN NO EVENT SHALL OUR COMPANY OR THE SUPPLIER BE LIABLE TO YOU OR ANY OTHER PARTY FOR ANY DIRECT, INDIRECT, GENERAL SPECIAL, INCIDENTAL, CONSEQUENTIAL, EXEMPLARY OR OTHER DAMAGES ARISING OUT OF THE USE OR INABILITY TO USE THE PRODUCT (INCLUDING, WITHOUT LIMITATION, DAMAGES FOR INJURY, LOSS OF PROPERTY, BUSINESS PROFITS, BUSINESS INTERRUPTION) OR FROM ANY BREACH OF WARRANTY, EVEN IF OUR COMPANY OR SUPPLIER HAS BEEN ADVISED OF THE POSSIBILITY OF SUCH DAMAGES. IN NO CASE SHALL OUR COMPANY OR SUPPLIER’S LIABILITY EXCEED THE AMOUNT Y OU PAID FOR THE PRODUCT. Specifications, designs and dimensions are subject to change without prior notice.。
海尔除湿机de 20a22的说明书

海尔除湿机de 20a22的说明书
1.使用前,请确认电源电压、频率等规格符合产品铭牌要求,并确保电源可接地。
2.请不要采用直接拔出电源插头的方式停机。
3.机身移动位置时,请先关闭电源键,再拔出电源。
4.请不要用手指或其他物品放入进风口或出风口。
5.机身放置处为水平,且勿放置在松软的地方。
6.请不要用湿手拔插电源插头。
7.机身上请勿喷洒杀虫剂及可燃性液体。
8.不要将机器放置在衣柜等密闭场所运行,以免引起火灾。
9.若电源线损坏时,必须由制造厂商或其服务处或具有资格的人员更换以避免危险。
10.机身上不可以放置重物或让小孩子乘坐、玩耍。
11.禁止儿童或无自理能力的人在无人监护时使用除湿机。
12.本产品含有UV杀菌装置,请勿自行拆开机器,以防UV光线泄露对皮肤造成伤害。
13.请注意绝对不可将接地线与自来水管等连接作为导通接地。
14.根据国家标准检查接地情况,电源插座必须有地线,且接地线必
须良好,地线和零线应严格分开,严禁在无可靠接地情况下使用。
智能除湿装置用户手册说明书

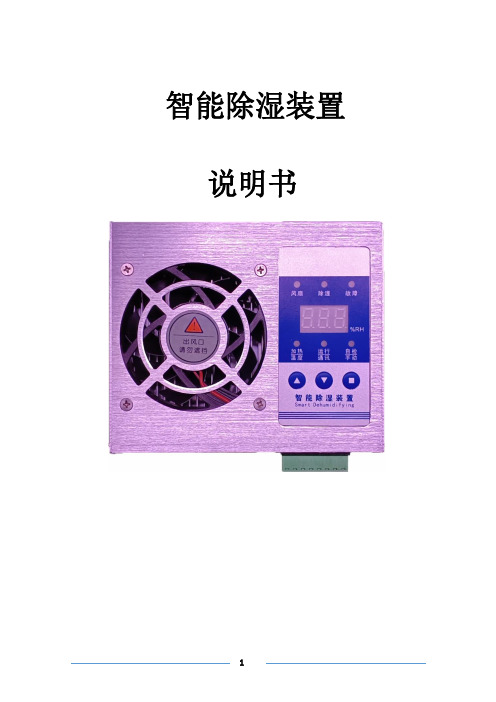
智能除湿装置说明书用户手册尊敬的客户:很荣幸向您介绍智能除湿装置。
本手册将详细介绍该产品的结构和性能特点。
本手册可能包含技术上的不准确或印刷错误,真诚地希望您能把宝贵意见及时反馈给我们,在以后的版本中,我们会加以改进。
使用前必读:1、在施加工作电源之前,务必确保工作电源在装置规定范围之内;2、现场安装使用时,装置必须竖直安装,严禁横装或平装,以防止凝水倒灌入装置内部;3、现场安装使用时,前后排风口严禁堵塞;4、与后台通讯时,通讯参数务必与后台一致。
在使用过程中如果您对本装置有任何疑问,本公司将非常愿意为您提供帮助。
注意:本文件中的资料如有更改,恕不另行通知。
如果本手册叙述的内容与您使用的设备有所不同,应以随设备一起提供的操作手册为准。
手册中所提及的内容受法律或内部协议的保护,只有在符合协议的规定条款下,才可使用和复制,未经书面许可,不得以任何形式翻印、引用本手册的内容,违者必究。
目录一、概述 (3)二、应用范围 (4)三、产品特点 (4)四、工作原理 (5)4.1、除湿原理: (5)4.2、低温加热功能: (5)4.3、报警功能: (5)4.4、通讯控制功能: (5)五、产品性能 (5)六、面板显示及操作说明 (6)智能除湿装置面板示意图 (6)A)指示灯 (7)B)数码管 (7)七、外形尺寸及安装接线图 (8)7.1、外形尺寸图 (8)7.2、安装尺寸图 (9)7.3、电气接线图 (9)7.4、安装步骤 (10)八、产品维护及故障处理 (13)8.1、装置维护 (13)8.2、故障的判别与维修 (14)九、装箱清单 (15)十、质量保证与服务 (16)一、概述配电柜智能冷凝抽湿装置是采用半导体制冷除湿方式,主动将密闭空间的潮湿空气在风扇的作用下吸入除湿风道,空气中的水汽经过半导体制冷机构后冷凝成水,再通过导水管排出柜体,可以达到很好的除湿效果。
通过减低空气中含水量,使相对湿度和绝对湿度同时下降,几乎不提高温度,不产生温差带来的负面影响,从根本上杜绝或减少了事故的发生,也不会因高温而加速柜内器件及柜体的老化。
- 1、下载文档前请自行甄别文档内容的完整性,平台不提供额外的编辑、内容补充、找答案等附加服务。
- 2、"仅部分预览"的文档,不可在线预览部分如存在完整性等问题,可反馈申请退款(可完整预览的文档不适用该条件!)。
- 3、如文档侵犯您的权益,请联系客服反馈,我们会尽快为您处理(人工客服工作时间:9:00-18:30)。
文件编号:URS-XX-2017-03-01
XXXX公司
物流部
除湿机
用户需求说明书
目录
1.审批表 (2)
2.概述 (2)
3.法规标准 (2)
4.前期调研准备 (3)
5.技术要求 (3)
5.1 性能要求 (3)
5.2厂房设施要求 (3)
5.3工程要求 (4)
5.4 QA要求 (4)
5.5 EHS要求 (5)
6.服务要求 (5)
7.财务预算 (5)
8.版本历史 (5)
1审批表
2概述
我部库区是仓储包材的主要区域,现有3台除湿机在阴雨天库区湿度无法达到检查要求。
为了迎接WHO的检查,现申请采购3台220V除湿机以最大满足仓储条件。
具有操作方便、安全可靠的特点,能适应工作环境,售后服务好等。
3法规标准
除湿机应符合国家的如下法规标准:
GB/T 19411-2003《国家标准》
GB/T 20109技术规《全新风除湿机》
GB 4706.32-2004 《家用和类似用途电器的安全热泵、空调器和除湿机的特殊要求》
GB 4706.1-1998《家用和类似用途电器的安全通用要求》
GB 4706.32-1996 《家用和类似用途电器的安全热泵、空调器和除湿机的特殊要求》
GB 4343-1995《家用和类似用途电器电热器具,电动工具以及类似电器无线电干扰特性测量方法和允许值》
GB 4343.2-1999《家用电器、电动工具和类似器具的要求第2部分:抗干扰---产品类标准》
GB 17625.1-1998《低压电器及电子设备发出的谐波电流限值》
4.前期调研
在设备选型过程中我们依据公司目前除湿机使用的实际情况,着重考察知名生产企业的资历、产品类别特点和适应性等,结合性价比进行全面评估,建议选择仟井TH-130C型除湿机或国知名品牌的产品。
5.技术要求
5.1性能要求
最大除湿量:≥130L/D
适用面积:≥130-260㎡
重量:≤60㎏
额定电压:220V
额定功率:≥1750W
5.2厂房设施要求
安装地面平整,库房密封性良好。
5.3工程要求
5.3.1材质及系统构件
凡未注明部分、采用企业标准的均必须高于等同于国家关于制作上述产品的各项要求,包括测试要求。
5.4 QA要求
能满足起重重量、安全及环保要求。
5.5 EHS要求
6服务要求
6.1现场安装调校。
6.2提供除湿机易损配件的型号及清单。
6.3提供除湿机的说明书、合格证便于日后维护保养。
6.4提供除湿机的部结构图及电路图便于日后检修时故障排查。
6.5在出现严重故障时来厂指导维修或定期到厂指导保养、大修。
6.6保修期发生非人为损坏,厂家应按“三包”原则免费维修更换受损
件。
6.7提供完善的售前、售中、售后服务。
7财务预算
18000元
8版本历史。
