sk239g报警器说明书
PD239系列产品使用说明书

Owner’s manualPlease read this manual carefully before operating your device.MODEL : PD239W/ PD239P/ PD239Y/ PD239TW/ PD239TP/ PD239TY/ PD239SP/ PD239SL/ PD239SA/ PD239G/PD239PH/ PD239BH/ PD239YH/ PD239SFBluetooth®ENGLISH The actual device may differ from the image.CAUTION: TO REDUCE THE RISK OF ELECTRIC SHOCK DO NOT REMOVE COVER (OR BACK) NO USER-SERVICEABLE PARTS INSIDE REFER SERVICING TO QUALIFIED SERVICE PERSONNEL.This lightning flash with arrowheadsymbol within an equilateral triangle isintended to alert the user to the presenceof uninsulated dangerous voltage withinthe product’s enclosure that may be of sufficientmagnitude to constitute a risk of electric shock topersons.The exclamation point within anequilateral triangle is intended to alertthe user to the presence of importantoperating and maintenance (servicing)instructions in the literature accompanying theproduct.WARNING: TO PREVENT FIRE OR ELECTRIC SHOCKHAZARD, DO NOT EXPOSE THIS PRODUCT TO RAINOR MOISTURE.WARNING: Do not install this equipment in aconfined space such as a book case or similar unit.CAUTION: Do not block any ventilation openings.Install in accordance with the manufacturer’sinstructions.Slots and openings in the cabinet are providedfor ventilation and to ensure reliable operation ofthe product and to protect it from over heating.The openings shall never be blocked by placingthe product on a bed, sofa, rug or other similarsurface. This product shall not be placed in a built-in installation such as a bookcase or rack unlessproper ventilation is provided or the manufacturer’sinstruction has been adhered to.2CAUTION concerning the Power CordMost appliances recommend they be placed upon a dedicated circuit;That is, a single outlet circuit which powers onlythat appliance and has no additional outlets or branch circuits. Check the specification page of this owner’s manual to be certain. Do not overload wall outlets. Overloaded wall outlets, loose or damaged wall outlets, extension cords, frayed power cords, or damaged or cracked wire insulation are dangerous. Any of these conditions could result in electric shock or fire. Periodically examine the cord of your appliance, and if its appearance indicates damageor deterioration, unplug it, discontinue use of the appliance, and have the cord replaced with an exact replacement part by an authorized service center. Protect the power cord from physical or mechanical abuse, such as being twisted, kinked, pinched, closed in a door, or walked upon. Pay particular attention to plugs, wall outlets, and the point where the cord exits the appliance. To disconnect power from the mains, pull out the mains cord plug. When installing the product, ensure that the plug is easily accessible.This device is equipped with a portable battery or accumulator.Safety way to remove the battery or the battery from the equipment: Remove the old batteryor battery pack, follow the steps in reverse order than the assembly. To prevent contamination ofthe environment and bring on possible threatto human and animal health, the old battery orthe battery put it in the appropriate containerat designated collection points. Do not disposeof batteries or battery together with other waste. It is recommended that you use local,free reimbursement systems for batteries and accumulators. The battery shall not be exposed to excessive heat such as sunshine, fire or the like. NOTICE: For safety making information including product identification and supply ratings, please refer to the main label inside the apparatus. NOTICE: Only use the AC adaptor supplied with this device. Do not use a power supply from another device or another manufacturer. Using any other power cable or power supply may cause damage to the device and void your warranty.3CAUTION:y The apparatus should not be exposed to water (dripping or splashing) and objects filled withliquids, such as vases, shouldn’t be placed on the apparatus.y Minimum distance around the apparatus for sufficient ventilation, no less than 5 cm.y The ventilation should not be impeded by covering the ventilation openings with items, such as newspapers, table-cloth, curtains etc.y No naked flame sources, such as lighted candles, should be placed on the apparatus.y The unit’s internal lithium battery should only be serviced by an authorised service centre.4ContentsSafety information . . . . . . . . . . . . . . . . . . . . . .2 STEP 1 Getting Started . . . . . . . . . . . . . . . . . .6 Supplied items (6)Product Overview (6)Power On / Off (7)STEP 2 Charging Battery . . . . . . . . . . . . . . . . .7 STEP 3 Inserting Photo Paper . . . . . . . . . . . .9 Cleaning printer head using Smart Sheet 10 About photo paper (10)Paper Jam Solution (12)STEP 4 Installing App . . . . . . . . . . . . . . . . .12 Installing App for Android phone (12)App Setting (13)Installing App for iPhone (14)Setting Bluetooth of iPhone .............14Installing App for Windows phone . (15)Setting Bluetooth of Windows phone (15)STEP 5 Printing Photo . . . . . . . . . . . . . . . . .16 Printing using Android phone (16)Printing using iPhone (20)Printing using Windows phone (22)Using the edit mode (24)Notes on the printing (24)Checking where to buy paper (26)Updating the device (26)Checking Label . . . . . . . . . . . . . . . . . . . . . . . .27 About LED Indicator . . . . . . . . . . . . . . . . . . .28 Specifications . . . . . . . . . . . . . . . . . . . . . . . . .30 Troubleshooting . . . . . . . . . . . . . . . . . . . . . .315STEP 1 Getting Started Supplied itemsUSB cableZINK Photo Paper Simple manualy Depending on the model, supplied items may differ . (ex . Charger, Photo Paper etc .)Product Overview6Power On / OffOn: Slide the switch to direction of the arrow. Off: Slide the switch to the opposite direction.STEP 2 Charging Battery This device uses built-in battery. Before using it,charge the battery in full. (Refer to below)yyyprinted.7Charger (AC Adapter) Array y Model : ADS-5MA-06A 05050GPG/ ADS-5MA-06A 05050GPCU/ ADS-5MA-06A 05050GPB/ ADS-5MA-06A 05050GPI/ ADS-5MA-06A 05050GPSAy Manufacturer : SHENZHEN HONOR ELECTRONIC CO. ,LTD.y Input : 100 - 240 V ~, 50 / 60 Hz Max. 0.3 Ay Output : 5 V 0 1.0 A8Paper1.2. Unwrap the pack of the photo papers.3. Slide Smart Sheet (Blue) and photo paperstogether into the Paper insert slot. Smart Sheetwill be ejected automatically before first printing.y Do not insert more than 10 Photo papers and1 Smart Sheet. Otherwise2 papers may beejected at once or paper jam may occur.y Once the pack is unwrap, keep the remaining papers after using in an airtight plastic bag.y When power is turned on, you cannot open theupper cover. To open it, turn off the power.9Cleaning printer head using Smart SheetSmart sheet (Cleaner)When you insert new smart sheet and photo papers, this device scans the barcode of smart sheet to maintain optimized photo paper. (It will be ejected before the first printing.)To maintain the best quality, remove foreign material of the head using cleaning feature.About photo paperPhoto paper pouch10Use exclusive photo paper for LG Pocket Photo.Otherwise, the print quality cannot be guaranteed, and it may cause damage of Pocket Photo .y Using photo papers from other company may result in malfunction, paper jam or lowquality.y Do not place inside a car or, expose to direct sunlight or moisture.y Do not leave in a place where thetemperature or humidity is too high or low.It may reduce the quality of the printedphoto.1112Paper Jam SolutionDo not pull the paper out. Turn the device off and on again, the paper will be ejected automatically.y If there are foreign material or dust on the roller, it may not be ejected properly.In that case, remove the foreign material of thesmart sheet and try again. y If this problem is not solved, please refer to “Troubleshooting”.STEP 4 Installing AppInstalling App for Android phoneFrom Play Store (Android market)Search for “LG Pocket Photo”.Using QR codeScan the QR code on the product box.Using NFCRefer to “Printing using NFC” .Taging: Tagging for the first time, it links to Play Store where you can download LG Pocket Photo App.Preparation : Before using NFCTo print a photo using NFC, go to [setting] of smart phone and then, activate [Read and Write]mode.13App SettingSet the options in [Setting y NFC *: Prints using NFC (NFC-enabled phone only)y Bluetooth : Prints using Bluetoothy GPS **: Saves the location where you took a photo* NFC : Near Field Communication** GPS : Global Positioning System using a satellitey To optimize printing photo, activate all modes and use pocket photo App.See “Help” for detailsFor more information about the App, touch []14From App StoreSearch for “LG Pocket Photo”.Using QR codeScan the QR code on the product box.1.2. Touch “Bluetooth” and touch the slider to turnBluetooth [On].3. To connect your Pocket Photo device to theiPhone, turn on your device and make sure it isdiscoverable mode.4. When you find the device, touch the model nameof Pocket Photo on the screen.See “Help” for detailsFor more information about the App, touch [].Installing App for Windows phoneFrom StoreSearch for “LG Pocket Photo”.Setting Bluetooth of Windows phone1. On your Windows phone home screen, touch[Settings].2. Select “Bluetooth” on the system and touch theslider to turn Bluetooth [On].3. To connect your Pocket Photo device to Windowsphone, turn on your device and make sure it isdiscoverable mode.4. When you find the device, touch the model nameof Pocket Photo on the list.5.After Checking [Connected], Run the App.15STEP 5 Printing Photowith the LED indicator turning on.1. Run LG Pocket Photo App on Android phone.2. Select a photo to print, and touch [].3. Touch [OK], then it will start searching forBluetooth devices.y To print, set print mode or the number of photo on the preview screen.4. When LG Pocket Photo is paired for the first time,[Bluetooth pairing request] appears. To startprinting, touch [Pairing] or input the PIN code ‘0000’. y If Smart Sheet is in the device, it will be ejected before the printing starts.16Printing using NFC (Bluetooth®)Check whether your Android phone supports NFCfirst.yto the NFC tag on the device.1. Tagging for the first time, it links to Play Storewhere you can download LG Pocket Photo App.2. Go to [Setting] in the App installed, and check[NFC].3. Choose a photo to print and tag, then printing isstarted immediately. From this time, you can runthe App and print a photo by just tagging.17,You can print photos directly from Android phones or PC via Bluetooth without the App.Choose a photo and select [Bluetooth] in [Share]or [Menu].1819Setting Pocket Photo App of Android phone You can check remaining battery, the number of photos printed, Help, Where to buy paper, device version, update, MAC address, and setting of print mode, etc.1. Run LG Pocket Photo App on Android phone. (To check [Device information], set to [On] the Bluetooth of smartphone.)2. Go to Setting .3.Touch [Device Information].[] Paper FullPrints without white space. (The edge of the image can be cut off.)[] Image FullPrints an image as a whole. (White space can occur at the edge of the paper.)Auto Power OffSet a time so that the device turns itself off.(Default is [5 min]. If you set to [Off], the device can be on for up to 2.5 hours when fully charged.)20Printing using Bluetooth (with the LED indicator turning on. 1. Run LG Pocket Photo App on iPhone.2. Select a photo to print, and touch [].3. “Do you want to print?” message appeares. Touch [OK] to start printing.y To print, set print mode or the number of photo on the preview screen. y If Bluetooth is not connected, “ Paired device not found” message is appeared. (refer to the Bluetooth setting for iPhone.)y If Smart Sheet is in the device, it will be ejected before starting printing.21Setting iPhone Pocket Photo AppYou can check remaining battery, the number of the photos printed, Help, Where to buy paper, device version, update, MAC address, and setting of print mode, etc.1. Run LG Pocket Photo App on iPhone.(To check [Device information], set to [On] the Bluetooth of iPhone.)2. Go to Setting .3. Touch Settingoptions to change.[] Paper FullPrints without white space. (Theedge of the image can be cut off.)[] Image FullPrints an image as a whole. (White space can occur at the edge of the paper.)Auto Power OffSet a time so that the device turns itself off.(Default is [5 min]. If you set to [Off], the device can be on for up to 2.5 hours when fully charged.)22Printing using Bluetooth (with the LED indicator turning on. 1. Run LG Pocket Photo App on Windows phone.2. Select a photo to print, and touch [].3. “Do you want to print?” message appeares. Touch [OK] to start printing.y If the printing is not started, check power of the device. y If Bluetooth is not connected, select registered Pocket photo device or reset Bluetooth by selecting [Search].Print modey [] Paper Full: Prints without white space. (The edge of the image can be cut off.) y [] Image Full: Prints an image as a whole. (White space can occur at the edge of the paper.)23See “Help” for detailsFor more information about the App, touch [] /[Help].At under downloadable,you can download the Owner’s manual using PCs.Note on Windows Phoney You can check Manual, Share, App version and Where to buy paper by touching []. y Windows phone does not support installing App or printing photo by NFC function. y In case of Windows phone, to print a photo in the normal folder via bluetooth it is available only when using the app. y The limitations of Windows Phone -Device information is not supported.-Windows phone does not support firmware /TMD *update of Pocket Photo.(At , under Downloadable, you can download the Pocket Photo update tool for Windows PCs.)TMD : TMD means colour correction data.24Using the edit modeYou can edit a photo quality, color or size using edition tool on the menu.Use the edit function with a variety of imagecorrection filterNotes on the printingy The printed image may differ from the orginal image due to the printing method (thermal transfer printing). y Use the lastest App of LG Pocket Photo ( when printing a photo, it makes optimized image.) y The higher resolution the image has, the higher quality the printed photo has. (The proper resolution is more than 1280 x 2448 pixel.) y Once the battery is fully charged, you can print up to 30 papers in a row. y The maximum prints are based on ISO 24712Colour image standard and the number of photos printed may vary depending on user enviromental conditions (time, temperture,humidity or printing method). y If there are more than a LG Pocket Photo device, check MAC address on the label to choose one you want to use. (Refer to “Checking Label”.)y The Bluetooth searching and transferring may Array fail depending on its environment. Check theBluetooth condition on your phone and try again.y If pairing multiple smartphone, re-pairing mayoccur.25Checking where to buy paper1. To check where to buy paper, go to setting ormenu screen.2.After touching [], select a country.Updating the deviceYou can update the device by pairing smart phone to the latest software to enhance the products operation and /or add new features.1. Connect the device and smart phone viaBluetooth.2. Run the Pocket Photo App and then, touch[Setting] menu.3. The current version and higher version are shownif new version is existed. 4. Touch [Update]button to update the device.During the device update procedure, donot turn off the power or press Reset button.This device cannot be updated to previousIf there is no higher version, the MessageNote26Checking LabelIn case there are more than a LG Pocket Photo device, check MAC address on the product label to choose one you want to use.1. Open the upper cover.2729SpecificationsPhoto size50 mm x 76 mm (Dot size : 640x 1224)Image file type/ size PNG (Max: 1350x1050), JPEG (Baseline) / less than 10 MB (Progressive JPEG is not supported.)Media paper used ZINK TM Photo Paper (exclusive for LG)Media paper storage environment Temperature : 20 - 25 °C Humidity : 40 - 55 % RHDevice operation environment Temperature : 5 - 40 °C Humidity : less than 70 % (35 °C) (An temperature limitation message appears on the App.)Optimum print environment Temperature : 15 - 32 °CHumidity : less than 70 % (32 °C)LED indicatorPower / Waiting / Bluetoothtransmitting / Charged /Discharged / Error / Condition ofprinter/ UpdateCommunication Bluetooth 4.0ExternalconnectorMicro USB port for chargingbatteryBus PowerSupply (USB)(Adapter) DC 5 V 0 1.0 ABattery life500 mAh Li-Polymerrechargeable batteryPower supply AC adapter (DC 5 V 0 1.0 A)Imageresolution More than 1280 x 2448 pixelsDimensions (Wx D x H)76 mm x 126 mm x 20 mmNet Weight221 g30Pocket Photo App supporting version y Android v2.2 or highery iOS v5.1 or highery Windows Phone 8.0 or highery Your phone may be incompatible with the device depending on its manufacturer, environment or(Android or iOS) operating system.y Design and specifications are subject to change without prior notice.y All other product and brand names are trademarks or registered trademarks of their respectiveowners.Troubleshooting31The paper is jammed before printing.1. Turn the device off and onagain then paper is ejectedautomatically.2. If above solution doesnot work, open the Uppercover and arrange thepapers. Then insert themwith Smart Sheet (Blue) orpull the paper out slowlyand gently.The paper is jammed during printing.The printed photo has lines.Open the Upper cover, arrange the papers and insert them with Smart Sheet locating at the bottom. Then try printing again. (To open the Upper cover, refer to “Checking Label”.No or incomplete image is printed.The edge of the image on the photo is cut off.Set Print mode to [] in theApp’s setting then the imageis printed as a whole.White spaceappears at theedge of the paper.When print mode is set to[] , white space mayappears if the aspect ratio ofthe paper and your image isnot the same.When print mode is set to[] , the edge of the imagecan be cut off o r white spaceat the edge of the paper mayappear.32Quality of printed photo is too low.In case you magnify an imageusing [] menu in the App,the quality of the printedphoto may be reduced.Turn off the device and insertSmart Sheet locating at thebottom of the papers. Then tryprinting again.Be sure the photo size isbigger than the properresolution.(1280 x 2448 pixels)When using Smart Sheet, itshould be used with photopapers in the same pouch.If you use other company’sphoto paper, it cannot beguaranteed for print quality ordamage of pocket photo.Device does notprint.Preheating is needed. Wait forabout 2 min.Be sure there are papers inthe device.It may take time to print afterSmart Sheet is ejected.Be sure the photo file is lessthan 10 MB.Only baseline JPEG, PNG(Max: 1350x1050) format issupported.Device is turned offautomatically.Check [Auto Power Off] timein the App’s setting.Above solutions donot work.Press Reset hole with apointed thing like mechanicalpencil to initialize.33。
JB-QGL-9000火灾报警控制器使用说明

2.2.2 工程配置检查................................................................................................................ 7
2.2.3 控制器内部配置及连接状况检查................................................................................ 7
第 4 章 系统配置详解.......................................................................................................................... 17
4.1
系统设置.............................................................................................................................. 18
1.1
系统简介................................................................................................................................ 1
1.2
系统特点................................................................................................................................ 1
报警器使用说明书
一、概述:品牌大眼睛型号HP-99GSM类型防盗报警电话工作电压12(V)无线接收频率315(MHz)报警喇叭声强120(dB)录音留言时长6(S)储存电话号二、详细说明:品牌大眼睛型号HP-99GSM类型防盗报警电话工作电压12(V)无线接收频率315(MHz)报警喇叭声强120(dB)录音留言时长6(S)电话号码位长11(位)密码设置功能有系统安装系统简介本报警器由报警主机和各种无线连接的配件组成。
当有人非法进入设防区域时,主机就会发出警报声,并且拨打主人的电话,主人收到通知后可立即赶回家或通知附近的亲朋好友处理,也可以通过电话监听现场的声音,进行远程操作。
报警器安装把电话线外线插头插入主机的LINE2孔,用报警器附带的电话线将主机的LINE1孔与电话机相连,然后接上电源和警号,此时主机会发出“B”的一声,电源指示灯常亮,表示主机已开始工作。
门磁安装将随机配备的双面胶把磁条贴在门上,门磁发射盒贴在门框上,安装时注意将磁条靠近发射盒上有指示灯一侧,两者对齐,间距越小越好。
xx探测器的安装红外探测器的原理是感应人体发出的红外线信号,它能感应到人体的移动,探测距离通常为5-12米,红外探头应装在离地2.2米左右的位置,对准要探测的区域。
红外只能安装在室内,不要对着太阳光,不要对着窗户及温度容易改变的地方。
红外安装的位置会影响到探测距离及探测的准确性。
GSMxx安装抽出主机背后的SIM卡盖,用手指压住SIM卡座向后推动,翻开卡座盖板,将SIM卡按豁口位置插入盖板,保持SIM卡缺角与板上缺角方向一致,压下盖板向前推动扣住SIM卡即可。
功能设置所有设置都需要在撤防下进行,所有正确的操作均是长响一声,错误的操作都是两声短响储存电话号码6(个)报警项目多功能调节报警时警笛音量# 0(0~99)#报警时调节警笛音量大小,0到99之间选择,0是无声,99是最大声。
设置普通报警电话号码#(1~5)?...?#设置1~5组电话号码,“1~5”为电话号码的序号;此处“?...?”代表电话号码。
SK-239BC常见问题

客服常规机型常见问题如下:1.SK-239B/C主机不能编程及不能正常工作:A、主机首先要处于编程状态下,主板里面的拨动开关一定要处于“SQ”状态。
B、SK-239B/C的负载最大范围在1A之内,正常只能接有线探头、警号、烟感探测器、对射、紧急按键、振动传感器等负载的总和,如所接的负载量超过主机带载范围必需配置外接电源,这样更好的保护主机的正常使用。
SK-968C的负载最大范围在350mA之内C、编程之后须按“确认”键,所设置的内容才能生效。
2.如何恢复出厂设置:指令地址31栏输入1234按确认键主机发出BB-BB四声响,主机面板的指示灯逐个闪烁,如早期07年之前使用的主机则使用指令地址31栏输入239*按确认键主机发出BB-BB四声响即可。
3.新买的遥控器不能控制主机:需在指令地址50栏重新学习对码,详见说明书第21页遥控器学习对码操作。
4.无线门磁、无线探头如何跟主机学习对码:在指令地址51栏对码学习,详见说明书第21页。
5.如何删除及修改接警电话号码:A、在编程状态下(主板拨动开关处于SQ状态),如删除第1组报警电话号码:复位+电话+01+确认(显示屏【01】138********)+#+确认。
B、在编程状态下(主板拨动开关处于SQ状态),如修改第1组报警电话号码:复位+电话+01+确认(显示屏【01】138********)+(输入新的电话号码)+确认。
注:以此类推删除及修改其它组的接警电话号码操作一致。
6.主机上电后在处于正常待机状态间隔发出B、B声:A、若间隔4秒响一下,是开通电话线故障检测功能,SK-239B/C在无线接收板对下方三脚跳线短接2-3脚为开通,详见说明书第3页点说明,检查电话线是否有接上。
B、间隔1分钟响一下,是备用电池低压,检查是否有接220V的交流电,或备用电池损坏。
C、在布防状态,触发探头后主机也会发出B、B声,检查是否有设置布防延时,指令地址08栏设置0000关闭延时。
MCM239D快速上手指南说明书
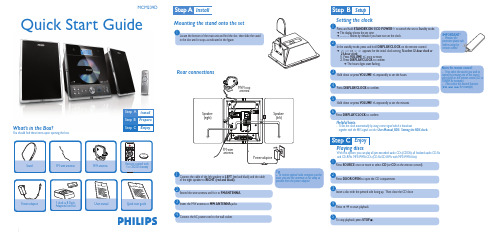
MCM239D Quick Start GuideWhat’s in the Box?Y ou should find these items upon opening the box.PrepareInstallEnjoy Step AStepStepBCTip– To receive optimal radio reception,put themain unit and the antennas as far away aspossible from the power adaptor.Connect the cable of the left speaker to LEFT(red and black) and the cableof the right speaker to RIGHT(red and black).Extend the wire antenna and fit it to FM ANTENNA.Insert the MW antenna to MW ANTENNA jacks.2Mounting the stand onto the set131Locate the bottom of the main unit and find the slot, then slide the standin the slot until it stops, as indicated in the figure.Setting the clock23456In the standby mode, press and hold DISPLAY/CLOCK on the remote control.➜24 HR or 12 HR appears for the initial clock setting. To select 12-hour clock or24-hour clock,1.Press VOLUME +/-once or more.2.Press DISPLA Y/CLOCK to confirm.➜The hours digits start flashing.Hold down or press VOLUME+/-repeatedly to set the hours.Press DISPLAY/CLOCK to confirm.Hold down or press VOLUME+/-repeatedly to set the minutes.Press DISPLAY/CLOCK to confirm.12345Playing discsWith this system, you can play all pre-recorded audio CDs (CDDA), all finalized audio CD-Rsand CD-RWs, MP3/WMA-CDs (CD-Rs/CD-RWs with MP3/WMA files)Press SOURCE once or more to select CD (or CD on the remote control).Press DOOR OPEN to open the CD compartment.Insert a disc with the printed side facing up. Then close the CD door.PressÉÅto start playback.T o stop playback, press STOPÇ.Notes for remote control:–First,select the source you wish tocontrol by pressing one of the sourceselect keys on the remote control (CD orTUNER, for example).–Then select the desired function(2;, 4, ¢for example).1Press and hold STANDBY-ON/ ECO POWER y to switch the set to Standby mode.➜The display shows the set time.➜-- --:-- -- flashes by default if you have not set the clock.Helpful hints:- To set the clock automatically by using a time signal which is broadcasttogether with the RDS signal,s ee the User Manual, RDS: Setting the RDS clock.Playing iPod using the dock1 2 3Select the correct dock adaptor supplied, then snap the adaptor into the dock connector to provide a snug fit for the player.➜ The indication on the adaptor’s back fits specific iPod player.4Correctly place your player in the dock connector.Connect the cables of the dock to DOCK IN jacks on the main set correspondingly. Press SOURCE repeatedly or on the set (or iPod on the remote) to select DOCK source.➜ The connected player will play automatically.➜ The iPod battery will be charged in either normal standby mode or power-on mode.The charging will not be available in the Eco power standby mode.TipRefer to the user manual supplied fordetailed descriptions of “Compatibleportable player”, “Selecting the correct dockadaptor”,“Installing the dock adaptor”,andthe important notes for dock operation.Press STANDBY-ON/ ECO POWER y to switch off the setPlay the USB’s audio files as you do with the albums/tracks on a CDTuning to radio stations123123Insert the USB device’s USB plug into the socket on the front panel of the main set.Press SOURCE once or more to select USB (or USB on the remote control)Press SOURCE once or more to select TUNER (or TUNER on the remote control).Press and hold PROGRAM until AUTO appears➜ Available stations are programmed in order of waveband reception strenght: RDS, FMfollowed by MW.Press the ALBUM/ PRESET buttons once or more until the desired preset station isdisplayed.Playing a USB mass storage deviceWith the Hi-Fi system, you can use USB flash memory (USB 2.0 or USB1.1),USB flash players(USB 2.0 or USB1.1), memory cards (requires an additional card reader towork with this Hi-Fi system).4Detailed playback features andadditional functions are described in theaccompanied owner's manual.PDCC-JH-07342007 C Koninklijie Philips Electronics N.V.All rights reserved.。
智能防盗报警器使用说明书

智能防盗报警系统使用说明书概述本产品是利用电话线路传递报警信息的智能设备。
本系统采用微处理器为控制核心,通过电话线路与接警中心进行通讯;且安装简单,操作方便;还可选配紧急呼叫器,实现紧急拨号求救。
主要适用于家庭、写字楼、营业场所等需要防止他人非法入侵的场所。
产品主要功能简章1.智能语音提示。
操作简单。
工作状态直观明了。
2.内置90分贝警笛。
也可增加外置警号。
3.主机可以登录10个遥控器;4.主机有9个无线防区与4个有线防区,其中每个无线防区可以登录5个探测器,主机会自动识别防区所登录的探测器是否为烟感或煤感;可自动区分紧急事件、盗窃、火灾、煤气泄漏警情类型等等。
5.探测器与主机之间采用学习式自动登录识别,扩充更加简单、方便,可任意删除某个防区的探测器。
6.信息保护功能,所有信息设置必须在输入密码后才能进行设置,避免信息被有意或无意更改。
安全系数高。
7.主机所设置的内容信息,均储存在记忆元件内,掉电后不丢失。
8.紧急情况下可按下遥控器的紧急报警键,发出求救信息。
9.支持多种布控模式。
10.可以通过电话异地拨号,对主机进行远程控制。
可实现家居控制功能。
11.可以与标准CID协议格式的联网报警中心联网。
12.剪线提示/报警功能。
13.个性化设置、各参数恢复出厂设置功能。
14.智能学习码,电脑滚动数据、防破解功能,设备具有防破坏功能。
简易操作流程1.进入主机设置状态(只有进入主机设置状态,才能对主机的各个功能进行操作)按“*1234”(默认的4位密码为1234);输入完后便可以进入设置状态。
2.修改密码:进入主机设置状态→按一下“*”→输入“4位新密码”→按一下“#”→再次输入“4位新密码”→再按一下“#”3.设置普通报警电话号码(第1~第5组为普通报警电话号码)进入主机设置状态(默认*1234)→按一下“1”→输入“1~5”中的一个数→“电话号码”→按一下“#”4.联网报警中心电话号码的设置(第六组为联网报警中心号码,当没有联网时,则不需要设置)进入主机设置状态→“1”→“6”→“中心电话号码”→“*”→“4位ID码”→按一下“#”。
9伏特电池驱动的光电 电离烟雾报警器用户指南说明书
9Volt Battery Operated Photoelectric/Ionization Smoke Alarm with “HUSH” Control to temporarily silence nuisance alarms.Thank you for purchasing this smoke alarm. It is an important part of your family’s home safety plan. You can trust this product to provide the highest quality safety protection. We know you expect nothing less when the lives of your family are at stake.Smoke Alarm User Guide 820-0895 REV. C 06/170475-7208-04PI9010For model: PI9010The Ion portion of this alarm detects products of combustion using the ionization technique. It contains 0.9 microcurie of Americium 241, a radioactive material (see section 9). Distributed under U.S. NRC License No. 32-23858-01E. Manufactured in compliance with U.S. NRC safety criteria in 10 CFR 32.27. The purchaser is exempt from any regulatory requirements. Do not try to repair the smoke alarm yourself. Refer to the instructions in section 12 for service.WARNING! BATTERY DOOR WILL NOT CLOSE UNLESS BATTERY IS PRESENT. REMOVAL OF BATTERY WILL RENDER THE SMOKE ALARM INOPERATIVE.IMPORTANT! READ ALL INSTRUCTIONS BEFORE INSTALLATION AND KEEP THIS USER GUIDE NEAR THE ALARM FOR FUTURE REFERENCE.CONTENTS OF THIS USER GUIDE1 -- RECOMMENDED LOCATIONS FOR SMOKE ALARMS2 -- LOCATIONS TO AVOID3 -- INSTALLATION INSTRUCTIONS4 -- OPERATION AND TESTING5 -- NUISANCE ALARMS6 -- MAINTENANCE7 -- LIMITATIONS OF SMOKE ALARMS8 -- GOOD SAFETY HABITS9 -- NRC INFORMATION10 -- NFPA PROTECTION STANDARD 7211 -- CAUTION (AS REQUIRED BY THE CALIFORNIASTATE FIRE MARSHAL)12 -- SERVICE AND WARRANTY1. RECOMMENDED LOCATIONS FOR SMOKE ALARMS • Locate the first alarm in the immediate area of the sleeping rooms. Try to monitor the exit path as the sleeping rooms are usually far-thest from the exit. If more than one sleeping area exists, locate additional alarms in each sleeping area (See figure 3).• Locate additional alarms to monitor any stairway as stairways act like chimneys for smoke and heat.• Locate at least one alarm on every floor level.• Locate an alarm in every sleeping room.• Locate an alarm in every room where electrical appliances are operated (i.e. portable heaters or humidifiers).• Locate an alarm in every room where someone sleeps with the door closed. The closed door may prevent an alarm not located in that•below.•••••than 1 ft in 8 ft (.3m in 2.4 m) horizontally shall be located on the high side of the room.” NFPA 72 states: “A row of detectors shall be spaced and located within 3 ft (0.9m) of the peak of the ceiling measured horizontally” (see figure 2).• Install Smoke Alarms on tray-shaped ceilings (coffered ceilings) on the highest portion of the ceiling or on the sloped portion of the ceil-ing within 12” (305mm) vertically down from the highest point (see figure 4).Mobile Home InstallationModern mobile homes have been designed and built to be energy efficient. Install smoke alarms as recommended above (refer to RECOMMENDED LOCATIONS and Figures 1 and 2). In older mobile homes that are not well insulated compared to present standards, extreme heat or cold can be transferred from the outside to the inside through poorly insulated walls and roof. This may create a thermal bar-rier which can prevent the smoke from reaching an alarm mounted on the ceiling. In such units, install the smoke alarm on an inside wall with the top edge of the alarm at a minimum of 4” (10cm) and a maximum of 12” (30.5cm) below the ceiling (see figure 1).If you are not sure about the insulation in your mobile home, or if you notice that the outer walls and ceiling are either hot or cold, installthe alarm on an inside wall. For minimum protection, install at least one alarm close to the sleeping rooms. For additional protection, see SINGLE FLOOR PLAN in figure 2.WARNING: TEST YOUR SMOKE ALARM OPERATION AFTER RV OR MOBILE HOME VEHICLE HAS BEEN IN STORAGE, BEFORE EACH TRIP AND AT LEAST ONCE A WEEK DURING USE.2. LOCATIONS TO AVOID• In the garage. Products of combustion are present when you start your automobile.• Less than 4” (10cm) from the peak of an “A” frame type ceiling.• In an area where the temperature may fall below 40ºF or rise above 100ºF, such as garages and unfinished attics; this should also include electrical boxes exposed to these environments.• In dusty areas. Dust particles may cause nuisance alarm or failure to alarm.• In very humid areas (greater than 95% RH, non-condensing). Moisture or steam can cause nuisance alarms.• In insect-infested areas.• Smoke alarms should not be installed within 3 ft (.9m) of the follow-ing: the door to a kitchen, the door to a bathroom containing a tub or shower, forced air supply ducts used for heating or cooling, ceiling or whole house ventilating fans, or other high air flow areas.• Kitchens. Normal cooking may cause nuisance alarms. If a kitchen alarm is desired, it should have an alarm silence feature or be a pho-toelectric type.• Near fluorescent lights. Electronic “noise” may cause nuisance alarms.• Smoke alarms are not to be used with detector guards unless the combination (alarm and guard) has been evaluated and found suit-able for that purpose.3. INSTALLATION INSTRUCTIONSCAUTION: THIS UNIT IS SEALED. THE COVER IS NOT REMOVABLE!1. R emove the mounting plate from the back of the alarm by hold-ing the mounting plate and twisting the alarm in the direction indicated by the “OFF” arrow on the alarm cover.2. T o insure aesthetic alignment of the alarm with the hallway or wall, the “A” line on the mounting plate should be parallel with the hallway when ceiling mounting or horizontal when wall mounting3. A fter selecting the proper smoke alarm location as described in section 1, attach the mounting plate to the ceiling as shown in figure4. For wall mounting see figure 4. Place mounting plate on the wall. Be sure the “A” line is horizontal. Use the screws and anchors provided to secure the mounting plate (use 3/16” drill bit for anchor holes).4. B attery installation instructions are provided on the inside of the battery door.To ensure proper installation of the smoke alarm battery, follow the instructions.5. W hen installing the battery, press the battery reminder finger down into the battery compartment and install the battery (see figure 5).CAUTION! IF THE BATTERY REMINDER FINGER IS NOT HELD DOWN IN THE BATTERY COMPARTMENT BY THEBATTERY, THE BATTERY DOOR WILL NOT CLOSE AND THE UNIT WILL NOT ATTACH TO THE MOUNTING BRACKET.6. Install the alarm on the trim ring and rotate the alarm in thedirection of the “ON” arrow on the cover until the alarm ratchets into place (this ratcheting function allows for aesthetic alignment).TAMPER RESIST FEATURE: To make your smoke alarm tamper resistant, a tamper resist feature has been provided. Activate the tamper resist feature by breaking off the four posts in the square holes in the trim ring (see figure 6). When the posts are broken off, the tamper resist tab on the base is allowed to engage the mounting bracket. Rotate the alarm onto the trim ring until you hear the tamper resist tab snap into place, locking the alarm on the trim ring. Using the tamper resist feature will help deter chil-dren and others from removing the alarm from trim ring. NOTE: To remove the alarm when the tamper resist tab is engaged, press down on the tamper resist tab, and rotate the alarm off of the trim ring (see figure 6).After installation, test your alarm by depressing and holding down the test button for at least 5 seconds. This should sound the alarm.OPERATION: The smoke alarm is operating once a fresh battery is installed and testing is complete. When products of combustion are sensed, the unit sounds a loud 85db pulsating alarm until the air is cleared.FIGURE 5BatteryReminderFinger4. OPERATION AND TESTINGHUSH CONTROL: The “HUSH” feature has the capability of temporarily desensitizing the alarm circuit for approximately 10 minutes. This feature is to be used only when a known alarm condition, such as smoke from cooking activates the alarm. The smoke alarm is desensitized by pushing the “HUSH” button on thesmoke alarm cover. If the smoke is not too dense, the alarm will silence immediately and the red LED will flash every 10 seconds for approximately 10 minutes. This indicates that the alarm is in a temporarily desensitized condition. The smoke alarm will automati-cally reset after approximately 10 minutes, and sound the alarm if smoke is still present. The “HUSH” feature can be used repeatedly until the air has been cleared of the condition causing the alarm.NOTE: DENSE SMOKE WILL OVERRIDE THE HUSHCONTROL FEATURE AND SOUND A CONTINUOUS ALARM. CAUTION: BEFORE USING THE ALARM HUSH FEATURE, IDENTIFY THE SOURCE OF THE SMOKE AND BE CERTAIN A SAFE CONDITION EXISTS.LED INDICATOR: This smoke alarm is equipped with a red LED indicator. The red LED is located under the test button and has several modes of operation.FIGURE 6A AStandby Condition:The red LED will flash every 45seconds to indicate that the smokealarm is operating properly.Alarm Condition:When the alarm senses products ofcombustion and goes into alarm, thered LED will flash rapidly (once everysecond). The rapid flashing LEDand temporal alarm will continueuntil the air is cleared.Hush Condition:The red LED will flash every 10 secondsas long as the alarm is in Hush mode. Low Battery Condition: The red LED flash will be accompaniedby an audible chirp. Replace the batterywhen this condition occurs.SMOKE SENSING CHAMBER OPERATION: This alarm will “chirp” if any of the components in the smoke sensing chamber fail. This chirp will occur between the flashes of the red LED indicator light. (If the chirp occurs at the same time as the red LED flash, see sec-tion 6 for low battery information).TESTING: Test by pushing the test button on the cover and holdit down for a minimum of 5 seconds. This will sound the alarmif the electronic circuitry and horn and battery are working. If no alarm sounds, the unit has defective batteries or other failure. DO NOT use an open flame to test your alarm, you could damage the alarm or ignite combustible materials and start a structure fire. TEST THE ALARM WEEKLY TO ENSURE PROPER OPERATION. Erratic or low sound coming from your alarm may indicate a defective alarm, and it should be returned for service (see section 12).NOTE: WEEKLY TESTING IS REQUIRED.5. NUISANCE ALARMSSmoke alarms are designed to minimize nuisance alarms. Cigarette smoke will not normally set off the alarm, unless the smoke is blown directly into the alarm. Combustion particles from cooking may set off the alarm if the alarm is located close to the cooking area. Large quantities of combustible particles are gener-ated from spills or when broiling. Using the fan on a range hood which vents to the outside (non-recirculating type) will also help remove these combustible products from the kitchen.If the alarm does sound, check for fires first. If a fire is discovered,get out and call the fire department. If no fire is present, check to see if one of the reasons listed in section 2 may have caused the alarm.The model PI9010 has a “HUSH” control that is extremely use-ful in a kitchen area or other areas prone to nuisance alarms. For more information refer to section 4, OPERATION AND TESTING.6. MAINTENANCEBATTERY REPLACEMENTIf tamper resist feature has been used, refer to TAMPER RESIST FEATURE in section 3 for removal instructions.To replace the battery, remove the alarm from the mounting plate by rotating the alarm in the direction of the “OFF” arrow on the cover (see section 3, figure 4).The Model PI9010 Smoke Alarm is powered by a 9V alkaline battery . A fresh battery should last for one year under normal operating conditions. This alarm has a low battery monitor circuit which will cause the alarm to “chirp” approximately every 45 sec-onds for a minimum of seven (7) days when the battery gets low. Replace the battery when this condition occurs.USE ONLY THE FOLLOWING 9 VOLT BATTERIES FOR SMOKE ALARM REPLACEMENT.Alkaline Type: ENERGIZER 522; DURACELL MN1604,MX1604; GOLD PEAK 1604A; PANASONIC6AM6, 6AM-6, 6AM-6PI, 6AM6X, and6LR61(GA)NOTE: WEEKLY TESTING IS REQUIRED.WARNING!! USE ONLY THE BATTERIES SPECIFIED. USE OF DIFFERENT BATTERIES MAY HAVE A DETRIMENTAL EFFECT ON THE SMOKE ALARM.NOTE: DO NOT USE LITHIUM BATTERIES IN THIS UNIT.CLEANING YOUR ALARMYOUR ALARM SHOULD BE CLEANED AT LEAST ONCE A YEAR To clean your alarm, remove it from the mounting bracket as outlined in the beginning of this section. You can clean the inte-rior of your alarm (sensing chamber) by using compressed air ora vacuum cleaner hose and blowing or vacuuming through the openings around the perimeter of the alarm. The outside of the alarm can be wiped with a damp cloth. After cleaning, reinstall your alarm and test your alarm by using the test button. If clean-ing does not restore the alarm to normal operation the alarm should be replaced.7. LIMITATIONS OF SMOKE ALARMSWARNING: PLEASE READ CAREFULLY AND THOROUGHLY • NFPA 72 states: Life safety from fire in residential occupanciesis based primarily on early notification to occupants of the need to escape, followed by the appropriate egress actions by those occupants. Fire warning systems for dwelling units are capable of protecting about half of the occupants in potentially fatal fires. Victims are often intimate with the fire, too old or young, or physically or mentally impaired such that they cannot escape even when warned early enough that escape should be possible. For these people, other strategies such as protection-in-place or assisted escape or rescue are necessary.• Leading authorities recommend that both ionization and photo-electric smoke alarms be installed to help insure maximum detec-tion of the various types of fires that can occur within the home. Ionization sensing alarms may detect invisible fire particles (asso-ciated with fast flaming fires) sooner than photoelectric alarms. Photoelectric sensing alarms may detect visible fire particles (asso-ciated with slow smoldering fires) sooner than ionization alarms.• A battery powered alarm must have a battery of the specified type, in good condition and installed properly.• AC powered alarms (without battery backup) will not operate if the AC power has been cut off, such as by an electrical fire or an open fuse.• Smoke alarms must be tested regularly to make sure the batter-ies and the alarm circuits are in good operating condition.• Smoke alarms cannot provide an alarm if smoke does not reach the alarm. Therefore, smoke alarms may not sense fires starting in chimneys, walls, on roofs, on the other side of a closed door or on a different floor.• If the alarm is located outside the bedroom or on a different floor, it may not wake up a sound sleeper.• The use of alcohol or drugs may also impair one’s ability to hear the smoke alarm. For maximum protection, a smoke alarm should be installed in each sleeping area on every level of a home.• Although smoke alarms can help save lives by providing an early warning of a fire, they are not a substitute for an insurance policy. Home owners and renters should have adequate insur-ance to protect their lives and property.8. GOOD SAFETY HABITSDEVELOP AND PRACTICE A PLAN OF ESCAPE• Make a floor plan indicating all doors and windows and at least two (2) escape routes from each room. Second story windows may need a rope or chain ladder.• Have a family meeting and discuss your escape plan, showing everyone what to do in case of fire.• Determine a place outside your home where you all can meet if a fire occurs.• Familiarize everyone with the sound of the smoke alarm and train them to leave your home when they hear it.• Practice a fire drill at least every six months, including fire drills at night. Ensure that small children hear the alarm and wake when it sounds. They must wake up in order to execute the escape plan. Practice allows all occupants to test your plan before an emergency. You may not be able to reach your chil-dren. It is important they know what to do.• Install and maintain fire extinguishers on every level of the home and in the kitchen, basement and garage. Know how to use a fire extinguisher prior to an emergency.• Current studies have shown smoke alarms may not awaken all sleeping individuals, and that it is the responsibility of individuals in the household that are capable of assisting others to provide assistance to those who may not be awakened by the alarm sound, or to those who may be incapable of safely evacuating the area unassisted.WHAT TO DO WHEN THE ALARM SOUNDS• Alert small children in the home.• Leave immediately by your escape plan. Every second counts, so don’t waste time getting dressed or picking up valuables.• In leaving, don’t open any inside door without first feeling its surface. If hot, or if you see smoke seeping through cracks, don’t open that door! Instead, use your alternate exit. If the inside of the door is cool, place your shoulder against it, open it slightly and be ready to slam it shut if heat and smoke rush in.• Stay close to the floor if the air is smoky. Breathe shallowly through a cloth, wet if possible.• Once outside, go to your selected meeting place and make sure everyone is there.• Call the fire department from your cell phone outside, or your neighbor’s home - not from yours!• Don’t return to your home until the fire officials say that it is all right to do so.There are situations where a smoke alarm may not be effective to protect against fire as noted by the NFPA and UL. For instance:a) smoking in bedb) leaving children home alonec) cleaning with flammable liquids, such as gasolined) fires where the victim is intimate with a flaming initiatedfire; for example, when a person’s clothes catch fire whilecookinge) fires where the smoke is prevented from reaching thedetector due to a closed door or other obstructionf) incendiary fires where the fire grows so rapidly that anoccupant’s egress is blocked even with properly locateddetectors9. NRC INFORMATIONThe ionization portion of this smoke alarm uses a very small amount of a radioactive element in the sensing chamber to enable detection of visible and invisible combustion products. The radio-active element is safely contained in the chamber and requires no adjustments or maintenance. This smoke alarm meets or exceeds all government standards. It is manufactured and distributed under license from the U.S. Nuclear Regulatory Commission.10. NFPA REQUIRED PROTECTIONThe National Fire Protection Association’s Standard 72 provides the following information:Smoke Detection - Where required by other governing laws, codes, or standards for a specific type of occupancy, approved sin-gle and multiple-station smoke alarms shall be installed as follows:(1) In all sleeping rooms and guest rooms(2) Outside of each separate dwelling unit sleeping area, within21 ft (6.4 m) of any door to a sleeping room, with the distancemeasured along a path of travel(3) On every level of a dwelling unit, including basements(4) On every level of a residential board and care occupancy (smallfacility), including basements and excluding crawl spaces and unfinished attics(5) In the living area(s) of a guest suite(6) In the living area(s) of a residential board and care occupancy(small facility)Smoke Detection - Are More Smoke Alarms Desirable? The required number of smoke alarms might not provide reliable early warning protection for those areas separated by a door from the areas protected by the required smoke alarms. For this reason, it is recommended that the householder consider the use of addi-tional smoke alarms for those areas for increased protection. The additional areas include the basement, bedrooms, dining room, furnace room, utility room, and hallways not protected by the required smoke alarms. The installation of the smoke alarms in the kitchen, attic (finished or unfinished), or garage is normally not recommended, as these locations occasionally experience condi-tions that can result in improper operation.This equipment should be installed in accordance with the National Fire Protection Association’s Standard 72 (NFPA, Batterymarch Park, Quincy, MA 02269).NOTIFY YOUR LOCAL FIRE DEPARTMENT AND INSURANCE COMPANY OF YOUR SMOKE ALARM INSTALLATION.11. CAUTION (AS REQUIRED BY THE CALIFORNIASTATE FIRE MARSHAL)“Early warning fire detection is best achieved by the installation of fire detection equipment in all rooms and areas of the house-hold as follows. A smoke alarm installed in each separate sleeping area (in the vicinity of, but outside of the bedrooms), and heat or smoke alarms in the living rooms, dining rooms, bedrooms, kitch-ens, hallways, attics, furnace rooms, closets, utility and storage rooms, basements and attached garages”.12. SERVICE AND WARRANTYIf after reviewing this user guide you feel that your smoke alarm is defective in any way, do not tamper with the unit. Return it for servicing to: KIDDE Safety, 1016 Corporate Park Dr., Mebane, NC 27302. 1-800-880-6788 (See Warranty for in-warranty returns).QUESTIONS OR FOR MORE INFORMATIONCall our Consumer Hotline at 1-800-880-6788 or contact us at our website at Kidde, 1016 Corporate Park Drive, Mebane, NC 27302Made in China。
AEC2392气体报警控制器使用说明书
安可信 ® 成立于 1998 年,是专业化的高科技实体。 安可信 ® 集设计、开发、生产、销售、服务于一体,通过 ISO9001-2008 质量管理体系认证。 安可信 ® 全国率先推出总线制通讯产品,系同行业知名企业。采用先进技术、生产工艺、质量 管理体系和现代化生产加工设备,自主研发生产智能型气体探测器、报警控制器,质量高,功能强, 安装、调试、使用方便。产品全线通过国家消防电子产品质量监督检验中心检验,并获得国家消防 产品认证委员会颁发的型式认可证书及质量技术监督局颁发的制造计量器具许可证。 安可信 ® 获得以下荣誉: 2003 年“气体泄漏报警控制系统”项目被列入四川省火炬计划 2003 年被四川科学技术厅评定为“高新技术企业” 2004 年获得国家创新基金的扶持 2005 年被四川省质量技术监督信息中心评定为“重质量、守规则‘共铸诚信’单位” 2006 年获软件企业及多种软件产品认证、被评为成都市高新区“纳税大户” 2007 年获科技进步奖、中国 AAA 级信用企业证书 2007 年通过中石化及能源一号网入网 2008 年正式成为海湾集团气体探测系统的战略合作伙伴(同年通过国家级“高新技术企业”认 定) 2009 年入选中燃采购网合格供应商(同年完成股份制改造,更名为成都安可信电子股份有限公 司) 2010 年入选新奥采购网合格供应商 2010 年成为成都市物联网联盟理事单位 ……
报警主机使用说明书(中文版)
报警主机使用说明书(中文版)注意事项:1.安装场所远离高温的热源和环境,避免阳光直接照射。
为确保本机的正常散热,应避开通风不良的场所。
为了防止电击和失火,请勿将本机放置于易燃、易爆的场所。
小心轻放本机避免强烈碰撞、振动等,避免安装在会剧烈震动的场所。
MV2516智能报警主机避免在过冷、过热的场所间相互搬动本机,以免机器内部产生结露,影响机器的使用寿命。
(ALARM CONTROLLER)2.避免电击和失火使用说明书切记勿用湿手触摸电源开关和本机。
勿将液体溅落在本机上,以免造成机器内部短路或失火。
(中文版第一版)勿将其它设备直接放置于本机上部。
安装过程中进行接线或改线时,都应将电源断开,预防触电。
重要提示:为了避免损坏,请勿自动拆开机壳,必须委托有资格有专业维修人员在指定的维修单位进行维修。
清洁装置时,请勿使用强力清洗剂,当有灰尘时用干布擦拭装置。
不得在电源电压过高和过低的场合下使用该本机。
务请通读本使用说明书,以便您掌握如何正确使用本机。
当您读本说明书后,请把它妥善保存好,以备日后参考。
如果需要维修,请在当地与经本公司授权的维修站联系。
环境防护:本机符合国家电磁辐射标准,对人体无电磁辐射伤害。
申明:产品的发行和销售由原始购买者在许可协议条款下使用;未经允许,任何单位和个人不得将该产品全部或部分复制、再生或翻译深圳市智敏科技有限公司成其它机器可读形式的电子媒介;SHEN ZHEN ZHI MIN TECHNOLOGY CO.,LTD. 本手册若有任何修改恕不另行通知;Copyright 2000-2004. All Rights Reserved.因软件版本升级而造成的与本手册不符,以软件为准。
智能报警主机目 录ALARM CONTROLLER1.设备概述………………………………………………………………3 1.设备概述:2.设备介绍………………………………………………………………3 智能报警主机是采用微处理器控制的报警信息采集和输出设备。
SK-239G报警主机编程手册--新版简易编程
SK239G简易编程手册注:与原来版本变化主要在第07、10项,第24、38、39项。
新主机在编程前,需要将主机板左上方的SQ/OFF开关打到SQ;编程完毕后再打回OFF主机编程方式,在编程锁处于SQ位置时,按“复位”+“电话”出现“--”后输入要编程项号及内容按“确定”键保存。
退出编程按“复位”。
删除编程项时按“复位”+“电话”出现“--”后输入要编程项号会显示原有内容,此时输入“#”并按“确定”键,编程项删除。
复位:可作退出键使用。
报警防区入口延时:布防延时布防延时:退出延时1、指令地址01:88880043(一中心)2、指令地址02:88880042(二中心)(同时报两个中心)3、指令地址06:xxxx(用户密码,输入内容-用户编号+1000)4、指令地址07:01 x 远程遥控布撤防布防为9# 撤防0#注:电话线或双线联网编51,单GSM无线联网编01。
(数字第一项5表示电话机振铃5次后,无人接听方可进入远程遥控,0-9可选,如选0,电话机就无法接听使用。
数字第二项1表示手机模块振铃1次。
)【07】增加第3位功能--------------短信来电号码控制权限设置设置为*或空--------------允许任意有效短信远程控制;设置为0---------跟01-05组号码有匹配都可控制;设置为1-5------------------指定01-05栏单组号码控制;设置为6-9--------关闭短信来电遥控控制功能。
5、指令地址08:0404 进出延时时间进入和退出延时都为12秒,04×3。
如果编04 04 123……,表示123防区入口报警不延时。
6、指令地址10:01X功能:第1、2位是开通或者关闭接收无线电信号,第3位是设置主机无线模块功能。
第1、2位代码为01――关闭遥控紧急报警,开通遥控布/撤防及解除报警;第1、2位代码为21――在01的基础上开通遥控紧急报警功能。
第3位代码为0――有线电话和无线手机模块自动转换;第3位代码为1――有线电话网出现故障,直接转为手机模块;第3位代码为9――关闭手机无线模块。