lync客户端安装与使用说明(20130726)
Microsoft Lync 2013 企业整合通讯平台用户手册说明书

產品手冊發佈日期:2012年11月©2012 Microsoft Corporation Page 2引言Microsoft® Lync® 2013 是一款專為企業打造的整合通訊平臺,能夠在 Windows 8 或其它手機及平板設備上連接各地使用者,並將其轉化為日常生產力體驗的一部分。
Lync 為狀態顯示、即時訊息、語音、視訊和會議提供了一致的用戶端體驗。
Lync 2013支援多人高解析視訊會議以及行動化且“觸手可及”的主要功能,以便實現快速自然的溝通和無需通過 VPN 進行加密,這樣,就能夠隨時隨地完成工作。
Lync 2013 用戶能夠聯繫 Skype 中的任何人,且Lync 2013 支援豐富的溝通方式,能夠與全世界的數百億用戶進行溝通。
Lync 2013中的新功能通過全面創新,這是我們有史以來最前瞻也是最精良的 Lync 產品。
Lync 總是能夠幫用戶隨時隨地進行溝通,而如今,我們能通過一些新增和改進的功能幫助 Lync 變得更好:❶隨時隨地保持聯繫:只要有網路連接,Lync 就能使用戶隨時隨地並且安全地實現溝通,並能夠自動適應當地網路環境。
❷使用慣用設備:Lync 通過在 Windows PC、Windows Phone、iOS 以及Android 智慧手機中提供一致的且熟悉的用戶體驗,使溝通變得更容易。
與 Windows 8風格統一的新版 Lync 應用程式能夠提供一種無縫的觸控體驗。
❸以正確的方式進行溝通:Lync 將語音和視訊通話、Lync 會議、連線提醒和即時訊息合併到一個易於使用的用戶端中,讓切換和選擇不同的溝通方式更便捷。
❹與外界進行連接:Lync 結合身份驗證使用 Lync 或 Skype 來將統一溝通內容通過Internet 擴展到客戶、供應商及合作夥伴。
❺使用標準化的高解析視訊:Lync 憑藉包含 H.264 SVC 的開放標準,在多種設備上為使用者提供高品質的視訊體驗。
Lync 2013快速启动指南说明书

CalendrierGuide de démarrage rapide Planifiez une réunion LyncOrganisez une réunion en face à face ou limitez vos déplacementsen planifiant une réunion en ligne à l’aide de Lync 2013.Marqueur de temps actuelLa ligne intermédiaire indique l’heure actuelle pour vous permettre de voir les événements à venir. Consultez la météo Consultez les prévisions pour votre ville et quatre autres villes au maximum. Si vous devez assister à une réunion à l’extérieur, vous saurez ainsi comment vous vêtir.Créez d’autres calendriers Identifiez rapidement la période optimale pour planifier uneréunion professionnelle ou un congé. Changez d’affichageUtilisez l’affichage Calendrier adapté à votre flux detravail. Changez d’affichage selon vos besoins.Partagez votre calendrierOuvrez votre calendrier à des collègues pour qu’ils puissentafficher vos rendez-vous et votre statut.Statut de réponse à unedemande de réunionSi vous n’avez pas encore réponduà une invitation à une réunion, lerendez-vous est indiqué avec unecouleur plus claire.Planifier un rendez-vous 1.Cliquez sur Calendrier dans la barrede navigation. Planifier une réunion avec d’autres personnes1.Cliquez sur Calendrier dans la barre de navigation.2.Cliquez sur Nouvelle réunion.3.Renseignez les zones Objet et Emplacement, puis entrez les heures de début et de fin.4.Dans la demande de réunion, tapez les informations que vous souhaitez partager avecles destinataires. Vous pouvez également joindre des fichiers.5.Cliquez sur Assistant Planification pour trouver le meilleur moment pour votre réunionen analysant la disponibilité des destinataires et des ressources (telles que les sallesde réunion).2.Dans le ruban, cliquez surNouveau rendez-vous .3.Renseignez leszones Objet etEmplacement.4.Tapez les heuresde début etde fin.5.Dans la zone Afficher en tant que, sélectionnez un statut indiquant votredisponibilité aux autres personnes.6.Pour rendre le rendez-vous périodique, cliquez sur Périodicité.7.Sélectionnez la fréquence (par exemple, tous les jours ou tous les mois) et lesautres options adaptées (par exemple, tous les deux jours ou tous les trois mois).8.Si vous voulez modifier l’heure du rappel (15 minutes par défaut), cliquez sur lazone Rappel , puis sélectionnez une autre heure. 6.Cliquez sur Ajouter des participants, puis tapez les noms des destinataires, lesadresses de messagerie ou les noms des ressources (séparés par des points-virgules) dans les zones Obligatoire, Facultatif ou Ressources.7.Pour les comptes Exchange, le volet Recherche de salles suggère les meilleuresheures pour votre réunion (lorsque la plupart des participants sont disponibles). Pour sélectionner un horaire de réunion, cliquez sur une suggestion d’horaire dans le volet Recherche de salles dans la section Heures suggérées ou choisissez un horaire dans la grille de disponibilité.8.Si vous ne voulez pas rendre cette réunion périodique, cliquez sur Envoyer.Laisser un calendrier et vos rendez-vous et réunions toujours visiblesDéplacez votre souris sur Calendrier dans la barre de navigation, puis cliquez surle bouton Ancrer dans le coin supérieur droit de l’aperçu. Le calendrier, ainsi queles rendez-vous et réunions du jour, apparaissent dans un volet à droite.Modifier un rendez-vous, une réunion ou un événement Pour modifier un rendez-vous ou une réunion1.Ouvrez l’événement dans votre calendrier.2.Si cet événement fait partie d’une série périodique et que vous voulez simplement modifiercette instance, dans la boîte de dialogue Ouvrir un élément périodique, cliquez surCe rendez-vous, puis sur OK.3.Si cet événement fait partie d’une série périodique et que vous voulez modifier toutes lesinstances, dans la boîte de dialogue Ouvrir un élément périodique, cliquez sur Toute la série, puis sur OK.4.Apportez les modifications souhaitées, puis cliquez sur Enregistrer et fermer. Pour uneréunion, cliquez sur Envoyer une mise à jour.Pour modifier un événement1.Ouvrez l’événement dans votre calendrier, puis cliquez sur Événement.2.Modifiez l’option Afficher en tant que sur Occupé(e), Travaille ailleurs, Provisoireou Absent(e) du bureau.3.Cliquez sur Enregistrer et fermer. Proposer, accepter ou refuser une nouvelle heurede réunionPlutôt que de refuser une demande pour une réunion à laquelle vous ne pouvez pas assister, vous pouvez proposer une nouvelle heure de réunion. L’organisateur de la réunion peut accepter ou refuser la modification.Pour proposer une nouvelle heure1.Dans la demande de réunion ouverte, cliquez sur Réunion.2.Dans le groupe Répondre, cliquez sur Proposer une nouvelle heure.3.Choisissez une heure à laquelle tous les invités ou la plupart d’entre eux sont libres.4.Cliquez sur Proposer une heure, puis sur Envoyer.Si vous êtes l’organisateur de la réunion, les propositions de changement d’horaire vous sont envoyées. C’est à vous de décider si vous voulez changer l’heure de la réunion.Pour accepter une nouvelle heure de réunion proposée1.Ouvrez la demande de réunion.2.Cliquez sur Accepter la proposition.3.Cliquez sur Envoyer une mise à jour.Pour refuser une nouvelle heure proposée1.Ouvrez la demande de réunion.2.Cliquez sur Réponse à une demande de réunion.3.Dans le groupe Répondre, cliquez sur Répondre, tapez votre message, puis cliquez surEnvoyer.4.Dans la demande de réunion, sous l’onglet Réponse à une demande de réunion, dansle groupe Supprimer, cliquez sur Supprimer.Changer les jours ouvrés de votre calendrier et le début de votre semaine1.Cliquez sur Fichier > Options > Calendrier.2.Sous Horaire de travail, effectuez l’une des opérations suivantes :•Pour modifier vos heures de travail, dans les listes Heure de début et Heure de fin, cliquez sur les heures de début et de fin de votre journée de travail.•Pour définir votre semaine de travail, cochez les cases qui font partie de votre semaine de travail. Décochez les cases qui ne font pas partie de votre semaine de travail.•Pour définir le premier jour de la semaine, cliquez sur un jour dans la liste Premier jour de la semaine.•Pour définir la première semaine de l’année, cliquez sur une entrée dans la liste Première semaine de l’année.Personnaliser des calendriers et s’y déplacerVous pouvez accéder directement au jour actuel ou afficher les 7 prochains jours.Partager votre calendrierPour partager votre calendrier avec des personnes de votre organisation qui utilisent la messagerie avec un serveur Exchange1.Cliquez sur Calendrier dans la barre de navigation, puis cliquez sur Accueil > Partagerle calendrier . 2.Dans le nouveau message électronique qui s’ouvre, ajoutez les personnes aveclesquelles vous souhaitez partager le calendrier dans la zone À. 3.Cliquez sur Envoyer , puis sur OK .Le destinataire reçoit une notification par courrier électronique indiquant que vous avez partagé votre calendrier, et votre calendrier est ajouté à sa liste Calendriers partagés.Pour partager votre calendrier avec des personnes externes à votre organisation dans un message électronique1.Cliquez sur Calendrier dans la barre de navigation, puis cliquez sur Accueil > Envoyerle calendrier par courrier électronique . 2.Dans les zones Calendrier et Plage de dates , sélectionnez le calendrier et la périodeà partager. Par exemple, sélectionnez Aujourd’hui ou 7 prochains jours . 3.Cliquez sur OK pour l’envoyer.Les destinataires peuvent désormais voir votre calendrier dans le message et ils peuvent ouvrir le fichier iCalendar joint dans Outlook.Pour partager votre calendrier en le publiant en ligne1.Cliquez sur Calendrier dans la barre de navigation, puis cliquez sur Accueil > Publieren ligne .2.Cliquez sur Configurer ce calendrier publié. Une nouvelle page de navigateur webintitulée Publication de calendrier – Calendrier s’affiche. 3.Choisissez les informations de publication, les heures de début et de fin et lesrestrictions d’accès.4.Cliquez sur Copier les liens dans le Presse-papiers pour copier les liens d’abonnement aucalendrier (via un compte connecté à un serveur Exchange) ou pour afficher le calendrier dans un navigateur web. Copiez les liens dans un éditeur de texte, tel que le Bloc-notes.5.Cliquez sur Enregistrer pour terminer l’opération de publication.6.Envoyez les liens par courrier électronique aux utilisateurs souhaités, selon qu’ils peuventou non s’abonner au calendrier via leur compte de messagerie Exchange ou simplement l’afficher dans le navigateur.•Pour afficher le jour actuel, dans le groupe Atteindre , cliquez sur Aujourd’hui . •Pour afficher le calendrier sur les 7 prochains jours, dans le groupe Atteindre , cliquez sur Les 7 prochains jours . Vous pouvez organiser l’affichage Calendrier de manière à n’afficher qu’un seul jour, la semaine de travail, la semaine de 7 jours ou le mois.•Dans le groupe Réorganiser , cliquez sur Jour , Semaine de travail , Semaine ou Mois . La vue Calendrier affiche le calendrier dans le sens vertical. Cet affichage est utile lorsque plusieurs calendriers sont sélectionnés. Chaque calendrier est empilé de haut en bas. Pour vous déplacer entre les jours, les semaines et les mois, cliquez sur les flèches gauche et droite en regard de la période située en haut du calendrier.Créer des calendriers supplémentaires1.Cliquez sur Calendrier dans la barre de navigation.2.Cliquez sur l’onglet Dossier, puis sur Nouveau calendrier.3.Dans la zone Nom, tapez un nom pour le nouveau calendrier.4.Dans la liste Sélectionner l’emplacement de ce dossier, cliquez sur Calendrier,puis sur OK.Le nouveau calendrier apparaît dans le volet Dossiers du calendrier.Pour afficher un calendrier, cochez la case en regard du calendrier.Gérer les éléments de courrier et de calendrier d’une autre personneAjoutez la boîte aux lettres de l’autre personne à votre profil Outlook de manière à ce qu’elle s’ouvre au démarrage d’Outlook.Pour ajouter la boîte aux lettres d’une autre personne à votre profil Pour ouvrir les dossiers d’une autre personne1.Cliquez sur Fichier > Ouvrir et exporter > Dossier d’un autre utilisateur.2.Dans la zone Nom, entrezle nom de la personne quivous a accordé des autorisationsde partage ou d’accès déléguéou cliquez sur Nom pour lesélectionner dans la liste.3.Dans la liste Type de dossier,cliquez sur le dossier à ouvrir.1.Cliquez sur Fichier >Paramètres du compte >Paramètres du compte.2.Sous l’onglet Messagerie,dans la liste, cliquez sur letype de compte Exchange,cliquez sur Modifier, puiscliquez sur Paramètressupplémentaires.3.Sous l’onglet Avancé, sousOuvrir ces boîtes aux lettressupplémentaires, cliquez surAjouter, puis entrez le nomde la boîte aux lettres àajouter à votre profilutilisateur. Pour répondre aux demandes de réunion1.Si la réunion ne vous a pas été envoyée directement, ouvrez la boîte deréception de l’autre personne, puis ouvrez la demande de réunion.2.Cliquez sur Accepter, Provisoire ou Refuser.Pour créer un message électronique ou répondre à un message électronique de la part d’une autre personne1.Dans Courrier, créez ou ouvrez un message électronique.2.Sous l’onglet Options, dans le groupe Afficher les champs, cliquez sur De.3.Dans la zone De, tapez le nom de la personne de la part de laquelle vousenvoyez le message. Pour sélectionner le nom dans une liste du carnetd’adresses, cliquez sur De. Si la zone et le bouton De ne sont pas affichés, cliquez sur Options > De.。
Lync安装步骤

Lync安装步骤说明以下是lync软件说明,office必须是2007版或更高
1首先,以管理员的身份登陆电脑,安装证书文件
点安装证书
下一步
选择“浏览”,按下图操作。
完成证书安装
2跟据操作系统版本,选择对应版本软件,公司内windows2008为64位版本,其它的系统都是32位版本安装,一直点下一步,完成就可以了,如果安装失败,请先装安msxml6_x86.msi(32位)或
msxml6_x64.msi,
然后再重新装安lync软件,完成。
以下是安装截图
安装补丁
重新安装Lnyc软件,成功安装完成如下。
3执行updata_addressbook.bat文件,重新登陆就可以了。
4lync登陆都是邮箱名,登陆后,右下角如果有错误提示,
请安装软件列表中的office2007-kb936864-fullfile-x86-en-us.exe 登陆帐号是邮箱地址,如果电脑是加入域的,并用域帐号登陆,软件会自动登陆,如果电脑没有加入域,
请手动登陆
设置如下。
1.安装Lync Server 2013前的准备工作

1、安装Lync Server 2013前的准备工作一、实验环境拓扑的准备工作1.Lync Server 2013 分为两个版本:Lync Server 2013 Enterprise Edition 和Lync Server 2013Standard Edition。
主要差异是Standard Edition 不支持Enterprise Edition 的高可用性功能。
为实现高可用性,需要将多个前端服务器部署到一个池中,然后可以进行镜像运行SQL Server 的服务器。
使用Enterprise Edition,您可选择并置或定义独立中介服务器。
监控服务器和存档服务器可使用独立的运行SQL Server 的服务器。
或者,可以将数据库服务器上运行的SQL Server 实例用于前端服务器和池。
2.准备域环境,拓扑图如图所示,并规划IP地址设置:我们将开始Lync Server 2013企业版的部署,首先来介绍一下实验环境,本次部署使用四台虚拟机,一台为DC服务器(同时包含DNS服务器,Exchange Server 2013服务器和CA证书颁发服务器),一台为数据库服务器(SQL Server 2012),作为Lync Server 2013的后端存储,一台为Lync前端服务器(Lync Server 2013)。
操作系统全部采用Windows Server 2012数据中心版,数据库版本采用SQL Server 2012企业版。
3.首先把所有的Windows Server 2012服务器的防火墙关闭:二、DNS服务器的准备工作1.在正式部署Lync Server 2013之前,我们需要提前在DNS中创建Lync所需要的A记录和SRV记录,做好DNS记录的创建和规划,也是部署中比较重要的一项任务。
2.首先,我创建了Lync Server 2013所需要的一些A记录,如图所示:3.然后,继续创建SRV记录,根据官方文档要求,我创建了两条SRV记录,如图所示:4.首先我们在DNS服务器新建一条“其他新记录”:5.选择资源记录类型为“服务位置(SRV)”:6.配置如下图所示:7.以同样的方法在创建一条资源记录,如下图所示:三、CA服务器的准备工作在部署Lync Server 2013之前,要求我们的环境中有证书服务器,我们可以利用Windows 的CA服务来搭建自己的企业证书服务器,该服务器可以为Exchange/Lync/IIS等微软的服务器颁发证书。
LyncServer2013安装部署图文教程(标准版示例附软件下载)

LyncServer2013安装部署图⽂教程(标准版⽰例附软件下载)Lync Server 2013是微软前不久发布的⼀款预览版产品,提供标准和企业两种版本。
Lync Server 2013企业版和标准版之间的主要区别在于标准版不⽀持企业版的⾼可⽤性功能。
下⾯将以Lync Server 2013标准版为例,简述lync 2013的部署过程,体验微软新产品。
1. 部署准备为Lync部署操作系统,安装功能组件、配置IIS,配置DNS,添加SRV记录、准备安装账户、共享⽂件夹2. lync证书服务安装证书服务器3. 扩展架构、安装lync管理⼯具域架构扩展,准备lync标准版服务、安装lync管理⼯具、构建及发布拓扑4. 安装lync server安装Lync 服务器及组件5. 启⽤⽤户,Client 测试⼀、部署准备为Lync部署操作系统,安装功能组件、配置IIS,配置DNS,添加SRV记录、准备安装账户、共享⽂件夹Windows功能和组件准备安装(需要sever2012安装镜像并指定⽂件位置)、Windows Desktop Experience、Message Queuing、Windows Identity Foundation、配置IIS安装Silverlight软件名称:微软银光(Microsoft Silverlight) 官⽅版DNS准备SRV记录⽤于在域内的⽤户使⽤Lync客户端⾃动登录⽤的完成后,测试创建的记录是否正确。
在任意⼀台服务器或域内客户端上运⾏命令提⽰符,设置正确后结果如下:准备安装账户权限将Lync安装账户加⼊到“CsAdministrator”组准备共享⽂件夹以便以后存档服务器和监控服务器的使⽤。
任意位置创建⼀个⽂件夹,并共享,添加管理员有读写权限,everyone的只读权限。
lyncwebapp会议使用手册

lyncwebapp会议使用手册上海有孚阳光互联阳光云会议用户手册2013年12月上海有孚计算机网络有限公司目录1. 主持人账号管理员 (2)1.1 添加主持人账号 (2)1.2 编辑主持人账号 (3)2. 会议管理 (5)2.1. 会议创建 (5)2.2. 会议编辑 (6)在会议主题中,选择需要编辑会议,在右边点击“编辑会议”。
(7)3. 加入会议 (8)3.1. 浏览器加入会议 (8)3.2. 电话加入会议 (11)3.3. 手机/平板加入会议 (12)4. 阳光云会议功能介绍 (17)4.1. 即时消息 (18)4.2. 相关任务 (19)4.3. 音频控件 (20)4.4. 视频控件 (24)4.5. 共享内容 (26)4.6. 管理参与者 (33)3.6.1 管理会议音频 (35)3.6.2 管理会议视频 (36)3.6.3 更改显示布局 (36)3.6.4 更改窗口大小 (37)3.6.5 检查参与者的音频和视频功能 (37)3.6.6 结束计算机音频和通过电话加入音频 (38)4.7. 布局选项 (38)4.8. 会议选项 (39)3.8.1 阳光云会议选项 (39)3.8.2 导航选项 (40)3.8.3 需要帮助 (40)3.8.4 离开音频 (40)3.8.5 退出会议 (41)1.主持人账号管理员1.1 添加主持人账号主持人账号管理员登陆地址是/,显示界面如下:输入用户名、域名、密码以及验证码,点击登陆。
显示如下页面:点击“云会议”,点击“新建主持人账号”。
输入主持人信息,点击“增加”。
1.2 编辑主持人账号点击需要编辑的主持人显示名,或勾选需要编辑的主持人,点击操作中的“”符号。
在基本信息中修改主持人的基本信息,点击“保存”。
点击“修改密码”,修改完密码后,点击“保存”。
2.会议管理2.1.会议创建1)浏览器登陆主持人界面2)输入主持人账号、密码、验证码,点击登陆。
如下图所示:3)点击“创建新会议”4)填写会议信息,填写完毕,点击“安排会议”。
Lync_主要功能介绍
2. 多方会谈 1) 先按照键盘的 Ctrl 键不松开,再选中需要会谈的多个人员,再放开 Ctrl 键,再右键点击被选过 的人员中的其中一个,再选择 Send an Instant Message,如下图
2) 然后会出现 Group Conversationd 对话框,如下图
3) 打开后点击左边的 Personal,再将右面的 Automatically Start Lync when I log on to Windows 前面的 方框打钩,然后点击 OK。
设置好后,以后都会在每次启动电脑后,Lync 都会自动启动和登录。
举例改名为 Planning,这时新组已经建立好了。
2. 修改组的名称 1) 先右键点击需要修改的组,再点击 Rename Group
2) 现在就可以重新命名需要的组
3. 可以将刚刚添加好的再选择 Move Contact To,再选择事先创建过的组,如下图
4. 如需要添加相同组的人,可以用以下方法添加。也是现在搜索栏输入对方全名,等出现在列表 后,点击+号,再选择刚刚新建好的组。
当对方添加你时,也可以直接放到事先创建好的组中,如下图
也可以在 Outlook 地址薄里面的用户添加到 Lync 里面,如下图
3) 如果发现还需要增加人员进来会谈,可以先点击右边有两个小人的图标, 再选择 Invite by Name or Phone Number。
4) 然后会出现 Invite by Name or Phone Number 对话框,这时候可以选择一个或多个人员,再点 击 OK,就可以将需要增加的人员添加到会谈中。 (选择多个人员的方法也是先按住键盘的 Ctrl 键,再选择需要的人,再松口 Ctrl 键)
Lync Server 2013之初次安装

Lync Server 2013之初次安装原创作品,允许转载,转载时请务必以超链接形式标明文章原始出处、作者信息和本声明。
否则将追究法律责任。
/4042188/934400Lync 2013安装 1. IIS 7.5 role servicesThe following table indicates the required IIS 7.5 role servicesAdd-WindowsFeature Web-Server, Web-Static-Content, Web-Default-Doc, Web-Scripting-Tools, Web-Windows-Auth, Web-Asp-Net, Web-Log-Libraries, Web-Http-Tracing,Web-Stat-Compression, Web-Default-Doc, Web-ISAPI-Ext, Web-ISAPI-Filter,Web-Http-Errors, Web-Http-Logging, Web-Net-Ext, Web-Client-Auth, Web-Filtering, Web-Mgmt-Console,Web-Asp-Net,Web-Dyn-Compression, Web-Mgmt-Console,MSMQ-Server, MSMQ-Directory,Desktop-Experience, Web-Asp-Net45 –restart2. Configure File Storage1. Click Start, point to All Programs, point to Administrative Tools, and then click DFS Management.2. In the console tree of the DFS Management snap-in, right-click the namespace server (for example ), and then click Edit Settings.3. Select Shared Folder Permissions.4. Select Use Custom Permissions.5. For the Administrator group, select the following under Allow:a) Full Controlb) Changec) Read6. Click Apply, and then click OK.3. Install Lync Server Administrative Tools1. Log on as a local administrator (minimum requirement) to the computer where you want to install the administrative tools. If you are logged on as an a standard user on the Windows Vista or Windows 7 operating systems, and User Account Control (UAC) is enabled, you will be prompted for the local administrator or a domain equivalent user name and password.2. Locate the installation media on your computer, and then double-click \Setup\amd64\Setup.exe.3. If you are prompted to install the Microsoft Visual C++ 2008 distributable, click Yes.4. On the Microsoft Lync Server 2013 Preview Installation Location page, click OK. Change this path to another location or drive if you need to have the files installed to another location.5. On the End User License Agreement page, review the license terms, click I accept, and then click OK. This step is required before you can continue.6. On the Microsoft Lync Server 2013 Preview – Deployment Wizard page, click Install Topology Builder.7. When the installation successfully completes, click Exit.8.4. Run Schema Preparation1. Log on to a computer in the forest as a member of the Schema Admins group and with administrator rights on the schema master.2. Install Lync Server Core components as follows:a) From the Lync Server 2013 Preview installation folder or media, run Setup.exe to start the Lync Server Deployment Wizard.b) If you are prompted to install the Microsoft Visual C++ Redistributable, click Yes.c) The Lync Server 2013 Preview Setup dialog box prompts you for a location to install the Lync Server files. Choose the default location or Browse to a location of your choice, and then click Install.d) On the License Agreement page, check I accept the terms in the license agreement, and then click OK. The installer installs the Lync Server 2013 Preview Core Components.3. Start the Lync Server Management Shell: Click Start, click All Programs, click Microsoft Lync Server 2013 Preview, and then click Lync Server Management Shell.4. Run cmdletInstall-CsAdServerSchema5. Use the following cmdlet to verify that schema preparation ran to completion.Get-CsAdServerSchemaThis cmdlet returns a value of SCHEMA_VERSION_STATE_CURRENT if schema preparation was successful6. Wait for Active Directory replication to complete or force replication.5. Run Forest Preparation1. Start the Lync Server Management Shell: Click Start, click All Programs, click Microsoft Lync Server 2013 Preview, and then click Lync Server Management Shell.2. Run:Enable-CsAdForest -GroupDomain is my domain name3. To verify that forest preparation was successfulLog on to a computer that is joined to a domain as a member of the Domain Admins group in the forest root domain.1. Start the Lync Server Management Shell: Click Start, click All Programs, click Microsoft Lync Server 2013 Preview, and then click Lync Server Management Shell.2. Run:Get-CsAdForestThis cmdlet returns a value of LC_FORESTSETTINGS_STATE_READY if forest preparation was successful.6. Run Domain PreparationTo use cmdlets to prepare the domain1.Log on to any server in the domain as a member of the Domain Admins group.2.Install Lync Server Core components as follows:a. From the Lync Server 2013 Preview installation folder or media, run Setup.exe to start the Lync Server Deployment Wizard.b. If you are prompted to install the Microsoft Visual C++ Redistributable, click Yes.c. The Lync Server 2013 Preview Setup dialog box prompts you for a location to install the Lync Server files. Choose the default location or Browse to a location of your choice, and then click Install.d. On the License Agreement page, check I accept the terms in the license agreement, and then click OK. The installer installs the Lync Server 2013 Preview Core Components.3.Start the Lync Server Management Shell: Click Start, click All Programs, click Microsoft Lync Server 2013 Preview, and then click Lync Server Management Shell.4.Run:Enable-CsAdDomain -Domain If you do not specify the Domain parameter, the default is the local domain.5.To verify that domain preparation was successfulGet-CsAdDomain -Domain -GlobalSettingsDomainController If you do not specify the Domain parameter, the default is the local domain.This cmdlet returns a value of LC_DOMAINSETTINGS_STATE_READY if domain preparation was successful.7. Design the topology1. Log on to the computer where Topology Builder is installed as a member of the Domain Admins group and the RTCUniversalServerAdmins group.2. Start Topology Builder: Click Start, click All Programs, click Microsoft Lync Server 2013 Preview, and then click Lync Server Topology Builder.3. Start Topology Builder: Click Start, click All Programs, click Microsoft Lync Server 2013 Preview, and then click Lync Server Topology Builder.4. In Topology Builder, select New Topology. You are prompted for a location and file name for saving the topology. Give the topology file a meaningful name and accept the default extension of .tbxml. Click OK.5. Navigate to the location where you want to save the new topology XML file, enter a name for the file, and then click Save.6. On the Define the primary domain page, enter the name of the primary SIP domain for your organization, and then click Next.7. On the Specify additional supported domains page, enter the names of additional domains, if any, and then click Next.8. On the Define the first site page, enter a name and a description for the first site, and then click Next.9. On the Specify site details page, enter the location information for the site, and then click Next.10.On the New topology was successfully defined page, ensure the Open the New Front End Wizard when this wizard closes check box is selected, and then click Finish8. Define and Configure a Front End Pool1. In the Define New Front End Pool Wizard, on the Define the New Front End pool page, click Next.2. On the Define the Front End pool FQDN page, enter a fully qualified domain name (FQDN) for the pool you are creating, click Enterprise Edition Front End pool, and then click Next.3. On the Define the computers in this pool page, enter a computer FQDN for the first Front End Server in the pool, and then click Add. Repeat this step for any additional computers (up to eight) that you want to add to the pool, and then click Next.4. On the Select features page, select the check boxes for the features that you want on this Front End pool. For example, if you are deploying only instant messaging (IM) and presence features, you would select the Conferencing check box to allow multiparty IM, but would not select the Dial-in (PSTN) conferencing, Enterprise Voice, or Call Admission Control check boxes, because they represent voice, video, and collaborative conferencing features.a) Conferencing This selection enables a rich set of features including:i. IM with more than two parties in an IM session.ii. Conferencing, which includes document collaboration, application sharing, and desktop sharing.iii. A/V conferencing, which enables users to have real-time audio/video (A/V) conferences without the need for external services such as the Live Meeting service or a third-party audio bridge.b) Dial-in (PSTN) conferencing Allows users to join the audio portion of a Lync Server 2013 Preview conference by using a public switched telephone network (PSTN) phone without requiring an audio conferencing provider.c) Enterprise Voice Enterprise Voice is the Voice over IP (VoIP) solution in Lync Server 2013 Preview that allows users to make and receive phone calls. You would deploy this feature if you plan to use Lync Server 2013 Preview for voice calls, voice mail, and other functions that use a hardware device or a software client.d) Call admission control (CAC) CAC determines, based on available network bandwidth, whether to allow real-time communications sessions such as voice or video calls to be established. If you have deployed only IM and presence, CAC is not needed because neither of these two features uses CAC.e) Archiving Archiving provides a way for you to archive IM content, conferencing (meeting) content, or both that is sent through Lync Server 2013 Preview.f) Monitoring Monitoring Server enables you to collect numerical data that describes the media quality on your network and endpoints, usage information related to VoIP calls, IM messages, A/V conversations, meetings, application sharing, and file transfers, and call error and troubleshooting information for failed calls.5. On the Select collocated server roles page, you can to collocate the Mediation Server on the Front End Server or to deploy it as a stand-alone server.You can collocate the Mediation Server on the Front End pool.a) If you intend to collocate the Mediation Server on the Enterprise Edition Front End pool, ensure the check box is selected. The server role will be deployed on the pool servers.b) If you intend to deploy the Mediation Server as a stand-alone server, clear the appropriate check box. You will deploy Mediation Server in a separate deployment step after you completely deploy the Front End Server.6. The Associate server roles with this Front End pool page allows you to define and associate server roles with the Front End pool. The following role is available:Enable an Edge pool Defines and associates a single Edge Server or a pool of Edge Servers. An Edge Server facilitates communication and collaboration between users inside the organization and people outside the organization, including federated users.There are two possible scenarios that you can use to deploy and associate the server roles:For scenario one, you are defining a new topology for a new installation. You can approach the installation in one of two ways:a) Leave the check box clear and proceed with defining the topology. After you have published, configured, and tested the Front End and Back End Server roles, you can run Topology Builder again to add the role servers to the topology. This strategy will allow you to test the Front End pool and the server running SQL Server without additional complications from additional roles. After you have completed your initial testing, you can run Topology Builder again to select the roles you need to deploy.b) Select roles that you need to install, and then set up the hardware to accommodate the selected roles.For scenario two, you have an existing deployment and your infrastructure is ready for new roles or you need to associate existing roles with a new Front End Server:c) In this case, you will select the roles that you intend to deploy or associate with the new Front End Server. In either case, you will proceed with the definition of the roles, set up any needed hardware, and proceed with the installation.7. On the Define the SQL store page, do one of the following:a) To use an existing SQL Server store that has already been defined in your topology, select an instance from SQL store.b) To define a new SQL Server instance to store pool information, click New and then specify the SQL Server FQDNin the Define New SQL Store dialog box.c) To specify the name of a SQL Server instance, select Named Instance, and then specify the name of the instance.d) To use the default instance, click Default instance.e) To use SQL Mirroring, select Enable SQL mirroring and select an existing instance or create a new instance.8. On the Define the file share page, do one of the following:a) To use a file share that has already been defined in your topology, select Use a previously defined file share.To define a new file share, select Define a new file share, in the File Server FQDN box, enter the FQDN of the existing file server where the file share is to reside, and then enter a name for the file share in the File Share box.9. On the Specify the Web Services URL page, do one or both of the following:a) If you are configuring DNS load balancing, select the Override internal Web Services pool FQDN check box, enter the internal base URL (which must be different from the pool FQDN and could be, for example, internal-<your base URL>) in Internal Base URL.b) Optionally enter the external base URL in External Base URL. You would enter the external base URL to differentiate it from your internal domain naming. For example, your internal domain is , but your external domain name is . You would define the URL using the domain name. This is also important in the case of a reverse proxy. The external base URL domain name would be the same as the domain name of the FQDN of the reverse proxy. Instant messaging and presence does require HTTP access to the Front End pool.10. If you selected Conferencing on the Select Features page, on the Specify the WAC Server URL page enter the WAC server discovery URL.11. On the Define the SQL store for archiving page, select an existing instance or SQL Server, or define a new instance to store the data associated with archiving data.12. On the Define the SQL store for monitoring page, select an existing instance or SQL Server, or define a new instance to store the data associated with monitoring data.13. Click Next. If you defined other role servers on the Associate server roles with this Front End pool page, separate role configuration wizard pages will open to allow you to configure the server roles. For details, see the following: 14. If you did not select additional server roles to configure and deploy, or when you have finished the configuration of the additional role servers, click Finish.Setup 1Setup 2Setup 3Setup 4本文出自“阳光☆奋进”博客,请务必保留此出处/4042188/934400。
- 1、下载文档前请自行甄别文档内容的完整性,平台不提供额外的编辑、内容补充、找答案等附加服务。
- 2、"仅部分预览"的文档,不可在线预览部分如存在完整性等问题,可反馈申请退款(可完整预览的文档不适用该条件!)。
- 3、如文档侵犯您的权益,请联系客服反馈,我们会尽快为您处理(人工客服工作时间:9:00-18:30)。
LYNC客户端安装与使用说明
一、环境检查
为了成功安装使用Lync 2010即时消息客户端,用户计算机必须满足下列条件:
1.操作系统为Windows XP专业版SP3以上。
点击开始,右键点击“我的电脑”,选择“属
性”,在“常规”选项卡下确认操作系统版本;
2.安装了.Net Framework
3.5 SP1。
二、安装Lync 2010客户端
以win 7操作系统为例,根据以下步骤完成安装配置过程:
1.LYNC2010客户端安装及手动配置一下LYNC服务器,路径
是 \\tdsws\Public\Software\Application\System Tools\LYNC 2010\32位或64位
2.双击lyncsetup.exe:
3.在确保所列程序中已打开的程序如Outlook, IE和Office(Excel、PowerPoint、Word)
全部保存并关闭后,点击“安装”:
4.安装完成后点击“关闭”运行Lync,建议在安装完成后重新启动计算机:
三、Lync客户端登陆及其配置
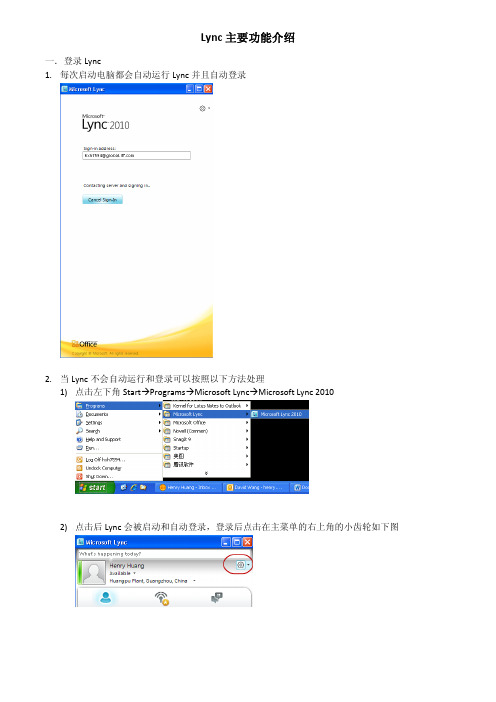
1.Lync客户端运行后界面如下图,按照提示格式输入登陆地址,用户名和密码进行登录,默
认情况下,登陆地址应为电子邮件系统的email地址(如果尚未开通邮箱功能,则登陆格式为username@),您的帐户的密码。
2.在登陆Lync客户端之前需要在客户端的”工具”→”选项”→“高级“设置里面添加一个lync
服务器内部地址,如不需可以省略:
3.点击菜单栏的“文件”-“注销”,则可以退出Lync客户端。
四、体验Lync 2010客户端
(一)查找和添加联系人
1.登录Lync,在“查找联系人”处输入要添加人的地址格式为:username@,
在查找到的联系人图标上点击鼠标右键,选择“添加到联系人列表”,添加到组:
或直接点击“+”按钮添加;
2.对方将弹出如下提示:
3.添加后即可在联系人列表中看到新添加的联系人,双击后即可进行对话、传送文件、共享信
息和视频等。
注:等通讯簿同步完成可直接输入简称搜索联系人
(二)创建联系人组
1.在“组”的菜单界面,点击右键,选择“创建新组”,输入组的名称。
2.新建组将与其他组并列。
(三)使用语音功能
1.在联系人列表中,鼠标移至所选联系人,点击右侧的“呼叫”图标,即可发起呼叫。
或者
点击右键选择“呼叫”;
或者在文本消息对话窗口点击“呼叫”发起语音会话。
2.对方屏幕右下角将收到如下提示:
3.双方接听后,状态显示如下:
4.拨打话机或手机:
(四)多人文本消息
如果需要多人文本消息,可以将其他联系人直接拖拽到当前对话窗口。
(五)会议功能体验
如果需要多人电话会议,可以将其他联系人直接拖拽到当前通话窗口。
(六)共享功能
演示者可以共享自己的桌面、ppt等如下图所示:。