瓦尔特刀盘型号说明
瓦尔特刀具资料4

3
| 26th Sept. 2008 | FRD |
Activities/improvements since launch in i-pac 2/2007 改进措施
• improvement of blanks (run-out <0,02mm) 跳动小于2丝 • flute polishing 排削槽抛光处理,减小排削阻力 • edge treaTment with small tolerances 刃口小的公差处理 • checking of coolant holes after edge treatment 刃口处理后再复查内冷孔
C45 1045
D = 2,0mm t = 40,0mm vc = 63m/min n = 10.000rpm f = 0,06mm/rev vf = 600mm/min
xdmicro_01.wmv
7
| 26th Sept. 2008 | FRD |
Tool life test 刀具寿命试验
Material: C45 (1045) Diameter: 2.0mm vc = 63 m/min f = 0.05 mm/rev vf = 500 mm/min t = 50 mm Coolant: Emulsion 6%
XD geometry XD 槽型
2
| 26th Sept. 2008 | FRD |
Application Areas 应用领域
– Steel- and cast iron materials – 钢件-铸铁 – Stainless steel 不锈钢 – Non-ferrous metals, such as – 非铁金属 – Aluminum alloys 铝合金 – Copper alloys 铜合金 – Magnesium alloys 镁合金 – Titanium alloys 钛合金
11-瓦尔特三面刃铣刀F2252特点

2
三面刃铣刀F2252 三面刃铣刀
1. 产品概述 2. 应用范围 3. 客户受益 4. 与竞争对手的比较 5. 目标 6. 市场技术资料
W200D-01/01
3
1. 产品概述
• 直径范围 Dc = 80 - 315 mm • 切削刃有三种宽度系列,宽度尺寸 B = 8 - 25 mm • 宽度可以通过偏心销来调整 • 直径可以调整 • 调整螺钉的安装位置确保调整方便 • 夹紧斜块有导向 • 刀座和备件适用于该系列原三面刃铣刀 • 通用刀片可以用于左手刀或右手刀 • 安装孔采用标准系列
W200D-01/01
11
W200D-01/01
4
1. 产品结构
夹紧斜楔 刀座 螺钉 偏心销
刀体
W200D-01/01
5
1. 产品介绍
全刃三面刃铣刀-错齿 全刃三面刃铣刀 错齿 三面刃铣刀 -斜齿 斜齿
W200D-01/01
6
1. 产品概述 应用范围 产品概述-应用范围
刀具类型 MP..0603.. 几何形状 A57 F57 G88 A57 MP..0803.. F57 G88 A57 MP..1204..
W200D-01/01
SB 8-9 9-10
SB SB 10-12 12-14 14-16 16-19 19-22 22-25
• • • •
• • • •
• • •
• • •
• • •
• • • • •ຫໍສະໝຸດ • • • • •SB
• • • •
可调范围 2 mm SB
可调范围 3 mm
SB
•
• • • • • • •
16-18 18-19
瓦尔特

10
| April. 2010 | WCN | Du Yiwei
刀片的厚度6
01 T1 02 T2 03 T3 04 05 06 07 09 10 12
11 | April. 2010 | WCN | Du Yiwei
表示刀片主切削刃到刀 片定位面的距离,用两 S=1.98 位数代表,取理论长度 S=2.38 的整数部分。 S=1.59 S=2.78 S=3.18 S=3.97 S=4.76 S=5.56 S=6.35 S=7.94 S=9.52 S=10.00 S=12.00 •当刀片厚度的整数 相同而小数部分值 不同,则将小数部 分大的刀片的代号 用“T”代替“0”, 以示区别。 •如舍取小数部分后 只剩下一位数字, 则必须在数字前加 一个“0”。
厂方标记12
生产厂可在ISO的9个符号后加一个连字符,填写自己的标记以 表明产品的特点,例如卷屑槽形状
车 G1 G2 NF NF5 NS4 NS5 NS8 NM NM4 NM5 NM7 NR5 NR7 PF5 PS4 PS5 PM2 PM5 PR5
镗 钻 B57 D57 E57 精镗 X5 X15 X25
π ×d ×n
1000
进给速度:
Vf = n× fz × Z
n —转速,r/min d —铣刀直径,mm Z---齿数 Vc—切削速度,m/min f —进给量,mm/r
30
| April. 2010 | WCN | Du Yiwei
如何正确查找瓦尔特刀具?
• 查看相关的目录表 • 查看产品一览图 • Walter 选择法 • 索引表
8/32 0.38 0.47 0.54 0.66 1 1.1 1.26 1.42 1.58
32/100 1.08 1.32 2.54 2.94 3.33
模具常用刀片介绍

清角刀片系列一
• 11型:
• APMT1135PDER HP-7025:适合加工钢件\铸铁.
APMT1135
• APMT1135PDER HP-7022:表面呈红色,新的含硅涂层,适合加工钢件, 表现出良好的耐崩性和耐磨性.
• 新建文件夹 (4)\7022、7225和VP15TF 16R0.8对比.xls
寿命长.尤其在加工侧壁时表现出良好的光 洁度,可替代山特R390-11T308M-PM 1030/530 刀片. 此刀片 配SA011R刀杆。
AOMT1136
清角刀片系列三
• APKT11T308E MP-7025 • 加工钢件用,在槽型跟刃口设计上跟1135有
区别,切削时更加轻快,更耐崩,在使用 寿命上表现突出. 配SAP11R及TAP11T3R刀杆。
• RDEWT0802MO HP-7012 加工高硬度钢件,可达HRC50. 使用高硬度刀片时.线速度尽量调低,Vc=6080M/Min.即降低转速,余量控制在0.15-0.25mm之 间.
RPEW0802
圆刀片系列五(精加工)
• R5/R6精加工刀片:
• RCKT10T3MO PL30
• RCKT1204MO PL20/PL25/PL30 模具精加工刀片,替代山特R6-530刀片,在通用性,稳定性方
•
HRC45度以上材料加工(HP7012 )
• 配刀盘:463X13Q22(锐耐克)
•
KXP13-63-22(SKIF)
• 编制程序:63R2
• 可替代东芝WPMT080615ZSR AH120.刀片
• 刀头可以通用,在使用寿命相同情况下性价
• 比更佳.
• 可替代可乐易WDKT130520 ZDSR-MH PC3525
CNC标准刀柄及拉钉
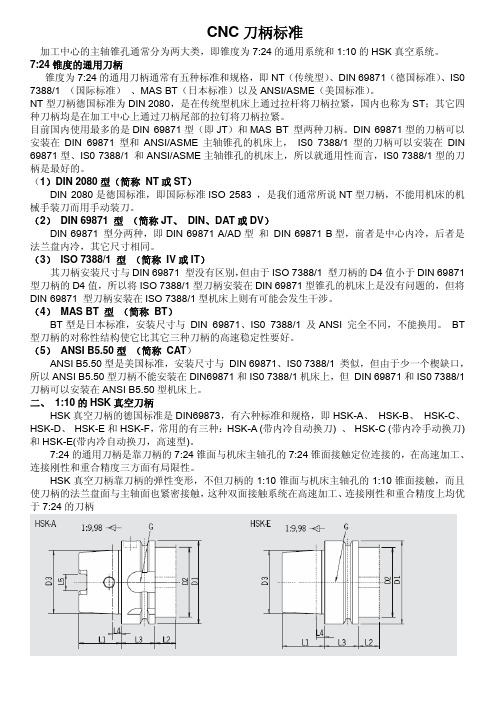
CNC刀柄标准加工中心的主轴锥孔通常分为两大类,即锥度为7:24的通用系统和1:10的HSK真空系统。
7:24锥度的通用刀柄锥度为7:24的通用刀柄通常有五种标准和规格,即NT(传统型)、DIN 69871(德国标准)、IS0 7388/1 (国际标准)、MAS BT(日本标准)以及ANSI/ASME(美国标准)。
NT型刀柄德国标准为DIN 2080,是在传统型机床上通过拉杆将刀柄拉紧,国内也称为ST;其它四种刀柄均是在加工中心上通过刀柄尾部的拉钉将刀柄拉紧。
目前国内使用最多的是DIN 69871型(即JT)和MAS BT 型两种刀柄。
DIN 69871型的刀柄可以安装在DIN 69871型和ANSI/ASME主轴锥孔的机床上, IS0 7388/1型的刀柄可以安装在DIN 69871型、IS0 7388/1 和ANSI/ASME主轴锥孔的机床上,所以就通用性而言,IS0 7388/1型的刀柄是最好的。
(1)DIN 2080型(简称 NT或ST)DIN 2080是德国标准,即国际标准ISO 2583 ,是我们通常所说NT型刀柄,不能用机床的机械手装刀而用手动装刀。
(2) DIN 69871 型(简称JT、 DIN、DAT或DV)DIN 69871 型分两种,即DIN 69871 A/AD型和DIN 69871 B型,前者是中心内冷,后者是法兰盘内冷,其它尺寸相同。
(3) ISO 7388/1 型(简称 IV或IT)其刀柄安装尺寸与DIN 69871 型没有区别,但由于ISO 7388/1 型刀柄的D4值小于DIN 69871 型刀柄的D4值,所以将ISO 7388/1型刀柄安装在DIN 69871型锥孔的机床上是没有问题的,但将DIN 69871 型刀柄安装在ISO 7388/1型机床上则有可能会发生干涉。
(4) MAS BT 型(简称 BT)BT型是日本标准,安装尺寸与 DIN 69871、IS0 7388/1 及ANSI 完全不同,不能换用。
Walter Meier 半、1、2、3、5吨杠锤说明书
Operating Instructions and Parts ManualArbor Press – ½-, 1-, 2-, 3-, 5-TonModel No. AP0-M, AP1-M, AP2-M, AP3-M, AP5-MWALTER MEIER (Manufacturing) Inc.427 New Sanford RoadLaVergne, Tennessee 37086 Part No. M-333605M Ph.: 800-274-6848 Revision A 05/2011 Copyright © 2011 Walter Meier (Manufacturing) Inc.Warranty and ServiceWalter Meier (Manufacturing) Inc., warrants every product it sells. If one of our tools needs service or repair, one of our Authorized Service Centers located throughout the United States can give you quick service. In most cases, any of these Walter Meier Authorized Service Centers can authorize warranty repair, assist you in obtaining parts, or perform routine maintenance and major repair on your JET® tools. For the name of an Authorized Service Center in your area call 1-800-274-6848.MORE INFORMATIONWalter Meier is consistently adding new products to the line. For complete, up-to-date product information, check with your local Walter Meier distributor, or visit .WARRANTYJET products carry a limited warranty which varies in duration based upon the product (MW = Metalworking, WW = Woodworking).WHAT IS COVERED?This warranty covers any defects in workmanship or materials subject to the exceptions stated below. Cutting tools, abrasives and other consumables are excluded from warranty coverage.WHO IS COVERED?This warranty covers only the initial purchaser of the product.WHAT IS THE PERIOD OF COVERAGE?The general JET warranty lasts for the time period specified in the product literature of each product.WHAT IS NOT COVERED?Five Year Warranties do not cover woodworking (WW) products used for commercial, industrial or educational purposes. Woodworking products with Five Year Warranties that are used for commercial, industrial or education purposes revert to a One Year Warranty. This warranty does not cover defects due directly or indirectly to misuse, abuse, negligence or accidents, normal wear-and-tear, improper repair or alterations, or lack of maintenance.HOW TO GET SERVICEThe product or part must be returned for examination, postage prepaid, to a location designated by us. For the name of the location nearest you, please call 1-800-274-6848.You must provide proof of initial purchase date and an explanation of the complaint must accompany the merchandise. If our inspection discloses a defect, we will repair or replace the product, or refund the purchase price, at our option. We will return the repaired product or replacement at our expense unless it is determined by us that there is no defect, or that the defect resulted from causes not within the scope of our warranty in which case we will, at your direction, dispose of or return the product. In the event you choose to have the product returned, you will be responsible for the shipping and handling costs of the return.HOW STATE LAW APPLIESThis warranty gives you specific legal rights; you may also have other rights which vary from state to state.LIMITATIONS ON THIS WARRANTYWALTER MEIER (MANUFACTURING) INC., LIMITS ALL IMPLIED WARRANTIES TO THE PERIOD OF THE LIMITED WARRANTY FOR EACH PRODUCT. EXCEPT AS STATED HEREIN, ANY IMPLIED WARRANTIES OR MERCHANTABILITY AND FITNESS ARE EXCLUDED. SOME STATES DO NOT ALLOW LIMITATIONS ON HOW LONG THE IMPLIED WARRANTY LASTS, SO THE ABOVE LIMITATION MAY NOT APPLY TO YOU.WALTER MEIER SHALL IN NO EVENT BE LIABLE FOR DEATH, INJURIES TO PERSONS OR PROPERTY, OR FOR INCIDENTAL, CONTINGENT, SPECIAL, OR CONSEQUENTIAL DAMAGES ARISING FROM THE USE OF OUR PRODUCTS. SOME STATES DO NOT ALLOW THE EXCLUSION OR LIMITATION OF INCIDENTAL OR CONSEQUENTIAL DAMAGES, SO THE ABOVE LIMITATION OR EXCLUSION MAY NOT APPLY TO YOU.Walter Meier sells through distributors only. The specifications in Walter Meier catalogs are given as general information and are not binding. Members of Walter Meier reserve the right to effect at any time, without prior notice, those alterations to parts, fittings, and accessory equipment which they may deem necessary for any reason whatsoever. JET® branded products are not sold in Canada by Walter Meier.Table of ContentsWarranty and Service (2)Table of Contents (3)Warnings (4)Introduction (5)Specifications (5)Arbor Press Features (6)Set-up and Operation (6)Changing Ram Position (6)Maintenance (6)Parts Lists (7)Exploded View (8)The specifications in this manual are given as general information and are not binding. Walter Meier (Manufacturing) Inc., reserves the right to effect, at any time and without prior notice, changes or alterations to parts, fittings, and accessory equipment deemed necessary for any reason whatsoever.1. Read and understand the entire owners' manual before attempting assembly or operation.2. Read and understand the warnings posted on the machine and in this manual. Failure to comply withall of these warnings may cause serious injury.3. Replace the warning labels if they become obscured or removed.4. This arbor press is designed and intended for use by properly trained and experienced personnelonly. If you are not familiar with the proper and safe operation of an arbor press, do not use until proper training and knowledge have been obtained.5. Do not use this arbor press for other than its intended use. If used for other purposes, Walter Meier(Manufacturing) Inc., disclaims any real or implied warranty and holds itself harmless from any injury that may result from that use.6. Always wear approved safety glasses/face shields while using this arbor press. Everyday eyeglassesonly have impact resistant lenses; they are not safety glasses.7. Do not operate this arbor press while tired or under the influence of drugs, alcohol or any medication.8. Make sure this arbor press is firmly secured to the floor or bench before use.9. Check damaged parts. Before further use of the arbor press, a part that is damaged should becarefully checked to determine that it will operate properly and perform its intended function. Check for alignment of moving parts, binding of moving parts, breakage of parts, mounting and any other conditions that may affect its operation. A guard or other part that is damaged should be properly repaired or replaced.10. Provide for adequate space surrounding work area and non-glare, overhead lighting.11. Keep the floor around the arbor press clean and free of scrap material, oil and grease.12. Keep visitors a safe distance from the work area. Keep children away.13. Make your workshop child proof with padlocks, master switches or by removing starter keys.14. Give your work undivided attention. Looking around, carrying on a conversation and “horse-play” arecareless acts that can result in serious injury.15. Maintain a balanced stance at all times so that you do not fall into the arbor press. Do not overreachor use excessive force to perform any machine operation.16. Use recommended accessories; improper accessories may be hazardous.17. Make sure the work piece is securely attached or clamped to the table.18. Remove loose items and unnecessary work pieces from the area before starting the machine.19. Do not overload the arbor press by using extension (cheater) bars.20. Use steel collars to support parts when pressing on bearings to prevent damage to the bearings. Familiarize yourself with the following safety notices used in this manual:This means that if precautions are not heeded, it may result in minor injury and/or possible machine damage.This means that if precautions are not heeded, it may result in serious injury or possibly even death.IntroductionThe arbor press is designed for riveting, swaging, bending, punching, and flattening. The arbor press can be used to press on or remove close-fitting bearings and bushings. It is suited for the production environment as well as machine shops, automobile repair shops, and home workshops.The anvil has four slots that are available for a variety of pressing operations.SpecificationsStock# ............................... 333605............... 333610............... 333620............... 333630 (333650)Model# ............................... AP0-M................ AP1-M................ AP2-M................ AP3-M................ AP5-M Capacity .............................. ½Ton.................. 1 Ton.................. 2 Ton.................. 3 Ton................... 5Ton Dimensions:Length ................................... 9”......................11”......................16”................18-1/8”................ 26-1/8” Width .............................. 5-1/2””................. 7-1/2”................. 9-1/2”......................11”................ 12-3/4” Height ............. ....................11”................. 8-3/4”................17-1/8”................20-1/2”................ 34-5/8” Max Working Height ........ 4-3/4”................. 5-7/8”....................... 9”................12-1/2”................ 18-1/6” Swing .............................. 6-5/8”....................... 8”................11-3/8”................10-3/4”...................... 17” Anvil Diameter ....................... 4”....................... 5”................. 7-3/8”................11-3/8”...................... 18” Ram Dimension ............ 3/4” Sq.................. 1” Sq.................. 1” Sq.................. 1” Sq................... 2” Sq. Net Weight ................... 16-1/2 lbs........... 24-1/4 lbs................. 64 lbs............... 105 lbs................ 248 lbs. The above specifications were current at the time this manual was published, but because of our policy of continuous improvement, Walter Meier (Manufacturing) Inc., reserves the right to change specifications at any time and without prior notice, without incurring obligations.Read and understand the entire contents of this manual before attempting assembly or operation! Failure to comply may cause serious injury!Arbor Press FeaturesThe arbor press (see Exploded view on page 8) consists of a cast iron base, an anvil, a pressing handle with lock knob, and a rack-type ram.The removable anvil has four cutouts that can be used for pressing off or pressing on bearings or bushings of various sizes.Set-up and OperationNote: The item numbers provided in the procedures that follow correspond with the item numbers in the exploded view in the Replacement Parts section, see page 8.Do not use the arbor press without first securing the arbor press to the workbench and anchoring the workbench to the floor.Mount the arbor press to the workbench or stand and secure with bolts using the holes in the base (1). Also, secure the workbench or stand to the floor..Changing Ram PositionThe ram has a flat surface on one end and a hole on the other end. The hole is used to accept the punch inserts. Change-out the ram as follows:A. Remove the handle by loosening the knob(17). Then remove one cap (5) from thehandle assembly. Remove handle (6) from the pinion (16).B. Remove the pinion retainer (14) by backingoff the Set Screw (13). Now slide the pinion retainer (14) off of the pinion (16).C. Pull up on the ram (4) enough to provideslack to remove the pinion (16) from the arbor press.D. Pull the ram (4) out the top of the arborpress body. Turn the ram (4) end-for-end.Hint: if ram does not freely come out of arbor press body loosening the two hex nuts (11) on side of arbor press body and the two hex nuts (11) on the front plate (12).E. Repeat steps A – D in reverse.MaintenanceA. Periodically lubricate the arbor press with alight machine oil.B. Wipe off or vacuum the accumulated debrisand dust after using the arbor press.C. Periodically check the ram for side-to-side andfront-to-back play. If the play is excessive, loosen the hex nuts (11) and adjust (tighten) the screws (10 on side, 9 in front) just enough to eliminate the excess play. Tighten them equally to assure even contact with the ram(4).D. Once the play is eliminated, hold the screw(10 or 9) in position and tighten the hex nut(11). Check to make sure the amount of playis acceptable.Parts ListsModel AP0-M – 1/2-ton Arbor PressIndex Part No. Description Qty1 .......... A P0-01 ............. B ase .. (1)2 .......... A P0-06 ............. A nvil (1)3 .......... A P0-16 ............. S pring Pin 6x16 . (1)4 .......... A P0-02 ............. R am (1)5 .......... A P0-5-1............ C ap . (2)6 .......... A P0-6-1............ H andle .. (1)7 .......... T S-1482051 ..... B olt, Hex M6x25 (4)8 .......... T S-1550041 ..... W asher M6.. (4)9 .......... T S-1482051 ..... B olt, Hex M6x25 (2)10 ........ T S-1482061 ..... B olt, Hex M6x30 (2)11 ........ T S-1540041 ..... N ut, Hex M6 (4)12 ........ A P0-12 ............. P late .. (1)13 ........ T S-1523011 ..... S HSS M6x6 (1)14 ........ A P0-10 ............. P inion Retainer.. (1)15 ........ T S-1482021 ..... B olt, Hex M6x12 (1)16 ........ A P0-03 ............. P inion . (1)17 ........ A P0-05 ............. K nob .. (1)18 ........ T S-2361061 ..... L ock Washer M6 .. (4)............ A P0-19 ............. I D Label (not shown) .. 1 Model AP1-M – 1-ton Arbor PressIndex Part No. Description Qty1 .......... A P1-01 ............. B ase .. (1)2 .......... A P1-06 ............. A nvil (1)3 .......... A P0-16 ............. S pring Pin 6x16 . (1)4 .......... A P1-02 ............. R am (1)5 .......... A P1-5-1............ C ap . (2)6 .......... A P1-6-1............ H andle .. (1)7 .......... T S-1482051 ..... B olt, Hex M6x25 (4)8 .......... T S-1550041 ..... W asher M6.. (4)9 .......... T S-1482051 ..... B olt, Hex M6x25 (2)10 ........ T S-1482061 ..... B olt, Hex M6x30 (2)11 ........ T S-1540041 ..... N ut, Hex M6 (4)12 ........ A P1-12 ............. P late .. (1)13 ........ T S-1523011 ..... S HSS M6x6 (1)14 ........ A P1-10 ............. P inion Retainer.. (1)15 ........ T S-1482021 ..... B olt, Hex M6x12 (1)16 ........ A P1-03 ............. P inion . (1)17 ........ A P1-05 ............. K nob .. (1)18 ........ T S-2361061 ..... L ock Washer M6 .. (4)............ A P1-19 ............. I D Label (not shown) .. 1 Model AP2-M – 2-ton Arbor PressIndex Part No. Description Qty1 .......... A P2-01 ............. B ase .. (1)2 .......... A P2-06 ............. A nvil (1)3 .......... A P2-16 ............. S pring Pin 6x25 . (1)4 .......... A P2-02 ............. R am (1)5 .......... A P2-5-1............ C ap . (2)6 .......... A P2-6-1............ H andle .. (1)7 .......... T S-1490051 ..... B olt, Hex M8x30 (4)8 .......... T S-1550061 ..... W asher M8................. 4 9 ..........TS-1490051 .....Bolt, Hex M8x30 (2)10 ........TS-1490051 .....Bolt, Hex M8x30 (2)11 ........TS-1540061 .....Nut, Hex M8 (4)12 ........AP2-12 .............Plate (1)13 ........TS-1523011 .....SHSS M6x6 . (1)14 ........AP2-10 .............Pinion Retainer .. (1)15 ........TS-1490021 .....Bolt, Hex M8x16 (1)16 ........AP2-03 .............Pinion . (1)17 ........AP2-05 .............Knob .. (1)18 ........TS-2361081 .....Lock Washer M8 .. (4)............AP2-19 .............ID Label (not shown) (1)Model AP3-M – 3-ton Arbor PressIndex Part No. Description Qty1 ..........AP3-01 .............Base (1)2 ..........AP3-06 .............Anvil (1)3 ..........AP2-16 .............Spring Pin 6x25 . (1)4 ..........AP3-02 .............Ram (1)5 ..........AP3-5-1 ............Cap . (2)6 ..........AP3-6-1 ............Handle (1)7 ..........TS-1490051 .....Bolt, Hex M8x30 (4)8 ..........TS-1550061 .....Washer M8 .. (4)9 ..........TS-1490051 .....Bolt, Hex M8x30 (2)10 ........TS-1490051 .....Bolt, Hex M8x30 (2)11 ........TS-1540061 .....Nut, Hex M8 (4)12 ........AP3-12 .............Plate (1)13 ........TS-1524011 .....SHSS M8x8 . (1)14 ........AP3-10 .............Pinion Retainer .. (1)15 ........TS-1490031 .....Bolt, Hex M8x20 (1)16 ........AP3-03 .............Pinion . (1)17 ........AP3-05 .............Knob .. (1)18 ........TS-2361081 .....Lock Washer M8 .. (4)............AP3-19 .............ID Label (not shown) (1)Model AP5-M – 5-ton Arbor PressIndex Part No. Description Qty1 ..........AP5-01 .............Base (1)2 ..........AP5-06 .............Anvil (1)3 ..........AP5-16 .............Spring Pin 6x24 . (1)4 ..........AP5-02 .............Ram (1)5 ..........AP5-5-1 ............Cap . (2)6 ..........AP5-6-1 ............Handle (1)7 ..........TS-1491061 .....Bolt, Hex M10x40 . (4)8 ..........TS-1550071 .....Washer M10 (4)9 ..........TS-1491061 .....Bolt, Hex M10x40 . (2)10 ........TS-2210501 .....Bolt, Hex M10x50 . (2)11 ........TS-1540071 .....Nut, Hex M10 . (4)12 ........AP5-12 .............Plate (1)13 ........TS-1524031 .....SHSS M8x12 .. (1)14 ........AP5-10 .............Pinion Retainer .. (1)16 ........AP5-03 .............Pinion . (1)18 ........TS-2361101 .....Lock Washer M10. (4)............AP5-19 .............ID Label (not shown) (1)Exploded ViewWALTER MEIER (Manufacturing) Inc.427 New Sanford RoadLaVergne, Tennessee 37086Ph: 800-274-6848。
瓦尔特刀具资料

F4033试切
• 试切:42CrMo4
Rm 工件材质 [N/mm² ] 820 参数 Vc Z fz ap ae [m/min] [1] [mm] [mm] [mm] 0.3 6 50 SNMX1205ANN-F57 WKP35 240 1 0.4 6 50 刀片 材质 加工长度 [m] 11.2 9.6
– 相同切削参数时,要降低成本,必须 命
[min]
100 80 60 40 20 0
+ 60%
before
after
采用更新进的刀具材质以提高刀具寿
+ 60%
W200D-01/01
Performance / Folien-Nr.7
Increase of Performance_d.ppt / MPR / 16.04.02
W200D-01/01
Performance / Folien-Nr.19
Increase of Performance_d.ppt / MPR / 16.04.02
GW61_镗孔加工知识培训

3
886
3
861
3
836
3
810
3
785
3
759
3
734
3
709
4
683
4
658
4
632
4
607
4
582
4
Balancing scale presetting
R 0.4
R0,8
U [gmm]
φ [°]
U [gmm]
φ [°]
974
3
946
3
949
3
921
3
923
3
895
3
898
3
870
3
872
3
844
2.刀片槽型的推荐值决定了切削深度 更锋利的槽型更小的圆角半径,其切深就越小。 切深过大,不宜断屑。 切深过小,易吃刀不足,产生磨擦。
镗加工时防止振动的方法
使用尽可能大的刀具直径 使用尽可能短的刀具悬伸 尽可能使用锥形刀柄/缩径杆 使用大悬伸的抗振刀具 检查机床主轴,跳动量,磨损,夹紧力等 检查刀具组件间是否以正确的扭矩装配 降低切削速度 降低进给/提高进给 提高切深(精加工) 使用更小的刀尖半径(精加工) 使用有更锋利切削刃的刀片 使用90度主偏角(粗加工) 检查工件夹紧
3
847
3
819
3
822
3
794
3
796
3
768
3
771
3
743
3
745
3
717
4
720
4
692
4
695
4
667