电子秒表说明书
ktj秒表ta210使用说明书
Ktj秒表ta210使用说明书秒表设置使用:在正常时间显示下,按一次MODE键,就会看到进入秒表状态,再按二次START键(右键)开始计时,需停再按一次START键,继续再按一次START键。
重新归零计时,在秒表停止状态下,按一下SPLIT键(左键)就会归零重新计时。
闹铃时间设置:在正常时间显示下,按二次MODE键,就会看到进入闹铃时间设置状态,再连续按START键(右键)开始调时,按一下SPLIT键(左键),就会转入调分。
按住左键同时按右键一下就取消了闹钟功能。
时间设置:在正常时间显示下,按三次MODE键,就会看到秒数在闪,按一下SPLIT键(左键),就会看到分数在闪,然后按START 键(右键)把分数调好,按一下SPLIT键(左键)就会看到时数在闪,然后按START键(右键)把时数调好,按一下SPLIT键(左键)就会看到日数在闪,然后按START键(右键)把日数调好,都这样操作等把月数和星期都调好后,按MODE键退出完毕使用纽扣电池一粒AG10纽扣电池(表里面有一粒)说明书在包装盒上英文说明共计三个调节按键产品用途:广泛用于设定午体学习、美容、煲烫、晒版等等时间设定。
产品功能:精确度以秒为单位计算.最大容量为99分59秒。
使用方法:1:按M键设置“分”所指的位置。
2:按S键设置“秒”所指的位置。
3:同时按M键和S键显示归零重新设置。
4:按START,/STOP键开始或停止到时。
5:当设定时间倒数为“零”秒时发生警报。
6:按任意键停止警报。
电池使换:1:当计时器显示不清楚或声音减弱时要更换电池2:使用纽扣G13型号电子。
3:滑开电池门.取出旧电池.分清新电池正负极放进去.把电池门推回原来位置即可。
电子秒表使用说明

正品深圳君斯达JS-601金属秒表运动秒表2道记忆1/100秒萤幕显示双道记忆、1/100秒萤幕显示日历及时间显示(12/24小时转换)定闹及整点报闹金属外壳LR44电池Size:77××君斯达牌多功能系列秒表使用说明书秒表计时:按3号键直接秒表显示,如果秒表显示为零,按1号键停止计时,按2号键复位到零1、秒表计时按1号键开始计时,再按1号键停止计时(重复按1号键,重得开始/停止),按2号键复位到零2、分段计时按1号键开始计时,按2号键记下前段时间(注:秒表在计下前段时间时,表内部仍在计时),再按2号键,在累加时间的基础上恢复走时(每次分段重复按2号键两次),按1号键复位到零3、二段计时按1号键开始计时,按2号键显示第一段时间;按1号键停止计时,按2号键显示第二段时间;再按2号键复位到零二、时间,日历,响闹显示按3号键直至显示正常走时,按1号键显示月,日和星期,按2号键显示响闹时间,同时按住1号键和2号键响闹取消/保持三、设置时间和日历在正常走时状态按3号键三次,正常走时闪烁,这样进入了时间设置方式,按1号键置(按住不动,快数置数),按2号键选择秒,分,时,日,月,星期(A/P为12小时制,A为上午,P为下午,H为24小时制)作为调校对象,调校完毕,按3号键回到时间显示方式。
四、设置响闹在正常走时关态按3号键两次,时和星期同时闪烁,这样进入响闹设置方式;按2号键先择分和小时,按1号键改变分和小时数字,按3号键回到时间显示。
在正常走时关态,按住2号键,同时按1号键,定闹符号出现/消失,定闹取消/保持,同时按3号键,每小时报点符号,星期日至星期六,七个字符出现/消失,每小时报点保持/取消五、电池更换当显示变暗或无显示时,用十字的拧松表后壳螺丝,取下表后壳,(或用硬币拧出表后壳上的电池门),取出表内旧的扣式电池,装上一个同样型号或一个同样大小的扣式电池,然后装上表壳,拧紧表壳螺丝六、注意事项1避免受潮,不能在雨不下使用2不宜长时间在太阳下爆晒和置于强光下照射3避免与腐蚀性物质接触4避免在温度过高或过低的环境下使用。
多功能电子时钟说明书
实现的功能如下:
1、显示时间;
2、调节时间;
3、设置闹钟时间;
4、整点报时(可开可关可随时停止);
扩展功能:
5、简易计算器(可算加减法)计算、秒表(可精确到百分之一秒和十分之一秒,可切换);
7、倒计时(可设置倒计时时间,减到0后蜂鸣器响);
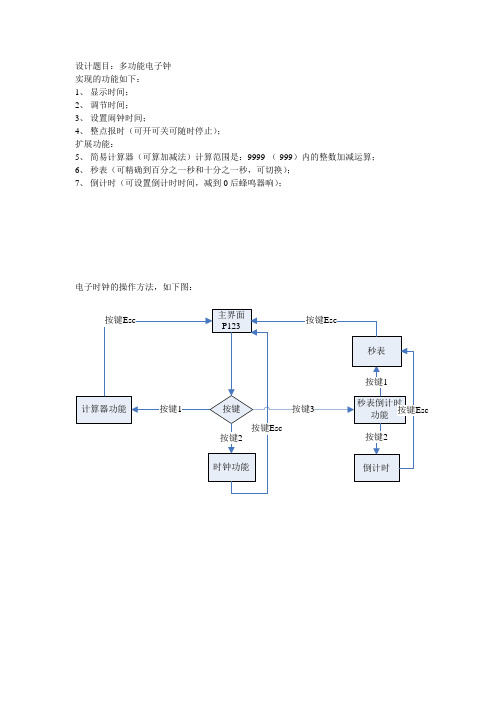
电子时钟的操作方法,如下图:
下面,具体介绍各功能使用方法:
1、计算器功能,如下图:
2、时钟功能,如下图:
3、秒表倒计时功能,如下图:
秒表倒计时功能倒计时功能秒表功能按键1按键2退出秒表倒计时功能按键esc开始计时按键ok十分之一秒百分之一秒按键按键0暂停计时按键继续计时按键ok存储数据1存储数据2存储数据3按键1按键2按键3暂停计时按键按键按键读取数据按键读取数据1读取数据2读取数据3按键1按键2按键3清零清零清零按键按键按键按键按键按键09可以输入数据开始倒计时按键ok减到0蜂按键esc关闭蜂鸣器按键清零按键0
君斯达js609秒表使用说明

君斯达JS609秒表使用说明1. 产品概述君斯达JS609是一款高性能的电子秒表,它具有精准计时、多功能计时和便捷携带等特点,适用于各种计时场景。
2. 产品外观君斯达JS609采用简约的设计风格,外观小巧轻便。
其主要部件包括显示屏、操作按钮和电池仓。
3. 功能介绍3.1 精准计时君斯达JS609采用先进的计时芯片,具有高精度的计时功能。
它可以以毫秒为单位进行计时,并且误差极小,确保您能够准确记录时间。
3.2 多功能计时君斯达JS609具有多种计时模式,可以满足不同场景下的需求。
主要的计时模式包括: - 单次计时:按下开始按钮后开始计时,再次按下停止按钮后停止计时。
- 分段计时:可以记录多个时间段,并在最后显示总时间。
- 计次功能:可以记录多次单次计时,并显示每次单次计时的结果。
此外,君斯达JS609还具有倒数定时、闹钟和日期显示等实用功能,可以满足更多日常需求。
3.3 操作说明君斯达JS609的操作非常简单,下面是详细的操作说明: 1. 开始计时:按下开始按钮即可开始计时。
2. 停止计时:按下停止按钮即可停止计时。
3. 复位计时:按下复位按钮即可复位计时器,并清零显示屏。
4. 记录分段时间:在分段计时模式下,按下记录按钮即可记录当前时间段,并在显示屏上显示总时间。
5. 计次功能:在单次计时模式下,按下记录按钮即可记录当前单次计时结果,并在显示屏上显示每次单次计时的结果。
4. 使用注意事项为了保证君斯达JS609的正常使用和延长其使用寿命,请注意以下事项: - 请勿将君斯达JS609放置在高温、潮湿或有腐蚀性气体的环境中。
- 请勿将君斯达JS609暴露在阳光直射或强烈磁场中。
- 请勿使用尖锐物品划伤或损坏君斯达JS609的外壳。
- 请定期更换电池,以确保君斯达JS609正常工作。
- 请避免将君斯达JS609与其他电子设备放在一起,以免干扰计时精度。
5. 常见问题解答5.1 为什么君斯达JS609的计时不准确?可能是因为电池电量不足,请更换新电池并重新使用。
电子表使用说明书
电子表使用说明书电子表使用说明书篇一:电子表使用说明书 1 、正常时间模式:正常时间画面显示时、分、秒、星期。
1.1 按START键显示日期。
1.2 按RESET键显示每日闹铃时间。
1.3 按MODE进入跑秒模式。
1.4 按LIGHT键灯亮3秒。
1.5 按RESET+START键打开/关闭每日闹铃,相应的图标显示/消失;按住两键则发出bibi的响声。
1.6 按RESET+MODE键可打开/关闭整点报时(星期全显示为打开,反之则为关闭)。
任何状态下按住RESET+START+MODE三键,画面全显示,松开则返回。
2 、跑秒模式:从正常时间模式按MODE键一次进入跑秒模式。
2.1 按START键开始/停止跑秒。
2.2 跑秒停止时,按RESET键跑秒数值归0。
2.3 跑秒运行时,按RESET键,提取一个分段时间,跑秒画面停止(但跑秒并没有中止依然在背后运行)之后:若按RESET键,画面显示总的跑秒值;若按START键,在背后运行的跑秒停止,但画面依然停止,再按RESET键显示跑秒停止时的值。
3 、每日闹铃设定:从正常时间模式按MODE键两次进入每日闹铃设定状态,时位闪动。
3.1 按RESET键转换设定对象:时分3.2 按START键调整相应的数值,按住键可进行快速调整。
3.3 每日闹铃设定完成,按MODE键保存并退出设定,转到正常时间模式。
每日闹铃打开,当到达闹铃时间,会发出1分钟的bibi声;闹铃期间,若按START键,5分钟后会再次闹铃。
4 、正常时间设定:从正常时间模式按MODE键三次进入正常时间设定状态,秒位闪动。
4.1 按RESET键转换设定对象:秒分时日月星期4.2 按START键调整相应的数值,按住键可进行快速调整(秒位除外);秒位调整时按START键秒值归0,若秒值大于或等于30,则分值同时增加1。
4.3 时位设定时,按START键可选择12/24小时显示格式。
4.4 正常时间设定完成,按MODE键保存并退出设定状态,转到正常时间模式。
SEIKO数字秒表 Cal. S05A 说明书

You are now the proud owner of a SEIKO Digital Stopwatch Cal. S05A. For best results, please read the instructions in this booklet carefully before using your SEIKO Digital Stopwatch. Please keep this manual handy for ready reference.FEATURESThe SEIKO Quartz Stopwatch for industrial measurement Cal. S05A is a digital decimal stopwatch that can be used for activities such as production control and performance analysis. The stopwatch features a lap time/split time memory function that can store and recall up to 100 sets of lap times and split times. Time/calendar, timer, and alarm functions are also provided.■STOPWATCHThe stopwatch can measure up to 99999.9 DM (999.999 minutes) in 1/10 DM(1/1000minute) increments.*DM (Decimal): Unit used in a decimal system1 DM=1/100 minute 100 DM = 1 minute600 DM = 6 minutes6000 DM = 60 minutes ■LAP TIME, LAP TIME IN PROGRESS AND SPLIT TIME DISPLAYS Three separate stopwatch displays are available for lap time, lap time in progress andsplit time measurements.■MEMORY FUNCTIONUp to 100 lap/split time data can be stored in memory, and they can be recalled either during or after the measurement.■TIME/CALENDARYear, month, day, date, hour, minutes and seconds are displayed.The calendar automatically adjusts for odd and even months including February of leap years from January 1, 2006 to December 31, 2055.■AUTOMATIC SHUT-OFF FUNCTIONWhen the stopwatch is left untouched for one hour, the display automatically becomes blank in order to minimize battery consumption.■DOUBLE REPEAT TIMER•The built-in two descending timers (which allow you to set two different timer times)can be used repeatedly one after the other.•Each Timer 1 and Timer 2 can be set for any desired amount of time from 10 secondsup to 99 hours, 59 minutes and 59 seconds in one-second increments.•For easy distinction between Timer 1 and Timer 2, the time-up warning beeps aredifferent in tones.DISPLAY AND BUTTONSCHANGE OF DISPLAYSTIME/CALENDARdisplaySTOPWATCH <LAP TIME> displaySTOPWATCH<LAP TIME IN PROGRESS>displayALARM displaySTOPWATCH <SPLIT TIME> displayTIMER displayPress Button D to change the display mode.■ALARM•The daily alarm sounds once at the designated time (hour, minute) every 24 hours.■BATTERY LIFE INDICATOR*If Buttons A, B, C and D are pressed at the same time, all the data in memory will be erased. Refer to “HOW TO RESET THE BUILT-IN IC” on page 13 for further details.TIME/CALENDAR SETTINGDayPress to show the TIME/CALENDAR display.Press and hold for 2 seconds to show the TIME/CALENDAR SETTING display.Press repeatedly to select the digits (flashing) to be adjusted.Press to set the flashing digits or reset the SECONDS to “00.”*The DAY disappears and the SECOND digits start flashing.*The digits move quickly if Button A is kept pressed.●12-/24-hour indication setting:Change between 12- and 24-hour indications is made alternately with each press of Button A.●Automatic shut-off function setting (ECO) :With each press of Button A, the automatic shut-off function(ECO) is alternately set to "ON" and "OFF."After all the adjustments are completed, press to return to the TIME/CALENDAR display.STOPWATCH●The stopwatch can measure up to 99999.9 DM in 1/10 DM increments.●Three separate measurement displays are available; lap time, lap time in progress and split time displays.[LAP TIME IN PROGRESS display][LAP TIME display][SPLIT TIME display]STOPWATCH OPERATION1Standard measurementSTARTSTOPRESET▼▼2Accumulated elapsed time measurementPress to show the LAP TIME, LAP TIME IN PROGRESS or SPLIT TIME display.STARTSTOPRESTARTSTOPRESET▼▼▼▼3Lap time measurementPress to show the LAP TIME or LAP TIME IN PROGRESS display.*Restarting and stopping the stopwatch can be repeated by pressing Button C.STARTLAP 1LAP 2FINISHRESET▼▼▼▼*Lap time measurement can be repeated by pressing Button A.4Split time measurementSTARTSPLIT 1SPLIT 2FINISHRESET▼▼▼▼*Split time measurement can be repeated by pressing Button A.5How to use the memory function●Up to 100 lap/split time data can be stored and recalled either during or after measurement.Press to show the MEMORY RECALL display.*In memory recall after measurement, the oldest measurement stored in memory is displayed first.In memory recall during measurement, the newest one is displayed first.Press to return to the STOPWATCH display.Press to show the SPLIT TIME display.●Before using the stopwatch, be sure to reset the digits to “00.”When the stopwatch is stopped, press Button A.When it is counting, press Button C to stop the measurement and then press Button A.Press to show the LAP TIME, LAP TIME IN PROGRESS or SPLIT TIME display.DOUBLE REPEAT TIMER●Two timers are available for use either individually or in combination. When used together, Timer 2 starts counting down as soon as Timer 1 has finished counting down the set time. They repeat their respective countdown cycles alternately as many times as necessary unless stopped.●Each Timer 1 and Timer 2 can be set for any desired amount of time from 10 seconds up to 99 hours, 59 minutes and 59 seconds in one-second increments.●To use either Timer 1 or Timer 2 as a standard repeat timer, set the timer not in use to “00:00’00.”●The number of times that the timers repeat their countdown cycles can be set from 1 to 100 times. If “---“ is set for the number of repeatingtimes, the timers will automatically start over a new counting until stopped by the user.Number of times the countdown isNumber of times the countdownTIMER SETTINGPress to show the TIMER display.Press and hold for 2 seconds to show the TIMER SETTING display.Press repeatedly to select the digits (flashing) to be adjusted.*The HOUR digits for Timer 1 start flashing.Press to set the flashing digits.*The digits move quickly if Button A is kept pressed.*By pressing Button D while the digits are flashing, both of the timers and the number of times the countdown is to be repeated will be reset to “00:00'00"” and “001,” respectively.After all the adjustments are completed, press to return to the TIMER display.▼How to use the timerPress Button C to startTimer 1.mark flashes during the countdown.A time-up warning beep for Timer 1 sounds 3seconds before the set time is up. When the set time is up, time-up beep for Timer 1 sounds for 5seconds.T I M E R 2 s t a r t s counting down.A time-up warning beep for Timer 2 sounds 3seconds before the set time is up. When the set time is up, time-up beep for Timer 2 sounds for 5seconds.TIMER 1 starts counting down.In this way, both the timers repeat the countdown the number of times you have set,showing the number of times the countdown has been completed on the display.ALARM●The daily alarm sounds once at the designated time (hour, minute) every 24 hours.●The alarm sounds for approximately 20 seconds at the designated time and automatically stops.●The alarm can be engaged (on) or disengaged (off) by pressing button C.●Depending on which indication is selected in the Time/Calendar display, the alarm time is displayed in a 12-hour or 24-hour indication.off: --)ALARM TIME SETTINGPress to show the ALARM display.Press and hold for 2 seconds to show the ALARM SETTING display.*The hour digit starts flashing.ENGAGEMENT/DISENGAGEMENT OF THE DAILY ALARMPress to engage (on) or disengage (off) the alarm.Alarm time▼Press repeatedly to select the digits (flashing) to be adjusted.▼Press to set the flashing digits.*The digits move quickly if Button A is kept pressed.After all the adjustments are completed, press to return to the ALARM display.*The alarm mark and alarm on mark will be automatically displayed.HOW TO RESET THE BUILT-IN ICAUTOMATIC SHUT-OFF FUNCTIONWhen the automatic shut-off function is set to “ON” in the TIME/CALENDAR SETTING display, the following energy-saving functions will be activated to help extend the battery life.●Regardless of the display modes, when the stopwatch is left untouched for one hour, the display becomes blank in order to minimize battery consumption.●The current time will be displayed once every 10 seconds even while the display is blank, to indicate that the blank display is not caused by battery exhaustion.●While the stopwatch or timer is measuring, the display will not become blank for the energy-saving functions.●If the alarm is engaged, the alarm will sound at the designated time even while the display is blank.●To return to the normal display, press either Button A, B, C or D.The last display before it became blank will be shown.HOW TO STOP THE ALARM MANUALLY WHILE SOUNDING●The alarm sounds for approximately 20 seconds at the designated time and automatically stops.●Press any of buttons A, B, C, or D to stop the alarm while sounding.*If the alarm time coincides with time-up time while the Double repeat time is counting, the time-up beep is activated first.When an abnormal display (broken digits, etc.) appears, follow the procedure below. The built-in IC will be reset and the watch will resume normal operation.HOW TO RESET THE ICBe sure to press buttons A, B, C, and D at the same time for 2 to 3 seconds. The display will become blank, and then “Sun ’06 1-1 A12:00 willbe displayed. Set the time, calendar and alarm before using the watch.*Please note that if the IC is reset, all data of the MEMO function is deleted.BATTERY CHANGEThe miniature battery which powers your stopwatch should last approximately 3 years (or approximately 7 years if the ECO mode is activated). However,because the battery is inserted at the factory to check the function and performance of the stopwatch, its actual life once in your possession may be less than the specified period. When the battery expires, be sure to replace it as soon as possible to prevent any malfunction. For battery replacement, we recommend that you contact an AUTHORIZED SEIKO DEALER and request a SEIKO CR2032 battery.● If the stopwatch is used for more than 3 hours a day, the Double Repeat Timer function is used more than 5 times a day, the confirmation sound for button operation rings more than 50 times a day, or if the alarm is used more than once a day, the battery life may be less than the specified period.●Battery life indicatorSPECIFICATIONS1.Frequency of crystal oscillator ......................32,768Hz (Hz = Hertz … Cycles per second)2.Accuracy ......................................................... 0.0012% or 30 seconds per month at normal temperature (25ºC 3)3.Operational temperature range ....................–10ºC - +60ºC4.Desirable temperature range of use .............0ºC - 50ºC5.Display systemTIME/CALENDAR display........................Hour, minutes, seconds, year, month, date and day of the week(The calendar automatically adjusts for odd and even months including February of leap years from January 1, 2006to December 31, 2055.)STOPWATCH display .............................. 2 rows of digital displays and a dot matrix display (5 x 35 dots)Hour, minutes, seconds and 1/10 DM (Measures up to 99999.9 DM)LAP TIME display/ LAP TIME IN PROGRESS display/SPLIT TIME display Up to 100 sets of lap times and split times can be stored in memory.TIMER display ..........................................Timer 1 and Timer 2 displaysHour, minutes, seconds, the number of times the countdown was repeated and the number of times the countdown is to be repeated.ALARM display ........................................Alarm time (hour, minute), current time (hour, minute, second)6.Display medium .............................................Nematic Liquid Crystal, FEM (Field Effect Mode)7.Battery .............................................................SEIKO CR2032, 1 piece8.Battery life....................................................... Approximately 3 years (or approximately 7 years if the automatic shut-off function is activated)9.IC (Integrated Circuit).....................................C-MOS-LSI, 1 piece 10.Battery life indicator*The specifications are subject to change without prior notice for product improvement.*Even though the display is flashing, time accuracy is not affected.When all the segments of the display start flashing in the TIME/CALENDAR display, or when “ ” mark starts flashing in other displays, the stopwatch may run down in 2 to 3 days. We suggest that you have the battery replaced by a SEIKO DEALER.。
电子秒表使用说明

正品深圳君斯达JS-601金属秒表运动秒表2道记忆1/100秒萤幕显示双道记忆、1/100秒萤幕显示日历及时间显示(12/24小时转换)定闹及整点报闹金属外壳LR44电池Size:77×61、5×15、5mm君斯达牌多功能系列秒表使用说明书秒表计时:按3号键直接秒表显示,如果秒表显示为零,按1号键停止计时,按2号键复位到零1、秒表计时按1号键开始计时,再按1号键停止计时(重复按1号键,重得开始/停止),按2号键复位到零2、分段计时按1号键开始计时,按2号键记下前段时间(注:秒表在计下前段时间时,表内部仍在计时),再按2号键,在累加时间的基础上恢复走时(每次分段重复按2号键两次),按1号键复位到零3、二段计时按1号键开始计时,按2号键显示第一段时间;按1号键停止计时,按2号键显示第二段时间;再按2号键复位到零二、时间,日历,响闹显示按3号键直至显示正常走时,按1号键显示月,日与星期,按2号键显示响闹时间,同时按住1号键与2号键响闹取消/保持三、设置时间与日历在正常走时状态按3号键三次,正常走时闪烁,这样进入了时间设置方式,按1号键置(按住不动,快数置数),按2号键选择秒,分,时,日,月,星期(A/P为12小时制,A为上午,P为下午,H为24小时制)作为调校对象,调校完毕,按3号键回到时间显示方式。
四、设置响闹在正常走时关态按3号键两次,时与星期同时闪烁,这样进入响闹设置方式;按2号键先择分与小时,按1号键改变分与小时数字,按3号键回到时间显示。
在正常走时关态,按住2号键,同时按1号键,定闹符号出现/消失,定闹取消/保持,同时按3号键,每小时报点符号,星期日至星期六,七个字符出现/消失,每小时报点保持/取消五、电池更换当显示变暗或无显示时,用十字的拧松表后壳螺丝,取下表后壳,(或用硬币拧出表后壳上的电池门),取出表内旧的扣式电池,装上一个同样型号或一个同样大小的扣式电池,然后装上表壳,拧紧表壳螺丝六、注意事项1避免受潮,不能在雨不下使用2不宜长时间在太阳下爆晒与置于强光下照射3避免与腐蚀性物质接触4避免在温度过高或过低的环境下使用。
ys860秒表说明书
ys860秒表说明书摘要:一、秒表ys860概述1.产品简介2.适用场景二、秒表ys860的功能特点1.基本功能2.高级功能三、秒表ys860的性能参数1.测量范围2.精确度3.最大测量值四、秒表ys860的使用方法1.准备工作2.操作步骤3.注意事项五、秒表ys860的维护与保养1.清洁保养2.存放建议3.维修服务正文:一、秒表ys860概述秒表ys860是一款高性能的电子秒表,适用于各种需要精确计时的场景,如实验室研究、运动计时、工业生产等。
二、秒表ys860的功能特点1.基本功能秒表ys860具备基本的计时功能,可以进行单次计时、连续计时以及手动计时。
用户可以根据实际需求选择相应的计时模式。
2.高级功能秒表ys860还具备一些高级功能,如数据存储、统计分析、公英制转换等,为用户提供更多便利。
三、秒表ys860的性能参数1.测量范围秒表ys860的测量范围广泛,最小计时单位可达0.01秒,满足各类应用场景的需求。
2.精确度秒表ys860具有高精确度,测量误差在±0.1%以内,确保数据的准确性。
3.最大测量值秒表ys860最大测量值可达99999.99秒,足以应对各种计时需求。
四、秒表ys860的使用方法1.准备工作使用前,请确保电池电量充足,并检查秒表外观是否有损坏。
然后按照使用说明书进行正确连接电源。
2.操作步骤在确保设备连接正常后,根据实际需求选择相应的计时模式,进行操作。
3.注意事项使用过程中,请勿让液体进入秒表内部,以免影响正常使用。
使用完毕后,请及时关闭电源,避免电池过度放电。
五、秒表ys860的维护与保养1.清洁保养使用干净的软布擦拭秒表外壳,避免使用含有酒精或其他有溶剂的清洁剂。
2.存放建议秒表ys860在不使用时,建议存放在干燥、阴凉的地方,避免阳光直射和高温环境。
- 1、下载文档前请自行甄别文档内容的完整性,平台不提供额外的编辑、内容补充、找答案等附加服务。
- 2、"仅部分预览"的文档,不可在线预览部分如存在完整性等问题,可反馈申请退款(可完整预览的文档不适用该条件!)。
- 3、如文档侵犯您的权益,请联系客服反馈,我们会尽快为您处理(人工客服工作时间:9:00-18:30)。
目录第1章绪论 (1)1.1课题背景 (1)1.2设计题目和设计指标 (1)1.3设计功能 (1)第2章电路的方框图 (2)2.1电路的方框图 (2)2.1电路的方框图的原理说明 (3)第3章单元电路设计与分析 (4)3.1多谐振荡电路 (4)3.2 控制电路 (6)3.3 分频电路 (7)3.4译码显示电路 (8)第4章整机电路的组成 (10)4.1整机电路原理图 (10)4.2整机电路的工作原理 (11)第5章电路的组装调试 (12)5.1 合理布局 (12)5.2 分级调试 (13)结论 (14)收获和体会 (15)致 (17)参考文献 (18)附录 (19)课程设计任务书年月日第1章绪论1.1课题背景随着电子技术的发展,电子技术在各个领域的运用也越来越广泛。
人们对它的认识也逐渐加深。
作为一个学习电子专业的大学生,我们不但要有扎实的基础知识、课本知识,还应该有较强的动手能力。
现实也要求我们既精通电子技术理论,更要掌握电子电路设计、实验研究和调试技术。
1.2技术指标1. 计数围000~999。
2. 具有启动、暂停、停止功能。
1.3设计功能电子秒表是重要的记时工具,广泛运用于各行各业中。
它可广泛应用于对运动物体的速度、加速度的测量实验,还可用来验证牛顿第二定律、机械能守恒等物理实验,同时也适用于对时间测量精度要求较高的场合.测定短时间间隔的仪表。
作为一种测量工具,电子秒表相对其它一般的记时工具具有便捷、准确、可比性高等优点,不仅可以提高精确度,而且可以大大减轻操作人员的负担,降低错误率。
第2章方框图的设计2.1电路的方框图电路的方框图主要由脉冲产生电路、控制及分频电路、计数电路、译码驱动电路及显示电路等单元电路的综合电路组成。
如图2—1所示。
2.2方框图的原理2.2.1 脉冲产生电路由NE555构成的多谐振荡器,是一种能产生矩形波的自激振荡器,也称矩形波发生器。
多谐振荡器没有稳态,只有两个暂稳态。
在工作时电路在这两个稳态之间自动的交替变换,由此产生矩形脉冲信号,常用作脉冲信号源及时序电路中的时钟信号。
并且555定时器的比较器灵敏度高,输出驱动电流大,功能灵活且电路结构简单计算简单。
因此在本电路中采用NE555定时器构成的多谐振荡器作为振荡源。
2.2.2 控制及分频电路(1)清零的功能利用74LS90的使能端,74LS90的R01·R02=0 ,R91·R92=0计数进行。
R01·R02=1时清零。
将R01(2脚)接空相当于接高电平,R02(3脚)接单刀双制开关的中间端,然后两端分别接地与电源,则当开关合向地时计时,当开关合向电源时清零。
(2)暂停的功能用一个开关控制振荡器的输出端与分频电路的输入端的开合。
合则继续,开则暂停。
2.2.3 计数电路74LS90 是异步二—五—十进制加法计数器,它既可以作二进制加法计数器,又可以作五进制和十进制加法. 将12脚与1脚相连组成十进制计数器。
并将6、7脚接地,2、3脚相与得零则计数器开始计数。
14脚为脉冲输入端,将前一个芯片的11脚与后一个的14脚连接则构成74LS90十进制计数的级联。
2.2.4 译码显示电路74LS47,是一种常用的七段显示译码器,该电路的输出为低电平有效,该译码器能够驱动七段显示器显示0~9共10个数字的字形。
将其与数码管相应脚相连则构成译码显示电路。
第3章单元电路的设计与分析3.1 多谐振荡电路由555定时器和外接元件R1、R2、C构成多谐振荡器,脚2与脚6直接相连。
电路没有稳态,仅存在两个暂稳态,电路亦不需要外接触发信号,利用电源通过R1、R2向C充电,以及C通过R2向放电端Dc放电,使电路产生振荡。
电容C在2/3Vcc 和1/3Vcc之间充电和放电,从而在输出端得到一系列的矩形波,对应的波形。
如图3-1。
输出信号的时间参数是: T=tw1+tw2 (式3—1)tw1=0.7(R1+R2)C (式3—2)tw2=0.7R2C (式3—3)其中,tw1为Vc由1/3Vcc上升到2/3Vcc所需的时间,tw2为电容C放电所需的时间。
555电路要求R1与R2均应不小于1KΩ,但两者之和应不大于3.3MΩ。
外部元件的稳定性决定了多谐振荡器的稳定性,555定时器配以少量的元件即可获得较高精度的振荡频率和具有较强的功率输出能力。
(b)(a)图3-1555电路图及波形图图3-2 555引脚图555定时器的逻辑功能TH TRd R OUT DIS ××0 0 导通 >cc V 32 >cc V 31 1导通<cc V 32 >cc V 31 1 保持 保持 ×<cc V 3111截止多谐振荡器如图3-1(a)所示。
当电路刚接通电源时,由于C (C1//C2)来不及充电,555电路的2脚处于零电平,导致其输出3脚为高电平。
当电源通过R1、Rp 向C 充电到Vc≥Vcc 时,输出端3脚由高电路平变为低电平,电容C 经R1和部电路的放电开关管放电。
当放电到Vc≤Vcc 时,输出端又由低电平转变为高电平。
此时电容再次充电,这种过程可周而复始地进行下去,形成自激振荡。
图3-1(b)是输出端及电容器C 上电压的波形。
3.2 控制电路(1)清零的功能利用74LS90的使能端,74LS90的R01·R02=0 ,R91·R92=0计数进行。
R01·R02=1时清零。
将R01(2脚)接空相当于接高电平,R02(3脚)接单刀双制开关的中间端,然后两端分别接地与电源,则当开关合向地时计时,当开关合向电源时清零。
(2)暂停的功能用一个开关控制振荡器的输出端与分频电路的输入端的开合。
合则继续,开则暂停3.3 分频电路计数器是一个用以实现计数功能的时序部件,它不仅可用来计脉冲数,还常用作数字系统的定时,分频和执行数字运算以及其它特定的逻辑功能. 计数器种类很多.按构成计数器中的各触发器是否使用一个时钟脉冲源来分,有同步计数器和异步计数器.根据计数制的不同,分为二进制计数器,十进制计数器和任意进制计数器.根据计数的增减趋势,又分为加法,减法和可逆计数器.还有可预置数和可编程序功能计数器等等。
本次分频电路主要由74LS90完成,如图3-6所示为74LS90的引脚排列图,其中计数器接成十进制形式,对频率为50HZ 的时钟脉冲进行五分频,在输出端Q取得D周期为0.1S 的矩形脉冲,作计数器的时钟输入。
计数器③的输出端与实验装置上译码显示单元的相应输入端连接,可显示000 ~999 秒;000 ~999 秒计时。
通过不同的连接方式,74LS90 可以实现四种不同的逻辑功能;而且还可借助R(1) 、R0(2) 对计数器清零,借助S9(1) 、S9(2) 将计数器置9 。
其具体功能详述如下:(1) 计数脉冲从CP1输入,QA作为输出端,为二进制计数器。
(2) 计数脉冲从CP2输入,QDQCQB作为输出端,为异步五进制加法计数器。
表3-7 74LS90功能表图3-6 74LS90的引脚排列图(3) 若将CP2和QA相连,计数脉冲由CP1输入,QD、QC、QB、QA作为输出端,则构成异步8421 码十进制加法计数器。
(4) 若将CP1与QD相连,计数脉冲由CP2输入, QA、QD、QC、QB作为输出端,则构成异步5421 码十进制加法计数器。
(5) 清零、置9 功能。
a) 异步清零当R0(1) 、R(2) 均为“1”;S9(1)、S9(2) 中有“0”时,实现异步清零功能,即QD QCQBQA=0000 。
b) 置9 功能当S9(1)、S9(2) 均为“1”;R(1)、R(2) 中有“0”时,实现置9功能,即QDQCQBQA=1001。
3.4 译码驱动电路译码器是一个多输入,多输出的组合逻辑电路.它的作用是把给定的代码进行"翻译",成相应的状态,使输出通道中相应的一路有信号输出。
译码器在数字系统中有广泛的用途,不仅用于代码的转换,终端的数字显示,还用于数据分配,存贮器寻址和组合控制信号等。
不同的功能可选用不同种类的译码器。
本次采用的是74LS47译码器。
它是BCD-7段数码管译码器/驱动器,74LS47的功能用于将BCD码转化成数码块中的数字,通过它解码,可以直接把数字转换为数码管的显示数字。
译码为编码的逆过程。
它将编码时赋予代码的含义“翻译”过来。
实现译码的逻辑电路成为译码器。
译码器输出与输入代码有唯一的对应关系。
74LS47是输出低电平有效的七段字形译码器,它在这里与数码管配合使用。
3.5 显示电路现在的许多电器设备上都有显示十进制字符显示器,以直观的显示出电器设备的运行数据。
目前广泛使用的字符显示器是七段字符显示器,或称七段数码管。
共阳极数码管的8个发光二极管的阳极(二极管正端)连接在一起。
通常,公共阳极接高电平(一般接电源),其它管脚接段驱动电路输出端。
当某段驱动电路的输出端为低电平时,则该端所连接的字段导通并点亮。
根据发光字段的不同组合可显示出各种数字或字符。
此时,要求段驱动电路能吸收额定的段导通电流,还需根据外电源及额定段导通电流来确定相应的限流电阻。
第4章整机电路的组成4.1整机电路原理图整机电路由组成整机原理图见图4-1。
图4-1整机电路原理图4.2 整机电路的工作原理把电路接通电源,合上k1电路接通电源开始工作,数码管变亮。
k3合向1端则使得74ls90 R02接地,和R01相与为0,则秒表开始计数,如果合向3端,相与为1则数码管清零。
如果k2断开,振荡器与后面部分断开,则计时暂停,闭合则继续。
计数部分的输出的二进制数信号通过译码器的译码后送数码管显示。
第5章电路的组装与调试5.1 合理布局电路在安装前要将各级进行合理布局,一般按照电路的顺序一级一级地布局,在此过程中我们本着以下原则:1. 了解元件管脚功能。
2. 布线尽可能少,合理进行步线。
3. 电源线用红线,地线用黑线。
4. 布线规律有制,尽量减少交叉。
5.美观大方。
注意事项:1.万用板各个所用电源,地都连起来。
2.防止接线短路。
3.元件注意不可接反。
5.2 分级调试电路的调试过程一般是先分级调试,再级联调试,最后整机调试与性能指标测试。
5.2.1 振荡电路的测试示波器输出波形为调节R使得输出波形的频率为10HZ 。
用555 定时器构成的多谐振荡器,作为时钟p源。
5.2.2 计数器的测试计数器分别接成十进制形式,将计数器(1)(2)(3)级连,进行逻辑功能测试,并记录.5.2.3 译码显示电路的测试看数码管的输出是否有输出,围为000 ~999s 。
5.2.4 控制电路拨动K3看显示是否清零、计时。
拨动K2看显示是否暂停、继续。
结论本次课程设计的题目是电子秒表,技术指标为:计数围为0-999,可以清零、暂停。