winbox基本操作
winbox使用

1.查看局域网网速:Tools→Torch,Interface选择LAN1,Collect勾选
Src.Address,之后点击右侧的start,即开始检测各个IP网速。
2.IP与mac绑定,ip→ arp 里点+号输入IP地址和MAC地址,选择
内网网卡LAN1,点OK在ip →dhcp-server 里把DHCP 服务器里的add arp for leases(把租约ip添加到arp里)打勾。
然后到arp里选中要添加的ip 点右键make static。
然后在IP→DHCP-server里把add arp for leases勾去掉。
add arp for leases选项,只要选中它,从ros分发出的ip是可以自动帮定到ip-mac表中的
3.TX RATE是发送速度,RX RATE是接收速度,判断发送还是接
收,是看他针对的是哪个口
比如,你这里的PPPOE-OUT1,他对外是internet,所以,TX是发送,指的就是上行速度了,RX是接收,就是下载速度了
但你的内部的PPPOE接口,TX发送的就是指客户的下载了,RX 接收就是客户的上行。
Winbox 简要使用说明

本文档来自[url][/url],欢迎转载,并保存本文档完整,谢谢合作。
Document revision:1.0 (Fri Mar 05 07:59:49 GMT 2004)Applies to:MikroTik RouterOS V2.9General Information 总说明Summary 摘要The MikroTik RouterOS can be configured remotely, using Telnet, SSH, WinBox Console or Webbox. In this manual we will discuss how to use the interactive WinBox console.MikroTik RouterOS可以通过Telnet,SSH,WinBox或WebBox进行控制,本文档将对Winbox 的使用进行简要说明。
DescriptionThe Winbox console is used for accessing the MikroTik Router configuration and management features, using graphical user interface (GUI).Winbox通过图形接口界面(GUI)对RouterOS进行配置管理。
All Winbox interface functions are as close as possible to Console functions: all Winbox functions are exactly in the same hierarchy in Terminal Console and vice versa (except functions that are not implemented in Winbox). That is why there are no Winbox sections in the manual.The Winbox Console plugin loader, the winbox.exe program, can be retrieved from the MikroTik router, the URL is http://router_address/winbox/winbox.exe Use any web browser on Windows 95/98/ME/NT4.0/2000/XP or Linux to retrieve the winbox.exe executable file from Router. If your router is not specifically configured, you can also type in the web-browser just http://router_addressWinbox是通过Winbox.exe程序进行的,我们可以通过在Windows 95/98/ME/NT4.0/2000/XP or Linux系统的浏览器中输入Http://路由器IP地址//winbox/winbox.exe下载winbox.exe 文件,另外,你也可以通过输入http://路由器ip地址/下载winbox.exe 文件。
RouterOS双线路由安装设置教程及配套工具脚本

RouterOS 双线路由安装设置教程及配套工具脚本Coolbeboy一、预安装配制RouterOS 双线路由的基本硬件要求:主板:英特尔845 系列(建议选用板载显卡)CPU:英特尔奔腾系列处理器内存:512M —1G硬盘:10G(越大越浪费)网卡:Realtek 8139D 10M-100M(三块)二、RouterOS 2.9.27 安装部分说明:本教程选用RouterOS 2.9.27 软件版本进行说明,首先对RouterOS 的安装进行一下回顾:1、首先把从这里下载到的mikrotik-2.9.27.iso 文件刻到CD 光盘中;2、用该CD 引导计算机并进行RouterOS 的安装操作;3、图一上所显示的是RouterOS 安装程序的欢迎界面:(图一)在这个界面上可以选择所需要安装的RouterOS 组件,设置其安装后所拥有的功能,一般在这里我们按字母“A”对其进行全选,然后按字母“I”进行安装即可;4、在安装过程中会提示是否需要保持以前的设置如图二所示:(图二)此时如果是首次安装只需要按字母“N”键取消之前安装设置即可;5、继续系统会提示你硬盘上的所有数据将会被清除,是否继续如图三所示:(图三)按字母“Y”键继续,并等待系统安装。
6、系统安装完比后出现如图四的提示:(图四)软件安装完成,按回车键重启的安样,此时先需要把安装光盘取出,然后按回车键重启计算机;RouterOS 2.9.27 软件下载地址:.22/RouterOS/download/mikrotik-2.9.27.rar三、RouterOS 配制说明:1、安装完成后,首次启动时会出现如图五那样的提示要求你对硬盘进行检查:(图五)此时按字母“N”键继续,将进入到RouterOS ,如图六所示:(图六)2、在Mikrotik Login: 一栏中输入用户名,默认用户名为admin ,密码为空,这样就可以进入到RouterOS 的提示符操作界面,用过DOS 的朋友会发现,此时的界面和以前使用过的DOS 提示符很类似,所以操作上会有一些亲切感;3、在[admin@Mikrotik] > 提示符下输入Setup 此时将会出现如图七所示的操作提示:(图七)这里咱们对图七上所示的操作进行一下比较详细的说明://恢复RouterOS 的所有设置r --reset all router configuration//读取网卡驱动程序,当你安装了新网卡或在安装RouterOS 时未带网卡安装时选择此项对网卡进行安装l -- load interface driver//设置IP 地址以及网关a -- configure ip address and gateway//设置dhcp 客户端d -- setup dhcp client//设置dhcp 服务端s -- setup dhcp server//设置pppoe 客户端p -- setup pppoe client//设置pptp 客户端t - setup pptp client//退出设置菜单x -- exit menu在这里我们需要进行配制的仅是网卡的IP 地址,所以我们按字母“a”进行IP 地址的配制,如图八所示:(图八)将会再次出现以下选择进行配制://添加IP 地址a -- add in address//设置默认网关g -- setup default gateway//返回主菜单x -- exit menu此时我们需要按字母“a”对网卡的IP 地址分别进行配制,将会出现如图九所示的界面:图九)对于图九在这里需要再一次的进行一下说明,大家从图九上都可以看到,上面默认在enable internetface 显示的是ether1 在这里的这个eteher1 代表的是RouterOS 里识别到的第一块网卡,当我们需要设置第二块网卡的时候只需要把这里的ether1 改为ether2 即可,这里我们先对第一块网卡进行配制,按回车键继续配制;4、此时将会出现ip address/netmask 这样的提示,这里就是我们需要填入IP 地址的地方,我们只需要按照这里所提供的模式输入IP 地址和子网掩码即可,这里我们假定服务器的IP 地址是,子网掩码是,此时我们只需要输入或都可以,刚输入的那个24 和是一样的,只不过表示方式不一样罢了,为了输入的准确建议朋友们以前种方式进行输入,输入完毕后回车即可;5、此又出现了如图八所示的界面,我们需要先按一下字母“x”,向上退一级操作,否则我们再操作的还是刚选择的那块ether1 的那块网卡,然后再次选择字母“a”这样依次把三块网卡的地址配制好了,第二块网卡我们这里是配制的电信的外网接入,第三块网卡配制的是网通的外网接入,请朋友自行配制,这里我就不再多说了。
Mikrotik RouterOS Winbox 操作手册说明书
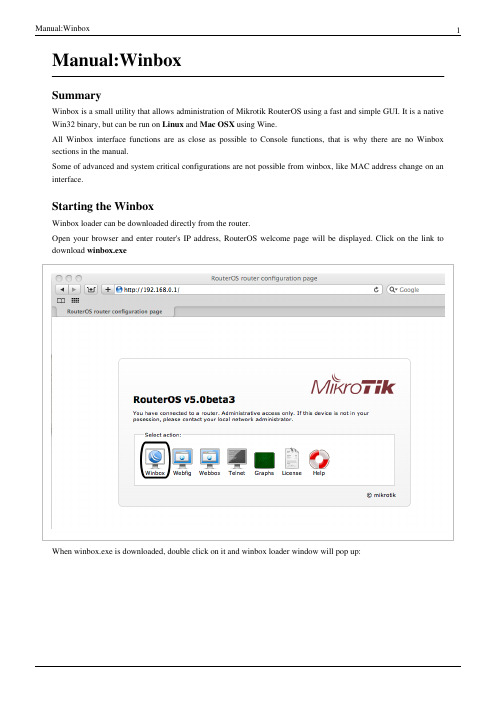
Manual:WinboxSummaryWinbox is a small utility that allows administration of Mikrotik RouterOS using a fast and simple GUI. It is a native Win32 binary, but can be run on Linux and Mac OSX using Wine.All Winbox interface functions are as close as possible to Console functions, that is why there are no Winbox sections in the manual.Some of advanced and system critical configurations are not possible from winbox, like MAC address change on an interface.Starting the WinboxWinbox loader can be downloaded directly from the router.Open your browser and enter router's IP address, RouterOS welcome page will be displayed. Click on the link to download winbox.exeWhen winbox.exe is downloaded, double click on it and winbox loader window will pop up:To connect to the router enter IP or MAC address of the router, specify username and password (if any) and click on Connect button. You can also enter the port number after the IP address, separating them with a colon, like this 192.168.88.1:9999. The port can be changed in RouterOS services menu.Note: It is recommended to use IP address whenever possible. MAC session uses network broadcasts and isnot 100% reliable.You can also use neighbor discovery, to list available routers by clicking on [...] button:From list of discovered routers you can click on IP or MAC address column to connect to that router. If you click on IP address then IP will be used to connect, but if you click on MAC Address then MAC address will be used to connect to the router.Note: Neighbor discovery will show also devices which are not compatible with Winbox, like Cisco routersor any other device that uses CDP (Cisco Discovery Protocol)Description of buttons and fields of loader screen•[...] - discovers and shows MNDP (MikroTik Neighbor Discovery Protocol) or CDP (Cisco Discovery Protocol) devices.•Connect - Connect to the router•Save - Save address, login, password and note. Saved entries are listed at the bottom of loader window.•Remove - Remove selected entry from saved list•Tools... - Allows to run various tools: removes all items from the list, clears cache on the local disk, imports addresses from wbx file or exports them to wbx file.•Connect To: - destination IP or MAC address of the router•Login - username used for authentication•Password - password used for authentication•Keep Password - if unchecked, password is not saved to the list•Secure Mode - if checked, winbox will use TLS encryption to secure session•Load Previous Session - if checked, winbox will try to restore all previously opened windows.•Note - description of the router that will be saved to the list.Warning: Passwords are saved in plain text. Anyone with access to your file system will be able to retrievepasswords.It is possible to use command line to pass connect to user and password parameters automatically:winbox.exe [<connect-to> [<login> [<password>]]]For example (with no password):winbox.exe 10.5.101.1 admin ""Will connect to router 10.5.101.1 with username "admin"without password.IPv6 connectivityStarting from v5RC6 Winbox supports IPv6 connectivity. To connect to the routers IPv6 address, it must be placed in square braces the same as in web browsers when connecting to IPv6 server. Example:Winbox neighbor discovery is now capable of discovering IPv6 enabled routers. As you can see from the image below, there are two entries for each IPv6 enabled router, one entry is with IPv4 address and another one with IPv6 link-local address. You can easily choose to which one you want to connect:Interface OverviewWinbox interface has been designed to be intuitive for most of the users. Interface consists of:•Main toolbar at the top where users ca add various info fields, like CPU and memory usage.•Menu bar on the left - list of all available menus and sub-menus. This list changes depending on what packages are installed. For example if IPv6 package is disabled, then IPv6 menu and all it's sub-menus will not be displayed.•Work area - area where all menu windows are opened.Title bar shows information to identify with which router Winbox session is opened. Information is displayed in following format:[username]@[Router's IP or MAC] ( [RouterID] ) - Winbox [ROS version] on [RB model] ([platform]) From screenshot above we can see that user admin is logged into router with IP address 10.1.101.18. Router's ID is MikroTik, currently installed RouterOS version is v5.0beta1, RouterBoard is RB800 and platform is PowerPC.On the Main toolbar's left side is located undo and redo buttons to quickly undo any changes made to configuration. On the right side is located:•winbox traffic indicator displayed as a green bar,•indicator that shows whether winbox session uses TLS encryption•checkbox Hide password. This checkbox replaces all sensitive information (for example, ppp secret passwords)with '*' asterisk symbols.Work Area and child windowsWinbox has MDI interface meaning that all menu configuration (child) widows are attached to main (parent) Winbox window and are showed in work area.Child windows can not be dragged out of working area. Notice in screenshot above that Interface window is dragged out of visible working area and horizontal scroll bar appeared at the bottom. If any window is outside visible work area boundaries the vertical or/and horizontal scrollbars will appear.Child window menu barEach child window has its own toolbar. Most of the windows have the same set of toolbar buttons:•Add - add new item to the list•Remove - remove selected item from the list•Enable - enable selected item (the same as enable command from console)•Disable - disable selected item (the same as disable command from console)•Comment - add or edit comment•Sort - allows to sort out items depending on various parameters. Read more >>Almost all windows have quick search input field at the right side of the toolbar. Any text entered in this field is searched through all the items and highlighted as illustrated in screenshot belowNotice that at the right side next to quick find input filed there is a dropdown box. For currently opened (IP Route) window this dropdown box allows to quickly sort out items by routing tables. For example if main is selected, then only routes from main routing table will be listed.Similar dropdown box is also in all firewall windows to quickly sort out rules by chains.Sorting out displayed itemsAlmost every window has a Sort button. When clicking on this button several options appear as illustrated in screenshot belowExample shows how to quickly filter out routes that are in 10.0.0.0/8 range1.Press Sort button2.Chose Dst.Address from the first dropdown box.3.Chose in form the second dropdown box. "in" means that filter will check if dst address value is in range ofspecified network.4.Enter network against which values will be compared (in our example enter "10.0.0.0/8")5.These buttons are to add or remove another filter to the stack.6.Press Filter button to apply our filter.As you can see from screenshot winbox sorted out only routes that are within 10.0.0.0/8 range.Comparison operators (Number 3 in screenshot) may be different for each window. For example "Ip Route" window has only two is and in. Other windows may have operators such as "is not", "contains", "contains not".Winbox allows to build stack of filters. For example if there is a need to filter by destination address and gateway, then•set first filter as described in example above,•press [+] button to add another filter bar in stack.•set up seconf filter to filter by gateway•press Filter button to apply filters.You can also remove unnecessary filter from the stack by pressing [-] button.Customizing list of displayed columnsBy default winbox shows most commonly used parameters. However sometimes it is needed to see another parameters, for example "BGP AS Path" or other BGP attributes to monitor if routes are selected properly.Winbox allows to customize displayed columns for each individual window. For example to add BGP AS path column:•Click on little arrow button (1) on the right side of the column titles or right mouse click on the route list.•From popped up menu move to Show Columns (2) and from the sub-menu pick desired column, in our case click on BGP AS Path (3)Changes made to window layout are saved and next time when winbox is opened the same column order and size is applied.Detail modeIt is also possible to enable Detail mode. In this mode all parameters are displayed in columns, first column is parameter name, second column is parameter's value.To enable detail mode right mouse click on the item list and from the popupmenu pick Detail modeCategory viewIt is possible to list items by categories. In tis mode all items will be grouped alphabetically or by other category. For example items may be categorized alphabetically if sorted by name, items can also be categorized by type like in screenshot below.To enable Category view, right mouse click on the item list and from the popupmenu pick Show CategoriesDrag & DropIt is possible to upload and download files to/from router using winbox drag & drop functionality.Note: Drag & Drop does not work if winbox is running on Linux using wine. This is not a winbox problem,wine does not support drag & drop.Traffic monitoringWinbox can be used as a tool to monitor traffic of every interface, queue or firewall rule in real-time. Screenshot below shows ethernet traffic monitoring graphs.Item copyThis shows how easy it is to copy an item in Winbox. In this example, we will use the COPY button to make a Dynamic WDS interface into a Static interface.This image shows us the initial state, as you see DRA indicates "D" which means Dynamic:•Double-Click on the interface and click on COPY:•A new interface window will appear, a new name will be created automatically (in this case WDS2)•You can see that the new interface status has changed:•Transferring SettingsOn Windows Vista/7 Winbox settings are stored in: %USERPROFILE%\AppData\Roaming\Mikrotik\Winbox\winbox.cfgSimply copy this file to the same location on the new host.[ Top | Back to Content ]Article Sources and Contributors17 Article Sources and ContributorsManual:Winbox Source: /index.php?oldid=25527 Contributors: Janisk, Marisb, Normis, Nz monkeyImage Sources, Licenses and ContributorsFile:win-web-snap.png Source: /index.php?title=File:Win-web-snap.png License: unknown Contributors: Marisb, SergejsBFile:winbox-loader.png Source: /index.php?title=File:Winbox-loader.png License: unknown Contributors: MarisbImage:Icon-note.png Source: /index.php?title=File:Icon-note.png License: unknown Contributors: Marisb, RouteFile:winbox-loader2.png Source: /index.php?title=File:Winbox-loader2.png License: unknown Contributors: MarisbImage:Icon-warn.png Source: /index.php?title=File:Icon-warn.png License: unknown Contributors: Marisb, RouteFile:winbox-ipv6-loader.png Source: /index.php?title=File:Winbox-ipv6-loader.png License: unknown Contributors: MarisbFile:winbox-ipv6nd.png Source: /index.php?title=File:Winbox-ipv6nd.png License: unknown Contributors: MarisbFile:Winbox-workarea.png Source: /index.php?title=File:Winbox-workarea.png License: unknown Contributors: MarisbFile:winbox-win-child.png Source: /index.php?title=File:Winbox-win-child.png License: unknown Contributors: MarisbFile:win-add.png Source: /index.php?title=File:Win-add.png License: unknown Contributors: MarisbFile:win-remove.png Source: /index.php?title=File:Win-remove.png License: unknown Contributors: MarisbFile:win-enable.png Source: /index.php?title=File:Win-enable.png License: unknown Contributors: MarisbFile:win-disable.png Source: /index.php?title=File:Win-disable.png License: unknown Contributors: MarisbFile:win-comment.png Source: /index.php?title=File:Win-comment.png License: unknown Contributors: MarisbFile:win-sort.png Source: /index.php?title=File:Win-sort.png License: unknown Contributors: MarisbFile:winbox-window-search.png Source: /index.php?title=File:Winbox-window-search.png License: unknown Contributors: MarisbFile:Winbox-window-sort.png Source: /index.php?title=File:Winbox-window-sort.png License: unknown Contributors: MarisbFile:Winbox-window-field.png Source: /index.php?title=File:Winbox-window-field.png License: unknown Contributors: MarisbFile:Winbox-window-detail.png Source: /index.php?title=File:Winbox-window-detail.png License: unknown Contributors: MarisbFile:Winbox-window-category.png Source: /index.php?title=File:Winbox-window-category.png License: unknown Contributors: MarisbFile:Winbox1.jpg Source: /index.php?title=File:Winbox1.jpg License: unknown Contributors: NormisFile:winbox-window-trafmon.png Source: /index.php?title=File:Winbox-window-trafmon.png License: unknown Contributors: MarisbImage:2009-04-02_1241.png Source: /index.php?title=File:2009-04-02_1241.png License: unknown Contributors: NormisImage:2009-04-02_1241_001.png Source: /index.php?title=File:2009-04-02_1241_001.png License: unknown Contributors: NormisImage:2009-04-02_1242.png Source: /index.php?title=File:2009-04-02_1242.png License: unknown Contributors: NormisImage:2009-04-02_1242_001.png Source: /index.php?title=File:2009-04-02_1242_001.png License: unknown Contributors: Normis。
RouterOS基础操作

RouterOS 操作1、如何使用 Console 口连接 RouterOS 的终端控制:通过标准的 DB9 的 Console 线连接到路由器, 的串口连接的默认设置为每秒位数: PC 9600 bits/s (RouterBOARD 系列串口是 115200 bits/s), 使用终端仿真程序 (如在 windows 中的超级终端或 SecureCRT,UNIX/Linux 的 minicom)连接到路由器。
2、如何通过命了复位 RouterOS?进入 RouterOS 的终端控制台(CLI 命令行),在命令行输入以下命令[admin@cdnat] /system> reset-configuration Dangerous! Reset anyway? [y/N]:3、如果 RouterOS 密码丢失或者系统故障如何处理:这个问题需要分 2 部分: 1、 如果密码丢失,如果是 PC 可以通过 RouterOS 光盘重新安装回复出厂设置,也可 以通过我公司的 U 盘复位软件删除密码,删除后默认账号是 admin,密码为空。
如 果是 RouterBOARD 可以通过 Netinstall 软件或者主板上的 reset 圆形铜片复位, 如 下图:RouterBOARD 的复位2、 当系统出现故障无法正常启动或者允许,PC 通过 RouterOS 光盘重新安装系统,如 果是 RouterBOARD 也通过 Netinstall 安装4、我的 RB750/G 密码忘记该怎么复位?RB750/G 在前面板都有复位按钮,开机通电安装复位按钮,直到 RouterOS 自检(设备灯 连续闪烁两次)完成即复位5、 我的 RB750/G 系统损害, 要重新通过 Netinstall 安装软件, 但没有 Console 口该怎么办?RB750/G 不需要 Console 口也可以安装 RouterOS,只需要在本地电脑上打开并配置好 Netinstall 软件,通过网线连接到 RB750/G 的 ether1 口,启动时同时安装 reset 按钮不放, 则可以在 Netinstall 上显示 RB750/G 的安装信息,这时你便可以安装6、如何升级 RouterBOARD 的固件RouterBOARD 的固件不定期进行更新,通常我们需要进行升级,操作时要求能连接到互联 网,一般用 winbox 操作即可,通过命令行设置,配置参数如下[admin@cdnat] /system routerboard> upgrade Do you really want to upgrade firmware? [y/n] y firmware upgraded successfully, please reboot for changes to take effect! [admin@cdnat] /system routerboard>7、我的 RouterOS 添加 IP 地址后,路由器的网卡和我的电脑在同一局域网, 且在同一网段,但为什么不能 ping 通路由器这个问题可能是你的路由器 IP 地址的子网掩码没有设置正确,例如 192.168.1.1/24 的 IP 地址设置到路由器,可能你没有设置子网掩码直接输入的是 192.168.1.1,这样路由器则认 为 IP 地址是 192.168.1.1/32,这样的问题需要你重新设置网络地址和广播地址,保证路由 器和局域网在同一子网段。
winbox教程

winbox教程 (电信+网通双线接入策略路由+自动切换图文教程)2009-05-25 10:39从开始学习ROS到现在也没有几天,在routerbbs里学到了不少东西,回想初学的时候四处找教程的日子,也很是有点不好过。
其实已经有很多人写具体教程了,包括2.9版本的,例如winxp2000的教程--我还是参考着他的教程写的备份脚本--只是没有图,不是很直观。
来到routerbbs也不能只索取不付出不是,就算是对他们教程的图片补充也好。
下面开始1、安装ROS除了自己学习和测试用ROS外,最好还是单独用一台机器,相信这也不用多说,安装的时候要注意的是硬盘一定要接在IDE0上面,并且作为主盘MASTER,光驱随便,很多安装之后不能正常启动的都是这个问题、用安装光盘启动后,如图1选择 i 进入安装界面选择需要安装的package,图2选择完后,再按i安装,y确定,再按n不保存旧配置。
最后回车重新启动,这时进入ROS是未注册的版本,如图4用光驱启动,在启动菜单按c破解,图5破解之后进入已经没有了未注册提示。
见图62、服务端配置/interface pri 能显示出你现在可用的网卡。
如图6/ip addressadd address=192.168.1.1/24 interface=ether1设置ether1为内网IP,其中192.168.1.1/24添自己的内网IP ,设置成功没有提示,可以用pri查看在局域网其他机器IE浏览器192.168.1.1 进入WEBBOX,左边可以下载WINBOX,当然如果你已经有WINBOX可以省略这步。
打开WINBOX输入IP和用户名连接(图8)进入配置界面(1)点左侧INTERFACE,双击ether1将name改为lan,同样将另两个改为cnc和tel。
图92)左侧IP->ADDRESS ,+号,分别设置CNC和TEL的IP地址,添网通和电信给的IP/子网掩码(不要和我的一样...),红叉部分是自动添加的.图10见图73、winbox配置(所有配置都在这里进行)(3)IP->ROUTE,+号添加默认的网关,默认网通就添网通网关,默认电信就添电信的网关,这里默认电信.如图11,正常下黑圈处为AS,黄圈出为ment设注释为tel(4)IP->FIREWALL,NAT选项卡,+号添加chain:srcnat,src.addr:192.168.1.0/24,ACTION选项卡里为masquerade.OK,现在可以通过电信上网了.图12(5)FTP://admin:@192.168.1.1上传路由表文件cnc.rsc,如图13在WINBOX中,NEW TERMINAL,输入import cnc完成.如图14现在已经可以电信网通自动切换了.(6)只是切换也不太安全,一定要配制一下防火墙么,同5一样,上传防火墙的RSC文件到192.168.1.1,在NEW TERMINAL里执行import firewall,整体和第5步相近.(7)配置的差不多了,该改管理员账号了,左侧USERS,双击ADMIN改个名字和右下脚的password,如果不需要远程修改ROS的话,可以设定访问IP,192.168.1.0/24之类的至此,基本OK了.第一次写教程用了2个多小时呵呵..有什么不完整的地方欢迎大家补充. 本文完全是面对新手的,还希望个位大人砖头不要扔的太狠~下面留个网通的IP,我用的防火墙是winxp2000的那个,个人感觉不错。
MikroTik RouterOS v2.9操作说明

MikroTik RouterOS v2.9基本操作说明CDNAT 导航:如何登录MikroTik RouterOS终端控制与命令操作网络接口(/Interface)管理Setup配置网络参数普通单线接入配置NAT伪装带宽控制配置端口映射配置系统备份导出指令导入指令系统复位ADSL拨号上网配置源地址双线路由配置防火墙配置规则RouterOS应用说明主要特征TCP/IP协议组:∙Firewall和NAT–包状态过滤;P2P协议过滤;源和目标NAT;对源MAC、IP地址、端口、IP协议、协议(ICMP、TCP、MSS等)、接口、对内部的数据包和连接作标记、ToS 字节、内容过滤、顺序优先与数据频繁和时间控制、包长度控制...∙路由–静态路由;多线路平衡路由;基于策略的路由(在防火墙中分类); RIP v1 / v2, OSPF v2, BGP v4∙数据流控制–能对每个IP、协议、子网、端口、防火墙标记做流量控制;支持PCQ, RED, SFQ, FIFO 对列; Peer-to-Peer协议限制∙HotSpot– HotSpot认证网关支持RADIUS验证和记录;用户可用即插即用访问网络;流量控制功能;具备防火墙功能;实时信息状态显示;自定义HTML登录页;支持iPass;支持SSL安全验证;支持广告功能。
∙点对点隧道协议–支持PPTP, PPPoE和L2TP访问控制和客户端;支持PAP, CHAP, MSCHAPv1和MSCHAPv2 验证协议;支持RADIUS验证和记录;MPPE加密;PPPoE压缩;数据流控制;具备防火墙功能;支持PPPoE按需拨号。
∙简单隧道– IPIP隧道、EoIP隧道(Ethernet over IP)∙IPsec–支持IP安全加密AH和ESP协议;∙Proxy–支持FTP和HTTP缓存服务器;支持HTTPS代理;支持透明代理;支持SOCKS协议;DNS static entries; 支持独立的缓存驱动器;访问控制列表;支持父系代理。
简述海外台站RouterBOARD 750的安装及登陆过程

简述海外台站RouterBOARD 750的安装及登陆过程作者:李东杰来源:《科技传播》2016年第06期摘要本文通过对海外台站使用RouterBOARD 750进行组网的实例,来学习和了解RouterBOARD的基础知识及RouterBOARD 750的基本使用方法,通过对RouterBOARD的更深层次的认知与扩展,进一步来学习RouterOS(路由操作系统)的基础知识,通过操控WinBox控制台的图形界面软件来管理和配置RouterOS系统,进而来完成对RouterBOARD 750硬路由的管理,本文只是简单的概述了RouterBOARD 750的安装过程及配置和管理RouterOS系统的WinBox软件的初始登录过程。
关键词 RouterBOARD;RouterOS;WinBox控制台;图形用户接口(GUI)中图分类号 G2 文献标识码 A 文章编号 1674-6708(2016)159-0078-01由于海外台站所在驻地国家的互联网技术较为落后,台站内一直在使用微波进行数据信息的传输,数据“丢包”十分严重,且在恶劣天气下数据传送效率极低,基于以上的原因,经研究后,我们特别申请安装了光纤网络,以减少由于恶劣气候、电波干扰等不利因素而造成的数据传输速率低下及数据传送中突然中断等现象的发生。
由于这次是对海外工作人员职工宿舍的基础网络进行安装,所以相对来说比较简单,仅是为了满足职工的文化生活需要,如浏览网页、检索信息、视频联络等基本上网需求的应用,因此,针对这种情况,我们配备了一套十分简单相对容易的计算机网络架构,此文就不多说了,在这里我们主要讲述是Mikrotik RouterBOARD750的安装情况与所处位置及对Mikrotik RouterOS(路由操作系统)进行配置的过程。
在叙述之前,我们先来了解一下RouterBOARD与RouterOS方面的知识,这两款产品都是由东欧小国拉脱维亚的Mikrotik公司(Mikrotikls SIA)开发的。
- 1、下载文档前请自行甄别文档内容的完整性,平台不提供额外的编辑、内容补充、找答案等附加服务。
- 2、"仅部分预览"的文档,不可在线预览部分如存在完整性等问题,可反馈申请退款(可完整预览的文档不适用该条件!)。
- 3、如文档侵犯您的权益,请联系客服反馈,我们会尽快为您处理(人工客服工作时间:9:00-18:30)。
NAT Router 图形管理操作手册基本设置在使用NAT Router图形管理前,必须在本机上启用和设置网卡查看网卡状态:当我们需要查看路由器上的网卡使用情况,点开Interfaces可以看到网卡的使用状况:如果需要查看W AN口的使用情况,直接点开Interface列表中的W AN口的选项点开Traffic可以看到W AN口上的流量波型图:设置一个双网口的基本路由1、添加IP地址:当我们需要添加IP地址,先进入IP-Addresses目录:如果我们要在LAN口上添加192.168.0.1/255.255.255.0(子网掩码24位)的地址,点开Addresses项后,点加号并填入相应的设置,设置完后点OK。
WAN口的设置同样的操作。
2、添加网关:进入IP-Routers中添加网关,列如网关假设为192.168.0.254,在路由列表中点加号,在Gateway中填写网关:3、IP伪装当IP地址和网关设置完毕后,这时可根据自己的路由器需要是否伪装内网的IP地址(即NA T功能),假设内网地址段为192.168.0.0/24,具体设置如下:进入IP-firewall-src-nat中添加一条策略,将src-address设置为192.168.0.0/24,并将action 设置为masquerade(伪装):一个双网口的基本路由设置就完成。
设置双WAN口的负载均衡基本情况:用户有两条Internet线路,一条是使用光纤,另一条是使用ADSL。
使用IP伪装使一个局域网共享上网。
NAT Router共有3块网卡,WAN1用于ADSL,WAN2用于光纤,LAN用于连接终端。
实现负载平衡,并且在其中一条线路断掉后自动切换为单线路,线路恢复后,继续使用负载平衡。
实施:1、配置光纤线路在IP-address中为光纤线路配置IP地址、子网掩码,地址为 61.139.77.77,掩码24,网关61.139.77.1,interface WAN2 设置的方法同上面相同。
2、配置ADSL线路Interface-pppoe-client 配置ADSL拨号信息。
设置的内容为用户名:NAT,密码:NAT,service名称:CHN-Telecom,以太网interface WAN1,并将MTU和MRU设置为1492。
网关为218.88.32.1。
修改MTU和MRU的参数:设置帐号、密码和service名称:设置完后点OK添加即可。
在Interface列表中可以看到一个pppoe-out的接口。
3、配置双网关设置完ADSL的pppoe选项后,就要在IP-Routers中添加双网关,这个操作在Terminal中完成,根据上面提到的两个网络的网关分别为:61.139.77.1,218.88.32.1,操作如下:添加操作如下:这样就实现了双W AN口的负载均衡,但有时需要指定静态的路由目的地址,只要在IP-Routers中设置添加静态路由,同样在路由列表中点“加号”,并在Destination中填写目标地址,Gateway填写经过的网关。
4、配置自动切换脚本在system-script中添加自动切换的脚本:在Script中添加一条name:adsl,即在ADSL断开的设置,内容如下:然后在Script中另添加一条name:wan,即当光纤接入断时的设置,输入如下:当两条线路都正常时设置如下:设置完脚本后,进入Tool-Netwatch中监视两条线路使用的情况,在任何一条线路断开的时候自动启动相应的脚本设置。
在Netwatch中设置ADSL的监视状况:设置状态:在Netwatch中设置光纤的监视状况这样一个双W AN口的负载均衡就设置完成了。
ROS菜单含义guanlianinterfaces---网络接口wireless---无线网络bridge---桥接ppp-虚拟拨号ipports--端口queues-限速drivers-设备systemfiles-文件备份/恢复log--系统日志snmp-snmp管理方式users-用户radius-radius管理tools-工具new terminal-命令方式telnet--tlenet连接方式password--修改密码certificate---证书哎,盗版madk supout.rif 制作rif文件manual--说明isdn chanels--一线通方式routing--路由exit--退出ip addr add addr=192.168.1.1/24 interface=ether1ip addr add addr=58.213.126.58/30 interface=ether2ip route add gateway=58.213.126.57 外网ip firewall nat add chain=srcnat src-address=192.168.1.0/24 action=masquerade 222.190.124.46218。
94。
132。
50天之骄傲ipipipiipipipipipipipipipipipsys reset__________________________________addresses--ip地址routers-路由表pool-地址池arp-帮定ipvrrp-热备份firewall-防火墙socks-代理upnp-自动端口映射traffic flow-网络流量accounting--合计services--服务packing-ros模块neighbors--邻居ros用户dns--proxy-代理dhcp client-dhcp客户端dhcp server - dhcp服务dhcp relay-dhcp转换hospot-热点认证telephony-电话ipsec-ip隧道连接方式web proxy web代理system system system system system system---------------------------------------------identity---ros标示clock-时间resources-系统配置license-注册信息packages--安装包auto upgrade-自动升级logging--日志history--历史日志console---com控制台scripts--脚本scheduler--进程watchdog--监视狗reboot-从起shutdown-关机lcd-小液晶显示ros消息ntp chient--ros时间客户端ntp server---ros时间服务端自动更新ros时间health---ros情况ups-ups电源,可持续电源,就是电瓶。
汗~ tools tools tools tools tools tools--------------------------------------pingmacping 探测mac地址traceroute---Tracert命令bandwidth test-宽带测试btest server--btest服务器traffic monitor--数据报监视器packet sniffer--数据报扫描torch--察看客户机信息mac server mac 服务器graphing---曲线图ip sacan--ip扫描ping speed--ping 速度flood ping --ping阻塞netwatch--网络监视====================================================================== ========== Router OS 配置手册(网吧)一初始安装1 启动后,用用户名:admin 密码空登入1运行Setup2选a ,配制ip和网关3再选a 添加一个IP地址,这时会询问你哪一个接口,一般是直接回车,再输入一个IP和子网掩码4现在可以用routerOS自带的专用工具进行设置了.打开IE 输入地址:http://内网IP5下载左上方的mikrotik winbox consle,输入地址,用户名,密码登入6先在interface 中把两个接口改名wan 和lan 便于辨认,原来的wan 口是灰色的,打上勾启动起来。
7选IP ---address 点+号添加一个Ip,子网掩码用10进制,比如255.255.255.252就是30 (30个1),接口选wan8 选IP ----Router 点+号添加个路由,在gateway 中输外网网关9选IP ---Firewall,在source NA T 中加入内网网段,在general 的src address 中输内网网段,多个网段可加多个在Action 中选masquerade ,意思是IP伪装。
到这已经可以正常上网了。
10端口映射在IP---firewall---destinationNAT general 的dst address 输外网IP 掩码32 端口协议。
在Action 中输内网ip 端口,action 选nat11防火墙的设置在ip –firewall ---Filter rule 中,有intup (入口)forward (转发) output (出口),网吧一般设置input 和forward就可以了比如封掉445端口,协议tcp 和udp 都要做,input 和forward 都要做,action 选drop 就是丢弃限制bt 下载,在advanced –p2p 中选bit-torrent ,里面还有其他的p2p软件,看情况设,梦幻西游用的是里面的kazaa限制下载速度在queues –simple queue ,比如限制ip 为192.168.0.5的机器的下载速度为128k-256k 上传为56k-128k最后别忘了设置密码:。