Autolab 电化学工作站操作规程
Autolab 电位器和 NOVA 控制器程序的电化学测量说明书
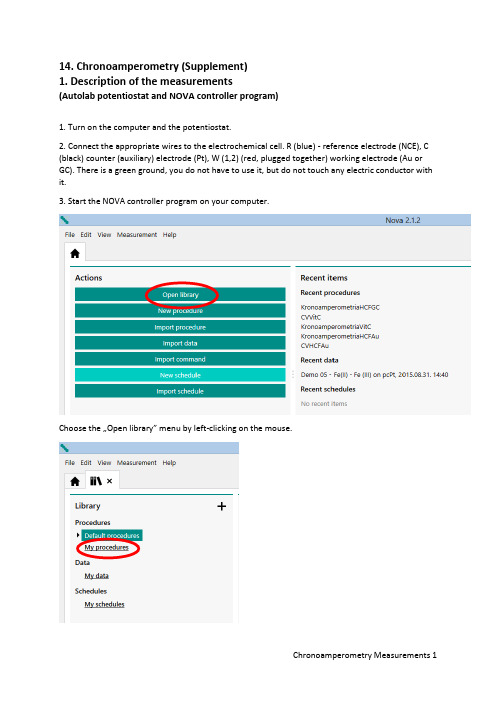
14. Chronoamperometry (Supplement)1. Description of the measurements(Autolab potentiostat and NOVA controller program)1. Turn on the computer and the potentiostat.2. Connect the appropriate wires to the electrochemical cell. R (blue) - reference electrode (NCE), C (black) counter (auxiliary) electrode (Pt), W (1,2) (red, plugged together) working electrode (Au or GC). There is a green ground, you do not have to use it, but do not touch any electric conductor with it.3. Start the NOVA controller program on your computer.Choose the …Open library” menu by left-clicking on the mouse.Clicking on the …My procedures” menu, you could find the procedures (programs) used in the measurements.Choose the appropriate procedure to what you want to do. Read the …Remarks” field also to choose the right program.For Chronoamperometric measurements, the parameters given in the measurement description are already set. The procedure looks like this.Each icon indicates "Commands", which makes the measurement happen. The first icon, "Autolab control" is used to detect the measuring instrument, to set the potentiostatic mode, and to select the current range. The second icon, "Apply", sets the initial electrode potential at the input of the potentiostat. The third icon, "Cell on", connects the potentiostat to the electrochemical cell. The fourth icon, "Wait", keeps the working electrode for the specified time at the initial potential. The fifth icon, "Apply", indicates the potential step to the specified value. The sixth icon, "Record signals", performs the measurement of the time depending current after the potential step. The seventh icon, "Cell Off" turns the cell off from the potentiostat, finishes the measurement. The measurement procedure and the measured data are automatically saved in a .nox file that can be found later on the "My data" menu in the "Library" menu. The data file name is the file name of the "Procedure" plus a "Timestamp", i.e. when the measurement was made. Therefore, it is important to note the order of measurements so that their results can easily be found later.The measurement can be started by clicking on the "Run" command in the "Measurement" menu on the top of the screen or by clicking the Play ( ) icon above the Procedure.During the measurement, instead of the Play icon, the Pause ( ) and Stop ( ) icons will be displayed. If you notice a problem, stop the measurement.During the measurement, the computer automatically plots the measured data in the Plots window in the lower left corner of the screen.Physically, the data files are stored in the Dokumentumok Library in the NOVA 2.1 folder in the Data subfolder. From there, you can make a copy, e.g. to a pendrive.…Behind” each Command icon you could find "Subcommands", shown on the right side of the Procedure pane, or you can see the details with the "More" command by clicking on the corresponding icon. If it is possible, do not change the parameters, or if this happened, DO NOT SAVE THE ALTERED PROCEDURE WITH ITS ORIGINAL NAME.For cyclic voltammetric measurements, the "Procedure" looks like this:Each icon indicates "Commands", which makes the measurement happen. The first icon, "Autolab control" (Autolab control) is used to detect the measuring instrument, to set the potentiostatic mode, and to select the current range. The second icon, "Message", asks for the applicable scan rate ("Scan rate (V/s)"). Once the measurement is started, it must be set to the desired value. The third icon, "Apply", sets the initial electrode potential at the input of the potentiostat. The fourth icon, "Cell on", switches the potentiostat to the electrochemical cell. The fifth icon, "Wait", keeps the working electrode for the specified time at the initial potential. The sixth icon, "CV staircase", represents the cyclic measurement between the lower and upper potential limits with the scan rate given in the …Message". The seventh icon, "Cell Off" turns the cell off from the potentiostat, finishes the measurement. The measurement procedure and the measured data are automatically saved in a .nox file that can be found later on the "My data" menu in the "Library" menu. The data file name is the file name of the "Procedure" plus a "Timestamp", i.e. when the measurement was made. Therefore, it is important to note the order of measurements so that their results can easily be found later.The measurement can be started by clicking on the "Run" command in the "Measurement" menu on the top of the screen or by clicking the Play ( ) icon above the Procedure.During the measurement, instead of the Play icon, the Pause ( ) and Stop ( ) icons will be displayed. If you notice a problem, stop the measurement.During the measurement, the computer automatically plots the measured data in the Plots window in the lower left corner of the screen.Physically, the data files are stored in the Dokumentumok Library in the NOVA 2.1 folder in the Data subfolder. From there, you can make a copy, e.g. to a pendrive.…Behind” each Command icon you could find "Subcommands", shown on the right side of the Procedure pane, or you can see the details with the "More" command by clicking on the corresponding icon. If it is possible, do not change the parameters, or if this happened, DO NOT SAVE THE ALTERED PROCEDURE WITH ITS ORIGINAL NAME.The only parameter you have to set is "Scan rate (V/s)". For sequential runs, use the order that is described in the measurement description. (For example HCF solutions 0.320 V/s, 0.160 V/s, 0.080V/s, etc.)IMPORTANT! NOVA uses Windows default decimal separator. See that the "Message" contains the default value, and that the entered value is also correct! (For example, 0,08 or 0.08!) The data exported from the NOVA also uses the same decimal separator. If necessary, change it to the settings in the Excel Options menu in accordance with the Windows setup!2. Description of evaluation(Autolab potentiometer and NOVA controller program)The NOVA software used for the measurements can be applied for many purposes, but the User's manual is 1196 pages, which is a bit tiring in a lab to read. Therefore, only the most important functions are highlighted.For the evaluation of voltammograms, it is necessary to determine the peak potentials (E p), half peak current potentials (E p/2) and the background corrected peak currents (I p). This can be done in Excel after exporting the measurement data. To do this, double-click the "Plots" pane.Instead of the procedure, the measured plot is displayed in the main window.Clicking on the …Show data” icon you could see a table.In the top right corner there is a marker leading to the export function.Select Excel Export from "File Format", and Windows Explorer will save the file to the desired name and location.ATTENTION! The Excel file contains only the measured data (maybe calculated data, as well), not the description of the Procedure! It's still in the .nox files, do not delete them.IMPORTANT! NOVA uses Windows default decimal separator. The data exported from the NOVA also uses the same decimal separator. If necessary, change it to the settings in the Excel Options menu in accordance with the Windows setup!For Excel files, you can get the desired data, graphics, where needed.For the evaluation of voltammograms, it is necessary to determine the peak potentials (E p), half peak current potentials (E p/2) and the background corrected peak currents (I p). This can be done in Excel after exporting the measurement data, but (perhaps) simpler in NOVA with an "Analysis" function.Click the microscope icon to see a menu. Select "Peak search" analysis.Then, a submenu "Properties" opens in the right window, which offers different versions of the peak search. The default setting is "Automatic", and the figure (or the table) also shows this result, but this is usually good for nothing!Select "Manual", and "Linear free cursor" option.Returning to the plot in the main window with the mouse, you could see a cross. Set this to the initial part of the voltammogram, and fix it with a click. Drag a straight line with the mouse that best fits thefirst part of the voltammogram. The end of the line does not have to be on the curve (free cursor). You can fix the straight line with another click, and the results of the peak search appear in the "Properties" window on the right. (Another voltammogram is illustrated because there will be many peaks on the earlier example.)The same can also be done for the cathodic peak, however from the other end of the curve, the straight line must be fitted backwards.All of these can go in succession, the peaks are included in the right table ("Peaks"). If you are not satisfied with the fitting, you can resume the search at any time by pressing the "Reset" button.The values in the table are:1 Number of found peaks"Peak position" is the electrode potential of the found peak in Volt"Peak height" is the corrected value of the peak current in Amper"Peak (1/2)" is the difference between the potential at the peak current and the potential at the half peak current, i.e. Peak (1/2) = E p– E P/2. (Signed!) (The other columns are not interesting now!)Data can not be exported directly, but when the data is marked with the mouse you can use Ctrl-C to put those on the clipboard, and then use the command Ctrl-V, for example, to copy those to Excel. Only the data, the header will not pass! Afterwards, you can delete unnecessary parts. IMPORTANT! NOVA uses Windows default decimal separator. The data exported (or copied) from NOVA also uses the same decimal separator. If necessary, change it to the settings in the Excel Options menu in accordance with the Windows setup!For chronoamperometric measurements it is recommended to integrate (calculate the charge-time function) in NOVA (you could spare an Excel programming). In the "Plot" window, call up the "Integrate" analysis command!The result is a new figure and the extension of the data file with integrated values.Exporting the measurement results to Excel will include the measured currents and the calculated charge as well.The rest are just time, patience and lots of work, and the evaluation is ready!14. Chronoamperometry1. Description of the measurements(Autolab potentiostat and NOVA controller program)IMPORTANT SUPPLEMENTAfter each electrode exchange and / or solution change, the first thing is a cell control!To do this, select "OCPMeasurement" from the "My procedures" list. The procedure looks like this.The first icon, "Autolab control", is used to detect the measuring instrument and to set the potentiostatic mode. The second icon, "Cell on", connects the potentiostat to the electrochemical cell. The third icon "OCP" (Open Circuit Potential) begins to measure the potential difference between the working and reference electrodes (OCP) when no current flows (the electric circuit is open between the working and the counter electrode). The fourth icon "Cell Off" turns the cell off the potentiostat, finishes the measurement.If, after starting the measurement, it is found that the difference between the Minimum and Maximum Potential is too high, or the blue line indicating the time dependence of the time derivative of the electrode potential (dE/dt) shows too high values (V/s and not μV/s), interrupt the measurement with the "Abort" command. THERE IS SOME TROUBLE!It is likely that the working and / or the reference electrode is not properly connected, the system can not be used! (The system did not damage yet because there was no current during the measurement!) Check the connections and run the procedure again.R (blue) reference electrode (NCE), C (black) counter (auxiliary) electrode (Pt), W (1,2) (red, plugged together) working electrode (Au or GC). There is a green ground, you do not have to use it, but do not touch any electric conductor with it.If, after starting the measurement, it is found that the deviation between the Minimum and Maximum Potential is small max. 10-20 mV, and the blue line indicating the time dependence of the time derivative of the electrode potential (dE/dt) shows normal (mV/s or μV/s) values, you can interrupt the measurement with the "Abort" command. The cell connection is OK!The measurement procedure and the measured data are automatically saved in a .nox file that can be found later in the "My data" menu in the "Library" menu. The data file name is called "OCPMeasurement" plus a "Timestamp", i.e. when the measurement was made. These files should normally not be used at the time of evaluation, but only for diagnostic purposes.。
Autolab 电化学工作站操作规程
、Autolab 电化学工作站操作规程辽宁省新能源电池重点实验室一、开机1)先开启电化学工作站电源开关。
2)再开启电脑电源开关,计算机会自动连接到仪器。
3)连接正常时,在电脑显示屏右下角出现一个图标。
二、测试步骤将各电极连接到仪器。
1. 点击桌面上“Nova 1.8” 图标,(或选择:开始----所有程序----Autolab----Nova 1.8),开启电化学测量程序Nova。
2. 选择测量程序:view----set up view(或工具栏中的左数第四个按钮)。
Procedures包括三部分:Autolab(用于实验),Standards(测试仪器模块功能,需用到标准仿真电池,一般不用),My procedures(个人定义的测试程序)Procedures----Autolab----双击测试程序(或点右键Open for editing)。
在窗口右侧界面可编辑当前程序,点“+”号打开下级程序,鼠标放在相应数字处,单击打开编辑窗口修改(如打不开,是不可修改的项目)。
Procedure修改完后,如下次试验可能还用,选中第一列第一行,单击,打开程序名修改框另命名,然后,File----Save procedures as new,则修改后的程序保存在My procedures中。
开始测试,点界面左下角的Strart按钮,程序开始执行,此时,界面自动转到Measurement view,显示实时测量结果。
测试中出现的异常情况,记录在最下行的User log message中。
3. 测试完后,查看和导出数据。
View----Analysis view(或工具栏左数第七个按钮),打开数据分析界面,双击界面上方的程序名,调入实验结果,单击左侧的相应“+”号,打开数据项,蓝色或红色的标志为采集的数据,单击,图显示。
(X、Y轴显示项更改,在X=Potential applied处单击右键,打开菜单选Time,则图的X轴显示为时间,同理,Y轴也可更改。
电化学工作站分析系统安全操作及保养规程

电化学工作站分析系统安全操作及保养规程1. 引言电化学工作站是一种用于进行电化学分析实验的实验设备,其安全操作及保养规程对确保实验室操作的安全与稳定具有重要意义。
本文档旨在提供一份电化学工作站分析系统的安全操作及保养规程,以帮助用户正确使用和保养设备,防止潜在风险和故障发生。
2. 安全操作规程2.1 熟悉设备在操作电化学工作站之前,用户应先熟悉设备的结构和功能。
了解设备各部分的位置和作用,以及操作面板上各个按钮和指示灯的含义。
用户应认真阅读设备的使用手册,掌握设备的使用方法和注意事项。
2.2 安全检查在每次使用电化学工作站之前,用户应进行安全检查,确保设备处于良好的工作状态。
检查项目包括但不限于:•设备是否接好地线,接地是否可靠;•设备电源线是否正常连接;•设备背面的风扇是否畅通,无异味或异常声音;•涉及到气体的部分如电解槽、管道等是否无泄漏现象。
2.3 实验室操作注意事项•在操作过程中,应严格按照操作手册中的步骤进行,不得随意操作或修改参数;•禁止在使用设备时吸烟、喝饮料或进食;•避免触摸设备上的高温部件,以免烫伤;•如实验中需要使用强酸或强碱等危险化学品,应佩戴防护手套、护目镜等个人防护设备;•实验结束后,应及时清理工作站,确保设备表面的干净和安全。
3. 保养规程3.1 定期检查定期检查是保持电化学工作站良好性能和操作安全的重要措施。
建议按照以下频率进行检查: - 每日检查:检查设备电源线、连接线是否完好;检查液体处理系统的泵、管道等部分是否有异味或异声。
-每周检查:检查电解槽内部的电极是否损坏或腐蚀;检查设备的温度传感器是否工作正常。
- 每月检查:检查设备的过滤器是否需要更换;检查电化学分析系统的软件是否需要更新。
- 每年检查:请相关专业技术人员对设备进行全面的维护和检修。
3.2 清洁保养定期清洁保养可以延长电化学工作站的使用寿命和保持其良好状态。
建议按照以下方法进行清洁保养: - 使用干净的软布擦拭设备表面的灰尘和污渍; - 如有需要,可以使用少量中性清洁剂来清洁设备表面;- 注意避免清洗液进入设备内部,以免损坏电路或其他部件; - 定期清理电解槽、电极等部分,防止污秽物堆积影响实验结果。
Autolab中文操作手册

电化学工作站软件简要操作手册(版本:4.9.005)目录一软件的安装 (6)二简要操作说明 (11)1.开机步骤 (11)2.GPES操作步骤 (11)3.FRA操作步骤 (14)三GPES软件 (15)1.窗口 (15)2.手动控制窗口 (24)3.测量条件窗口 (25)4.数据分析窗口 (26)四FRA软件 (38)1.主窗口 (38)2.手动控制窗口 (43)3.FRA设置窗口 (44)4.FRA手动控制窗口 (44)5.测量条件窗口 (45)6.数据分析窗口 (47)五电化学技术手册 (55)1. Autolab电化学试验 (55)2. 伏安分析 (57)3. 循环和线性扫描伏安 (62)4. 记时方法 (65)5. 多模式电化学检测 (67)6. 电位溶出分析 (68)7. 阶跃与扫描 (69)8. 电化学噪声 (70)9. 使用FRA模块的频率响应分析 (71)10. 高级技术 (74)附录一: GPES软件参数说明 (78)附录二: FRA软件参数说明 (93)附录三:FRA中的模拟与拟合 (96)注意事项1. 四根电极接线不能空置!只能与实际体系连接,或插回Dummy Cell中。
2. 在采用两电极体系时,WE与S相连接,RE与CE相连接;采用三电极体系时,WE与S仍然相连接;仅在四电极体系时才分开。
3. 保存文件时,由路径至文件名称都不能有中文字符!否则不能打开文件。
4. 在保存文件功能上,对于循环伏安或线性扫描方法,提供下述三种保存方式,其余的仅有(1)和(3)两种方式:(1) “主窗口——Files菜单——Save scan as”,把每一圈的数据保存为一份文件,以方便对曲线进行分析;(2) “主窗口——Files菜单——Save data as——Save data buffer as”,可把多圈扫描结果保存在同一份文件之中,以方便对不同扫描圈的数据进行对比。
这种文件打开时需要用“主窗口——Files菜单——Loaddata buffer”命令。
电化学工作站操作流程及注意事项

电化学工作站操作流程及注意事项一、电化学工作站操作流程:1.准备工作:a.检查实验设备,包括电化学细胞、电极、电解质溶液等是否完好。
b.准备所需试剂,包括电解质溶液、电极液等。
c.检查仪器的状态,包括电压表、电流表、温度计等是否正常工作。
2.组装电化学细胞:a.将电解质溶液加入电化学细胞中,确保液面高度与电极预留孔相对应。
b.将电极插入电化学细胞中,注意电极的正确安装位置。
c.确保电极与电解质溶液充分接触,避免引入气泡。
3.连接电路:a.将电极与电源等仪器设备连接。
b.确认电路连接正确无误,包括电解质溶液的导电性和电极的接触良好性。
c.注意保持良好的接地连接,避免电击等危险。
4.实验操作:a.打开电源,设定所需电压和电流。
b.开始实验并记录实验过程中的数据,包括电流、电压、时间等。
c.根据实验需要适时调整电压、电流等参数。
d.实验结束后,关闭电源并断开电路连接。
5.清洗设备:a.拆卸电化学细胞和电极,清洗并保持其干燥。
b.清洗使用过的试剂容器,避免交叉污染。
c.对设备进行定期维护和保养。
二、电化学工作站操作注意事项:1.安全第一:a.严格按照实验室安全操作规范进行操作。
b.注意电源使用和线路连接的安全,避免意外触电等事故。
c.注意使用化学试剂时的安全操作,避免接触皮肤和吸入有毒气体。
2.仪器设备:a.在操作前,检查仪器的工作状态,确保其正常工作。
b.确保电极的好品质,避免电极表面存在污染、氧化物等。
3.实验设计:a.在进行电化学实验前,明确实验目的、操作步骤和所需数据。
b.根据实际需要选择合适的电极类型、电解质溶液和实验条件。
4.参数调整:a.在实验过程中,根据实验结果和需要适时调整电压、电流等参数。
b.调整实验参数时,注意避免过高的电流和电压,以免损坏设备或导致危险发生。
5.数据记录:a.在实验过程中,及时记录实验数据,包括电流、电压、时间等。
b.注意记录实验过程中的变化和观察结果。
6.清洗与维护:a.在使用后及时清洗和干燥电化学细胞和电极,避免残留物的污染。
电化学作站安全操作及保养规程

电化学作站安全操作及保养规程电化学作站是实验室中常见的仪器设备,它用于进行电化学研究和实验。
由于涉及到电流、电压等较高的电能,因此在使用电化学作站时,必须遵守一定的安全操作规程,并做好仪器的保养工作,以确保人身安全和设备的正常运行。
下面是电化学作站的安全操作及保养规程。
一、安全操作规程:1.穿戴个人防护装备:在操作电化学作站前,必须穿戴好实验室需要的个人防护装备,如实验手套、护目镜、实验服等。
2.安装连接设备:在进行任何操作前,必须检查设备的安装和连接情况是否牢固稳定,确保电源、电极等设备正确连接,并保持设备和周围环境的干燥。
3.标准化设置:在进行实验前,必须先进行标准化设置,确保电流和电压等参数设置正确,并且设备相关的安全开关和保护装置正常工作。
4.禁止超负荷操作:严禁超负荷操作,即操作过程中不得超过设备规定的电流、电压等参数范围。
5.定时巡视:在使用电化学作站的过程中,需要定时巡视设备运行情况,如发现异常需要及时处理,严禁出现设备自燃、漏电等危险情况。
6.禁止在无人状态下操作:在无人监督或无人操作的情况下,不得使用电化学作站,必须将电源切断并正确关闭相关设备。
7.防止电解液溅出:在操作电化学作站时,应注意防止电解液溅出,必要时可以使用防护罩进行保护。
8.准确记录实验数据:在操作过程中,要准确记录实验参数和数据,便于分析和评估实验结果。
二、保养规程:1.定期清洁:定期清洁电化学作站,特别是电解槽和电极等部位,防止积存污渍影响设备正常工作。
2.检查电缆和接线:定期检查电缆和接线是否正常,是否损坏或老化,如发现问题及时更换,以确保设备的安全性和稳定性。
3.均匀使用电极:用电化学作站进行实验时,应尽量均匀使用电极,以免部分电极长时间使用导致磨损严重影响实验结果。
4.防止腐蚀:电化学作站中使用的电解液和试剂一般较为腐蚀性,因此应注意防止其对设备的腐蚀,可采取合适的防护措施。
5.保护仪器外壳:在使用电化学作站时,要保持仪器外壳的清洁和不受损害,更不得随意拆卸、维修或改变设备结构。
电化学工作站安全操作及保养规程

电化学工作站安全操作及保养规程前言电化学工作站是一种常见的化学实验仪器,用于电化学实验研究和分析化学研究等领域。
为了确保电化学工作站的正常运行和安全使用,本文将介绍电化学工作站的安全操作及保养规程。
安全操作规程1. 使用前的检查在使用电化学工作站前,必须进行全面的检查和测试,确保设备和仪器处于正常工作状态。
具体的检查内容包括:•检查电源、电缆、连接器等电源供应部件是否正常;•检查设备的连接和接地是否稳固;•检查设备所有传感器、电位器、电极等部位是否无损坏及污染。
2. 实验操作规范在进行实验操作时必须遵循以下规范和建议:•遵循实验操作步骤,按照实验要求进行操作;•维持实验环境清洁与卫生,避免污染或损坏实验器材;•避免使用金属器械接触电极以防止金属氧化进而影响实验结果及器材服务寿命;•避免使用针尖、小镊子或硬质器具轻触比较脆弱或易损坏的部位。
•不要在实验操作过程中将手指、胳膊或其他错误放入设备中。
3. 安全使用电力和化学试剂在使用电化学工作站时,必须遵守以下规定:•在操作前,必须仔细阅读所有使用说明及操作手册;•使用电源时,必须先将电源开关关闭,然后插上电源线,并在电缆稍微固定后才可以打开电源开关;•使用化学试剂时,必须仔细阅读它们的安全说明和警示标志。
使用一定的保护装置,如穿戴化学安全衣、戴手套、护目镜、口罩等;•在操作过程中,不要离开现场或未经授权将仪器交给其他人员在操作;•在使用化学试剂过程中,从化学品瓶中加取化学试剂,不是应该测量它并将它称量在一个干净的器皿内;•将试管清洗干净,避免积灰污染实验仪器。
4. 异常处理和设备关闭在使用电化学工作站时,如果发生异常情况,如设备故障、电源故障、化学试剂泄漏等,必须立即停止实验操作并采取相应的措施:•关闭设备并断开电源,避免留下任何可致命的物品;•将泄漏物处理在规定容器中,然后交由专业人员处理;•对设备的故障进行记录并通知维修人员。
5. 设备定期检查电化学工作站应该进行定期检查,检查包括设备内部和外部。
电化学工作站操作规程
电化学工作站操作规程
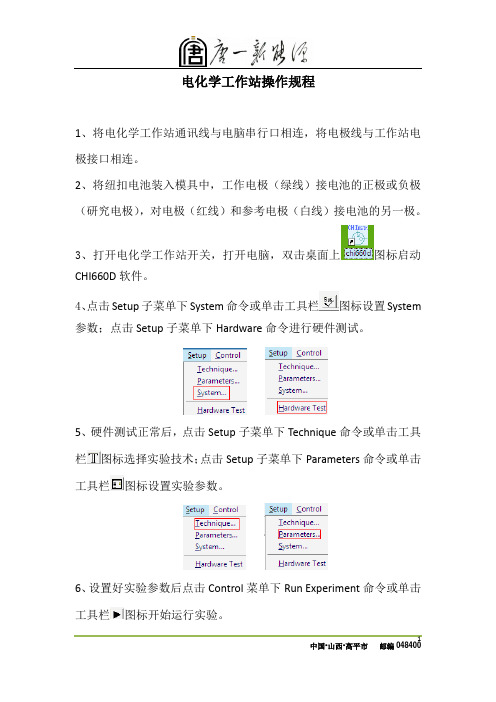
1、将电化学工作站通讯线与电脑串行口相连,将电极线与工作站电极接口相连。
2、将纽扣电池装入模具中,工作电极(绿线)接电池的正极或负极(研究电极),对电极(红线)和参考电极(白线)接电池的另一极。
3、打开电化学工作站开关,打开电脑,双击桌面上图标启动CHI660D软件。
4、点击Setup子菜单下System命令或单击工具栏图标设置System 参数;点击Setup子菜单下Hardware命令进行硬件测试。
5、硬件测试正常后,点击Setup子菜单下Technique命令或单击工具栏图标选择实验技术;点击Setup子菜单下Parameters命令或单击工具栏图标设置实验参数。
6、设置好实验参数后点击Control菜单下Run Experiment命令或单击工具栏图标开始运行实验。
6、实验结束后点击Graphics子菜单下的Present DataProc命令显示实验数据及图像。
7、点击File子菜单下的Save as命令保存文件。
8、点击File子菜单下的Exit命令退出CHI660D测试程序,在确定所
有应用程序都退出后,关闭CHI660D电化学工作站电源,然后关闭计算机。
注意事项:
1、电化学工作站不宜时开时关,更换测试设备或实验室无人时可关闭。
2、为避免接触不良,应定期对模具进行清洁。
3、由于该软件不具有即时备份和自动保存功能,做完实验后要及时保存文件,否则下次实验开始后上次实验数据丢失。
编制:审核:批准:。
- 1、下载文档前请自行甄别文档内容的完整性,平台不提供额外的编辑、内容补充、找答案等附加服务。
- 2、"仅部分预览"的文档,不可在线预览部分如存在完整性等问题,可反馈申请退款(可完整预览的文档不适用该条件!)。
- 3、如文档侵犯您的权益,请联系客服反馈,我们会尽快为您处理(人工客服工作时间:9:00-18:30)。
、Autolab 电化学工作站操作规程辽宁省新能源电池重点实验室一、开机1)先开启电化学工作站电源开关。
2)再开启电脑电源开关,计算机会自动连接到仪器。
3)连接正常时,在电脑显示屏右下角出现一个图标。
二、测试步骤将各电极连接到仪器。
1. 点击桌面上“Nova 1.8” 图标,(或选择:开始----所有程序----Autolab----Nova 1.8),开启电化学测量程序Nova。
2. 选择测量程序:view----set up view(或工具栏中的左数第四个按钮)。
Procedures包括三部分:Autolab(用于实验),Standards(测试仪器模块功能,需用到标准仿真电池,一般不用),My procedures(个人定义的测试程序)Procedures----Autolab----双击测试程序(或点右键Open for editing)。
在窗口右侧界面可编辑当前程序,点“+”号打开下级程序,鼠标放在相应数字处,单击打开编辑窗口修改(如打不开,是不可修改的项目)。
Procedure修改完后,如下次试验可能还用,选中第一列第一行,单击,打开程序名修改框另命名,然后,File----Save procedures as new,则修改后的程序保存在My procedures中。
开始测试,点界面左下角的Strart按钮,程序开始执行,此时,界面自动转到Measurement view,显示实时测量结果。
测试中出现的异常情况,记录在最下行的User log message中。
3. 测试完后,查看和导出数据。
View----Analysis view(或工具栏左数第七个按钮),打开数据分析界面,双击界面上方的程序名,调入实验结果,单击左侧的相应“+”号,打开数据项,蓝色或红色的标志为采集的数据,单击,图显示。
(X、Y轴显示项更改,在X=Potential applied处单击右键,打开菜单选Time,则图的X轴显示为时间,同理,Y轴也可更改。
)3D图显示,在二维图显示的基础上,工具栏右侧第三个按钮Show 3D plot,鼠标单击图,并按住左键旋转视图。
导出数据:工具栏右侧第二个按钮Show data grid,在打开的数据表处,单击右键,菜单中Export ASCII data。
三、Procedures介绍:可能需更改的参数(1)Cyclic voltammetry potentiostatic (恒电势循环伏安法)Signal sampler:(采样:时间、电位、电流)Options:(灵敏度选择)Timed Procedures:(编辑的程序)WE(1) current range:电流范围,点击Autolab control 右侧的按钮Set potential: 0 V (电极预处理电位)Set cell:on (电池开)Wait time: 5 s (电极预处理时间)Start potential: (扫描初始电位)Upper vertex potential: 1 V (高电位)Lower vertex potential: -1 V (低电位)Stop potential: 0 V (扫描终止电位)Number of stop crossings: 2 (电势扫描段数,即一个循环)Step potential: 2.44 mV (电势阶跃幅度,一般不改)Scan rate: 100 mV/s (扫描速度)(2)Cyclic voltammetry galvanostatic (恒电流循环伏安扫描)Signal sampler:(采样:时间、电流、电位)Options:(灵敏度选择,No options)Timed Procedures:(编辑的程序)WE(1) current range:电流范围(双击Autolab control 右侧的按钮,下拉箭头可更改)Set current: (电极预处理电流)Set cell:on (电池开)Wait time: 5 s (电极预处理时间)Start current: (扫描初始电位)Upper vertex current: (高电位)Lower vertex current: (低电位)Stop current: (扫描终止电位)Number of stop crossings: 2 (电流扫描段数,即一个循环)Step current: (电流阶跃幅度,一般不改)Scan rate: (电流扫描速度)(3)Chrono amperometry (Δt > 1 ms) 计时电流Timed procedures:Set potential (第一段阶跃电位)Wait time (第一段持续时间)Record signals (Durations第一段持续时间、Interval time采样间隔)Set potential(第二段阶跃电位)Record signals(第二段持续时间、采样间隔)Set potential(第三段阶跃电位)Record signals(第三段持续时间、采样间隔)……….如要追加命令,左侧command选项卡,选择相应命令,按住鼠标左键,拖曳至右侧Timed procedures中的相应行即可。
(注意箭头提示)四、Command介绍1. Massage command信息提示,可放在程序的任意位置,use time limit:如选择No,则信息显示界面一直存在,直至点OK,程序才往下进行;选择Yes,信息显示30s后结束,程序往下进行。
2. Input box交互式数据,用于程序进行中,在线更改测试参数,Value值与程序中的某参数link后,该参数值更改为Values值。
放在Timed procedure前。
3. 利用Command命令建立新程序工具栏第二行,new procedure建立空白界面。
(1)仅执行一次测试的程序格式:电极准备:Commands---Measurement general----拖曳Timed procedure(一级)至右侧界面,依次往下是Autolab control、set potential、set cell、wait time、optimize current range(二级)。
测试命令:如CV staircase(二级)。
结束命令:Set cell (二级)。
(2)如测试命令反复执行,格式如下:电极准备:Timed procedure(一级);依次Autolab control、set potential、set cell、wait time、optimize current range(二级)。
测试命令:LSV staircaseCommands----Control----Repeat for each value(一级)、Timed procedure(二级)、LSV staircase (三级)、Set potential(三级)、Wait time(三级)结束命令:Timed procedure(一级)、Set cell(二级)链接设置:Repeat for each value中Parameter link(二级)与LSV staircase中Scan rate(四级)链接。
准备命令中Set potential(二级)、测试命令中Start potential(四级)、Set potential(三级)三者链接。
(3)设定测试灵敏度:Procedure----Options(一级):打开Edit options、WE(1)前打钩,即自动灵敏度,然后选择高低电流范围、点OK。
取样点选择:Procedure----Signal sampler(一级),界面中取样点打钩。
在测试命令处点右键,选择图的X、Y、Z轴输出项目;图的位置:Measurement plot number。
Procedure建立后,验证正误:工具栏Tools----Check procedure。
(4)利用Procedure建立新程序工具栏第二行,new procedure建立空白界面。
拖曳Procedures中相应程序至右侧界面,Procedure均为一级(5)建立My command如恒电势预处理命令:New procedure,选择Commands中相应命令Timed procedure(一级);依次Autolab control、set potential、set cell、wait time、optimize current range(二级)。
Timed procedure 处点右键,存储,命名My Potentiostatic Preconditioning,OK即存到My command中,建立新程序时,可快速调用。
(6)建立Nested procedure(嵌入命令)用于测试数据的平滑、寻峰操作New procedure:建立空白程序编辑界面Commands----Control----Nested procedure(一级)、然后依次拖曳命令SG smooth(二级)、Peak search(二级),Nested procedure处右击,命名Nested Smooth and Peak search,保存到My command。
新程序可调用。
应用同上:电极准备命令、电极测试、结束命令、曲线平滑或寻峰命令。
关键是建立不同命令之间对应数据的链接,电极测试命令中的X、Y、Z数据输出,分别链接SG smooth命令的X、Y、Z数据输入,SG smooth的数据输出链接Peak search的X、Y、Z数据输出。
五、 Measurement view测试过程中,界面左侧,正在运行的命令加深显示,某些参数可在线修改。
在Setup view,Procedure程序中设定:测试过程中,数据图显示或不显示Show during measurement;显示在什么位置,Measurement plot number。
测试过程中,增加图的显示,Measurement view界面左侧,命令处点右键,弹出菜单,选择添加的图项目及显示位置;测试中,删除图的显示,Measurement view界面左侧,在命令的下一级中,找到对应数据轴,点右键,删除后,最终数据不会保存。
图的局部放大:在图的位置,点右键,Enable zooming / moving,然后拖拽要放大的区域即可;恢复原图,点F4键。
View菜单,Autolab display,打开实时测控界面,简称含义:Potentiostat mode (PSTAT label)Current range 1 mA (1 mA label)High stability on (HSTAB label)Cell on (CELL ON label)六、 Analysis view修改图、坐标轴显示格式:Analysis view界面左侧,如i vs.E处点右键,Plot options。