Cisco TelePresence SX10 Quick Set 群组视频会议系统评估
Cisco TelePresence TRC 6 快速参考指南说明书

现在将会发 出呼叫。
要结束呼叫, 导航到红色的结束按键并按确定,或者按遥控器上的红色按钮。
使用遥控器的光标键导航到绿色的呼叫按键。
然后按遥控器 上的确定。
当光标位于该 条目时按遥控器上的确定,以生成绿色的呼叫按键。
再次按确定或按遥控器上的呼叫按键。
要在特定列表 (收藏夹、通讯录或最近呼叫)中搜索某人, 导航到相应标题并按确定。
向下浏览找到要呼叫的条目。
2134然后按绿色的呼叫按钮发出呼叫。
如左侧所示, 结束呼叫。
使用遥控器的光标键导航到绿色的呼叫按键。
然后按遥控器 上的确定。
要输入数字, 可使用遥控器上的按键。
要使用虚拟键盘,向下导航到键盘并选择字符。
按确定选择一个字符。
导航到搜索或 拨号字段, 然后按遥控 器上的确定。
这将调用键盘。
2134这一新呼叫此 时将添加到现有呼叫,从而创建一个会议。
重复以添加更多人员。
在通话期间, 导航到添加 并按遥控器上的 确定。
这会将当前呼叫置于保 留状态。
这将生成添加 按键。
导航到 添加并按确定,或按遥控器上的 呼叫按键。
按正常方式找到或键入要添加的出席者。
2134使用姓名、号码或地址发出呼叫启动视频会议从联系人列表发出呼叫D15355. 2020 年 6 月 简体中文导航并点击左上角的图标。
通过确定按钮,根据需要激活/禁用功能。
按返回退出。
21要停止共享 内容,请选择 停止共享, 然后按遥控 器上的确定。
确保您的演示源已连接且已开启。
您可能需要选择共享并按遥控器上的确定。
所共享图像的大 小通过最小化/最大化按钮控制。
选择此按钮,然后按遥控器上的(如果需要)。
选择本地预览以检查内容而不与其他人共享, 然后选择通话中共享以与其他人共享内容。
2134确定导航到转接按键并按遥控器上的确定。
这将导致当前呼叫置于保留状态。
导航到绿色的 呼叫按键并按 确定,或使用遥控器上的绿色 呼叫按键。
与相应人员确认可以正常转接。
要转接的人员仍处于保留状态。
按正常方式搜索要呼叫的人员。
Cisco Network Assistant入门5.1
Smartports 2-13 权限等级序 2-14 联机帮助 2-14
第3章
安装、启动和连接 Network Assistant 3-1 安装要求 3-1 安装 Network Assistant 3-2 设置语言选项 3-2 启动 Network Assistant 3-3 将 Network Assistant 连接于团体或集群 3-3 Network Assistant 中的访问模式 3-4 事件通知 3-4
The Cisco implementation of TCP header compression is an adaptation of a program developed by the University of California, Berkeley (UCB) as part of UCB’s public domain version of the UNIX operating system. All rights reserved. Copyright © 1981, Regents of the University of California.
Cisco Network Assistant 入门 © 2004-2007 Cisco Systems, Inc. All rights reserved.
内容
第1章 第2章
OL-11453-02
序言 vii 致读者 vii 目的 vii 获取文档 vii viii 产品文档 DVD viii 订购文档 viii 文档反馈 ix Cisco 产品安全概述 ix 报告 Cisco 产品的安全问题 ix Product Alerts (产品信息速递)和 Field Notices (最新产品问题信息 汇总) x 获取技术支持 xi Cisco 技术支持和文档网站 xi 提交服务请求 xii 服务请求严重性的定义 xii 获取其他出版物和信息 xiii
用户指南ciscotelepresencesx10,sx20
1D1509705用户指南Cisco TelePresence SX10、SX20用户指南Cisco TelePresenceSX10SX20CE8.02D1509705用户指南Cisco TelePresence SX10、SX20本指南内容目录视频会议简介最佳实践................................................................................4屏幕和遥控器一览 .................................................................5视频呼叫从联系人列表发出呼叫 ..........................................................7编辑联系人列表条目状态,然后发出呼叫 ..............................8使用姓名、号码或视频地址发出呼叫 .....................................9收到呼叫..............................................................................10更改屏幕的布局 ...................................................................11启用免打扰 ..........................................................................12启用待机..............................................................................13Intelligent ProximityIntelligent Proximity .............................................................15分享内容启动和停止演示 (17)预约的会议查看会议列表 ......................................................................19联系人将某人加入收藏夹 — 非通话期间..........................................21将某人加入收藏夹 — 通话期间 .............................................22摄像机查看摄像机设置 ...................................................................24更改屏幕上画中画的位置 .....................................................25远端摄像机控制 ...................................................................26设置访问“设置” (28)所有目录条目都是可点击的超链接,点击即可打开相应的文章。
思科视频监控审核播放器使用手册说明书
Americas Headquarters:Cisco Systems, Inc., 170 West Tasman Drive, San Jose, CA 95134-1706USACisco Video Surveillance Review Player User GuideRevised August 2013OL-27380-05This guide describes how to open and view video clips using the Cisco Review Player.Contents•Overview, page 2•Supported File Formats, page 2 •Requirements, page 3 •Installing the Player, page 3 •Opening Video Clips, page 4•Creating Tamper-Proof MPX Files, page 4 •Viewing Clips, page 5•Creating a Snapshot Image, page 8 •Using the Pop-Up Menu, page 8 •Getting Help, page 9•Related Documentation, page 9OverviewOverviewThe Cisco Review Player is a stand-alone Windows utility that plays video archive clips without abrowser. The Cisco Review Player can also convert MP4 files into a tamper-proof MPX format.Supported File FormatsThe Cisco Review Player supports playback of the following format types:•CVA—Cisco video archives (CVA) can include multiple video panes that synchronize to the same time. CVA files can only be opened in applications that support the CVA format (such as the CiscoReview Player). CVA files do not support audio playback.•CVX—A tamper proof CVA file. CVX files require a password that is entered when the file is created. You must enter the password to open and view the video file. CVX video playback will shutdown if the file is tampered with. CVX files do not support audio.•MP4—A standard video file format that is playable on most computers and useful for sending to 3rd parties. MP4 clips support a single video pane. Audio playback is supported only with the CiscoVSM Review Player or VLC media player.•MPX—A tamper proof MP4 file. MPX file include a password that is entered when the file is created. You must enter the password to open and view the video file. Audio playback is supportedonly with the Cisco VSM Review Player or VLC media player.Note The Cisco Review Player also supports the ability to save snapshots of video in BMP, JPEG, PNG, and TIFF formats.Cisco Video Surveillance Review Player User GuideCisco Video Surveillance Review Player User GuideRequirementsRequirementsYou can use the Cisco Cisco Review Player on any PC that meets the following requirements:Installing the PlayerThe Cisco Review Player is installed automatically when you access the Cisco VSM Operations Manager web page and install the Cisco Multi-Pane client software.NoteThe Cisco Multi-Pane client software an Active X client that enables video playback and other features. You must have administrative privileges on the PC workstation to install the software.Double-click the Cisco Multipane Review Player icon on your desktop, or navigate to the program file in Start > Programs > Cisco Multipane Client > Cisco Multipane Review Player .TipYou can also install the Cisco Review Player from the Operations page of the browser-based Operations Manager. See the Cisco Video Surveillance Operations Manager User Guide for more information.Manual InstallationTo manually install the player:Step 1Log in to the Cisco VSM Operation Manager.Step 2Click System Settings .Step 3Click Review Player EX .Step 4Select your Windows platform and follow the onscreen instructions to download the Review Player EX zip file.T able 1-1RequirementsRequirementsRequirement Complete? (✓)A PC or laptop running Windows 7 (32-bit or 64-bit).☐Cisco Multi-Pane client software, an Active X client that enables video playback and other features.•You will be prompted to install this utility the first time you log in to theCisco VSM Operations Manager. Follow the on-screen instructions if prompted. You must have administrative privileges on the PC workstation to install the software.•You will also be prompted to install the required Microsoft .Net 4.0 component, if necessary. If your workstation does not have Internet access, the .Net 4.0 installer can be downloaded from/en-us/download/details.aspx?id=17718.☐Cisco Video Surveillance Review Player User GuideOpening Video ClipsStep 5Uncompress the .zip file.Step 6Double-click the ReviewPlayer.exe file. No installation is required.Opening Video ClipsTo open an existing video clip, launch the application and choose File > Open , or drag and drop a CVA file into the viewing pane.•The 32-bit Review Player can open CVA files 4GB or less. •The 64-bit Review Player can open CVA files greater than 4GB.ProcedureStep 1Double-click the Cisco Multipane Review Player shortcut on your desktop.TipYou can also select Start > Programs > Cisco Multipane Client > Cisco Multipane Review Player .Step 2Choose File > Open .Step 3Select a file format from the drop-down menu.Step 4Browse to choose the clip, and choose Open .Step 5(Tamper Proof file formats only) Enter the file password.TipCVA and CVX files can display multiple video panes. To create clips with multiple panes, see the Cisco Video Surveillance Operations Manager User Guide .Creating Tamper-Proof MPX FilesTo convert a CVA or MP4 file to a tamper proof MPX format, open the file and choose Tools > Create Tamper-Proof File . Enter a password between 6 and 64 characters and click OK. The password is required to access the file.NoteTamper-proof CVX files are created when the clip is saved using the Cisco Video Surveillance Safety and Security Desktop application or browser-based Operations Manager.Cisco Video Surveillance Review Player User GuideViewing ClipsViewing ClipsFigure 1-1 describes the viewing features and controls.TipSee the Cisco Video Surveillance Operations Manager User Guide for instructions to create and save single pane or multipane video clips.Figure 1-1Viewing Recorded Video1Clip file name, indicating the video source.2Timestamp for the currently displayed video image. For example:Cisco Video Surveillance Review Player User GuideViewing Clips3Range Bar—The span of video to work with. The entire range bar represents the entire span of available recorded video.Range Bar selectors— Drag the Range Bar selectors to narrow the time span of video you want to review. For example, drag the selectors to create a 3 minute range. You can then drag that range left to right to the appropriate place in the recorded span.TipClick and drag the Seek Bar selector in the lower (green) bar to choose the playback time. The green Seek Bar represents the span of video chosen by the Range Bars.TipDouble-click a range bar selector to playback the video from the beginning of that range.4Seek Bar —Represents the video range, and is used to select a playback time. Drag the selector to play video from the selected time (as indicated by the timestamp).For example, if the Range Bar selection is 3 minutes, then the seek bar represents 3 minutes of video.Tip Right-click the Seek Bar and select Seek to... to select a specific date and time.NoteGaps in the recorded video are shown in gray. Recording gaps occur if video was unavailable for that time (due to network connectivity issues, device malfunctions, or other events).Cisco Video Surveillance Review Player User GuideViewing Clips5Video playback controls.•—Step Reverse button—(Archived video only) Pauses the playback and steps back one frame at a time. •—Play Reverse button—(Archived video only) Plays the video archive in reverse at normal speed. •—Pause button—Pause the video playback.•—Play Forward button—Play the video forward at normal speed.•—Step Forward button—(Archived video only) Pauses the playback and steps forward one frame at a time.Variable Speed PlaybackRight-click the Play Reverse or Play Forward button to play the video slower or faster.For example, select 0.50X to play the video at half speed (forward or reverse). Select 4.00X to play at 4 times the normal rate (forward or reverse).6—Click the triangle to pin the control bar to the screen, or auto-hide it when the cursor is moved.7—The synchronization icon appears if multiple video panes are included in a clip. This indicates that the video in each pane displays the same time span.Creating a Snapshot ImageCreating a Snapshot ImageRight click the video image and select one of the following options from the menu:Menu Selection DescriptionTake Snapshot Save a snapshot of a single video pane (excluding control icons,timestamps and other information) in BMP, JPEG, PNG, or TIFFformat.Take Composite Snapshot Save a snapshot of a multiple video panes (including control icons,timestamps and other information) in BMP, JPEG, PNG, or TIFFformat.Using the Pop-Up MenuSelect a video pane and right-click on the image to open a menu with the following options.T able 1-2Camera Actions Available by Right-Clicking the Video ImageCamera Menu Item DescriptionPan, Tilt, and Zoom(Disabled) PTZ controls are not available when viewing recordedvideo.Digital zoom Digitally enlarges the image to zoom in on a specific area.Double click the enlarged image to use a window-in window view.Adjust the viewing area in the small window to define the portion ofenlarged video to display.Full screen mode Enlarges the video image to fill your display screen.Tip To exit, press Esc, or right-click and choose Full Screen Modeagain.Take snapshot See the “Creating a Snapshot Image” section on page 8.Take composite snapshot See the “Creating a Snapshot Image” section on page 8.Record now(Disabled) Recording is available for live video streams only.Audio settings(Clips with audio only). Opens a window used to adjust video playbackvolume and balance.Smooth video settings(Live video only) Creates a smooth video playback if the playback ischoppy or delayed due to network or other performance issues.See the Cisco Video Surveillance Operations Manager User Guide formore information.Global settings Provides the settings that apply to all video panes, allowing you tozoom the video to fit the pane.Cisco Video Surveillance Review Player User GuideGetting HelpGetting HelpUse the Help menu to view the information included in this guide.Related DocumentationSee the Cisco Video Surveillance 7 Documentation Roadmap for descriptions and links to Cisco VideoSurveillance documentation, server and storage platform documentation, and other relateddocumentation.Cisco and the Cisco logo are trademarks or registered trademarks of Cisco and/or its affiliates in the U.S. and other countries. To view a list ofCisco trademarks, go to this URL: /go/trademarks. Third-party trademarks mentioned are the property of their respective owners. Theuse of the word partner does not imply a partnership relationship between Cisco and any other company. (1110R)Any Internet Protocol (IP) addresses and phone numbers used in this document are not intended to be actual addresses and phone numbers. Anyexamples, command display output, network topology diagrams, and other figures included in the document are shown for illustrative purposes only.Any use of actual IP addresses or phone numbers in illustrative content is unintentional and coincidental.©2012-2013 Cisco Systems, Inc. All rights reserved.Cisco Video Surveillance Review Player User GuideRelated DocumentationCisco Video Surveillance Review Player User Guide。
cisco telepresence 用户手册 - 使用 touch10 的系统 - ce9.2说明
CE 9.2 Cisco TelePresence 用户手册使用 Touch10 的系统本指南内容目录所有目录条目都是可点击的超链接,点击即可打开相应的文章。
要在章节之间切换浏览,还可以点击侧边栏中的图标。
注:本用户指南中介绍的某些功能是可选的,因此可能不适用于您的系统。
视频会议简介最佳实践 ..................................................................................4其他提示 ...............................................................................4使用您的个人凭证登录 .............................................................5关于分机移动 ........................................................................5视频呼叫从联系人列表发出呼叫 .............................................................7关于联系人列表 .....................................................................7编辑联系人列表条目,然后发出呼叫 .........................................8关于条目编辑 ........................................................................8使用姓名、号码或 IP 地址发出呼叫 ...........................................9关于发出呼叫 ........................................................................9在非通话期间接收呼叫 ..........................................................10如果有人呼叫您 ..................................................................10在通话期间接收呼叫 ..............................................................11如果有人呼叫您 ..................................................................11从呼叫自行断开连接 ..............................................................12关于自行断开连接 ..............................................................12将呼叫置于保留状态和恢复保留的呼叫 ..................................13关于置于保留状态 ..............................................................13转接正在进行的呼叫 ..............................................................14关于转移 ............................................................................14激活免打扰 ...........................................................................15关于免打扰 ........................................................................15自动前转所有呼叫 .................................................................16关于前转呼叫 (16)在通话期间查看键盘 ..............................................................17在通话期间使用键盘 ...........................................................17将其他参加者添加到现有呼叫 ................................................18关于视频会议 .....................................................................18断开会议参加者的连接 ..........................................................19关于视频会议 .....................................................................19智能接近使用智能接近 ........................................................................21关于接近 ............................................................................21内容共享在通话中共享内容 .................................................................23关于内容共享 .....................................................................23在非通话期间共享内容 ..........................................................24本地内容共享 .....................................................................24在通话期间更改演示布局 .......................................................25关于演示布局 .....................................................................25预定的会议加入预定会议 ........................................................................27加入会议 ............................................................................27联系人收藏夹、最近呼叫和通讯录 ....................................................29关于联系人列表 ..................................................................29通话期间,将某人添加到收藏夹 .............................................30关于收藏夹 ........................................................................30非通话期间,将某人添加到收藏夹 .. (31)关于此功能 ........................................................................31摄像机查看摄像机设置 .....................................................................33关于摄像机控制 ..................................................................33添加摄像机预设位 .................................................................34关于摄像机预设位 ..............................................................34编辑摄像机预设位 .................................................................35关于编辑预设位 ..................................................................35发言人跟踪 ...........................................................................36关于发言人跟踪 ..................................................................36演示者跟踪 ...........................................................................37关于演示者跟踪 ..................................................................37控制自己的摄像机 .................................................................38关于编辑预设位 ..................................................................38管理本端视频 ........................................................................39关于编辑预设位 ..................................................................39调整本端视频 PiP 的大小 .......................................................40为什么要调整本端视频的大小? ..........................................40移动本端视频 PiP ..................................................................41为什么要移动本端视频? ....................................................41远端摄像头控制 .....................................................................42关于摄像机控制 ..................................................................42设置访问“设置” ............................................................................44关于设置 . (44)使用摄像机预设位Cisco TelePresence 系统可让您创建预定义的缩放和摄像机指向(平移和倾斜)。
Cisco Nexus 1000V 安装和升级视频指南说明书
Americas Headquarters:Cisco Systems, Inc., 170 West Tasman Drive, San Jose, CA 95134-1706USACisco Nexus 1000V Installation and Upgrade VideoGuide, Release 4.2(1) SV1(4)A set of brief screencast videos is available to assist in the installation and upgrade of the Cisco Nexus1000V to Release 4.2(1) SV1(4). This document describes the screencasts.Cisco Nexus 1000V Installation and Upgrade DocumentationThe screencast videos described in this document are intended to supplement the Cisco Nexus 1000Vinstallation and upgrade guides. For more comprehensive and detailed information, see the followingdocuments:Cisco Nexus 1000V Getting Started Guide, Release 4.2(1)SV1(4)Cisco Nexus 1000V Software Installation Guide, Release 4.2(1) SV1(4)Cisco Nexus 1000V Software Upgrade Guide, Release 4.2(1) SV1(4)Cisco Nexus 1000V VEM Software Installation and Upgrade Guide, Release 4.2(1) SV1(4)Note We strongly recommend that you read the prerequisites listed in these documents before performing anyof the procedures described in the screencasts.Other Cisco Nexus 1000V documentation can be found at this URL:/go/nexus1000v/docsYou should also read the Cisco release notes for this release and the VMware release notes for anyassociated VMware software releases, upgrades, or patches.Cisco Nexus 1000V and VMware Compatibility InformationCisco Nexus 1000V and VMware Compatibility InformationThe Cisco Nexus 1000V system comprises several Cisco and VMware software components. Tomaintain compatible versions of these components, and to know which components must be upgradedwhen others are upgraded, see the Cisco Nexus 1000V Compatibility Information, Release 4.2(1)SV1(4),at this URL:/en/US/docs/switches/datacenter/nexus1000/sw/4_2_1_s_v_1_4/compatibility/information/n1000v_compatibility.htmlThe links on the Compatibility Information page provide compatibility matrices for release levels ofCisco Nexus 1000V and VMware software components and configurations that have been tested andvalidated by Cisco, by Cisco partners, or both. Use this information as a reference when installing orupgrading software components.Cisco Nexus 1000V Installation VideosThe following screencast videos are available to assist you in the installation of Release 4.2(1) SV1(4)of the Cisco Nexus 1000V. We recommend that you view these videos and perform the procedures in theorder shownUnderstanding Cisco Nexus 1000V and VMware Software Version CompatibilityView This video introduces and explains the use of the Host Software Version Compatibilitytable in the Cisco Nexus 1000V and VMware Compatibility Information documentprovided for each release. Given the VMware host ESX or ESXi software version, thecompatibility table shows the appropriate Virtual Ethernet Module (VEM) installationfiles and the minimum required software versions of the VMware vCenter Server, thevCenter Update Manager, and the vSphere CLI. The video also shows how to determinethe software version of various components and how to download update software.Installing a Redundant Pair of VSMs from an OVA file Using the Installer ApplicationView This video shows how to install a redundant pair of VSMs in an HA configuration froman OVA file using the Installer Application.Installing the VEM using the VUM [two parts]View View Part 1 of the video shows you how to install the VEM on an ESX host using the VUM. Part 2 of the video shows you how to troubleshoot and verify the installation.Installing the VEM using the vSphere CLIView This video shows how to install the VEM on an ESX host using the VMware vSphere CLI.Cisco Nexus 1000V Installation and Upgrade Video Guide, Release 4.2(1) SV1(4)Cisco Nexus 1000V Upgrade VideosCisco Nexus 1000V Upgrade VideosThe following videos are available to assist you in upgrading the Cisco Nexus 1000V to Release 4.2(1)SV1(4). We recommend that you view these videos and perform the procedures in the order shown.Understanding Cisco Nexus 1000V and VMware Software Version CompatibilityView This video introduces and explains the use of the Host Software Version Compatibilitytable in the Cisco Nexus 1000V and VMware Compatibility Information documentprovided for each release. Given the VMware host ESX or ESXi software version, thecompatibility table shows the appropriate Virtual Ethernet Module (VEM) installationfiles and the minimum required software versions of the VMware vCenter Server, thevCenter Update Manager, and the vSphere CLI. The video also shows how to determinethe software version of various components and how to download update software.Understanding the Upgrade Process for the Cisco Nexus 1000V Release 4.2(1) SV1(4)View This video provides an overview of the steps required to update your VMwareinfrastructure for a non-disruptive upgrade, and to update your VEMs and VSMs to CiscoNexus 1000V Release 4.2(1) SV1(4).Upgrading the VMware vCenter Update Manager to Release 4.0 Update 1 Patch 2View This video shows how to upgrade the VMware vCenter Update Manager (VUM) to theminimum required version for the upgrade to Cisco Nexus 1000V Release 4.2(1) SV1(4).Upgrading the Cisco Nexus 1000V from 4.0(4) SV1(3, 3a, or 3b) to 4.2(1) SV1(4) [three parts]This three-part video shows you how to upgrade your Virtual Ethernet Modules (VEMs)and Virtual Supervisor Modules (VSMs) to Cisco Nexus 1000V Release 4.2(1)SV1(4).View Part 1 of the video describes the process, lists the prerequisites, and shows how todownload the required software.View Part 2 of the video shows you how to upgrade the VEMs.View Part 3 of the video shows you how to upgrade the Virtual Supervisor Modules (VSMs).Upgrading the Cisco Nexus 1000V from VMware Release 4.0 to 4.1 [three parts]This video shows how to upgrade your vCenter Server, vCenter Update Manager, andvSphere CLI from VMware Release 4.0 to Release 4.1.View Part 1 describes how to check software compatibility and how to upgrade the vCenterServer.View Part 2 describes how to upgrade the VUM.View Part 3 describes how to upgrade the hosts.Obtaining Documentation and Submitting a Service Request For information on obtaining documentation, submitting a service request, and gathering additionalinformation, see the monthly What’s New in Cisco Product Documentation, which also lists all new andrevised Cisco technical documentation, at:/en/US/docs/general/whatsnew/whatsnew.htmlSubscribe to the What’s New in Cisco Product Documentation as an RSS feed and set content to bedelivered directly to your desktop using a reader application. The RSS feeds are a free service. Cisco currentlysupports RSS Version2.0.Cisco Nexus 1000V Installation and Upgrade Video Guide, Release 4.2(1) SV1(4)Cisco Nexus 1000V Upgrade Videos© 2011 Cisco Systems, Inc. All rights reserved.Cisco and the Cisco Logo are trademarks of Cisco Systems, Inc. and/or its affiliates in the U.S. and other countries. A listing of Cisco's trademarkscan be found at /go/trademarks. Third party trademarks mentioned are the property of their respective owners. The use of the wordpartner does not imply a partnership relationship between Cisco and any other company. (1005R)Cisco Nexus 1000V Installation and Upgrade Video Guide, Release 4.2(1) SV1(4)。
思科SX20性能参数手册
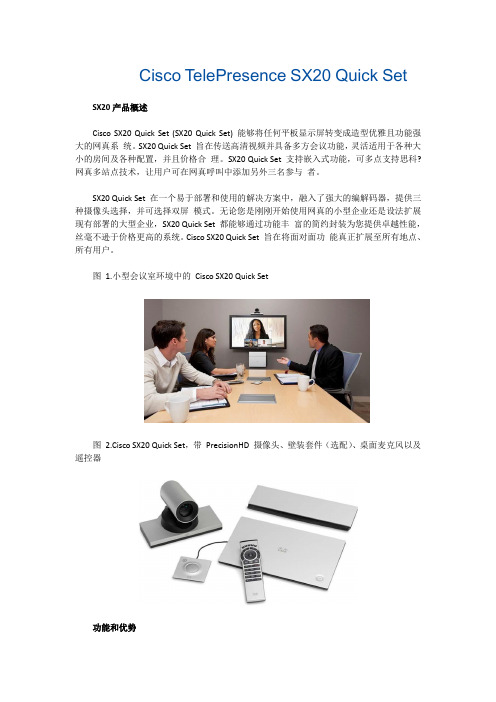
Cisco TelePresence SX20 Quick Set SX20产品概述Cisco SX20 Quick Set (SX20 Quick Set) 能够将任何平板显示屏转变成造型优雅且功能强大的网真系统。
SX20 Quick Set 旨在传送高清视频并具备多方会议功能,灵活适用于各种大小的房间及各种配置,并且价格合理。
SX20 Quick Set 支持嵌入式功能,可多点支持思科?网真多站点技术,让用户可在网真呼叫中添加另外三名参与者。
SX20 Quick Set 在一个易于部署和使用的解决方案中,融入了强大的编解码器,提供三种摄像头选择,并可选择双屏模式。
无论您是刚刚开始使用网真的小型企业还是设法扩展现有部署的大型企业,SX20 Quick Set 都能够通过功能丰富的简约封装为您提供卓越性能,丝毫不逊于价格更高的系统。
Cisco SX20 Quick Set 旨在将面对面功能真正扩展至所有地点、所有用户。
图 1.小型会议室环境中的Cisco SX20 Quick Set图2.Cisco SX20 Quick Set,带PrecisionHD 摄像头、壁装套件(选配)、桌面麦克风以及遥控器功能和优势1 总结了Cisco SX20 Quick Set 的主要特点。
1.Cisco SX20 Quick Set 特点总结特点总结设计特点●将平板显示屏转变成1080p 高清会议设备●连接直观,让设置如同连接DVD 播放器一样容易●提供高达1080p60 的分辨率,与基于标准的视频相兼容而不会牺牲功能●设计优雅简约应用特点●轻触按钮即可共享多媒体和演示文稿●通过IP(Telnet 或安全外壳协议[SSH])提供基本API●可选择双屏模式●高清内容共享,分辨率高达1080p15●通过一键式操作(OBTP) 召开会议性能特点●最佳分辨率高达1080p60●H.323/SIP 高达6 Mbps●内置单独转码的多点会议功能,可添加另外三名呼叫者●利用Cisco Unified Communications Manager (CUCM)、思科网真视频通信服务器(VCS) 或Cisco Callway轻松进行调配和自行配置●充分利用思科网真总体解决方案方法,包括思科网真Multiway 功能、录制和流媒体以及防火墙穿越服务●原生支持Cisco Unified Communications Manager(需要Cisco Unified CommunicationsManager 8.6 或以上版本)图3.Cisco SX20 Quick Set 壁挂式安装产品规格2 列出了Cisco TelePresence SX20 Quick Set 的产品功能规格。
Cisco TelePresence 用户手册 SX10 和 SX20 CE 9.9说明书
Cisco TelePresence 用户手册SX10 和 SX20CE 9.9本指南内容目录所有目录条目都是可点击的超链接,点击即可打开相应的文章。
要在章节之间切换浏览,还可以单击侧边栏中的图标。
注意!本用户手册中介绍的某些功能是可选的,因此可能不适用于您的系统。
视频会议简介触摸屏一览 ..............................................................................4操作提示 ...............................................................................4遥控器一览 (I) ..........................................................................5操作提示 ...............................................................................5遥控器一览 (II) .........................................................................6操作提示 ...............................................................................6视频呼叫从联系人列表发出呼叫 .............................................................8关于联系人列表 .....................................................................8呼叫之前编辑联系人 .................................................................9关于编辑 ...............................................................................9编辑呼叫速率,然后发出呼叫 ................................................10关于呼叫速率 .....................................................................10使用姓名、号码或 IP 地址发出呼叫 ........................................11关于发出呼叫 .....................................................................11将其他参加者添加到现有呼叫 ................................................12关于视频会议 .....................................................................12断开会议参加者的连接 ..........................................................13关于视频会议 .....................................................................13接收呼叫 ..............................................................................14如果有人呼叫您 ..................................................................14在通话期间接收其他呼叫 .......................................................15扩展呼叫 ............................................................................15转接正在进行的呼叫 ..............................................................16更改屏幕的布局 .....................................................................17关于布局 ............................................................................17启用免打扰 ...........................................................................18关于免打扰 ........................................................................18启用待机 ...............................................................................19关于待机 ............................................................................19前转所有呼叫 ........................................................................20关于前转 . (20)Intelligent Proximity关于 Cisco Proximity 超声波信号 ...........................................22关于 Proximity 功能 ............................................................22内容共享启动和停止演示 .....................................................................24关于内容共享 .....................................................................24在通话期间更改演示布局 .......................................................25关于演示布局 .....................................................................25预定的会议加入预定会议 ........................................................................27加入会议 ............................................................................27联系人非通话期间,将某人添加到收藏夹 .........................................29关于通讯录、最近呼叫和收藏夹 ..........................................29通话期间,将某人添加到收藏夹 .............................................30关于收藏夹 ........................................................................30摄像机控制查看摄像机设置(本地摄像机) .............................................32关于摄像机设置 ..................................................................32远端摄像机控制 .....................................................................33关于远端摄像机控制 ...........................................................33移动本端视频 PiP ..................................................................34为什么要移动本端视频? ....................................................34打开或关闭摄像机 .................................................................35关于视频关闭 .....................................................................35设置访问“设置” ............................................................................37关于设置 ............................................................................37使用遥控器的光标控件可在屏幕上四处移动,然后按确定/输入将打开所选菜单字段。
- 1、下载文档前请自行甄别文档内容的完整性,平台不提供额外的编辑、内容补充、找答案等附加服务。
- 2、"仅部分预览"的文档,不可在线预览部分如存在完整性等问题,可反馈申请退款(可完整预览的文档不适用该条件!)。
- 3、如文档侵犯您的权益,请联系客服反馈,我们会尽快为您处理(人工客服工作时间:9:00-18:30)。
本文档已由相关人员/公司从英文翻译为当地语言。
尽管此次翻译已获得 Wainhouse Research 的批准,但 Wainhouse Research 并未验证翻译的准确性,并且不会对此承担任何责任。
2015 年 9 月Cisco TelePresence SX10 Quick Set群组视频会议系统评估领先的小型机顶式群组会议系统的实际测试背景信息在竞争激烈的视频会议市场中,思科不仅是令竞争对手望而生畏的巨型企业,而且是毋庸置疑的市场领导者,2014 年的年收入超过 470 亿美元,在全球拥有 70,000 多名员工。
本文档不专门对思科在视频会议市场的表现做出深入讨论。
如果读者需要了解详细信息,请参阅我们在 2015 年 1 月就此主题发布的研究报告。
思科在 2014 年 3 月发布了一系列新产品公告,其中包括 SX 系列群组视频系统的两个新成员:- SX80(带有多种输入和输出接口的机架安装型集成式群组视频系统)- SX10(低成本的入门级小型群组视频系统)一方面,SX80 所具有的强大性能和高度灵活性给我们留下了深刻的印象;另一方面,我们也充分意识到,如此强大的性能常常会伴随着昂贵的价格,应用范围自然会大受限制。
然而,SX10 这款产品,特别是它对外宣布的低于 2000 美元的零售价格(思科最初的新闻稿宣称此价格低于一台PC 的售价),深深吸引了我们。
SX10 并非市场上首款低成本的基于标准的群组视频系统。
早期的竞争对手包括 Aver、Biscotti、Kedacom 和 Tely Labs 等。
但是,思科(以及之前的 Tandberg)始终将自身定位为视频会议行业的“宝马公司”,坚持提供高性能、高价格的产品。
SX10 的问世标志着思科明显偏离了“高价格、高价值”这一原有轨道。
对我们而言,SX10 的动人之处并不仅仅限于其低廉的价格...实际上,无论是可用性还是后端管理,SX10 各方面的表现与所有其他思科视频系统同样出色。
对于本产品,低价并不意味着牺牲了可管理性,也无需在环境中引入不知名的新视频供应商填补空白。
在最近几个月,Wainhouse Research (WR) 注意到 SX10 已经开始大举进入各种办公室和小型会议室,我们的许多企业咨询客户都在使用这款产品。
在某些情况下,SX10 成为了在这些环境中安装的第一款思科视频产品。
这些发现促使我们对该系统进行更加深入的了解。
本文档包括 WR 的独立第三方测试结果以及对 Cisco TelePresence SX10 Quick Set 群组视频会议系统的整体评估结果。
1需要声明的是,思科并未付费请 WR 来评估此解决方案。
为确保信息的准确性,我们的最终测试结果已通过思科审查,本文档也已获得思科的公开发布许可。
1遗憾的是,在进行此次评估时,WR 测试实验室未能针对 CUCM 环境进行测试。
因此,我们未能测试 SX10 的 CUCM 注册和调配功能。
Cisco SX10 群组视频系统SX10 是基于标准的个人或小组视频会议系统,价目表价格为 3,990 美元,适于 1-3 名与会者参加的群组或小型会议室使用。
SX10 是一款机顶式系统,专用于安装在会议室正面显示器的顶部。
SX10 的主要特性如下:- 一体化(机顶式)设备- 双电源(PoE 或外部 12V 电源),最大功耗 12 瓦(备用电源获得 B 类认证,功耗低于 8W)- 基于标准(SIP、H.264、H.263+、H.263 等)- 支持单台 HDMI 显示器 (1080p/60 fps)- 集成麦克风- 集成 1080p 电动 PTZ 摄像头(2.65 倍光学变焦,83 度水平视场)- 支持 1080p/30 fps 视频分辨率- 支持 1080p/5 fps 和 WXGA/5 fps 内容共享(通过 HDMI 和 VGA 内容输入接口)- 集成麦克风输入接口(仅支持 Cisco Telepresence Table Microphone 20)- 集成线路电平音频输出接口(适用于可选外置扬声器)SX10 随附一个壁装适配器,也可单独购买可选的显示器顶部安装套件。
此外,SX10 包装内还包括一个红外线遥控器,但是此系统也可以配合使用可选的 Cisco TelePresence Touch 10 触控面板。
SX10 可通过以下思科基础设施系统在本地进行注册(和调配):- 思科统一通信管理器 (CUCM) - 通过 Expressway 的本地或远程注册- 思科网真视频通信服务器 (VCS)另外,SX10 可以注册到任何标准 SIP 服务器以及思科网真管理套件 (TMS),从而支持调配和系统管理。
通过注册到思科基础设施,用户即可利用各种特性和功能(具体情况因系统、版本和许可而异),其中包括集中目录服务、集中固件更新、NAT/防火墙穿越、基本电话功能以及集成调度系统。
右侧屏幕截图中显示的内容是,将思科 SX10 连接到 LCD 显示器之后,屏幕上会显示有关该会议室即将举行的下一个预定会议的信息。
点击通话图标即可将SX10 自动连接到相应的会议,无需用户输入复杂的 IP 地址、SIP URI 或会议 ID 进行拨号操作。
SX10 实际测试SX10 的外形不同于带有固定于长方形底座之上的PTZ 摄像头的标准机顶式系统。
与标准设计不同,SX10 以高级工业设计为基础,设计理念与其他众多全新发布的思科视频会议解决方案一脉相承。
WR 测试团队深为这款设计精良、注重细节的产品所折服。
举例来讲...- SX10 背面的连接器采用垂直安装式设计,而非水平安装(请参见右图,其中显示了两根电缆连接到 SX10 的情形)。
与竞争对手的机顶式系统相比,SX10 正是凭借这种看似微不足道的设计思路,将与墙壁的安装距离缩短4-6 英寸(约 101.6-152.4 毫米)。
- 利用随附的壁装适配器,SX10 的安装过程会更加轻松、快捷,而且无需准备单独的适配器或机架。
厂商能把着眼点放在容量和速度之外实属难能可贵。
显而易见,思科确实是不惜时间和成本,反复考虑如何在会议室中轻松、快速地安装设备,以及设备外观是否与会议室的整体氛围融洽契合。
虽然是老生常谈,但是我们还是要说...通常细微之处才能见真章。
毫无疑问,思科是真正精于此道的高手。
不仅如此,各种系统技术设计元素也令我们赞不绝口。
举例来说,SX10 支持PoE,使用非常方便,既可缩短安装时间,又无需为设备附送外置电源,进而降低制造和运输成本。
此外,SX10 的低功耗(12 瓦)也让我们爱不释手。
对于是否应将支持 PoE(和销售 PoE 交换机)的要求作为需要考量的首要因素并强制实施低功耗设计,或者低功耗设计是否应支持 PoE 的使用这样的问题,我们尚无定论。
无论从哪个角度评价,这都是 SX10 的又一亮点。
2系统安装SX10 的基本安装过程快速而简单,只需将以太网(支持 PoE)电缆和 HDMI 电缆连接到显示器即可。
与之相对,竞争对手的机顶式视频系统通常需要连接一根以太网电缆、一根电源电缆、一根HDMI 电缆和一个麦克风,SX10 的优势不言而喻。
2在不具备支持 PoE 的交换机的情况下,思科(以及许多其他厂商)会提供可单独购买的 PoE 馈电器。
此外,SX10 还可以使用 12V、2A 的电源适配器(非附送配件)供电。
我们认为,思科为 SX10 提供便于壁装的开箱即用配置的出发点完全正确,但是这种方式的具体细节有待商榷:1)如果配合使用的显示器比较厚(显示器厚度及其与墙壁之间距离的总和为 100 毫米或以上),SX10 就必须安装在墙壁上比较高的位置,才能避免显示器阻挡摄像头的视野。
这也意味着连接到 SX10 的电缆可能会外露。
2)可选的显示器壁挂支架采用安装于显示器背面的 VESA 壁挂支架。
在某些情况下,这可能会影响或妨碍使用 VESA 壁挂支架对显示器进行壁挂式安装。
在我们看来,与集成壁装方式所带来的简单和快速的优势相比,上面提及的潜在问题也就微不足道了。
值得称道的是,思科在每台设备随附的 SX10 Quick Set 手册中对上述两种情况都进行了清晰的说明。
这种高度透明的信息传递方式,不仅能为安装者节省大量时间,而且有助于避免现场忙乱紧张。
系统配置通电之后,SX10 会在大约一分钟左右开机。
SX10 没有提供电源开关,因此,如果启用 PoE,设备将立即开机。
我们认为,绝大多数客户(即使不是所有客户)都会长期将 SX10 插入插座并通电。
首次对 SX10 通电后,屏幕上显示了包括 10 个步骤的配置向导,利用此向导可以进行以下选择:(1) 首选语言;(2) 合适的网络设置(默认设置为 DHCP);(3) 合适的自动调配选项(CUCM、通过Expressway 的 CUCM、VCS 或无)。
3由于无法使用 CUCM 或 VCS,我们选择跳过自动调配步骤。
紧接着,向导帮助我们测试麦克风电平、调整扬声器音量和设置默认摄像头位置。
最后,向导帮助我们测试 VGA/HDMI 内容输入接口。
之后,我们使用 Web 用户界面,手动输入了 SIP 服务器的地址和凭证。
虽然记录过程耗时稍长,但包括手动输入网络设置在内的设置过程只需要几分钟即可完成。
对于部署了思科基础设施的组织,系统配置和调配的速度应该更快。
配置向导非常便于用户使用,我们对此给予高度评价,但是在简化和加速初始设备设置方面,思科仍有需要改进之处。
举例来讲...- 用户没有必要使用红外线遥控器手动输入 CUCM 或 VCS 服务器信息。
相反,思科应提供一个配对代码,利用屏幕二维码以及提供安装应用,还可以提供一些其他方法来简化流程。
- 初始向导应允许用户对系统进行命名。
目前来看,系统名称必须通过 CUCM 或 VCS 分配或通过 SX10 的 Web 界面手动输入。
3选择 CUCM 或 VCS 的用户稍后必须输入其服务器地址和凭证,这些指向系统的服务器地址和凭证会自动注册到思科基础设施并自动进行调配。
借助此类创新工作流程,不仅能降低安装成本,而且即使是缺乏经验或未经过培训的人员(例如本地管理员)也能进行安装,可无需认证视频会议技术人员参与。
系统用户界面几年以前,视频会议系统用户界面的作用是帮助用户(和管理员)使用系统各个方面的功能。
虽然工程师和视频专业人员对此大加赞赏,但此类界面的复杂性却令除少数铁杆视频用户外的所有其他用户望而却步。
SX10 紧跟简化用户体验和工作流程的行业趋势,提供数量极少的屏幕用户界面和简化的(可能有些过分简化)红外线遥控器。
利用屏幕用户界面(请参见上图),仅可以直接(即一键式)使用最重要的功能,进行通话和共享内容。
通过导航到系统名称(左上方)并点击该名称,用户还可以激活免扰模式,重新启动系统,以及重新启动初始设置向导。