加拿大PointGrey工业相机FlyCapture软件使用说明书
相机串口控制使用说明(软硬件技术)

-串口设置:
-寄存器查询:
-寄存器赋值:
识别寄存器地址的方法:
例如:相机Manual中给出的寄存器如下:
此说明了:
-此列表中的寄存器的基础地址为1100h
-SystemMode在基础地址上偏移了00h,即h1100就是SystemMode的寄存器
-此寄存器为4个字节,32位,其中第一位表示offset控制,第二位表示固定噪声矫正控制,第三位表示自动增益控制……
-Pin7,Pin8为RS232信号的输入、输出
触发设置:
-相机后面板有SMA接口用于进行触发输入及同步信号输出
-输入的触发信号为TTL信号:最大值3.3V
-输出的同步信号为3.3V的TTL信号;其中同步信号输出的模式可设置为:开始采集时输出,曝光开始时输出,接收到触发信号输入时输出三种模式;
Xeneth软件中支持的Gobi可更改的功能:
【FAQ】丨【基本知识】丨【其他】
Xenics Gobi相机串口控制使用说明
以相机型号Gobi-640-CL-25um,仅CL接口的相机为例:
GPIO接口定义:
-Pin2,Pin3为两路触发信号的输入,Pin1为输入的地
-Pin4,Pin5为两路同步信号的输出,加入47k欧姆的下拉电阻,使输出为3.3V,Pin6为输出的地
-寄存器均是16进制表示方法,由8位16进制的数表示32位二进制,其中最低位表示低4bit:bit0、bit1、bit2、bit3;
例如:
#h1100?;返回h7000031B,
转为二进制为:
低4位1011表示;offset control为1,固定模式;Fixed Pattern Noise correction为1,矫正模式;Gain control为0,自动增益模式;PRNU为1,平场矫正模式;
VGA工业相机DVSP538_USB使用操作说明书
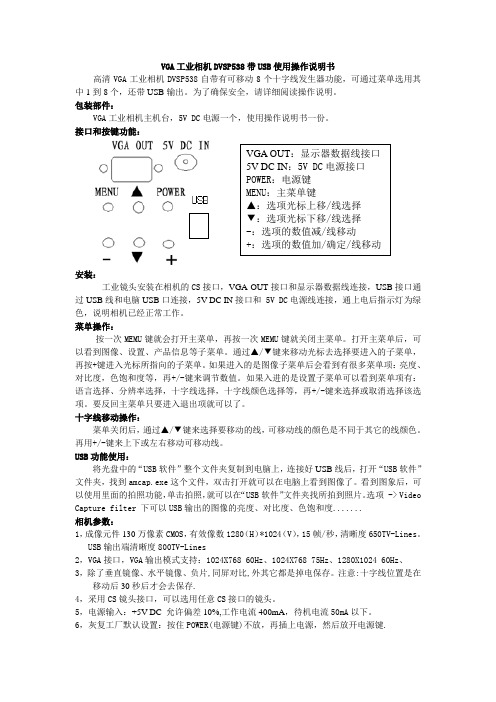
VGA 工业相机DVSP538带USB 使用操作说明书高清VGA 工业相机DVSP538自带有可移动8个十字线发生器功能,可通过菜单选用其中1到8个,还带USB 输出。
为了确保安全,请详细阅读操作说明。
包装部件:VGA 工业相机主机台,5V DC 电源一个,使用操作说明书一份。
接口和按键功能:安装:工业镜头安装在相机的CS 接口,VGA OUT 接口和显示器数据线连接,USB 接口通过USB 线和电脑USB 口连接,5V DC IN 接口和 5V DC 电源线连接,通上电后指示灯为绿色,说明相机已经正常工作。
菜单操作:按一次MEMU 键就会打开主菜单,再按一次MEMU 键就关闭主菜单。
打开主菜单后,可以看到图像、设置、产品信息等子菜单。
通过▲/▼键来移动光标去选择要进入的子菜单,再按+键进入光标所指向的子菜单。
如果进入的是图像子菜单后会看到有很多菜单项:亮度、对比度,色饱和度等,再+/-键来调节数值。
如果入进的是设置子菜单可以看到菜单项有:语言选择、分辨率选择,十字线选择,十字线颜色选择等,再+/-键来选择或取消选择该选项。
要反回主菜单只要进入退出项就可以了。
十字线移动操作:菜单关闭后,通过▲/▼键来选择要移动的线,可移动线的颜色是不同于其它的线颜色。
再用+/-键来上下或左右移动可移动线。
USB 功能使用:将光盘中的“USB 软件”整个文件夹复制到电脑上,连接好USB 线后,打开“USB 软件”文件夹,找到amcap.exe 这个文件,双击打开就可以在电脑上看到图像了。
看到图象后,可以使用里面的拍照功能,单击拍照,就可以在“USB 软件”文件夹找所拍到照片。
选项 -> Video Capture filter 下可以USB 输出的图像的亮度、对比度、色饱和度.......相机参数:1,成像元件130万像素CMOS ,有效像数1280(H )*1024(V ),15帧/秒,清晰度650TV-Lines 。
康耐视视觉软件说明书
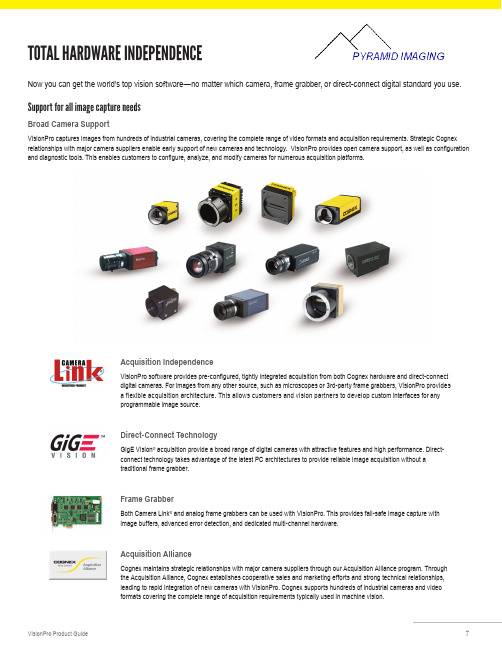
Now you can get the world’s top vision software—no matter which camera, frame grabber, or direct-connect digital standard you use.Support for all image capture needsBroad Camera SupportVisionPro captures images from hundreds of industrial cameras, covering the complete range of video formats and acquisition requirements. Strategic Cognex relationships with major camera suppliers enable early support of new cameras and technology. VisionPro provides open camera support, as well as configuration and diagnostic tools. This enables customers to configure, analyze, and modify cameras for numerous acquisition platforms.Acquisition IndependenceVisionPro software provides pre-configured, tightly integrated acquisition from both Cognex hardware and direct-connect digital cameras. For images from any other source, such as microscopes or 3rd-party frame grabbers, VisionPro provides a flexible acquisition architecture. This allows customers and vision partners to develop custom interfaces for any programmable image source.Direct-Connect TechnologyGigE Vision ® acquisition provide a broad range of digital cameras with attractive features and high performance. Direct-connect technology takes advantage of the latest PC architectures to provide reliable image acquisition without a traditional frame grabber.Frame GrabberBoth Camera Link ® and analog frame grabbers can be used with VisionPro. This provides fail-safe image capture with image buffers, advanced error detection, and dedicated multi-channel hardware.Acquisition AllianceCognex maintains strategic relationships with major camera suppliers through our Acquisition Alliance program. Through the Acquisition Alliance, Cognex establishes cooperative sales and marketing efforts and strong technical relationships, leading to rapid integration of new cameras with VisionPro. Cognex supports hundreds of industrial cameras and videoformats covering the complete range of acquisition requirements typically used in machine vision.TOTAL HARDWARE INDEPENDENCENotes:*1 Cognex Designer is only available with the Development dongle, VC5, CC24 Comm Card, or 8704E GigE Framegrabber*2 3D Measurements Tools are exclusive to the Cognex Displacement Sensor series。
VGA工业相机使用操作说明书

VGA工业相机使用操作说明书高清VGA工业相机自带有可移动8个十字线发生器功能,可通过菜单选用其中1到8个。
为了确保安全,请详细阅读操作说明。
包装部件:VGA工业相机主机台,5V DC电源一个,使用操作说明书一份。
接口和按键功能:VGA OUT:显示器数据线接口5V DC IN:5V DC电源接口POWER:电源键MENU:主菜单键▲:选项光标上移/线选择▼:选项光标下移/线选择-:选项的数值减/线移动+:选项的数值加/确定/线移动安装:工业镜头安装在相机的CS接口,VGA OUT接口和显示器数据线连接,5V DC IN接口和 5V DC电源线连接,通上电后指示灯为绿色,说明相机已经正常工作。
注意事项:不要将相机放潮湿环境里,如果不慎有水进入,可用热风机吹干。
不要将相机镜头朝上放置,以减少镜头被灰尘污染,如果镜头或成像元件有灰尘,请用无水酒精(无水乙醇)清洗或用眼镜布擦掉。
不要擅自打开外壳,如果发生故障,可以通过代理商送回原厂维修。
菜单操作:按一次MEMU键就会打开主菜单,再按一次MEMU键就关闭主菜单。
打开主菜单后,可以看到图像、设置、产品信息等子菜单。
通过▲/▼键来移动光标去选择要进入的子菜单,再按+键进入光标所指向的子菜单。
如果进入的是图像子菜单后会看到有很多菜单项:亮度、对比度,色饱和度等,再+/-键来调节数值。
如果入进的是设置子菜单可以看到菜单项有:语言选择、分辨率选择,十字线选择,十字线颜色选择等,再+/-键来选择或取消选择该选项。
要反回主菜单只要进入退出项就可以了。
十字线移动操作:菜单关闭后,通过▲/▼键来选择要移动的线,可移动线的颜色是不同于其它的线颜色。
再用+/-键来上下或左右移动可移动线。
相机参数:1,成像元件130万像素CMOS,有效像数1280(H)*1024(V),15帧/秒,清晰度650TV-Lines。
2,VGA接口,VGA输出模式支持:1024X768 60Hz、1024X768 75Hz、1280X1024 60Hz、3,中英文菜单、可调亮度、对比度、色饱和度、锐度、蓝色偏移量、红色偏移量;自动曝光、有垂直镜像、水平镜像、负片、十字线、线条颜色选择功能。
豪普戈捕捉应用程序手册说明书

Hauppauge Capture ManualIntroductionHauppauge Capture ApplicationHauppauge Capture Application combines Capture, Editing, and Streaming all into one easy-to-use interface. This document will cover the basic operation of the individual screens within the application.Please note that the menus and options available will change depending on the product that is connected.Capture TabPVR ProductsThe following options are for Personal Video Recorder products such as the HD PVR, HD PVR 2, HD PVR Rocket, HD PVR Pro 60, Colossus, and Colossus 2.Device Dropdown: These settings will listHauppauge capture devices on your system ifyou have multiple devices. At the moment thefollowing devices are supported by HauppaugeCapture. HD PVR, HD PVR 2, HD PVR Rocket, HD PVR Pro 60, Colossus, Colossus 2. As well these analog devices Impact VCB-e, and USB-Live2.Record: Click it to start recording. Click it to stop when recording or use the push button on the top of the HD PVR 2, HD PVR Rocket, or HD PVR Pro 60 to start and stop recordings.SkipBack: If enabled, the Hauppauge Capture application will begin recording as soon as the application is opened. SkipBack sets the amount of buffer recording time the application will store. For example, if the application has been opened for 20 minutes andthe Skipback is set to 10 minutes when you press the Record button your recording will include the previous 10 minutes before you pressed the Record button.Filename: You can type your filename or leave thedefault filename layout which isHDPVR2_Yr/Mo/Day_Hr/Min. A timer is available onthe right to record for a specified amount of time. Forexample, if you select 10:00. It will countdown for 10 minutes and stop recording.File Type: Three options are available for recording. They are Transport Stream or TS is our default capture format. MPEG-2 Transport Stream or .m2ts is a Blu-ray format. MPEG-4 Part 14 or .mp4 is best for online sharing.Note: Analog products do not have the .mp4 file option. Also, our original HD PVR is not supported.Video Input: Click the dropdown to choose your video input (HDMI, Component, S-Video, or Composite).Audio Input: Click the dropdown to choose your audio Input (AV IN, SPDIF (Optical), HDMI, or LineIn PC).Audio Mixer: Click the dropdown to turn ON the audio mixer with or without a microphone. If a microphone is connected, it will show up on the dropdown menu. There are separate volume controls for Audio In, Mic, and PC Audio so you can find the correct audio balance.Video Quality: You can adjust the bitrate of your recordings. The higher the bitrate the better the video quality but also makes the file size larger. You can also select if you would like to capture in variable bitrate or constant bitrate.Note: The HD PVR Pro 60 and HD PVR Rocket can only capture in variable bitrate.Advanced: Click to open the Advanced menu.Camera button: Use this to snap still frame images. Files by default are stored atC:\Users\Public\Public Videos\Input resolution: This indicates the input resolution that Hauppauge Capture is detecting from the source (game console, set-top box, PC, etc.).Audio Input: This indicates the audio input that Hauppauge Capture is detecting from the source.Volume Control: Slide bar and Mute button are on the lower right.Analog ProductsDevice Dropdown: These settings will list Hauppauge Capture devices on your system if you have multiple devices. At the moment the following devices are supported by Hauppauge Capture for analog. The Impact VCB-e and USB-Live2.Record: Click it to start recording and click it to stop when recording.Filename: You can type your filename or leave the default filename layout which is Analog_Yr/Mo/Day_Hr/Min. A timer is available on the right to record for a specified amount of time. For example, if you select 10:00. It will countdown for 10 minutes and stop recording.File type: Only TS and M2TS formats are available. They are Transport Stream or TS is our default capture format. MPEG-2 Transport Stream or M2TS is a Blu-ray format. Video In: Click the dropdown to choose your video input (Composite or S-Video).Audio In: Audio can only be RCA.Standard:Click the dropdown to choose your video standard (NTSC, PAL, NTSC-J, or SECAM). The software will make the change after a few seconds. No need to close and reopen Hauppauge Capture.Aspect:Click the dropdown menu to capture in 4:3 or 16:9 ratio. The software will makethe change after a few seconds. No need to close and reopen Hauppauge Capture.Video Quality:You can adjust the bitrate of your recordings. The higher the bitrate the better the video quality but also makes the file size larger. You can also select if you would like to capture in variable bitrate or constant bit rate.Advanced SettingsVideo ScalerEnable Video Scaler: Check this option if you wish to downscale your video.Note: All settings are for downscaling, there is no upscaling.Output Resolution: This section allows you to downscale the source resolution to a lower resolution.Note: only certain resolutions can be used based on the source resolution. Selecting "Source" indicates no scaling.Output Frame Rate: This section allows you to downscale the frame rate. For example, you can downscale 60fps to 30fps. Selecting "Source" indicates no scaling.Video EncoderVideo Encoder: It sets the H.264 specification defined "Profile" and "Level" parameters. The default settings are our recommended values. For exact details please consult the H.264 specification online.Standard Definition Aspect Ratio: Auto will be default for the standard definition aspect ratio. If you would like to override it, you uncheck the box and select 16:9.Video Proc AmpVideo Proc Amp: These controls adjust recording and pass-thru picture quality.Note: Not all of these controls have an effect and are model specific.Audio EncoderThese settings affect the audio capture.AAC Bitrate: This lets you change the AAC encoding bitrate. The default is 192kbps.AAC Sample Rate Downscaling: The sample rate is based on the source audio.The source is either 48k or 44.1k, but you can't tell what is coming in. All you can do is downscale to the choice you want..TS Audio: In two-channel audio or when recording with voice audio, you can change how audio is encodedAnalog Boost: Increases the audio level for left and right analog audio sources.Ignore Audio Format Changes: When unchecked, if the audio changes from 2ch to 5.1 or vice versa, the video preview will reset. When checked it will ignore the change and stay in the current mode.Use Multiple Audio Tracks for recordings: This will split the recorded audio into separate tracks. Mic audio on its track, PC audio on its track, etc. In case you would like to edit them separately.Capture original AC3 track for Multiple Track recordings: In multi-track audio, it keeps the original 5.1 stream rather than downmixing from 5.1 via audio mixer to 2ch.Audio DecodersAudio Decoders are used for playback of audio in Hauppauge Capture. They do not change how audio is captured. Audio decoders are provided but can be changed with third-party decoders if you wish.HDMI PassthroughEDID Mode: (Extended Display Identification Data) is a small configuration file stored on devices that contains information about the type of signal the device can accept, such as resolution, frame rate, audio, and much more. This information is transmitted from our capture device to the monitor it is connected to.Merge HD PVR 2 and TV Settings: This is the default mode. It combines our capture device capabilities and TV information for the best functionality.Use HD PVR 2 Settings: This will force the use of the capabilities of our devices to be passed on to the TV.Use TV Settings: This will force the HD PVR 2 to accept what the TV is capable of receiving.FacecamEncoder: Auto uses the h.264 encoder chip on the device, while Software Encoder uses your CPU to encode the video.Threads: Uses your CPU threads to help process the webcam video. Auto is the default. Quality: The default is Good quality, but you can reduce it to Low or increase it to Best.Line-InDevice: This allows you to record from the Line-In of your PC as the audio source. MicrophoneMicrophone: Adjusts delay of microphone audio to game audio in milliseconds.Edit TabRecordings: The recorded files will be listed here. Click the recording with which you wish to work with.Play: Click to play your file. You can stop or pause play your file with the buttons located below the cut left button below the playback window on the left. Export to MP4: Files captured in TS or M2TS can be exported to MP4 after already being captured.Note: files can only be exported to MP4, but you can’t edit MP4 files. Only .TS and .M2TS files can be edited by Hauppauge Capture.Add: Use to import a file into the editor file list.Delete: Click to delete a recording or edited file. A file deleted through the application will be completely deleted and will not go to the recycling bin.Rename: Click to rename a file. If a file is currently open, you must hit stop first before renaming the file.Using the cuts editorYou can navigate through your clip using the slider or just watch your video to find your cut points. You can also use the back button and forward button to move in 1-minute increments. Use the and for one-second increments.If you wish to cut off the first minute of the clip navigate there and click the this will remove the first minute and recreates the file. The same thing applies if you wish to remove something from the back end. Find the spot and click the button. The button will let you split the file and will create two files at the point you choose. This is a simple cuts editor. If you need to put the pieces together to create a new file you will need to copy the clips you wish to work with into a third-party video editor.YouTube TabHauppauge Capture can upload your recorded videos directly to YouTube within the application. All video files are uploaded in the resolution that they were captured in. Recordings: Any recordings available for uploading will be listed here. Highlight the recording you want to upload.Upload to YouTubePress the Upload to YouTube button and you will need to login to your Youtube account to authorize Hauppauge Capture to upload files for you.Once authorized you will see the Share Recording dialog box.Note: All fields are required for uploading.Video MetadataYouTube is the world's second-largest search engine, and it uses metadata - your video's title, tags, and description - to index your video correctly. To maximize your presence in search, promotion, suggested videos, and ad-serving, make sure your metadata is well optimized.Title: type in a title for your video.Keywords: type in at least one keyword. This is essentially tags.Category: Select a category for your video.Descriptions: type a description for your video.Access: select public and everyone can see it or private and only you can see it while logged into your YouTube account. Unlisted and only can be viewed with direct access to the link.Click OK to upload the video. If the connection is successful you will see the upload progress bar.StreamEezStreamEez will let you Stream your video with Facebook, Twitch, and YouTube. Using StreamEezNote: you must have a valid account with Facebook, Twitch, or YouTube.Select the Video and Audio Inputs that you are using and then click Start Device.Adjust the Microphone Input settings if needed.Stream Quality: Select the upload bit rate you want to stream at from 0.50 Mbps to 6.00 Mbps.Auto Scaling: If enabled (default) it adjusts the streaming resolution based on the stream quality. Example 1080p resolution streamed at 0.50 Mbps can't handle 1080p, auto-scaling will change the resolution to 640x360. If you increase stream quality to 2.00 Mbps it will adjust it to 1280x720. If disabled it will attempt to stream at incoming resolution. Also, Advance Streaming will become available.Service: Select the streaming service, either Facebook, Twitch, or YouTube.Channel: Select the service Facebook, Twitch, or Youtube.If you select Twitch you will get the following login screen.Location: Once logged in, it will show you the nearest server that you can connect to for Twitch only.If you select Facebook, you will need to provide the Server URL and Stream Key.You can get this information by login into your Facebook accounts and going to the following link. https:///live/producerYouTube will open your default browser and ask you to log in to your Google account.Once you set all your options. You can now press the Start Streaming button.A link will be provided at the bottom of the software to access your stream or share itwith others.Advance Streaming SettingsWhen you disable Auto Scaling you will have an Advance Streaming Settings menu available. The advanced streaming settings menu has options for Video Scaler, Audio Encoder, and Microphone. More information about these settings can be found on theAdvanced Settings page.Settings TabRecordings Directory: Default location listed. You can change the video directory here.Snapshot Directory: Default location listed. You can change the snapshot directory here.Video Decoding:Full Video: video preview will show all frames of the video.I-Frames only: video preview will only show I-frames (every 2 seconds of video) use this setting to help smooth out the preview on slower systems or low-end graphics systems.None: No preview at all. Video will still record and audio will be heard.Video Renderer:EVR or VMR9: Specifies the video renderer to be used. The video renderer is a software interface to your display adapter. Changes take effect after restarting the application.Use Hardware Acceleration: This will allow your graphics system to use hardware acceleration for video decoding.Note: Graphics hardware acceleration does not work on all systems. It is a feature of your graphics chipset. Use this feature to help the preview video if it is not smooth.WebcamYou can select from the dropdown menu your webcam to use for the FaceCam option. It would be placed above your video.Edit FaceCam Position: Check this box to be able to move the FaceCam widow on the screen. You can also select if you want the screen to be in 4:3 or 16:9 ratio.Frame: The dropdown gives you multiple styles of frames to use around your Facecam Video.Low Resource Mode: Save CPU resource when FaceCam is ON. Sets Video Decoder to "I-Frame" so it only shows 1 frame every second and also reduces the encoded video quality to say 720p30 instead of source.Personal LogoYou can use the Personal Logo to add a personal logo or picture to your recordings.Personal Logo: check the box to turn on/off the personal logo.Click the browse button and locate your file then select it and it will appear in the upper left of the video window.Location: select the position for your logo on the screen. You can also move around with your mouse.Size: Select the size for the personal logo on the screen. You can also drag in and out with your mouse.Transparency: adjust the transparency of the image using the slider.Simulate: drop-down and choose the resolution in which you will be recording. This will size the image to that resolution.When finished click Apply and the settings will be stored.Hauppauge Device CentralHauppauge Device Central is a tool installed with Hauppauge Capture. It allows you to modify what the button on top of the HD PVR 2, HD PVR Rocket, HD PVR Pro 60 will do.You can open Hauppauge Device Central by clicking on the icon in the taskbar.You can select in the Hauppauge Devices application that opens the behavior of the button on the device. By default, it should open Hauppauge Capture and start recording.If the Hauppauge Device Central icon is not on your taskbar, you can manually reopen it by navigating to the following shortcut.C:\Program Files (x86)\Hauppauge\DeviceCentral\HcwDCTrayTool.exe。
jai网口相机使用说明(以cv-a10ge为例)

JAI网口相机使用说明(以CV-A10GE为例)一.网口相机连接步骤1.安装相机控制软件:JAI-SDK;2.关闭所有杀毒软件、防火墙(包括Windows防火墙“网络连接-属性-高级-设置”);3.在“本地连接属性”中安装“QoS数据包计划程序”,禁用“Microsoft网络客户端”和“Microsoft网络的文件和打印机共享”;4.此步骤可选,有些网卡不支持“高级设置”打开网络连接-本地连接-属性-常规-配置-高级属性:接受描述字符(receive buffers) 值:2048巨帧(Jumbo Packet) 9014中断节流率(Interrupt Moderation Rate) 极端二.JAI Control Tool使用介绍连接好相机,打开JAI Control Tool,软件会自动找到相机,无须任何设置。
下图为JAI Control Tool软件界面。
①区为菜单项,提供了简单的采集功能;Start Acquisition:开始连续采集,自动弹出图像显示窗口Pause/Snap:按下为单帧采集,当连续采集时按下为暂停Stop Acquisition:停止连续采集,自动关闭图像显示窗口磁盘图标:保存下一帧图像②区为相机基本信息显示区,显示相机型号、IP地址等基本信息;③区为相机参数更改区Feature Properties逐栏显示相机参数,用户可自行修改;Feature Tree Information将相机参数信息由树状显示,方便查找。
Acquisition and Trigger ControlAcquisition Mode: 采集模式Continuous 连续采集Acquisition Frame Rate: 设置帧频* GigE相机的结构是普通相机+GigE转换装置,改变帧频其实是作用在GigE转换装置中(相当于抽帧)Shutter Mode: 快门模式选择Preset Shutter:分为几个等级,可在下方“Preset Shutter中选择”Programmable Exposure in lines:在“Exposure Time Raw”中输入曝光时间Programmable Exposure (PE):可控曝光时间,在“Exposure Time”中输入数值,曝光时间采用分级制,具体级数间隔见相机UserManual。
OPT智能相机软件说明

1.1灰度匹配图像匹配是指通过一定的匹配算法在两幅或多幅图像之间识别或者定位目标,如二维图像匹配中通过比较目标区和搜索区中相同大小的窗口的相关系数,取搜索区中相关系数最大所对应的窗口中心点作为位置。
其实质是在基元相似性的条件下,运用匹配准则的最佳搜索问题。
灰度匹配原理:以统计的观点将图像看成是二维信号,采用统计相关的方法寻找信号间的相关匹配。
利用两个信号的相关函数,评价它们的相似性以确定其位置。
灰度匹配通过利用某种相似性度量,如相关函数、协方差函数、差平方和、差绝对值和等测度极值,判定两幅图像中的对应关系。
开发包中,采用的相似性度量是归一化的相关函数,其原理是逐像素的把一个以一定大小的实时图像窗口的灰度矩阵,与参考图像的灰度阵列,按某种相似性度量方法计算其相关系数值,值越大,则两者越相似。
该值的范围为[0 100]。
匹配结果由匹配得分、匹配区域的中心点坐标、匹配区域相对模板的旋转角度3部分组成。
目前本开发包的灰度匹配不支持尺度缩放。
本开发包实现该功能模块的类为:界面类SciGreyMatchDlg和算法类SciGreyMatch,共包括以下6个功能函数:(1)界面类函数:ShowDialog,SetParam,GetParam,Execute;(2)算法类函数:CreateTemplate,Match。
1.1.1显示灰度匹配界面ShowDialog函数:long SciGreyMatchDlg::ShowDialog (SciImage &image)(1)功能显示灰度匹配功能界面。
(2)参数说明image:待匹配图像。
1.1.2设置对话框参数SetParam函数:long SciGreyMatchDlg::SetParam(SciImage &templateImage,SciROI &mask,SciROI &ROI, int minScore,int matchCount,int overLapRatio,int startAngle, int endAngle,int angleStep,int pyramidLevel)(1)功能设置匹配工具界面的参数。
华用科技工业相机 HG HE HV系列GIGE工业相机 使用说明说明书
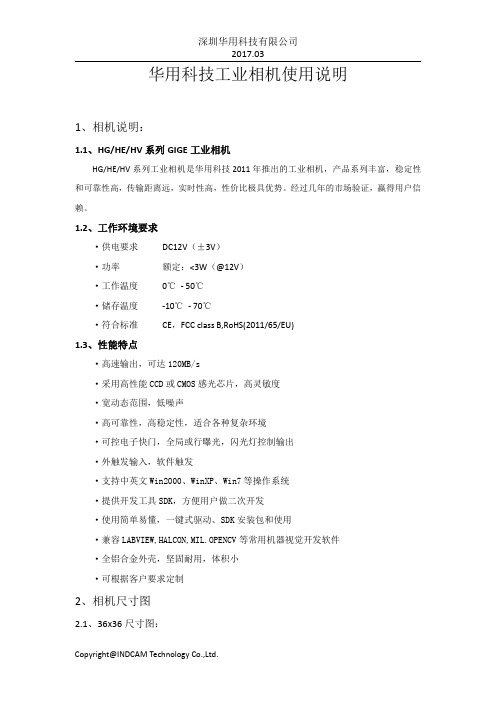
华用科技工业相机使用说明1、相机说明:1.1、HG/HE/HV系列GIGE工业相机HG/HE/HV系列工业相机是华用科技2011年推出的工业相机,产品系列丰富,稳定性和可靠性高,传输距离远,实时性高,性价比极具优势。
经过几年的市场验证,赢得用户信赖。
1.2、工作环境要求·供电要求DC12V(±3V)·功率额定:<3W(@12V)·工作温度0℃-50℃·储存温度-10℃-70℃·符合标准CE,FCC class B,RoHS(2011/65/EU)1.3、性能特点·高速输出,可达120MB/s·采用高性能CCD或CMOS感光芯片,高灵敏度·宽动态范围,低噪声·高可靠性,高稳定性,适合各种复杂环境·可控电子快门,全局或行曝光,闪光灯控制输出·外触发输入,软件触发·支持中英文Win2000、WinXP、Win7等操作系统·提供开发工具SDK,方便用户做二次开发·使用简单易懂,一键式驱动、SDK安装包和使用·兼容LABVIEW,HALCON,MIL.OPENCV等常用机器视觉开发软件·全铝合金外壳,坚固耐用,体积小·可根据客户要求定制2、相机尺寸图2.1、36x36尺寸图:图1 2.2、32x33尺寸图:图22.3、29x29尺寸图:图33、电气接口3.1航空连接器特征说明连接器类型7芯航空连接器连接器尺寸Φ10电源12V±0.5最大电流Max.0.5A管脚定义见图4图43.2管脚定义管脚号名称说明1Ext_VCC电源2Ext_Strobe+控制光源输出的电压范围3Ext_Strobe-光源控制输出(Strobe地,GND_Strobe)4Trigger+外触发输入5Trigger-外触发输入(Trigger地,GND_Trigger)6GND电气接地注意:Pin1~Pin6分别对应接线端红,白,橙,绿,蓝,黑色线。
- 1、下载文档前请自行甄别文档内容的完整性,平台不提供额外的编辑、内容补充、找答案等附加服务。
- 2、"仅部分预览"的文档,不可在线预览部分如存在完整性等问题,可反馈申请退款(可完整预览的文档不适用该条件!)。
- 3、如文档侵犯您的权益,请联系客服反馈,我们会尽快为您处理(人工客服工作时间:9:00-18:30)。
Point Grey 采集软件
FlyCapture2使用说明书
Point Grey 采集软件 FlyCapture2使用说明书
目录
前言 (1)
1软件安装 (2)
2软件使用 (4)
2.1设备选择 (4)
2.1.1 1394相机或USB相机 (4)
2.1.2 网口相机 (4)
2.2图像采集 (5)
2.2.1 数据记录功能 (6)
2.2.2 参数设置功能 (7)
前言
FlyCapture SDK是加拿大Point Grey(灰点)公司开发的功能丰富,最稳定的软件套件。
它提供了Point Grey公司所有的GigE、1394、USB相机的采集与开发功能,以及所有千兆网卡、1394采集卡、USB3.0采集卡的驱动。
FlyCapture SDK支持Windows XP 32/64及其以上版本和Linux操作系统,支持C、C++、C#、VB等语言对相机的接口函数(API)进行开发工作,简化了面向对象的接口,使应用开发更容易。
1 软件安装
Point Grey采集调试软件最新版本为FlyCapture2-2.4,首先要根据系统是32位还是64位选择合适的SDK安装版本,在程序开始安装时会自动检测系统是否安装NET Framework 4.0补丁,如果没有,软件会自动连网下载并安装或手动下载NET Framework 4.0补丁安装,完成之后再安装FlyCapture2-2.4。
运行Point Grey最新软件安装包,软件里面包含PGR网口、1394、USB三种接口相机的驱动程序,用户可以根据需要选择合适的驱动程序。
点击Complete进入驱动选择界面,根据相机使用的类型勾选相应的驱动。
安装过程中的其它地方并无特殊设置的地方,按其默认设置安装即可。
在使用网口相机时需要注意的是,因为正常情况下千兆网卡在驱动安装后对数据包做了限制,所以要想发挥Point Grey网口相机的全部性能必须对这一限制进行修改。
进入网卡本地连接-属性-配置-高级-巨帧数据包,默认情况下值为禁用的,需要修改为9014字节即可。
2 软件使用
2.1 设备选择
2.1.1 1394相机或USB相机
在完成安装时候就可以运行采集软件了,在软件启动后会弹出一个设备选择窗口,在这个窗口中您可以选择您所连接的PGR Camera,并查看相机的型号、系列号、芯片等设备信息。
还可以通过点击Configure Selected按钮进入相机的参数设置界面修改相机的帧速、分辨率等参数,后面会详细介绍。
2.1.2 网口相机
在使用网口相机前需要对相机进行配置。
进入开始-程序FlyCapture2 SDK-Utilities-GigEConfigurator,配置窗口如下:
选中Devices下面相机型号,在右边配置相机的IP地址与电脑为同一网段,子网掩码相同。
例如:
电脑IP:169.254.3.12 子网掩码:255.255.0.0
相机IP:169.254.3.16 子网掩码:255.255.0.0
设置完成后,重复上述(1)中所述的步骤进入相机主程序。
2.2 图像采集
进入程序主窗口后相机将开始自动采集,其主要功能均以快捷键的方式继承在采集窗口顶端,包括新建设备、采集图像、停止采集、开始记录、保存图片、相机参数设置、灰度直方图、采集统计、图像放大、缩小几项功能。
下面将重点介绍相机的记录功能和参数设置功能。
2.2.1 数据记录功能
上菜单栏红色圆点为记录功能快捷按钮。
记录功能主窗口如下所示:
第一步:点击Browse用户可手动选择即将数据记录的路径;
第二步:在Saving Options可选择记录图像数据的方式,例如:根据帧数
多少记录和根据时间长短记录等。
第三步:选择记录数据的格式,图像或视频;
第四步:点击Start Recording开始记录。
除了上述记录功能外,软件还提供了图像直接保存功能,点击,可选择保存图片的格式和路径。
2.2.2 参数设置功能
点击进入相机设置参数窗口。
Camera Settings
界面中显示了相机的基本参数的设定,可以对相机的shutter(曝光)、Gain(增益)、FrameRate(帧率)和W.R/W.B(颜色白平衡)等重要参数进行设置,一般工业检测中会勾选取消掉后面的Auto选项。
shutter(曝光):shutter为相机的曝光时间,直接影响到相机的亮度,同时也会对帧率有一定的影响,在一些对相机拍摄速度有很高要求的项目,不建议将其值设的太大;
Gain(增益):Gain为相机的增益,一般在图像亮度不够的情况下加增益值,但是会带来一定的噪声,图像信噪比会下降,不推荐增加增益值,一般设置为0,尽量从增加光源亮度和曝光值去改善图像的亮度;
FrameRate(帧率):FrameRate为相机的拍摄速度,最高帧率会受到相机的曝光时间的影响,为了使相机工作在最高帧率,需要将曝光时间设置为一个合适的值;
W.R/W.B(颜色白平衡):On/Off为是否启用白平衡功能,部分相机后面还有Auto 按钮,其为是否启用自动白平衡功能,一般只要将2个选择框全部选上,相机就可以自动调整白平衡系数,也可以手动拖动滑块进行调整。
在白平衡中相机提供的是R(红)和B(蓝)两个通道的调节,第三个通道G(绿)是通过Bayer滤波算法来实现的,软件提供多种Bayer滤波算法选择方式:
在上图中可以选择需要使用的Bayer滤波算法,当我们让相机输出raw原始图像时此功能才有效,这里可以选择用哪种软件Bayer滤波算法来还原彩色图像。
越是细
致的算法,耗时越长,可以根据自己的需要选择适合的算法。
●Custom Video Modes
Video Modes可以设定相机的工作模式、输出数据的格式和相机ROI。
在相机工作模式Mode列表中一般有3个选项,分别为Mode 0、Mode 1和Mode 2其中Mode 0为全分辨率显示,Mode 1为2x2 Binning模式,Mode 2为2x1 Binning模式。
在Pixel Format列表中Mono8、Mono16为黑白图像,Raw为原始图像,其余格式为彩色图像。
用户可以通过相机ROI来取得感兴趣的区域,同时ROI后,部分相机还可以提高帧率。
●Camera Registers
通过改写相机的寄存器值也是控制相机各种基本参数的一种方式,这种方式使用需要查询相机工作手册中各个参数的寄存器值来实现,一般不常用。
其功能包括控制曝光、帧率、白平衡、增益等参数。
如图中示例为控制白平衡的寄存器值:0X80C,通过Read Register来读取寄存器的值,可以通过Write Register改写Value值来控制白平衡的开与关、R通道值、B通道值等。
Trigger/Strobe
在触发控制界面中,可以勾选Trigger Control-Enalbe打开相机的触发模式,当外触发功能被启用后,可以点击右边的Software Trigger功能使用软触发做功能测试。
触发模式开启后,可以对相机GPIO口进行自定义,一般默认的触发信号源是相机8PIN线缆的PIN1,对应的是GPIO 0,可以启用触发延时功能。
同时根据接入的引脚不同(PIN2/PIN3/PIN4),也可以手动选择其它的引脚触发源进行相机触发,同时对GPIO口引脚IN/OUT自定义选择IN。
PGR相机同时提供Strobe信号输出功能,Strobe功能是指相机在采集每帧图像的同时输出一个3.3V的TTL信号,通过勾选Enable strobe开启相机Strobe功能,在使用相机Strobe功能时需要对信号输出的引脚定义,对接出的GPIO引脚选择OUT。
Advanced Camera Settings
在高级设置区里面,可以使相机参数还原到出厂设置状态,选中Memory Channels -Default,点击Restore即完成还原。
同时,相机提供了两个用户寄存器存储区,用户
对相机的参数自定义后,为了保证相机断电参数不丢失,需要选中Memory Channels -1或2,点击Save即完成参数保存,如果在使用中丢失参数,也可以选中用户寄存器Memory Channels -1或2,点击Restore即还原到用户保存的工作参数。