ActiveMQ部署方案分析对比-精选版-精心整理
ActiveMQ集群部署方式对比
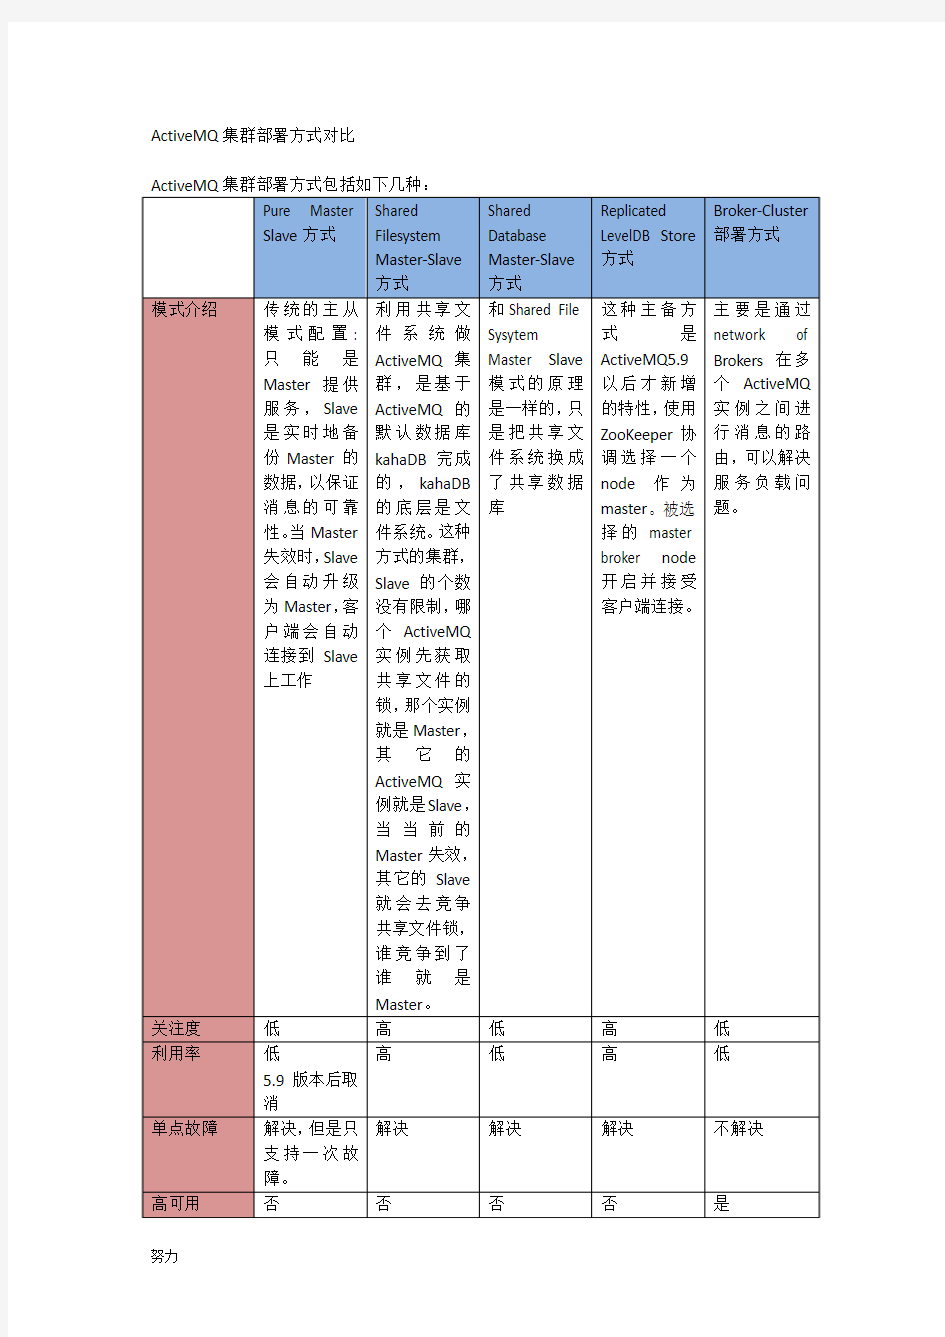
构建高可用的ActiveMQ系统在生产环境中是非常重要的,单点的ActiveMQ作为企业应用无法满足高可用和集群的需求,所以ActiveMQ提供了master-slave、broker cluster等多种部署方式,但通过分析多种部署方式之后我认为需要将两种部署方式相结合才能满足我们公司分布式和高可用的需求。
自从activemq5.9.0开始,activemq的集群实现方式取消了传统的Pure Master Slave方式,增加了基于zookeeper+leveldb的实现方式,其他两种方式:目录共享和数据库共享依然存在。
1、Master-Slave部署方式
1)、Shared Filesystem Master-Slave方式
2)、Shared Database Master-Slave方式
3)、Replicated LevelDB Store方式
第一种方案同样支持N个AMQ实例组网,但由于他是基于kahadb存储策略,亦可以部署在分布式文件系统上,应用灵活、高效且安全。(如果不需要考虑负载问题,则可用考虑用分布式文件系统模式部署)
第二种方案与shared filesystem方式类似,只是共享的存储介质由文件系统改成了数据库而已,支持N个AMQ实例组网,但他的性能会受限于数据库;
第三种方案是ActiveMQ5.9以后才新增的特性,使用ZooKeeper协调选择一个node作为master。被选择的master broker node开启并接受客户端连接。
其他node转入slave模式,连接master并同步他们的存储状态。slave不接受客户端连接。所有的存储操作都将被复制到连接至Master的slaves。
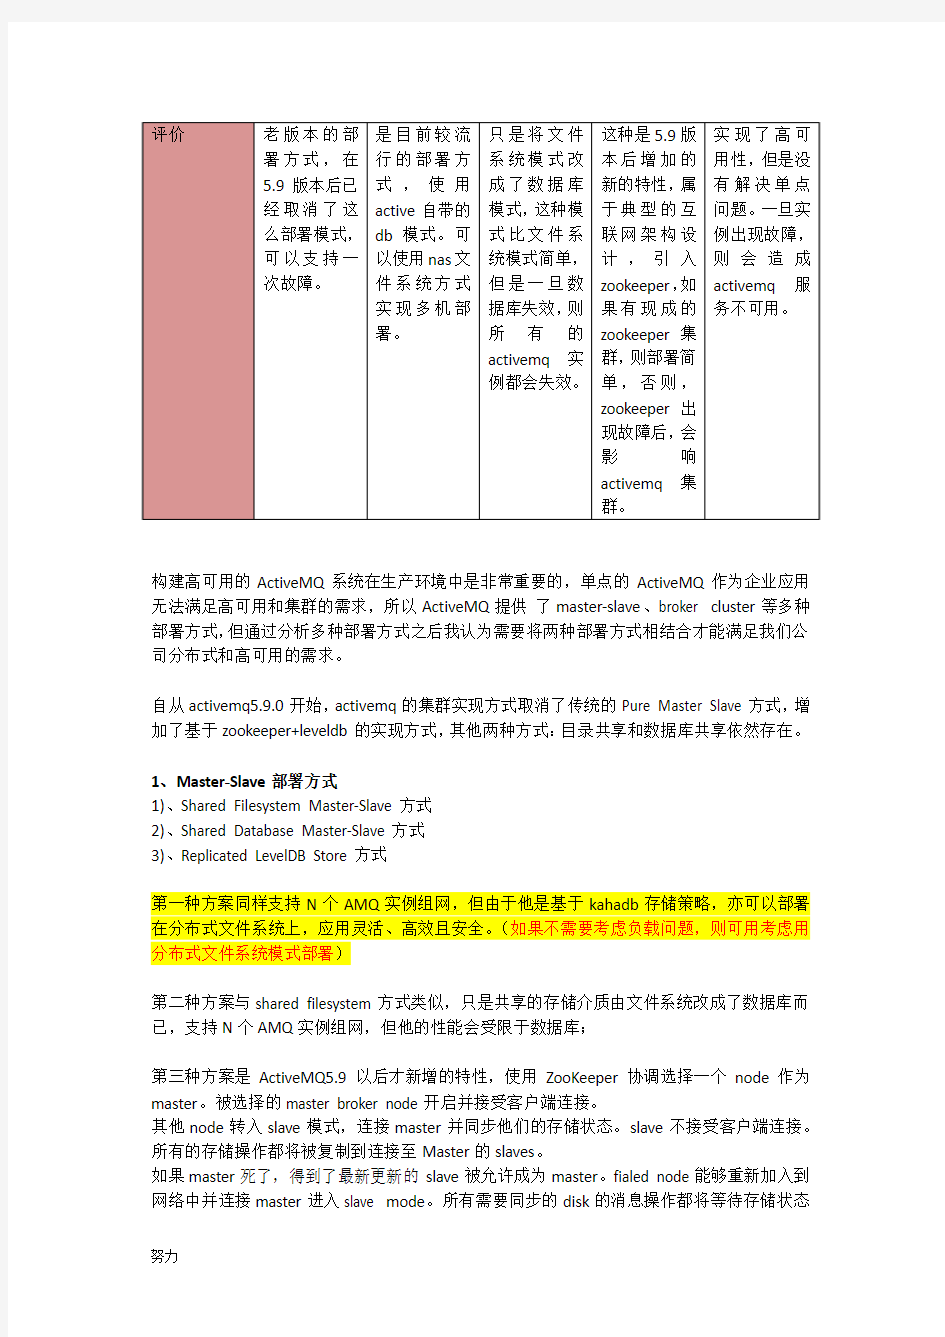
如果master死了,得到了最新更新的slave被允许成为master。fialed node能够重新加入到网络中并连接master进入slave mode。所有需要同步的disk的消息操作都将等待存储状态
被复制到其他法定节点的操作完成才能完成。所以,如果你配置了replicas=3,那么法定大小是(3/2)+1=2. Master将会存储并更新然后等待(2-1)=1个slave存储和更新完成,才汇报success。至于为什么是2-1,熟悉Zookeeper的应该知道,有一个node要作为观擦者存在。单一个新的master被选中,你需要至少保障一个法定node在线以能够找到拥有最新状态的node。这个node将会成为新的master。因此,推荐运行至少3个replica nodes,以防止一个node失败了,服务中断。
Shared Filesystem Master-Slave方式
shared filesystem Master-Slave部署方式主要是通过共享存储目录来实现master和slave的热备,所有的ActiveMQ应用都在不断地获取共享目录的控制权,哪个应用抢到了控制权,它就成为master。
多个共享存储目录的应用,谁先启动,谁就可以最早取得共享目录的控制权成为master,其他的应用就只能作为slave。
Apache ActiveMQ单点基本配置的原配置内容:
SharedFile System Master Slave 修改为:
在D:\\ActiveMQ Cluster目录先创建shareBrokerData文件夹。
注意:
1.前面提到如果在一台设备上部署多个AMQ,需要修改对应端口号,如AMQ对外的监听端口61616和jetty的监听端口8161等。
2.如果多套AMQ部署在不同的设备上,这里的directory应该指向一个远程的系统目录(分布式文件系统)
3.客户端通过failover方式进行连接,多个AMQ实例地址使用英文逗号隔开,当某个实例断开时会自动重连,但如果所有实例都失效,failover默认情况下会无限期的等待下去,不会有任何提示。
下面为在一台设备上部署两个AMQ示例:
ActiveMQ A
1.activemq.xml修改监听端口:
uri="tcp://0.0.0.0:61616?maximumConnections=1000&wireformat.maxFrameSize=1048576 00&wireFormat.maxInactivityDuration=0" discoveryUri="multicast://default"/> uri="amqp://0.0.0.0:5672?maximumConnections=1000&wireformat.maxFrameSize=104857 600&wireFormat.maxInactivityDuration=0"/> 2.jetty.xml修改监听端口: ActiveMQ B 1.activemq.xml修改监听端口: uri="tcp://0.0.0.0:61617?maximumConnections=1000&wireformat.maxFrameSize=1048576 00&wireFormat.maxInactivityDuration=0" discoveryUri="multicast://default"/> uri="amqp://0.0.0.0:5673?maximumConnections=1000&wireformat.maxFrameSize=104857 600&wireFormat.maxInactivityDuration=0"/> 2.jetty.xml修改监听端口: --> Java测试程序代码: 1.Producer: import javax.jms.Connection; import javax.jms.DeliveryMode; import javax.jms.Destination; import javax.jms.JMSException; import javax.jms.MessageProducer; import javax.jms.Session; import javax.jms.TextMessage; import org.apache.activemq.ActiveMQConnectionFactory; public class ProducerTool { private String subject = "TOOL.DEFAULT"; private Destination destination = null; private Connection connection = null; private Session session = null; private MessageProducer producer = null; // 初始化 private void initialize() throws JMSException, Exception { ActiveMQConnectionFactory connectionFactory = new ActiveMQConnectionFactory("failover:(tcp://172.16.30.11:61616?wireFormat.maxInactivityDurat ion=0,tcp://172.16.30.11:61617?wireFormat.maxInactivityDuration=0)"); connection = connectionFactory.createConnection(); session = connection.createSession(Boolean.FALSE, Session.AUTO_ACKNOWLEDGE); destination = session.createQueue(subject); producer = session.createProducer(destination); producer.setDeliveryMode(DeliveryMode.NON_PERSISTENT); } // 发送消息 public void produceMessage(String message) throws JMSException, Exception { initialize(); TextMessage msg = session.createTextMessage(message); connection.start(); System.out.println("Producer:->Sending message: " + message); producer.send(msg); System.out.println("Producer:->Message sent complete!"); } // 关闭连接 public void close() throws JMSException { System.out.println("Producer:->Closing connection"); if (producer != null) producer.close(); if (session != null) session.close(); if (connection != null) connection.close(); } } import javax.jms.Connection; import javax.jms.Destination; import javax.jms.JMSException; import javax.jms.Message; import javax.jms.MessageConsumer; import javax.jms.MessageListener; import javax.jms.Session; import javax.jms.TextMessage; import org.apache.activemq.ActiveMQConnectionFactory; public class ConsumerTool implements MessageListener { private String subject = "TOOL.DEFAULT"; private Destination destination = null; private Connection connection = null; private Session session = null; private MessageConsumer consumer = null; // 初始化 private void initialize() throws JMSException, Exception { ActiveMQConnectionFactory connectionFactory = new ActiveMQConnectionFactory("failover:(tcp://172.16.30.11:61616,tcp://172.16.30.11:61617)"); connection = connectionFactory.createConnection(); session = connection.createSession(Boolean.FALSE, Session.AUTO_ACKNOWLEDGE); destination = session.createQueue(subject); consumer = session.createConsumer(destination); } // 消费消息 public void consumeMessage() throws JMSException, Exception { initialize(); connection.start(); System.out.println("Consumer:->Begin listening..."); // consumer.setMessageListener(this); // Message message = consumer.receive(); } // 关闭连接 public void close() throws JMSException { System.out.println("Consumer:->Closing connection"); if (consumer != null) consumer.close(); if (session != null) session.close(); if (connection != null) connection.close(); } // 消息处理函数 public void onMessage(Message message) { try { if (message instanceof TextMessage) { TextMessage txtMsg = (TextMessage) message; String msg = txtMsg.getText(); System.out.println("Consumer:->Received: " + msg); } else { System.out.println("Consumer:->Received: " + message); } } catch (JMSException e) { // TODO Auto-generated catch block e.printStackTrace(); } } } 2.Consumer: import javax.jms.Connection; import javax.jms.Destination; import javax.jms.JMSException; import javax.jms.Message; import javax.jms.MessageConsumer; import javax.jms.MessageListener; import javax.jms.Session; import javax.jms.TextMessage; import org.apache.activemq.ActiveMQConnectionFactory; public class ConsumerTool implements MessageListener { private String subject = "TOOL.DEFAULT"; private Destination destination = null; private Connection connection = null; private Session session = null; private MessageConsumer consumer = null; // 初始化 private void initialize() throws JMSException, Exception { ActiveMQConnectionFactory connectionFactory = new ActiveMQConnectionFactory("failover:(tcp://172.16.30.11:61616,tcp://172.16.30.11:61617)"); connection = connectionFactory.createConnection(); session = connection.createSession(Boolean.FALSE, Session.AUTO_ACKNOWLEDGE); destination = session.createQueue(subject); consumer = session.createConsumer(destination); } // 消费消息 public void consumeMessage() throws JMSException, Exception { initialize(); connection.start(); System.out.println("Consumer:->Begin listening..."); // consumer.setMessageListener(this); // Message message = consumer.receive(); } // 关闭连接 public void close() throws JMSException { System.out.println("Consumer:->Closing connection"); if (consumer != null) consumer.close(); if (session != null) session.close(); if (connection != null) connection.close(); } // 消息处理函数 public void onMessage(Message message) { try { if (message instanceof TextMessage) { TextMessage txtMsg = (TextMessage) message; String msg = txtMsg.getText(); System.out.println("Consumer:->Received: " + msg); } else { System.out.println("Consumer:->Received: " + message); } } catch (JMSException e) { // TODO Auto-generated catch block e.printStackTrace(); } } } 3.Main import javax.jms.JMSException; public class Test { /** * @param args */ public static void main(String[] args) throws JMSException, Exception { ConsumerTool consumer = new ConsumerTool(); ProducerTool producer = new ProducerTool(); // 开始监听 consumer.consumeMessage(); // 延时500毫秒之后发送消息 Thread.sleep(500); producer.produceMessage("Hello, world!"); producer.close(); // 延时500毫秒之后停止接受消息 Thread.sleep(500); consumer.close(); } } ActiveMQ A 启动界面: ActiveMQ B 启动界面: AMQ A先启动,先锁文件,当AMQ B启动是,不能锁文件,但会不断的监听等待。 运行Java Test程序日志: 10:22:43.745 INFO [] org.apache.activemq.transport.failover.FailoverTransport - Successfully connected to tcp://172.16.30.11:61616 Consumer:->Begin listening... 10:22:45.623 INFO [] org.apache.activemq.transport.failover.FailoverTransport - Successfully connected to tcp://172.16.30.11:61616?wireFormat.maxInactivityDuration=0 Producer:->Sending message: Hello, world! Producer:->Message sent complete! Producer:->Closing connection Consumer:->Received: Hello, world! Consumer:->Closing connection ActiveMQ A 管理界面: 异常处理: 配置好ActiveMQ后,前几次都启动成功。有一天启动时发现启动不成功,查看报错日志发现出现如下提示: Failed to start Apache ActiveMQ (localhost, ID:*-PC-*-*-0:1). Reason: java.io.IOException: Transport Connector could not be registered in JMX: Failed to bind to server socket: tcp://0.0.0.0:61616?maximumConnections=1000&wireformat.maxFrameSize=104857600 due to: https://www.360docs.net/doc/5b3204099.html,.BindException: Address already in use: JVM_Bind。 1.先去查看是不是端口被占用,用netstat -ano命令查看端口使用情况,发现没有端口被占用。 2.在控制面板的服务里把正在运行的Internet Connection Sharing (ICS)为家庭和小型办公网络提供网络地址转换、寻址、名称解析和/或入侵保护服务关了,他占用着端口。 3.把此服务关了后再启动ActvieMQ成功了。 2、Broker-Cluster部署方式 前面的Master-Slave的方式虽然能解决多服务热备的高可用问题,但无法解决负载均衡和分布式的问题。Broker-Cluster的部署方式就可以解决负载均衡的问题。 Broker-Cluster部署方式中,各个broker通过网络互相连接,并共享queue。当broker-A 上面指定的queue-A中接收到一个message处于pending状态,而此时没有consumer连接broker-A时。如果cluster中的broker-B上面由一个consumer在消费queue-A的消息,那么broker-B会先通过内部网络获取到broker-A上面的message,并通知自己的consumer来消费。 1)static Broker-Cluster部署 在activemq.xml文件中静态指定Broker需要建立桥连接的其他Broker: 1、首先在Broker-A节点中添加networkConnector节点: 2、修改Broker-A节点中的服务提供端口为61616: 3、在Broker-B节点中添加networkConnector节点: 4、修改Broker-A节点中的服务提供端口为61617: 5、分别启动Broker-A和Broker-B。 2)Dynamic Broker-Cluster部署 在activemq.xml文件中不直接指定Broker需要建立桥连接的其他Broker,由activemq在 启动后动态查找: 1、首先在Broker-A节点中添加networkConnector节点: dynamicOnly="true" networkTTL="3" prefetchSize="1" decreaseNetworkConsumerPriority="true" /> 2、修改Broker-A节点中的服务提供端口为61616: 3、在Broker-B节点中添加networkConnector节点: dynamicOnly="true" networkTTL="3" prefetchSize="1" decreaseNetworkConsumerPriority="true" /> 4、修改Broker-B节点中的服务提供端口为61617: discoveryUri="multicast://default"/> 5、启动Broker-A和Broker-B 3、Master-Slave与Broker-Cluster相结合的部署方式 可以看到Master-Slave的部署方式虽然解决了高可用的问题,但不支持负载均衡,Broker-Cluster解决了负载均衡,但当其中一个Broker突然宕掉的话,那么存在于该Broker 上处于Pending状态的message将会丢失,无法达到高可用的目的。 由于目前ActiveMQ官网上并没有一个明确的将两种部署方式相结合的部署方案,所以我尝试者把两者结合起来部署: 部署的配置修改 这里以Broker-A + Broker-B建立cluster,Broker-C作为Broker-B的slave为例: 1)首先在Broker-A节点中添加networkConnector节点: 2)修改Broker-A节点中的服务提供端口为61616: 3)在Broker-B节点中添加networkConnector节点: 4)修改Broker-B节点中的服务提供端口为61617: 5)修改Broker-B节点中的持久化方式: 6)在Broker-C节点中添加networkConnector节点: 7)修改Broker-C节点中的服务提供端口为61618: 8)修改Broker-B节点中的持久化方式: 9)分别启动broker-A、broker-B、broker-C,因为是broker-B先启动,所以“/localhost/kahadb”目录被lock住,broker-C将一直处于挂起状态,当人为停掉broker-B之后,broker-C将获取目录“/localhost/kahadb” 的控制权,重新与broker-A组成cluster提供服务。