俄罗斯PC3000教程
第一部分:PC3000-V12主菜单及各模块菜单第二部分:PC3000-V12的工具模块列表
第三部分:PC3000-V11使用说明(整理)For diagnostics and repair of and hdd(ATA)
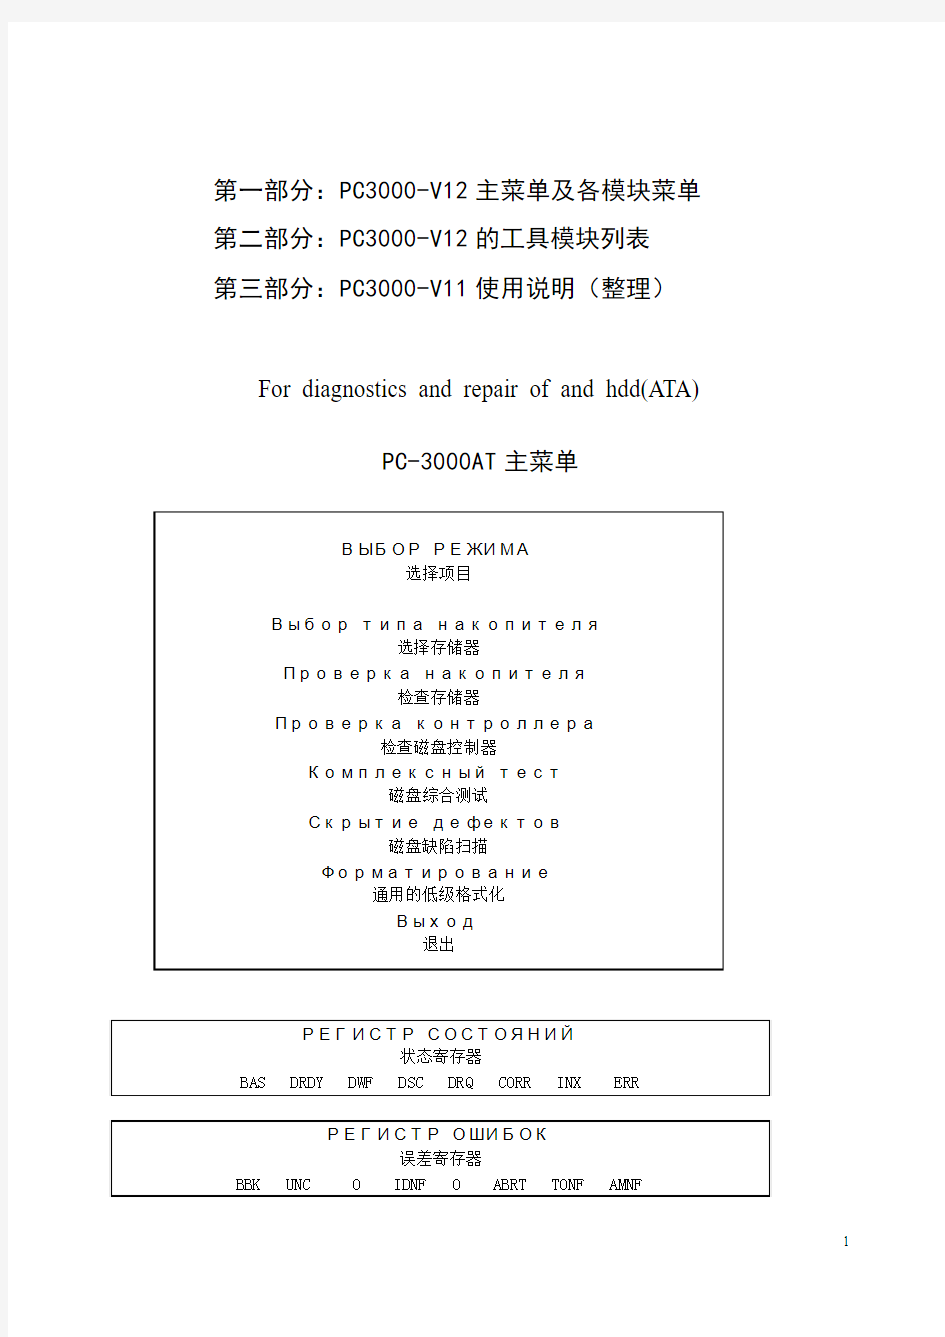
PC-3000AT主菜单
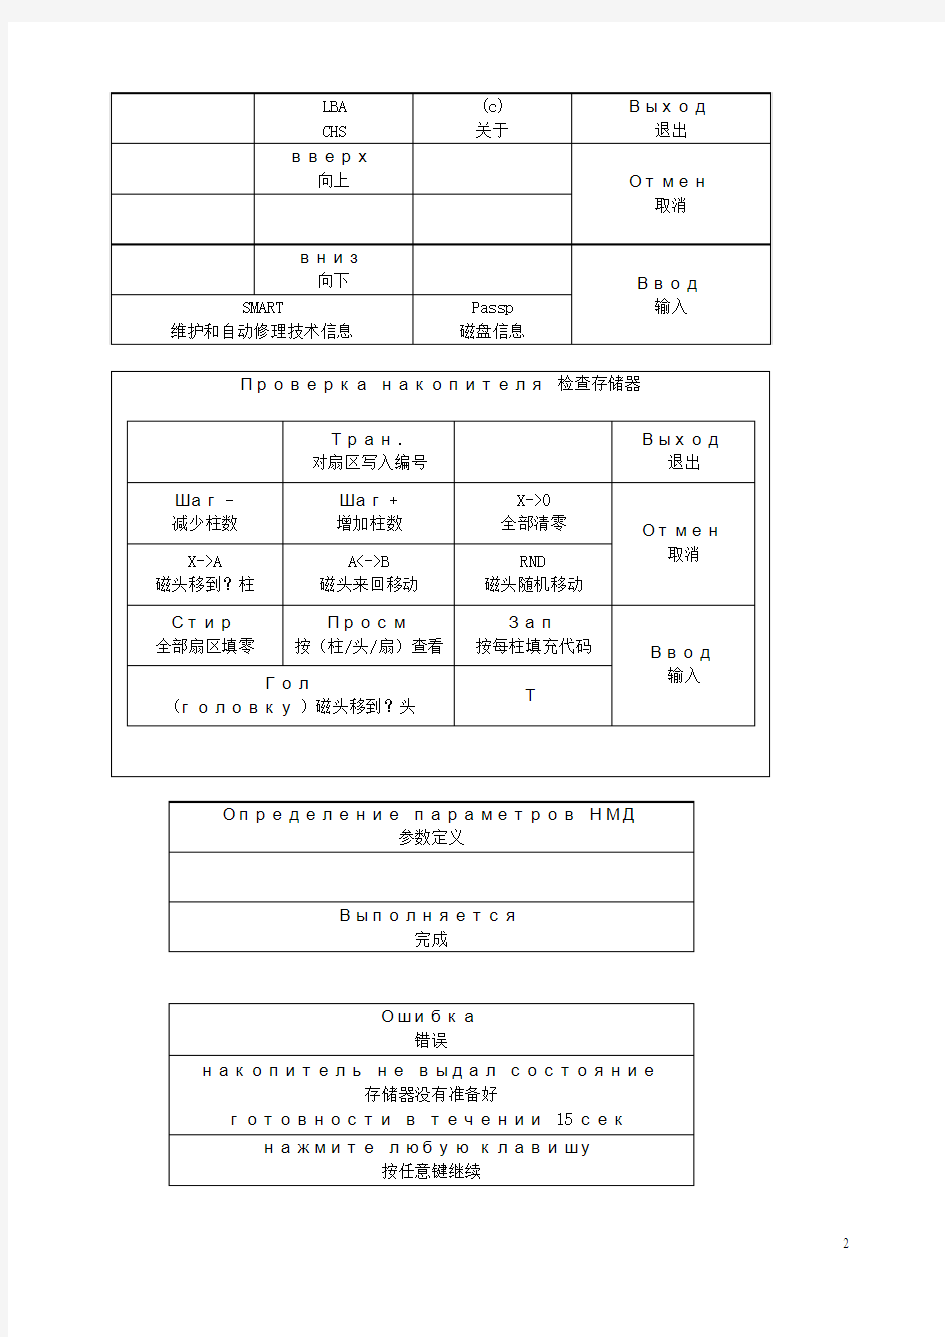
PC-3000各个模块主菜单
一、 富
士通
V er 4.52(中文说明)
1、Servo test 伺服测试
1.1 |-------------------------------------------------------------------------------------------------|
| The testimg procedure will destroy all user data drive
| 这个测试程序将破坏驱动器的全部使用数据
| test starting cylinder : xxxxxxxx
| 测试开始的柱面: xxxxxxxx
| test ending cylinder : xxxxxxxx
| 测试结束的柱面: xxxxxxxx
| place defecfs to : P-List
| 放置坏道到: P-List (空格健变换P-List和Glist)
| limit fo grouping into cylinders : xxxxxxxx
| 一个柱面超过多少个坏道就封闭:
|-------------------------------------------------------------------------------------------------|
2、Surface test 表面测试(物理测试)
2.1 |------------------------------------------------------------------------------------------------|
| test starting cylinder : xxxxxxxxxx
| 测试开始的柱面: xxxxxxxxxx
| test ending cylinder : xxxxxxxx
| 测试结束的柱面: xxxxxxxx
| number of passes : 3
| 通过的次数: 3 (可在1-x之间选择,默认是3)
| number of retry of a defect : 3
| 一个坏道重复测试的次数: 3(可在1-x之间选择,默认是3)
| critical time test (ms): 300
| 测试的临界时间(毫秒):300 (意思是停顿多少毫秒就视为坏道)
| perform writing test : NO
| 执行写测试: NO/YES (N)不是(y)是默认是(N)
| use all heads while testing : yes
| 当测试的时候使用全部的磁头: yes (y)是(n)是默认是(yes)
| limit fo grouping into cylinders : xxxxxxx
| 一个柱面超过多少个坏道就封闭:
|------------------------------------------------------------------------------------------------|
3、Disc firmware zone 碟片的固件区
3.1 Work with the rom 对ROM 工作
3.1.1 Review of the disc firmware zone in the ROM检看碟片固件地区的ROM 版本信息3.1.2 Read ROM to file 读ROM 文件
3.1.3 Write ROM from file 写ROM 文件
3.1.4 Supported ted ROMS 支持的ROM的所有型号
3.2 work with disc firmware zone 对碟片固件地区工作
3.2.1 Checking of disc firmware structure 检查碟片固件结构
3.2.2 disc firmware data writing/reading 碟片固件数据写/读
3.2.2.1 Exrtact MP from BASE <-| 从基地提取MP
3.2.2.1.1 writing to disc drive <- 写硬盘
3.2.2.1.1 writing of modules 写模块
3.2.2.1.2 configuration pages writing 写结构页
3.2.2.1.2 writing to folder 写文件夹
3.2.2.2 Add MP to BASE 添加MP 数据库
3.2.2.3 Delete MP from BASE 从数据库册除MP
3.3.3 Reading of the modules 读模块
3.3.4 Writing of the modules 写模块
3.3.5 Regen translator 再生变换器
3.3.6 Security subsystem 安全子系统
3.3.8.1 show security information 显示安全信息
3.3.8.2 Clear passwords 清除密码
3.2 software hesds switching off 用软件关闭磁头
3.3 spindle stop 主轴停转
3.4 work with adaptives
4、Disc ID 硬盘的身份(变硬盘的型号和容量)
5、Formatting 低级格式化
6、Logical scanning 逻辑扫描
6.1 |--------------------------------------------------------------------------------------------|
| initial LBA position : x
| 初始LBA位置: X
| final LBA position : xxxxxxxxxxxx
| 结束的LBA位置: xxxxxxxxxxxx
| reversive scanning :NO
| 从后面向前面扫描:NO (键入(Y)就从后面向前面扫描)
| number of passes : 3
| 通过的次数: 3 (可在1-x之间选择,默认是3)
| number of retry of a defect : 3
| 一个坏道重复测试的次数: 3(可在1-x之间选择,默认是3)
| critical time test (ms): 300
| 测试的临界时间(毫秒):300 (意思是停顿多少毫秒就视为坏道)
| perform writing test : NO
| 执行写测试: NO/YES (N)不是(y)是默认是(N)
| verify instead of reading : yes
| 校验代替读: yes
|--------------------------------------------------------------------------------------------|
7、S.M.A.R.T. table S.M.A.R.T 表
7.1 to review S.M.A.R.T. table 观察S.M.A.R.T 表
7.2 S.M.A.R.T. parameters reset 复位S.M.A.R.T. 参数
7.3 to load S.M.A.R.T. (external module) 加载S.M.A.R.T. (外部模块)
8、Defects table 坏道表
8.1 to review defects teble 观察坏道表
8.2 Add LBA defects 按LBA添加坏道表
8.3 Add LCHS derects 按柱面/磁头/扇区/长度添加坏道
8.4 Add physical sector 按物理扇区添加
8.5 Add physical tracks 添加物理磁道
8.6 Group into tracks 封闭磁道
8.7 import of logical defects table 逻辑坏道表的输入
8.8 Erase defects table 删除坏道表
9、Automatic mode 自动化模式
10、EXIT 退出
二、昆腾与迈拓(LE VQ系列)Ver 2.32(中文说明)
1、Servo test 伺服测试
1.1 |-------------------------------------------------------------------------------------------------|
| The testimg procedure will destroy all user data drive
| 这个测试程序将破坏驱动器的全部使用数据
| test starting cylinder : xxxxxxxx
| 测试开始的柱面: xxxxxxxx
| test ending cylinder : xxxxxxxx
| 测试结束的柱面: xxxxxxxx
| place defecfs to : P-List
| 放置坏道到: P-List 空格健变换P-List和Glist
| limit fo grouping into cylinders : 64
| 一个柱面超过多少个坏道就封闭: 64 (可以是2-63)
|--------------------------------------------------------|
2、Surface test 表面测试(物理测试)
2.1 |-------------------------------------------------------------------------------------------------|
| test starting cylinder : xxxxxxxxxx
| 测试开始的柱面: xxxxxxxxxx
| test ending cylinder : xxxxxxxx
| 测试结束的柱面: xxxxxxxx
| number of passes : 3
| 通过的次数: 3 (可在1-x之间选择,默认是3)
| number of retry of a defect : 3
| 一个坏道重复测试的次数: 3(可在1-x之间选择,默认是3)
| critical time test (ms): 300
| 测试的临界时间(毫秒):300 (意思是停顿多少毫秒就视为坏道)
| perform writing test : NO
| 执行写测试: NO/YES (N)不是(y)是默认是(N)
| use all heads while testing : yes
| 当测试的时候使用全部的磁头: yes (y)是(n)是默认是(yes)
| place defects to : P-List
| 放置坏道到: P-List 空格健变换P-List和Glist
| limit fo grouping into cylinders : 64
| 一个柱面超过多少个坏道就封闭: 64 (可以是2-63)
|---------------------------------------------------------------------------------------------------------|
3、Disc firmware zone 碟片的固件地区
3.1 Work with the rom 对ROM 工作
3.2 work with disc firmware zone 对碟片固件地区工作
3.2.1 Checking of disc firmware structure 检查碟片固件结构
3.2.2 disc firmware data writing/reading 碟片固件数据写/读
3.2.2.1 Exrtact MP from BASE <-| 从数据库提取MP
3.2.2.1.1 writing to disc drive <- 写硬盘
3.2.2.1.1 writing of modules 写模块
3.2.2.1.2 configuration pages writing 写结构页
3.2.2.1.2 writing to folder 写文件夹
3.2.2.2 Add MP to BASE 添加MP 到数据库
3.2.2.3 Delete MP from BASE 从数据库删除MP
3.2.3 Configuration pages reading 构造页读
3.2.4 Configuration pages writing 构造页写
3.2.5 Reading of the modules 读模块
3.2.6 Writing of the modules 写模块
3.2.7 Detailed COM log 详细COM log
3.2.8 Security subsystem 安全子系统
3.2.8.1 show security information 显示安全信息
3.2.8.2 Clear passwords 清除密码
3.3 Configuration changing 改变内部构造
3.4 Load LDR-file to disc RAM 加载LDR 文件到碟片的RAM
3.5 spindle stop 主轴停转
4、Disc ID 硬盘的身份(硬盘的型号和容量)
5、Logical scanning 逻辑扫描
5.1 |---------------------------------------------------------------------------------------------|
| initial LBA position : x
| 初始LBA位置: X
| final LBA position : xxxxxxxxxxxx
| 结束的LBA位置: xxxxxxxxxxxx
| reversive scanning : NO
| 从后面向前面扫描: NO 键入(Y)就从后面向前面扫描
| number of passes : 3
| 通过的次数: 3 (可在1-x之间选择,默认是3)
| number of retry of a defect : 3
| 一个坏道重复测试的次数: 3(可在1-x之间选择,默认是3)
| critical time test (ms): 300
| 测试的临界时间(毫秒):300 (意思是停顿多少毫秒就视为坏道)
| perform writing test : NO
| 执行写测试: NO/YES (N)不是(y)是默认是(N)
| verify instead of reading : yes
| 校验代替读: yes
| place defecfs to : P-List
| 放置坏道到: P-List 空格健变换P-List和Glist
|----------------------------------------------------------------------------------------------|
6、S.M.A.R.T. table S.M.A.R.T 表
6.1 to review S.M.A.R.T. table 观察S.M.A.R.T 表
6.2 to load S.M.A.R.T. (external module) 加载S.M.A.R.T. (外部模块)
6.3 S.M.A.R.T. parameters reset 复位S.M.A.R.T. 参数
7、Defects table 坏道表
7.1 to review defects teble 观察坏道表
7.2 Add LBA defects 按LBA添加坏道表
7.3 Add physical sector 按物理扇区添加
7.4 Add physical track 按物理磁轨添加
7.5 Grouping defects into tracks 封闭坏道到磁轨里
7.6 import of logical defects table 逻辑坏道表的输入
7.7 Erase defects table 删除坏道表
7.8 Defects table export 坏道表输出
7.9 Defects table import 坏道表输入
7.10 Work with module 06h 对06h 模块工作
8、Automatic mode 自动化模式
9、SELFSCAN 自我扫描
9.1 condition viewing 条件观察
9.2 load selfscan 加载自我扫描
9.3 start selfscan 起动自我扫描
9.4 stop selfscan 停止自我扫描
10、EXIT 退出
三、西数(EB AB BB JB DA)(中文说明)
1、Disk firmware zone 磁盘固件区
1.1 Disk firmware zone 磁盘固件区
1.1.1 disk firmware surface test 硬盘固件表面测试(硬盘固件物理测试)
1.1.2 disk firmware structure test 硬盘固件结构测试及观查
1.1.3 disk firmware data read/write 硬盘固件数据读/写
1.1.3.1 write FW to the disk 写FW到硬盘
1.1.3.2 Add FW to the DA TABASE 添加FW到数据库
1.1.3.2 Remove FW the DA TABASE 册除FW数据库
1.1.4 Read modules 读模块
1.1.5 write modules 写模块
1.1.6 Erase firmware area 清除固件范围
1.1.7 Change Servo Area SPT 改变伺服范围
1.1.8 Security subsystem 安全子系统
1.2 Translator operations 变换器操作
1.3 Spindle stop 主轴停转
1.4 Change time scale 改变时间等级
2、drive description 驱动器描写(改硬盘容量)
3、Formatting 低级格式化
3.1 Take into account PList and Glist 考虑PList和GList
3.2 Take into account Plist 考虑PList
3.3 Take into account Glist 考虑GList
3.4 Do not Take into account neither PList and Glist PList 和GList 两者都不考虑
4、Logical structure scaning 逻辑结构扫描
4.1 |----------------------------------------------------------------------------------------------------|
| start LBA : x
| 开始LBA: X
| End LBA : xxxxxxxx
| 结束LBA : XXXXXXXX
| passes : 3
| 通过的次数: 3
| carefulness index : 3
| 仔细指标
| perfrom writing test : NO
| 按照写测试
| verification instead of reading : yes
| 校验代替读
|---------------------------------------------------------------------------------------------|
5、S.M.A.R.T. table S.M.A.R.T. 表
6、Defects table 坏道表
6.1 V iew defects table 观察坏道表
6.2 Add physical track 添加物理磁道
6.3 import logical defects table 输入逻辑坏道表
6.4 clear defects table 清除坏道表
6.5 move G-List to P-List G-List 转P-List
6.6 Group to tracks 封闭磁道
7、Automatic mode 自动模式
8、Exit 退出
四、迈拓ver1.07 (中文说明)
迈拓ver1.20 (中文说明)
1、Logicaln scanning 逻辑扫描
1.1 |------------------------------------------------------------------------------------------------ |
| initial LBA position:xxxxxxx
| 开始位置
| final LBA position:xxxxxxxx
| 结束位置
| reversive scanning:on
| 反向扫描打开、关闭
| number of passes:3
| 通过的次数
| perform writing test:on
| 执行写测试打开关闭
| verif. instead of reading
| 读版本代替
| put defects to:p-list
| 放置默认列表
|---------------------------------------------------------------------------------------------------| 2、disc firmware zone 固件区
2.1 work with momeory buffer 操作存储缓冲器
1.1 memory buffer reading 存储缓冲器读
1.2 memory buffer writing 存储缓冲器写
2.2 work with sa 操作sa
1.1 checking of disc fw structure 检查磁盘固件结构
1.2 sa surface checking sa表面检查
1.3 reading of the modules 读那个模块
1.4 writing of modules 写那个模块
1.5 reading modules groups 读全部模块
1.6 writing modules groups 写全部模块
1.7 sa write test sa写测试
1.8 modules repairing 模块修理
1.9 transltor regeneration 扇区再生
1.10 spindle stop 主轴停转
2.3 LDR-file loading 加载ldr文件
2.4 LDR-file creation 制造ldr文件
2.5 security subsystem 安全系统
3、disc id 硬盘id号
4、defects table 缺陷表
1.1 view p-list 查看p-list
1.2 view g-list 查看g-list
1.3 move g-list defects to p-list 转移g表到p表
1.4 erase g-list 擦除g-list
1.5 erase g-list and p-list 擦除g-list和p-list
1.6 import from defectoscope 引入探测器
5、exit 退出
五、IBM (中文说明)
六、西捷(中文说明)
PC3000-解密版的安装方法:
1、PC3000运行于DOS系统。可以将PC3000的全部程序拷贝在系统盘中。
2、系统盘安装在IDE1的MASTER口。
3、待修盘安装在IDE2的MASTER口,并要求在BIOS中设为“NONE”。
4、PC3000要求在CONFIG.SYS中加载HIMEM.SYS及俄文版的EMM386.EXE。
5、在AUTOEXEC.BAT中先后执行EMUL目录内的PCDOSEMU.EXE和VGAGA.EXE。
6、进入PC3000目录,执行SHELL.EXE即可进入PC3000主界面。
7、注意:V09和V11版的EMUL文件相同,可以通用。V12版是另外一套。
PC3000的工具模块