PXE网络安装OS过程
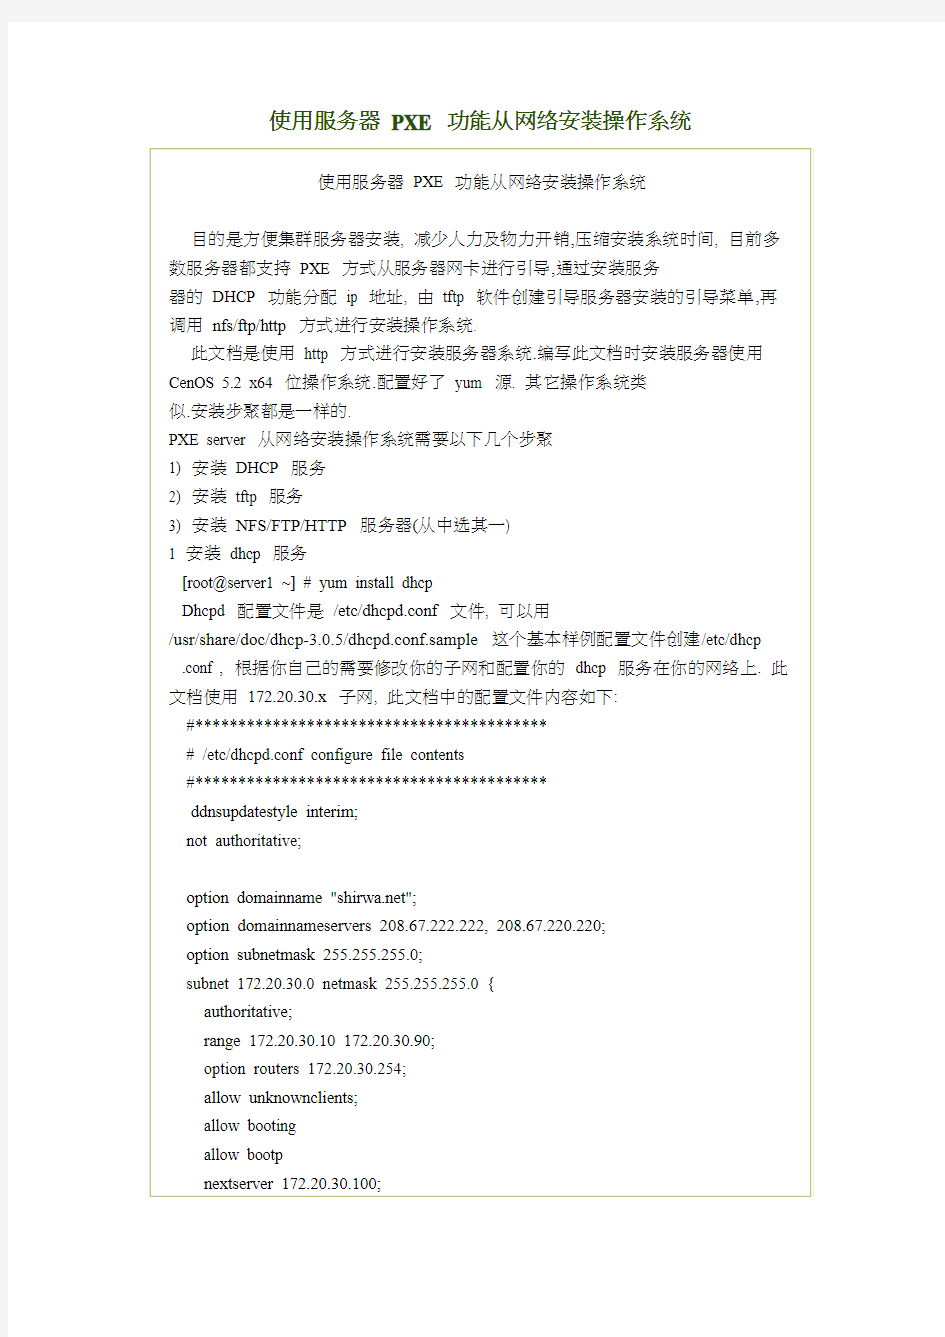

使用服务器PXE 功能从网络安装操作系统
1.引言
一般情况下,我们都是利用软驱或光驱引导Linux后,再通过本地的光驱安装Linux。但是,这种安装方法在以下的几种情况下就不能适用:
1.无软驱和光驱:很多公司为了节省成本,计算机一般都不带光驱或软驱,
这样就无法通过本地安装Linux;
2.非标准的软驱和光驱:虽然笔记本都会配置光驱,但是并不一定都是标准
的IDE设备,有些是通过USB接口,有些是通过1394接口(例如Samsung 的Q10)。在Linux安装时所引导的Linux内核一般都不会带这些接口的
驱动,所以也无法通过本地安装Linux;
3.另外,在一些场合,如机房中,有大量的计算机需要同时安装Linux,如
果通过光驱的方式一个个安装,不仅效率低,也不利于维护。
笔者在工作过程中,就遇到过第二种情况。一台Samsung的Q10笔记本需要安装Redhat Linux 8.0,但是通过光驱引导后发现,安装程序无法访问光盘。针对这个问题,笔者经过查阅资料和摸索,找到了在Q10上安装Linux的方法。在下面的讨论中,如不做特别声明,都将以Q10为例,介绍如何通过PXE Bootrom来远程安装Linux。
回页首
2.基本原理
1)什么是PXE
PXE(Pre-boot Execution Environment)是由Intel设计的协议,它可以使计算机通过网络启动。协议分为client和server两端,PXE client在网卡的ROM中,当计算机引导时,BIOS把PXE client调入内存执行,并显示出命令菜单,经用户选择后,PXE client将放置在远端的操作系统通过网络下载到本地运行。
PXE协议的成功运行需要解决以下两个问题:
1.既然是通过网络传输,那么计算机在启动时,它的IP地址由谁来配置;
2.通过什么协议下载Linux内核和根文件系统
对于第一个问题,可以通过DHCP Server解决,由DHCP server来给PXE client
分配一个IP地址,DHCP Server是用来给DHCP Client动态分配IP地址的协议,不过由于这里是给PXE Client分配IP地址,所以在配置DHCP Server时,需要增加相应的PXE特有配置。
至于第二个问题,在PXE client所在的ROM中,已经存在了TFTP Client。PXE Client 使用TFTP Client,通过TFTP协议到TFTP Server上下载所需的文件。
这样,PXE协议运行的条件就具备了,下面我们就来看看PXE协议的工作过程。
2)工作过程
在上图中,PXE client是需要安装Linux的计算机,TFTP Server和DHCP Server 运行在另外一台Linux Server上。Bootstrap文件、配置文件、Linux内核以及Linux 根文件系统都放置在Linux Server上TFTP服务器的根目录下。
PXE client在工作过程中,需要三个二进制文件:bootstrap、Linux 内核和Linux 根文件系统。Bootstrap文件是可执行程序,它向用户提供简单的控制界面,并根
据用户的选择,下载合适的Linux内核以及Linux根文件系统。
回页首
3.步骤
有了前面的背景知识,接下来就可以正式操作了,下面按照顺序给出了操作步骤:
1)配置DHCP Server
选用ISC dhcp-3.0,DHCP Server的配置文件是/etc/dhcpd.conf,配置文件的内容如下:
option space PXE;
option PXE.mtftp-ip code 1 = ip-address;
option PXE.mtftp-cport code 2 = unsigned integer 16; option PXE.mtftp-sport code 3 = unsigned integer 16; option PXE.mtftp-tmout code 4 = unsigned integer 8;
option PXE.mtftp-delay code 5 = unsigned integer 8;
option PXE.discovery-control code 6 = unsigned integer 8;
option PXE.discovery-mcast-addr code 7 = ip-address;
class "pxeclients" {
match if substring (option vendor-class-identifier, 0, 9) = "PXEClient";
option vendor-class-identifier "PXEClient";
vendor-option-space PXE;
# At least one of the vendor-specific PXE options must be set in # order for the client boot ROMs to realize that we are a PXE-compliant # server. We set the MCAST IP address to 0.0.0.0 to tell the boot ROM
# that we can't provide multicast TFTP (address 0.0.0.0 means no # address).
option PXE.mtftp-ip 0.0.0.0;
# This is the name of the file the boot ROMs should download.
filename "pxelinux.0";
# This is the name of the server they should get it from.
next-server 192.168.0.1;
}
ddns-update-style interim;
ignore client-updates;
default-lease-time 1200;
max-lease-time 9200;
option subnet-mask 255.255.255.0;
option broadcast-address 192.168.0.255;
option routers 192.168.0.254;
option domain-name-servers 192.168.0.1,192.168.0.2;
option domain-name "https://www.360docs.net/doc/f28977981.html,";
subnet 192.168.0.0 netmask 255.255.255.0 {
range 192.168.0.10 192.168.0.100;
}
host q10 {
hardware ethernet 00:00:F0:6B:38:5B;
fixed-address 192.168.0.22;
}
dhcpd.conf配置文件中几个关键部分说明如下:host q10{…}定义了笔记本Q10网卡的MAC地址与IP地址的对应关系,表明DHCP Server为Q10分配一个固定的IP:192.168.0.22;filename ""指定bootstrap的文件名;netx-server指定TFTP Server 的地址。其它的配置请读者参考DHCP Server的手册。
2)配置TFTP server
选用tftp-hpa,TFTP Server的配置文件是/etc/xinetd.d/tftp,配置文件的内容如下:
service tftp
{
socket_type = dgram
protocol = udp
wait = yes
user = root
server = /usr/sbin/in.tftpd
server_args = -u nobody -s /tftpboot
disable = no
per_source = 11
cps = 100 2
}
这里制定了/tftpboot为TFTP Server的根目录位置。
3)配置bootstrap
bootstrap文件在dhcpd.conf中被指定为pxelinux.0文件,放置在/tftpboot。Linux内核以及Linux根文件系统也放置在/tftpboot。pxelinux.0在执行过程中,要读配置文件,所有的配置文件都放在/tftpboot/pxelinux.cfg/目录下。由于PXElinux具有为不同的PXE Client提供不同的Linux内核以及根文件系统的功能,所以要通过不同的配置文件名来区分出不同的PXE Client的需求。比如一个PXE Client由DHCP Server分配的IP地址为192.168.0.22,那么相对应的配置文件名为
/tftpboot/pxelinux.cfg/C0A80016(注:C0A80016为IP地址192.168.0.22的十六进制表示)。如果找不到,就按照顺序C0A80016-> C0A8001-> C0A800-> C0A80->
C0A8-> C0A-> C0-> C->default查找配置文件。
/tftpboot/pxelinux.cft/C0A80001配置文件的具体内容如下:
DEFAULT install
PROMPT 1
LABEL install
KERNEL vmlinuz
APPEND initrd=initrd.img devfs=nomount ramdisk_size=16384
此配置文件指定了Linux内核以及根文件系统的名称,并给内核传递了一些参数,其中ramdisk_size参数要非常注意,它指定Linux内核启动后建立ramdisk的大小,如果设置太小,Linux的安装过程就可能无法进行。
4)制作Linux内核/根文件系统
因为需要通过网络安装,所有选择Redhat Linux 8.0安装盘(disk #1)中
E:\images\bootnet.img(光驱的盘符为E:)。bootnet.img包括Linux内核、Linux根文件系统(有安装程序在内)。用bootnet.img制作一张引导软盘,方法在DOS 命令行运行E:\dosutils\rawrite E:\images\bootnet.img,根据提示制作。制作完毕后,将引导软盘中的vmlinuz(Linux内核)和initrd.img(Linux根文件系统)拷贝到Linux Server的/tftpboot下。
5)启动DHCP Server/TFTP Server
在Linux Server上,运行service dhcpd start和service xinetd restart。
6)启动Q10
Q10加电后,在出现Samsung公司徽标时,在左下角会提示用户按F12进入网络引导。按F12后,Q10进入网络引导过程。首先通过DHCP Server获得了IP地址,然后下载并执行bootstrap文件pxelinux.0;在执行中,读入配置文件
/tftpboot/pxelinux.cfg/C0A80016。此时屏幕上出现boot:,敲入install,就进入了Redhat Linux 8.0的网络安装界面,一切OK!
回页首
4.结束语
虽然以上的讨论是针对Samsung Q10笔记本,但是工作原理和安装方法对于其它类型的计算机也是适用的,不过要记住,计算机的网卡中必须要有BootROM--PXE Client。同时,PXE协议也可作为无盘Linux技术,用于引导放置在远程的Linux。实际上,只要根据需要,在Pxelinux的配置文件的APPEND选项中,为Linux内核传进需要mount的文件系统的位置参数即可。
参考资料
?PXELINUX,https://www.360docs.net/doc/f28977981.html,/pxe.php
?Net booting with DHCP, PXE-Linux and TFTP,
http://logout.sh/computers/linux/netboot/
?Different kinds of PXE,
https://www.360docs.net/doc/f28977981.html,/documentation/pxe/ch02.html
/etc/dhcpd.conf
option space PXE;
option PXE.mtftp-ip code 1 = ip-address;
option PXE.mtftp-cport code 2 = unsigned integer 16;
option PXE.mtftp-sport code 3 = unsigned integer 16;
option PXE.mtftp-tmout code 4 = unsigned integer 8;
option PXE.mtftp-delay code 5 = unsigned integer 8;
option PXE.discovery-control code 6 = unsigned integer 8;
option PXE.discovery-mcast-addr code 7 = ip-address;
class "pxeclients" {
match if substring (option vendor-class-identifier, 0, 9) = "PXEClient";
option vendor-class-identifier "PXEClient";
vendor-option-space PXE;
# At least one of the vendor-specific PXE options must be set in
# order for the client boot ROMs to realize that we are a PXE-compliant # server. We set the MCAST IP address to 0.0.0.0 to tell the boot ROM # that we can't provide multicast TFTP (address 0.0.0.0 means no
# address).
option PXE.mtftp-ip 0.0.0.0;
# This is the name of the file the boot ROMs should download.
filename "pxelinux.0";
# This is the name of the server they should get it from.
next-server 192.168.0.1;
}
ddns-update-style interim;
ignore client-updates;
allow booting;
allow bootp;
subnet 192.168.0.0 netmask 255.255.255.0 {
# --- default gateway
option routers 192.168.0.1;
option subnet-mask 255.255.255.0;
option nis-domain "https://www.360docs.net/doc/f28977981.html,";
option domain-name "https://www.360docs.net/doc/f28977981.html,";
option domain-name-servers 192.168.1.1;
option time-offset -18000; # Eastern Standard Time
# option ntp-servers 192.168.1.1;
# option netbios-name-servers 192.168.1.1;
# --- Selects point-to-point node (default is hybrid). Don't change this unless # -- you understand Netbios very well
# option netbios-node-type 2;
range dynamic-bootp 192.168.0.128 192.168.0.191;
default-lease-time 21600;
max-lease-time 43200;
# we want the nameserver to appear at a fixed address
}
Running Deployment Scripts Using DTK and Embedded Linux
Dell? OpenManage? Deployment Toolkit Version 2.5 User's Guide
This section provides best practices procedures and scenarios for using the Deployment Toolkit (DTK) to perform pre-operating system configuration tasks and to install supported operating systems on supported Dell? systems.
After you have populated the deployment directory structure with all necessary files and carefully edited the deployment scripts and configurations files, you are ready to begin the final stage of the deployment process. Before running the deployment, however, you need to create specific deployment media to facilitate your chosen deployment method. The common deployment scenarios are:
?Deployment using Dell-provided embedded Linux
?Deployment using customized embedded Linux
?Using a Third-Party Deployment Solution Framework
Deployment Using Dell-Provided Embedded Linux
There are two common scenarios:
?Network-based deployment
?CD-based deployment
Network-Based Deployment
The procedure below enables you to boot DTK over network and pass parameters (startup script location and name) during boot using the Pre-boot eXecution Environment (PXE) configuration file. This will automatically launch the start-up script off the network share, when DTK is booted.
1.Obtain the ISO image of the embedded Linux available on the Dell Support website at https://www.360docs.net/doc/f28977981.html,.
2.Burn the ISO image using any commonly available CD burning software.
NOTE:When you create a bootable CD, this image is supplied to the CD burning software along with the complete deployment directory structure, which includes all necessary supporting files to perform
the deployment.
The CD burning software creates a self-bootable CD when the CD is booted.
3.Set up the Trivial File Transfer Protocol (TFTP) services and the Dynamic Host
Configuration Protocol (DHCP) services on your network to boot the target system using Pre-Boot Execution Environment (PXE).
4.Copy the contents of the embedded Linux DTK ISO image (SA.1, SA.2, and
isolinux.cfg) from /mnt/cdrom/isolinux to the tftp folder.
5.The isolinux.cfg file has various boot options. Select the method you want, and edit the
isolinux.cfg file for the following:
o IP address of the network share
o Share path of the network share
o Name of your startup script
6.The isolinux.cfg file is ready for PXE-booting. Copy this isolinux.cfg file into the PXE
configuration folder.
7.Create your own start-up script and place it in the network share specified in your
modified isolinux.cfg file.
8.The modified script is picked up and executed during the boot process.
NOTE: The network share on which you have the scripts and DTK files are mounted to
/opt/dell/toolkit/systems.
NOTE: Ensure that you specify the correct RAMDISK size in the pxe config file before booting through PXE. (A sample pxe config file is provided in /mnt/cdrom/isolinux/isolinux.cfg.)
CD-Based Deployment
1.Obtain the ISO image of the embedded Linux available on the Dell Support website at
https://www.360docs.net/doc/f28977981.html,.
2.Burn the ISO image using any commonly available CD burning software.
NOTE: When you create a bootable CD, this image is supplied to the CD burning software along with the complete deployment directory structure, which includes all necessary supporting files to perform the deployment.
The CD burning software creates an image of the self-bootable ISO image and the
deployment files on the CD.
3.Extract the contents of the ISO image to a folder on your hard drive.
4.Copy your custom scripts into the folder you created in step 3. (See "Installation for
Embedded Linux" for an example of the folder structure.)
NOTE: Your scripts should also take care of copying miscellaneous items to unlock the CD, so that the CD can be mounted and ejected as required by the operating system's installation process.
5.In /mnt/cdrom/isolinux.cfg, edit the cd install section to point to your customized
start-up script. In other words, add the share_script option; for example:
label 1
kernel SA.1
append initrd=SA.2 ramdisk_size=55321 Stage3_type=cdrom DEBUG=0 quiet
share_type=cdrom share_script=dracupdate.sh
Then, use mkisofs to make your customized CD image; for example:
mkisofs -o usaf.iso -b isolinux/isolinux.bin -c isolinux/boot.cat -no-emul-boot -boot-load-size 4 -iso-level 2 -relaxed-filenames -r -J -pad -boot-info-table /root/usaf/
NOTE: It is important to use mkisofs to make your customized image because the ISO Linux recognizes only the isolinux.cfg (and all files within /isolinux). If you do not use mkisofs, DTK's openipmi and HAPI libraries will not load and most of the Dell Update Packages will not work.
NOTE: The scripts that you copy into the CD will be copied to the RAM disk and run from the RAM disk. This task is done to ensure the CD is not locked. Ensure that your sample scripts have valid path names.
6.Copy the directory structure created on your work station into the root folder that you
created in step 3. This folder contains the DTK CD, files necessary for operating system installation, and files required for replication.
7.Burn the contents of the folder you created in step 3 to a CD. (Use the isolinux utility to
make the CD bootable.)
8.Your ISO image is ready for booting.
Deployment Using Customized Embedded Linux
Ensure that you have the following basic libraries, Dell toolkit libraries, tools, and utilities required for DTK to work in your customized Linux deployment environment (see Table 7-1 for details on files and RPMs to customize your embedded Linux):
?Drivers for all your hardware installed in your embedded Linux (from the Dell Support website at https://www.360docs.net/doc/f28977981.html,)
?Serial port configuration utilities (setserial and stty) for racadm
?Installed and working instrumentation drivers (from /mnt/cdrom/tools)
?Point-to-Point Protocol (PPP) tools
?Open Intelligent Platform Management Interface (IPMI) drivers
?Basic libraries and utilities for Linux to execute customized scripts
?DTK tools and utilities extracted from the embedded Linux CD
(/mnt/cdrom/tools/dell.tar.gz)
?Necessary entries in the ld.so.config file so that the libraries get loaded
Integrate all the above mentioned libraries, Dell toolkit libraries, tools, and utilities into your embedded Linux environment and proceed with deployment.
NOTE: Ensure that the raidcfg executable in the /bin directory is a symbolic link to the raidcfg in the Dell-provided /lib folder.
NOTE: Refer to start-stage3.sh, start-hapi.sh, or start-raid.sh on /mnt/cdrom/tools to see how Dell-provided utilities and drivers are loaded.
NOTE: The /opt/dell/srvadmin/shared and/opt/dell/srvadmin/hapi directories should have Read-Write permissions. Refer to start-stage3.sh and start-hapi.sh for details.
Using a Third-Party Deployment Solution Framework
You can use the DTK with any existing third-party deployment solution framework that provides a
PXE booting infrastructure that can be used as the transport mechanism for the DTK utilities. Because each third-party deployment framework is unique, however, these solutions fall outside the scope of this document. If you plan to utilize a third-party deployment solution framework, keep in mind that the DTK is an embedded Linux-based set of tools and scripts, so the deployment solution framework must also support embedded Linux as a pre-operating system environment.