Compaq Visual Fortran6.5说明
《Compaq Visual Fortran Installing and Getting Started》文档摘录:
一、认识Compaq Visual Fortran
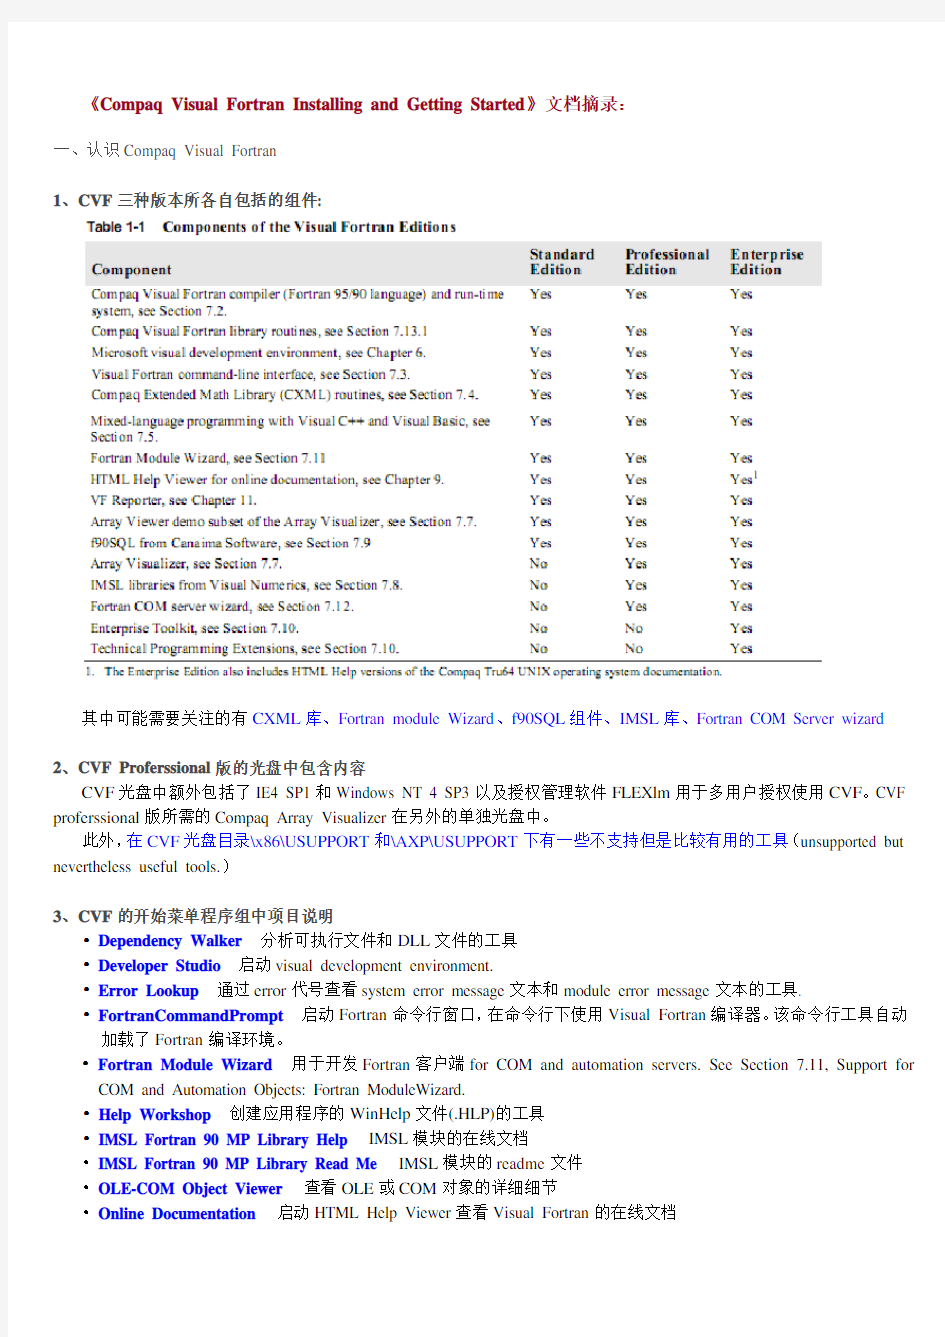
1、CVF三种版本所各自包括的组件:
其中可能需要关注的有CXML库、Fortran module Wizard、f90SQL组件、IMSL库、Fortran COM Server wizard
2、CVF Proferssional版的光盘中包含内容
CVF光盘中额外包括了IE4 SP1和Windows NT 4 SP3以及授权管理软件FLEXlm用于多用户授权使用CVF。CVF proferssional版所需的Compaq Array Visualizer在另外的单独光盘中。
此外,在CVF光盘目录\x86\USUPPORT和\AXP\USUPPORT下有一些不支持但是比较有用的工具(unsupported but nevertheless useful tools.)
3、CVF的开始菜单程序组中项目说明
?Dependency Walker分析可执行文件和DLL文件的工具
?Developer Studio启动visual development environment.
?Error Lookup通过error代号查看system error message文本和module error message文本的工具.
?FortranCommandPrompt启动Fortran命令行窗口,在命令行下使用Visual Fortran编译器。该命令行工具自动加载了Fortran编译环境。
?Fortran Module Wizard 用于开发Fortran客户端for COM and automation servers. See Section 7.11, Support for COM and Automation Objects: Fortran ModuleWizard.
?Help Workshop创建应用程序的WinHelp文件(.HLP)的工具
?IMSL Fortran 90 MP Library Help IMSL模块的在线文档
?IMSL Fortran 90 MP Library Read Me IMSL模块的readme文件
?OLE-COM Object Viewer 查看OLE或COM对象的详细细节
?Online Documentation 启动HTML Help Viewer查看Visual Fortran的在线文档
?Online Registration 联机注册Visual Fortran
?Per-User Setup 用于设置Visual Fortran运行环境。Visual Fortran安装之后必须至少应用一次该组件
?Process Viewe r 系统进程查看器
?ReadMe
?Release Notes
?Spy++ 查看系统进程、线程、windows、window messages等信息
?VF Reporter Visual Fortran反馈工具
?WinDiff 比较和修改文件内容和路径的工具
二、安装Compaq Visual Fortran后的任务
4、安装CVF后任务1:运行Per-User Setup option
该Per-User Setup option可在CVF开始程序组中找到,可以在同一帐户中多次运行。如果不运行,可能在使用CVF 时遇到某些问题。
After installing (or reinstalling) Visual Fortran, if you do not apply the Per-User Setup option, you might encounter difficulties locating the Visual Fortran driver image DF.EXE and viewing Fortran data in the visual development environment debugger. For example, you might have trouble compiling Visual Fortran programs or might not be able to view the contents of arrays within the debugger.
5、安装CVF后任务2:注册Visual Fortran Com Server wizard
The Visual Fortran COM server wizard被作为Developer Studio 的一个宏而使用,因此应在Developer Studio中先注册和载入。方法是在Developer Studio中自定义工具栏中的Add-ins and Macro Files标签中指定Fortran COM server wizard 的对应宏文件\Microsoft Visual Studio\Common\MSDev98\Addins\Df98\ CSAddin.dll
6、安装CVF后任务3:选择Visual Studio的默认在线文档
安装Compaq Visual Fortran使用的是Visual Studio的界面,默认的帮助文档应该是Compaq Visual Fortran的文档,但用户同时安装了微软的MSDN库,则默认文档可能需要指定。在Visual Studio的工具-选项-Help System标签中,在Preferred Collection下拉框中选择默认的online documentation collection
7、安装CVF后任务5:修改堆栈大小
CVF在程序运行时以堆栈的形式,动态地为数列分配内存空间。CVF允许用户在链接可执行程序时增加堆栈大小,也可以对已链接的可执行程序通过EDITBIN工具增加堆栈大小(It is possible to increase the stack size either when you link the executable, or by using EDITBIN on the executable later.)
CVF默认在Win32平台上分配的堆栈大小为0x100000 (1,048,576 decimal)字节,约1MB。
有以下几种方式修改堆栈大小:
●LINK命令行下,使用/stack nnnnn参数调整堆栈大小,其中n是字节数(十进制)如:link /stack:4000000
●也可在DF或F90命令后添加以上选项,如:df foo.f /link /stack:4000000
●对于已经链接的可执行程序,使用EDITBIN命令并添加以上选项,如:editbin /stack:4000000 foo.exe
●在Develop Studio工具中,选择菜单命令Project-Setting-Link标签,在Project Optios框中添加上面的选项。
8、安装CVF后任务6:安装VC++后更新Include和library路径
安装Visual Fortran后再安装Visual C++,其安装过程不会自动更新include和library路径。需要手动更新,步骤如下:
1 Developer Studio的Tools菜单中选择options
2 选择Directories标签
3 选择Show directories for下拉菜单,选择所需的类型(in this case, Include files).
4 在下面的列表中添加MFC\INCLUDE and ATL\INCLUDE两个路径
5 同样地,添加路径MFC\LIB到Library Files列表
9、安装CVF后任务7:安装f90SQL-Lite
f90SQL-lite from Canaima Software是一个程序库,允许Fortran程序直接读取和写入符合ODBC(Open Database Connectivity )要求的数据库,比如Excel\Access\Oracle等。
安装f90SQL-lite,需在命令行下切换到Fortran安装光盘的相应目录,执行F90_SQL\setup.exe命令。安装前最好读一下\F90_SQL\readme.txt文件中的安装事项。
删除f90SQL-lite则可在控制面板的添加删除程序中进行。
三、自定义Compaq Visual Fortran环境
12、查看当前的键盘映射列表
查看当前的键盘映射(keyboard mappings),可以通过菜单Help-Keyboard Map命令。将可以看到CVF下所有可用的命令与解释及其快捷键。.
13、自定义键盘映射
可以为CVF的所有命令自定义快捷键,步骤为菜单Tool-Customize-Keyboard标签。该标签下,左边是命令类型,右边是命令的快捷键。
14、自定义编辑器风格环境
To customize the keyboard commands to match a more familiar text editor, such as BrieforEpsilon:
1 In the Tools menu, choose Options.
2 Click the Compatibility tab.
3 Select the editor emulation from the drop-down list.
4 Select other options by using the checkboxes.
You can open any file in binary form and work with either the ASCII or the hexadecimal representation. You can even look at programs, object files, and libraries this way.
四、使用Compaq Visual Fortran
10、CVF中可创建的project类型列表
11、Visual Fortran中创建断点的完全设置
通常是使用F9或点击工具栏手型按钮;断点的完全设置选项可以通过Edit-Breakpoint菜单命令调出的对话框中设置。For more information, see Debugging Fortran Programs in the online Programmer’s Guide described in Section 8.2, Documentation Available in HTML Help Viewer Format.
15、使用Source Browser
在用户build代码时,CVF可以自动创建一个browse information file,方便用户查看任意变量、函数的使用情况,以及他们之间的调用关系。
As you are developing and debugging your application, you need to see the symbols you are using in a variety of contexts. The source browser in the visual development environment lets you look at symbol usage in the source code and view graphs of calling relationships between functions. Using the source browser makes it easy to maintain, revise, and debug your code.
When you build your application, Visual Fortran can create a browse information file containing information about the symbols in your application. The browse window displays this information and lets you move among instances of the symbols in your source code. For example, you can move to every place in every file where the symbol is used.
要启用这一功能,步骤如下:
1 选择菜单Project- Settings.
2 选择Fortran 标签.
3 选择category下拉框中的General类型,勾选Generate Source Browser Information选项
4 选择Browse Info标签
5 设置Build browse info file选项
要使用这一功能,步骤如下:
0 Build程序
1 选择Tool- Source Browser菜单命令
2 取消Case sensitive选择
3 输入要查询的Identifier,确定。
16、混合编程:
混合编程尤其适用于相同版本的Visual C++和Vsual Fortran,因为它们使用同一个可视开发环境,可以在同一个可视开发环境环境下编译链接成一个完整的程序。如果用户需要使用不同版本或不同类型的可视开发环境(visual development environment),则不能在同一个可视开发环境下编译混合语言程序的所有部分。
用户可以将其他编译环境下编译的对象文件复制到CVF的project下,使用CVF将这些对象链接到用户的应用程序中。
用户可以将Fortran对象模块(object module)直接链接到C/C++程序中编译;用户还可以将Fortran程序编译成DLL和COM server,使用VB等其他不同开发环境下的语言调用这些DLL和COM server。
更多信息,请参考….
Mixed-language programming occurs when an application has source code written in two or more languages. Compaq provides Visual Fortran. Microsoft provides Visual C++, Visual J++, Visual Basic, Microsoft MASM (Assembler for IA-32 (x86) systems), and other Visual Studio tools. Mixed-language programming is possible among all these languages.
Mixed-language development is especially easy when you use the same versions of Visual C++ and Visual Fortran, because they use the same visual development environment. Having a common development environment lets you edit, debug, link, and compile Fortran and C/C++ modules transparently.
If you need to use language products that use a different version of the visual development environment (or a different development environment) than Visual Fortran, you cannot use the same visual development environment to build all parts of the mixed-language application.
When other languages in a mixed-language application use a different version of Microsoft’s visual development environment, you can copy object files into your project workspace and use the visual development environment to link them into your application.
Another way to build a mixed-language application is to link the Fortran object module directly into a C/C++ program. Visual Basic and Visual Fortran do not share the same visual development environment. However, you can use Visual Basic to create a graphical user interface for an application and use Visual Fortran to create Fortran DLLs or a COM server from existing Fortran source code to build the numerical calcu lation engine ‘back end’ of a 32-bit Windows application.
For more information, see the following topics in the online Programmer’s Guide described in Section 8.2, Documentation Available in HTML Help Viewer Format:
?For information on creating DLLs that work with other applications, see Creating Windows Applications.
?For information on creating a COM server, see Creating a COM Server.
?For information on mixed-language programming, see Programming with Mixed Languages.
For more information, see the Microsoft Visual Studio Web site at: https://www.360docs.net/doc/2e3693303.html,/vstudio/
五、Compaq Visual Fortran的扩展
17、CXML库包含的内容
?基本线性代数程序Basic Linear Algebra routines (BLAS)
The BLAS routines include the industry-standard Basic Linear Algebra Subprograms for Level 1 (vector-vector or BLAS1), Level 2 (matrix-vector or BLAS2), and Level 3 (matrix-matrix or BLAS3). Also included are subprograms for BLAS Level 1 Extensions, Sparse BLAS Level 1, and Array Math Functions (VLIB).
?符号计算库Signal Processing routines
The Signal Processing routines provide a basic set of signal processing functions. Included are one-, two-, and three-dimensional Fast Fourier Transforms (FFT), group FFTs, Cosine/Sine Transforms (FCT/FST), Convolution, Correlation, and Digital Filters.
?稀疏线状系统库Sparse Linear System routines
The Sparse Linear System routines provide both direct and iterative sparse linear system solvers. The direct solver package supports both symmetric and nonsymmetric sparse matrices. The iterative solver package contains a basic set of storage schemes, preconditioners, and iterative solvers.
?LAPACK包LAPACK routines
LAPACK is an industry-standard subprogram package offering an extensive set of linear system and eigen problem solvers. LAPACK uses blocked algorithms that are better suited to most modern architectures, particularly ones with memory
hierarchies.
?工具型子程序Utility routines
Utility routines include random number generation, array math functions, and sorting subprograms.
For more information about CXML, see the following:
?The Compaq Extended Math Library Reference Guide described in Section 8.4, Documentation Available in PDF Format. ?Using the Compaq Extended Math Library (CXML) in the online Programmer’s Guide described in Section 8.2, Documentation Available in HTML Help Viewer Format.
?The CXML section of the Visual Fortran release notes. See Section 2.2, Release Notes.
?TheCXML readme file installed in: \Df98\CXML
?The CXML samples installed in: \Df98\CXML\Samples
?The Compaq Math Libraries Web page at: https://www.360docs.net/doc/2e3693303.html,/math
18、IMSL库包含的的内容
IMSL库用于数值计算和统计分析The IMSL libraries are for applications in general applied mathematics and for analyzing and presenting statistical data in scientific and business applications
For more information about IMSL, see:
?The IMSL Fortran 90 MP Library Read Me text file provided in the Compaq Visual Fortran 6 program folder.
?The IMSL Fortran 90 MP Library Help item provided in the Compaq Visual Fortran 6 program folder. This brings up the IMSL documentation in PDF format. (See Section 8.4.4, Location of IMSL PDF Files.)
?Using the IMSL Mathematical and Statistical Libraries in the online Programmer’s Guide.
?The Visual Numerics Web page for IMSL at: https://www.360docs.net/doc/2e3693303.html,/products/imsl/
19、使用f90SQL工具访问数据库
f90SQL库允许Fortran程序直接读写符合ODBC(Open Database Connectivity )要求的数据库,比如Excel\Access\Oracle等。CVF提供的f90SQL-lite是完整f90SQL产品的一个子集,完整的f90SQL-pro需自行购买。
f90SQL from Canaima Software is a library of functions and subroutines that makes it possible for Fortran applications to directly read and write data stored in stored in databases. The databases must be compliant with the Open Database Connectivity (ODBC) application programming interface (API). Examples of database and spreadsheet formats that you can read and write to are: Microsoft Excel, Lotus 1-2-3, Microsoft Access, Microsoft FoxPro, Paradox, Oracle, Sybase, Ingres, Informix, and Microsoft SQL-Server, among others. You can read and write data to the database application’s format directly from your Fortran programs, as long as the application offers an ODBC interface to its data files. f90SQL-lite is a subset of the full f90SQL product, known as f90SQL-pro. f90SQL-lite is suitable for small record sets and a limited number of database connections. You can purchase f90SQL-pro for larger databases from Canaima Software.
For more information about f90SQL, see:
?The README.TXT and F90SQL.RTF files provided in the F90_SQL directory on the Visual Fortran CD–ROM. (These will be placed on your system during the installation process.)
?The Canaima Software Web site at: https://www.360docs.net/doc/2e3693303.html,
20、使用Fortran Module Wizard用于COM and Automation Objects
Visual Fortran provides a wizard to simplify the use of functionality available with Component Object Model (COM) and
Automation (formerly called OLE Automation) objects. COM is an open architecture for cross-platform development of client-server applications, based on object-oriented technology. Automation is a way to manipulate an application’s objects from outside the application. Automation is typically used to create applications that expose objects to programming tools and macro languages, create and manipulate one application's objects from other applications, or create tools for accessing and manipulating objects.The Visual Fortran Module Wizard generates Fortran 90 modules that simplify calling COM and Automation services from Fortran programs.
The Fortran ModuleWizard automatically generates Fortran source code that simplifies invoking:
?Routines in a dynamic-link library (DLL)
?Methods of an Automation object
?Member functions of a COM object
The generated code includes derived-type data declarations for data structures, procedure interface block definitions, and procedure definitions (external jacket routines) that simplify calling conventions.
For more information, see Using COM and Automation Objects in the online Programmer’s Guide described in Section 8.2, Documentation Available in HTML Help Viewer Format.
21、创建COM Servers
COM supports a model of client-server interaction between a user of an object (the client) and the implementor of the object (the server). Visual Fortran provides a COMserver wizard that simplifies the task of creating a COM server or a server that supports dual interfaces. Applications that access COM objects can use the objects exposed by the COM server, including Visual Fortran, Visual C++, and Visual Basic clients.
For information about how to implement the COM server wizard as a Developer Studio add-in, see Section 4.2, Specifying the COM ServerWizard as a Developer Studio Add-in (Professional and Enterprise Editions Only).
For more information, see Creating a COM Server in the online Programmer’s Guide described in Section 8.2, Documentation Available in HTML Help Viewer Format.
37、Compaq Array Visualizer特征与组件介绍
Array Visualizer能够交互式地显示数据,也能生成.agl格式的二进制文件以供查看分析:
The Array Visualizeris a set of software components that enables you to visualize array data interactively. Any integer or real type array of rank 1-7 can be viewed using the array visualizer software. The Array Visualizer also defines a binary file format (.agl) that can be used to save array data for later analysis. Visual Fortran Standard Edition contains only the Compaq Array Viewer.
Array Visualizer包括以下内容:
?Compaq Array Viewer
The Array Viewer (AViewer) is an executable program that can load and display .agl or .hdf files. Array Viewer displays the array data in two adjustable panes:
o The top pane shows a scrollable spreadsheet-style view of the array data.
o The bottom pane displays a graphical view of the array data.
There are four viewing modes in which the graph can be displayed:
o Height Plot displays the array data as a 3D surface where the X and Y dimensions correspond to the array indexes and the array elements are mapped as a displacement in Z. This option is only available for arrays of rank 2 or
higher.
o Image Map displays the array data as a 2D image where the X and Y dimensions correspond to the array indexes and the array elements are mapped to a color range. This option is only available for arrays of rank 2 or higher.
o Vector Graph displays the array data as a series of 2, 3, or 4 component vectors. In this mode an array is viewed as
a list of vectors. For example an array declared as M(3, 500) would consist of 500 vectors of the form (x, y, z). The
first three components are mapped to the x, y, and z axis. The fourth component (if present), is mapped to a color
using the color palette. This option is only available for arrays of rank 2 or higher.
o2D View displays the array data as a conventional 2D graph where the X dimension corresponds to the array index and the array elements are mapped as a displacement in Z. This option is available for arrays of rank 1 or arrays of
higher rank but with 10 or fewer rows.
?Aview Library
The Aview library (aview.lib) is a small set of subroutines that enables any Fortran application to display array data with Array Viewer. The Aview library can also be used to directly save array data to an .agl file for later viewing with the Array Viewer. The AVDef module defines the Fortran interface for the Aview library. There is also a C language interface defined in avdef.h. The \Program Files\ArrayVisualizer\Samples directory includes example programs that use the Aview library.
?Avis2D ActiveX Control
The Avis2D ActiveX (ocx) control, can be used by any development environment that supports ActiveX controls. For example Visual C++/MFC or Visual Basic, and now with the 6.1 release, Visual Fortran. The Avis2D control enables the application to display array data, as a height field or image view, within one of its applications windows. The Avis2D control provides more than 100 properties and methods that the application can use to customize its behavior.
?AvisGrid ActiveX Control
Like the Avis2D control, the AvisGrid control can be used by any development environment that supports ActiveX controls. The AvisGrid control can be used to display array data numerically in a scrollable window. AvisGrid shares many of Avis2D's properties and methods.
?Developer Studio Enhancements
The Developer Studio debugger now supports the ability to select an array in the watch window and use the Array Viewer to inspect it. The view can be updated to observe changes in the array data as the program executes.
在Debugger调试时可以使用Fortran Array Visualizer。
The Visual Fortran Professional Edition Debugger supports new functionality which allows the programmer to view arrays using the Visual Fortran (Developer Studio) Array Visualizer. This functionality is made available through a new Visual Studio docking window named the Fortran Arrays window.
The Fortran Arrays window is available when the program is at a breakpoint in a Fortran source file. The Fortran Arrays window can be displayed using 1 of 3 methods:
o Place your cursor on, or select, the name of a Fortran array in the source window and select the Array Visualizer icon in the Fortran toolbar.
o Place your cursor on, or select, the name of a Fortran array in the source window and select the Fortran Array Visualizer item from the Debug item.
o Select Debug Windows -> Fortran Arrays from the view menu.
The Fortran Arrays window consists of 2 panes. The left pane contains the names of Fortran arrays. The right pane contains the current viewing status of each array. Each row in the Fortran Arrays window is associated with an instance of the Array Visualizer application.
Methods 1 and 2 above add a new row to the Fortran Arrays window and attempt to launch an Array Visualizer to view the array. While the Array Visualizer is starting, the status pane displays "Working...". Once the Array Visualizer has displayed the array, the status changes to "Viewing...". If the array cannot be viewed, for example because the name entered is not the name of a Fortran array of intrinsic numeric data, an error message is displayed in the status pane.
Unlike the data displayed in other Debug windows, arrays listed in the Fortran Arrays window are not automatically updated at each breakpoint. This is because viewing an array can be a time consuming operation.
You may use the following mouse and keyboard actions in the Fortran Arrays window to manipulate the arrays in the Fortran Arrays window.
o Left mouse button click on an array name selects the array.
o Left mouse button double click sends updated array data to the Array Visualizer.
o After selecting one or more arrays, pressing the Delete key closes the Array Visualizers associated with the selected arrays, and removes the names from the Fortran Arrays window.
o After selecting one or more arrays, pressing the Escape key detaches the Array Visualizers associated with the selected arrays, and removes the names from the Fortran Arrays window. Detached Array Visualizers remain
displayed but are no longer under the control of the visual Debugger.
o Left mouse button click on a selected array, or pressing the Enter key after selecting an array, places the array name into edit mode. Editing is completed when the Enter key is pressed or the mouse is clicked outside of the
editing window. If you delete the array name, then the Array Visualizer associated with the array is closed and the name is remove from the Fortran Arrays window. If you change the name to a different name, then the Array
Visualizer associated with the array is used to view the data of the array with the new name.
When the Fortran Array window is closed, either by explicit user action, or when the debugging session ends, all Array Visualizer windows are closed (except for Array Visualizers which have been previously detached).
Fortran Arrays窗口中有如下限制:
The following limitations exist in the Fortran Arrays window:
o When viewing Fortran assumed-size arrays, the last dimension of the array is not viewable.
o When viewing Fortran assumed-shape arrays, the lower bounds are always represented at 1 by default. To change the lower bound used by the Visualizer, open the ROI Settings dialog (Settings->ROI in the Visualizer menu), and modify the value(s) displayed in the LowerBound Column.
六、Compaq Visual Fortran的帮助、文档与范例
22、Visual Fortran的范例文件
22、CVF的帮助文档
CVF帮助文档之一:《Compaq Visual Fortran Installing and Getting Started》
位置一:光盘\Cvf_gs.pdf
位置二:光盘\Info\Df\Doc\CVF_HTML\GettingStarted\目录,启动文件title.htm或GSTOC.HTM
位置三:光盘\X86\DF\Cvf_gs.pdf
位置四:安装目录\Program Files\Microsoft Visual Studio\Df98\Cvf_gs.pdf
CVF帮助文档之二:《Compaq Fortran Language Reference Manual》
位置一:光盘\Info\Df\Doc\CVF_HTML\VISUALFORTRAN\目录的部分,启动文件VF_FRAME.HTM或VF_NOFRA.HTM
位置二:光盘\Info\Df\Doc\CVF_PDF\Cvf_lref.pdf
位置三:光盘\Info\Df\Doc\LRM\Dflrm.htm.
位置四:本文档也属于HTML Help Viewer文档中的一部分,参见下文
CVF帮助文档之三:《Visual Fortran Programmer's Guide》
位置一:光盘\Info\Df\Doc\CVF_HTML\VISUALFORTRAN\目录的部分,启动文件VF_FRAME.HTM或VF_NOFRA.HTM
位置二:光盘\Info\Df\Doc\CVF_PDF\CVF_PG.PDF
位置三:本文档也属于HTML Help Viewer文档中的一部分,参见下文
CVF帮助文档之四:《Visual Fortran Error Messages》
位置一:光盘\Info\Df\Doc\CVF_HTML\VISUALFORTRAN\目录的部分,启动文件VF_FRAME.HTM或VF_NOFRA.HTM
位置二:光盘\Info\Df\Doc\CVF_PDF\CVF_RTER.PDF
位置三:本文档也属于HTML Help Viewer文档中的一部分,参见下文
CVF帮助文档之五:《Compaq Array Visualizer》
位置一:光盘Info\Df\Doc\CVF_HTML\ARRAYVISUALIZER目录,启动文件AV_FRAME.HTM或AV_NOFRA.HTM 位置二:光盘\Info\Df\Doc\CVF_PDF\CVF_AVIS.PDF
位置三:本文档也属于HTML Help Viewer文档中的一部分,参见下文
CVF帮助文档之六:HTML Help Viewer条目(综合内容).
位置一:光盘\Info\Df\Doc\目录下的文件,启动文件HH.exe /df60.col
位置二:安装目录\Program Files\Microsoft Visual Studio\DF98\DOC目录下的文件,可通过帮助菜单和开始菜单中的"online documentation"组调用
其中内容包括:
Programmer Guide (in the Compaq Visual Fortran title,即DFMain.chm)
Language Reference (in the Compaq Visual Fortran title,即DFMain.chm)
Error Messages (in the Compaq Visual Fortran title,即DFMain.chm)
Compaq Array Visualizer
Visual C++ User Guide(in the Developer Studio 98 title,即VCUGDVF.chm)
Platform SDK and SDK manuals(in the Platform SDK and SDK Documentation titles)
CVF帮助文档之七:CXML的pdf文档《Compaq Extended Math Library Reference Guide》
位置一:光盘\x86\df\cxml\doc\Cxmlref.pdf
位置二:安装目录\Program Files\Microsoft Visual Studio\Df98\Cxml\Doc\Cxmlref.pdf
CVF帮助文档之八:IMSL的pdf文档
位置一:光盘\INFO\DF\DOC\PDF
位置二:光盘\x86\Df\IMSL\Help
位置三:安装目录\Program Files\Microsoft Visual Studio\Df98\Imsl\Help
其中内容包括:
IMSL contents file, Imsl.pdf
IMSL Math/Library, Volumes 1 and 2, file Math.pdf
IMSL Math/Library, Special Functions, file Sfun.pdf
IMSL Stat/Library, Volume 1, file Statvol1.pdf
IMSL Stat/Library, Volume 2, file Statvol2.pdf
IMSL Fortran 90 MP Library, file, F9040.pdf
CVF的Samples目录
位置一:光盘\info\DF\Samples\
位置二:安装目录\Project Files\Microsoft Visual Studio\DF98\Samples\
23、CVF常用的帮助主题及其所在位置
下表列出了常见的帮助主题及其所在的位置。
24、帮助文档中的查找语法
If you cannot easily find the information you are looking for in the index or you are looking for detailed information, you can perform a full-text search of either the entire icontents of Books Online or the currently selected subset. (See Section 9.9, Changing the Current Collection.) The HTML Help Viewer displays every occurrence of a given word or phrase, anywhere within the help system.
To search the full text of the online books:
1 Bring up the Search pane as described in Section 9.2, Displaying the HTML Help Viewer.
2 Enter the word, phrase, or wildcard expression you want information on.
3 Click the List Topics button.The list box at the bottom of the Search dialog box displays all the topics containing the word or phrase you specified.
4 Either select the topic you want to view and click the Display button or double-click the topic you want to view.
At the bottom, the Search pane contains checkboxes for the following:
?Search previous results
?Match similar words
?Search titles only
Before you perform a search by clicking the List Topics button, make sure the checkboxes in the lower-left corner of the Search tab are set appropriately.
在CVF帮助文档中可以使用布尔操作符(AND, OR, NOT)和近似操作符(NEAR)来进行高级搜索。
A basic search query consists of the word or phrase you want to find. To create more complex search queries, you can use Boolean operators (AND, OR, NOT) and a proximity operator (NEAR).
Keep in mind the following rules when you are creating a query:
?Search queries are case-insensitive, so you can enter your query in uppercase or lowercase letters.
?You can search for any combination of letters (a-z) and numbers (0-9), except for the words in the exception list (a, an,
and, as, at, be, but, by, do, for, from, have, he, in, it, not, of, on, or, she, that, the, there, they, this, to, we, which, with, you), which are ignored during a search.
?Punctuation marks such as the period (.), colon (:), semicolon (;), comma (,), and hyphen (-) are ignored during a search.
?Use single or double quotation marks to enclose phrases; you cannot search for these characters.
?You can use parentheses to nest expressions within your query.
用户还可以使用通配操作符来进行高级操作。
You can use wildcards with the basic query syntax to create powerful and flexible search queries, as shown in Table 9-3.
25、帮助文档中定义子集subset和书签,可以方便浏览
The HTML Help Viewer lets you define and use subsets to limit the index or search activity on your system. For example, you can define a subset for just the Visual Fortran documentation, the Array Visualizer documentation, or the Platform SDK documentation, or any combination.
The name of the current subset is shown in the upper left part of the HTML Help Viewer window in a list box labeled Active Subset. The subset titled Entire Collection displays the entire contents of the currently selected collection. (See Section 9.9, Changing the Current Collection.)
To define a new subset:
1 Start the HTML Help Viewer.
2 In the View menu, click Define Subset.
3 In the Available Items list, double-click the Compaq Visual Fortran 6.6 subcategories.
4 If needed, double-click the subcategory to display its contents.
5 Click the appropriate title. You can use the Ctrl key to select multiple titles.
6 Click the Add button; the selected titles are moved into the right pane.
7 In the lower-right corner, in the text box below Save new subset as:, highlight and enter the desired subset name.
8 Click the Save button to save the defined subset for subsequent use.
9 Click the Close button.
To use a previously defined subset, in the Active Subset list box, select the desired subset. After you select the subset, the Contents pane shows only the contents of the current subset. When you exit the HTML Help Viewer, it remembers the last subset selected and uses it the next time you start the HTML Help Viewer.
If you use multiple subsets and cannot find a topic you need, make sure you select the Entire Contents subset or the appropriate subset you previously defined.
七、Compaq Visual Fortran的常见问题
26、如果无法安装CVF 6.*,试试运行光盘下\X86\SETUPX86.EXE :
If you attempt to install Visual Fortran v6.* using any of the methods described in "Installing and Getting Started - Using Setup to Install Visual Fortran", and SETUP.EXE in the root directory fails to run, on x86 systems, run: \X86\SETUPX86.EXE。This runs the same installation procedure as SETUP.EXE in the root directory.
27、CVF与VC可共存,但版本不匹配时,可能出现错误提示
Visual Fortran v6.* and Microsoft Visual C++ v6.0 are engineered to co-exist in Microsoft Developer Studio.
However, the versions of all products MUST match or you will receive version mismatch errors when starting Developer Studio. An example of the error message you would receive is:
28、CVF安装过程中会自动注册一些组件。但组件注册有可能失败,可以试着手动注册组件
The CVF and CAV installation procedures register a number of DLLs and OCXs. CVF registers DFDLG100.DLL, COMCAT.DLL, SHLWAPI.DLL, WININET.DLL, HHCTRL.OCX, ITIRCL.DLL, and ITSS.DLL in the windows\system directory. CAV registers ATL.DLL, HHCTRL.OCX, ITIRCL.DLL, and ITSS.DLL in the windows\system directory. CAV registers AVIS2D.OCX and AVISGRID.OCX in the ArrayVisualizer\Bin directory. Occasionally, these files are not properly registered by the installation or become unregistered. To re-register any of these files, use the Microsoft Register Server utility (regsvr32.exe) that can be found in your windows\system directory. The syntax for using Regsvr32.exe is as follows: Regsvr32 [/u] [/s] file-name
29、运行Developer Studio或者Array Viewer出错时,查找提示出错的动态链接库,去掉只读属性
If you receive a message box on running Developer Studio or the Array Viewer that says: "The ordinal nnnn could not be located in the dynamic link library xxxx"
Search for the file "xxxx" on your system; most often it will be in your Windows system directory. If the file has the "Read-only" attribute set, remove the attribute and reinstall VF and/or the Array Viewer.
30、使用了ARRAY_VISUALIZER组件的程序必须在安装有ARRAY_VISUALIZER的机器上运行,否则可能会出错。
Programs that use the ARRAY_VISUALIZER attribute must be linked and run on systems that have the Array Visualizer installed. If the array visualizer is not installed and a link of a program using the ARRAY_VISUALIZER attribute is attempted, an unresolved reference will be reported. If a program using the ARRAY_VISUALIZER attribute is run on a system on which the array visualizer is not installed, the program will crash at run time.
31、PowerStation用源码中第一列的不同字符实现条件编译,但CVF已不支持。CVF提供了工具DLINES可直接转化PowerStation中的条件编译字符到CVF下
Conditional compilation with various letters in column 1 of fixed form source is a Microsoft Fortran PowerStation feature that is not supported by VF. VF provides a sample program called DLINES (under Samples\Advanced\COM) which will automatically convert PowerStation conditional compilation letter lines to the !DEC$ IF DEFINED form. This program is also an interesting example of using the COM interface to drive Developer Studio, which is used to actually do the editing.
32、文件FULLAPI.F90
The FULLAPI.F90 file. If the/winapp switch does not eliminate undefined globals from compiling a native windows application,try adding this file to your project or command line. FULLAPI.F90 contains library search directives for almost all needed libraries.
33、linker的查找问题
In the linker, the order that libraries are searched is the order in which the libraries are specified EXCEPT that the linker looks in the "current" library first. So, if your program references something in B.LIB and then it references F which is in both A and B, the linker will find the F in B.LIB even if A.LIB is specified on the link line first. If you specify /VERBOSE on the link command line, the linker will show you what it is doing.
34、在Developer Studio开发Fortran的一些已知的问题
?The /WARN:ERRORS Fortran compiler option is not always correctly carried forward when converting a project from V5 to V6.*. If you have set /WARN:ERRORS on a V5 project, you should check the setting after Developer Studio has converted the project to the V6 format and verify that /WARN:ERRORS remains set.
?When a Standard Graphics project is opened, the Fortran Libraries category does not correctly map the /libs:qwins from the Project Settings edit box to:
?This is an appearance problem only - /libs:qwins is used when the project is built. Changing the setting of "Use Fortran Run-Time Libraries:" to Standard Graphics results in an additional /libs:qwins appearing in the Project Settings edit box.
?The Fortran editor does not handle tab indents properly. This problem occurs when editing a fixed format source file and using tabs at the beginning of the line. When you have multiple tabs at the beginning of a line and press ENTER, the cursor is positioned to the same indent level as the previous line. However, when you type the first character on the new line, all but the first tab are deleted. Here are two workarounds:
1.Press Tab as the first character on the new line and then Backspace to delete it.
2.Select the Tools menu, Options item, Tabs tab. Select "Insert spaces" and set "Auto Indent" to None.
?Under Developer Studio, selecting AutoIndent with Tabs replaced by Spaces for editing Fortran sources (under the Tools->Options->Tabs page) does not work as expected. Using this combination will result with tabs randomly being inserted and incorrect indentation.
?If you install both Visual Fortran v6.* and Visual Fortran v5.0.A, 5.0.B, 5.0.C, or 5.0.D, when you select the "About..."
entry in the Help menu, both versions will display that they are the Visual Fortran v6.* version. This is a bug in the v5.0 version. Other information in the About box will identify the version as Developer Studio 97 (which is v5).
35、调试Developer Studio问题
?If you install both Visual Fortran v6.* and the Visual C++ 6.0 with the MSDN Library Visual Studio 6.0, selecting Contents, Search, and Index from the Developer Studio Help menu may display the MSDN documentation. In order to view the VF documentation:
o Use the "Online Documentation" icon in the "Visual Fortran 6" folder.
o Change the "Preferred collection" in Developer Studio; see the Tools menu, Options item, Help System tab.
?To use the Visual Studio 98 documentation, you need to have the version of HTML Help shipped with Visual Fortran v6.* installed on your computer. If you don't have a compatible version of HTML Help on your computer, and you open the Help system, you may get one of these messages:
?To fix the problem, copy the file, HHCTRL.OCX, from the ...\SUPPORT\HH\SYSTEM directory on the CD-ROM to your hard drive as follows:
?When you select "Build browse info file" in the Browse Info option page, Developer Studio may display the following message:
?For Fortran-only Developer Studio projects, check 'Generate Source Browse Information' on the Fortran page, General category. You do not need to set any C/C++ settings.
?When using the Source Browser in Developer Studio for browsing Fortran code, be sure to uncheck the "Case Sensitive" check box at the bottom of the "Browse" dialog box. This allows the Source Browser to find occurrences of Fortran symbols regardless of the case used in the sources.
?If you receive "Unexpected error returned by Array Visualizer" when attempting to view an array from the debugger, please try the following. From a command window, run:
?If the files created during a build appear to be out of date, and you are running Visual Fortran on Windows 95 or Windows 98 operating systems, there is a possibility that the timestamps on the files created during a build can be off by up to 2 seconds. With faster machines and performance improvements in the linker, this can cause the .OBJ files to have a later timestamp than the result of the linker. This makes some projects appear out-of-date after a build and thus Visual Fortran may incorrectly indicate that another link is needed. If you encounter this problem, you can work around it by adding a pre-link build rule to your project that takes 2 seconds or longer. Executing a console application that does a "CALL SLEEP(2)" will work fine.
?If you install Visual Fortran v6.* on a system with Visual C++ v5 please note the following concerning mixed-language programming with Fortran and C/C++. You will not be able to perform mixed Fortran v6 and C/C++ v5 programming in either environment. Note that if you also have Visual Fortran 5.0 installed on the system, then you can continue to perform mixed Fortran v5 and C/C++ v5 programming in the Visual Studio 97 environment. To
perform mixed Fortran v6 and C/C++ v5 programming, you will need compile your C/C++ code using Visual C++ v5, and then add the object files to your Visual Fortran v6.* project. This is done using the normal method of adding files to a project. The object files generated using Visual C++ v5 will be linked with your Fortran code. You will be able to debug your mixed language application from the Visual Fortran v6.* environment.
?If Developer Studio repeatedly aborts while attempting the same action with the same project, try moving the project.opt file out of the project directory. The project.opt file contains local cosmetic settings, which include information about the local organization and appearance of the project workspace using your hardware and configuration. A new project.opt file is created automatically when the workspace is opened and no project.opt file is found.
NOTE: this problem is frequently encountered when you are using a project which was created on a system with both Visual C++ and VF installed and have copied the project (including the project.opt file) to a system with only VF. The abort typically occurs when you start the debugger. This can also occur if your system has Visual C++ V5 and VF V5, and you upgrade to VF V6.*, but do not upgrade to Visual C++ V6 at the same time.
?If the screen flashes during builds or the wrong code page is used when debugging a console application, and you are using Windows 95, delete any of the following files from your computer:
?These files were used by Windows 3.x, and are not needed by Windows 95. If they are used while you are debugging a console application, the country settings associated with the PIF files will be used, and could result in the wrong code page being loaded. A result of their use on Windows 95 may be screen flashing during a build, if you have specified console windows to be full screen.
36、Developer Studio的局限之处:
?The following limitations exist in Fortran make files exported from Developer Studio:
1.The "CLEAN" target in the make file does not delete .PDB files created by the Fortran compiler.
2.NMAKE sometimes compiles the same file twice when the source contains a MODULE definition which is
USEd by other source files in the project.
?Fortran editor does not support the following Edit menu commands: List members, Type info, Parameter info, Complete word.
?Fortran editor syntax coloring has limitations. The syntax coloring in the Developer Studio editor cannot correctly color all valid Fortran source programs. In particular, white space is required around keywords in order for the editor to correctly recognize them. Also, keywords may be highlighted even when they are not being used as keywords in the source program.
门禁系统使用说明书
安装、使用产品前,请阅读安装使用说明书。 请妥善保管好本手册,以便日后能随时查阅。 GST-DJ6000系列可视对讲系统 液晶室外主机 安装使用说明书 目录 一、概述 (1) 二、特点 (2) 三、技术特性 (3) 四、结构特征与工作原理 (3) 五、安装与调试 (5) 六、使用及操作 (10) 七、故障分析与排除 (16) 海湾安全技术有限公司
一概述 GST-DJ6000可视对讲系统是海湾公司开发的集对讲、监视、锁控、呼救、报警等功能于一体的新一代可视对讲产品。产品造型美观,系统配置灵活,是一套技术先进、功能齐全的可视对讲系统。 GST-DJ6100系列液晶室外主机是一置于单元门口的可视对讲设备。本系列产品具有呼叫住户、呼叫管理中心、密码开单元门、刷卡开门和刷卡巡更等功能,并支持胁迫报警。当同一单元具有多个入口时,使用室外主机可以实现多出入口可视对讲模式。 GST-DJ6100系列液晶室外主机分两类(以下简称室外主机),十二种型号产品: 1.1黑白可视室外主机 a)GST-DJ6116可视室外主机(黑白); b)GST-DJ6118可视室外主机(黑白); c)GST-DJ6116I IC卡可视室外主机(黑白); d)GST-DJ6118I IC卡可视室外主机(黑白); e)GST-DJ6116I(MIFARE)IC卡可视室外主机(黑白); f)GST-DJ6118I(MIFARE)IC卡可视室外主机(黑白)。 1.2彩色可视液晶室外主机 g)GST-DJ6116C可视室外主机(彩色); h)GST-DJ6118C可视室外主机(彩色); i)GST-DJ6116CI IC卡可视室外主机(彩色); j)GST-DJ6118CI IC卡可视室外主机(彩色); k)GST-DJ6116CI(MIFARE)IC卡可视室外主机(彩色); GST-DJ6118CI(MIFARE)IC卡可视室外主机(彩色)。 二特点 2.1 4*4数码式按键,可以实现在1~8999间根据需求选择任意合适的数字来 对室内分机进行地址编码。 2.2每个室外主机通过层间分配器可以挂接最多2500台室内分机。 2.3支持两种密码(住户密码、公用密码)开锁,便于用户使用和管理。 2.4每户可以设置一个住户开门密码。 2.5采用128×64大屏幕液晶屏显示,可显示汉字操作提示。 2.6支持胁迫报警,住户在开门时输入胁迫密码可以产生胁迫报警。 2.7具有防拆报警功能。 2.8支持单元多门系统,每个单元可支持1~9个室外主机。 2.9密码保护功能。当使用者使用密码开门,三次尝试不对时,呼叫管理中 心。 2.10在线设置室外主机和室内分机地址,方便工程调试。 2.11室外主机内置红外线摄像头及红外补光装置,对外界光照要求低。彩色 室外主机需增加可见光照明才能得到好的夜间补偿。 2.12带IC卡室外主机支持住户卡、巡更卡、管理员卡的分类管理,可执行 刷卡开门或刷卡巡更的操作,最多可以管理900张卡片。卡片可以在本机进行注册或删除,也可以通过上位计算机进行主责或删除。
F6门禁管理系统用户手册
F6门禁管理系统用户手册 目录 1.系统软件 (2) 2.服务器连接 (2) 3.系统管理 (3) 3.1系统登录 (3) 3.2修改密码 (3) 4.联机通讯 (4) 4.1读取记录 (4) 4.2自动下载数据 (5) 4.3手动下载数据 (5) 4.4实时通讯 (6) 4.5主控设置 (6) 5.辅助管理 (8) 5.1服务器设置 (8) 5.2系统功能设置 (9) 5.3读写器设置 (10) 5.4电子地图 (13) 6.查询报表 (14) 6.1开锁查询 (14) 7.帮助 (18) 7.1帮助 (18)
1.系统软件 图1 门禁管理软件主界面 F6版门禁管理系统的软件界面如上图,顶端菜单栏包括“系统管理”、“联机通讯”、“辅助管理”、“查询报表”和“帮助”菜单;左侧快捷按钮包括“系统管理”、“联机通讯”、“辅助管理”、“查询报表”、“状态”等主功能项,每个主功能项包含几个子功能,在主界面上可以不依靠主菜单,就可在主界面中找到每个功能的快捷按钮。以下按照菜单栏的顺序进行介绍。 2.服务器连接 如图2点击设置则进入远程服务器设置,此处的远程服务器IP地址不是指数据库服务器,而是指中间层Fujica Server服务管理器的IP地址。 图2 服务连接
图2 远程服务器设置 3.系统管理 3.1系统登录 系统默认的操作员卡号为“0001”,密码为“admin”,上班人员输入管理卡号和密码后可以进入系统,进行授权给他的一切操作。 图3 系统登录 3.2修改密码 修改密码是指操作员登录成功后,可以修改自己登录的密码。先输入操作员的旧密码,再输入新密码并确认,则密码修改成功。
光功率计的使用说明
光功率计的具体说明 深圳中视同创光钎通信 光功率计使用说明书 概述 本仪器测量精度高,稳定可靠。是一种智能化的、高性能的通用光功率计。采用了精确的软件校准技术,可测量不同波长的光功率,具有好的性价比。是光电器件、光无源器件、光纤、光缆、光纤通信设备的测量,以及光纤通信系统工程建設和维护的必备测量工具。技术条件 性能指标: a.光波长范围:850 ~1550 nm ,b.光功率测量范围:-70 ~+10 dBm,c.显示分辨率:0.01 dB,d.准确度: ±5%(-70 ~+3 dBm ),非线性:≤ 4%(-70 ~+3 dBm )e.环境条件:工作温度 0 ~55℃,工作湿度≤ 85%,f.电源: AC 220伏/50Hz ±10% 基本功能: a.显示方式:线性(mw/μw/ nw),对数(dBm)、相对測量(dB); b.自动功能:自动量程,自动调零,量程保持,平均处理,相对测量处理, 波长校 准; 操作 将后面板上电源线连接好,电源开关置“ON” 。仪器开始自检,点亮所有的发光器件,然后进入初始状态。仪器的初始状态如下: a.測量方式:dBm;b.測量波长:1310 nm;c.量程(RH):自动方式;d.调零(Z ERO):关;e.平均(AVG):关。 测量准备 1).开机后预热半小时。若对測量要求不高,预热几分钟就行了; 2).调零 调零主要是消除光探测器的残余暗电流及弱背景光等噪声功率的影响。调零时,输入口必须完全遮光(注意:塑料保护盖不能完全遮光)。也可以在弱背景光下调零,但是,背景光功率值不能超过最小量程值的一半; 调零时,只需按一下“ZERO”键便可自动进行。调零过程中,“ZERO”和“RH”鍵上方指示器发光,面板上除波长设定键“λ SET”及测量键“MEAS”外,其余控制键不起作用,直到调零结束,指示器不发光,各控制键恢复常态。 3).设定波长 开机后,仪器自动设定为1310(nm) 波长。要改变测量波长,按“λ SET”键,其上方指示器发光,此时,“数码显示窗”(10)显示其对应的波长数(nm),每按一次该键,改变一个选定波长,同时在“数码显示窗”(10)显示出来,其值可以在850、980、1300、1310、1 480和1550(nm)之间循环,按“MEAS”键后便选定了最后显示的波长,同时转入测量状态。 4).将FC-PC型測试光缆连接线接好。 测量 1).一般测量 仪器在测量状态下,可以根据使用者的习惯和测试特点选择测量数据的显示方式为“dBm”
光功率计操作规程
光功率计操作规程 编制: 审核: 批准:山西新太阳科技有限公司
光功率计操作规程 一、概述 本仪器测量精度高,稳定可靠。是一种智能化的、高性能的通用光功率计。采用了精确的软件校准技术,可测量不同波长的光功率,具有好的性价比。是光电器件、光无源器件、光纤、光缆、光纤通信设备的测量,以及光纤通信系统工程建設和维护的必备测量工具。 二.技术条件 2.1 性能指标 a.光波长范围: 850 ~ 1550 nm b.光功率测量范围:-70 ~+10 dBm c.显示分辨率: 0.01 dB d.准确度:± 5%(-70 ~+3 dBm ) 非线性:≤ 4%(-70 ~+3 dBm ) e.环境条件: 工作温度 0 ~ 55℃ 工作湿度≤ 85% f.电源: AC 220伏/50Hz ±10% 2.基本功能 a.显示方式:线性(mw/μw/ nw),对数(dBm)、相对測量(dB);
b.自动功能:自动量程,自动调零,量程保持,平均处理,相对测量处理, 波长校准; 三.原理 光功率计由五部分组成, 即光探測器、程控放大器和程控滤波器、A/D转换器、微处理器以及控制面板与数码显示器。 A/D变换器 P I N I/V 程控放大器和滤波器 C P U 控制面板和显示器 被測光由PIN光探测器检测转换为光电流,由后续斩波稳定程控放大器将电流信号转换成电压信号,即实现I/V转换并放大,经程控滤波器滤除斩波附加分量及干扰信号后,送至A/D转换器,变成相应于输入光功率电平的数字信号,由微处理器(CPU)进行数据处理,再由数码显示器显示其数据。CPU可根据注入光功率的大小自动设置量程状态和滤波器状态,同时,可由面板输入指令(通过CPU)控制各部分完成指定工作。不注入光的情况下,可指令仪器自动调零。四.使用 4.1 面板说明
智能门禁管理系统说明书.doc
ID一体式/嵌入式门禁管理系统 使用说明书
1 软件使用说明 (1)配置要求 在安装软件之前,请先了解您所使用的管理电脑的配置情况。本软件要求安装在(基本配置): Windows 2000,windows xp操作系统; 奔腾II600或更高的处理器(CPU); 10GB以上硬盘; 128MB或更大的内存; 支持分辨率800*600或更高的显示器。 (2)安装说明 在光盘中运行“智能一卡通管理系统”安装程序(ID版),按照安装提示依次操作即可。 安装数据库以后,有两种创建数据库的方式,手动创建和自动创建。手动创建:在数据库SQL Server2000的数据库企业管理器中,建立一个database(数据库)。进入查询分析器/Query Analyzer 运行智能一卡通管理系统的脚本文件,形成门禁数据库表;自动创建:在安装智能一卡通管理软件中自动创建默认门禁数据库,默然数据名:znykt。 上述安装完后,在安装目录下,在first.dsn 文件中设置其参数,计算机server的名字(无服务器时即本机名)和数据库database的名字。 在桌面运行智能一卡通管理系统运行文件,选择卡号888888,密码为123456即可进入系统。 2 人事管理子系统 部门资料设置 首先运行‘智能一卡通管理系统’软件后,进入软件主界面,如下图所示:
然后点击进入“人事管理子系统”,如图所示: 选择<人事管理>菜单下的<部门管理>或点击工具栏内的‘部门管理’按钮,则会出现如下所示界面: 在<部门管理>中可以完成单位内部各个部门及其下属部门的设置。如果公司要成立新的部门,先用鼠标左键单击最上面的部门名,然后按鼠标右键弹出一菜单,在菜单中选择“增加部门”,则光标停留在窗口右边的“部门编号”输入框中,在此输入由用户自己定义的部门编号后,再在“部门名称”输入框中输入部门名称,最后按 <保存>按钮,此时发现窗口左边的结构图中多了一个新增的部门。如果要给部门设置其下属部门,则首选用鼠标左键选中该部门,再按鼠标右键弹出一菜单,在菜单中选择“增加”,最后输入、保存。同时也可以对选中的部门或下属部门进行“修改”或“删除”。特别要注意的是,如果是“删除”,则被选中的部门及其下属部门将被全部删除,所以要特别谨慎。
光功率计使用说明
ON/OFF 为关闭或接通电源入/Select 按键一次则显示另一个设置波长,设置波长可往复顺序循环。 W/dBm 主机开机后以dBm为单位显示,按键后在W和dBm 之间转换。 Ref 按Ref键,将测量值转换成相对差值以dB为单位显示。 ... 光功率计的使用要和光源配合使用,要想知道光源发出的光是多少个DB,就用一条尾纤的A端链接光源B端连接光功率计计,显示在光功率计的数值,就是光源发出的光是多少个DB,一般光源发出的光是7个DB左右。 值得注意的是光源和光功率计要选择同样的波长测试,例如:光源选择的是1310nm,光功率计要选择同样的。 但若要光缆发生故障时,因设备还在发光,一般不要用OTDR测试,需要注意设备与OTDR发出的同样的光,有可能把设备或者OTDR毁坏,要用光功率计测试,OTDR一般测试备用纤芯,因为主要还要看在用纤芯的好坏,就需要先把一条尾纤连接光功率计与在用纤芯,看是否能受到光,收到光是多少个DB。 一般基站小于36DB或者更小,就达到最大值了,若是一般的直放站就要10个DB左右。 若是监控、光纤上网等一般需要数据的,还要更小,因为怕丢数据。 如果购买光源光功率计的话,建议购买3M的。 光功率计使用说明书 一、概述 本仪器测量精度高,稳定可靠。是一种智能化的、高性能的通用光功率计。采用了精确的软件校准 技术,可测量不同波长的光功率,具有好的性价比。是光电器件、光无源器件、光纤、光缆、光纤通 信设备的测量,以及光纤通信系统工程建設和维护的必备测量工具。 二.技术条件 2.1 性能指标 a.光波长范围: 850 ~1550 nm b.光功率测量范围:-70 ~+10 dBm c.显示分辨率: 0.01 dB d.准确度: ±5%(-70 ~+3 dBm ) 非线性:≤ 4%(-70 ~+3 dBm ) e.环境条件: 工作温度 0 ~55℃ 工作湿度≤ 85% f.电源: AC 220伏/50Hz ±10% 2.基本功能 a.显示方式:线性(mw/μw/ nw),对数(dBm)、相对測量(dB); b.自动功能:自动量程,自动调零,量程保持,平均处理,相对测量 处理, 波长校准; 三.原理
光功率计使用说明
光功率计使用说明
ON/OFF 为关闭或接通电源入/Select 按键一次则显示另一个设置波长,设置波长可往复顺序循环。 W/dBm 主机开机后以dBm为单位显示,按键后在W和dBm 之间转换。 Ref 按Ref键,将测量值转换成相对差值以dB为单位显示。 ... 光功率计的使用要和光源配合使用,要想知道光源发出的光是多少个DB,就用一条尾纤的A端链接光源B端连接光功率计计,显示在光功率计的数值,就是光源发出的光是多少个DB,一般光源发出的光是7个DB左右。 值得注意的是光源和光功率计要选择同样的波长测试,例如:光源选择的是1310nm,光功率计要选择同样的。 但若要光缆发生故障时,因设备还在发光,一般不要用OTDR测试,需要注意设备与OTDR发出的同样的光,有可能把设备或者OTDR毁坏,要用光功率计测试,OTDR一般测试备用纤芯,因为主要还要看在用纤芯的好坏,就需要先把一条尾纤连接光功率计与在用纤芯,看是否能受到光,收到光是多少个DB。 一般基站小于36DB或者更小,就达到最大值了,若是一般的直放站就要10个DB左右。 若是监控、光纤上网等一般需要数据的,还要更小,因为怕丢数据。 如果购买光源光功率计的话,建议购买3M的。 光功率计使用说明书 一、概述 本仪器测量精度高,稳定可靠。是一种智能化的、高性能的通用光功率计。采用了精确的软件校准 技术,可测量不同波长的光功率,具有好的性价比。是光电器件、光无源器件、光纤、光缆、光纤通 信设备的测量,以及光纤通信系统工程建設和维护的必备测量工具。 二.技术条件 2.1 性能指标 a.光波长范围: 850 ~1550 nm b.光功率测量范围:-70 ~+10 dBm c.显示分辨率: 0.01 dB d.准确度: ±5%(-70 ~+3 dBm ) 非线性:≤ 4%(-70 ~+3 dBm ) e.环境条件: 工作温度 0 ~55℃ 工作湿度≤ 85% f.电源: AC 220伏/50Hz ±10% 2.基本功能 a.显示方式:线性(mw/μw/ nw),对数(dBm)、相对測量(dB); b.自动功能:自动量程,自动调零,量程保持,平均处理,相对测量 处理, 波长校准;
计算器按键的使用说明
计算器按键的使用说明 . 1、电源开关键: ON、 OFF 2、输入键: 0— 9、. +/ —:正负转换键 3、运算功能键: + - * / ( 注意 : 加、减、乘、除键在计算时都可能代替等号键 ) √:开平方键,用来进行开平方运算。先输入数字,再按下此键,不必按等号键即可得 出结果。 4、等号键:= 5、清除键: ①C:清除键。在数字输入期间 , 第一次按下此键将清除除存储器内容外的所 有数值 . 如果是太阳能计算器,在计算器关闭状态下,按此键则开启电源,显示 屏显示出“ 0”。 ②AC或 CA键:全部清除键,也叫总清除键,作用是将显示屏所显示的数 字全部清除。 ③→:右移键。其功能是荧屏值向右位移,删除最右边的尾数。 ④CE:部分清除键,也叫更正键。其功能是清除当前输入的数字,而不是清除 以前输入的数。如刚输入的数字有误,立即按此键可清除,待输入正确的数字后,原运算继续进行。如 5+13,这时发现“ 13”输入错了,则按“ CE”键就可以清除 刚才的“ 13”,但还保留“ 5”这个数。值得注意的是,在输入数字后,按“ +”、“- ”、“/ ”、“* ”键的,再按“ CE”键,数字不能清除。 ⑤MC:累计清除键,也叫记忆式清除键。其功能是清除储存数据,清除存储 器内容,只清除存储器中的数字,内存数据清除,而不是清除显示器上的数字。 6、累计显示键: (1)M+:记忆加法键,也叫累加键。是计算结果并加上已经储存的数;用 作记忆功能,它可以连续追加,把目前显示的值放在存储器中(也就是将显示的 数字与内存中已有的任何数字相加,结果存入存储器,但不显示这些数字的和)。 如先输入“ 5×1.6 ”→按“ M+”键(把“ 5×1.6 ”的结果计算出来并储存起来)→然后输入“10×0.8 ”→按“M+”键(把“10×0.8 ”的结果计算出来并和前面储存的数相加)→接着输入“15×0.4 ”→按“M+”键(把“15×0.4 ”的结果计算出来并和前面储存的数相加)→最后按“MR”键(把储存的数全部取出来)→则出结果“ 22” (2)M-:记忆减法键,也叫累减键。是计算结果并用已储存的数字减去目前 的结果;从存储器内容中减去当前显示值(也就是将显示的数字与内存中已有 的任何数字相减,结果存入存储器,但不显示这些数字的差). 计算“ 50- (23+4)”时→先输入“ 50”→按“ M+”(把“ 50”储存起来)→再输入“ 23+4”→按“ M-”键(计算结果是“ 27”)→再按“ MR”(用储存的“ 50”减去目前的结果“ 27”)→则出结果“ 23” 7、存储读出键: MR MRC GT ①MR:存储读出键。表示用存储器中数值取代显示值。按下此键后,可使存储在“ M+”或“ M-”中的数字显示出来或同时参加运算,数字仍保存在存储器中,在未按“ MC”键以前有效。 MR调用存储器内容,读取储存的数据。如有三组数字不连续在一起相加的时候,则用这个“ MR”键。举例:如输入“ 3+2”时,按“ M+”键,再输入“ 6+7”时,按“ M+”键,再输入“8+9”时按“ M+”键,然后再按“MR”,则三组数字的总和“ 35”就出来了。 ②MRC:MR和 MC功能的组合,即存储读出和清除键。按一次为 MR功能, 即显示存储数,按第二次为 MC功能,即清除存储数。
博克门禁系统使用说明书
《门禁系统使用说明书》
陕西********科技有限公司 单位地址:**************************** 联系电话:**************************** 目录 ( 1.1)软件系统---------------------------------------------------------------------------------------1-135 第一章软件基本操作...................................................................................................................... - 5 - 2.1进入操作软件 (5) 2.4人事管理 (7) 2.4.1 企业信息.................................................................................................................................................................. - 7 - 2.4.2添加/编辑部门信息 ................................................................................................................................................ - 9 - 2.4.2.1添加部门 ............................................................................................................................................................... - 9 - 2.4.2.2修改部门 ............................................................................................................................................................ - 10 - 2.4.2.3 删除部门 ........................................................................................................................................................... - 11 -
光功率计使用说明书
光功率计使用说明书 一、概述 本仪器测量精度高,稳定可靠。是一种智能化的、高性能的通用光功率计。采用了精确的软件校准技术,可测量不同波长的光功率,具有好的性价比。是光电器件、光无源器件、光纤、光缆、光纤通信设备的测量,以及光纤通信系统工程建設和维护的必备测量工具。 二.技术条件 2.1 性能指标 a.光波长范围:850 ~1550 nm b.光功率测量范围:-70 ~+10 dBm c.显示分辨率:0.01 dB d.准确度:±5%(-70 ~+3 dBm )非线性:≤4%(-70 ~+3 dBm )e.环境条件: 工作温度0 ~55℃ 工作湿度≤85% f.电源:AC 220伏/50Hz ±10% 2.基本功能
a.显示方式:线性(mw/μw/ nw),对数(dBm)、相对測量(dB); b.自动功能:自动量程,自动调零,量程保持,平均处理,相对测量处理, 波长校准; 三.原理 光功率计由五部分组成, 即光探測器、程控放大器和程控滤波器、A/D转换器、微处理器以及控制面板与数码显示器。 A/D变换器 P I N I/V 程控放大器和滤波器 C P U 控制面板和显示器 被測光由PIN光探测器检测转换为光电流,由后续斩波稳定程控放大器将电流信号转换成电压信号,即实现I/V转换并放大,经程控滤波器滤除斩波附加分量及干扰信号后,送至A/D 转换器,变成相应于输入光功率电平的数字信号,由微处理器(CPU)进行数据处理,再由数码显示器显示其数据。CPU可根据注入光功率的大小自动设置量程状态和滤波器状态,同时,可由面板输入指令(通过CPU)控制各部分完成指定工作。不注入光的情况下,可指令仪器自动调零。 四.使用
门禁系统使用说明书
-- - XX职业技术学院信息工程学院 门禁管理系统 操作说明书
制作人:X珍海 日期:2014年3月25日 目录 (请打开【帮助H】下的【使用说明书】,这样方便您了解本系统) 第1章软件的基本操作3 1.1 登录和进入操作软件3 1.2 设备参数设置4 1.3 部门和注册卡用户操作4 1.3.1 设置部门4 1.3.2 自动添加注册卡功能(自动发卡)5 1.4 基本操作7 1.4.1 权限管理8 1.4.2 校准系统时间11 1.5 常用工具12 1.5.1 修改登陆用户名和密码12 第2章考勤管理功能模块13 2.1 正常班考勤设置13 2.1.1 设置考勤基本规则13 2.1.2 设置节假日和周休日14 2.1.3 请假出差的设置15 2.2 考勤统计和生成报表17 2.2.1 生成考勤详细报表17 2.2.2 启用远程开门错误!未定义书签。
第1章软件的基本操作 1.1登录和进入操作软件 1.点击【开始】>【程序】>【专业智能门禁管理系统】>【专业智能门禁管理系统】或双击桌面钥匙图标的快捷方式,进入登录界面。 2.输入缺省的用户名:abc 与密码:123(注意:用户名用小写)。该用户名和密码可在软件里更改。 3.登录后显示主操作界面
入门指南。如果您没有经验,您可以在该向导的指引下完成基本的操作和设置。我们建议您熟悉后, 关闭操作入门指南,仔细阅读说明书,熟悉和掌握软件的操作。 “关闭入门指南”后,操作界面如下。 1.2设备参数设置 1.3部门和注册卡用户操作 1.3.1设置部门 点击【设置】>【部门】,进入部门界面。 点击【添加最高级部门】。
光功率计1
光功率计 用于测量绝对光功率或通过一段光纤的光功率相对损耗。在光纤系统中,测量光功率是最基本的,非常像电子学中的万用表。在光纤测量中,光功率计是重负荷常用表。,通过测量发射端机或光网络的绝对功率,一台光功率计就能够评价光端设备的性能。用光功率计与稳定光源组合使用,则能够测量连接损耗、检验连续性,并帮助评估光纤链路传输质量。 针对用户的具体应用,要选择适合的光功率计,应该关注以下各点: 1、选择最优的探头类型和接口类型 2、评价校准精度和制造校准程序,与你的光纤和接头要求范围相匹配。 3、确定这些型号与你的测量范围和显示分辨率相一致。 4、具备直接插入损耗测量的 dB功能。 光功率的单位是dbm,在光纤收发器或交换机的说明书中有它的发光和接收光功率,通常发光小于0dbm,接收端能够接收的最小光功率称为灵敏度,能接收的最大光功率减去灵敏度的值的单位是db(dbm-dbm=db),称为动态 范围,发光功率减去接收灵敏度是允许的光纤衰耗值.测试时实际的发光功率减去实际接收到的光功率的值就是光纤衰耗(db).接收端接收到的光功 率最佳值是能接收的最大光功率-(动态范围/2),但一般不会这样好.由于每种光收发器和光模块的动态范围不一样,所以光纤具体能够允许衰耗多 少要看实际情形.一般来说允许的衰耗为15-30db左右. 有的说明书会只有发光功率和传输距离两个参数,有时会说明以每公 里光纤衰耗多少算出的传输距离,大多是0.5db/km.用最小传输距离除以0. 5,就是能接收的最大光功率,如果接收的光功率高于这个值,光收发器可能会被烧坏.用最大传输距离除以0.5,就是灵敏度,如果接收的光功率低于这个值,链路可能会不通. 光纤的连接有两种方式,一种是固定连接一种是活动连接,固定连接就是熔接,是用专用设备通过放电,将光纤熔化使两段光纤连接在一起,优点 是衰耗小,缺点是*作复杂灵活性差.活动连接是通过连接器,通常在ODF上连接尾纤,优点是*作简单灵活性好缺点是衰耗大,一般说来一个活动连接 的衰耗相当于一公里光纤.光纤的衰耗可以这样估算:包括固定和活动连接,每公里光纤衰耗0.5db,如果活动连接相当少,这个值可以为0.4db,单纯光纤不包括活动连接,可以减少至0.3db,理论值纯光纤为0.2db/km;为保险计大多数情况下以0.5为好. 光纤测试TX与RX必须分别测试,在单纤情况下由于仅使用一纤所以当然只需测试一次.单纤的实现原理据生产公司讲是波分复用,但本人认为使用光纤耦合器的可能性更高
计算器使用说明书
计算器使用说明书目录 取下和装上计算器保护壳 (1) 安全注意事项 (2) 使用注意事项 (3) 双行显示屏 (7) 使用前的准备 (7) k模式 (7) k输入限度 (8) k输入时的错误订正 (9) k重现功能 (9) k错误指示器 (9) k多语句 (10) k指数显示格式 (10) k小数点及分隔符 (11) k计算器的初始化 (11) 基本计算 (12) k算术运算 (12) k分数计算 (12) k百分比计算 (14) k度分秒计算 (15) kMODEIX, SCI, RND (15) 记忆器计算 (16) k答案记忆器 (16) k连续计算 (17) k独立记忆器 (17) k变量 (18) 科学函数计算 (18) k三角函数/反三角函数 (18) Ch。6 k双曲线函数/反双曲线函数 (19) k常用及自然对数/反对数 (19) k平方根﹑立方根﹑根﹑平方﹑立方﹑倒数﹑阶乘﹑ 随机数﹑圆周率(π)及排列/组合 (20) k角度单位转换 (21) k坐标变换(Pol(x, y)﹐Rec(r, θ)) (21) k工程符号计算 (22) 方程式计算 (22) k二次及三次方程式 (22) k联立方程式 (25) 统计计算 (27)
标准偏差 (27) 回归计算 (29) 技术数据 (33) k当遇到问题时 (33) k错误讯息 (33) k运算的顺序 (35) k堆栈 (36) k输入范围 (37) 电源(仅限MODEx。95MS) (39) 规格(仅限MODEx。95MS) (40) 取下和装上计算器保护壳 ?在开始之前 (1) 如图所示握住保护壳并将机体从保护壳抽出。 ?结束后 (2) 如图所示握住保护壳并将机体从保护壳抽出。 ?机体上键盘的一端必须先推入保护壳。切勿将显示屏的一端先推入保护壳。 使用注意事项 ?在首次使用本计算器前务请按5 键。 ?即使操作正常﹐MODEx。115MS/MODEx。570MS/MODEx。991MS 型计算器也必须至少每3 年更换一次电池。而MODEx。95MS/MODEx。100MS型计算器则须每2 年更换一次电池。电量耗尽的电池会泄漏液体﹐使计算器造成损坏及出现故障。因此切勿将电量耗尽的电池留放在计算器内。 ?本机所附带的电池在出厂后的搬运﹑保管过程中会有轻微的电源消耗。因此﹐其寿命可能会比正常的电池寿命要短。 ?如果电池的电力过低﹐记忆器的内容将会发生错误或完全消失。因此﹐对于所有重要的数据﹐请务必另作记录。 ?避免在温度极端的环境中使用及保管计算器。低温会使显示画面的反应变得缓慢迟钝或完全无法显示﹐同时亦会缩短电池的使用寿命。此外﹐应避免让计算器受到太阳的直接照射﹐亦不要将其放置在诸如窗边﹐取暖器的附近等任何会产生高温的地方。高温会使本机机壳褪色或变形及会损坏内部电路。 ?避免在湿度高及多灰尘的地方使用及存放本机。注意切勿将计算器放置在容易触水受潮的地方或高湿度及多灰尘的环境中。因如此会损坏本机的内部电路。 双行显示屏
门禁系统管理平台-详细设计说明书
门禁系统管理平台详细设计报告 2015年09月20日
目录 一、基本信息 .................................................................................................................. 错误!未定义书签。 二、市场分析 (4) 1.客户需求分析 (4) (1)国际国内市场需求量预测及客户咨询类似产品情况..... 错误!未定义书签。 (2)客户对该产品的功能、安全、使用环境要求等............. 错误!未定义书签。 2.市场现状分析 (4) 三、详细设计 (4) 1. 模块描述 (4) 2. 功能描述 (4) 3. 信息传输过程 (6) 4. 标准符合性分析 (6) 5. 验证(试制/试验/检测)确认方法、手段的分析 (8) 四、资源论证 (8) 1.人力资源需求分析 (8) 2.开发设备资源需求分析 (9) 3.项目开发成本预算 (9) 五、研发时间安排 (9) 六、项目风险评估 (10) 1.技术方面 (10) 2.人员方面 (10) 3.其它资源 (10) 七、评审结论 (11) 八、公司意见 (11)
一、市场分析 1.客户需求分析 1.2014年7月份由三大运营商出资成立了中国通信设施服务股份有限公司,同年9月份 变更名称为中国铁塔股份有限公司。铁塔公司成立后,2015年12月下旬,2000多亿存量铁塔资产基本完成交接。而从2015年1月1日起,三大运营商停止新建铁塔基站,交由中国铁塔进行建设。据统计,2015年1-11月,中国铁塔累计承接三家电信运营企业塔类建设需求53.2万座,已交付41.8万座。针对如此庞大的存量基站及新建基站。 铁塔公司总部急需对基站人员进出做到统一管理,有效管控。提高效率。因此所产生的市场需求量是很大的。 2.随着互联网及物联网技术的快速发展,原有传统门禁管理系统、单一功能的管理软件已 经无法管理众多不同品牌、不同通讯方式、不同厂家的IC/ID读卡设备,因此客户需要一种开放式、分布式的云管理平台,来管理整个基站门禁系统中的所有设备 2.市场现状分析 ●同行业中,各厂家的产品采用传统的门禁方案,既读卡器和控制器及电磁锁或电插锁对 现场的基站门进行管理。造价昂贵,安装复杂。。 ●目前大部分厂家的管理平台架构单一,系统兼容性差,各家的门禁管理平台只能兼容自 家的控制器。开放性不够。 ●目前很多厂商的平台都是针对某一个硬件厂商的设备来运行的,当项目中有多家设备时 平台的控制力明显不足 二、详细设计 1. 模块描述 铁塔基站门禁系统管理平台系统主要包括三部分:BS/CS客户端、云服务器和手机APP。 其中客户端的主要功能包括: 支持对多家基站锁具设备的识别、获取、登录 支持对不同用户进行权限划分。 支持对锁具根据区域进行分组。 支持多家基站锁具设备的设备配置 支持多家设备通过手机APP开锁、获取状态、日志查询。 支持多家设备的设备时间校准 支持设备更新,当设备更新时,可以方便的只更新涉及到的文件,而不需要重装整个系统 支持电子地图
(最新整理)传输仪表2M表、光功率计使用方法
(完整)传输仪表2M表、光功率计使用方法 编辑整理: 尊敬的读者朋友们: 这里是精品文档编辑中心,本文档内容是由我和我的同事精心编辑整理后发布的,发布之前我们对文中内容进行仔细校对,但是难免会有疏漏的地方,但是任然希望((完整)传输仪表2M表、光功率计使用方法)的内容能够给您的工作和学习带来便利。同时也真诚的希望收到您的建议和反馈,这将是我们进步的源泉,前进的动力。 本文可编辑可修改,如果觉得对您有帮助请收藏以便随时查阅,最后祝您生活愉快业绩进步,以下为(完整)传输仪表2M表、光功率计使用方法的全部内容。
常用传输测试仪表的使用方法及注意事项 一、传输测试2M表 (一)W ET-210B 2Mbit/s数字传输分析仪使用方法和应用举例 2Mbit/s数字传输分析仪适用于数字传输系统的工程施工、工程验收、日常维护及科研测试。 1.面板说明 POWER PATTERN FAS ERR SIGNAL AIS CRC ERR FRAME RA EBIT ERR MFRAME MRA PATSLIP CRC-4 CODE ERR BIT ERR HISTORY HISTORY HISTORY POWER 电源工作状态指示.绿色表示正常工作;红色表示欠电压,需充电;橙色表示正在充电。 SIGNAL RX1端口或DATA端口信号状态指示。红色表示无接收信号或不成环路状态。 FRAME RX1端口信号帧同步状态指示。红色表示帧同步丢失。 MFRAME RX1端口信号复帧同步状态指示。红色表示复帧同步丢失. CRC—4 RX1端口信号结构指示.红色表示有CRC-4校验码插入。 PATTERN RX1端口或DATA端口信号图案同步状态指示。红色表示图案同步丢失。 AIS RX1端口或DATA端口输入信号告警指示.红色表示端口信号输入有告警. RA RX1端口输入信号远端帧告警。红色表示远端帧丢失。 MRA RX1端口输入信号远端复帧告警。红色表示远端复帧丢失。
智能门禁管理系统说明书
IC一体式/嵌入式门禁管理系统 使用说明书
目录 1.系统简介 (3) 2.功能特点 (3) 3、主要技术参数 (4) 4、系统组成 (4) 5、设备连接 (5) 6、门禁管理系统软件 (6) 6.1 软件的安装 (6) 6.2 人事管理子系统 (7) 6.3 一卡通管理系统 (9) 6.4 门禁管理子系统 (12) 7. 调试操作流程 (28) 8、注意事项 (28)
1.系统简介 在高科技发展的今天,以铁锁和钥匙为代表的传统房门管理方式已经不能满足要求,而集信息管理、计算机控制、Mifare 1 IC智能(射频)卡技术于一体的智能门禁管理系统引领我们走进新的科技生活。 Mifare 1 IC智能(射频)卡上具有先进的数据通信加密并双向验证密码系统,卡片制造时具有唯一的卡片系列号,保证每张卡片都不相同。每个扇区可有多种密码管理方式。卡片上的数据读写可超过10万次以上;数据保存期可达10年以上,且卡片抗静电保护能力达2KV以上。具有良好的安全性,保密性,耐用性。 IC卡嵌入式门禁管理系统以IC卡作为信息载体,利用控制系统对IC卡中的信息作出判断,并给电磁门锁发送控制信号以控制房门的开启。同时将读卡时间和所使用的IC卡的卡号等信息记录、存储在相应的数据库中,方便管理人员随时查询进出记录,为房门的安全管理工作提供了强有力的保证。 IC卡嵌入式门禁管理系统在发行IC卡的过程中对不同人员的进出权限进行限制,在使用卡开门时门禁控制机记录读卡信息,在管理计算机中具有查询、统计和输出报表功能,既方便授权人员的自由出入和管理,又杜绝了外来人员的随意进出,提高了安全防范能力。 IC卡嵌入式门禁管理系统,在线监控IC卡开门信息、门状态,给客户以直观的门锁管理信息。 IC卡嵌入式门禁(简称门禁读卡器,门禁控制机,控制器)是目前同行业产品中体积较小的门禁,可以嵌入到市场上几乎所有的楼宇门禁控制器中,解决了因为楼宇门禁控制器内部空间小所带来的麻烦,是楼宇门禁控制器的最佳配套产品;它绝不仅仅是简单的门锁工具,而是一种快捷方便、安全可靠、一劳永逸的多功能、高效率、高档次的管理系统。它能够让你实实在在享受高科技带来的诸多实惠和方便。 2.功能特点 2.1.IC卡嵌入式门禁具有的功能: 2.1.1使用MIFARE 1 IC卡代替钥匙,开门快捷,安全方便。 2.1.2经过授权,一张IC卡可以开启多个门(255个以内)。 2.1.3可以随时更改、取消有关人员的开门权限。 2.1.4读卡过程多重确认,密钥算法,IC卡不可复制,安全可靠。 2.1.5具有512条黑名单。
光功率计使用说明
光功率计使用说明 设置按键一次则显示另一个设置波长,ON/OFF 为关闭或接通电源入/Select dBm和dBm波长可往复顺序循环。 W/dBm 主机开机后以为单位显示,按键后在W ... 为单位显示。 Ref 按Ref键,将测量值转换成相对差值以dB之间转换。 就用一DB,光功率计的使用要和光源配合使用,要想知道光源发出的光是多少个
端连接光功率计计,显示在光功率计的数值,就是光端链接光源B条尾纤的A DB 左右。源发出的光是多少个DB,一般光源发出的光是7个值得注意的是光源和光功率计要选择同样的波长测试,例如:光源选择的是 1310nm,光功率计要选择同样的。测试,需要注意设发生故障时,因设备还在发光,一般不要用OTDR但若要光缆毁坏,要用光功率计测试,OTDR发出的同样的光,有可能把设备或者OTDR备与一般测试备用纤芯,因为主要还要看在用纤芯的好坏,就需要先把一条尾OTDR 纤连接光功率计与在用纤芯,看是否能受到光,收到光是多少个DB。个就要10直放站一般基站小于36DB或者更小,就达到最大值了,若是一般的左右。DB 上网等一般需要数据的,还要更小,因为怕丢数据。若是监控、光纤如果购买光源光功率计的话,建议购买3M的。 光功率计使用说明书 一、概述 本仪器测量精度高,稳定可靠。是一种智能化的、高性能的通用光功率计。采用了精确的软件校准技术,可测量不同波长的光功率,具有好的性价比。是光电器件、光无源器件、光纤、光缆、光纤通信设备的测量,以及光纤通信系统工程建設和维护的必备测量工具。 二.技术条件
2.1 性能指标 a.光波长范围:850 ~1550 nm b.光功率测量范围:-70 ~+10 dBm c.显示分辨率:0.01 dB d.准确度:±5%(-70 ~+3 dBm ) 非线性:≤4%(-70 ~+3 dBm ) e.环境条件: 工作温度0 ~55℃ 工作湿度≤85% f.电源:AC 220伏/50Hz ±10% 2.基本功能 a.显示方式:线性(mw/μw/ nw),对数(dBm)、相对測量(dB); b.自动功能:自动量程,自动调零,量程保持,平均处理,相对测量 ; 波长校准, 处理 三.原理转换器、微处理器以及控, 即光探測器、程控放大器和程控滤波器、A/D 光功率计由五部分组成1):制面板与数码显示器。其原理方框图如下(图/D变换器AP I N V 程控放大器和滤波器I/C P U
光功率计操作及注意事项
光功率计操作及注意事项 一、用途 用于测量绝对光功率或通过一段光纤的光功率相对损耗。是最基本的光纤设备,非常像电子学中的万用表。在光纤测量中,光功率计是重负荷常用表。通过测量发射端机或光网络的绝对功率,一台光功率计就能够判断光端设备的性能。用光功率计与稳定光源组合使用,则能够测量连接损耗、检验连续性,并帮助评估光纤线路传输质量。 二、操作方法 针对用户的具体应用,要选择适合的光功率计,应该关注以下各点: 1、选择最优的探头类型和接口类型 2、比价校准精度和制造校准程序,与你的光纤和接头要求范围相匹配。 3、确定这些型号与你的测量范围和显示分辨率相一致。 4、具备直接插入损耗测量的dB功能。 三、注意事项 光功率的单位是dbm,在光纤收发器或交换机的说明书中有它的发光和接收光功率,通常发光小于0dbm,接收端能够接收的最小光功率称为灵敏度,能接收的最大光功率减去灵敏度的值的单位是db(dbm-dbm=db),为动态范围,光功率减去接收灵敏度是允许的光纤衰耗值。测试时实际的发光功率减去实际接收到的光功率的值就是光纤衰耗(db)。端接收到的光功率最佳值是能接收的最大光功率-(动态
范围/2),每种光收发器和光模块的动态范围不一样,为15-30db左右。 有的说明书会只有发光功率和传输距离两个参数,出的传输距离,大多是0.5db/km。用最小传输距离除以0.5,就是能接收的最大光功率,如果接收的光功率高于这个值,光收发器可能会被烧坏。用最大传输距离除以0.5,就是灵敏度,如果接收的光功率低于这个值,链路可能会不通。 光纤的连接有两种方式,一种是固定连接一种是活动连接,固定连接就是熔接,是用专用设备通过放电,将光纤熔化使两段光纤连接在一起,优点是衰耗小,缺点是操作复杂灵活性差。活动连接是通过连接器,通常在ODF上连接尾纤,优点是操作简单灵活性好,缺点是衰耗大,一般说来一个活动连接的衰耗相当于一公里光纤。光纤的衰耗可以这样估算:包括固定和活动连接,每公里光纤衰耗0.5db,如果活动连接相当少,这个值可以为0.4db,单纯光纤不包括活动连接,可以减少至0.3db,理论值纯光纤为0.2db/km;为保险计大多数情况下以0.5为好。 光纤测试TX与RX必须分别测试,在单纤情况下由于仅使用一纤,所以只需测试一次.