repastTurorial
Repast Simphony Tutorial
Nick Malleson
May7,2008
1Introduction
This is a short tutorial which looks at some of the major differences between Repast3and Repast Simphony and goes over how to start building a simple model in Simphony.I’m still learning how to use repast myself so I make no promises that the information here is correct!I hope that my experiences will help you overcome Simphony’s steep learning curve.By the end of you should understand:
1.What Repast Simphony is/what it does.
2.How to build a simple model without using the new GUI interface,
3.How to use contexts and projections to organise agents,
4.How to make some agents move around a geographical environment.
2So what is Repast S?
2.1A bit of history
Repast is a free and open-source set of tools which was originally based Swarm.Initially Repast was implemented exclusively in Java,although Repast version3is now fully object-oriented and consists of three core implementations:Repast for Java(Repast J);Repast for the https://www.360docs.net/doc/c110658501.html, framework (https://www.360docs.net/doc/c110658501.html,);and Repast for Python Scripting(Repast Py).However,Repast3has recently been superseded by a signi?cant development named Repast Simphony(Repast S).
2.2Repast Simphony
The main improvements that Simphony has made over Repast3are:
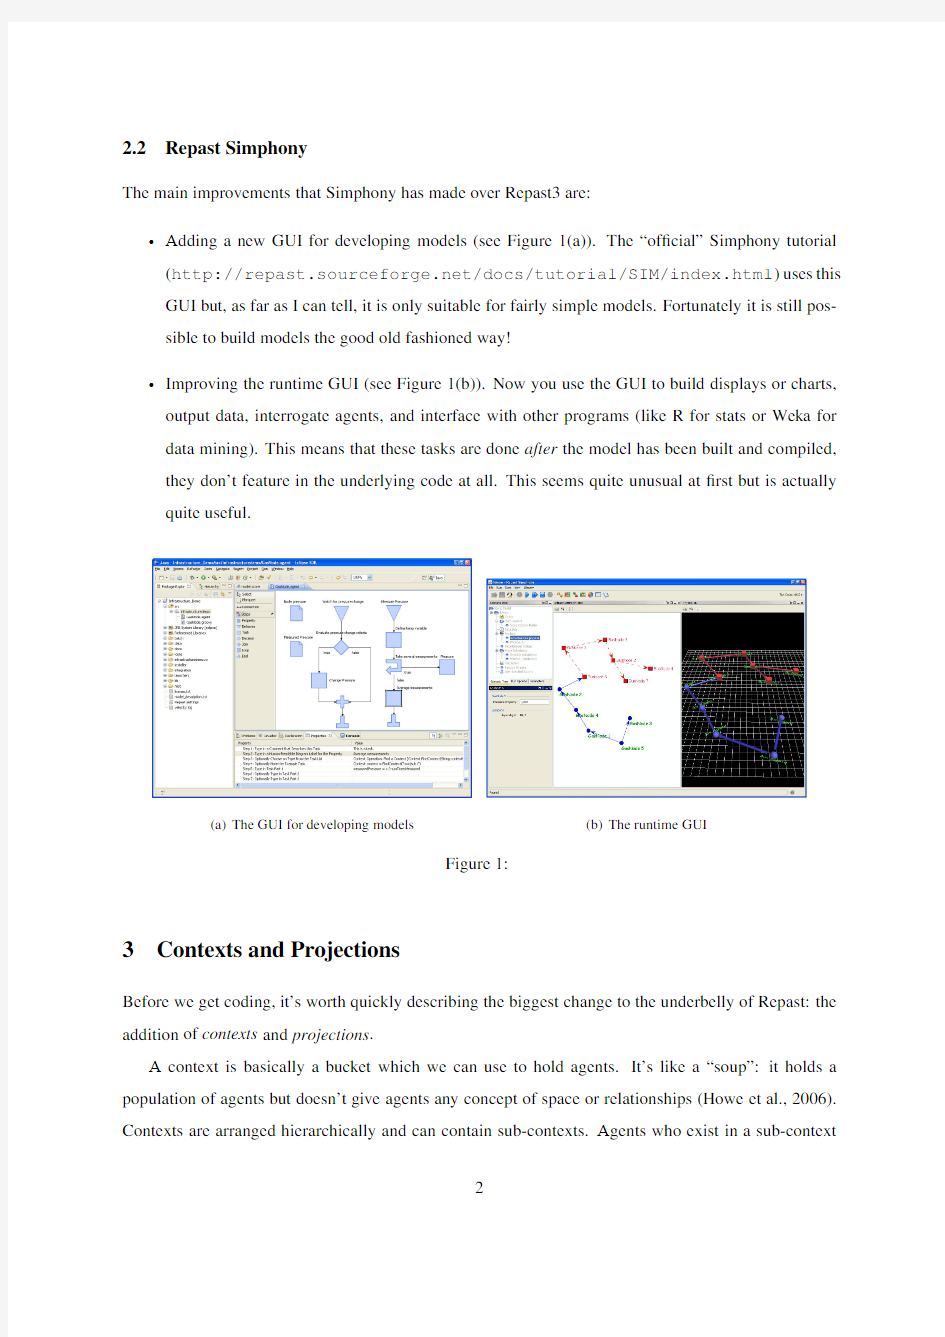
?Adding a new GUI for developing models(see Figure1(a)).The“of?cial”Simphony tutorial (https://www.360docs.net/doc/c110658501.html,/docs/tutorial/SIM/index.html)uses this GUI but,as far as I can tell,it is only suitable for fairly simple models.Fortunately it is still pos-sible to build models the good old fashioned way!
?Improving the runtime GUI(see Figure1(b)).Now you use the GUI to build displays or charts, output data,interrogate agents,and interface with other programs(like R for stats or Weka for data mining).This means that these tasks are done after the model has been built and compiled, they don’t feature in the underlying code at all.This seems quite unusual at?rst but is actually quite useful.
(a)The GUI for developing models(b)The runtime GUI
Figure1:
3Contexts and Projections
Before we get coding,it’s worth quickly describing the biggest change to the underbelly of Repast:the addition of contexts and projections.
A context is basically a bucket which we can use to hold agents.It’s like a“soup”:it holds a population of agents but doesn’t give agents any concept of space or relationships(Howe et al.,2006). Contexts are arranged hierarchically and can contain sub-contexts.Agents who exist in a sub-context
also exist in the parent context,but the reverse is not necessarily true.For example,contexts which hold People agents could be used to represent villages and subcontexts could be used to represent families. Then agents could move between family and village contexts if they marry,move away,divorce etc. Figure2illustrates this.Contexts are also useful for separating different types of agents,such as Houses and People.
Figure2:Contexts and sub-contexts
Once we have agents in a context,projections can give the agents a space and can de?ne their relationships.For example,“GIS”projections gives each agent an(x,y)spatial location and“Network”projections allow relationships between agents to be de?ned(e.g.a social network).Projections are created for speci?c contexts and will automatically contain every agent within the context(so if you add an agent to a context it is also added to any projections which have been created in that context)1.
4An Example:SimTutorial
Ok,enough reading,lets start!Simphony has been integrated with Eclipse so we’re pretty-much forced to use this development environment.If you like Eclipse then this is?ne and if you don’t you can edit your model code using a different text editor later anyway.
Step1:Start Eclipse
This one is fairly straightforward.
Step2:Build a new Simphony Project
1.Go to File->New->Other
1Don’t worry about this too much,it will become clear later
2.Select Repast Simphony->Repast Simphony Project from the box which appears.
3.Give the project a name(we’ll call it“SimTutorial”).
4.Press next a few times and then finish,the default values should all be ok.
When Eclipse has?nished creating the project you should see something a bit like this:
The model.score will be open automatically.This is an xml?le(displayed nicely in Eclipse) which describes the model components(agents,contexts,projections and attributes)2.The runtime GUI reads this?le so it knows what the model contains.So,if we create a new type of agent/context/projection we add it to the model.score?le and then write the Java code for it.3This is what we’ll do next.
Step3:Creating our?rst context
We could just add agents to our root context(called SimTutorial),but it’s better to organise different types of agent into their own sub-contexts.We’ll create a sub-context to hold People agents:
1.How to create a context in model.score?le:
2If you need to re-open the model.score?le it is in the simtutorial.rs folder.
3This isn’t strictly true,particularly if you use your own ContextCreator(see Section4.2)but will do for now.
(a)Right-click on“SimTutorial”and then Create Member->Context.This will create
a new context called“SimTutorialContext”.We can now con?gure this new context:
(b)Right-click on SimTutorialContext and go to Show Properties.The box at the bottom
of Eclipse should now show all the properties of our context.
(c)To change the name of the context to something more suitable,click on Label and type
“PeopleContext”.If you scroll down a bit you’ll notice that there is a property called File
Name for Source Code,this is where we implement the Java code for the context.4
2.Implement the Java class for the context.We’ve told Repast that we want to create a new context,
but at the moment it doesn’t do anything(later we want to get the context to create some People).
Here’s how to create Java code which will make the context do what we want:
(a)The box on the left of the Eclipse workspace shows all the different components of the
project.Click on the(+)to expand the SimTutorial folder and then expand the src folder
(this is where all our source code is kept).
(b)Right-click on the default package(called“simtutorial”)and go to New->Class.
(c)We need the class to have the same name as the context so type“PeopleContext”in the
Name box.
(d)Finally,we can de?ne parent classes or interfaces here.As we’re creating a context we need
to extend“DefaultContext”.Click on Browse next to the Superclass box and type
“DefaultContext”into the box which appears.After a few seconds Eclipse should?nd the
DefaultContext class(in the repast.simphony.context package).After clicking on OK you
should have something that looks like Figure3.
(e)Click on OK and then Finish.
4There is also a Package property,if you’re arranging your code into different packages this is how to tell repast which package the source code is in.
Figure3:Creating a new class for the PeopleContext
Now we have created a new context and a Java class for it.Eclipse will have brought up an editor for this new class.We haven’t made any agents yet so we’ll ignore the implementation of the context for now.Don’t worry about the yellow line underneath DefaultContext,this is Eclipse’s way of telling us there will be a compile-time warning(if you hold your mouse over the yellow line you’ll see what the warning is).Ignore this for now.
Step4:Creating the?rst agent type
We’ve told repast about our main context,now lets tell it what agents we want to be part of the context (this is very similar to creating a new context).
1.Create the agent in the model.score.
(a)Click on the model.score tab(near the top of the Eclipse window)to show the model.score
?le.
(b)Right click on“PeopleContext”and then Create member->Agent.
(c)Change the label to”Person”.
2.Implement the Java classes.
(a)Right click on the“simtutorial”package and then New->Class.
(b)Call the class“Person”.Then?nish.
Again,Eclipse will bring up an editor window for our Person class.Now we’ve created a new context and a new type of agent who will exist in the context.Lets check everything’s OK by running Simphony.To do this click on the little arrow next to the green button and then”Run SimTutorial Model”(see Figure4).This might take a while on the geography machines(much quicker on my computer at home for some reason).
Figure4:How to run the model
After a few seconds the Simphony GUI should pop up(on the left near the bottom you should see our“PeopleContext”subcontext).This is the GUI that we can use to create charts,show displays,output data and so on.You can save the con?guration by clicking on the little disk icon so you don’t need to re-create everything each time you re-run the model(afraid I don’t know how repast remembers the con?guration,but trust me it does!).If everything worked OK just close Simphony for now.
Step5:Create a projection for the agents
We’ve created a context and told repast that we might create some people to exist in the context,but so
far we haven’t said anything about the space which the agents will inhabit.Repast uses projections to
specify relationships between agents and their environment.The types of projection we can use include:?GIS Projections-agents have an(x,y)location and can move around a geographic environment.
?Grid Projections-traditional,CA-type,grid.
?Network Projections-specify relationships between agents,i.e.social networks.
In this tutorial we’ll create a GIS projection.Here’s how:
1.Tell the model.score about the projection.
(a)In the model.score?le,right click on PeopleContext and then Create Member->Projection
-Geography.
(b)Right click on the new projection and choose Show Properties.
(c)Change the label to“PeopleGeography”.
We don’t do anything with our projection yet,we”ve just told repast that we want to use one.
Because the projection is part of our PeopleContext we’ll write the code for the projection in this
class so that when Repast creates the PeopleContext,it will also create our PeopleGeography.
2.Implement the projection
(a)Open up PeopleContext.java(should still be open as a tab in Eclipse).
(b)Add the following default constructor to the class:
public PeopleContext(){
super("PeopleContext");//must match name in model.score
GeographyParameters
new GeographyParameters
//These lines actually create our Geography.
//Tell Repast to create a new geography projection
//called"PeopleGeography"in this context.
Geography
GeographyFactoryFinder.createGeographyFactory(null).
createGeography("PeopleGeography",this,geoParams);
System.out.println("Created PeopleGeography");
}
The PeopleContext()constructor will be called when our model is initialised,so all the code
inside it will be executed.
(c)The indentation is probably horrible,if you highlight all the code and press Control+I
Eclipse will indent everything nicely.
(d)You’ll notice that lots of the code is underlined in red.This is Eclipse telling us that there
will be compile errors,this is because we need to add some import lines at the top.Eclipse
has a nice way of looking for the classes we might want to import,if you click on the tiny red
x on the left of the line with an error you should get an option to import a class?le.Figure5
illustrates this.Import all the required class?les until all the errors have been corrected
(check that you are importing classes from a repast simphony package,not a class with the
same name from a different package).
Step6:Add some agents to the context
Ok we’re almost there,we have a context to hold our agents and a projection which will give them all a spatial location.Now all that’s left to do is create our agents and give them some simple actions.
Figure5:Eclipse can automatically import classes.
Step7:Create some agents
1.The?rst thing we need to do is add a bit more code to our Person class.Open up the class and
copy all this lot in(between the open/close curly brackets of the class):
private String name;
private String age;
public Person(){
super();
}
public String getName(){
return name;
}
public void setName(String name){
https://www.360docs.net/doc/c110658501.html,=name;
}
public String getAge(){
return age;
}
public void setAge(String age){
this.age=age;
}
2.Now we could just put a for-loop in our PeopleContext class which creates some agents,adds
them to the context and gives them an(x,y)location in our projection,something like:
for(int i=0;i<10;i++){
Person p=new Person();
this.add(p);//‘‘this’’refers to PeopleContext
peopleGeography.move(p,new GeometryFactory().
createPoint(new Coordinate(i,i+1)));
}
But this isn’t very useful so instead we’ll make use of a fantastic feature of Simphony:reading in
a shape?le.
3.Loading agents from a shape?le.
(a)I’ve already created a little shape?le with some people in it.Copy the entire“People”folder
from my transfer directory:
N:/Earth&Environment/Geography/TransferArea/NickMalleson into the root directory of the SimTutorial project which is probably here:
C:/RepastS/workspace/SimTutorial.
(b)Then add this code after creating the geography in PeopleContext.java:
//Create some people from a shapefile:
File shapefile=null;//NOTE:import java.io,not the sun package!
ShapefileLoader
try{
shapefile=new File("People/people.shp");
personLoader=new ShapefileLoader
Person.class,shapefile.toURL(),
peopleGeography,this);
}
catch(https://www.360docs.net/doc/c110658501.html,.MalformedURLException e){
e.printStackTrace();
}
while(personLoader.hasNext()){
personLoader.next();
}
The amazing,magical thing about the shapefileLoader is that if you have an attribute in the
shape?le and corresponding get/set methods in your agent,it will automatically create agents with
the same values as the shape?le.For example,the people shape?le has“name”and“age”?elds
and our Person agent has get and set methods for“name”and“age”variables,so each Person is
created with the correct name and age.Amazing!5.
The shape?le loader will have loaded every Person from the shape?le into the PeopleContext and given them an appropriate spatial location in the PeopleGeography.We can test this by running through all the agents in the geography and printing their location.If you want to do this you’ll need to add these lines after the people have been loaded in PeopleContext.java(not compulsory):
//Get all agents in the geography and print their location:
for(Person p:peopleGeography.getAllObjects()){
Geometry geom=peopleGeography.getGeometry(p);
Coordinate coord=geom.getCoordinate();
System.out.println(p.getName()+"is at:("+
coord.x+","+coord.y+")");
}
Note:make sure you import the com.vividsolutions.jts.geometry package for the Geom-etry object.
Step8:Get the agents moving
Now that we have loaded our agents into the context and given them a spatial location in the projection we can get them to move around.For now we’ll just have them move in a random direction.Firstly,we need to create and schedule a method which will be called every iteration to control the agents:
1.Create and schedule a step method for the agents which will control their behaviour.
(a)There are a few ways to schedule things in Simphony,have a look at the“Working with the
scheduler”section in the Simphony reference docs if you want more info.6For now we’ll
use annotations,these take advantage of a nice new feature of Java and are good if we know,
at compile-time,when we would like a method to be executed.
(b)Put the following code after the setAge method in Person:
5Does anyone else?nd this really exciting?
6https://www.360docs.net/doc/c110658501.html,/docs/reference/SIM/index.html
//Tell repast to run this function at every iteration
@ScheduledMethod(start=1,interval=1,priority=0)
public void step(){
System.out.println(name+"has called step method");
}
(c)The step()method will now be called at every iteration.If you open the project now and
run it(the little green arrow)you should see text telling us that the step()method is being
called for each Person.This isn’t particularly useful though as the agents don’t actually do
anything.
2.To make the agents move around the geography add the following code(put it after the System.out
line in the step()method):
//Find the context this person exists in.
Context
//Get the GIS projection associated with the context
Geography
getProjection("PeopleGeography");
//Move the agents a small distance in a random direction
projection.moveByVector(this,0.01,
RandomHelper.nextDoubleFromTo(0,(2*Math.PI)));
It’s worth noting that in Simphony all the geographical information about each agent is stored in the projection,not in the agent(the Person class has no(x,y)variables).This allows our agents to be more generic,you don’t have to speci?cally give them any information about their relationship with each other or the environment.We could,for example,control our agents from another class and then the Person class wouldn’t even need know about Repast Simphony!
Step9:Create a Display
We’ve pretty-much?nished now.You can run Simphony and the agents will move around their geogra-phy.To actually see this happen,however,we need to create a display:
1.Run the model.Remember that all displays,charts etc are created separately from the underlying
model source code,we do this using the runtime GUI.
2.On the list on the left look for the“Displays”icon underneath the“PeopleContext”folder.Right
click on it and choose Add Display.
3.In the new window which pops up you can con?gure the display.
(a)Leave the default name(“A Display”)for now,anything will do.
(b)The type of projection should be“GIS”.Repast has detected that the only projection we
have created in the PeopleContext is a GIS geography,this could be Network or Grid if we had created these types of projections as well.
(c)Tell repast that we would like the display to show our PeopleGeography by clicking on it
and then clicking on the right arrow to move it accross into the box on the right.You should have something that looks like Figure6
(d)Click Next.
4.Now we can con?gure how we would like the agents to be displayed.We can also add other
shape?les to be displayed(like roads,houses etc)by clicking on the+button.For now,just change the?ll colour of our People agents(click on Edit)then click next.
5.The?nal box lets us con?gure how often the display will be updated.Click?nish.
6.Finally,save the new model con?guration by clicking on the?oppy disk at the top.I’m not sure
how repast remembers the con?guration but it does!7Now if we re-compile and/or re-run the model Repast will have remembered this display.
7There’ll be some xml?le in the project somewhere...
Figure6:Creating a display
Press the play button and we’re off!
You should see some agents wandering around aimlessly,like in Figure7.I’ve also put a video on my transfer drive,see if you can work out how to save your own video(it’s really easy,just press one button).
So far we’ve created a context,added some agents into the context and created a GIS projection so the agents can have a location in a geographical space.Now we could create a Network projection to create a social network for the agents or create another context to hold House objects and give the agents a home.
That’s the end of the main tutorial.For the remainder I’ll just outline a few other features which might be useful that you can look at if you ever need/want to:model parameters,saving the model state,outputting data and drawing charts.Then,as an appendix,I’ll look at a couple of the unanswered
questions,like why are there yellow lines all over the Java code?(Haven’t?nished the rest yet...)
Figure7:Running the SimTutorial Model
Step10:Saving a model state:Freeze Drying
Step11:Output some information
The runtime GUI has made the task of outputting information pretty simple.Firstly we create a new data set,then tell Repast how we would like to output the data.Here are some instructions to output the name and age of each person every iteration and also the average age(this isn’t particularly interesting because the name and age don’t change but it will do for now).
1.Run the model.
2.Under PeopleContext,right click on Data Sets and the Add Data Set.
3.In the new box:any name will do but the Data Set ID will be used when we tell Repast how
we’d like to output the data.Select Person under Agent Class.Then press next.
4.Press Add three times to add three simple variables.Change the source of the second two variables
to print the output from the getAge()and getName()functions.
5.Click on the little arrow just to the right of the Add button and select“Add Aggregate Mapping”.
Select getAge()and Mean.
6.Press OK,then next,then?nish.
No we’ve created the data set we need to tell Repast how we would like to output it:
1.Right-click on Outputters under PeopleContext and the Add File Outputter.
2.Give the outputter any name and select the ID of the data set we just created.
3.Move all the variables from the box on the left to the right-hand box.If you change the order of
the variables this will change the order of the columns in the output?le.Press next.
4.Click on browse to say where you would like the?le to be stored and also give it a name,it is
handy to give the?le a“.csv”extension so that silly programs like Excel will know how to read it.Press Finish.
5.Save the changes by clicking on the?oppy disk(otherwise you’ll have to redo these steps each
time you re-run the model).
6.Press Run.
Step12:Draw a chart
Step13:Using Parameters
Parameters are variables,held by repast,which can be changed during a simulation run.They’re quite useful because it gives you a central place to store important model variables but they’re especially useful because you can get repast to automatically test the sensitivity of your model by running a parameter sweep.
4.1Extras:Why all the yellow lines?
XXXX
4.2Extras:Implementing your own Context Creator
When you run Simphony,note that under the“Data Loaders”section is something called“Score Context Builder”.This means that Simphony will read the model.score?le to build the contexts.If you want to,you can change this to“A speci?c Java class”and implement your own context creator(which must implement“ContextBuilder”).This is very useful because it gives you?ner control over what contexts/agents are created.For example,our PeopleContext might require a HouseContext to give each Person a home once they have been https://www.360docs.net/doc/c110658501.html,ing a ContextCreator which you implement yourself means you can ensure that the HouseContext is created before the PeopleContext.
4.3Extras:Complete Code
Person.java
package simtutorial;
import repast.simphony.context.Context;
import repast.simphony.engine.schedule.ScheduledMethod; import repast.simphony.random.RandomHelper;
import repast.simphony.space.gis.Geography;
import repast.simphony.util.ContextUtils;
public class Person{
private String name;
private int age;
public Person(){
super();
System.out.println("Created a new Person");
}
public String getName(){
return name;
}
public void setName(String name){
https://www.360docs.net/doc/c110658501.html,=name;
}
public int getAge(){
return age;
}
public void setAge(int age){
this.age=age;