An Easy Catalyst-Free__ Hydrothermal Method to Prepare Monodisperse Carbon

An Easy Catalyst-Free Hydrothermal Method to Prepare Monodisperse Carbon Microspheres on a Large Scale
Mingtao Zheng,Yingliang Liu,*Yong Xiao,Yong Zhu,Qiu Guan,Dingsheng Yuan,and Jingxian Zhang
Department of Chemistry and Institute of Nanochemistry,Jinan Uni V ersity,Guangzhou 510632,People’s Republic of China
Recei V ed:December 23,2008;Re V ised Manuscript Recei V ed:March 12,2009
We report an easy catalyst-free method to prepare carbon microspheres via a hydrothermal carbonization process using starch solution as starting materials.SEM and TEM images show that the products consist of a large scale of monodisperse carbon microspheres with a size of about 2μm.The size of the carbon microspheres can be easily controlled by regulating the concentration of the starch solution and the reaction temperature.Furthermore,the surface of the spheres is functionalized with hydroxyl and carboxyl groups,which make further surface modi?cation unnecessary and facilitate immobilization of noble metal nanoparticles and fabrication of core -shell materials or hollow structures.Through SEM observation,the mechanism of the formation of carbon microspheres under hydrothermal conditions was suggested to be a direct dehydration polymerization and self-assemble fusion process.The present work provides a convenient yet effective method for large-scale synthesis of monodisperse carbon microspheres with high purity.
1.Introduction
Since the discovery of fullerenes 1and carbon nanotubes,2signi?cant efforts have been made toward the synthesis of functional carbon materials with diverse morphologies and structures,such as coin-like hollow carbons,3macro?owers,4colloidal spheres,5nano?bers,6and so on.Among the different forms of carbon materials,carbon microspheres (CMSs)have attracted considerable attention,owing to their potential impor-tance in catalyst supports,7-9adsorbents,10,11anode material for lithium ion batteries,12-14and templates for fabricating core -shell or hollow structures.15-17Carbon microspheres have been prepared by various methods,such as chemical vapor deposi-tion,18pressure carbonization,19mixed-valence oxide-catalytic carbonization,20and reduction of carbides with metal catalysis.21
Saccharide materials,such as glucose and sucrose,were excellent carbon precursors for preparing CMSs.For instance,Sun et al.prepared colloidal carbon spheres from glucose via a hydrothermal method;5Wang et al.reported a two-step route to synthesize hard carbon spheres by a hydrothermal method using sugar as precursor.22Recently,Mi and co-workers developed a hydrothermal method to synthesize CMSs with the aqueous glucose solution as starting materials under moderate conditions.23However,as a cheaper and more available polysac-charide,starch was rarely used as a carbon precursor to prepare CMSs because it is
hard to dissolve in water to form a clear solution.Cui et al.have reported a facile strategy for the synthesis of carbon particles with different nano-and micro-structures by using a hydrothermal reaction and starch or rice grains as carbon sources catalyzed by free iron ions or iron oxide nanoparticles,24yet carbon microspheres of high purity were extremely dif?cult to acquire by traditional hydrothermal process.Although carbon spheres were obtained from corn starch by a two-stage process,25uniform spheres were dif?cult to obtain even though graphitized at very high temperature (2600
°C),and the particle size,which ranged from 5to 25μm,could not be controlled.
Herein,we develop an easy and cost-effective method to prepare monodisperse CMSs on a large scale via a hydrothermal carbonization process under moderate conditions (500-600°C).In this work,commercial soluble starch was chosen as the carbon precursor.Remarkably,it has been found that the size of CMSs could be easily controlled by regulating the concentra-tion of the starch solution and the reaction temperature.Furthermore,the main process in this method was carried out in aqueous solution without involving any organic solvents or catalysts.This catalyst-free synthesis strategy will promote a better understanding of CMSs growth,and moreover,the as-synthesized CMSs may lead to many new potential applications.2.Experimental Section
2.1.Synthesis of the Carbon https://www.360docs.net/doc/e214821902.html,mercial soluble starch was purchased from the Guangzhou Chemical Reagent Factory and used as the starting material without further puri?cation.In a typical procedure,starch (4g)was dissolved in 40mL of distilled water that was magnetically stirred for 2h,and then the mixture was heated at 60°C for 30min to form a clear solution.The solution was then sealed in a 50mL stainless-steel autoclave.Subsequently,the autoclave was put into an electronic furnace,which was then heated to 600°C with a rapid heating rate of 10deg min -1and maintained at 600°C for 12h.After the autoclave was cooled to room temperature naturally,the dark precipitates were collected and washed with distilled water and ethanol four times and dried in a vacuum at 60°C for 6h.Soft,light,cotton-like products were X-ray powder diffraction (XRD)performed on a MSAL-XD2X-ray diffractometer with Cu K R radiation (40kV,20mA,λ)1.54051?).The morphology observation of the samples was examined with scanning electron microscopy (SEM,Philips
*To whom correspondence should be addressed.Fax:+862085221697.E-mail:tliuyl@https://www.360docs.net/doc/e214821902.html,.
J.Phys.Chem.C 2009,113,8455–84598455
10.1021/jp811356a CCC:$40.75 2009American Chemical Society
Published on Web 04/21/2009
XL-30)and transmission electron microscopy (TEM,Philips Tecnai-10).The Raman spectrum of as-prepared samples was recorded at room temperature on a Renishaw RM2000Raman microspectrometer with the 514.5nm line of an argon laser.The Fourier transform infrared spectroscopy (FTIR)spectrum was measured by an EQUINOX 55(Bruker)spectrometer with the KBr pellet technique ranging from 500to 4000cm -1.3.Results and Discussion
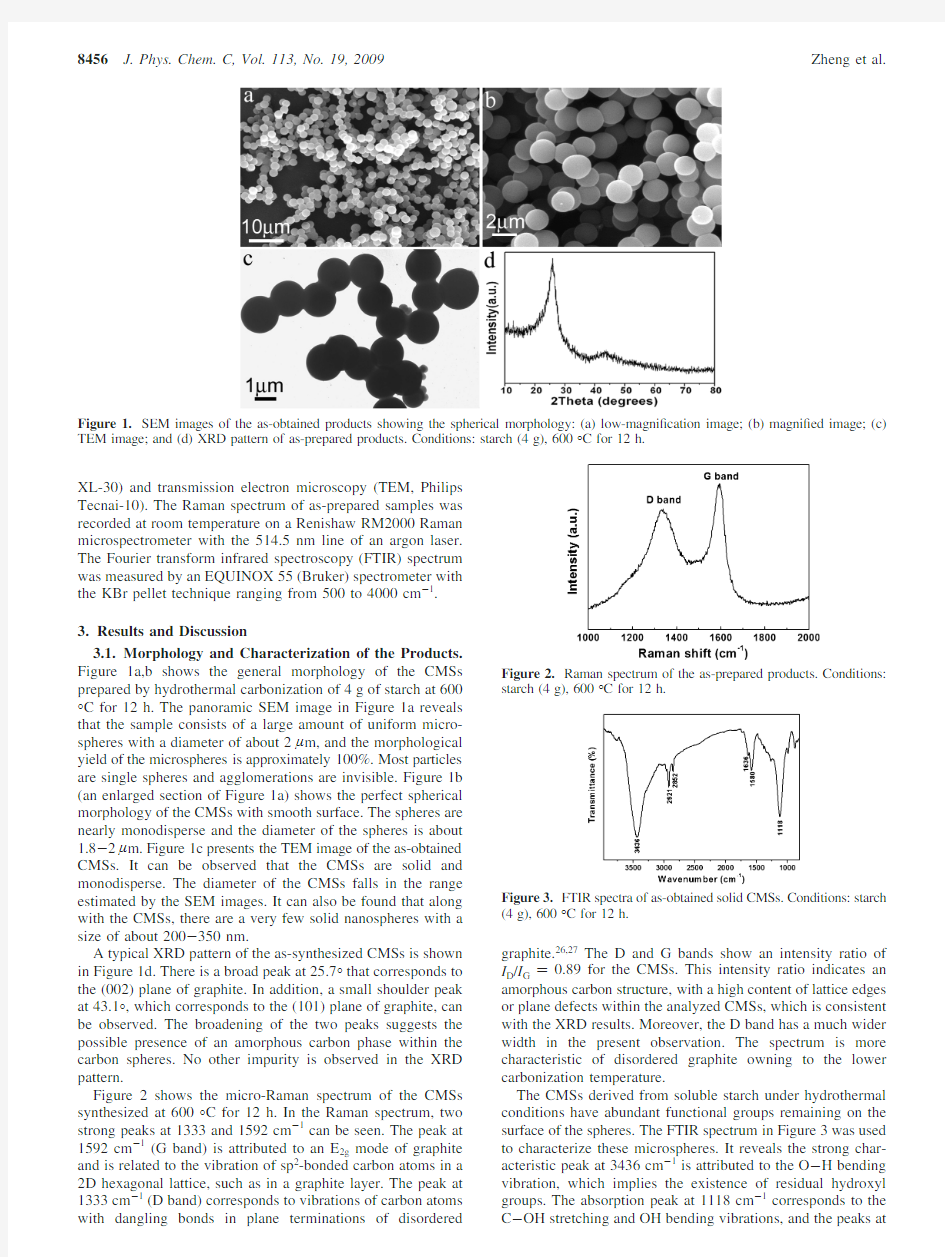
3.1.Morphology and Characterization of the Products.Figure 1a,b shows the general morphology of the CMSs prepared by hydrothermal carbonization of 4g of starch at 600°C for 12h.The panoramic SEM image in Figure 1a reveals that the sample consists of a large amount of uniform micro-spheres with a diameter of about 2μm,and the morphological yield of the microspheres is approximately 100%.Most particles are single spheres and agglomerations are invisible.Figure 1b (an enlarged section of Figure 1a)shows the perfect spherical morphology of the CMSs with smooth surface.The spheres are nearly monodisperse and the diameter of the spheres is about 1.8-2μm.Figure 1c presents the TEM image of the as-obtained CMSs.It can be observed that the CMSs are solid and monodisperse.The diameter of the CMSs falls in the range estimated by the SEM images.It can also be found that along with the CMSs,there are a very few solid nanospheres with a size of about 200-350nm.
A typical XRD pattern of the as-synthesized CMSs is shown in Figure 1d.There is a broad peak at 25.7°that corresponds to the (002)plane of graphite.In addition,a small shoulder peak at 43.1°,which corresponds to the (101)plane of graphite,can be observed.The broadening of the two peaks suggests the possible presence of an amorphous carbon phase within the carbon spheres.No other impurity is observed in the XRD pattern.
Figure 2shows the micro-Raman spectrum of the CMSs synthesized at 600°C for 12h.In the Raman spectrum,two strong peaks at 1333and 1592cm -1can be seen.The peak at 1592cm -1(G band)is attributed to an E 2g mode of graphite and is related to the vibration of sp 2-bonded carbon atoms in a 2D hexagonal lattice,such as in a graphite layer.The peak at 1333cm -1(D band)corresponds to vibrations of carbon atoms with dangling bonds in plane terminations of disordered
graphite.26,27The D and G bands show an intensity ratio of I D /I G )0.89for the CMSs.This intensity ratio indicates an amorphous carbon structure,with a high content of lattice edges or plane defects within the analyzed CMSs,which is consistent with the XRD results.Moreover,the D band has a much wider width in the present observation.The spectrum is more characteristic of disordered graphite owning to the lower carbonization temperature.
The CMSs derived from soluble starch under hydrothermal conditions have abundant functional groups remaining on the surface of the spheres.The FTIR spectrum in Figure 3was used to characterize these microspheres.It reveals the strong char-acteristic peak at 3436cm -1is attributed to the O -H bending vibration,which implies the existence of residual hydroxyl groups.The absorption peak at 1118cm -1corresponds to the C -OH stretching and OH bending vibrations,and the peaks
at
Figure 1.SEM images of the as-obtained products showing the spherical morphology:(a)low-magni?cation image;(b)magni?ed image;(c)TEM image;and (d)XRD pattern of as-prepared products.Conditions:starch (4g),600°C for 12
h.
Figure 2.Raman spectrum of the as-prepared products.Conditions:starch (4g),600°C for 12
h.
Figure 3.FTIR spectra of as-obtained solid CMSs.Conditions:starch (4g),600°C for 12h.
8456J.Phys.Chem.C,Vol.113,No.19,2009Zheng et al.
2921and 2852cm -1originate from the C -H stretching vibration.The infrared spectrum peaks at 1580and 1636cm -1due to the stretching vibration of carboxyl groups.These results indicate that there are a large number of residues including hydroxyl and carboxyl groups on the surface of the as-prepared CMSs due to an incomplete carbonization process,28and they play important roles in the formation process of the spherical structures.Furthermore,the functional groups provide a potential avenue to load other functional groups,molecules,ions,and nanoparticles or fabricate other core -shell or hollow structures.3.2.Effect of the Reaction Conditions on Morphology and Size of the Carbon Microspheres.In this study,the hydro-thermal carbonization process of starch solution in various concentrations for a proper reaction time and temperature yields very interesting results.The concentration of the starch solution plays a crucial role in controlling the diameter and size distribution of the products.Figure 4a -d shows the SEM images
of the products obtained from 0.5,6,8,and 12g of soluble starch dissolved in 40mL of distilled water and reacted at 600°C for 12h in the autoclave,respectively.It can be observed that the average size of the spheres is about 1,3,5,and 7μm,respectively.These results indicate that the size of the CMSs tends to increase with the increase of the concentration of the starch solution.In addition,it can be seen that the dispersibility of the CMSs reduces with the increase of the concentration
of
Figure 4.SEM images of the samples synthesized from the starch solution with different concentrations:(a)0.5,(b)6,(c)8,and (d)12g of starch dissolved in 40mL of distilled water and reacted at 600°C for 12
h.
Figure 5.SEM images of carbon spheres synthesized from (a,b)4g of starch at 500°C for 12h,(c)4g of starch at 450°C for 6h and (d)4g of starch at 700°C for 12h,and (e,f)4g of starch at 600°C for 12h with the heating rate of 2(e)and 20°C/min (f).
SCHEME 1:Schematic Representation of the Possible Formation Process of Carbon
Microspheres
Catalyst-Free Preparation of Carbon Microspheres J.Phys.Chem.C,Vol.113,No.19,20098457
starch solution.When the solution turns dense enough,the carbon spheres with a diameter of about 5-8μm tend to aggregate and then to form larger particles (Figure 4d).
On the other hand,the size of the CMSs varied greatly as the hydrothermal temperature changes while keeping other conditions constant.Figure 5a -d shows the SEM images of the products obtained at different hydrothermal temperatures.As shown in Figure 5a,b,the average size of the CMSs ranges from 1.2to 1.5μm when the reaction temperature is kept at 500°C,indicating that the size of the spheres decreased with the decrease of the reaction temperature.It can be observed that there are some incompletely developed microspheres (indicated with a white arrow in Figure 5b)probably due to lower hydrothermal temperature.It is worth noting that the size of the CMSs increases abnormally and presents a wide distributing character ranging from 4to 10μm when the temperature is about 450°C (Figure 5c).As shown in Figure 5d,the CMSs with a diameter of 6-8μm aggregate with each other when the temperature is up to 700°C,which is possibly due to the reduction of the functional groups on the surface of CMSs.Moreover,the heating rate plays a key role on the size distribution of the spheres.The rapid heating rate (>10deg/min)is essential to obtain monodisperse CMSs.At a lower heating rate,larger carbon spheres are acquired and the size of the spheres presents a wide size distribution character.For example,the diameter of the obtained CMSs ranges from 2.5to 9μm when the heating rate is about 2deg/min (Figure 5e).On the contrary,the monodisperse microspheres with a diameter of about 1.5-1.8μm can be obtained when the heating rate is about 20deg/min (Figure 5f).These results indicate that the rapid heating rate results in small microspheres and a narrow size distribution.It was also found that varying the reaction time between 6and 12h did not signi?cantly affect the morphology of the CMSs.When the time is shorter than 2h,the reaction becomes very incomplete and the carbon yield is very low due to the short reaction time.Consequently,the appropriate heating rate to obtain monodisperse CMSs in a suitable yield ranges from 10to 20deg/min and the reaction time is about 12h.
3.3.Formation Mechanism of the Carbon Microspheres.On the basis of all the above observations,a simple possible mechanism was proposed addressing the formation of CMSs under hydrothermal condition and schematically shown in Scheme 1.At lower temperature (about 160-200°C,step I),the starch starts to hydrolyze and produce glucose and levulose,followed by further dehydrate and then polymerize to form colloidal carbon spheres with a uniform size of about several hundred nanometers.This process is similar to the growth of colloidal carbon spheres.5As the temperature increases (about 300-400°C,step II),the moving speed of the colloidal spheres is accelerated,resulting in the self-assembly and aggregation
of colloidal spheres because of the surface tension,29thus the spherical aggregates formed.In this step,the heating rate is an important factor to control the size of the aggregates and it is found that a rapid one leads to the small aggregates.At higher temperatures (above 450°C,step III),the number of functional groups in the colloidal carbon spheres decreased accordingly,and the “fusion”of the colloidal spheres and surface smoothing of the spherical aggregates proceeds further.Finally the ag-gregates are “fused”into solid carbon microspheres.
This possible formation mechanism could be substantiated by the SEM observation of the intermediate products.Figure 6a shows a typical SEM image of the sample synthesized at 400°C for 3h with a heating rate of 10deg/min.It can be seen that the sample consists of some aggregates.The aggregates present a wide size distribution from 2.5to 5μm,and consist of a large number of little spherical particles with an average size of about 200nm.As shown in Figure 6b (a magni?ed image of Figure 5c),the spheres display a granular surface when examined under higher magni?cation.Individual colloidal spheres with diameters of about 150-300nm can be distin-guished clearly,and these carbon spheres appear to be “fused”together.These results indicate that the carbon microspheres are formed via aggregation and fusion of a large number of colloidal spheres rather than continuous growth of carbon colloidal spheres.Of course,to control the size of the CMSs accurately and its distribution,considerable kinetic and ther-modynamic principles behind the formation of the microspheres in the hydrothermal system should be further studied.The work is now in progress.4.Conclusion
Highly uniform CMSs with smooth surface were synthesized via an easy hydrothermal carbonization process without any catalysts.The high-yield,low-cost starting materials and moder-ate reaction temperature provide an ef?cient way to fabricate solid CMSs.Furthermore,the size of the CMSs could be easily controlled by regulating the concentration of the starch solution,the heating rate,and the reaction temperature.Cheap raw materials and a simple preparation process make this technique of industrial importance.Moreover,the surface of the CMSs synthesized from hydrothermal carbonization of soluble starch is functionalized with hydroxyl and carboxyl groups,which makes further surface modi?cation unnecessary.Therefore,the CMSs may greatly widen their potential applications in bio-chemistry,drug delivery,and catalyst supports,and they can be used as templates for fabricating core -shell or hollow structures.
Acknowledgment.This work was ?nancially supported by the Natural Science Union Foundations of China and
Guangdong
Figure 6.(a)SEM image of the sample obtained at 400°C for 3h;(b)a close-up of the granular surface for the sample in Figure 5c was observed by high-magni?ed SEM.
8458J.Phys.Chem.C,Vol.113,No.19,2009Zheng et al.
Province(U0734005)and of the Key S&T Special Projects of Guangdong Province(Grant No.2005A11001001). References and Notes
(1)Kroto,H.W.;Heath,J.R.;O’Brien,S.C.;Curl,R.F.;Smalley, R.E.Nature(London)1985,318,162.
(2)Iijima,S.Nature(London)1991,354,56.
(3)Yuan,D.S.;Xu,C.W.;Liu,Y.L.;Tan,S.Z.;Wang,X.;Wei, Z.D.;Shen,https://www.360docs.net/doc/e214821902.html,mun.2007,9,2473.
(4)Xiao,Y.;Liu,Y.L.;Cheng,L.Q.;Yuan,D.S.;Zhang,J.X.;Gu, Y.L.;Sun,G.H.Carbon2006,44,1581.
(5)Sun,X.M.;Li,Y.D.Angew.Chem.2004,116,607.
(6)Jang,J.;Bae,J.Angew.Chem.,Int.Ed.2004,43,3803.
(7)Xu,C.W.;Liu,Y.L.;Yuan,D.S.Int.J.Electrochem.Sci.2007, 2,674.
(8)Auer,E.;Freund,A.;Pietsch,J.;Tacke,T.Appl.Catal.1998,173, 259.
(9)Xu,C.W.;Cheng,L.Q.;Shen,P.K.;Liu,Y.L.Electrochem. Commun.2007,9,997.
(10)Vignal,V.;Morawski,A.W.;Konno,H.;Inagaki,M.J.Mater. Res.1999,14,1102.
(11)Inagaki,M.;Vignal,V.;Konno,H.;Morawski,A.W.J.Mater Res.1999,14,3152.
(12)Flandrois,S.;Simon,B.Carbon1999,37,165.
(13)Yi,Z.H.;Liang,Y.G.;Lei,X.F.;Wang,C.W.;Sun,J.T.Mater. Lett.2007,61,4199.
(14)Hu,J.;Li,H.;Huang,X.J.Solid State Ionics2007,178,265.
(15)Sun,X.M.;Li,Y.D.Angew.Chem.,Int.Ed.2004,43,3827.
(16)Yang,R.Z.;Li,H.;Qiu,X.P.;Chen,L.Q.Chem.s Eur.J.2006, 12,4083.
(17)Li,X.L.;Lou,T.J.;Sun,X.M.;Li,Y.D.Inorg.Chem.2004,43, 5442.
(18)Serp,P.;Feurer,R.;Kalck,P.;Kihn,Y.;Faria,J.L.;Figueiredo, J.L.Carbon2001,39,621.
(19)Washiyama,M.;Sakai,M.;Inagaki,M.Carbon1988,26,303.
(20)Wang,Z.L.;Kang,Z.C.J.Phys.Chem.1996,100,17725.
(21)Lou,Z.S.;Chen,Q.W.;Gao,J.;Zhang,Y.F.Carbon2004,42, 229.
(22)Wang,Q.;Li,H.;Chen,L.Q.;Huang,X.J.Carbon2001,39, 2211.
(23)Mi,Y.Z.;Hu,W.B.;dan,Y.M.;Liu,Y.L.Mater.Lett.2008, 62,1194.
(24)Cui,X.J.;Antonietti,M.;Yu,S.H.Small2006,2,756.
(25)Zhao,S.;Wang,C.Y.;Chen,M.M.;Shi,Z.Q.Mater.Lett.2008, 62,3322.
(26)Jawhari,T.;Roid,A.;Casado,J.Carbon1995,33,1561.
(27)Yang,X.G.;Li,C.;Wang,W.;Yang,B.J.;Zhang,S.Y.;Qian, https://www.360docs.net/doc/e214821902.html,mun.2004,3,342.
(28)Zhan,Y.J.;Yu,S.H.J.Phys.Chem.C2008,112,4024.
(29)Yan,X.B.;Xu,T.;Xu,S.;Chen,G.;Liu,H.W.;Yang,S.R. Carbon2004,42,2769.
JP811356A
Catalyst-Free Preparation of Carbon Microspheres J.Phys.Chem.C,Vol.113,No.19,20098459
Windows7系统封装教程(详细图解)
Windows7系统封装教程(详细图解) Windows7系统封装教程(详细图解) 一、封装前准备 1、Windows7官方发布的安装光盘(镜像)(这里就不提供给大家了,大家自己想办法) 2、需要预装的各种应用软件,如Office/、Photoshop、Win7优化大师等等,当然,作为对软媒的支持,也加上闪游浏览器和酷点吧。 3、UltraISO和Windows7 AIK。Windows7 AIK简体中文版的下载地址为: download.microsoft./download/6/3/1/631A7F90-E5CE-43AA-AB05-EA82AEAA402A/KB3AIK_.iso 4、WindowsPE光盘(最好是Windows7PE光盘)。Windows7PE光盘可以使用Windows7AIK制作,也可以在以下地址下载: /zh-/files/709d244c-2e5a-11de-a413-0019d11a795f/ 二、安装操作系统和应用程序
1、安装Windows7操作系统。 安装操作系统有4个环节要注意: ①操作系统最好安装在C盘,安装期间(包括后面安装应用程序 和进行封装)最好不要连接到网络。 ②如果在安装操作系统过程中输入序列号,进行封装以后再重新 安装操作系统不会再提示输入序列号。除非要制作成OEM版的封装系统,否则在安装过程中提示输入序列号时,不要输入序列号,直接点―下一步‖继续系统的安装。③为保持封装系统纯净,安装好Windows7操作系统后最好不要安装硬件的驱动。当然,安装驱动程序也不会影响系统的封装。 ④为避免调整优化系统、安装应用软件过程中出现不必要的错误 和产生错误报告文件,第一次进入系统后应当禁用UAC和关闭错误报告。禁用UAC和关闭错误报告的方法如下: ——打开―控制面板‖,点击―系统和安全‖,选择―操作中心‖,点击―安全‖,在展开的详细设置内容中找到并点击―用户帐户控制‖下方的―选择您 UAC级别‖,
系统封装详细图文教程详细版
教程架构: 第一篇系统、工具及软件安装 第二篇封装工具选择及实战 第三篇光盘ISO文件制作 下面以封装制作GHOSTXPSP3为例,进行讲解! 第一篇系统、工具及软件安装 一、准备工作 1、操作系统选择:建议采用微软官方的VOL原版 ——为什么要用VOL原版?因为VOL原版适用于任何电脑,而某些品牌机赠送的是OEM版,只能用于对应的品牌电脑,并且还需激活! ——特别说明一下:很多人喜欢说正版,其实所谓的正版是要通过微软官方验证的,但是系统内容却并不一定是原版的。 详情可以参阅帖子: Windows_XP_Service_Pack_3_X86_CD_VOL_CN微软官方原版下 载:
2、系统补丁:主要靠自己平时收集整理,建议到微软官方下载 如果没有,可以使用别人做好的,推荐一个比较好的系统补丁集— —系统之家,每月都有更新! 也可以使用360安全卫士下载,然后收集整理。 3、办公软件:一般来讲,做GHOST封装都会安装OFFICE办公软 件,也建议采用微软原版,不要使用修改版。 Microsoft Office 2003_vol原版下载 Microsoft Office 2003 Service Pack 3下载 2007 office system格式兼容文件下载 4、工具软件:可以根据自己的爱好并结合电脑城装机的实际情况安装部分常用工具软件。这些软件大部分都是共享的免费软件,也建议到相应的官方网站下载,尽量不要使用第三方修改版本! 推荐下载 二、系统安装 1、微软官方原版系统安装过程图解 补充一下:为了封装系统的稳定,建议全新安装,即使用全盘格式化进行安装;同时在安装系统、工具、软件的时候断开外部网络;并
EasySysprep4统封装图文教程
(一)备份当前操作系统 封装的第一步,其实是备份当前安装好的操作系统。避免我们在之后的步骤中出现问题,以至于还要重新安装操作系统,浪费时间精力。 系统备份想必大家都会。对于WinXP而言,建议使用Ghost备份。推荐使用U盘装机助理中的Easy Image X 执行Ghost备份操作,Easy Image X 具有图形化操作、便于设置压缩率等特点。 提醒大家要注意的是,我们现在是备份系统以备不时之需,而并非封装完毕后制作系统映像,所以压缩率不用调整的过高,以免浪费更多的备份和恢复时间。压缩率建议选择“快速压缩”,体积略大,但备份和恢复速度都很快。设置完毕后,Ghost备份过程自动启动。
2013-1-22 14:15 上传 下载附件(125.39 KB) 稍事等待后,系统备份完毕。 (二)封装前的准备 封装的目的,是为了快速的部署操作系统,减少不必要的重复劳动。所以,我们需要向源系统集成系统补丁、安装常用软件,从而减少每次部署后的重复劳动。 1、集成系统补丁。集成补丁的方法有很多,例如使用Windows Update、使用第三方安全软件、使用第三方补丁包等。这里推荐大家选用IT天空系统补丁安装助理,一次性安装所有重要补丁。
2、安装常用软件。常用软件常用的一般也就几种,大家请根据自己的系统部署范围而决定。
特别提醒 (1)不是所有的软件都能良好适应系统封装部署,特别是某些国产软件; (2)需要激活的软件,部署完毕后一般都需要重新激活; (3)不建议集成安全类软件,某些安全软件会阻挡正常的系统部署进程,甚至导致蓝屏宕机; (4)如果某些软件不适合集成在系统,可以使用首次进桌面静默安装的方法来解决。 3、备份系统。又备份系统?对,备份。补丁安装要20分钟左右,软件也需要逐个安装与调整,所以整体时间一般不少于30分钟。为防止封装时出现未知错误,建议再次备份系统,以备今后的调整操作。这次备份完,我们就可以放心大胆的开始封装操作了。
Easy Sysprep v4.3完美封装图文教程
ES4完美封装图文教程-虎鲨软件站 作者:S大源于天空,高仿必究 (一)备份当前操作系统 封装的第一步,其实是备份当前安装好的操作系统。避免我们在之后的步骤中出现问题,以至于还要重新安装操作系统,浪费时间精力。 系统备份想必大家都会。对于WinXP而言,建议使用Ghost备份。推荐使用U盘装机助理中的Easy Image X 执行Ghost备份操作,Easy Image X 具有图形化操作、便于设置压缩率等特点。 提醒大家要注意的是,我们现在是备份系统以备不时之需,而并非封装完毕后制作系统映像,所以压缩率不用调整的过高,以免浪费更多的备份和恢复时间。压缩率建议选择“快速压缩”,体积略大,但备份和恢复速度都很快。设置完毕后,Ghost备份过程自动启动。
稍事等待后,系统备份完毕。 (二)封装前的准备 封装的目的,是为了快速的部署操作系统,减少不必要的重复劳动。所以,我们需要向源系统集成系统补丁、安装常用软件,从而减少每次部署后的重复劳动。 1、集成系统补丁。集成补丁的方法有很多,例如使用Windows Update、使用第三方安全软件、使用第三方补丁包等。这里推荐大家选用IT天空系统补丁安装助理,一次性安装所有重要补丁。
2、安装常用软件。常用软件常用的一般也就几种,大家请根据自己的系统部署范围而决定。
特别提醒 (1)不是所有的软件都能良好适应系统封装部署,特别是某些国产软件; (2)需要激活的软件,部署完毕后一般都需要重新激活; (3)不建议集成安全类软件,某些安全软件会阻挡正常的系统部署进程,甚至导致蓝屏宕机; (4)如果某些软件不适合集成在系统,可以使用首次进桌面静默安装的方法来解决。 3、备份系统。又备份系统?对,备份。补丁安装要20分钟左右,软件也需要逐个安装与调整,所以整体时间一般不少于30分钟。为防止封装时出现未知错误,建议再次备份系统,以备今后的调整操作。这次备份完,我们就可以放心大胆的开始封装操作了。 (三)第一阶段封装 Easy Sysprep v4 (ES4)与之前ES3、ES2以及传统封装辅助工具最大的不同,在于其将封装分为了两个阶段。 第一阶段:以完成封装操作为首要目的; 第二阶段:以完成对系统的调整为首要目的。 将封装与调整分开,减少调整操作对封装操作的影响,保障封装成功率。 1、启动ES4
Ghost系统封装详细图文教程
GHOST系统封装详细图文教程[完整版](适合初学者) 2009-06-28 21:42 教程架构: 第一篇系统、工具及软件安装 第二篇封装工具选择及实战 第三篇光盘ISO文件制作 下面以封装制作GHOSTXPSP3为例,进行讲解! 第一篇系统、工具及软件安装 一、准备工作 1、操作系统选择:建议采用微软官方的VOL原版 ——为什么要用VOL原版?因为VOL原版适用于任何电脑,而某些品牌机赠送的是OEM版,只能用于对应的品牌电脑,并且还需激活! ——特别说明一下:很多人喜欢说正版,其实所谓的正版是要通过微软官方验证的,但是系统内容却并不一定是原版的。 2、系统补丁:主要靠自己平时收集整理,建议到微软官方下载 如果没有,可以使用别人做好的,推荐一个比较好的系统补丁集——系统之家,每月都有更新! 也可以使用360安全卫士下载,然后收集整理。 3、办公软件:一般来讲,做GHOST封装都会安装OFFICE办公软件,也建议采用微软原版,不要使用修改版。 Microsoft Office 2003_vol原版 Microsoft Office 2003 Service Pack 3 2007 office system格式兼容文件 4、工具软件:可以根据自己的爱好并结合电脑城装机的实际情况安装部分常用工具软件。这些软件大部分都是共享的免费软件,也建议到相应的官方网站下载,尽量不要使用第三方修改版本! 二、系统安装 1、微软官方原版系统安装过程图解 补充一下:为了封装系统的稳定,建议全新安装,即使用全盘格式化进行安装;同时在安装系统、工具、软件的时候断开外部网络;并使用
PS/2鼠标操作! 系统安装好后就可以进行系统补丁、工具软件、办公软件的安装——这里讲点窍门:先装工具软件、办公软件,最后装系统补丁。因为很多集成补丁包里面含有WMP、OFFICE、DX、AX补丁,如果先装,可能你的OFFICE 补丁就不是很完整。 2、系统主题屏保安装: 首先进行系统主题破解,这里有适合XPSP2、XPSP3使用的破解程序 然后是安装系统主题 三、系统设置 ——这是一个比较复杂的东西,很多人都有自己的理解,也有自己的爱好。 1、设置任务栏:建议按如下图进行设置 2、任务栏快捷图标建议保留三个(如下图) 3、系统属性设置: A)远程设置——把两个勾都去掉
教你制作属于自己的GHOST系统【图文教程】
使用计算机,最头疼的还是自己的机子系统被摧毁,导致我们需要重新安装,如果手里没有几张系统盘,更是让人很懊恼的事! 一直来是用GHOST来安装系统的,比如箫心的、系统之家的、龙帝国的几款GHOST都非常棒! 如果自己做个GHOST安装盘,里面带上自己的LOGO,是件非常令人愉快和骄傲的事!!!!! 好了,就让柱子带大家一起打造属于我们自己的系统,完成我们的这个不是梦想的梦想! 先来看看我仓促做的系统界面(由于是制作本教程时附带临时做的) 第一步为安装虚拟环境,这个过程在前几天我已经专
门发了相关的内容,详细内容请移至站内链接: 虚拟机【VMware】详细图解[让你在虚拟世界安装系统]https://www.360docs.net/doc/e214821902.html,/pc/thread-930348-1-1.html 一、系统安装 1、微软官方原版系统安装过程图解 补充一下:为了封装系统的稳定,建议全新安装,即使用全盘格式化进行安装;同时在安装系统、工具、软件的时候断开外部网络;并使用PS/2鼠标操作! 系统安装好后就可以进行系统补丁、工具软件、办公软件的安装——这里讲点窍门:先装工具软件、办公软件,最后装系统补丁。因为很多集成补丁包里面含有WMP、OFFICE、DX、AX补丁,如果先装,可能你的OFFICE 补丁就不是很完整。 2、系统主题屏保安装: 首先进行系统主题破解,这里有适合XPSP2、XPSP3使用的破解程序,然后是安装系统主题 二、系统设置 这是一个比较复杂的东西,很多人都有自己的理解,也有自己的爱好。 1、设置任务栏:建议按如下图进行设置
2、任务栏快捷图标建议保留三个(如下图) 3、系统属性设置: 远程设置——把两个勾都去掉 自动更新设置——关闭自动更新 系统还原设置——关闭系统还原 高级设置: 性能选项——选图示的三项就行了
GHOST系统封装详细教程(适合初学者)
看到很多会员说封装时出现各种各样的问题,感觉还是因为看的封装教程太多,封装工具也太多、太乱,都不知道该怎么具体操作了,所以会出现这样那样的错误。本人就将自己的封装经验写出来分享一下。 本文中涉及的文章及帖子,可能部分会员无法阅读,如果是这种情况,请你努力发表有意义的帖子,达到中级会员,这样就可以阅读了。对你造成的不便还请谅解! 教程架构: 第一篇系统、工具及软件安装 第二篇封装工具选择及实战 第三篇光盘ISO文件制作 下面以封装制作GHOSTXPSP3为例,进行讲解! 第一篇系统、工具及软件安装 一、准备工作 1、操作系统选择:建议采用微软官方的VOL原版 ——为什么要用VOL原版?因为VOL原版适用于任何电脑,而某些品牌机赠送的是OEM版,只能用于对应的品牌电脑,并且还需激活! ——特别说明一下:很多人喜欢说正版,其实所谓的正版是要通过微软官方验证的,但是系统内容却并不一定是原版的。 详情可以参阅帖子: Windows_XP_Service_Pack_3_X86_CD_VOL_CN微软官方原版下载: 2、系统补丁:主要靠自己平时收集整理,建议到微软官方下载 如果没有,可以使用别人做好的,推荐一个比较好的系统补丁集——系统之家,每月都有更新! 也可以使用360安全卫士下载,然后收集整理。 3、办公软件:一般来讲,做GHOST封装都会安装OFFICE办公软件,也建议采用微软原版,不要使用修改版。 Microsoft Office 2003_vol原版下载
Microsoft Office 2003 Service Pack 3下载 2007 office system格式兼容文件下载 4、工具软件:可以根据自己的爱好并结合电脑城装机的实际情况安装部分常用工具软件。这些软件大部分都是共享的免费软件,也建议到相应的官方网站下载,尽量不要使用第三方修改版本! 推荐下载 二、系统安装 1、微软官方原版系统安装过程图解 补充一下:为了封装系统的稳定,建议全新安装,即使用全盘格式化进行安装;同时在安装系统、工具、软件的时候断开外部网络;并使用PS/2鼠标操作! 系统安装好后就可以进行系统补丁、工具软件、办公软件的安装——这里讲点窍门:先装工具软件、办公软件,最后装系统补丁。因为很多集成补丁包里面含有WMP、OFFICE、DX、AX补丁,如果先装,可能你的OFFICE补丁就不是很完整。 2、系统主题屏保安装: 首先进行系统主题破解,这里有适合XPSP2、XPSP3使用的破解程序 然后是安装系统主题 三、系统设置 ——这是一个比较复杂的东西,很多人都有自己的理解,也有自己的爱好。
超级详细的系统封装教程超级详细的系统封装教程
超级详细的系统封装教程超级详细的系统封装教程 一、准备工作 1、准备所需工具软件 ※S&R&S_V9.5.1118 智能系统封装工具 ※DEPLOY.CAB(在系统安装光盘:\SUPPORT\TOOLS目录下自带) ※Ghost_v8.0 & v8.2(v8.0以上版本才能够支持NTFS分区) ※Windows2K/XP/2003系统安装光盘(推荐使用免激活的版本) ※DllCacheManager_V1.0(龙帝国专用版)Dllcache备份还原工具 2、安装操作系统 正常安装操作系统并打好系统安全补丁(一定要安装到C盘,不能安装到其他分区,除非你是整个硬盘Ghost )。操作系统可选择FAT32和NTFS两种文件格式进行安装,建议采用FAT32文件格式(不要偷懒一定要完全格 式化,防止磁盘有坏区),因为Ghost对FTA32的压缩率更大一些,可以减小制作后的备份文件体积。再一个 是FTA32格式在恢复后还可以转换为NTFS,而NTFS转换成FTA32的话就比较麻烦,因此采用FAT32文件格式较 为灵活一些。当然认真读过MS的FAT与NTFS、NTFS与Convert NTFS区别的就应该知道,"原生"的NTFS比转换 的NTFS在性能与文件碎片上更具有优势,因此也建议注重性能者采用NTFS文件格式进行安装操作系统(" 原 生"是指直接用NTFS文件格式进行格式化的分区,而不是通过Convert转换的)。 对于Windows XP,制作万能克隆时的一个重要问题就是系统激活,因为Windows XP为了防止盗版,采取了激 活机制,当硬件发生改变时,系统就会要求重新激活,所以建议使用不需要激活的Windows XP版本,如大企 业授权版本等。 3、安装应用软件 安装注册并设置好你所需要的应用软件,如:Office、Winrar等。 注:由于使用sysprep重新封装系统后,在恢复安装时系统将把输入法的相关设置还原到系统默认状态,封 装前新安装的输入法将不在语言栏的列表里显示,需手动再次添加。为此WindowsXP的系统可在系统封装前 作以下设置:打开控制面板,双击“区域和语言选项”,选择“高级”,在“默认用户帐户设置”框下选中“将所 有设置应用于当前用户帐户和默认用户配置文件”,然后点“确定”,这样语言栏的输入法相关设置就添加到 系统的默认配置文件中了。重新封装系统后,在恢复安装时就可使新安装的输入法自动添加到语言栏的输入 法列表里了。 4、安装S&R&S_V9.5.1118 智能系统封装工具 双击S&R&S_V9.5.1118 智能系统封装工具,一路“下一步”就可以了,它会自动在当前系
手把手教你封装GHOST系统(详细图文教程)
新增:虚拟机安装 一、虚拟机的按装 首先安装虚拟(我用的是VM5.5.1),然后运行汉化包 二.设置:新建虚拟,要选择windows xp professional(我们现在封的都是XP) 最重要的一步,如图 这里要注意了,要选择第2个,方便我们和主机一样,可以上网。 硬盘设置看你真机的硬盘的大小而定,一般我们有10G就够了。 下一步,就是虚拟的分区等设置 首先,要改的是启动顺序,要改成光区 启动,和我们真机是一样的,开虚拟后按F2,进入设置,首先把软区去了 然后改启动顺序的,这个估计大家都会吧,用减号键就可以改的。 下一步,让光区加载所要做的系统的的ISO(我用的是自由的V6),然后给系统分区,我用DM分的,C盘4.G,D盘6G。 下一步,就是做系统了,这个就不用给大家说了吧。 下面是关于主机和虚拟互相转移文件的设置, 首先,我们用虚拟机光区加载一个互相拖拽的ISO, 然后启动虚拟,打开光区,把这个文件复制到D盘,运行一下,就可以实现真机和虚拟来回拖拽文件了,但是有一点,虚拟不可以重起,如果重起了的话,还要运行他,才可以拖拽的。 这样,我们就可以把我们所需要的封装一系列文件直接放到虚拟里了。 第一篇,系统安装及优化 一、系统安装
1、微软官方原版系统安装过程图解 补充一下:为了封装系统的稳定,建议全新安装,即使用全盘格式化进行安装;同时在安装系统、工具、软件的时候断开外部网络;并使用PS/2鼠标操作! 系统安装好后就可以进行系统补丁、工具软件、办公软件的安装——这里讲点窍门:先装工具软件、办公软件,最后装系统补丁。因为很多集成补丁包里面含有WMP、OFFICE、DX、AX补丁,如果先装,可能你的OFFICE补丁就不是很完整。 2、系统主题屏保安装: 首先进行系统主题破解,这里有适合XPSP2、XPSP3使用的破解程序,然后是安装系统主题 二、系统设置 这是一个比较复杂的东西,很多人都有自己的理解,也有自己的爱好。 1、设置任务栏:建议按如下图进行设置 2、任务栏快捷图标建议保留三个(如下图) 3、系统属性设置: A)远程设置——把两个勾都去掉 B)自动更新设置——关闭自动更新 C)系统还原设置——关闭系统还原 D)高级设置: 性能选项——选图示的三项就行了
GHOST系统封装详细图文教程完整版
第一篇系统、工具及软件安装 一、准备工作 1、操作系统选择:建议采用微软官方的VOL原版 ——为什么要用VOL原版?因为VOL原版适用于任何电脑,而某些品牌机赠送的是OEM 版,只能用于对应的品牌电脑,并且还需激活! ——特别说明一下:很多人喜欢说正版,其实所谓的正版是要通过微软官方验证的,但是系统内容却并不一定是原版的。 详情可以参阅帖子: Windows_XP_Service_Pack_3_X86_CD_VOL_CN微软官方原版下载: 2、系统补丁:主要靠自己平时收集整理,建议到微软官方下载 如果没有,可以使用别人做好的,推荐一个比较好的系统补丁集——系统之家,每月都有更新! 也可以使用360安全卫士下载,然后收集整理。 3、办公软件:一般来讲,做GHOST封装都会安装OFFICE办公软件,也建议采用微软原版,不要使用修改版。 Microsoft Office 2003_vol原版下载 Microsoft Office 2003 Service Pack 3下载 2007 office system格式兼容文件下载 4、工具软件:可以根据自己的爱好并结合电脑城装机的实际情况安装部分常用工具软件。这些软件大部分都是共享的免费软件,也建议到相应的官方网站下载,尽量不要使用第三方修改版本! 推荐下载 二、系统安装 1、微软官方原版系统安装过程图解 补充一下:为了封装系统的稳定,建议全新安装,即使用全盘格式化进行安装;同时在安装系统、工具、软件的时候断开外部网络;并使用PS/2鼠标操作! 系统安装好后就可以进行系统补丁、工具软件、办公软件的安装——这里讲点窍门:
先装工具软件、办公软件,最后装系统补丁。因为很多集成补丁包里面含有WMP、OFFICE、DX、AX补丁,如果先装,可能你的OFFICE补丁就不是很完整。 2、系统主题屏保安装: 首先进行系统主题破解,这里有适合XPSP2、XPSP3使用的破解程序 然后是安装系统主题 三、系统设置 ——这是一个比较复杂的东西,很多人都有自己的理解,也有自己的爱好。 1、设置任务栏:建议按如下图进行设置 2、任务栏快捷图标建议保留三个(如下图) 3、系统属性设置: A)远程设置——把两个勾都去掉
封装制作Windows7系统(详细教程)
网上有很多的各种修改版的系统,如当年的xx花园,如x度,xx风等等,作为熟悉电脑的老手们是只使用纯净版系统的,毕竟,网上的修改版系统即使没有病毒木马,也给你塞了一堆你不喜欢的东西。可是,每次自己重装纯净版系统还是要安装很多自己常用的软件,还要去挨个做下系统配置来适应自己的习惯,自己家的电脑、公司的电脑都可能碰到这个问题,这个时候,我们就可以考虑动手DIY一个专属系统了,是的,这就是要封装。 很多人都认为制作封装系统是一件很复杂、很高深的事情。事实上,真正做过1次封装系统以后,就会发觉做封装系统并不困难。只要具有一定电脑基础(会装操作系统、安装软件,能够比较熟练地使用常用的应用软件),再加上一点点细心和耐心,制作一个属于自己的封装系统是一件轻而易举的事情。下面,我们一起来制作属于自己的Windows7封装系统吧。 一、封装前准备二、安装操作系统和应用程序 三、进行封装四、制作封装系统镜像 五、让封装系统更加完美 一、封装前准备 1、Windows7官方发布的安装光盘(镜像)(这里就不提供给大家了,大家自己想办法) 2、需要预装的各种应用软件,如Office/WPS、Photoshop、Win7优化大师等等, 3、UltraISO和Windows7 AIK。Windows7 AIK简体中文版的下载地址为: https://www.360docs.net/doc/e214821902.html,/do ... A402A/KB3AIK_CN.iso 4、WindowsPE光盘(最好是Windows7PE光盘)。Windows7PE光盘可以使用Windows7AIK制作,也可以在以下地址下载: https://www.360docs.net/doc/e214821902.html,/zh-cn/fil ... -a413-0019d11a795f/ 二、安装操作系统和应用程序 1、安装Windows7操作系统。 安装操作系统有4个环节要注意: ①操作系统最好安装在C盘,安装期间(包括后面安装应用程序和进行封装)最好不要连接到网络。 ②如果在安装操作系统过程中输入序列号,进行封装以后再重新安装操作系统不会再提示输入序列号。除非要制作成OEM版的封装系统,否则在安装过程中提示输入序列号时,不要输入序列号,直接点―下一步‖继续系统的安装。 ③为保持封装系统纯净,安装好Windows7操作系统后最好不要安装硬件的驱动。当然,安装驱动程序也不会影响系统的封装。 ④为避免调整优化系统、安装应用软件过程中出现不必要的错误和产生错误报告文件,
使用 Easy Sysprep V4(ES4) 封装 Windows 7教程
使用Easy Sysprep v4(ES4) 封装 Windows 7教程 (一)安装与备份系统 1、安装Windows 7 可能很多人会说,安装Win7谁不会,这也用说?装Win7的确人人都会,但如何安装才是最适合系统封装的,就未必是人人都会了。安装是封装之本,没有好的安装方法,封装只是徒劳,请重视本节内容。 Win7(Vista)在安装时,与往代系统最大的区别在于会默认创建一个100M的分区(如下图),但100M的分区并不是区别的本质,区别的本质是“Win7默认将启动文件与系统文件分开存放”。
我们姑且将存放启动文件的分区叫做“启动分区”,存放Windows的分区叫做“系统分区”。WinXP时代启动分区和系统分区都是C盘,而Win7时代则为启动分区单独划分100M存放,另将系统分区作为C盘。所以Win7的那100M并不难理解,理解为是启动文件特设的“单间”就可以了。 没有这100M会怎样?答案很明确,没有这100M系统会无法启动。虽然系统文件都在C盘完好无缺,但没有引导系统是无法正常启动的。反应快的同学已经意识到这将带来的问题了,如果按此方式分区,封装部署后映像如果只备份系统分区(C盘),则映像恢复后是无法启动的!(其实这也不尽然,使用Easy Image X这类恢复映像后自动修复MBR和引导文件映像的恢复工具的话,系统还是可以正常启动的) 那有没有办法像XP时代那样,将启动分区和系统分区都放在C盘?当然可以,实现也很简单,使用第三方分区工具进行分区操作就可以了。例如使用DiskGenius分区,如下图所示:
使用第三方分区工具分区后,再次启用Win7安装程序,就会呈现类似下图状况了,不会出现100M的启动分区,选择系统分区安装系统后,启动文件和系统文件就都位于C盘了。 2、进入最适合封装的系统账户:Administrator Windows 7 的Administrator 具有用户可用的最高系统权限。即便新建一个管理员账户,与Administrator 用户同属于Administrators 组,也无法具有与Administrator 完全相同的系统管理与操作权限。系统封装需要执行大量对系统文件的修改与执行类操作,所以最适用于系统封装的,莫过于Administrator 用户。进入Administrator用户的方法有很多,但下面我为大家推荐一个最为直接的方法,且不易产生问题和残留。 系统安装完毕后,会进入OOBE阶段(如下图),此时不要输入任何信息,也不要“下一步”,直接按“Ctrl + Shift + F3”。
系统封装超详细图文教程、工具原理
万能Ghost系统封装超详细图文教程、工具原理 系统封装,说简单就是把系统制作成镜像的方法刻录到光盘,它不同于系统的正常安装,本质区别在于“系统封装”是将一个完整的系统以拷贝的形式打包,然后用粘贴的形式安装在另外一个系统盘上,而正常安装则是通过 Ghost Setup程序进行安装。它是以硬盘的扇区为单位进行的,也就是说可以将一个硬盘上的物理信息完整复制,而不仅仅是数据的简单复制,能克隆系统中所有的东东,包括声音动画图像,连磁盘碎片都可以帮你复制。 现在的Ghost系统不断地发展,已经将各种驱动集成到Ghost里,并实现自识别,Ghost克隆版系统的优点众所周知,集成常用软件、设备驱动齐全,删减了系统无用的功能,安装速度快,缩短系统安装的时间,只需要10分钟左右! =================================================================================== ======= 总步骤: 一、前期基础工作 二、系统设置准备 三、系统DIY,替换的系统资源 四、系统减肥(可选) 五、更改系统硬件驱动(关键) 六、系统封装(推荐) 七、制作Ghost系统镜像文件 下面按照“总步骤”正式开始 一、前期基础工作 1、准备封装所需工具软件 *Windows2K/XP/2003系统安装光盘(推荐使用免激活的版本) 关于XP免激活版本的问题【附:Winxp sp2 上海政府版vol 下载】 https://www.360docs.net/doc/e214821902.html,/masoso/blog/item/7a52856309d5cb660d33fa31.html *DEPLOY.CAB(企业部署工具DEPLOY,系统安装光盘:\SUPPORT\TOOLS目录下提取) *SysPacker_1.0_RC_4(系统封装测试版) *YLMF 系统 DIY Y1.6(系统信息修改工具) *Drvtool.exe(驱动程序智能选择工具,可以从GHOST光盘C:\WINDOWS内提取已经制作好的,别遗漏了Drvtool.ini配置文件) *Drivers.exe(系统补充驱动程序exe安装包,如果不会设置“驱动程序智能选择工具”,直接使用这个安装包,就不需要用驱动选择工具了) *Drivers驱动包(“深度”一类的驱动包,为了实现驱动程序智能识别选择,分为显卡、声卡
教你怎么制作系统GHOST封装详细图文教程完整版
xp系统GHOST封装详细图文教程完整版(适合初学者) 教程架构: 第一篇系统、工具及软件安装 第二篇封装工具选择及实战 第三篇光盘ISO文件制作 下面以封装制作GHOSTXPSP3为例,进行讲解! 第一篇系统、工具及软件安装 一、准备工作 1、操作系统选择:建议采用微软官方的VOL原版 ——为什么要用VOL原版因为VOL原版适用于任何电脑,而某些品牌机赠送的是OEM版,只能用于对应的品牌电脑,并且还需激活! ——特别说明一下:很多人喜欢说正版,其实所谓的正版是要通过微软官方验证的,但是系统内容却并不一定是原版的。 Windows XP with sp3 VOL 微软原版下载:
SHA1: D142469D0C3953D8E4A6A490A58052EF52837F0F CRC32: FFFFFFFF ? 正版密钥: MRX3F-47B9T-2487J-KWKMF-RPWBY M6TF9-8XQ2M-YQK9F-7TBB2-XGG88 附:关于VOL 和 VLK 解析—— VOL是Volume Licensing for Organizations 的简称,中文即“团体批量许可证”。根据这个许可,当企业或者政府需要大量购买微软操作系统时可以获得优惠。这种产品的光盘卷标带有"VOL"字样,就取 "Volume"前3个字母,以表明是批量。这种版本根据购买数量等又细分为“开放式许可证”(Open License)、“选择式许可证(Select License)”、“企业协议(Enterprise Agreement)”、“学术教育许可证(Academic Volume Licens ing)”等5种版本。根据VOL计划规定, VOL产品是不需要激活的。 VLK不是一种独立版本。VLK的全称是Volume Licensing Key ,它是指VOL版本在部署(deploy)中所需要的 KEY,而且只能用于VOL版中。简而言之,对VOL版XP来说,VLK就是PID为640的安装 KEY 。例如,上海政府VOL版XP所带的安装KEY:DG8FV-B9TKY-FRT9J-6CRCC-XPQ4G,就是一个VLK。VLK的作用仅仅是证明产品合法化。按照许可协议,零售版XP的“密钥”只能用在一台PC上,而 VOL 版XP 则可按协议供给多台PC使用。还有一个重要的区别,零售版XP需要激活,而 VOL 版XP根本就没有这个概念。VOL版的XP没有Home这个版本,其功能跟 Professional版是一样的。 2、系统补丁:主要靠自己平时收集整理,如果没有,可以使用别人做好的, 也可以使用360安全卫士下载,然后收集整理。 3、办公软件:一般来讲,做GHOST封装都会安装OFFICE办公软件,也建议采 用微软原版,不要使用修改版。
Windows7系统封装教程(详细图解)
Windows7系统封装教程(详细图解) 网上有很多的各种修改版的系统,如当年的xx花园,如x度,xx风等等,作为熟悉电脑的老手们是只使用纯净版系统的,毕竟,网上的修改版系统即使没有病毒木马,也给你塞了一堆你不喜欢的东西。可是,每次自己重装纯净版系统还是要安装很多自己常用的软件,还要去挨个做下系统配置来适应自己的习惯,自己家的电脑、公司的电脑都可能碰到这个问题,这个时候,我们就可以考虑动手DIY一个专属系统了,是的,这就是要封装。 很多人都认为制作封装系统是一件很复杂、很高深的事情。事实上,真正做过1次封装系统以后,就会发觉做封装系统并不困难。只要具有一定电脑基础(会装操作系统、安装软件,能够比较熟练地使用常用的应用软件),再加上一点点细心和耐心,制作一个属于自己的封装系统是一件轻而易举的事情。下面,我们一起来制作属于自己的Windows7封装系统吧。 Windows7系统封装教程 一、封装前准备
1、Windows7官方发布的安装光盘(镜像)(这里就不提供给大家了,大家自己想办法) 2、需要预装的各种应用软件,如Office/WPS、Photoshop、Win7优化大师等等,当然,作为对软媒的支持,也加上闪游浏览器和酷点吧。 3、UltraISO和Windows7 AIK。Windows7 AIK简体中文版的下载地址为: https://www.360docs.net/doc/e214821902.html,/download/6/3/1/631A7F90-E5CE-43AA-AB05-EA82AEAA402A/KB3AIK_CN.iso 4、WindowsPE光盘(最好是Windows7PE光盘)。Windows7PE光盘可以使用Windows7AIK制作,也可以在以下地址下载: https://www.360docs.net/doc/e214821902.html,/zh-cn/files/709d244c-2e5a-11de-a4 13-0019d11a795f/ 二、安装操作系统和应用程序
Windows7 封装 系统 图文 详细教程
制作Windows7封装系统详细教程 很多人都认为制作封装系统是一件很复杂、很高深的事情。事实上,真正做过1次封装系统以后,就会发觉做封装系统并不困难。只要具有一定电脑基础(会装操作系统、安装软件,能够比较熟练地使用常用的应用软件),再加上一点点细心和耐心,制作一个属于自己的封装系统是一件轻而易举的事情。下面,我们一起来制作属于自己的Windows7封装系统吧。 一、封装前准备 1、Windows7官方发布的安装光盘(镜像)。 2、需要预装的各种应用软件,如Office、Photoshop、完美解码等等。 3、UltraISO和Windows7AIK。Windows7AIK简体中文版的下载地址为: https://www.360docs.net/doc/e214821902.html,/download/6/3/1/631A7F9 0-E5CE-43AA-AB05-EA82AEAA402A/KB3AIK_CN.iso 4、WindowsPE光盘(最好是Windows7PE光盘)。
Windows7PE光盘可以使用Windows7AIK制作,也可以在以下地址下载: https://www.360docs.net/doc/e214821902.html,/zh-cn/files/709d244c-2e5a-11de-a413-0019d11a795f/ 二、安装操作系统和应用程序 1、安装Windows7操作系统。 安装操作系统有4个环节要注意: ①操作系统最好安装在C盘,安装期间(包括后面安装应用程序和进行封装)最好不要连接到网络。 ②如果在安装操作系统过程中输入序列号,进行封装以后再重新安装操作系统不会再提示输入序列号。除非要制作成OEM版的封装系统,否则在安装过程中提示输入序列号时,不要输入序列号,直接点“下一步”继续系统的安装。 ③为保持封装系统纯净,安装好Windows7操作系统后最好不要安装硬件的驱动。当然,安装驱动程序也不会影响系统的封装。 ④为避免调整优化系统、安装应用软件过程中出现不必要的错误和产生错误报告文件,第一次进入系统后应当禁用UAC和关闭错误报告。禁用UAC和关闭错误报告的方法如下: