NET20 plus说明书2016
ID20网络连接设备说明书

1ID20 network connectionOne of the following network cards can be installed to allow operation of the ID20-... in a network.13Pin assignmentPin assignment AUI Pin 1collision –Pin 2collision +Pin 4transmit +Pin 6receive +Pin 7receive –Pin 8power Pin 9power return Pin 10collision shield Pin 12transmit –Pin assignment twisted pair Pin 1TX +Pin 2TX –Pin 4RX –Pin 12RX +Pin assignment token ringStation receive Station receive Station transmit Station transmit Shield4Installing network cardsDisassembly•Switch off terminal, disconnect power plug.•Unscrew 2 screws on underside of cover at front.•Lift off cover and place face down in front of terminal on a clean, soft support.•Disconnect graphics ribbon cable or LCD adapter board (5).•Disconnect CAN bus cable at power supply board and backlighting board (2,4).•Disconnect keypad extension cable (3).•Unscrew guard plate of power supply and disconnect fan cable (1).•If need be, move all interface cables to the right.•Undo ring nuts for scale connection 1,keypad, COM1 and COM2 at the rear of the terminal.•Unscrew backplane and lift out complete with holder and plug-in cards.•Unscrew spacer bolt on the left.•Remove heavy gauge nut and dummy stopper at the rear of the terminal.Installing connection socket board(for Ethernet 10 base T, Ethernet 10 base5 and token ring).•Unscrew ring nut (6) from the interface connection socket.•Lead interface connection socket out-ward, screw on ring nut (6) from the outside and tighten. Ensure correct seating of the rubber ring seal.2Final assembly steps•Insert backplane with plug-in cards in the housing.The two side fastening plates must be exactly level with the top edge of the bottom housing.•Tighten 4 ring nuts at rear of terminal. Ensure correct seating of the rubber ring seals and spacer washers.•Fasten backplane with screw to the spacer bolt.•Plug network link cable into network card.•Plug in all cables.•Install guard plate of power supply.•Engage cover from the back with the 2 screws and fasten underside of cover at the front.3Installing coax connector(for Ethernet 10 base 2 and Arcnet)•Unscrew ring nut (6) from the interface connection socket.•Lead network link cable with spring was-her (7) and rubber washer (8) outward.•Attach nut (10) and reducer (9) to rear of terminal and tighten. Ensure correct seating of the reducer.Installing network card•Engage network card securely with the backplane.•Slide slotted plate of network card into fastening plate and secure with a screw.•Screw spacer bolt onto threaded bolt.Installation instructionsMETTLER TOLEDO MultiRangeID20 Network connectionMettler-Toledo (Albstadt) GmbH, D-72458 Albstadt, Germany, Tel. (0 74 31) 14-0, Fax (0 74 31) 14-232A Mettler-Toledo Ges.m.b.H., 1100 Wien, Tel. (01) 604 19 80, Fax (01) 604 28 80AUS Mettler-Toledo Ltd., Victoria 3207, Tel. (3) 646 45 51, Fax (3) 645 39 35B N.V. Mettler-Toledo S.A., 1651 Lot, Tél. (02) 3340211, Fax (02) 3781665CH Mettler-Toledo (Schweiz) AG, 8606 Greifensee, Tel. (01) 944 45 45, Fax (01) 944 45 10CN Mettler-Toledo (Shanghai) Ltd., Shanghai 200233, Tel. (21) 470 3932, Fax (21) 470 3351D Mettler-Toledo GmbH, 35353 Giessen 11, Tel. (0641) 507-0, Fax (0641) 5 29 51DK Mettler-Toledo A/S, 2100 Copenhagen Ø, Tel. (39) 29 04 00, Fax (39) 29 04 26E Mettler-Toledo S.A.E., 08038 Barcelona, Tel. (93) 223 22 22, Fax (93) 223 02 71F Mettler-Toledo s.a., 78220 Viroflay, Tél. (1) 30 97 17 17, Fax (1) 30 97 16 16HK Mettler-Toledo PacRim Ltd., Kowloon, Hongkong, Tel. 724 23 48, Fax 724 23 49I Mettler-Toledo S.p.A., 20026 Novate Milanese, Tel. (02) 33332.1, Fax (02) 35 62 973J Mettler-Toledo K.K., Takarazuka 665, Tel. 797 74 2406, Fax 797 74 2641N Mettler-Toledo A/S, 1008 Oslo 10, Tel. (22) 30 44 90, Fax (22) 32 70 02NL Mettler-Toledo B.V., 4000 HA Tiel, Tel. (03440)11311*, Fax (03440) 20530S Mettler-Toledo AB, 120 08 Stockholm, Tel. (08) 702 50 00, Fax (08) 642 45 62SGP Mettler-Toledo (S.E.A.) Pte. Ltd., Singapore 0513, Tel. 0065 778 67 79, Fax 0065 778 66 39TH Mettler-Toledo (Thailand), Bangkok 10310, Tel. 719 64 80-87, Fax 719 64 79UK Mettler-Toledo Ltd., Leicester, LE4 lAW, Tel. (0116) 235 7070, Fax (0116) 236 6399USA Mettler-Toledo Inc., Worthington, Ohio 43085, Tel. (614) 438-4511, Fax (614) 438-4755USA Mettler-Toledo Inc., Hightstown, NJ 08520-0071, Tel. (609) 448-3000, Fax (609) 586-5451For all other countries: Mettler-Toledo AG, VI, 8606 Greifensee, Tel. 01/944 22 11, Fax 01/944 31 70Subject to technical changes © 10/95 Mettler-Toledo (Albstadt) GmbH Printed in Germany 2082844 Software installation Ethernet The drivers for the Ethernet network cards are already installed in the ID20 Weighing Terminal in the directory C:\3COM.Arcnet and token ring The drivers for these network cards must be installed from the enclosed diskette, see manual of the network card.5Optional equipment Boot ROM For powerup of the ID20 Weighing Terminal via Ethernet AUI cable For Ethernet 10 base 5,15-pin D-subminiature5 m20 m Twisted pair cable For Ethernet 10 base T, 8-pin RJ455 m20 m Adapter For token ring, 5-pin Order No.2075852056832075652052472081525059235。
Juniper Networks SSG 5和SSG 20产品说明说明书
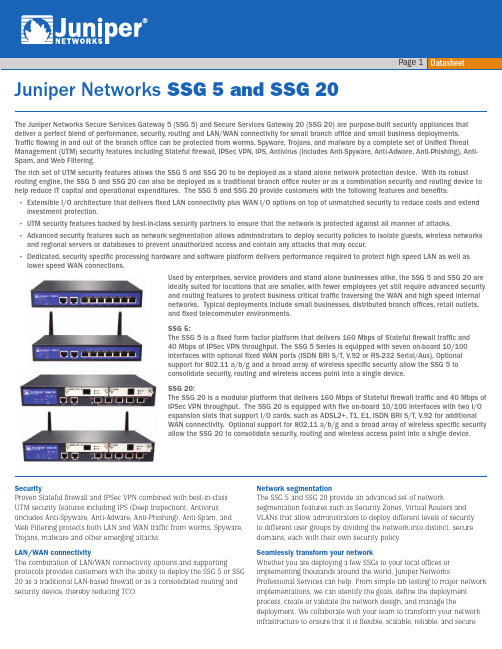
Security Proven Stateful firewall and IPSec VPN combined with best-in-class UTM security features including IPS (Deep Inspection), Antivirus (includes Anti-Spyware, Anti-Adware, Anti-Phishing), Anti-Spam, and Web Filtering protects both LAN and WAN traffic from worms, Spyware, Trojans, malware and other emerging attacks.
NET PLUS 门禁软件使用说明书

Microsoft .NET Core开发平台指南说明书

About the T utorial.NET Core is the latest general purpose development platform maintained by Microsoft. It works across different platforms and has been redesigned in a way that makes .NET fast, flexible and modern..NET Core happens to be one of the major contributions by Microsoft. Developers can now build Android, iOS, Linux, Mac, and Windows applications with .NET, all in Open Source.AudienceThis tutorial is designed for software programmers who want to learn the basics of .NET Core.PrerequisitesYou should have a basic understanding of Computer Programming terminologies. A basic understanding of any of the programming languages is a plus.Disclaimer & CopyrightCopyright 2018 by Tutorials Point (I) Pvt. Ltd.All the content and graphics published in this e-book are the property of Tutorials Point (I) Pvt. Ltd. The user of this e-book is prohibited to reuse, retain, copy, distribute or republish any contents or a part of contents of this e-book in any manner without written consent of the publisher.We strive to update the contents of our website and tutorials as timely and as precisely as possible, however, the contents may contain inaccuracies or errors. Tutorials Point (I) Pvt. Ltd. provides no guarantee regarding the accuracy, timeliness or completeness of our website or its contents including this tutorial. If you discover any errors on our website or inthistutorial,******************************************.T able of ContentsAbout the Tutorial (i)Audience (i)Prerequisites (i)Disclaimer & Copyright (i)Table of Contents (ii) Core – Overview (1)Characteristics of .NET Core (1)The .NET Core Platform (2) Core – Prerequisites (3) Core – Environment Setup (4)Visual Studio 2015 (4) Core – Getting Started (10) Core – Numerics (13)Integral types (13)Floating-point types (13) Core – Garbage Collection (16)Advantages of Garbage Collection (16)Conditions for Garbage Collection (16)Generations (16) Core – Code Execution (18).NET Core Code Execution Process (19) Core – Modularity (21) Core – Project Files (24) Core – Package References (28) Core – Create UWP App with .NET Core (34) Core – MSBuild (42) Core – Metapackage (47) Core – Windows Runtime and Extension SDKs (53) Core – Create .NET Standard Library (58) Core – Portable Class Library (63)What is PCL (64) Core – Adding References to Library (72) Core – Sharing .NET Core Libraries (77) Core – Creating a Xamarin.Forms Project (87) Core – PCL Troubleshooting (95) Core – Create a Testing Project (105) Core – Running Tests in Visual Studio (109) Core – Testing Library (116) Core – Managed Extensibility Framework (124) Core – .NET Core SDK (134) Core – MSBuild and project.json (140)MSBuild vs project.json (141) Core – Restoring and Building with MSBuild (143) Core – Migrations (147).NET Core is the latest general purpose development platform maintained by Microsoft. It works across different platforms and has been redesigned in a way that makes .NET fast, flexible and modern. This happens to be one of the major contributions by Microsoft. Developers can now build Android, iOS, Linux, Mac, and Windows applications with .NET, all in Open Source.In this tutorial, we will cover .NET Core and a few new innovations including the .NET Framework updates, .NET Standard, and Universal Windows Platform updates, etc.Characteristics of .NET CoreThe following are the major characteristics of .NET Core:Open source∙.NET Core is an open source implementation, using MIT and Apache 2 licenses.∙.NET Core is a .NET Foundation project and is available on GitHub.∙As an open source project, it promotes a more transparent development process and promotes an active and engaged community.Cross-platform∙Application implemented in .NET Core can be run and its code can be reused regardless of your platform target.∙It currently supports three main operating systems (OS):o Windowso Linuxo MacOS∙The supported Operating Systems (OS), CPUs and application scenarios will grow over time, provided by Microsoft, other companies, and individuals.Flexible deployment∙There can be two types of deployments for .NET Core applications:o Framework-dependent deploymento Self-contained deployment4.NET Core5∙ With framework-dependent deployment, your app depends on a system-wide version of .NET Core on which your app and third-party dependencies are installed.∙With self-contained deployment, the .NET Core version used to build your application is also deployed along with your app and third-party dependencies and can run side-by-side with other versions.Command-line tools∙All product scenarios can be exercised at the command-line.Compatible∙.NET Core is compatible with .NET Framework, Xamarin and Mono, via the .NET Standard Library.Modular∙ .NET Core is released through NuGet in smaller assembly packages.∙ .NET Framework is one large assembly that contains most of the core functionalities. ∙ .NET Core is made available as smaller feature-centric packages.∙ This modular approach enables the developers to optimize their app by including just those NuGet packages which they need in their app.∙The benefits of a smaller app surface area include tighter security, reduced servicing, improved performance, and decreased costs in a pay-for-what-you-use model.The .NET Core Platform.NET Core Platform contains the following main parts:∙ .NET Runtime : It provides a type system, assembly loading, a garbage collector, native interop and other basic services.∙ Fundamental Libraries : A set of framework libraries, which provide primitive data types, app composition types and fundamental utilities.∙ SDK & Compiler : A set of SDK tools and language compilers that enable the base developer experience, available in the .NET Core SDK.∙‘dotnet’ app host : it is used to launch .NET Core apps. It selects the runtime and hosts the runtime, provides an assembly loading policy and launches the app. The same host is also used to launch SDK tools in much the same way..NET Core6In this chapter, we will discuss the various dependencies that you need to deploy and run. These include the .NET Core applications on Windows machines that are developed using Visual Studio.Supported Windows Versions.NET Core is supported on the following versions of Windows:∙ Windows 7 SP1 ∙ Windows 8.1 ∙ Windows 10∙ Windows Server 2008 R2 SP1 (Full Server or Server Core) ∙ Windows Server 2012 SP1 (Full Server or Server Core) ∙ Windows Server 2012 R2 SP1 (Full Server or Server Core) ∙Windows Server 2016 (Full Server, Server Core or Nano Server)Dependencies∙If you are running your .NET Core application on Windows versions earlier than Windows 10 and Windows Server 2016, then it will also require the Visual C++ Redistributable.∙ This dependency is automatically installed for you if you use the .NET Core installer. ∙You need to manually install the Visual C++ Redistributable for Visual Studio 2015 if you are installing .NET Core via the installer script or deploying a self-contained .NET Core application.∙For Windows 7 and Windows Server 2008 machines, you need to make sure that your Windows installation is up-to-date and also includes hotfix KB2533623 installed through Windows Update.Prerequisites with Visual Studio∙ To develop .NET Core applications using the .NET Core SDK, you can use any editor of your choice.∙However, if you want to develop .NET Core applications on Windows using Visual Studio, you can use the following two versions:o Visual Studio 2015 o Visual Studio 2017 RC.NET Core7Projects created with Visual Studio 2015 will be project.json-based by default while projects created with Visual Studio 2017 RC will always be MSBuild-based.In this chapter, we will discuss the Environment Setup of .NET Core. It is a significant redesign of the .NET Framework. To use .NET Core in your application, there are two versions you can use:∙Visual Studio 2015∙Visual Studio 2017 RCVisual Studio 2015To use Visual Studio 2015, you must have installed the following;∙Microsoft Visual Studio 2015 Update 3∙Microsoft .NET Core 1.0.1 - VS 2015 Tooling Preview 2Microsoft provides a free version of visual studio which also contains the SQL Server and can be downloaded from https:///en-us/downloads/download-visual-studio-vs.aspx and Microsoft .NET Core 1.0.1 - VS 2015 Tooling Preview 2 can be downloaded from https:///fwlink/?LinkId=817245.You can also follow the installation guidelines on the following Url https:///net/core/#windowsvs2015.Installation of Visual Studio 2015Follow these steps to install Visual Studio 2015:Step 1: Once the downloading completes, then run the installer. The following dialog box will be displayed.89Step 2: Click Install to start the installation process.Step 3: Once the installation completes, you will see the following dialog box.Step 4: Close this dialog and restart your computer if required.10Step 5: Open Visual Studio from the Start Menu; you will receive the following dialog box. It may take a few minutes to load and finally be used for the first time.Step 6: Once it is loaded, you will see the following screen.11Step 7: Once Visual Studio installation is finished, then close Visual Studio and launch Microsoft .NET Core - VS 2015 Tooling Preview 2.Step 8: Check the checkbox and click Install.12Step 9: Once the installation completes, you will see the following dialog box.You are now ready to start your application using .NET Core.Visual Studio 2017In this tutorial, we will be using Visual Studio 2015, but if you want to use Visual Studio 2017, an experimental release of .NET Core tools for Visual Studio is included in Visual Studio 2017 RC and you can see the installation guidelines here https:///net/core/#windowsvs2017.13Visual Studio 2015 provides a full-featured development environment for developing .NET Core applications. In this chapter, we will be creating a new project inside Visual Studio. Once you have installed the Visual Studio 2015 tooling, you can start building a new .NET Core Application.In the New Project dialog box, in the Templates list, expand the Visual C# node and select .NET Core and you should see the following three new project templates: ∙Class Library (.NET Core)∙Console Application (.NET Core)∙ Core Web Application (.NET Core)In the middle pane on the New Project dialog box, select Console Application (.NET Core) and name it "FirstApp", then click OK.14Visual Studio will open the newly created project, and you will see in the Solution Explorer window all of the files that are in this project.To test that .NET core console application is working, let us add the following line.Now, run the application. You should see the following output.1617.NET Core supports the standard numeric integral and floating-point primitives. It also supports the following types:∙ System.Numerics.BigInteger which is an integral type with no upper or lower bound. ∙ plex is a type that represents complex numbers.∙A set of Single Instruction Multiple Data (SIMD)-enabled vector types in the System.Numerics namespace.Integral types.NET Core supports both signed and unsigned integers of different ranges from one byte to eight bytes in length. All integers are value types.The following table represents the integral types and their size;Each integral type supports a standard set of arithmetic, comparison, equality, explicit conversion, and implicit conversion operators.You can also work with the individual bits in an integer value by using the System.BitConverter class.Floating-point types.NET Core includes three primitive floating point types, which are shown in the following table.∙Each floating-point type supports a standard set of arithmetic, comparison, equality, explicit conversion, and implicit conversion operators.∙You can also work with the individual bits in Double and Single values by using the BitConverter class.∙The Decimal structure has its own methods, Decimal.GetBits and Decimal.Decimal(Int32()), for working with a decimal value's individual bits, as well as its own set of methods for performing some additional mathematical operations.BigInteger∙System.Numerics.BigInteger is an immutable type that represents an arbitrarily large integer whose value in theory has no upper or lower bounds.∙The methods of the BigInteger type is closely parallel to those of the other integral types.Complex∙The plex type represents a complex number, i.e., a number witha real number part and an imaginary number part.∙It supports a standard set of arithmetic, comparison, equality, explicit conversion, and implicit conversion operators, as well as mathematical, algebraic, and trigonometric methods.SIMD∙The Numerics namespace includes a set of SIMD-enabled vector types for .NET Core.∙SIMD allows some operations to be parallelized at the hardware level, which results in huge performance improvements in mathematical, scientific, and graphics apps that perform computations over vectors.∙The SIMD-enabled vector types in .NET Core include the following:o System.Numerics.Vector2, System.Numerics.Vector3, and System.Numerics.Vector4 types, which are 2, 3, and 4-dimensional vectors oftype Single.o The Vector<T> structure that allows you to create a vector of any primitive numeric type. The primitive numeric types include all numeric types in theSystem namespace except for Decimal.18o Two matrix types, System.Numerics.Matrix3x2, which represents a 3x2 matrix;and System.Numerics.Matrix4x4, which represents a 4x4 matrix.o The System.Numerics.Plane type, which represents a three-dimensional plane, and the System.Numerics.Quaternion type, which represents a vector that is used to encode three-dimensional physical rotations.19.NET Core20 In this chapter, we will cover the concept of Garbage collection which is one of most important features of the .NET managed code platform. The garbage collector (GC) manages the allocation and release of memory. The garbage collector serves as an automatic memory manager.∙You do not need to know how to allocate and release memory or manage the lifetime of the objects that use that memory. ∙An allocation is made any time you declare an object with a “new” keyword or a value type is boxed. Allocations are typically very fast. ∙When there isn’t enough memory to allocate an object, the GC must collect and dispose of garbage memory to make memory available for new allocations. ∙ This process is known as garbage collection .Advantages of Garbage CollectionGarbage Collection provides the following benefits:∙You don’t need to free memory manually while developing your application. ∙It also allocates objects on the managed heap efficiently. ∙When objects are no longer used then it will reclaim those objects by clearing their memory, and keeps the memory available for future allocations. ∙Managed objects automatically get clean content to start with, so their constructors do not have to initialize every data field. ∙ It also provides memory safety by making sure that an object cannot use the content of another object.Conditions for Garbage CollectionGarbage collection occurs when one of the following conditions is true.∙The system has low physical memory. ∙The memory that is used by allocated objects on the managed heap surpasses an acceptable threshold. This threshold is continuously adjusted as the process runs. ∙ The GC.Collect method is called and in almost all cases, you do not have to call thismethod, because the garbage collector runs continuously. This method is primarily used for unique situations and testing..NET Core21 GenerationsThe .NET Garbage Collector has 3 generations and each generation has its own heap that that is used for the storage of allocated objects. There is a basic principle that most objects are either short-lived or long-lived.Generation First (0)∙In Generation 0, objects are first allocated. ∙In this generation, objects often don’t live past the first generation, since they are no longer in use (out of scope) by the time the next garbage collection occurs. ∙ Generation 0 is quick to collect because its associated heap is small.Generation Second (1)∙In Generation 1, objects have a second chance space. ∙Objects that are short-lived but survive the generation 0 collection (often based on coincidental timing) go to generation 1. ∙Generation 1 collections are also quick because its associated heap is also small. ∙ The first two heaps remain small because objects are either collected or promoted to the next generation heap.Generation Third (2)∙In Generation 2, all long objects are lived and its heap can grow to be very large. ∙The objects in this generation can survive a long time and there is no next generation heap to further promote objects. ∙The Garbage Collector has an additional heap for large objects known as Large Object Heap (LOH). ∙It is reserved for objects that are 85,000 bytes or greater. ∙Large objects are not allocated to the generational heaps but are allocated directly to the LOH. ∙Generation 2 and LOH collections can take noticeable time for programs that have run for a long time or operate over large amounts of data. ∙Large server programs are known to have heaps in the 10s of GBs. ∙The GC employs a variety of techniques to reduce the amount of time that it blocks program execution. ∙The primary approach is to do as much garbage collection work as possible on a background thread in a way that does not interfere with program execution. ∙The GC also exposes a few ways for developers to influence its behavior, which can be quite useful to improve performance.In this chapter, we will understand the execution process of .NET Core and compare it with the .NET Framework. The managed execution process includes the following steps.∙Choosing a compiler∙Compiling your code to MSIL∙Compiling MSIL to native code∙Running codeChoosing a Compiler∙It is a multi-language execution environment, the runtime supports a wide variety of data types and language features.∙To obtain the benefits provided by the common language runtime, you must use one or more language compilers that target the runtime.Compiling your code to MSIL∙Compiling translates your source code into Microsoft Intermediate Language (MSIL)and generates the required metadata.22∙Metadata describes the types in your code, including the definition of each type, the signatures of each type's members, the members that your code references, and other data that the runtime uses at execution time.∙The runtime locates and extracts the metadata from the file as well as from framework class libraries (FCL) as needed during execution.23End of ebook previewIf you liked what you saw…Buy it from our store @ https://24。
NE20 PLUS GNSS接收机用户手册

NET20 PLUS GNSS连续运行参考站系统用户手册北京合众思壮科技股份有限公司说明产品标识版本说明目录说明 (2)第一章技术指标 (5)1.1欢迎使用NET20 PLUS (5)1.2技术规格 (5)1.2.1 物理特性 (5)1.2.2 环境特征 (5)1.2.3 电气特性 (5)1.2.4 性能 (5)1.2.5 接口 (6)1.2.6 数据与存储 (6)第二章 硬件组成 (7)2.1外观 (7)2.1.1 仪器正面 (7)2.1.2 仪器背面 (8)2.2连接及工作状态 (9)2.3结构尺寸图/安装尺寸图 (10)2.4启动主机 (10)第三章WEB应用 (12)3.1 WEB访问 (12)3.2系统状态 (13)3.2.1 系统信息 (13)3.2.2 GNSS状态 (13)3.2.3 卫星信息 (14)3.2.4 数据传输 (14)3.2.5数据记录 (15)3.3更改配置 (17)3.3.1 参考站设置 (18)3.3.2 网络设置 (19)3.3.3 数据传输设置 (22)3.3.4数据记录设置 (22)3.3.5 端口设置 (23)3.3.5.1 蓝牙 (23)3.3.5.2 COM1口方式 (26)3.3.5.3 SOCKET方式 (28)3.3.6 提醒设置 (30)3.3.7仪器注册 (31)3.4数据下载 (31)3.5系统管理 (32)3.5.1 在线升级 (32)3.5.2 日志查看 (33)3.5.3 安全管理 (35)3.6使用帮助 (35)第四章快速面板设置 (36)第一章技术指标1.1欢迎使用NET20 PLUS亲爱的用户,欢迎您使用北斗导航科技有限公司设计开发的NET20 PLUS GNSS连续运行参考站系统接收机。
NET20 PLUS是一款高性能CORS参考站接收机。
以LINUX系统作为开发平台,更支持二次开发,功能强大稳定,可以兼顾很多领域的不同应用。
车载无线充电器说明书
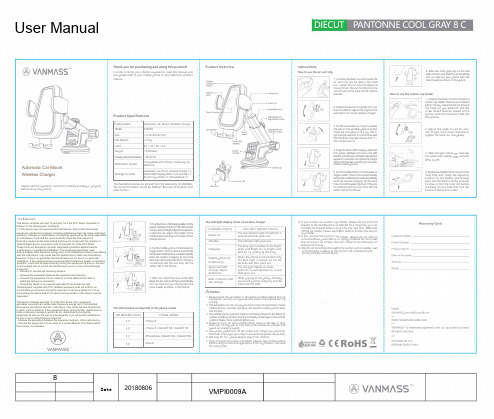
Thank you for purchasing and using this product!In order to bring you a better ex erience, read this manual and also lease refer to your mobile hone or your electronic product manualPlease read this o eration instruction carefully and kee it ro erly before using this roduct.Product Specifications Product Name Automatic Car Mount Wireless Charger ModelCTEZ59 Size ::s 118x83x67)mmNet Weight 叮37gIn utSV::: 2A / 9V::: 2AOut ut10W Max) 妇irgl心ction氏沺m=6-8)m mA lication Model Com atible with iPhone, Samsung, LG,Moto etc.Automatic car mount wireless charger x1, Package IncludesMiao-USS中arging cable xl,Airvent dp xl,Suction cu holder x1, M anual book x 1 The arameters above are denved from the laboratory of ANDOBIL, The actual arameter would be different Because of roducts and other factorsProduct Overviewp ,uc otg r A 乡o心g ps 勺InstructionsHow to use the air vent clip1. Unsc面the fixed nut and choose thea;, vent c1;p, set the ball ;n the fixed nut . Fasten the nut ;nto the spher;cal,:1 top and ush the nut fordbly ;nto theround hole at the back of the veh;cle bracket.2. Rotate dod切ise to tighten the nut.then如s able toad丿ust the angle of the automatic car mount劝闭ess cha勺er.3. Fix the automabc car mount wireless charger on the suitable lace of outlet The"'a"'two gears ,n the cli , left or nght can be selected, 几IS recommended that the如ck wind回choose one·I ",thin choose two· 江4. p为the Micro-tJS charg四a,b团叩the区哼,呴寸忒e.Pull down the LED bracket and the area of height adjustment appears.Cust可沺"'can adjust the height of the LED bracket acco吐ng to the sizes of their mobile hones.5 Put the mc心le hone in the bracket to trigger switch The arm kx:k automat四lly cla飞themob l e如e,anda北m乖alf,,starts the wireless charging. At the same tim�the LED bracket lights u . 什there is no res ond with the arm lock ta the u er haW of the hone6. After use, short ress any on the邓de edg e, the arm lock如政hes automa归ly.You can take out your hone from the mount easily as shown in the icture.How to use the suction cup holder''t. Unscrew the fixed nut and choose thesuction cup心氓The,e has a connectk>n ball on the di , m ake tho ball go th心gh the fixed nut ay attention that the screw thread must be toward to the groove. Push the connection ball mto the groove2. Adjust the angle to suit for your line of sight, then rotate clockwise to tighten the fixed nut com letelyse 抓u w『and You g re p he m w da ss a lah g 什一e w ”th 5dan Id to Cle ho ss 3the gla 』4. Budde the mobile hone mount to tre long ole, and rotate the adjusting knob to fix the mobile phone base twist the s in button at the long bar to draw or ull the long rod buckle the base of long ole and lock the buckle of fasten the sucke『勹t 立尸-』沁\二I 、『尸t ''"f 卢�k 穸S.Plug归M;oo-USB中匆屯志叩妇区1nterface.Pulldc,,,ntheLED如et 印the area of h e,ghtadjustment芩rs.Cu叩mers can ad」ust the he;ght of the LED bracket a coord;ng to the sizes of如r moblle phones6. Put the mobile hone in the bracket to 四ge『switch.The arrn杠k automatia,lly dampsthemobilep比杠氓rdau.,,认starts the wireless cha屯ing.At the same bme, t he LED bracket lights u . �there is no 『es ond with the arm lock, ta the u er half of the hone7 After use, s hort r,ss any on the s,de edg�the arm lock st,e灿己au缸m妇V You can扫ke out your hone f『om the mount easily as shown in the 如"'The LED bracket corl'esponds to the phone modelLED BRACKET SCALEPHONE MODEL47"iPhone 8s o ·iPhone X / GALAXY SB / GALAXY S9 5 5" 旧8plus/ GALAXY S8+ / GALAXY S9+ 6 3" Note BThe LED light display status of wireless charger CHARGING STATUS LED LIGHT DISPLAY STATUS Power onThe red indicator light is bright for 3 seconds and then goes out. Standby The indicator light goes out.Cha『gingThe blue lig b h r ti , breathes to be bright d d a a r r k k fo un r t 1 il s, cy g h i t n fo g a r [[1s t , h b e r t ig im h et ) until Mobile hone full W t s h e h e co e b n n l d u t s h e e a n p g d h h o t t h n ;e e , n ;a , g lw f o u e a ll s y o s o f -u o e tn lect fo r r ;c 2;t 0 y, of electricity Abnormal FODThe red lig 1 ht flashes 10 times:d fe o t r e e c ;g t;n on o )bjectt li h g e h1t s for s, extinguishes fo『1s and n goes outBuilt-in battery withW so h u e n n d w u i ll in g ro o m n p t t he ch a h r o g n ing , th a e nd be th e elow voltagemotor will not start.,&, Notes1. Please install the car holder in the good cond巾on before drivingnavigation and do not o erate and ad」ust the bracket during driving2. The automatic car mount sup ort 4-6 5 inches of mainstream model mobile phone, wireless charging will need to mobile hone have the function.3. The mobile phone c ase with metal on the back will lead to the failure of w,rele艾啦ing funct i on and the ossib,hty of damage to the vehicle su port. Please check ca响lly before use.4. Please turn on car vent cond巾on fan)when m hot day or long time use, it'll hel you to cool down the wireless car cha『ger and s eed up charging s eed5. Low ower, lease turn off the screen and charge your hone for 10minutes Then o en you『map,it can avoid lose power very quickly6. Not toys for fun, lease keep it away from children7. If you choose the suction c驴holder,flease clean u the sulface before using to ensure its a sorption i the cu holder is not used for a long t,me.8. If you choose the suction cup holder, please do not stick the bracket to the dashboard or windshield for a long time,ft°u can reinstall the bracket before using it for the next time. A er take off the car holder, lease use lastic wra to rotect the suction cu holde「9. If you choose the suction cu holder, please do not affix to curved surfaces, lush fabrics, or bu�r SU『faces.Do not install the car mount on a lace that will mf uence the o eration of airbag and driving10. We do not recommend to a�ly the suction cu on leather, wallor filmed glass surfaces as t e suction cu is designed with strong viscosity and attraction�Q CER oHS 三Warranty CardCustomer Name Phone Number Product Name: Date of Purchase: Address: Notes Email: su ***************SI旧凶归l砬obit Tatu ""YYCo, Ltd.Andobil is the trademark registe呡I in U5 and othe『countries.All rights 『eserved.MADE IN CHINABDate20180806FCC StatementAutomatic Car Mount Wireless ChargerUser ManualThis device complies with part 15 and part 18 of the FCC Rules. Operation is Subject To the following two conditions:(1) This device may not cause harmful interference, and (2) this devicemustaccept any interference received, including interference that may cause undesired operation. Changes or modifications not explicitly approved by the partyresponsible for compliance could void the user's authority tooperate this equipment.Note: this equipment has been tested and found to comply with the limits for a Class B digital device, pursuant to part 15 and part 18 of the FCC Rules.These limits are designed to provide reasonable protection against harmful interference in a residential installation. This equipment generates, usesand canradiate radio frequency energy and, if not installed and used in accordance with the instructions, may cause harmful interference to radio communications.However, there is no guarantee that interference will not occur in a particularinstallation. If this equipment does cause harmful interference toradio or television reception, which can be determined by turning the equipment off and on, the user is encouraged totry to correct the interference by one or more of the following measures:--- Reorient or relocate the receiving antenna--- Increase the separation between the equipment and receiver.--- Connect the equipment into an outlet on a circuit different from that to which the receiver is connected.--- Consult the dealer or an experienced radio/TV technician for help.Theequipment complies with FCC radiation exposure limits set forth for an uncontrolled environment. During the operation of device a distance of 15 cm surrounding the device and 20 cm above the top surface of the device must be respected.VMPI0009AThis device complies with Part 18 of the FCC Rules. This equipmentgenerates uses and can radiate radio frequency energy and, if not installed and used in accordance with the instructions, may cause harmful interference to radio communications. If this equipment does cause harmful interference to radio or television reception, which can be determined by turning theequipment off and on, the user is encouraged to try to correct the interference by one or more of the following measures:- Increase the separation between the equipment and any other radio device.- Connect the equipment into an outlet on a circuit different from that to which the receiver is connected.。
Live! Titanium-20系列快速安装指南说明书

Step 3: Open your web browser and check if your connection is working. If your connection is not working, please refer to the troubleshooting section.
LEDs are on, other LEDs may blink.
When the start-up sequence has finished the following LEDs
should be on:
.
The complete start-up sequence may take several minutes.
Internet connection enabled Internet connection initializing Internet connection disabled
WLAN enabled WPS active WLAN disabled
1000M link - blink on activity 100/10M link - blink on activity
3
2. Installation
Step 1: Installing the Hybrid Live! Click the Hybrid Live! module on the Hybrid Element, as shown in the picture. Note: Proper installation does not require excessive force.
3.
Network setup................................. 7
Vista-20P中文说明书
关于编程................................................................................................................... ......... ............. 23 防区及子系统............................................................................................................ ...................... 23
兼容设备 ........................................................................................... ................ ..................... 5 重要安装信息 (安装员请阅读) ......................................................... ...... ............. ...... .......... 6
- 1、下载文档前请自行甄别文档内容的完整性,平台不提供额外的编辑、内容补充、找答案等附加服务。
- 2、"仅部分预览"的文档,不可在线预览部分如存在完整性等问题,可反馈申请退款(可完整预览的文档不适用该条件!)。
- 3、如文档侵犯您的权益,请联系客服反馈,我们会尽快为您处理(人工客服工作时间:9:00-18:30)。
NET20 PLUS用户手册北京合众思壮科技股份有限公司【版权所有不得翻印】声明重要须知请认真阅读:此《用户手册》最终解释权归本公司所有。
本《用户手册》内容仅供参考,如有与您接收机不符情况下,请以接收机的实际状况为准。
本《用户手册》已经过仔细核对,但不排除有少量文字错误的可能性,如有发现,请与本公司客服中心联系。
对于《用户手册》更改将不另行通知,直接编入新版手册中。
请先仔细阅读《用户手册》的说明与指示,并只使用原厂提供的配件,以免造成无法预期的损坏。
如果您未依照正确的程序使用本系统或连接不兼容的配件,造成设备损坏,甚至可能危害您及他人的安全。
对此,本公司不承担任何责任。
目录用户手册 (1)声明 (2)第一章技术指标 (1)1.1欢迎使用NET20 PLUS (2)1.2特点 (2)1.3技术规格 (2)1.3.1 物理特性 (2)1.3.2 环境特征 (2)1.3.3 电气特性 (2)1.3.4 性能 (2)1.3.5 接口 (3)1.3.6 数据与存储 (3)1.3.7 配件 (4)第二章硬件组成 (6)2.1外观 (7)2.1.1 仪器正面 (7)2.1.2 仪器背面 (8)2.2连接及工作状态 (9)2.3结构尺寸图/安装尺寸图 (10)2.4启动主机 (10)第三章WEB应用 (12)3.1 WEB访问 (13)3.2系统状态 (14)3.2.1 系统信息 (14)3.2.2 GNSS状态 (15)3.2.3 卫星信息 (15)3.2.4 数据传输 (16)3.2.5数据记录 (17)3.3更改配置 (19)3.3.1 参考站设置 (20)3.3.2 网络设置 (21)3.3.3 数据传输设置 (25)3.3.4数据记录设置 (26)3.3.5 端口设置 (26)3.3.6 提醒设置 (36)3.3.7仪器注册 (37)3.4数据下载 (38)3.5系统管理 (38)3.5.1 在线升级 (38)3.5.2 日志查看 (40)3.5.3 安全管理 (41)3.6使用帮助 (42)第四章快速面板设置 (43)第一章技术指标1.1欢迎使用NET20 PLUS亲爱的用户,欢迎您使用北京合众思壮科技股份有限公司设计开发的NET20 PLUS三星接收机。
NET20 PLUS是一款高性能CORS参考站接收机。
以LINUX系统作为开发平台,更支持二次开发,功能强大稳定,可以兼顾很多领域的不同应用。
本手册将和您一起熟悉和了解NET20 PLUS带来的先进的技术与丰富的功能特性。
1.2特点1)372通道的多星座GNSS支持2)厘米级定位精度3)优于1mm的载波相位观测值4)B1/B2/B3+GPSL1/L2+GLONASSL1/L21.3技术规格1.3.1 物理特性1 )重量:1.93KG2 )尺寸:222mm*164mm*79mm1.3.2 环境特征1 )工作温度:-30℃-65℃2 ) 储存温度:-40℃-75℃3 )工作存储湿度:10%-95%(不凝露水)1.3.3 电气特性1 )工作电压:9-28V2 )功耗:2.8W1.3.4 性能1 )最低跟踪信号强度:-159db2 )平均无故障时间:7*24H3 )定位时间:<30s冷启动:<45s热启动:<30s失锁重捕时间: (signal re-qcquistion)<2s系统启动时间:<20s4 )定位精度:5 )速度精度:0.03m/s1.3.5 接口1 )2个高速率(115.2Kbps)标准RS232串口2 )1PPS输出:TTL电平,精度±50ns同步与GPS、UTC或GLONASS的秒脉冲输出3 )数据输出格式: 兼容JAVAD JNS100格式4)波特率: 9600~115200bps5) 网口:1个RJ45网络接口6) 天线接口:TNC标准天线接口1.3.6 数据与存储1)支持输出的数据格式:NMEA-0183,自定义2)内存空间:4G3)可拓展存储空间:32G 1.3.7 配件NET20 PLUS产品标配及选配件表第二章硬件组成2.1外观2.1.1 仪器正面NET20 PLUS主机前面板包括7个按键、4个指示灯、1个OLED显示屏。
图1-1启动NET20 PLUS主机后,主界面显示的当前时间信息,卫星定位状态,默认显示语言为英文,按左右方向键可以查看到当前NET20 PLUS主机获取到的IP信息。
各按键及指示灯的功能如下表:表1-1 各按键及指示灯功能表光标为上下移动方式时移动光标,当进入修改项时修改参数当光标为左右移动方式时移动光标2.1.2 仪器背面图1-2NET20 PLUS主机提供多种通讯接口方便用户在不同的应用场景进行使用,各通讯接口的功能如表1-2所述。
表1-2 各通讯接口功能表PWRUSBCOM1COM2COM3GNSSOSCSIMRJ451PPSEVENT2.2连接及工作状态NET20 PLUS接收机需连接天线和电源达到工作状态,如需在PC上显示信息,可通过网线连接到PC,即可查看相应信息,包括卫星数量、卫星编号、信噪比、方位角、仰角等。
2.3结构尺寸图/安装尺寸图2.4启动主机长按主机面板上红色电源键启动NET20 PLUS,待初始化完成后OLED液晶屏主菜单如图1-3所示:图1-3按左右指示键查看当前DHCP模式或是静态IP模式下的IP信息。
图1-4第三章WEB应用3.1 WEB访问在浏览器中输入NET20 PLUS面板上面显示的IP进行NET20 PLUS的访问。
在弹出的对话框中输入用户名和密码,默认时用户名和密码为admin:password。
图2-1验证信息登录后,进入NET20 PLUS的web界面,首页内容为参考站信息,设备程序版本,系统版本信息,网络参数,存储状态等内容。
显示如下:图2-2注意:不同的浏览器显示的效果可能会有稍许差别,建议使用谷歌浏览器或是IE8以上版本。
为了更加清楚的了解NET20 PLUS的各个功能,下面分各个功能板块进行介绍。
3.2系统状态3.2.1 系统信息在系统信息界面会显示出参考站的名称等信息,设备的型号,机身号,系统版本,应用程序版本信息,内置OEM板卡的型号等息息,网络参数信息。
图2-33.2.2 GNSS状态SS状态页面显示的是当前GNET20 PLUS的定位状态,基站坐标,天线类型使用情况。
图2-43.2.3 卫星信息信息页面可以看到当前搜索到的卫星的信噪比,高度角,方位角等信息,信息的显示是分GPS、BEIDOU、GLONASS分别显示的。
图2-53.2.4 数据传输据传输后,进入数据传输页面的设置,设置的参数包括服务器名称,所要连接的服务器地址及端口号,差分数据类型。
本章节需要注意:a:如下图2-6中密码,任意输入即可,但不可为空;b:自动连接意思为当勾选自动连接后,若网络断开会恢复,数据传输会自动进行连接,否则需要人为启动传输;c:在设置参数前,请现在参考站设置中查看参考站坐标设置是否正确,若需要已知坐标启动,请输入已知坐标;图2-6设置好后,点击“提交”,数据传输开启,在状态栏可以看到数据传输的状态会显示为“transmiting”,同时“提交”按钮会变为灰色不可用,在主机前面板界面的差分传输灯开始闪烁,上述就是一个基站建立传输的过程。
图2-73.2.5数据记录数据记录是存储静态数据作为数据分析,静态解算及其它后处理时使用。
文件名称:NET20 PLUS静态记录时可以使用4种方式命名静态文件记录规则如下表:表2-1 静态记录文件名称规则记录的情况下则开始按同样时长记录下一个文件,否则需要手动启动记录;转为RINEX:开启此功能标示在记录dat数据的同时也同时存储同文件名的rinex 数据,且存放在同一个文件夹内;FTP上传:开启此功能标示在记录数据到NET20 PLUS主机存储器的同时,还发送一份数据到FTP服务器;图2-8图2-9上述记录参数设置完后,点击“启动记录”,则记录开始,状态显示为“recording”,同时“启动记录”变为灰色不可用,NET20 PLUS主机前面板数据记录指示灯开始闪烁。
图2-103.3更改配置更改配置模块是NET20 PLUS主机各项参数设置的部分,下面按照不同功能分节介绍。
3.3.1 参考站设置置部分主要设置参考站名称,参考站的编号,时区信息,HTTP远程网页访问端口,参考站的天线参数设置,参考站的坐标设置。
天线参数:0使用的是本web所提供的天线类型,则选择对应型号,然后输入实际参考站的天线高度;参考站坐标:若不需要已知点,则点击“使用当前坐标”作为参考站坐标,若需要已知点,则按照相应格式输入已知点坐标;图2-11T20的远程web访问端口设置为80,在相应路由设备设置好映射关系后,在公网中访问此台NET20 PLUS的页面显示如下:图2-123.3.2 网络设置网络设置部分主要是对NET20 PLUS使用的数据链路方式进行设置。
DHCP:若开始DHCP则表示NET20 PLUS使用自动获取IP的方式进行上网,否则使用的是静态IP;图2-13WIFI热点:开启WIFI热点后,此时可以使用其它具有WIFI功能的设备进行搜索连接此台NET20 PLUS,热点名称是以机身号显示,连接时不需要密码,连接后访问NET20 PLUS的IP固定为192.168.4.1,热点功能只起操控的作用,不具备上网功能;图2-14图2-15WIFI客户端:当选择WIFI客户端时,在SSID栏中输入可以搜索使用的WIFI 热点,在密码栏输入WIFI热点连接的密码,然后提交,连接WIFI后分配的密码在系统终端或是面板界面可以看到(不同的版本显示地方会有所差别);图2-163G网络:开启3G网络后,输入对应SIM卡支持的功能模式,是否有用户名和密码限制;NET20 PLUS支持联通3G,联通2G,移动2G的SIM卡;图2-17FTP下载:此处是设置FTP下载的参数,若开启匿名访问,则连接NET20 PLUS 进行FTP下载不需要用户名和密码,若关机匿名访问,则需要输入所给权限的用户名和密码;图2-18使用FTP工具连接NET20 PLUS后,数据显示如下:图2-193.3.3 数据传输设置数据传输设置是对NET20 PLUS参考站所传输的内容,传输的服务器进行设置,当在数据传输状态页面点击开始传输后,会自动跳转到此页面;图2-203.3.4数据记录设置数据记录设置是对NET20 PLUS所要记录的数据内容进行设置,当在数据记录状态页面点击启动记录后,会自动跳转到此页面;图2-213.3.5 端口设置蓝牙、COM1口、SOCKET均具有如下输出或是输入功能:CMD:指令操作NET20 PLUS;NMEA:输出指定的NMEA语句;RTK(INPUT):差分输入;RTK(OUTPUT):差分输出;RAW:原始数据输出;另外COM1口方式特有串口直连功能;3.3.5.1 蓝牙开启蓝牙功能后,选择某种数据功能后提交,然后使用蓝牙设备搜索连接NET20 PLUS,在搜索连接时NET20 PLUS的蓝牙名称是以机身号显示的;图2-22如下是使用手簿搜索连接NET20 PLUS,并使用串口工具打开接收NET20 PLUS 蓝牙输出的NMEA数据的过程;图2-23图2-24图2-25图2-263.3.5.2 COM1口方式此处使用注意:1)COM1数据传输时,请使用标配的七芯线连接NET20 PLUS后面板的七芯接口;2)波特率设置时要和所使用的接收设备波特率一致;如下图2-27和图2-28是进行COM1口输出RTCM3时的过程:图2-27图2-28如下图2-29和图2-30是进行串口直连时的过程:图2-29图2-303.3.5.3 SOCKET方式如下图2-31和图2-32是使用SOCKET方式进行NMEA数据输出的过程:图2-31图2-32如下图图2-33和图2-34是使用SOCKET方式进行RAW数据输出的过程:图2-33图2-343.3.6 提醒设置提醒设置是当NET20 PLUS出现系统或是程序异常时,NET20 PLUS使用邮件或是手机短信的方式通知管理者,以便管理者在第一时间进行维护;图2-353.3.7仪器注册当NET20 PLUS主机过期时,需要对其进行注册,输入完整注册码后点击提交即可;图2-363.4数据下载此处的数据下载是通过网络得方式下载存储在NET20 PLUS主机里面的数据;另外也可以通过USB线的方式连接NET20 PLUS主机进行数据的拷贝;图2-373.5系统管理3.5.1 在线升级选择NET20 PLUS升级文件的存放路径打开;图2-38导入文件后点击升级;图2-39升级过程中左下角会显示文件导入的状态,导入完后NET20 PLUS会自动重启实现升级;图2-403.5.2 日志查看日志查看部分是存储系统和程序运行状态异常的一个记录;图2-41图2-42图2-433.5.3 安全管理此处是进行安全登录限制的设置,admin账户是管理账户,而Guset账户是来宾账户,来宾账户只能查看信息;图2-443.6使用帮助此处提供操作指南进行NET20 PLUS的入门引导;第四章快速面板设置通过面板按键可以快速对主机进行设置,它主要包括6个部分:记录数据、传输数据、网络设定、天线设定、其他设定、机身信息。