2018 Smart Home Connecting the Isolated Devices Us
智能家居英语作文大学物理

The integration of smart technology into our daily lives has revolutionized the way we interact with our homes.Smart homes,equipped with advanced systems and devices, are designed to enhance convenience,security,and energy efficiency.Heres an exploration of the concept of smart homes,particularly focusing on their integration with universitylevel physics principles.Introduction to Smart HomesSmart homes are residences that are equipped with networkconnected devices,which can be remotely monitored and controlled.These homes are typically equipped with a range of smart devices such as thermostats,lighting systems,security cameras,and appliances that can be controlled via a central hub or through a mobile app.The Role of Physics in Smart HomesPhysics plays a crucial role in the functioning of smart homes in several ways:1.Energy Conservation:The principles of thermodynamics are applied in smart thermostats to optimize heating and cooling,thereby reducing energy consumption. Understanding heat transfer and insulation helps in designing more energyefficient homes.2.Motion Sensors:Physics of motion is fundamental in the operation of motion sensors used in smart homes.These sensors detect changes in the environment,such as movement,and can trigger actions like turning on lights or activating security systems.3.Lighting Systems:The manipulation of light,including its intensity and color temperature,is governed by the physics of optics.Smart lighting systems can adjust these parameters to create different moods or to save energy.4.Security Systems:The principles of electromagnetism are essential in the design of security systems,including magnetic sensors and cameras that use electromagnetic waves to transmit data.5.Automation and Control Systems:The operation of automated systems in smart homes is based on the principles of mechanics and electronics.These systems use feedback loops to maintain desired conditions within the home.Smart Home ComponentsSmart Thermostats:These devices learn the users preferences and adjust the temperature accordingly,optimizing for comfort and energy savings.Smart Lighting:Systems that can be programmed to turn lights on or off at specific times, or in response to natural light levels.Smart Appliances:Refrigerators,washing machines,and other appliances that can be controlled remotely and provide usage data.Security Cameras:Highdefinition cameras that can be accessed remotely,with features like motion detection and night vision.Challenges and ConsiderationsPrivacy and Security:With the increased connectivity of smart homes,there is a heightened risk of data breaches and privacy invasions.Interoperability:Ensuring that different devices and systems can work together seamlessly is a significant challenge.User Interface Design:Creating intuitive and userfriendly interfaces for controlling smart home systems is essential for widespread adoption.ConclusionThe fusion of physics with smart home technology not only enhances the functionality and efficiency of our living spaces but also opens up new avenues for innovation and research.As technology continues to advance,the principles of physics will remain at the core of these developments,shaping the future of smart homes and the way we live.。
迈克尔逊冷气系统安装说明书

18-AC107D1-1A-ENALL phases of this installation must comply with NA TIONAL, ST ATE AND LOCAL CODESIMPORTANT — This Document is customer property and is to remain with this unit. Please return to service informa-tion pack upon completion of work.Condensing UnitsThese instructions do not cover all variations in systems or provide for every possible contingency to be met in connection with the installation. Should further information be desired or should particular problems arise which are not covered sufficiently for the purchaser’s purposes, the matter should be referred to your installing dealer or local distributor.Note: The manufacturer recommends installing only approved matched indoor and outdoor systems. All of the manufacture’s split systems are AHRI rated only with TXV/EEV indoor systems. Some of the benefits of installing approved matched indoor and out-door split systems are maximum efficiency, optimum performance and the best overall system reliability.4TTA7Installer’s Guide Table of ContentsSection 1. Safety .....................................................................................2Section 2. Unit Location Considerations ..............................................3Section 3. Unit Preparation ....................................................................5Section 4. Setting the Unit .....................................................................5Section 5. Refrigerant Line Considerations .........................................6Section 6. Refrigerant Line Routing .....................................................8Section 7. Refrigerant Line Brazing ......................................................8Section 8. Refrigerant Line Leak Check .............................................10Section 9. Evacuation ...........................................................................12Section 10. Service Valves ...................................................................12Section 11. Electrical - Low Voltage ....................................................13Section 12. Electrical - High Voltage ...................................................15Section 13. Start Up ..............................................................................16Section 14. System Charge Adjustment .............................................17Section 15. Checkout Procedures and Troubleshooting ...................232 18-AC107D1-1A-ENSection 2. Unit Location Considerations2.1 Unit Dimensions and Weight2.2 Refrigerant Piping Limits18-AC107D1-1A-EN 32.3 Suggested Locations for Best Reliability4 18-AC107D1-1A-EN2.5 Coastal ConsiderationsIf installed within one mile of salt water, including seacoasts and inland waterways, models without factory sup-plied Seacoast Salt Shields require the addition of BAYSEAC001 (Seacoast Kit) at installation time.Section 3. Unit Preparation3.1 Prepare The Unit For InstallationSection 4. Setting the Unit4.1 Pad Installation18-AC107D1-1A-EN 5Section 5. Refrigerant Line Considerations 5.1 Refrigerant Line and Service Valve Connection SizesTable 5.1RATED LINE SIZESLine Sizes Service Valve Connection Sizes Max Line & Lift Lengths VaporLineLiquidLineVapor LineConnectionLiquid LineConnectionTOT AL MaxLine Length (ft.)Max Lift (ft.)4TTA7036A3/43/43/83/43/815050 4TTA7048A3/47/83/87/83/815050 4TTA7060A3/41-1/83/87/83/815050ALTERNATE LINE SIZESLine Sizes Service Valve Connection Sizes Max Line & Lift Lengths VaporLineLiquidLineVapor LineConnectionLiquid LineConnectionTOT AL MaxLine Length (ft.)Max Lift (ft.)4TTA7036A3/45/83/83/43/8150507/83/83/43/815050 4TTA7048A3/43/43/87/83/8150504TTA7060A3/43/43/87/83/8150507/83/87/83/815050Note: For other line lengths, Refer to Refrigerant Piping Application Guide, SS-APG006-EN or Refrigerant Piping Software Program, 32-3312-xx (latest revision).6 18-AC107D1-1A-EN5.2 Factory ChargeTrane outdoor condensing units are factory charged with the system charge required for the outdoor condensing unit, fifteen (15) feet of tested connecting line, and the smallest indoor evaporative coil match. If connecting line length exceeds fifteen (15) feet and/or a larger indoor evaporative coil is installed, then final refrigerant charge adjustment is necessary.5.3 Required Refrigerant Line Length5.4 Refrigerant Line Insulation18-AC107D1-1A-EN 78 18-AC107D1-1A-EN5.5 Reuse Existing Refrigerant LinesSection 6. Refrigerant Line Routing6.1 PrecautionsImportant: T ake precautions to prevent noisewithin the building structure due to vibration transmission from the refrigerant lines.For Example:• When the refrigerant lines have to be fastened to floor joists or other framing in a structure, use isolation type hangers.• Isolation hangers should also be used when refrigerant lines are run in stud spaces or enclosed ceilings.• Where the refrigerant lines run through a wall or sill, they should be insulated and isolated.• Isolate the lines from all ductwork.• Minimize the number of 90º turns.Comply with National, State, and Local Codes when isolating line sets from joists, rafters, walls, or otherstructural elements.Section 7. Refrigerant Line Brazing7.1 Braze The Refrigerant Lines18-AC107D1-1A-EN 91018-AC107D1-1A-ENSection 8. Refrigerant Line Leak Check 8.1 Check For LeaksSection 9. Evacuation9.1 Evacuate the Refrigerant Lines and Indoor CoilSection 10. Service Valves10.1 Open the Gas Service Valve10.1 Open the Liquid Service ValveSection 11. Electrical - Low Voltage 11.1 Low Voltage Maximum Wire LengthT able 11.1 defines the maximum total length of low voltage wiring from the outdoor unit, to the indoor unit, and to the thermostat.Table 11.124 VOLTSWIRE SIZE MAX. WIRE LENGTH 18 AWG150 Ft.16 AWG225 Ft.14 AWG300 Ft.11.2 Low Voltage Hook-up DiagramsSection 12. Electrical - High Voltage 12.1 High Voltage Power Supply12.2 High Voltage Disconnect Switch12.3 High Voltage GroundGround the outdoor unit per national, state, and local code requirements.Section 13. Start Up13.1 System Start UpSTEP 1 - Ensure Sections 7 through 12 have been completed.Section 14. System Charge Adjustment14.1 Temperature Measurements14.2 Subcooling Charging in Cooling (Above 55º F Outdoor Temp.)(2)INTERCONNECTING LINESGAS - 3/4" O.D.LIQUID - 3/8" O.D.DWG.NO.4TWR3036B118-AC107D1-1A-EN21STEP 9 - Record System Information for refer-ence.Record system pressures and temperatures after charging is complete.Outdoor model number = _________________Measured Outdoor Ambient = __________ º F Measured Indoor Ambient = __________ º F Measured Liquid Line T emp = __________ º FThe Subcooling Charging method in cooling is not recommended below 55º F outdoor temperature.The recommended method of charging at outdoor temperatures below 55º F is weighing in the charge. Return when weather conditions permit charge verification through subcooling.STEP 1 - Determine additional charge.Note : The nameplate charge value represents the amount of refrigerant shipped in the outdoor unit and is compatible with 15 feet of AHRI rated refrigerant lines and the smallest AHRI rated coil.Using the method below, find the charge associ-ated with the additional length of tubing above 15 ft. and record it below.14.3 Subcooling Charging Below 55º F Outdoor Temp.Measured Suction Line T emp = __________ º F Liquid Gage Pressure = __________ PSIG Suction Gage Pressure = __________ PSIGCalculating Charge Using the Weigh-In Method 1) Measure in feet the distance between the outdoor unit and the indoor unit. (Include the entire length of the line from the service valve to the IDU.) Subtract 15 ft from this entire length and record on line 1.2) Enter the charge multiplier (0.6 oz/ft). Each linear foot of interconnecting tubing requires the addition of 0.6 oz of refrigerant.3) Multiply the total length of refrigerant tubing (Line 1) times the value on Step 2. Record the result on Line 3 of the Worksheet.4) This is the amount of refrigerant to weigh-in prior to opening the service valves.1. Total Line length (ft) –15 ft ______________2. Charge multiplier x ___0.6 oz _____3. Step 1 x Step 2 = _____________4. Refrigerant (oz)= _____________Weigh-In Method can be used for the initialinstallation, or anytime a system charge is being replaced. Weigh-In Method can also be used when power is not available to the equipment site or operating conditions (indoor/outdoor temperatures) are not in range to verify with the subcooling charging method.22 18-AC107D1-1A-ENSTEP 3 - Check the liquid line temperature and liquid gage pressure to obtain a minimum of 10º subcooling in heating mode.Measured Liquid Line T emp = __________ º F Liquid Gage Pressure = __________ PSIGSTEP 4 - Add charge if a minimum of 10º sub-cooling is not obtained with the namplate charge plus additional charge previously added.STEP 5 - Return to site for adjustment.Important: Return in the spring or summer to accurately charge the system in the cooling mode with outdoor ambient above 55º F.18-AC107D1-1A-EN 231. Leak check refrigerant lines. ........................................ [ ]2. Properly insulate suction lines and fittings. ................... [ ]3. Properly secure and isolate all refrigerant lines. ........... [ ]4. Seal passages through masonry.If mortar is used, prevent mortar from cominginto direct contact with copper tubing. .......................... [ ] 5. Verify that all electrical connections are tight. ............... [ ] 6. Observe outdoor fan during on cycle for clearanceand smooth operation. .................................................. [ ]Section 15. Checkout Procedures and Troubleshooting15.1 Operational And Checkout ProceduresCHECKOUT PROCEDUREAfter installation has been completed, it is recommended that the entire system be checked against the following list:Final phases of this installation are the unit Operational and Checkout Procedures. To obtain proper performance, all units must be operated and charge adjustments made.Important: Perform a final unit inspection to be sure that factory tubing has not shifted during shipment. Adjust tubing if nec-essary so tubes do not rub against each other when the unit runs. Also be sure that wiring connections are tight and properly secured.7. Be sure that indoor coil drain line drains freely. Pour waterinto drain pan. ............................................................... [ ] 8. Be sure that supply registers and return grilles are o penand unobstructed. ......................................................... [ ] 9. Be sure that a return air filter is installed. ..................... [ ] 10. Be sure that the correct airflow setting is used.(Indoor blower motor) ................................................... [ ] 11. Operate complete system in each mode toensure safe operation. .................................................. [ ]SYSTEM FAULTSREFRIGERANT CIRCUIT Head Pressure Too High Head Pressure Too Low Suction Pressure Too High Suction Pressure Too LowLiquid Refrig. Floodback (TXV/EEV)Liquid Refrig. Floodback (Cap. Tube)I.D. Coil FrostingCompressor RunsInadequate or No Cooling/Htg ELECTRICALCompressor & O.D. Fan Won’t StartCompressor Will Not Start But O.D. Fan Runs O.D. Fan Won’t StartCompressor Hums But Won’t Start Compressor Cycles on IOL I.D. Blower Won’t Start DEFROSTUnit Won’t Initiate Defrost Defrost Terminates on Time Unit Icing UpW HA TT O C H E C K M O D E P O W E R S U P P L Y H I GH V O L T A G E W I R I N G C O M P R E S S O R I O L R U N C A P A C I T O R S T A R T C A P A C I T O R S T A R T R E L A Y C O N T A C T O R C O N T A C T S L O W V O L T A G E W I R I N G C O N T R O L T R A N S F O R M E R T H E R M O S T A T C O N T A C T O R C O I L L O W V O L T A G E F U S E S T U C K C O M P R E S S O R I N E F F I C I E N T C O M P .R E F . U N D E R C H A R G E R E F . O V E R C H A R G E E X C E S S I V E E V A P . L O A D N O N C O N D E N S A B L E S R E S . O .D . A I R F L O W O .D . A I R R E C I R C U L A T I O N T X V /E E V S T U C K O P E N S U P E R H E A T R E S . I .D . A I R F L O W R E F . C I R . R E S T R I C T I O N S S O V L E A K I N G S O V C O I L D E F E C T I V E C H E C K V A L V E L E A K I N G *D E F R O S T R E L A Y D E F .D E F R O S T C O N T R O L D E F .C H C H C H C H C H C H C H C H C H C H C H C H C H C H C H C H C HP P P PP P P P P PP P P PS S S SS S S S S S S S S S S S S S S S S S S S S SS S P P P P S S S SP P P P S SP PP P P PP P P P P P P P S S S S S S S S P P P PP P PP P P PP P P P P P P P P PS S S S SS SP S S S S S SS SS S S SSS S S P PS S S S S SS SS S S SP PPP P PS S S S SS SS S S S P PS SS SSS SSPP P P PP PS SP P PP*15.2 Troubleshooting6200 Troup Highway T yler, TX The manufacturer has a policy of continuous product and product data improvement and it reserves the right to change design and specifications without notice.Representative-only illustrations included in this document.© 2016 Trane04/16。
Eaton xComfort Smart Home控制器用户手册说明书

What can you do with the Eaton xComfort App?With this App you can easily control & visualize your xComfort Smart Home installation.Which functionality does the App offer?The functions are offered automatically and depend on the installed xComfort RF devices and their configuration. Each zone (e.g. room) can have one function of its type. e.g. one temperature control, one status&control, one shading management function, etc.Climate control (heating & cooling for individual rooms)Scenes (e.g. light scenes) including time scheduling tasksShow status & control: e.g. show open windows, dim lightsShading Control: e.g. open/close shutters depending on time schedule, light intensity and/or room temperatureMacros: Process your own logic featuresCamera Display: Show the pictures of IP surveillance camerasEnergy Monitoring: Display energy consumption & production (kWh, Cost, CO2)Which components do you need for your smart home?You need•An Eaton xComfort Smart Home Controller with internet connection (for remote access)•Components of the wireless Eaton xComfort Home installation (dependent of the wished functionality) e.g. dimmer actuators for dimming light, room controllers and radiator valve drives for controlling your heating, window/door contacts • A Smartphone or tabletWhere can I buy Eaton xComfort products?The Eaton xComfort wireless Home Automation system is currently available in many countries in Europe via Eaton's xComfort partner network. Please contact an xComfort Partner in your neighborhood to get xComfort products or solutions.What is the Demo House?The Demo House simulates a small smart home system to enable you to play around with the app without the need to have the components really installed. In this way you can see if you like the functionality of the app. No real switching is done and no data traffic is created.Connect your smart phone/tablet to your Smart Home ControllerAfter the installation and configuration of the Smart Home Controller, you start the app having an active Wifi connection to your home network and press on “Connect”.Available Devices:The iOS app detects your Smart Home controller (SHC) automatically (by Bonjour/UPnP) and shows it here with its device ID (SHC-ID xxxxxx).Select your SHC, enter username and password an press “Login”. Once you have been connected to you Smart Home Controller at home (via Wifi) it will be remembered and listed here even when you are away from home. If you have activated remote access, the remote access ID will be fetched and stored automatically in the app. Please write down username, password and remote access ID and store it in a safe place.Manual SHC connect:Selecting that button will open the manual connect page where you can enter all necessary data to connect locally or via internet to a Smart Home Controller.SHC Name:You can enter an descriptive name hereUsername, Password:Enter your username & password hereRemote Access ID: Enter the combination of letters&numbers you received when your remote connection was initialized. It is shown on the system settings page of your Smart Home ControllerIP /URL (:Port):The default entry to put in here is https:/// Enter only another IP/URL if you want to connect within your local network or via internet directly (without the Eaton server) to your Smart Home Controller.Deleting a Smart Home controller from the list:This can be done dependent on your device OS by swiping over the respective Controller entry from right to left (or vice versa) or by typing long on the controller. This works only if the Smart Home Controller is not available in the current local network.How do you recognize a successful connection?After successful connection the app will show the Main Dashboard automatically.Main NavigationEnter the Main Menu by the Main Menu selection icon:Click to show the main navigation menuMain Menu Icon Yellow: There are new messages, see "System Info" in the MenuThe Main Menu items:•Dashboard: Navigate directly to the Main Dashboard to see in one overview the main status of your home and to access main controls, scenes and the Main Zone overview.•Zones: Navigate directly to the Main Zone Overview to recognize in one overview the current situation of all Zones like: The Climate settings and temperature are correct, not switched Off the power consumption, are there windows open, are there lights On. Select the Zone to navigate directly to the Zone.•Menu: Main menu itmes: Connect, Logout, Help, About, System Info.Main Dashboard Tiles:See the indoor temperature of the main Zone and the outside temperature (If available). Select the main Zonetemperature in the Web Admin Console: 3. Options -> ZonesSee the current main mode of the Climate Function for all Zones. User indicates the Zones are not all in the samemode. Click to set all Zones to one mode: Automatic, Protection, Comfort, Economy, Standby.Click to access the main camera overview page.Show the trend of your current energy consumption compared to the previous period (24h, 1 week, 1 month). Clickto change the period.Now already more Energy consumed compared to the previous period (Tile color Orange).Almost the same Energy consumed compared to the previous period (Tile color Yellow).Doing good: Less Energy consumed compared to the previous period (No tile color).Scenes can be enable to be shown on the Main Dashboard. Enable a scene in the Web Admin Console: 3. Options-> Macros & Scenes. Use the edit option on the Macro name. Also a scene icon can be selected.See the number of activated lights. Click to access the Main Zone Overview. Tile will automatically pop-up if thenumber is one or more.See the number of activated Switching Actuators. Click to access the Main Zone Overview. Tile will automaticallypop-up if the number is one or more.See the number of open shutters (or screens). Click to access the Main Zone Overview. Tile will automatically pop-up if the number is one or more.See the number of open windows. Click to access the Main Zone Overview. Tile will automatically pop-up if thenumber is one or more.See the number of open doors. Click to access the Main Zone Overview. Tile will automatically pop-up if the number is one or more.Main Zone Overview:•Zone Overview bar: Find on the left side alwasy the Menu selection button.•All Zones: Here you see all the totals of all zones (e.g. rooms) like: Total power consumption and number of active devices.•Per Zone Name: Per zone you can see the power consumption, the Climate settings and temperature and the amount of active devices (Actuators, Sensors, etc). Click on the Zone to navigate directly to the Functions in this Zone.Zone and Functions:•Zone bar: Here you always can see the currently selected zone name. Find on the left side the Menu selection button.•Function selection bar: Here you can see all available functions in this zone (e.g. Climate Control, Status & control,..) By touching the symbols you can navigate to this function•Display area ("dashboard"): Here you can see the current status of the function e.g. the current room temperature, the set-point, etc.•Control area: Here are the main control elements for switching & dimming lights, moving shading devices, watching sensor valuesClimate controlThis function controls heating and cooling (if installed) in one zone (e.g. the living room).In the control area you can switch between the following operation modes•Auto: the room temperature always follows automatically the time schedule you have configured ("edit" button)•User: you can set the room temperature quickly to an individual value.If Auto mode is (or just was) active this value stays active until the next scheduled temperature change.Then thetemperature control changes to the Auto operation mode.If Auto mode is (or was before) inactive this value stays active until you change it manually or select the Auto mode again. If you select one of the following temperature levels, the temperature control changes to the manual mode, these set-points stay active until you change them manually or select the Auto mode again.•Frost protection/Heat protection: if you are away for longer time e.g. on holiday•Economy: if a room is empty for a whole day or e.g. at night•Standby: if a room is not used for some hours•Comfort: if you use the room or need comfortable temperatureThe display area shows•the current temperature value (large font),•the current active mode,•the wheel position of a Room Controller(if existent)•the resulting set point (set-point = temperature level of op. mode + wheel position of Room Controller)•the status of the heating (ON: flame symbol is white, OFF: flame symbol is grey)•the actual relative humidity value (if Room Controller with included humidity sensor is existent)Only users with advanced user rights see an "edit" button which enables to change the temperature control settings. Temperature control settings:Here you can edit:•The pre-defined set point levels for heating & cooling (if existent)•The time schedule(planner function)•The operation mode (Heating, Cooling,None=Off)Temperature control time scheduleHere you can select one of the pre-defined temperature levels which will be automatically choosen in the operation mode Auto. For detailed information about time schedule setting please read the description of the time planner function.Finish editing with "Done".Scenes:With help of this function you can release multiple actions at one push of a button. You can e.g. set several lamps to different dim levels by one push of a button. Scenes can be configured at setup time in the configuration interface of the Smart Home Controller or by your iOS App.All users can start scenes, but you need to have advanced user rights to configure and edit scenes.Edit Scenes:On this page you canadd a general sceneadd a light scene using the current light settings in status & control functionadd a scheduled scene start (e.g. switch on garden light at sun set)edit an existing sceneenable an existing scene (it can be started)disable an existing scene, (it can not be started)delete an existing sceneAdd new scene:Please enter at first the scene name, then add actions as you need.Add action:You see the list of available devices (e.g. lamps), to select a device tap on the row. You can now configure the action e.g. set the dim control to 45%. If you want that this action is executed after a delay, you can define it here. Finish that process by pressing the add button.In the sequence you add the actions they will be executed, but the sequence can be edited by drag & drop.Edit existing scene:You can see the list of actions contained in the scene. You have the following options:Edit action:At first select the action. Now change the the action's setting. Finish that process by pressing the back button.Delete action:Depending on your devices OS select the action by pressing it long or by pressing the delete symbol and confirm by pressing the trash can symbol or the button "delete".Start scene by time scheduleHere you can select a scene which should be started by time schedule. For detailed information about time schedule setting please read the description of the time planner function.Status & ControlWith help of this function you can manually control your lights, shutters and see temperatures, open windows and other sensor information in this zone.•Display area ("dashboard"): Here you can see the current number of active devices per device type.•Control area: Here are the main control elements for switching & dimming lights, moving shading devices, watching sensor values◦Device Icon (left): Here you can see the device types based on there Icons.◦Device name and additional info: Here you can find the Device Name. If available some Devices provide additional information◦Device control or status (right): Here you can find the main control elements for switching, dimming and shading devices. For sensor devices the values or status are presented. By pressing on ">" at analogue sensors (e.g.temperature) you can see a diagram with the history values for selectable time ranges(Current/Previousday/week/month/year)Examples additional bulb and switch actuator Icon indicators:Locked: The light actuator is locked and cannot be controlledOverload: The switch actuator is switched Off due to overloadShading ManagementThis function can manage automatically your shading devices (all in the zone at the same time). The following parameters are considered:1.time of day: the shutters will be opened/closeddependent of the scheduled time (planner function)2.sensor information: temperature (°C) or sun light intensity (%)Feature: If the temperature/light intensity (only one sensor possible) exceeds a certain level shading will be activated3. a combination of 1. & 2.: Only within the time set in 1. the sensor will be consideredThe display area shows•the current operation mode e.g. "Auto"•the current sensor information (temperature, light intensity)In the control area you can•manually operate the shadings of this zone (e.g. all in this room at the same time) and•see the treshold for the automatic control (temperature, light intensity) if sensors are configuredUsers with advanced rights can edit the function's settings:•time schedule for shading•treshold for automatic control (temperature, light intensity)Shading time schedule (planner):Here you can define the operation mode which should be active depending on time schedule•Open: open without changing the sensor control mode•Close: close without changing the sensor control mode•Open (Sensor Mode Off): open and disable the sensor control•Close (Sensor Mode Off): close and disable the sensor control e.g. close in the evening and keep closed regardless of sensor information•Open (Sensor Mode On): open and enable the sensor control e.g. open in the morning, but close if the temperature/light-intensity gets too high and vice versa•Close (Sensor Mode On): close and enable the sensor controlTime planner functionThis function can be accessed via the time planner symbol in each smart home function (temperature control, scenes, shading management, etc). In this way "events" as e.g. set heating to temp. level economy, open shutters, switch on garden light, etc. can be scheduled. All these events will be scheduled as weekly events ( weekly schedule).After pressing the symbol all days of the week are shown in a list. They can be selected to show existing events (only of the selected function) to edit them or add new events.In the next window the function-relevant activity(scene, temperatur level, Shading op mode,etc) is selected and after that the time (time of day, sunrise/sunset) is chosen.Sunrise/Sunset: Instead of a certain time of day you can also select sunrise or sunset for your event.Offset: In this case your event happens some minutes before/after the sunrise/sunset moment.Choose the days on which your event should take place. These events will be planned as weekly events.Finalize your input by pressing the "save" symbol or the button "save".Macro FunctionWith help of the macro function you can realize own sequences and logic functionality. The macro function can only be configured by users with administrator user rights in the configuration interface. In the mobile App enabled macros can be started by all users and users with advanced user rights can enable & disable them.Energy MonitoringWith help of this function you can display the consumed & produced electric energy and the the use of other ressources (such as natural gas or water). All you need are either•xComfort energy sensors that can measure voltage (V), current (A), active power (W), el. energy (kWh)•xComfort impulse counting inputs that can be connected to any meters with impuls outputs (S0) to measure e.g. natural gas, heat, water consumptionThe display area shows the accumulated active power of all energy measurement sensors (electricity) in this zone.The function offers two fields to select the presented data:•Select the sensor (device)•Select the time frame (day, week, year)to be displayed.The function offers different kind of diagrams:• A bar chart to display energy (kWh)• A power meter to display current power (W)• A realtime graph to display short time power changes (W)• A top 5 consumers pie-chartThe selectable time frames are:•current / previous day (24 values)•current / previous week (7 values)•current / previous month (31 values)•current / previous year (12 values)Camera displayThis function enables you to display pictures of IP cameras of selected brands & types (see SHC documentation). The display area shows thumbnails of all cameras in this zone, by touching the thumbnail the corresponding camera picture will be shown in the large picture.This picture is updated regularly.If there are lights and/or door openers configured in this zone you can see buttons to control them (1 for all lights, 1 for a door). System InfoThis function informs you about the overall system status of the Smart Home Controller:Everything OKYellow: There are warningsRed: There are errorsThis traffic light is dependent on the OS of your mobile device also shown in the menu or in the status line (on top of the display). As the LEDs at the Smart Home Controller's front side, the system info informs in detail about the status ofBattery status information of battery supplied sensors•Green: OK•Orange: At least one battery is weak•Red: At least one battery has to be replaced。
新教材高中英语人教版选择性必修一 Unit2
新教材高中英语人教版选择性必修一Unit2.d 1.教案understanding of the XXX.In this unit。
we will be exploring the XXX。
we will be discussing smart homes and the us ways in which they can XXX and drawbacks of smart homes。
XXX understanding of the role technology will play in our XXX.One of the key advantages of smart XXX to control everything from the temperature to the lighting with a simple voice command or swipe of a screen。
smart homes can make our lives much XXX efficient。
This can free up time and energy for other activities。
XXX.However。
there are also potential downsides to smart homes。
For example。
some people may feel fortable with the idea of having their every move XXX。
there is the risk of hacking and security breaches。
which could compromise sensitive personal n.Despite these concerns。
it is clear that smart homes have the potential to XXX the future。
爱德马克智能插座说明书
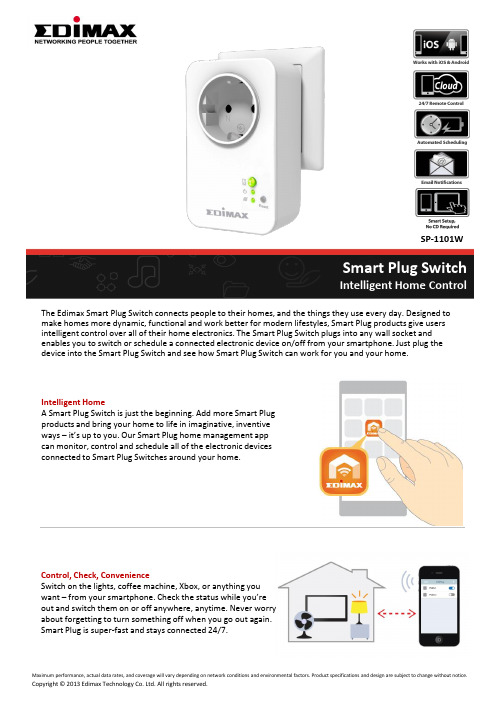
Intelligent HomeA Smart Plug Switch is just the beginning. Add more Smart Plug products and bring your home to life in imaginative, inventive ways – it’s up to you. Our Smart Plug home management app can monitor, control and schedule all of the electronic devices connected to Smart Plug Switches around your home.The Edimax Smart Plug Switch connects people to their homes, and the things they use every day. Designed to make homes more dynamic, functional and work better for modern lifestyles, Smart Plug products give users intelligent control over all of their home electronics. The Smart Plug Switch plugs into any wall socket and enables you to switch or schedule a connected electronic device on/off from your smartphone. Just plug the device into the Smart Plug Switch and see how Smart Plug Switch can work for you and your home.Smart Plug SwitchIntelligent Home ControlControl, Check, ConvenienceSwitch on the lights, coffee machine, Xbox, or anything you want – from your smartphone. Check the status while you’re out and switch them on or off anywhere, anytime. Never worry about forgetting to turn something off when you go out again. Smart Plug is super-fast and stays connected 24/7.SP-1101WSchedule, SaveProgram intelligent schedules to make your home smarter and more energy efficient. Smart Plug switch was developed to suit your lifestyle. Schedule your lights so it’s light when you get home or when you wake up in the morning. Schedule your lamp or coffee machine if youlike – Smart Plug Switch can schedule anything in your home to work in better ways for you and your life. SOFTWARE FEATURES•Easily switch on/off via iPhone, iPad, Android•Manual or scheduled controls•Email notifications after switching on/off•Wireless installation using a smart phone/tablet ADVANTAGES•Save: Save time and power•Easy: Manage your home electronics anywhere / anytime •Smart: Control your appliances from your smartphone or tablet Intelligent Home ControlSP-1101WEasy Setup & Smart NotificationsSetup couldn’t be any easier and is all done on your smartphone or tablet. Once the Smart Plug is up and running, email notifications can keep you updated about which appliances and electronics are switched on/off. Get an email notification that somebody got home safely or that someone is playing Xbox instead of homework. Anything that’s handy for you to know about.Electrical Communication RF Output PowerOperating Voltage: 100–240VAC Power Frequency: 50–60Hz Max. Load Capacity:EU: 16A/230VAC;UK: 13A/240VAC AU: 10A/240VAC;US: 15A/120VAC Wireless IEEE 802.11b/g/nCoverage: Up to 10MFrequency Band: 2.4000 –2.4835GHzWi-Fi Security: WEP,WPA/WPA2,WPSProtocol: Client UDP, TCP/IP, HTTP11n: Up to 150Mbps(dynamic)11g: Up to 54Mbps(dynamic)11b: Up to 11Mbps(dynamic)Modulation Technology DBPSK,DQPSK, CCK, OFDM, 16-QAM, 64-QAMManagement Interface EnvironmentFirmware upgradable iPhone & iPad app Android appRemote access (Internet) Email notifications Schedule control LED Indicator: Power, Switch,NetworkButtons: Reset, Switch32°F–104°F (0°C–40°C)5–80%RH (non-condensing)Indoor use onlyDimensions Weight Certification 105mm (L) x 64mm (W) x 60mm (H) 184g CE, FCC, LVD SP-1101WTECHNICAL SPECIFICATIONSHARDWARE INTERFACEIntelligent Home ControlMaximum performance, actual data rates, and coverage will vary depending on network conditions and environmental factors. Product specifications and design are subject to change without notice. Copyright © 2017 Edimax Technology Co. Ltd. All rights reserved.Edimax Technology Europe B.V. Edimax Computer Company。
让生活越来越便利英语作文

In todays fastpaced world,convenience has become a significant factor in our daily lives.The evolution of technology and the continuous development of society have made it possible for us to enjoy a more comfortable and hasslefree lifestyle.This essay will explore the various ways in which our lives have become increasingly convenient and the impact of these changes on our daily routines.The Role of TechnologyThe most evident factor contributing to the convenience of our lives is the advancement in technology.Smartphones,for instance,have revolutionized the way we communicate, access information,and manage our daily tasks.With just a few taps,we can connect with friends and family across the globe,navigate through unfamiliar cities,and even control smart home devices.Ecommerce and Online ShoppingThe rise of ecommerce has transformed the shopping experience,making it more accessible and efficient.Online shopping platforms allow us to purchase a wide range of products from the comfort of our homes,without the need to physically visit stores.This not only saves time but also provides a broader selection of goods,often at competitive prices.Digital PaymentsThe convenience of digital payments has significantly reduced the need to carry cash or cards.Mobile payment services and online banking have made transactions seamless and secure.This has not only facilitated everyday purchases but also enabled instant money transfers,making financial management more straightforward.Smart Home DevicesThe integration of smart home devices,such as voiceactivated assistants and automated lighting systems,has made our homes more responsive to our needs.These devices can be controlled remotely,allowing us to adjust the home environment even when we are away,enhancing our comfort and security.Transportation and MobilityThe development of transportation systems,including ridesharing apps and highspeed trains,has made travel more convenient.These services offer flexibility in terms ofscheduling and routes,reducing the stress associated with traditional modes of transportation.Healthcare ServicesThe healthcare sector has also seen a shift towards convenience,with telemedicine becoming increasingly popular.This allows patients to consult with doctors remotely, saving time and reducing the need for physical visits to healthcare facilities.Education and Remote LearningThe convenience of online education platforms has made learning more accessible, especially during times when physical attendance is not possible.These platforms offer a wide range of courses and learning materials,catering to different schedules and learning preferences.The Impact on SocietyWhile the convenience brought about by these advancements is undeniable,it is essential to consider the potential drawbacks.The reliance on technology can lead to a sedentary lifestyle,and the ease of access to information can sometimes compromise the quality of knowledge acquisition.Moreover,the environmental impact of ecommerce and transportation services must be addressed to ensure sustainable development.In conclusion,the pursuit of convenience has led to remarkable innovations that have simplified our lives.However,it is crucial to balance this convenience with considerations for health,education,and the environment to ensure a holistic approach to living.As we continue to embrace these changes,it is essential to remain mindful of their broader implications on our society and the world at large.。
互联网是连接人还是隔离人英语作文

互联网是连接人还是隔离人英语作文The Internet: Connecting or Isolating People?With the rapid development of technology, the Internet has become an indispensable part of our daily lives. It has revolutionized the way we communicate, work, shop, learn, and socialize. However, there is a debate on whether the Internet is connecting people or isolating them. Some argue that the Internet has brought people closer together, while others believe that it has driven them apart. In this essay, I will explore both sides of the argument and provide my perspective on this complex issue.Those who believe that the Internet is connecting people argue that it has made communication easier and more convenient than ever before. Through social media platforms such as Facebook, Twitter, and Instagram, people can easily stay in touch with friends and family members who are miles away. In addition, the Internet has made it possible to connect with people from different cultures and countries, breaking down geographical barriers and fostering global friendships. Online forums and chat rooms provide a space for people with common interests to come together and share ideas, experiences, and knowledge. The Internet has also made it easier for businesses toreach a wider audience and connect with potential customers from all over the world. In this way, the Internet has brought people closer together and created a more interconnected global community.On the other hand, there are those who argue that the Internet is actually isolating people and preventing them from forming meaningful relationships. They point out that the rise of social media has led to a decrease in face-to-face interactions, making people more reliant on virtual communication. Studies have shown that excessive use of social media can lead to feelings of loneliness and social isolation, as people spend more time interacting with screens than with real people. In addition, the Internet has made it easier for people to live in their own echo chambers, surrounding themselves with like-minded individuals and information that reinforces their existing beliefs. This can lead to a lack of diversity of thought and a lack of empathy for those with different perspectives. In this way, the Internet can isolate people and prevent them from engaging in meaningful, face-to-face interactions.In my opinion, the Internet is a powerful tool that has the potential to both connect and isolate people. It all depends on how we use it. When used responsibly and in moderation, theInternet can be a valuable tool for connecting with others, sharing information, and fostering relationships. However, when used excessively and as a substitute for real-life interactions, the Internet can lead to feelings of loneliness and isolation. It is important for us to strike a balance between online and offline interactions and to prioritize building strong, meaningful relationships with those around us.In conclusion, the Internet has the potential to connect people from all over the world and create a more interconnected global community. However, it can also isolate individuals and prevent them from forming meaningful relationships. It is up to us to use the Internet in a responsible and balanced way, so that we can reap its benefits while also maintaining strong, real-life connections with those around us. By doing so, we can ensure that the Internet remains a tool for bringing people together, rather than driving them apart.。
Home Connect 智能家居连接系统用户指南说明书

Installation guideCongratulations on your new smart appliance with Home Connect, designed to simplify your life and make it more enjoyable.*Home Connect helps you to manage your home appliances with ease and comfort, providing a variety of functions beyond simple remote control.The Home Connect app gives you important and useful information about your home appliance, allowing you to customize and trigger certain functionalities and actions. Furthermore, the app offers support on how to properly maintain your home appliance and also inspires with a variety of recipes. Explore our ecosystem of partners and gain even more functionalities and services.Home Connect opens up a world of possibilities exceeding your expectations of a home appliance.* The availability of the Home Connect function depends on the availability of Home Connect services in your country.Home Connect services are not available in every country. You can find more information on this at Welcome to the connected home!Explore: With the Home Connect app you can...Manage your applianceIn the app’s appliance section you have an overview ofyour connected home appliances, offering a variety offunctions beyond simple remote control. Monitor the home appliance’s progress, change or pause programs, change settings, trigger actions, and receive notifications.Be inspiredThe recipe section provides a variety of inspiring recipes,tips and videos, that will make cooking and baking evenmore enjoyable.Get supportThe service section gives helpful information on how to maintain and operate your home appliance properly.Discover even more benefitsWe are constantly expanding our ecosystems of partners. Please refer to for an overview ofall partners.Let's get started!What you need1 | Your oven that is connected to the power supply andswitched on.2 | A smartphone or tablet with the latest version of the iOS orAndroid operating system.3 | Your oven within range of your home network's Wi-Fi signal.4 | The name (SSID) and password (key) of your Wi-Fi homenetwork.5 | These installation instructions.3ENEN4Step 2: Connect your oven to your home network1 | Your oven must be installed properly and turned on.2 | Open your Home Connect app to add your oven.Select "Add appliance".3 | Please follow the directions in the app and refer to this guideonly when prompted to by the app.Step 1: Download the Home Connect app and create a user account1 | Open the App Store (Apple devices) or Google Play Store(Android devices) on your smartphone or tablet.2 | Search for the "Home Connect" app in the store’s search andinstall it.Home Connect app:3 | Open the app and register to create a Home Connect useraccount.4 | Write down your Home Connect account credentials (useraccount and password), you will need them later.D D The app will guide you through the steps of adding yourappliance to Home Connect. It will refer to this guide onlywhen needed.Step 2.1: Connect your oven to your WLAN home network (Wi-Fi) with WPSThe following steps describe operations at the homeappliance itself.1 |2 | Press "Home Connect Assistant" on your oven.DD The display now shows "Network connection Automatic".3 | Activate the WPS function on your home network routerwithin the next 2 minutes .DD After a few seconds, "Network connection Successful"appears on your oven's display.4 | Follow the instructions in the app.EN5EN6 Step 2.2: Connect your oven to yourWLAN home network (Wi-Fi) step by step Please enter step 2.2 only when prompted to by the app. The following steps describe operations at the home appliance itself.1 |2 | Press "Home Connect Assistant" on your oven.3 | To start connecting manually, press "Manually connect".3DD The appliance opens a temporary Wi-Fi network named"HomeConnect" for 5 minutes with the password4 |EN7Step 3: Connect your oven to the Home Connect appPlease enter step 3 only when prompted to by the app. The following steps describe operations at the home appliance itself.1 | Press "Connect with app"on your oven.12 | Follow the instructions in the app.3 | Once successfully logged in, press "End assistant" on youroven.EndassistantInformation:。