[整理]TouchKit四线产品规格书
SV1044S-01规格书
触 摸 屏 确 认 书中科美达科技有限公司客户名称:客户编号:机种编号:SV1044S-01日 期:2010-05-06客户签名确认:批准 审核 编写 发行部门目 录1 范围 Application (3)2 规格 Specification (3)2.1 Touch Panel类别 (3)2.2 结构材料Material applied (3)2.3 机械尺寸Mechanical size (3)3 特性 Characteristics (4)3.1 环境特性Environmental characteristics (4)3.2 电气特性Electrical characteristics (4)3.3 机械特性Mechanical characteristics (4)4 信赖性测试 Reliability test (4)5 检验标准 Appearance (5)5.1 刮痕 Scratch (5)5.2 粒状杂物 Granular sundries (5)5.3 线状杂物 Linear sundries (6)5.4 玻璃破损 Glass flaw (6)6 注意事项 Attention (6)6.1 储存 Storage (6)6.2 拆包装 Remove pack (6)6.3 操作 Operation (6)6.4 组装 Combination (7)7 附件Other (8)1. 范围 Application我司生产的触摸屏机种编号Product(Model No.): SV1044S-01贵公司产品料号Customer(P/N):我司生产的透明轻触开关严格按照ITO TOUCH PANEL标准规范制作,经检验其性能均满足贵司的要求。
在此,我们征求贵公司对我们产品的进一步确认,并请求回签此确认书以作确认依据。
Our Touch screen is strictly manufactured according to your request. We promise it’s performance meet the following standard specifications. Hereon, We need your company approval to our product. Please sign the file as your technical approval. 2. 规格 Specification2.2 结构材料 Material appliedNO. 产品结构 Product structure 材 质 Material 备 注 Remarks1 上电极 upper circuit ITO FILM 0.188mm2 下电极 lower circuit ITO GLASS 1.1mm3 线 键 spacer Adhesive 0.1mm4 连接线 tail FPC 单面板,镀金2.3 机械尺寸 Mechanical sizeNO. 项 目 Item 规 格 Specification 单 位unit1 外 形 Outline 225.5±0.20×172.9±0.20 mm2 可视区 View area 215±0.20×162.2±0.20 mm3 动作区 Active area 211.2 ±0.20×158.8±0.20 mm4 厚 度 Total thickness 1.4±0.15 mm3. 特性 Characteristics3.1 环境特性 Environmental characteristicsNO. 项 目 Item 规 格 Specification1 操作温度Operation temperature -10℃~+60℃2 保存温度Storage temperature -40℃~+80℃3.2 电气特性 Electrical characteristicsNO. 项 目 Item 规 格 Specification 备 注 Remarks1 额定电压Rated Voltage DC 5V 1mA2 线性度 Linearity ≤1.5% Load 120gfFilm side: 400Ω~1000Ω 3 端点阻抗ResistanceGlass side:200Ω~650Ω FPC连接端测量 At connector4 绝缘阻抗Insulation Resistance≥20 MΩ DC 25V3.3 机械特性 Mechanical characteristicsNO. 项 目 Item 规 格 Specification 备 注 Remarks1 操作荷重Operating force50-150g R0.8手写笔2 表面硬度Hardness of surface≥3H JISK54003 透光率Light Transmission≥80%4 FPC弯折 Bending 弯曲半径1.0mm,3次以上 满足3.25 FPC剥离强度FPC peeling strength水平180度方向,0.5kgf10分钟不剥离满足3.24. 信赖性测试 Reliability testNO. 项 目 Item 规 格 Specification 备 注 Remarks1 高温保存测试High temperature storage80℃, 240hr2 低温保存测试Low temperature storage-30℃, 240hr3 高温高湿保存测试High temperature highHumidity storage70℃,90%RH,120hr4 温度冲击循环测试Temperature Cycling-30℃—+80℃(1hr each),20cycles可靠性试验24小时后,电性能要符合 3.2,机械性能要符合3.35 打点寿命 Input life >1,000,000次 (Tip R0.8mm)6 划线测试 lineation test >100,000次 (Tip R0.8mm)5. 外观检验标准 Appearance以下标准只适用于可视区。
Touch Board 商品说明说明书

PRODUCT DESCRIPTIONT he Touch Board is a microcontroller board with dedicated capacitive touch and MP3 decoder ICs. It has a headphone socket and micro SD card holder (for file storage), as well as having 12 capacitive touch electrodes. It is based around the ATmega32U4 and runsat 16MHz from 5V. It has a micro USB connector, a JST connector for an external lithium polymer (LiPo) cell, a power switch and a reset button.It is similar to the Arduino Leonardo board and can be programmed using the Arduino IDE. The ATmega32U4 can appear to a connected computer as a mouse or a keyboard,(HID) serial port (CDC) or USB MIDI device.SUMMARY• M icrocontroller Atmel ATmega32U4• Touch IC Resurgent Semiconductor MPR121• MP3 decoder IC VLSI Solution VS1053b• Audio output 15mW into 32Ω via 3.5mm stereo socket• Removable storage up to 32GB via micro SD card• Input voltage 3.0V DC – 5.5V DC• Operating voltage 5V DC• Max. output current (5V rail) 400mA (100mA at startup)• Max. output current (3.3V rail) 300mA• LiPo cell connector 2-way JST PH series - pin 1 +ve, pin 2 -ve• LiPo charge current 200mA• Capacitive touch electrodes 12 (of which 8 can be configured as digital I/O)• Digital I/O Pins 20 (of which 3 are used for the MPR121 and 5 are used forthe VS1053b — the latter can be unlinked via solder blobs)• PWM channels 7 (shared with digital I/O pins)• Analogue input channels 12 (shared with digital I/O pins)• Flash memory 32 kB (ATmega32U4) of which 4kB used by bootloader• SRAM 2.5kB (ATmega32U4)• EEPROM 1kB (ATmega32U4)• Clock speed 16MHz (ATmega32U4), 12.288MHz (VS1053b)• DC current per I/O pin 40mA sink and source (ATmega32U4), 12mA source / 1.2mA sink (MPR121)• Analogue input resistance 100MΩ typical (ATmega32U4)Technical Data SheetTouch Board®POWERThe Touch Board can be powered via the micro USB connection or from a 3.7V lithium polymer (LiPo) cell connected to the 2-way JST PH series connector. The power switch will switch the board on or off when powered by either power source. If power is supplied over USB whilst the LiPo cell is connected, then the charge LED will illuminate and the LiPo will charge from USB power, regardless of power switch position. INPUT AND OUTPUTThe Touch Board has the same I/O layout as the Arduino Leonardo, with two important differences. Firstly, some of the Leonardo pins are used to drive the MPR121, VS1053b and micro SD card. If you want to use these pins in your project, you can disconnect them from the components they are connected to by removing the appropriate solder blobs on the board. However, if you do this, you will not be able to use the functionality provided by the components the pins were connected to, unless you re-make the blobs. Please reference the Touch Board Pin Map and Touch Board and Shields Guide documents for more information.Secondly, there are 12 capacitive touch electrodes, brought out to contacts along the top edge, which afford connecting through painting, alligator clips or M3 hardware, and a row of 0.1" / 2.54mm pitch pads on the right side, for you to solder a header to if you wish. 8 of these can be used as digital I/O.Each special pin function is explained below.• Touch electrodes These connect to the MPR121 and provide capacitive touch / proximityE0-E11 sensing. E4-E11 can optionally be used as 3.3V digital inputs or outputs.• Serial Used to receive (RX) and transmit (TX) TTL serial data using the ATmega32U4 Pins 0 (RX) and 1 (TX) UART. This is separate to the USB serial (CDC) functionality, so the boardeffectively has two serial ports — one virtual over USB and one physical.• TWI (I2C) TWI (I2C) data and clock pins — these are used to communicateP ins 2 (SDA) and 3 (SCL) with the MPR121.• IRQ This pin is used to detect interrupt events from the MPR121 —Pin 4 it should only be configured as an input.• SD-CS This pin is used to select the micro SD card on the SPI bus. You can disconnect Pin 5 i t from the micro SD card pin for your own use by removing the solder blobadjacent to the output pad.• D-CS This pin is used to select the data input on the VS1053b. You can disconnectPin 6 i t from the VS1053b pin for your own use by removing the solder blob adjacent tothe output pad.• DREQ This pin is used to detect data request events from the VS1053b.Pin 7 Y ou can disconnect it from the VS1053b pin for your own use by removing thesolder blob adjacent to the output pad.• MP3-RST This pin is used to reset the VS1053b. You can disconnect it from the VS1053b Pin 8 pin for your own use by removing the solder blob adjacent to the output pad.• MP3-CS This pin is use to select the instruction input on the VS1053b. You can disconnect Pin 9 i t from the VS1053b pin for your own use by removing the solder blob adjacent tothe output pad.• MIDI IN This pin can be used to pass MIDI data to the VS1053b and have it behavePin 10 a s a MIDI synthesiser as opposed to an MP3 player. By default, this is notconnected, but you can complete the connection to pin 10 by placing a solderblob across the pair of rectangular pads provided adjacent to the output pad.You will also need to place a solder blob on the “MIDI on” pad pair abovethe ICSP header.• HEADPHONE OUTPUT These pins provide the headphone output from the VS1053b on 0.1" / 2.54mm AGND, R, L p itch pads that you can solder a pin header to if you wish, as an alternativeto the 3.5mm socket.• EXTERNAL INTERRUPTS These pins can be configured to trigger an interrupt on a low value, a risingPins 0, 1, 2, 3, 7 or falling edge, or a change in value.Continued on next page.• PWM Provide 8-bit PWM output.Pins 3, 5, 6, 9, 10, 11, and 13• SPI Note that the SPI pins are not connected to any of the digital I/O pins as they are O n the ICSP header o n the Arduino Uno. This means that if you have a shield that uses SPI, but doesNOT have a 6-pin ICSP connector that connects to the Touch Board’s 6-pin ICSPheader, the shield will not work.• LED There is a built-in LED connected to digital pin 13. When the pin is HIGH value, Pin 13 t he LED is on, when the pin is LOW, it is off.• ANALOGUE INPUTS Provide 10-bit ADC input, returning integers from 0-1023. All analog pins haveA0-A5, A6-A11 (in addition) the same functionality as general purpose input / output (GP10) pins.A6 – A11 are on digital pins 4, 6, 8, 9, 10, and 12 respectively.• AREF Optional reference voltage for the analog inputs.• RESET Bring this line LOW to reset the ATmega32U4.OVERCURRENT PROTECTIONThe Touch Board has overcurrent protection for both the USB and battery power inputs. This protects them from trying to source too much current, which may damage them or the board. This protectionis provided by two positive temperature coefficient (PTC) resettable fuses. The USB fuse has a holding current of 500mA and a trip current of 1000mA. The LiPo fuse has a holding current of 1100mA and a trip current of 2200mA. If these fuses trip, you will notice that the board loses power. You should switch off the board, and inspect it for faults, correcting any you find. After 20 seconds the fuses should reset and you can plug the board back in again.PHYSICAL CHARACTERISTICS / PROGRAMMINGThe Touch Board can be programmed using the Arduino IDE. More details on how to do this can be found at /touch-board/。
Rokit G4 中文用户手册说明书

用户手册DSP控制监听音箱欢迎使用 ROKIT G4。
首先,我们想告诉您一些历史。
在 2016 年,经过与超过 300 名专家长达两年的不懈努力,KRK 发布了 V 系列 4 监听音箱。
这些产品在专业制作人、工程师和高级用户中广受欢迎而且赞誉有加。
开发 ROKIT G4 时,我们一开始就把目标定位在为 ROKI T G4 客户设计一款兼具音质和外观的 V 系列 4。
这意味着,在超过 30 年里,在我们的高级监听音箱产品系列中,这是 ROKIT 历史上首次使用Kevlar® 材料设计的驱动器。
与 V 系列 4 一样,我们使用功能强大的 DSP 来为您提供不可思议的音景,同时通过深度 EQ 控制,帮助您提升房间声效。
这仅仅是个开始。
下面给出一些可帮助您增强听觉体验的其他提示技巧以及信息。
房间布置和设置。
KRK 设计团队煞费苦心对成百上千个监视器布置和房间声学场景进行建模分析,以确保 KRK 提供最有用的 EQ 工具,同时尽量减少用户侧调试。
房间的设计和构造往往不完美,所以房间声学是当前工作室所面临的最大问题。
许多了不起的工作室都设在经过改造的房子里。
我们通过让您控制系统,从而避免这类情况导致的问题。
通过LOW EQ和HIGH EQ两个功能,系统提供 25 种不同的 EQ 和弦配置组合,帮助您调试工作室声学,实现更为准确的监听。
首先,将LOW EQ和HIGH EQ设置为3:FLAT,纯调,无减弱或增强,VOLUME 设置为 0.0dB。
根据以下说明和图表在您房间内进行设置。
听一些喜欢的歌曲和混音片段。
调试 EQ 前,在房间内尝试不同位置和不同布置,然后调试 EQ,获取最佳听觉和监听体验。
SYSTEM SETUP整体系统设置对于避免不必要的声互作用十分关键。
房间的自然音响效果可能由于异常阻尼或回声而导致在各种频率时改变声级。
有关更多细节,请遵守下面的检查表。
1.系统设定(监听音箱和工作台)必须置于房间的前三分之一内。
(整理)TouchKit四线产品规格书.
精品文档
精品文档
文件编号: 发行版本:4.0
SET
产品标准规格书 (线性式)
信赖性试验
发行日期:20010501 修定日期:20050501
页 次:06
精品文档
精品文档
6、信赖性试验
(1)高温测试 放置于 60℃之环境中,测试 72hr,取出室温放置 2 小时测,需满足 下列条件:
▲导通阻抗
300Ω ≤X≤900Ω 300Ω ≤X≤900Ω
面,需满足下列条件: ▲导通阻抗 300Ω ≤X≤900Ω 300Ω ≤X≤900Ω ▲绝缘阻抗 20MΩ ↑ @ DC25V ▲外型
TOUCHPANEL 上版 PET、下板玻璃不得有破裂情形发生。
(6) 击打测试
用击打测试仪,(笔尖 0.8mm2 打键荷重 110 克力,打键速度 2 次/秒)连续 100 万次以上,需满足下列条件:
>3H
100 万次以上(笔尖 0.8mm2 打键荷重 110 克力,打键速度 2
次/秒)
>80%
<1.5%
精品文档
精品文档
文件编号: 发行版本:4.0
SET 3、结构图
产品标准规格书 (线性式) 产品结构
发行日期:20010501 修定日期:20050501 页 次:03
项目 A B C D E F I G H
▲导通阻抗 300Ω ≤X≤900Ω 300Ω ≤X≤900Ω ▲绝缘阻抗 20MΩ ↑ @ DC25V
精品文档
精品文档
文件编号:
发行版本:4.0
SET
7、外观检验规范 (1)检验条件:
a、光源:40W 光管 b、距离,如图:
光管
产品标准规格书 (线性式)
TouchWin手册
TouchWin使用手册Human Machine InterfaceTouchWin使用手册●安全注意事项●在设计系统时,请仔细阅读相关手册,同时要非常注意安全。
此外,实习时请特别注意以下几点,正确操作设备。
◎实习注意事项◎注意●请遵照讲师或说明书上的展开实习。
●请不要随意安装实习机的模块,改装接线。
否则会引起故障、误动作、损失、火灾。
●实习机发出异臭/弄音时,请关闭电源开关。
危险●通电时请不要接触端子,以免引起触电。
●请不要打开盖板。
TouchWin使用手册前言PLC(Programmable Logical Controller)通常称为可编程逻辑控制器,是一种以微处理器为基础,综合现代计算机技术、自动控制技术和通信发展起来的一种通用的工业自动控制装置,由于它拥有体积小、功能强、程序设计简单、维护方便等优点,特别是它适应恶劣工业环境的能力和它的高可靠性,使它的应用越来越广泛,已经被称为现代工业的三大支柱(即PLC、机器人和CAD/CAM)之一。
人机界面是在操作人员与机器设备之间作双向沟通的桥梁,用户可以自由的组合文字、按钮、图形、数字等来处理或监控管理及应付随时可能变化信息的多功能显示屏幕。
随着机械设备的飞速发展,以往的操作界面需要熟练的操作员才可以操作,而且操作困难,无法提高工作效率。
但是使用人机界面能够明确指示并告知操作员机器设备目前的状态,使操作变得简单生动,并且减少操作上的失误,即使是新手也可以很轻松地操作整个机器设备。
使用人机界面还可以使机器的配线标准化、简单化,同时也能减少PLC监控器所需的I/O点数,降低生产成本,同时由于面板控制的小型化及高性能,相对地提高了整个设备的附加价值。
TouchWin使用手册目录前言------------------------------------------------------------------------------------------------------4目录-----------------------------------------------------------------------------------------------------5硬件篇--------------------------------------------------------------------------------------------------71 产品概述------------------------------------------------------------------------------------------------------------71-1 功能------------------------------------------------------------------------------------------------------------8 1-2 一般规格------------------------------------------------------------------------------------------------------9 1-3 各部分名称--------------------------------------------------------------------------------------------------112 外形尺寸----------------------------------------------------------------------------------------------------------132-1 TP460-L尺寸-----------------------------------------------------------------------------------------------13 2-2 TP560-L/TP560-T尺寸------------------------------------------------------------------------------------133 安装方法----------------------------------------------------------------------------------------------------------14软件篇-------------------------------------------------------------------------------------------------151 关于作图软件----------------------------------------------------------------------------------------------------151-1 软件的安装-------------------------------------------------------------------------------------------------15 1-2 软件画面的构成-------------------------------------------------------------------------------------------162 入门须知----------------------------------------------------------------------------------------------------------192-1 新建工程----------------------------------------------------------------------------------------------------192-1-1 新建画面或窗口--------------------------------------------------------------------------------------21 2-2 画面或窗口标题的设定----------------------------------------------------------------------------------23 2-3 图形的制作-------------------------------------------------------------------------------------------------262-3-1 画直线、长方形、圆-------------------------------------------------------------------------------262-3-2 画多边形、折线--------------------------------------------------------------------------------------272-3-3 画圆弧--------------------------------------------------------------------------------------------------282-3-4 尺寸的变更--------------------------------------------------------------------------------------------282-3-5 选中对象的移动--------------------------------------------------------------------------------------292-3-6 选中对象的剪切、复制和粘贴-------------------------------------------------------------------30 3部件----------------------------------------------------------------------------------------------------------------31 3-1 文字串设置-------------------------------------------------------------------------------------------------31 3-2 动态文字串-------------------------------------------------------------------------------------------------33 3-3 指示灯-------------------------------------------------------------------------------------------------------35 3-4 位操作按钮-------------------------------------------------------------------------------------------------37 3-5 指示灯按钮-------------------------------------------------------------------------------------------------39 3-6 画面跳转----------------------------------------------------------------------------------------------------41 3-7 数据显示----------------------------------------------------------------------------------------------------42 3-8 报警数据显示----------------------------------------------------------------------------------------------44 3-9 字符显示----------------------------------------------------------------------------------------------------45 3-10 数据输入---------------------------------------------------------------------------------------------------45 3-11 小键盘------------------------------------------------------------------------------------------------------46 3-12 用户输入---------------------------------------------------------------------------------------------------46 3-13 窗口调用---------------------------------------------------------------------------------------------------47 3-14 垂直棒图---------------------------------------------------------------------------------------------------48 3-15 水平棒图---------------------------------------------------------------------------------------------------50 3-16 动态图片---------------------------------------------------------------------------------------------------524 系统参数----------------------------------------------------------------------------------------------------------544-1 系统设置----------------------------------------------------------------------------------------------------54TouchWin使用手册4-1-1 启动画面和背景设定-------------------------------------------------------------------------------54 4-1-2 口令设置-----------------------------------------------------------------------------------------------54 4-1-3 屏幕保护-----------------------------------------------------------------------------------------------54 4-2 交互控制----------------------------------------------------------------------------------------------------55 4-3 PLC类型选择-----------------------------------------------------------------------------------------------55 5 保存与下载-------------------------------------------------------------------------------------------------------565-1 保存工程----------------------------------------------------------------------------------------------------56 5-2 下载----------------------------------------------------------------------------------------------------------57 6 特殊功能----------------------------------------------------------------------------------------------------------58应用篇-------------------------------------------------------------------------------------------------591 TP系列操作方法------------------------------------------------------------------------------------------------591-1 TP系列连机通讯-------------------------------------------------------------------------------------------59 1-2 TP系列触摸屏口令----------------------------------------------------------------------------------------59 附录----------------------------------------------------------------------------------------------------62 1 PLC连接方法--------------------------------------------------------------------------------------------------621-1 信捷FC系列-----------------------------------------------------------------------------------------------62 1-2 三菱FX系列-----------------------------------------------------------------------------------------------64 1-3 西门子S7-200系列---------------------------------------------------------------------------------------67 1-4 欧姆龙C系列----------------------------------------------------------------------------------------------68 1-5 光洋S系列-------------------------------------------------------------------------------------------------70 1-6 台达DVP系列---------------------------------------------------------------------------------------------73 1-7 LG Master-k系列PLC------------------------------------------------------------------------------------75 1-8 松下FP系列PLC-----------------------------------------------------------------------------------------77 1-9 施耐德PLC-------------------------------------------------------------------------------------------------80TouchWin 使用手册硬件篇1 产品概述TP 系列触摸屏工业显示器是代替控制面板和键盘的又一新突破,是机器的又一新面孔。
X4 商品说明书
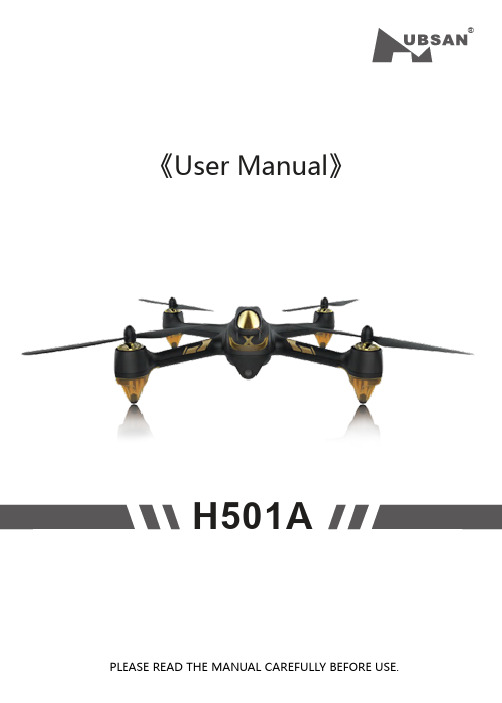
®《User Manual》H501APLEASE READ THE MANUAL CAREFULLY BEFORE USE.1.Quad + Phone/Pad2.Quad + Phone +Relay3.Quad + Transmitter+++orCaution:For safety, the quadcopter is default set to CAN NOT FLY WHEN NO GPS. If you prefer to fly when GPS is not available, please reset the value as instructed below before using.Pull the throttle stick to the lowest position and press the Elevator stick for 1.5 seconds to enter into the MAIN MENU interface. Push the Elevator stick up/down to select “Fly When no GPS”, push the stick right to enter into the “ Fly When no GPS” interface, select “YES”.The Default Setting is “NO”.Select “Exit” to exit.Compass calibration is required after the binding as instructed on the transmitter.1 ) Horizontally rotate the X4 in a clockwise direction when the LCD screen shows “Calib compass 1”2 ) Put the X4 nose down and vertically rotate it in a clockwise direction when the LCD screen shows “Calib compass 2”3 ) Calibration is completed when the4 LED indicators remain solid.Important safety notesOperation: Be extremely careful and responsible when using the quad. Small electronic components can be damaged due to crashes or exposure to water. To avoid any injuries, do not use the quad with broken or damaged components.Maintenance: Do not try to fix the quad yourself, please contact authorized distributors for service. For more information, please visit the official website at .Battery: Battery: Do not store the battery in high temperature area (60 ℃or higher). Using a Hubsan dedicated charger for recharging.Keep the batteries away from children.Keep the batteries dry.USAGE ADVICEHubsan provides you with two files for your quad:1.《Disclaimer》2.《Quick Start Guide》Watch the tutorial video and read the Disclaimer first,.For detail information, please download User Manual at .Read the Disclaimer first before use.※Symbol explanation1- Do not fly the quad in a crowded area, always be aware of the safety of yourself and others.- Do not fly in bad weather condition.- Do not try to catch the quadcopter while it is still in flight.- This product is intended for experienced pilots over the age of 14.- Remove the battery when it is not in use, to avoid accidental injuries.- Keep your body away from the propellers after powered on. High speed propellers are very dangerous.No operatingImportant NoticeInstructionExplanation, referenceSafety Advisory Notice for Lithium-Polymer (LIPO) Batteries LiPo batteries are different from conventional batteries in that their chemical contents are encased in a relatively lightweight foil packaging. This has the advantage of significantly reducing their weight but it does make them more susceptible to damage if roughly or inappropriately handled. As with all batteries, there is a risk of fire or explosion if safety practices are ignored:● If you do not plan to fly the quad for a long time, store the battery approximately 50%charged to maintain battery performance and battery life.● Please use Hubsan chargers for battery charging.● Discharging the battery within 5C current , do not over-discharging.● Do not charge on carpet to avoid fire.● Batteried need to be recharged if not in use for over 3 months.1.Charge and store LiPo batteries in a location where a battery fire or explosion(including smoke hazard) will not endanger life or property.2.Keep LiPo batteries away from children and animals.3.Never charge the LiPo battery that has ballooned or swelled.4.Never charge the LiPo battery that has been punctured or damaged.5.After a crash, inspect the battery pack for signs of damage. Discard in accordancewith your country’s recycling laws.6.Never charge the LiPo battery in a moving vehicle.7.Never overcharge the LiPo battery.8.Never leave the LiPo battery unattended during recharging9.Do not charge LiPo batteries near flammable materials or liquids.10.Ensure that charging leads are connected correctly. Reverse polarity charging canlead to battery damage or a fire or explosion.11.Have a suitable fire extinguisher (electrical type) OR a large bucket of dry sand nearthe charging area . Do not try to extinguish electrical (LiPo) battery fires with water.12.Reduce risks from fire/explosion by storing and charging LiPo batteries inside asuitable container.13.Protect your LiPo battery from accidental damage during storage and transportation.(Do not put battery packs in pockets or bags where they can short circuit or can come into contact with sharp or metallic objects.).14.If your LiPo battery is subjected to a shock (such as a crash), place it in a metalcontainer and observe for signs of swelling or heating for at least 30 minutes.15.Do not attempt to disassemble or modify or repair the LiPo battery.2Contents3IMPORTANT SAFETY NOTES INTRODUCTIONSYMBOL EXPLANATION 1.ITEMS INCLUDED IN THE BOX USAGE ADVICE 2QUAD COPTER 3QUAD COPTER BATTERY 4PROPELLERS 6 TRANSMITTER3.1INTRODUCTION4.1INTRODUCTION4.2 INSTALLING THE PROPELLERS 6.1 INTRODUCTION6.1.1 TRANSMITTER KEY FUNCTION3.2INSTALL THE BATTERY 3.3CHARGING 2.1QUAD COPTER MOTOR LED INDICATOR 1121211211341341355131313141555561515176617171818191920202223678107107117125 X-Hubsan App 6.1.2 INSTALL THE TRANSMITTER BATTERY 6.1.3 TRANSMITTER STICK CALIBRATION 6.1.4 ADJUSTABLE 5.8GHZ FREQUENCY 6.1.5 ANTENNA INSTRUCTION 7 START TO FLY7.1 FLIGHT ENVIRONMENT7.2 SAFETY CHECK BEFORE FLIGHT7.3 FLY WITH APP7.3.1 CONNECT THE QUADCOPTER WITH APP7.3.2 COMPASS CALIBRATION 7.4 FLY WITH TRANSMITTER 7.4.1 BIND THE QUAD WITH TRANSMITTER7.4.2 COMPASS CALIBRATION7.4.3 HORIZONTAL CALIBRATION 7.4.4 ROTATION CALIBRATION 7.4.5 START/ STOP THE MOTORS 7.4.6 BASIC FLIGHT8 ADVANCED PERFORMANCE SETUP 8.1 REVERSING CHANNEL SETUP 8.2 SENSITIVITY SET UP8.3 HEADLESS MODE8.4 FOLLOW ME MODE8.5 HOME MODE 8.6 EXIT HOME MODE9 FAILSAFE MODEH501A TROUBLESHOOTING SCHEMATIC DIAGRAM H501A Spare Part Chart4.3 REMOVING THE PROPELLERSIntroductionThank you for buying the HUBSAN product. It is designed as an easy-to-use, multi-functional RC model, capable of hovering and acrobatic flight maneuvers. Please read the manual carefully and follow all the instructions. Be sure to keep the manual for future reference.FPV:FFirst Person View,this feature enables you to experience every live moment of the flight from the drone's point of view.371PC 2PCSLi-Po battery User Manual For quad copter《Disclaimer》《Quick Start Guide》3Quadcopter battery3.1 IntroductionThe quadcopter battery is a rechargeable Li-Po battery with 2700mAh capacity and 7.4V voltage.The battery should only be charged with Hubsan charger to avoid overcharge.2.1 Quadcopter motor LED indicatorFront LED is blue; Back LED is red.1.Power on: 4 LED indicators blink simultaneously.pass Calibration:1). Horizontal calibration: 4 LED indicators blink circularly. 2). Vertical calibration: 4 LED indicators blink alternately .3.Quadcopter Horizontal Calibration: 4 LED indicators blink slowly.4.Quadcopter Rotation Calibration: 4 LED indicators blink circularly.5.GPS Flight: 4 LED indicators will remain solid.6.Low Voltage Return : 2 front LED indicators remain solid, and 2 back LED indicators blink quickly.7.Signal Lost: 2 front LED indicators blink alternately, 2 back LED indicators remain solid.8.LED indicators can be turned off by long pressing the lower throttle trim on the transmitter.3.2 Installing the battery167234895Propeller B Lower Body Shell 1080P Camera Propeller A Motor LED Light Battery CompartmentTF Slot[10]Upper Body ShellRubber Feet4 Propellers4.1 IntroductionThe quadcopter uses 7.3 inches propellers which are marked by A and B.3.3 ChargingConnect the battery to the balance charger and the wall charger. The left LED indicator on the balance charger will remain red and the right LED indicator will remain off when charging. The battery is fully charged when the right LED indicator turns green. It takes approximately 180 minutes to fully charge the battery.Please take off the charger and the battery when the battery is fully charged.4.3 Removing the propellersHold the motor with the wrench, then spin the propellers in the indicated unlock direction.●Make sure that the A and B propellers areinstalled correctly. The X4 will not fly if propellers are improperly installed.●Keep the moving propellers away from yourbody as well as other people and any obstacles.7Hubsan H901A is a multi-functional FPV transmitter with 3.7inch LCD screen and 5.8G live stream.Recommended maximum flight distance: 300m.6.1 Introduction6 Transmitter拍摄状态5 X-Hubsan AppHubsan designed an APP to go with the new X-Hubsan H501A. Users can use the APP to control the quad, take picture/videos and set the parameters of the quad. It is recommended to fly the quad within 100 meters and use smart devices with larger screen for the best visual experience.Camera Status Recording timeTransmitter's battery voltage Quad copter's battery voltage Quad copter's head dataQuad copter's roll Quad copter's pitchQuad copter's speed Quad copter's distance Quad copter's altitudeQuad copter's GPS signal strength Transmitter's GPS signal strengthLongitude & Latitude6.1.1 Transmitter key function9MODE 117 2.4G127MODE 289Throttle/Rudder stickElevator/Aileron stick Throttle/Aileron stickElevator/Rudder stick Aileron trim button Rudder trim buttonUp/Down T1、T2Headless mode switchGPS SwitchHome SwitchFollow Me SwitchThrottle trim button Power Switch Video/ENTER buttonPhoto/EXIT button Elevator trim button Push the stick forward or backward and the quadcopter willascend or decend; Push the stick left or right and the quadcopter will rotate in counter clockwise or in clockwisePush the stick forward or backward and the quadcopter will flyforward or backward;Push the stick left or right and the quadcopter will fly left or rightPush the stick forward or backward and the quadcopter will flyforward or backward;Push the stick left or right and the quadcopter will rotate in counter clockwise or in clockwise.Push the stick forward or backward and the quadcopter willascend or decend; Push the stick left or right and the quadcopter will fly left or right.Aileron trim adjusts for left and right drift.Rudder trim adjusts for drift of left and right rotation or yaw.To select settings.No FunctionPush up to enter headless mode;Push down to exit headless mode.Push up to activate GPS function;Push down to disactivate GPS function.Push up to turn on automatic return home;Push down to exit.Push the switch up, the follow me function will be activatedThrottle trim is normally at the center.Push to ON to turn on the transmitter. Push to OFF to turn off.Long press to enter Main Menu Short press to take videoLong press to exit Main Menu Short press to take photo Elevator trim adjusts for forward and backward drift.12(2)4635789101112131415(1)S/NMode/ ControlFunction6.1.2 Install the transmitter battery6.1.3 Transmitter stick calibrationMode 1: Push the left stick to the upper left corner and the right stick to the upper right corner then power on the transmitter simultaneously, Rotate both sticks in circles for three times when the LCD screen displays “Calibrate Stick” then release both sticks and press “Exit” until one beep sound is made, indicating a successful calibration.Mode 2: Push both sticks to the upper left corner then power on the transmitter simultaneously. Rotate both sticks in circles for three times when the LCD screen displays “Calibrate Stick” then release both sticks and press “Exit” until one beep sound is made, indicating a successful calibration.1016171819LCD 2.4G Antenna 5.8G AntennaStrap fastenerDisplay flight data and live streamTransmit control signalsReceive the video transmission To fasten the strap on tansmitterRemove the coverInstall 8 x AA batteriesaccording to the correct polaritiesClose the cover6.1.4 Adjustable 5.8GHz frequencyThe transmitter will automatically find the best frequency to ensure a good quality live video.When necessary, adjust the 5.8GHz frequency for a better video transmission.To adjust 5.8GHz frequency:Pull the throttle stick down to the lowest position and long press the ‘Enter’ button to open the ‘Main Menu’ interface. Use the Up/Down keys to select 5.8G frequency then press ‘Enter’ and switch between different frequency with Up and Down keys. Long pressThe transmitter mode can be shifted according to the above operation.11Mode 2/Mode1Mode 2/Mode1126.1.5 Antenna instructionFor maximum communication range, the 2.4G antenna should point skyward without obstructions in between; the 5.8G antenna should be bent vertically and have the side with‘Hubsan’ logo pointing at the quadcopter. The maximum range of the video transmission is approximately 300 meters.In case of any injuries caused by improper operations, it is recommended that beginners learn to operate the quadcopter under the guidance of an experienced user. It is also very important to choose a proper flight environment.7.1 Flight environment7.2 Safety check before flight(1) The flying area should be wide open and should be without any tall buildings, otherwise the GPS may not work.(2) Do not fly in bad weather condition such as windy, snowy, rainy or foggy weathers.(3) Avoid flying near obstacles, crowds, power cables, trees and water.(4) Do not fly near any radio towers or airports.(5) The quad will not work in the Antarctic Circle or the Arctic Circle.(6) Obey the local laws and regulations, do not fly in restricted areas.(7) Only fly in good weather conditions and between the temperature of 0-40℃ .(1) Make sure the batteries are fully charged. (Quad,transmitter or smart device)(2) Make sure propellers are installed properly.(3) Insert Micro-SD card for pictures and videos.(4) Check if motors work well after binding.Airport7.3.2 Compass CalibrationCompass calibration is required before the first flight, otherwise the compass may not work properly. The compass is very sensitive to the electromagnetic interference which can create false compass data and lead to poor flight performance or even flight failure. Calibrate the compass regularly can help to provide the optimal performance of the quad.7.3 Fly with AppAPP flight is only availabe when fly in outdoors.7.3.1 Connect the Quadcopter with App1.Power on the quad;2.Search for WI-FI on devices:For iPhone or iPad, please select【 Settings 】>Wi-Fi;For Android system,please select【 Settings 】>WLAN> W-Fi.3.Click HUBSAN_H501A_XXXXXX,and password is 12345678.The password cannot be changed by user.4.Connection completed5.Open X-Hubsan APP , choose Hubsan H501A to enter into the user interface for flight.NOTICE:For safety,please don't use the smart device for other purposes while it is connecting with Hubsan App.If you want to control the quad with other devices, please restart the quad.137.4 Fly with transmitter7.4.1 Bind the quad with transmitterThe binding process is completed in the factory.For re-binding, press Enter button and power on the transmitter simultaneously until “Bind to Plane” is displayed, then power on the drone and place it very close to the transmitter, the binding process will be completed after one “beep” sound.If the binding failed, please power off the drone and repeat the above steps.7.4.2 Compass calibrationCompass calibration is required before the first flight, otherwise the compass may not work properly. The compass is very sensitive to the electromagnetic interference which can create false compass data and lead to poor flight performance or even flight failure. Calibrate the compass regularly can help to provide the optimal performance of the quad.Do not calibrate the compass in a strong magnetic fieldDo not carry ferromagnetic materials with you while calibrating the compass,such as keys, cell phones, etc.Compass calibration procedures:1) Pull the left stick to the left side, and move the right stick from left to right quickly and repeat until the transmitter displays “Calib compass1”, and the 4 LED indicators blink circularly.2) Horizontally rotate the X4 in a clockwise direction until the LCD screen shows “Calib compass 2”, and the 4 LED indicators blink alternately.3) Put the X4 nose down and vertically rotate it in a clockwise direction until the “Calib compass 2” disappears.4) Calibration is completed when the 4 LED indicators remain solid.14Please follow the calibrating procedures:1) Push the left stick to the most right side, and move the right stick from left to right quickly until the 4 LED indicators blink slowly2) Calibration is completed whrn the 4 LED indicators stop blinking.StartC o m p l e t e7.4.4 Rotation calibrationRotation calibration is required when the quadcopter yaw during flight.Please follow the calibrating procedures:1) Push the left stick up, and move the right stick from left to right quickly until the 4 LED indicators blink slowly ;2) When the 4 LED indicators blink circularly, horizontally rotate the X4 in a clockwise direction until the 4 LED indicators remain solid temporarily;3) The 4 LED indictors will blink circularly again, repeat step 2 to rotate the X4;4) Calibration is completed whrn the 4 LED indicators stop blinking.157.4.5 Start/stop the motorsPull both sticks to the lower outer corner as shownon the picture to start or stop the motors.Push the throttle stick up slowly to take off;Push the throttle stick down slowly to land.7.4.6 Basic flightThe operations of the controller are based on Mode 2.The left stick controls the altitude and rudder of quadcopter, and the right stick controls its forward, backward, left and right flight.开始左边摇杆向上打到最大量程快速上下拨动右边摇杆直到航向灯慢闪当航向灯循环环形闪烁时,水平旋转飞行器直到航向灯变为慢闪重复上述动作直到航向灯变为长亮Caution:Keep the moving propellers away from your body as well as other people and any obstacles.Do not let go of the controller until the motors have fully stopped.Do not stop the motors during the flight to avoid crashing, unless for emergency.Start Push the left stick up Move the right stick from left to right quickly until the 4 LED indicators blink slowlyHorizontally rotate the X4 in a clockwise direction Continue to horizontally rotate the X4 in a clockwise direction168 Advanced performance setup8.1 Reversing channel setupIf you would like to reverse any of the stick functions due to personal preference, then follow the instructions below. Be aware that this will reverse the control commands.Pull the throttle stick down to the lowest position and long press the ‘Enter’ button to open the ‘Main Menu’ interface. Use the Up/Down keys to select ‘Set reverse’ and use ‘Enter’ button to switch between modes. Long press ‘Exit’ button to save and exit.178.2 Sensitivity setupIf you would like to adjust the sensitivity of any stick functions, then follow the instructions below.Pull the throttle stick down to the lowest position and long press the ‘Enter’ button to open the ‘Main Menu’ interface. Use the Up/Down keys to select ‘Set sensitive’ and use ‘Enter’ button to switch between ‘Expert mode’ and ‘Normal Mode’. Long press ‘Exit’ button to save and exit.8.3 Headless modeHeadless mode means the X4 will default the current head direction as its head when enterThe transmitter has a built-in GPS module. The Follow Me mode only works when bothPush the A switch up to enter Headless mode and push the A switch down to cancel Headless mode.The Head data displays in red when the quad copter enters into headless mode.The Head data displays in green when the quad copter exits headless mode.188.4 Follow me modePush the B switch up to enter Follow Me mode and push the B switch down to cancel Follow Me mode.When the switch is pushed up, the screen will display ‘Follow Mode’ in green and the quadcopter will turn and have the camera pointing at the transmitter. Only the throttle stick will still function under Follow Me mode.8.5 Home modeThe Return to Home mode will only work when both the quadcopter and the transmitter have 6 or more satellites.Enter into home modequadcopter.8.6 Exit home modeare armed19 automatically.9 Failsafe modeThe quadcopter will enter Failsafe mode when the connection between the transmitter is lost or when the power is low. The flight control system will control the quadcopter to return to the Home Point and land automatically. The Failsafe mode helps to avoid injuries or damages.H501A TROUBLESHOOTING1. Transmitter and X4 do not pair 1) Check if the transmitter and the X4 are both power on or not. 2) Re-pair by the following steps 1 Power off the transmitter.2 Press the camera function key and power on the transmitter till “Bing to plane” displays on the LCD screen.3 Face the X4’s bottom to the transmitter’s LCD screen very closely and power on the X4, hold 5 seconds till the pair is finished.2. Cannot Unlock the propellers 1) Make sure the X4 is finished the compass calibration. 2) Make sure the Home switch is in the downward position. 3) Make sure the sticks are all in the center positions.3. Cannot Search GPS Signals Make sure not fly indoor or fly surround by buildings. Make sure fly in outdoor and in an open field and void of obstacles, tall building or steel structures.(1) Transmitter is powered off.(2) The flight distance is over the signal transmission range of the transmitter.(3) The signal of the transmitter was interrupted by some other strong electronic interference.Home Point is recorded when the quadcopter receives the 6th satellite while the motors are armed.To ensure that the X4 can return safely to its Home Point, fly the X4 in a safe to fly area.If there are GPS satellites drops below 6 or less for more than 20 seconds while the X4 is returning home, the X4 will descend automatically.The X4 cannot avoid obstacles automatically while in Failsafe mode.If the power is low, please land the quadcopter in case of any damages.20Conditions that will activate Failsafe mode4. No Video or Video is Under Strong Interference1)Check if any strong interference sources around or not2)Check if the frequencies of the X4 and the transmitter are under cross interference ornot. (If so,please re-pair the X4 and the transmitter)5. Cannot HoverCheck if the barometric parameters displayed on the transmitter are correct or not.Check if the sticks are in the center position or not. (If not, please push the sticks to thecenterpositions)6. Cannot Flight In a Set-WaypointMake sure the GPS switch is in upper position.Make sure the GPS satellites are up to 6 or above.Make sure all the sticks are in the center positions, except the throttle stick.7. Follow Mode Function Not WorkMake sure the GPS and follow mode switches are in upper positions.Make sure the GPS satellites are up to 6 or above.Make sure all the sticks are in the center positions, except the throttle stick.Make sure 5 meters at least between the X4 and the transmitter.8. Cannot fly back to Home Point!Be sure the GPS satellites are more than 6 before flying.9. GPS signal lost!Check if there is any interference to quad or not, for example: high-tension cables, radio tower.10. The quad or video shakes while flying① Check the propellers, replace propellers if there is any brok en or deformed;② Check the screws on quadcopter are fixed in place or not;③ Check the motor shaft is broken or not.11. Cannot take pictures or videos!① Check if the Micro-SD card is inserted or not.② Check if the Micro-SD card is formatted correctly or not (For mat the Mirco-SD card before use, if the Micro-SD card is with FAT32, the card should be Cla ss 4 or Class 4+)12. Cannot connect with Wi-FiRestart the quadcopter.13. If you want to use the relay during flight, please unbind the quadcopter with the APP, otherwise the relay cannot be connected.2122H501A Spare Part ChartH501A-01 Body Shell- BlackH501S-18 Motor LED LampshadeA/BH501S-05B Propeller A- BlackH501S-08 Brushless Motor BH501S-01Body Shell- WhiteH109-04Rubber FeetH501S-06Propeller B- GoldH501S-19ESCH501S-17Eye LampshadeH501S-04ScrewH501S-06BPropeller B- BlackH501C-10LED PCBA(Blue/Red)H501S-03CanopyH501S-05Propeller A- GoldH501S-07Brushless Motor AH501A-02Flight Control PCBA23H501A-035.8G TransmissionModuleH501S-25H901A TX Li-Po BatteryH501A-05GPS ModuleH501S-27H906A TXH301S-11Adapter H501S-26USB CableH501S-13Compass ModuleH301S-12Balance ChargerH501A-04HT005 RelayH501S-14Li-Po BatteryH501S-16Propeller Wrench H501C-02Battery Cover24 Hubsan T echnology Company Limited。
苹果 iPhone、iPad 和 iPod touch 商品说明书

1x
1x
1x
29
1:1
40
2x
2x
30
1:1 41
1x
1x
31
42
1x
1x
32
1:1 43
1x
1x
1x
33
1:1
44
2x
1x
34
1:1 45
2x
1x
1x
35
1
2x
2
1:1
46
2x
1x
36
47
2x
4x
4x
37
2x
1
2
2x
48
1
1x
1x
1x
2
3
1x
1x
1x
38
1:1 49
1
1x
1x
1
2
3
11
6x
1x
4
12
1:1 1:1
1
2
3
6x
3x
5
1x
1x
6
1:1 13
4x
2x
1x
7
2x
2x
1x
2x
81
2
1:1
14
1
3
2x
1x
2x
2x
2x
1x 1x
2x
9
2
4
1:1 15
1x
1x
10
16
1x
1x
1x 1x
2x
11
1
2
3
1:1
1:1 17
1x
2x 1x
1x
12
1
四线触摸屏使用说明书
说明:”T” 表示压下触摸屏时数据头标志 “ R” 表示离开触摸屏时数据头标志 X Y 方向数据范围为 0-1023(10 进制)
C.应答速度
触摸屏输出 约 24ms 约 12ms
输出频率:87pps( pps:point per second). 说明:上面数据是在下述通信条件下测得的 通信速率:9600bps 校验方式:无 数据位:8 位于 结束位:1`位 八、软件安装说明: (1)DOS 下的安装: 在软驱中插入随机软盘,运行 setup.bat 文件即可把所有的 DOS 调试程序安装到你的硬盘并 自动建立起 Touchscr 目录。 文件清单如下: DOS 下程序 ST.EXE 显示触摸屏坐标值 DM.cpp DM 的 C 源程序(COM1 口) DM.EXE 波特率为 2400 的可执行程序(COM1 口) DM4800.EXE 波特率为 4800 的可执行程序(COM1 口) DM9600.EXE 波特率为 9600 的可执行程序(COM1 口)
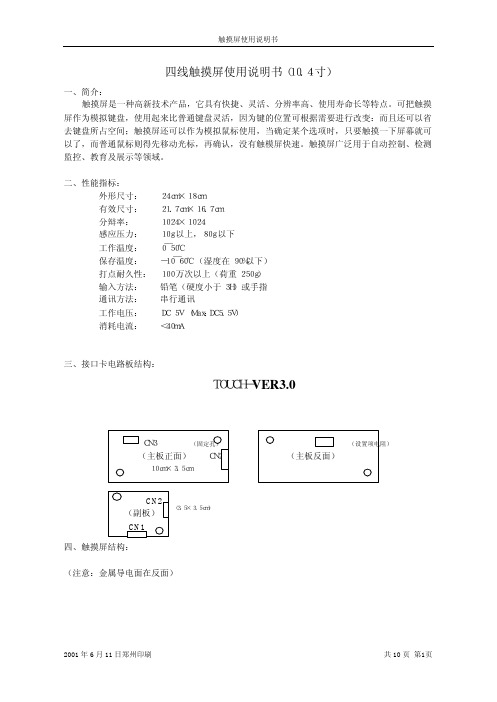
二、性能指标: 外形尺寸: 24cm×18cm
有效尺寸: 21.7cm×16.7cm 分辩率: 1024×1024 感应压力: 10g 以上,80g 以下 工作温度: 0 ̄50℃ 保存温度: -10 ̄60℃(湿度在 90%以下) 打点耐久性: 100 万次以上(荷重 250g) 输入方法: 铅笔(硬度小于 3H)或手指 通讯方法: 串行通讯 工作电压: DC 5V (Max:DC5.5V) 消耗电流: <40mA 三、接口卡电路板结构:
9600
开
开
19200
七、串行通信数据格式及应答速度:
A:数据传送格式:
数据传送有三种方式:连续传送、单发、双发。
连续传送方式,触摸屏输出多组数据;
- 1、下载文档前请自行甄别文档内容的完整性,平台不提供额外的编辑、内容补充、找答案等附加服务。
- 2、"仅部分预览"的文档,不可在线预览部分如存在完整性等问题,可反馈申请退款(可完整预览的文档不适用该条件!)。
- 3、如文档侵犯您的权益,请联系客服反馈,我们会尽快为您处理(人工客服工作时间:9:00-18:30)。
300Ω ≤X≤900Ω
▲绝缘阻抗
20MΩ ↑ @ DC25V
(4)高、低温冲击测试
放置于-20℃之环境中持续 30 分钟,再将温度提升为 25℃持续 5 分钟,再将
温度提升为 60℃持续 30 分钟,此为 1Cycle 持续 120Cycle 测试,需满足下
列条件:
60℃
▲导通阻抗
300Ω ≤X≤900Ω
项目 A B C D E F I G H
名称 表面硬化雾化处理
上部基材 下部基材 ITO 导电层 支撑点 导电层 绝缘层 粘着层
FPC
材料
PET GLASS 或 PET
ITO 网点油墨 导电银浆 光固 UV 胶
粘着胶 可挠性印刷电路板
-------------
-------------
文件编号: 发行版本:4.0
-------------
文件编号:
发行版本:4.0
SET
产品标准规格书 (线性式)
目录
发行日期:20010501 修定日期:20050501 页 次:01
1、目录------------------------------------------------------01 2、基本规格------------------------------------------------02 3、产品结构------------------------------------------------03 4、线性度的测试方法------------------------------------04 5、电气特性------------------------------------------------05 6、信赖性试验---------------------------------------------06 7、外观检验规范------------------------------------------09 8、使用注意事项------------------------------------------11
(6) 击打测试
用击打测试仪,(笔尖 0.8mm2 打键荷重 110 克力,打键速度 2 次/秒)连续 100 万次以上,需满足下列条件:
▲导通阻抗 300Ω ≤X≤900Ω 300Ω ≤X≤900Ω ▲绝缘阻抗 20MΩ ↑ @ DC25V
-------------
-------------
文件编号:
25℃
300Ω ≤X≤900Ω
-20℃
-20℃
▲绝缘阻抗
20MΩ ↑ @ DC25V
30 分 5 分 30 分 30 分
1Cycle
文件编号:
-------------
产品标准规格书 发行日期:20010501
-------------
发行版本:4.0
SET
(线性式) 信赖性测试
修定日期:20050501 页 次:08
物品在以上条件下,3--5 秒瞬间内可视问题为主要缺点判断。
检验项目
标准
允许数量范围
划伤、折
薄
痕
W≤0.05 L≤10mm
a) W≤0.02 不计数
b) 0.02<W≤0.05 3
c) W>0.05
0
膜 、
异色点
D≤0.15mm
a) D≤0.15 不计数
b) 0.15<D≤0.2 4
c) D>0.2
>3H
100 万次以上(笔尖 0.8mm2 打键荷重 110 克力,打键速度 2
次/秒)
>80%
<1.5%
-------------
-------------
文件编号:
发行版本:4.0
SET 3、结构图
产品标准规格书 (线性式) 产品结构
发行日期:20010501 修定日期:20050501 页 次:03
略。
b、此标准是一个指南,对于任何不曾列出的情况必须交与品管部主管确认判断 。
-------------
-------------
文件编号:
发行版本:4.0 SET 8、使用注意事项
产品标准规格书 (线性式)
使用注意事项
发行日期:20010501
修定日期:20050501 页 次:11
为了防止使用上的错误及降低危害,请注意下列预防方法与注意事项:
SET 4、线性度的测试方法
产品标准规格书 (线性式)
线性度的测试方法
发行日期:20010501 修定日期:20050501 页 次:04
Y1
1 2 3 4 5 。。。。。。n
A 。。。。。。。。
B 。。。。。。。。
C 。。。。。。。。
X1
D 。。。。。。。。
X2
。。。。。。。。。
。。。。。。。。。
▲导通阻抗
300Ω ≤X≤900Ω 300Ω ≤X≤900Ω
▲绝缘阻抗
20MΩ ↑ @ DC25V
(2)低温测试
放置于-20℃之环境中,测试 72hr,取出室温放置 2 小时测,需满足 下列条件:
▲导通阻抗
300Ω ≤X≤900Ω 300Ω ≤X≤900Ω
------------▲- 绝缘阻抗
20MΩ ↑ @ DC25V
璃 缺角 斑马纸部分 X≤3 Y<0.25 Z≤T
非斑马纸部分 X≤4 Y<1.0 Z≤T
备注:目测,难以界定时,使用游标卡尺、微分尺、显微镜或放大镜
备注 允许总缺点
数为 3 同上
同上
同上
-------------
-------------
文件编号:
发行版本:4.0
SET
产品标准规格书 (线性式)
(5)操作上注意事项 a、禁止使用非聚化合物外之笔或指尖硬之笔头等,使用聚化合物笔尖半径 0.8mm 笔或手指 b、禁止不合理之荷重(限制 250g 以上操作) c、长时间使用可能使输入位置位移,请使用归零软体重新定位 d、使用干布将玻璃上之污点拭去 e、禁止使用劣质清洁济如玻璃清洗剂、除脂剂或有机溶剂
光学、电气特性
发行日期:20010501
修定日期:20050501 页 次:05
5、电气特性 (1) 绝缘阻抗 DC25V 20MΩ 以上 (2) 端子间阻抗 ITO Film:300Ω -900Ω ITO Glass:300Ω -900Ω (3)反应速度 <10ms (4)工作电压 DC 3V-DC 10V (5)操作电流 20mA 以内。
在 X1、X2 回路端加 5V 基准电压,照 Y 轴线性度测试方法,在 Y1 端
测各点的电压;
(c) 线性度的计算:
1 以 Y 轴的 A 行为例:线性度=
2
Vmax-Vmin Varv
*100%
-------------
-------------
文件编号: 发行版本:4.0 SET
产品标准规格书 (线性式)
击打寿命
透光率 直线性
性
能
手指或专用笔
□0.7mm □1.1mm □1.8mm □其他
□400Ω
□其他
□0.175mm □0.188mm □其他
□300Ω
□400Ω
□其他
□0.4mm,□1.4mm □2.1mm
-10℃-70℃(湿度 20%RH-90%RH,但不可结露)
-20℃-80℃(湿度 20%RH-90%RH,但不可结露)
文件编号:
-------------
产品标准规格书 发行日期:20010501
-------------
发行版本:4.0
SET
(线性式) 信赖性试验
修定日期:20050501 页 次:06
-------------
-------------
6、信赖性试验
(1)高温测试 放置于 60℃之环境中,测试 72hr,取出室温放置 2 小时测,需满足 下列条件:
发行版本:4.0
SET
7、外观检验规范 (1)检验条件:
a、光源:40W 光管 b、距离,如图:
光管
产品标准规格书 (线性式)
外观检验规范
触摸屏
眼睛
发行日期:20010501 修定日期:20050501 页 次:09
100cm
45° TP LCD 30cm
c、检测范围:
触摸屏的可视区
(2)判定基准:
(1)保存注意事项
请依规格书所定之温湿度条件储存,避免阳光直射、重压及注意防水性
(2)拆装注意事项
拆装时,请注意上下方向标示及易碎标示
(3)拿取注意事项
a、透明是透明性 TP 的重要功能,请于拿取时戴干净的手套防止指纹及污染;
b、撷取时请戴手套或用手袋,防止被玻璃边角刮伤;
c、禁止产品的耐用度,勿拿取产品之 FPC 可曲折部份;
。。。。。。。。。
N 。。。。。。。。
Y2 (a) Y 轴线性度的测试方法:
在 Y1、Y2 回路端加 5V 基准电压,在 A1-Nn 各点分别用专用笔入力使
上下层电路接触,并在 X1 端测出各点的电压,(注:1、2、3。。。。n 各
点要求完全平行于 Y1、Y2 端银线;
(b)X 轴线性度的测试方法:
d、禁止产品重叠(易造成牛顿环)
e、禁止重物及锐利物品置于产品上。
(4)组装注意事项
a、禁止强装硬卸;
b、FPC 是以热压方式黏接,禁止强力拉扯;
c、请以距离 0.3-0.7mm 之间距与显示面板结合,确保可正常显示
d、请用干布擦拭 Film(禁止有机溶济或清洁济)注意勿让酒精渗入上下版夹层