xv6800拍照使用说明
单反相机如何使用 新手入门

记一下单反相机使用技巧入门2011-09-25 21:19:041、拍静止的小东西的特写,如花、鸟、虫:用Av档,光圈最好在f5.6或以下,焦距最好50以上,尽量在1m以内拍摄,使背景虚化!光线好的话,iso100,光线不好的话,iso最好400以内。
2、拍人:基本都是使用较大的光圈(f5.6以内)、50mm以上的焦距,拍摄距离视全身、半身、大头照而定,使背景虚化,使用Av档!光线好,iso100,光线不好,iso400以内。
运动中的人使用追拍,体现运动感(详见下面的运动物体的拍摄)!3、拍景:Av档,使用适当的光圈,f8以上吧,焦距随便,但是,一般广角端都有畸变,酌情使用。
4、拍夜景:上三脚架,Av档,自定义白平衡或白炽灯,f8以上的光圈,小光圈可以使灯光出星光的效果,使用反光板预升功能,减少按快门后,反光板抬起引起的机震;并用背带上的那个方盖子,盖住取景器,以免杂光从后面进入影响画质;iso200以内,尽量使曝光时间加长,这样可以使一些无意走过的人从画面消失,不留下痕迹,净化场景!例如拍一个广场,人来人往,可以使用很小的光圈f20左右,iso100,这样,曝光时间就会很长,那么,走动的人影,不会留在照片上!广场将会很干净!5、拍烟花:使用快门线,B快门,可以拍出多烟花重叠的效果!6、拍运行的东西:光线好的情况:Av档,光圈大小酌情处理;使用f8以上的光圈得到大景深效果,使用小光圈得到浅景深的效果;想拍很有动感的效果,可以使用Tv档,快门1/30左右,对焦按快门的同时,镜头以合适的速度追着对象移动,会出很动感的效果!光线不好的情况:只能酌情处理了,再加上使用追拍!7、拍流水或喷泉:使用Tv档,1/50左右的快门速度,可以拍出缎子的效果,如果使用太快的快门,喷泉拍出来就都是不连续的水滴了!8、夜间人像留影:上三脚架,调节白平衡,自动或自定义白平衡;iso100-400;Av档,光圈f8左右,使用慢速同步闪光,后帘闪光模式;此时,闪光灯会闪两次,按下快门闪一次,曝光结束前会再闪一次,所以在闪两次前,人不要离开。
Lorex LNC226X系列无线高清网络摄像头说明书
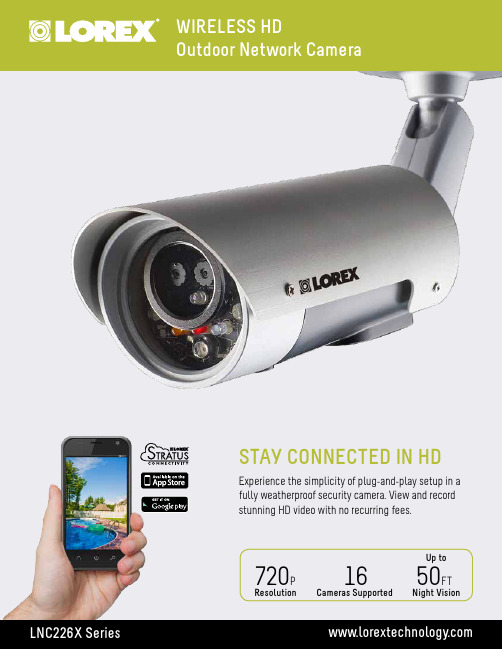
FEATURES:• View, record & playback in real-time HD• Weatherproof indoor/outdoor camera (IP66 rated) • Cold climate capability (operates to -4°F/ -20°C)• Record to smartphone, tablet, PC, Mac or NASFEATURES:• iOS, Android, PC and Mac compatible*• Real-Time (30fps) HD 1280x800 Mega-pixel resolution • Wi-Fi & wired internet connectivity• 5 Second pre-recording on SD cardLNC226X SpecificationsMode: Day & NightPower: 20V, 0.6AProcessors: RISC CPU, hardware video processing andcompressionNetwork interface: Ethernet 10BaseT/100BaseTX, Auto-MDIX, RJ-45 Wireless interface: IEEE 802.11b/g/nImage sensor: HD up to 1280x800 resolution1/4” Megapixel Color CMOSSeparate sensors for day and night with automaticgain, white balance, exposure and brightness control Light sensitivity: 0.2 Lux (IR LED off)0 Lux (with 9 meters IR LED on)Automatically turn on the IR LED in low lightenvironmentLens: 4.2mm, F2.4, viewing angle: 62°, fixed irisDay and night separate lensButtons: One reset button, to factory default settingsOne WPS button for automatic WiFi setup Indicators: One LED for Internet connection status indicationOne LED for Ethernet connection indicationOne LED for SD card recording indicationVideo compression: H.264Video streaming: Separate frame rate/resolution/bandwidth settingsfor PC and mobileResolution: 1280x800, 1024x768, VGA (640x480), QVGA(320x240)Bandwidth: 64Kbps ~ 3MbpsFrame rate: 1~30fpsAudio: Built-in microphone for audio monitoringVideo management software: L-View software for viewing and archiving up to 16cameras (PC/Mac)Lorex Ping app for viewing cameras on mobile(iOS/Android™)Security: Web management username/password protectionVideo display ID/password protectionWiFi WEP and WPA/WPA2 security mode Installation, management and maintenance:Plug & play by ID/passwordFirmware upgrades by FTPL-View SW upgrade Push Notification Users: Up to 20 simultaneous users (depends on videosettings and Internet bandwidth)Alarm and event management: Events triggered by motion and sound detectionE-mail/FTP alarm messagePush notification on supported mobile devices Approvals: EMC — CE, FCC Part 15 Subpart B Class B, IC Class BWireless RF — CE, FCC Part 15 Subpart C Indoor / Outdoor: Both (IP66 rated)*Operating conditions: -20 – 50°CHumditiy 20–80% RH (non-condensing) Dimensions (W x D x H): 58 x 230 x 52mm / 2.3 x 9.1 x 2.1”Weight: 0.37kg / 0.81lbs (including camera bracket)LNC204 SpecificationsMode: Day & NightPower: 5V (USB) - 12V, 1AProcessors: RISC CPU, hardware video processing andcompression.Network interface: Ethernet 10BaseT/100BaseTX, Auto-MDIX, RJ-45 Wireless interface: IEEE 802.11b / g / nImage sensor: HD up to 1280x800 resolution1/4" Megapixel Color CMOSSeparate sensors for day and night with automaticgain, white balance, exposure and brightnesscontrolPIR sensor: Effective distance – 7 metersLight sensitivity: 0.2 Lux ( IR LED off )0 Lux (with 9 meters IR LED on)Automatically turn on the IR LED on low lightenvironment.Infrared thermometer: Infrared Range: -40 ~ 115 °C, accuracy:+-0.5°C Lens: 4.2 mm, F2.4, viewing angle: 66°, fixed iris.Day and night separate lensButtons: One reset button, to factory default settingsOne WPS button for automatic WiFi setup Indicators: One LED for Internet connection status indicationOne LED for Ethernet connection indicationOne LED for SD card recording indicationVideo compression: H.264, baseline profile level 3.1Video streaming: Separate frame rate/resolution/bandwidth settingsfor PC and mobile.Resolution: 1280x800, 1024x768, VGA(640x480),QVGA(320x240)Bandwidth: 64Kbps ~ 3MbpsFrame rate: 1~30 fpsAudio: Built-in 0.5W speaker for alarm and half-duplextwo-way audio.Speaker jack for external speakerVideo management software: L-View software for viewing and recording up to 4cameras (PC/Mac)Lorex Ping app for viewing cameras on mobile (iOS/Android™)Security: Web management username/password protectionVideo display ID/password protectionWiFi WEP and WPA/WPA2 security mode Installation, management and maintenance:Plug & play by ID/password.Firmware upgrades via FTPL-View SW upgrade Push NotificationUsers Up to 20 simultaneous users (depends on videosettings and internet bandwidth)Alarm and event management: Events triggered by PIR and sound detectionEmail/ftp alarm messageTemperature alarm for low/high room temperaturePush notification on supported mobile devices. Dimensions: 68 x 25 x 95mm/2.8 x 1.0 x 3.7" (W x D x H) Weight: 0.28kg/0.62lbs (including camera bracket) Approvals: EMC - CE, FCC Part 15 Subpart B Class B, IC Class BWireless RF - CE, FCC Part 15 Subpart C, RSS210Power supply: CE, FCC, UL, EN 60950 Operating conditions 0-50 °CHumidity 20 – 80% RH (non-condensing)© 2015 Lorex CorporationAs our product is subject to continuous improvement, Lorex Corporation & subsidiaries reserve the right to modify product design, specifications &Lorex Corporation250 Royal Crest Court Markham, Ontario,901 Elkridge Landing Road, Suite Product InformationLNC226X Wireless HD Outdoor Network Camera UPC7-78597-00226-3Package Weight:0.8 kg / 1.8 lbsPackage Dimensions:(W x D x H)280 x 89 x 191mm / 11 x 3.5 x 7.5”Package Cube:0.0048 CBM x 0.168 CBFContents:Indoor/outdoor camera, Ethernet cable, Power adapter, Quick Setup Guide, CD (user manual included on CD)1. Not intended for submersion in water. Installation in a sheltered location recommended.2. Requires a high speed Internet connection and a wired connection to arouter (not included). An upload speed of 1Mbps is recommended for optimal video performance. Up to 3 devices may connect to the system at the same time. For the latest compatibility list check /support as new models become available in the market.3. Compatible with WPS enabled routers (not included).4. Stated IR illumination ranges are based on ideal conditions in total darkness and typical outdoor night time ambient lighting. Actual range and image clarity depends on installation location, viewing area and light reflection / absorption.5. microSD card not included (supports up to 32GB).6. Connection speed may vary depending Internet bandwidth.7. Additional cameras sold separately.LNC226X DisclaimersLNC226X Dimensions129mm/5.1"92mm/3.6"210/8.3"LNC226XPK2B Wireless HD Outdoor Network Camera, 2 Pack UPC6-95529-00217-0Package Weight: 2.1 kg / 4.8 lbsPackage Dimensions:(W x D x H)304 x 254x 190mm / 12 x 10 x 7.5”Package Cube:0.014 CBM x 0.52 CBFContents:2 x Indoor/outdoor cameras, 2 x Ethernet cables, 2 x Power adapters, Quick Setup Guide, CD (user manual included on CD)1. Compatible with WPS enabled routers (not included).2. Infrared illumination range under ideal conditions. Actual range and clarity may vary depending on scene/object reflection and camera application.3. microSD Card not included (supports up to 32GB).4. Connection speed may vary depending on internet bandwidth.5. Up to 4 simultaneous camera views available on PC, Mac and tablets. Selectable single camera viewing on smartphones.LNC204 DisclaimersLNC204 Dimensions75mm/3.0"35mm/1.4"128mm/5.1"LNC226PK22B Wireless HD Outdoor/Indoor Network Camera, 2 Pack UPC6-95529-00257-6Package Weight: 2.2 kg / 5 lbsPackage Dimensions:(W x D x H)304 x 228 x 228mm / 12 x 9 x 9”Package Cube:0.01 CBM x 0.56 CBFContents:1 x Indoor camera, 1 x Outdoor camera,2 x Ethernet cables, 2 x Power adapters, Quick Setup Guide, CD (user manual included on CD)。
单反相机手动教材档

单反相机手动拍摄技巧留下来好好学习来源:张问梅的日志据说,80%以上的人看了这个,都相见恨晚,你会么?不管你信不信,反正我是信了. [点击]。
1、拍静止的小东西的特写,如花、鸟、虫:用Av档,光圈最好在f5.6或以下,焦距最好50以上,尽量在1m以内拍摄,使背景虚化!光线好的话,iso100,光线不好的话,iso最好400以内。
2、拍人:基本都是使用较大的光圈(f5.6以内)、50mm以上的焦距,拍摄距离视全身、半身、大头照而定,使背景虚化,使用Av档!光线好,iso100,光线不好,iso400以内。
运动中的人使用追拍,体现运动感(详见下面的运动物体的拍摄)!3、拍景:Av档,使用适当的光圈,f8以上吧,焦距随便,但是,一般广角端都有畸变,酌情使用。
4、拍夜景:上三脚架,Av档,自定义白平衡或白炽灯,f8以上的光圈,小光圈可以使灯光出星光的效果,使用反光板预升功能,减少按快门后,反光板抬起引起的机震;并用背带上的那个方盖子,盖住取景器,以免杂光从后面进入影响画质;iso200以内,尽量使曝光时间加长,这样可以使一些无意走过的人从画面消失,不留下痕迹,净化场景!例如拍一个广场,人来人往,可以使用很小的光圈f20左右,iso100,这样,曝光时间就会很长,那么,走动的人影,不会留在照片上!广场将会很干净!5、拍烟花:使用快门线,B快门,可以拍出多烟花重叠的效果!6、拍运行的东西:光线好的情况:Av档,光圈大小酌情处理;使用f8以上的光圈得到大景深效果,使用小光圈得到浅景深的效果;想拍很有动感的效果,可以使用Tv档,快门1/30左右,对焦按快门的同时,镜头以合适的速度追着对象移动,会出很动感的效果!光线不好的情况:只能酌情处理了,再加上使用追拍!7、拍流水或喷泉:使用Tv档,1/50左右的快门速度,可以拍出缎子的效果,如果使用太快的快门,喷泉拍出来就都是不连续的水滴了!8、夜间人像留影:上三脚架,调节白平衡,自动或自定义白平衡;iso100-400;Av档,光圈f8左右,使用慢速同步闪光,后帘闪光模式;此时,闪光灯会闪两次,按下快门闪一次,曝光结束前会再闪一次,所以在闪两次前,人不要离开。
HTC XV6800中文说明书
* PPT 文档不支持新建、编辑,只能浏览现有文档
* 打开后可以浏览 PPT
* 点击坐下方三角可以打开菜单
* 选择结束反映后关闭 PPT
Windows Live
Windows Live for Windows Mobile 提供了独一无二的丰富体验,结合了多种在线服务,包
运行您的设备
Windows Mobile 的程序运行界面为您提供的简明而直观的运行路径,您即刻就能够轻松上
手。
以下是一些有用的信息,能够帮助您朝着正确的方向运行您的设备。
主页/今日
主页(非触摸屏设备)或者今日画面(触摸屏设备)在您运行 Windows Mobile 的设备的时
5. 选择 媒体库 中的 我的设备
6. 选择 我的音乐
7. 选择 所有音乐
8. 选择需要播放的音乐即可
9. 选择 我的视频
10. 选择 所有视频
11. 选择 视频
12. 播放界面
?
5. 触笔选择中间空白处可输入文字内容
6. 输入完成后在收件人栏中可输入电话号码
7. 选择 收件人 可呼出电话本选择需要发送的联系人
8. 联系人可快速添加
9. 如需群发短信可继续选择联系人
10. 选择联系人后联系人本插入
的共享与同步。现在就开始,从以下选项中下载并安装合适的软件,按照我们的介绍完成
Windows Mobile 移动设备与电脑的同步。
为您的电脑安装软件
下载适合 Windows 2000 /XP 系统的 ActiveSync 同步插件。
下载适合 Windows Vista 系统的同步插件。
5. 可选择用图片作为手机桌面
Lorex LNR600系列网络摄像头录像机用户手册说明书

Les informations contenues dans ce document sont indiquées sous réserve de modifications sans préavis. Nos produits étant sans cesse améliorés, Lorex Corporation et ses filiales se réservent le droit de modifier la conception du produit, les caractéristiques et les prix sans préavis et sans aucune obligation. E&OE © 2016 Lorex Corporation. Tous droits réservés.
REMARQUE : Veuillez visiter /support pour une liste de caméras IP Lorex compatibles.
1. Branchez la caméra à un routeur ou passez au même réseau que le NVR.
Guide de connexion rapide Série LNR600 Enregistreur de vidéosurveillance en réseau HD
CONTENU DE L'EMBALLAGE :
NVR
Câble d'alimentation
Connecter votre système
1. Cliquez sur le bouton gauche:
• Pendant le mode d'écran partagé : Cliquer sur un canal individuel pour le visualiser en mode plein écran. Cliquer à nouveau pour retourner au mode d’écran partagé.
LW2287系列无线数字安防摄像头快速使用指南说明书

through the cable notch
the camera position.
on the base. This will
keep the camera base
For outdoor use, installation in a sheltered location is recommended.
RCA audio
BNC video*
* BNC-to-RCA adapter attached.
NOTE: It is not recommended to install more than 4 digital wireless security cameras in the same environment to maintain optimal video frame rate performance.
flush to the wall / ceiling when mounted.
B. Connecting the Receiver to a DVR
1 Connect the BNC cable to your DVR’s video input.
3 Connect the receiver power adapter to the receiver. Connect the power adapter to a 120V power outlet.
RCA audio
4 OPTIONAL: Use the double-sided tape to securely attach the receiver to a flat surface.
C. Pairing the Camera with a Receiver
深入使用数码摄像机5

深入使用数码摄像机前面我们向大家介绍了DV的日常使用方法及数码影像的常规拍摄,让各位对DV有个大概的认识。
今天我们将向大家介绍DV的逆光拍摄、夜间拍摄等功能,让您在特殊光线下轻松拍摄数码影像。
一、定时自拍家用摄像机的定时自拍功能同普通的照相机相类似,即按下录像启/停按钮后,摄像机在10秒钟后才开始录像。
利用这段时间操作者可以进入镜头,加入被拍摄行列中。
在SONY-TRV17E的操作方法为:首先,在待机状态下按MENU键显示菜单设定,转动拨盘到「C」后按拨盘确定;然后,转动拨盘选择SELFTIMER确定,再转动拨盘选择ON,然后按拨盘,如图1;此时按MENU键使菜单设定消失,按START/STOP键开始自拍。
自拍在以哔音倒数计秒到10时开始,在倒数计秒的最后2秒钟,哔音变快,然后自动开始摄像,若要停止,再按一下START/STOP键即可。
当然您也可以用摇控器实现自拍功能,首先将遥控器中应装入电池,然后将摄像机对准目标。
再将遥控器对准摄像机的遥控接收窗口,按下“自拍按钮”(SELFTIMER),这时在寻像器上就会看到“SELF RECORD 0:10”的字样,表示10秒钟后摄像机便自动进入定时录像状态,在想停止拍摄时可以按一下遥控器上的“START/STOP”按钮,否则自动拍摄一直延长至带尾。
小技巧:在进行自拍时,您可以将液晶显示屏转动180度,这样,您就可以看见自己在镜头中的表现了,既平添加了乐趣,又增加了成功摄像的机率。
有一点要提示大家,在户外直射阳光下使用液晶显示屏时,液晶显示屏可能会很难看清,此时就要先对好位置,关掉液晶显示屏拍摄了。
二、微距拍摄微距拍摄又称近摄,是指在很小的物距(最短近摄距离10毫米)内进行的拍摄。
如图2,DV在变焦镜头的光圈后设有近摄调节环,不必加近摄镜便可进行近摄,操作更为方便。
可对花草、昆虫等进行近距离拍摄,一般最短近摄距离为10毫米。
摄录时只要按下镜头上的近摄按钮,然后旋转变焦手柄便可进入近摄(微距)状态。
清晰音频_UNITE 200 PTZ HD 摄像头用户手册说明书

User Manual UNITE® 200 PTZ HD CameraClearOne® ContactsHeadquarters Headquarters5225 Wiley Post Way Suite 500 T el: +1.801.975-7200 Salt Lake City, UT 84116Sales Technical SupportT el: +1.801.975.7200 T el: +1.801.974.3760*********************************************** Notices© 2021 ClearOne, Inc. All rights reserved.Information in this document is subject to change without notice.Document: DOC-0263-001v1.6, August 2021ContentsIntroduction (1)Remote Control (1)Menu Settings (3)EXPOSURE (3)COLOR (5)NOISE REDUCTION (8)SETUP (8)COMMUNICATION SETUP (9)RESTORE DEFAULT (10)USB 3.0 (10)IP Function (11)Access Through a Local Area Network (LAN) (11)Access Through a Wide Area Network (WAN) (12)IP Camera Parameter Setup (12)Control Interface Definition (16)Network Configuration (17)Command List (18)Maintenance and Troubleshooting (24)Camera Maintenance (24)Unqualified Application (24)Troubleshooting (24)IntroductionThis user manual provides advanced information regarding control of the ClearOne UNITE 200 PTZ HD Camera. Additional information about the camera is provided in the corresponding Datasheet and Quick-Start Guide, which are available in ClearOne’s Resource Library.Remote Control1. Standby ButtonPress this button to enter standby mode. Press it again to enternormal mode.Note: Power consumption in standby mode is approximately half ofthe normal mode2. Position ButtonsTo set preset or call preset3. * Button4. Set/Preset ButtonsSet a corresponding numeric key preset position[PRESET] + Numeric button (0-9)Note: Preset 0-9 via remote control and the rest from keyboard andthe serial port.5. Pan-Tilt Control ButtonsPress the arrow buttons to perform panning and tilting. Press the[HOME] button to face the camera back to front.6. Return ButtonPress to return to previous menu.7. Zoom ButtonsSlow Zoom: Zoom In [+] or Zoom Out [-] slowlyFast Zoom: Zoom In [+] or Zoom Out [-] fast8. L/R Set ButtonPress at the same time as the numeric button 1 [STD] and button 2[REV] to set the direction of the Pan-TiltL/R Set +1[STD]: set the Pan-Tilt turn the same direction as the L/RSetL/R Set +2[REV]: set the Pan-Tilt turn the opposite direction as theL/R Set9. Focus ButtonsPress [AUTO] to adjust the focus on the center of the object auto-matically.Press [MANUAL] to adjust the focus manually.Press [FAR] to focus on a far object.Press [NEAR] to focus on a near object.10. Camera Select ButtonsPress the button corresponding to the camera you want to control with the remote controller.11. # ButtonUsed with other buttons12. Set Camera IR Address ButtonsFunction 1. Set camera IR address[*]+[#]+[F1]: Address 1[*]+[#]+[F2]: Address 2[*]+[#]+[F3]: Address 3[*]+[#]+[F4]: Address 4Function 2: Image freezing functionPress [F4] to start the freeze function. The word “Freeze” displays in the upper left. After five seconds, the display automatically disappears (though the freeze feature continues). T o cancel the freeze, press the [F4] key the word “Unfreeze” displays in the upper left. After five seconds, the display automatically disappears.13. Reset ButtonsClear a specific preset: [Reset] + Numeric button (0-9)Clear all presets: [*]+[#]+[Reset]: Erase all presets14. Pan/Tilt Control ButtonsPress arrow buttons to perform panning and tilting. Press [HOME] button to face the camera back to front.15. MENUPress MENU to enter or exit the OSD menu.16. BLC (Backlight Compensation) ButtonIf there is light behind the subject, the subject will appear dark.Press this button to enable the backlight compensation. Press it again to disable the backlight compensation.Press the backlight ON / OFF button. T o cancel this function, press the backlight ON / OFF button.Note: The BLC feature is effective only in auto exposure mode.Note: If light behind the subject exists, the subject appears dark. In this case, press the backlight ON / OFF button.To cancel this function, press the backlight ON / OFF button.17. Pan/Tilt ResetReset Pan/Tilt self-test.Shortcut Set:[*]+[#]+[1]: Display OSD menu in English[*]+[#]+[3]: Display OSD menu in Chinese[*]+[#]+[5]: Save OSD[*]+[#]+[6]: Quickly recover the default settings[*]+[#]+[8]: Show the camera version[*]+[#]+[9]: Quickly set mount mode (flip/normal)Press the [MENU] button to display the main menu. Use the arrow buttons to select the item to be set.Press the [HOME] button to enter a sub-menu.EXPOSURESelect Exposure from the main menu and press the [HOME] button. The EXPOSURE menu appears.The table on the following page provides information about Exposure settings.Menu SettingsThe system displays the COLOR menu.NOISE REDUCTIONFrom the main menu, select Noise Reduction, then press the [HOME] button.The system displays the NOISE REDUCTION menu.SETUPFrom the main menu, select Setup, then press the [HOME] button. The system displays the SETUP menu.COMMUNICATION SETUPFrom the main menu, select Setup, then press the [HOME] button.The system displays the COMMUNICATION SETUP menu.RESTORE DEFAULTFrom the main menu, select Restore Default, then press the [HOME]button.The system displays the RESTORE DEFAULT menu.Note: Press [HOME] button to confirm.USB 3.0The camera supports UVC protocol, compatible USB 2.0 & USB 3.0.USB 3.0 support 1920x1080p/30 max output.Support OS: Windows 7/8/8.1/10, Linux, Mac OS, etc.General software are as follows:• Windows: AMCAP, VLC, Debut Video Capture, etc.• Linux:V412 software driver and VLC media player, etc.• Mac OS: FaceTime. iChat, Photo Booth and Debut Video Capture, etc.Note the following:• ClearOne recommends the use of AMCAP version 8.0 in Windows, as its software performance is morestable. When you use the high version of AMCAP in a low configuration system, it shows the streamrendering.• The first time the camera is accessed by USB cable, you must install a plug-in.IP FunctionAccess Through a Local Area Network (LAN)1. Setup IP addressThe camera’s default IP address is192.168.100.88.If you forget the camera’s IP address orhave changed it, to show the cameraIP address on screen, on the remotecontrol, press * and # and 4.To change the camera’s IP address:a. Open the camera’s Web interface(see Access Camera’s WebInterface later in this Manual fordetailed instructions).b. On Web interface page, find“Network”--->Change IP. Enter anew IP address, then Click “Apply”.c. Restart camera.2. Access camera’s webInput http://192.168.100.88 into a browser (InternetExplorer and Firefox work best).Note the following:• If you have changed the camera’s IPaddress, enter the new address.• To access the camera with an IP address,you must be on the same network as thecamera.A login window appears. Input the user name andpassword. The default for both is “admin”.Your login window may not look exactly like this,depending on your operating system and browser):After login, the Web interface appears, as shown below:Note: If this is the first use of the web interface, you must install the VLC player software.Access Through a Wide Area Network (WAN)Dynamic DNS setup for accessing the cameraOnce you have set a domain name to the camera,and have forwarded the traffic to the correct addressand port number, you can use a domain nameto access the camera. The access link is: http://hostname: port number.For example, set up host computer name as:, camera port number: 554.The access link would be: http://youdomain.f3322.org:554.VLC stream media player monitoringVLC media server procedure1. Open VLC media player, click “Media”->”OpenNetwork Steam”, or type “Ctrl + N”.2. Input stream address: rtsp://ipaddress:portnumber/1 (Main stream ).3. Example: rtsp://192.168.100.88:554/14. rtsp://ipaddress:port number/2 (Sub stream).5. Example: rtsp://192.168.100.88:554/2Note: The default RTSP port number is 554.IP Camera Parameter SetupHomepageMenuAll pages include two menu bars:• Real time monitoring: displaying video image• Parameter setup: with function buttonsVideo viewing windowThe video viewing window must be the same as video resolution; the bigger the resolution, the bigger the playing area. To show full-screen, double-click the viewing window; to return to initialized size, double-click again.• Pan-Tilt control: Up, Down, Left, Right, Home button.• Rate: You can choose vertical speed as 1 - 24, horizontal direction at the rate of 1 - 20.Select corresponding speed and click direction button to realize PTZ speed increase ordecrease.• Zoom In/ Zoom out: for zooming in or zooming out. Focus In/ Focus Out: Focusing ondistant objects or Focusing on close objects.• Set/Call: After you have set PTZ to a desired position, you can save that configurationas a preset for later use. Click the “Set” button to save a preset. At any point later, youcan click the “Call” button to call this preset.MediaSelect “Video”.• Video formatSupports 50 HZ (PAL) and 60 HZ (NTSC), and Dialpriority.• Encode ProtocolSupports MJPEG, H.264 and H.265.• Encode LevelSupports baseline, main profile, and high profile.• ResolutionMain bit rate supports 1920x1080, 1280x720 and1024x576.Minor bit rate supports 720x480, 720x576 and320x240.The higher the resolution, the clearer the image, butthis uses more network bandwidth.• Bit RateYou can assign bit rate/stream. Generally, the higherthe bit rate, the clearer the image. The bit allocationmust combine with network bandwidth. If the networkbandwidth is too low and the allocated bit rate is toohigh, the video quality suffers.• Frame rateYou can specify the frame rate. Generally speaking,the higher the frame rate, the smoother the image;the lower the frame rate, the choppier the image.• I key frame intervalSet the interval between 2 and 150. The larger the interval, smaller the response from the viewing window.• Bit Rate controlOptions:Constant bit rate: video coder codes per preset speedVariable bit rate: video coder adjusts the speed to gain the best image quality• Fluctuate levelRestrain the fluctuation magnitude of variable rate. Options: 1 - 6Image SetupClick “Image.”• BrightnessImage brightness, 0 -14, slider control, on the rightshows the corresponding numerical value. Thedefault value is 7.• SaturationSaturation 0 - 14, slider control, on the right showsthe corresponding numerical value. The default valueis 4.• ContrastContrast 0 - 14, slider control, on the right shows thecorresponding numerical value. The default value is8.• SharpnessSharpness 0 - 15, slider control, on the right showsthe corresponding numerical value. The default valueis 3.• HueHue 0 - 14, slider control, on the right shows thecorresponding numerical value. The default value is6.• Flip & MirrorSelect Flip to turn the image upside down; selectMirror to flip the image horizontally. The default valuefor both is not selected.• Apply, Cancel, and Default ButtonsAfter you adjust any parameters, to save the settings click “Apply”; to cancel the parameter adjustments, click “Cancel”. To revert to the default value, click “Default”.Audio SetupClick “Audio.”• Audio TypeOption: AAC.• Sample rateOptions: 44.1K and 48K.• Bit rateOptions: 96K, 128K, 256K.• Input TypeOption: line in only• Input Vol L and Input Vol RThe gain of the Line in.• Apply and Cancel buttonsTo save changes, click “Apply”, or to discard the changes click “Cancel”.System SettingClick “System.”• Work ModeWork Mode RTSP• RebootClick the “Reboot” button to restart thesystem.• User and passwordYou can modify the password (letters andnumbers only)• Apply / CancelModify the password, then to change thepassword, click “Apply”, or to cancel thechange click “Cancel”.Network SettingClick “System.”• LAN SettingsThe default IP address is192.168.100.88. The MAC addresscan be modified.• Port SettingsHTTP Port, Default port number: 80RTSP Port, Supports the RTSPprotocol. Default port number: 554.PTZ Port, Supports PTZ protocol.Default port number: 5678.• Control Protocol SettingCamera control communicationprotocols include Visca address,Pelco-D address, and Pelco-Paddress.• RTMP SettingWhen configuring the camera stream,can set up two streams, in the twostream selection control code streamof “On”, “Off”, “Video”, “Audio”, etc.• RTSP SettingSetting network camera RTSP protocol of “On”, “Off”.• Multicast SettingMulticast switch, multicast address (default address 224.1.2.3) and port (default port number: 6688) can be set.• Apply / CancelModify network parameters then click “Apply” to save the changes, or click “Cancel” to discard the changes.Device InformationClick “Information”, the current device information as shown.Serial Command ControlIn default working mode, the camera can be controlled via RS-232 or RS-485 (half-duplex mode).The parameters are as follows:• Baud rate: 2400/4800/9600 bits • Start bit: 1 bit • Data bit: 8 bits • Stop bit: 1bit • Parity bit: noneThe process of initialization is complete when the camera pan-tilt rotates to the maximum position of top right and thenreturns to the center.Note: If the position preset 0 has been stored, the position preset 0 is called up after initialization, and users can control the camera with commands in the following command list.Control Interface Definition54321867Network ConfigurationWith VISCA With PelcoCommand ListThe camera uses the VISCA/Pelco-D/Pelco-P serial standard. Camera-Issued Messages: In the following tables, z = Camera Address + 8NoteCamera Control CommandsDemand CommandMaintenance and TroubleshootingCamera Maintenance• If you choose not to use your camera for a long time, turn off the power switch and disconnect AC power cord of AC adapter to the outlet.• Use soft cloth to clean the camera cover.• Use the soft dry cloth to clean the lens. If the camera is very dirty, clean it with diluted neutral detergent. Do not use any type of solvents, which may damage the surface.Unqualified Application• Do not shoot extremely bright objects for a long period of time, such as sunlight, strong light sources, etc.• Do not operate in unstable lighting conditions, as image may flicker.Troubleshooting。
- 1、下载文档前请自行甄别文档内容的完整性,平台不提供额外的编辑、内容补充、找答案等附加服务。
- 2、"仅部分预览"的文档,不可在线预览部分如存在完整性等问题,可反馈申请退款(可完整预览的文档不适用该条件!)。
- 3、如文档侵犯您的权益,请联系客服反馈,我们会尽快为您处理(人工客服工作时间:9:00-18:30)。
12.1 使用内置的摄像头使用手机内置的摄像头可以方便的进行拍照和录制带音频的短片。
启动拍照功能:按压手机上的拍照键— 或—轻点开始 > 程序 > 拍照.拍照键— 或—轻点开始 > 程序 >图片和视频> 拍照图标.退出拍照功能:轻点退出图标拍照模式手机内置的摄像头可以利用内建的各种灵活的不同工作模式来拍照和录制视频。
摄像头默认的工作模式是拍照模式。
屏幕左上角显示的是当前的工作模式。
如需切换到其他模式,参照以下步骤:或图标。
.按导航控制的左或右。
.当前工作模式摄像头的工作模式有以下几种:拍照 用来获取标准的静止图片。
.摄像 用来制作有声或无声的视频。
联系人头像 用来拍摄静止的图片并和一位联系人相关联。
主题图片 用来拍摄静止的图片并给它加上相框。
全景画 用来沿一个方向有顺序的连续拍摄静止图片,然后将所有图片拼接在一起创建一个景观的全貌。
运动 用来自动拍摄连续的静止图片 (3, 5, 7, 或 10) 。
爆发 长时间按住手机上的拍照键或导航控制的中间键可以连续的拍摄静止图片(最多30) 。
140 第12章: 多媒体体验支持的文件格式手机上的摄像头支持以下格式:工作模式格式静止图片JPEG摄像MPEG-4 (.mp4)Motion-JPEG (.avi)H.263 (.3gp) 3GP2(.3g2)全景图 / 运动 / 爆发JPEG摄像头控制使用手机上的按钮和屏幕中的控制拍照和摄像短片并修改设置。
拍照键, ENTER 按钮, 和手动滚轮拍照键, ENTER 按钮, 和手动滚轮都可以用来启动快门。
按下后拍一张照片或拍一张主体图片或全景图。
按下后开始拍摄视频,再次按下停止拍摄。
在运动模式下连续拍照。
简短的按一下拍照键,然后跟随你的拍摄目标移动手机。
在爆发模式下连续拍照时长时间按住这几个键。
导航控制按导航控制的上和下可以增大和减小缩放的比例。
按导航控制的左和右可以切换当前工作模式。
屏幕控制和指示拍照模式1 工作模式控制 轻按屏幕上的左/右箭头可以改变当前工作模式。
.分辨率分辨率图标指示当前的分辨率. 轻点图标可以切换不同的分辨率。
第12章: 多 媒 体 体 验 1413存储器. 轻点图标可以对保存照片的位置在手机内存和扩展卡之间进行选择。
4剩余信息指示可以显示在各种拍照工作模式下,可拍摄图片的数量。
在摄像模式时,显示剩余的录制时间,在录制过程中,显示已录制的视频长度。
5 缩放控制. 轻点屏幕上的上和下图标或图标允许放大或缩小图像。
.6 摄像头设定 轻点工具图标可以打开摄像头设定画面。
7 显示器. 轻点显示器图标可以打开图片&视频画面。
8 亮度 轻点负号和正号图标可以减少和增加亮度水平。
9 测量模式 轻点图标可以转换测量模式为中心区域或平均10 闪光灯. 轻点图标可以打开或关闭安装在手机背面的闪光灯。
在光线不足的环境拍照时需要打开闪光灯。
11 白平衡. 轻点图标可以转换白平衡模式为:自动 , 日光夜晚白炽灯和荧光灯12 自拍延时. 轻点图标可以在拍照和联系人头像模式时,设定拍照延时时间为2 秒,10 秒,或关闭。
当你按下ENTER键或拍照键时,开始计时,等待设定的时间后(2秒或10秒),才会拍摄一张静止的图片。
摄像模式13 录像指示红点闪烁表示视频正在录制过程中。
主题图片模式14 进度指示在主题图片、全景、运动和爆发模式,此处显示已拍数量和可拍总数量。
15 模版选择图标在主题图片模式轻点可以选择几种不同的模版。
全景模式16 停止. 停止图标只出现在全景模式。
当你想停止拍摄并组合成全景图时,轻点这个图标。
17 退出轻点退出图标可以退出摄像头程序。
静止图像拍摄模式当你使用静止图像拍摄模式时,例如拍照、联系人头像、主题图片、全景图、运动和爆发模式,你可以通过操作拍照键、手动滚轮或导航控制中间的ENTER 键来拍摄一张或多张图片,这些静止图片将被保存为JPEG格式。
.当用主题图片模式模式拍摄图片时,你可以选择一个预设的模版。
查看和选择不同的模版可以通过点击屏幕上的图标。
. 根据所选模版,也可以使一张或多张图片成为模版。
摄像模式在摄像模式,可以通过操作拍照键、手动滚轮或导航控制中间的ENTER 键开始录制一段视频,如要停止再次按压其中一个按键。
在开始录制视频之前,你要设定视频文件的格式,并在摄像头设置画面指定录制的时间长度或文件的尺寸。
对于视频的格式请参看这一章“支持的文件格式”的相关说明。
第12章: 多媒体体验143回放在拍摄图片和摄制视频后,你可以在回放页面查看这些图片和视频。
. 另外,你可以点击回放页面底部的相应图标进行删除、发送邮件等操作。
.回放页面图标拍照、摄像、主题图片、和全景图模式联系人头像模式运动和爆发模式1 后退 点击返回摄像头画面。
2 删除 点击可以删除拍摄的图片和视频。
3 发送 点击可以通过email进行发送。
.4 预览 点击可以预览图片,或播放视频。
5 指派联系人 点击将图片和一位联系人相关联。
6 浏览 在使用运动和爆发模式拍照后,拍照的总数显示在Review screen的右下角,点击上下箭头可以按顺序查看这些图片。
7 调整回放图像的显示时间:1、点击打开摄像头设定画面。
2、在摄像头设定画面,点击出现高级菜单。
3、点击 回放持续时间, 然后根据需要进行修改。
144 第12章:多媒体体验拍摄模式 拍摄尺寸缩放范围 2M (1600 x 1200) 不能缩放1M (1280 x 960) 1.0x to 2.0x 大(640 x 480) 1.0x to 2.0x 中(320 x 240) 1.0x to 4.0x 拍照小(160 x 120) 1.0x to 8.0x 中(176 x 144) 1.0x to 2.0x 摄像小 (128 x 96) 1.0x to 2.0x 小 (480 x 640) 1.0x to 2.0x 中 (240 x 320) 1.0x to 4.0x 联系人头像小 (120 x 160) 1.0x to 4.0x主题图片 取决于使用的模版 取决于所使用模版的尺寸 大(640 x 480) 1.0x to 2.0x 中 (320 x 240) 1.0x to 4.0x 全景图小 (160 x 120) 1.0x to 8.0x 大(640 x 480) 1.0x to 2.0x 中(320 x 240) 1.0x to 4.0x 运动小(160 x 120) 1.0x to 8.0x 大 (640 x 480) 1.0x to 2.0x 中 (320 x 240) 1.0x to 4.0x 爆发小(160 x 120)1.0x to 8.0x缩 放当使用摄像头拍摄静止图片和视频时,可以利用缩放将目标拉近和推远,在所有拍摄模式中,按住导航控制的上和点击屏幕的向上的箭头是拉近目标,当缩放到极限时有铃声提醒。
按住导航控制的下和点击屏幕上向下的箭头是推远目标。
缩放范围摄像头的缩放范围和拍摄图片及视频的模式和尺寸有关。
摄像头设定在进行拍照和录像时,清点图标可以打开摄像头设定菜单,对拍摄进行配置。
拍照模式下的摄像头设定页面点击位于摄像头设定页面顶部的图标,会有不同的菜单出现,一些菜单和操作只出现在特定的拍摄模式。
提示:你也可以按压导航控制键来进行菜单操作。
更进一步的菜单和设定参照以下部分:自拍延时有三种选择: 关闭、2秒、10秒。
选择2秒或10秒设定,当按下拍照键、ENTER键、或手动滚轮后,要等待相应的时间才开始拍照。
模版菜单可以进行模版选择(只用于主题图片模式)。
全景画设定方向选择沿那个方向拼接全景画。
拼接数量设定使用拍摄图片中的几张来拼接全景画。
自动拼接如果设定为On,摄像头自动将所拍的图片拼接为一个图片存放。
如果设定为Off,则所拍图片每一张将单独存贮。
运动设定可以设定连续拍摄的的图片数量(只用于运动模式)。
.闪光灯此项设定为On 时,闪光灯(位于手机背面)打开,以帮助在光线较差时进行拍照。
但此设定不能用于运动和爆发模式。
环境设定白平衡选择和你当时环境照明相适应的类型,例如:日光或夜晚。
特效可以选择特殊效果用于你拍摄的图片和视频:黑白或怀旧(棕褐色)。
拍摄设定解析度 选择图片和视频的清晰度。
品质 设定所有JPEG格式静止图片的品质。
有四种选择:基本、一般、良好、优秀。
146 第12章: 多媒体体验测量模式选择合适的测量模式可以使拍摄获得准确的曝光。
有两种测量模式可供选择:中心区域:计算所要拍摄画面的中心位置的光线来获得准确的曝光。
平均:计算所要拍摄画面的光线的平均值来获得准确的曝光。
存储器选择所拍摄图像文件的存储位置。
可以选择存储在主内存或存储卡。
拍摄模式选择可以根据需要选择不同的拍摄模式,如拍照、摄像、联系人图片等等。
相关内容请参见本章前面的章节。
高级选项点击这个工具条上的左、右箭头图标,可以切换不同的高级选项。
.图像格式 选择图像文件的存储格式。
快门声音 可以选择按下快门后是否有快门提示音。
栅格(只适用于拍照模式) 选择是否在屏幕上显示栅格,以帮助你更好的取景。
栅格屏幕照明 可以选择在使用摄像头时打开或关闭显示屏的照明,当你使用摄像头时该设定使手机的显示器照明设定失效。
回放持续时间 对拍摄完图片或视频,自动存储所拍文件并返回继续拍摄画面所需时间进行设置。
不限制:不对等待时间进行限定,文件存储好才转回继续拍摄画面。
不等待:拍摄后可以马上进行下一次拍摄。
闪烁调节 在室内拍摄时,由于显示屏的刷新频率和日光灯的频率不一致,可能引起显示屏闪烁,为了减少闪烁,可以修改此设定值,和你使用地的电压频率 (50Hz or 60Hz) 相一致。
有声录制 选择 On 可以摄制有声视频,On 是默认值。
如果选择 Off ,拍摄的视频将是无声的。
第12章: 多媒体体验 147文件名首. 对拍摄的图片和视频文件进行命名。
当选择默认时,新文件将用“IMAGE”或“VIDEO”进行命名,例如IMAGE_001.jpg,你也可以选择日期和时间来进行命名。
计数. 默认的设置是利用文件名首和连续的数字来对新文件进行命名,如 001, 002 等,如果想重新从001开始,点击复位(Reset)。
录制限制 设定录制的最大时间或文件尺寸。
模版文件夹(仅用于主题图片模式) 模版文件默认值为存储在手机内存的\MyDocuments\Templates 文件夹。
如果你的存储卡上也有模版文件,设置此项为 Main + Card 。
调整 这个选项允许你调整摄像头的显示特性:对比度、饱和度、色调 和 锐度。
1 在子菜单中,点击一项进行调节,或使用导航控制的上和下进行选择。
2 要增大和减小数值,点击正号和负号图标,或按压导航控制的左右键,显示屏上立即就会出现变化。