迅时FXO-S网关配合elastix-asterisk配置说明
迅时FXO-S网关配合elastix-asterisk配置说明

迅时FXO/S网关配合elastix/asterisk配置说明前言如果你使用迅时的FXO/S混合网关和elastix配合使用,发现FXO的呼叫无法送入到Eleastix,但是自己又苦苦思索没有办法。
也许本文可以帮助到你。
其实Joe也痛苦了很长时间,最后才找到问题的了。
也许下面的东西会让你很有认同感,当你的FXO开启来显的时候,你sip show set bug on时会经常发现asterisk会用错误的peer 去验证FXO的peer8005>, digest has <6007>[Sep 12 11:42:28] WARNING[8051]: chan_sip.c:8825 check_auth: username mismatch, have <8005>, digest has <6007>.好吧。
不多废话了,我们开始迅时FXO/S网关和ELASTIX的配置吧。
步骤1.创建1个Trunk ,名字为VOPTechVG如下图,记住type=friend.2.建立1个拨号规则,我么假设9开始的前缀都从FXO呼出。
下图的意思是,9开始的号码,不管多少位都从VOPTECHVG的TRUNK送出以上全部,就是从FXO呼出的设置了,一般不出问题,大家就可以正常拨打外线了。
3.呼入设置,大家可以打开INBOUND ROUTER(呼入设置选项),然后如下图设置。
Joe 这里设置为,只要有888的DID号码进来,就会进入到ELASTIX的IVR(自动欢迎音)。
大家也可以自己进行稀饭的设置,比如说到某一个分机,取决于个人的爱好啊。
4.打开文件编辑器,编辑sip_custom.conf文件。
放入下面的字节match_auth_username=yes。
如果你不加这个。
ASTERISK会拒绝这个呼叫,是因为FXS和FXO的IP地址一样(迅时网关的FXO/S混合使用),ASTERISK会用FXS的用户名和密码去匹配FXO的用户名和密码。
FXS操作配置指南HW2.0
HW2.0FXS配置指南NTXConverged Communications PBX目录1.简介 (1)2.NTX配置说明 (1)2.1用户帐号 (1)2.2设置路由 (1)3.HW2.0配置说明 (2)3.1登录WEB界面 (2)3.2查看系统版本 (3)3.3HW2.0数据初始化 (3)3.4网络参数 (4)3.5HW2.0系统参数 (5)3.6注册服务器 (5)3.7注册帐号 (6)3.7.1号码设置 (6)3.7.2端口参数 (7)3.8拨号路由设置 (7)3.9媒体流参数设置 (9)3.10呼叫统计 (10)3.11导入数据和账号状态 (11)1.简介HW2.0(Integrated Access Device,综合接入设备)HW2.0是基于软交换控制的亚终端,可提供IP/POTS等业务的接入,同时起到VOIP CODEC的功能。
它既可以担当IP电话网关设备,更具有数据接入的功能,一般数据功能包括PPPoE,NAT,DHCP Server等功能甚至包括路由,简单防火墙功能,虚拟服务器功能等等。
HW2.0 在软交换体系中位于接入层,其主要功能是将各种网络终端统一接入,从而使各种业务在包交换网络中统一得以实现。
在继承PSTN 原有的电路交换和业务特性的基础上,HW2.0 融合了IP技术的各项优点,可实现传统PSTN 向NGN 网络的平滑过渡;同时,在充分利用现有PSTN 设备的基础上,HW2.0 可提供种类更丰富的增殖业务,从而为新老电信运营商的业务开展和网络建设与升级提供最佳平衡点。
2.NTX配置说明2.1用户帐号在NTX中给HW2.0的每个FXS端口开注册账号2.2设置路由以下路由定义为拨9占用NTX上接的DT中继出呼叫,HW2.0内部分机字头为2。
3.HW2.0配置说明将网线连接HW2.0的ETH1接口(型号为MX120的HW2.0设备默认地址为192.168.2.240/子网掩码255.255.0.0),将电脑IP地址设置为192.168.2.XX/掩码为255.255.0.0;(设备上电之后可在用户口上接上电话拨“##”听HW2.0的当前IP地址和软件版本;以下是网关缺省IP地址对应表:3.1登录WEB界面1.在浏览器地址栏中输入HW2.0的地址,可以看到输入密码的提示窗口,默认密码voip;登录系统后查看是否是以管理员的身份登录系统,如果不是管理员的身份登录则只能浏览数据2.修改及查看RTCP参数(设置此参数解决大话务量情况下设备会重启的问题)将x.x.x.x修改网关的IP】<?xml version="1.0" encoding="utf-8" ?>-<rsp stat="ok"><config method="gw.config.set" /></rsp>查看方法:http:// x.x.x.x/xml?method=gw.config.get&id=542 【注;将x.x.x.x修改网管的IP】<?xml version="1.0" encoding="utf-8" ?>-<rsp stat="ok">-<config method="gw.config.get"><item id="542" value="yes" />【注;有此黄色底色表示修改成功】</config></rsp>3.2查看系统版本点“版本信息”能看到当前的软件版本和硬件版本。
elastix-asterisk环境配置文档
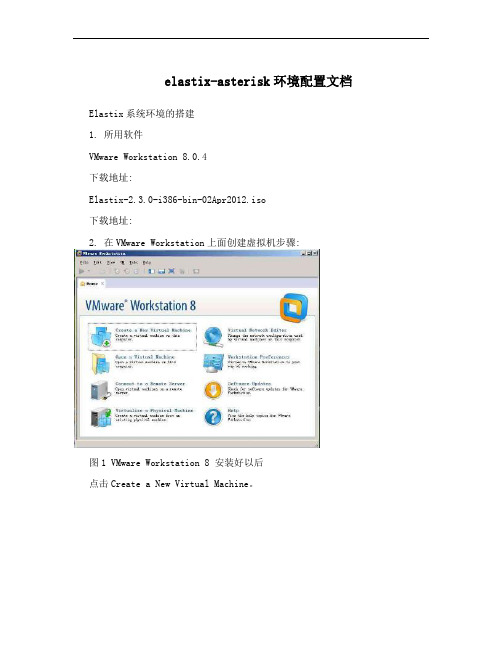
elastix-asterisk环境配置文档Elastix系统环境的搭建1. 所用软件VMware Workstation 8.0.4下载地址:Elastix-2.3.0-i386-bin-02Apr2012.iso下载地址:2. 在VMware Workstation上面创建虚拟机步骤:图1 VMware Workstation 8 安装好以后点击Create a New Virtual Machine。
图2 选择配置类型,选Custom(advanced),点Next图3 选Workstation 8.0,点Next到下面这个界面后要找到elastix的iso文件,然后选择I will install the operationsystem later图4 选择elastix镜像文件,选择I will install the operation system later,点next图5 选择在此虚拟机上安装的系统图6 为虚拟机命名,并选择虚拟机的安装目录图7 选择虚拟机的处理器数图8 配置内存大小1G图9 选择网络连接类型,Use bridged networking图10 选择I/O控制器类型图11 选择磁盘,默认即可图12 选择磁盘类型,默认图13 配置磁盘大小8.0G,将虚拟磁盘分隔成多个文件图14 确认磁盘文件存放位置,默认图15 确认虚拟机配置信息,点Finish图16 虚拟机创建好以后的界面3. 在虚拟机上面安装elastix图17 单击红色方框中CD/DVD(IDE),配置elastix镜像文件目录图18 选Use ISO image file,并找到下载的elastix镜像文件,点OK图19 启动虚拟机,并开始安装elastix图20 进入这个界面后回车图21 选择安装过程的语言,直接回车图22 选择键盘类型,默认,直接回车图23 提示会擦出分区上的数据,不用管,直接回车图24 选择Create custom layout,选择OK图25 进入到这个界面后开始创建几个分区图26 这是配置好的分区信息,点OK图27 配置网卡信息,选Yes图28 配置好网卡信息后点OK图29 手动设置好IP地址和子网掩码图30 配置好网关和DNS,点OK图31 配置主机名,点OK图32 选择时区,Asia/Shanghai图33 填写root用户密码图34 开始安装图35 输入MySQL的root密码图36 确认MySQL密码图37 输入admin密码图38 确实admin密码图39 用root登陆上去,输入密码图40 在浏览器里面输入,点击继续浏览此网站。
标准ERP配置Asterisk服务器使用指南说明书

CONFIGURING AN ASTERISK SERVERFrom Standard ERP's T elephony module, it is possible to fully configure an Asterisk server, whether it is installed locally on the same server as Standard ERP (only applicable on a Linux-based server) or on a separate remote server.It is also possible to integrate Standard ERP with an existing Asterisk server without managing its configuration directly from Standard ERP. Below are the steps required for a full integration, and will not explain what steps are required for local, remote, and existing servers.PBX ConnectionThe basic setting for integrating your Standard ERP system with an Asterisk server is a PBX Connection. A PBX Connection represents a connection to a unique actual VoIP Server.T o start with, you should create a new PBX Connection from the T elephony module in the PBX Connection register.A PBX Connection is defined primarily by:Code: The PBX unique identifier.Comment: A descriptive text.Type: The type of VoIP server to connect to; this can be chosen from a variety of Asterisk versions, TrixBox, Digium Switchvox, VPBX and 3CX Phone System 12 etc.Hostname: The hostname for the server being used.Host IP address: The IP address for the server being used.Port: The port through which the Asterisk's Management Interface (AMI) can be reached (5038 by default for Asterisk)Username: Username to connect to the AMI.Password:Password to connect to the AMI.Closed: A PBX Connection can be closed when it is no longer in use or valid.In the case of a locally or remotely installed Asterisk server, the T ype should be Asterisk 1.8 (AMI). The username and password can be freely set as they will be configured in the server for you.In case you are connecting to an existing server, the port, username, and password should match the content of your server's manager.conf file. Here is an example of manager configuration usable with Standard ERP:[general]enabled=yesport=5038bindaddr=0.0.0.0allowmultiplelogin=yesdisplayconnects=yestimestampevents=yes[myadmin]secret=passwordxyzdeny=0.0.0.0/0.0.0.0permit=1.2.3.4read=system,call,originatewrite=system,call,originateIn this case Port would be 5038, username myadmin and password passwordxyz. You should replace 1.2.3.4 by the IP address of your Standard ERP server.A PBX Connection has other fields organised in four tabs, and which are used when managing a local or remote server entirely from Standard ERP. Administrators using an existing server fully managed by some external means should skip over to the Contact records section.Dialling SettingsUnder this tab, you can configure the various telephony prefixes in use in your system.International Dial Prefix: T o dial out of your country.Country Code: T o dial in your country.Default Area Code: T o dial in your local area.External Line Prefix: T o dial out of your organisation.Skip Digit for International Calls:As its name indicates, you may also define digits to skip when dialling internationally.These parameters are used to place and receive calls, and to identify contacts based on their caller ID, including when using IAX (see below).RulesThis T ab allows to define a number of rules from various types:Ignore SIP Channel:In case of an existing server, this will ignore possible intermediary SIP channels to handle calls and instead only care about the end points. The Identifier is the name of the intermediary SIP channel to ignore.No Act For Calls Between Extensions Shorter Than: Disables the automatic Activity creation for internal calls (detected by the short length of internal extensions). This is only applicable for PBX Connections of the T ype Digium SwitchVox. The Identifier is the maximum length.Track number: Not used.Unique callers only: With this option, only one call will be displayed in Communicator even if there is more than one call from or to the number configured in Identifier.Remote AdministrationFrom this tab, you can define the following:Remote User: Linux user that will be used to copy the Asterisk configuration files to a remote serverRemote Configuration Directory: The path where to copy said configuration files. As such, it is important that the directory is writable by the Linux user and that your Standard ERP server has been set up to be able to connect directly to the remote Asterisk server without needing to enter a password (namely set up a Public Key Authentication between both servers).AsteriskFrom this final tab, you can enable the connection of your Asterisk server to other Asterisk server using IAX (Inter-Asterisk eXchange).Enable Inter-Asterisk eXchange(IAX):By ticking this option, you will allow all other PBX Connections configured in Standard ERP and set to use IAX to connect to this particular server as well as allow this server to connect to all other servers enabled for IAX and configured in Standard ERP.IAX Password: The password used by this server to connect to other IAX servers.Sending configuration to the serverThis section only applies to the local and remote servers situations.After completing the above configuration of a PBX Connection, you can already send the configuration to an Asterisk server.If you are running a local server, you can dump the configuration files by using the Local Asterisk Server settings from the T elephony module.First, you will need to install the Asterisk server by selecting Setup Asterisk Server in the Operation Menu. This will give you a warning pop-up reading “Starting download and installation of Asterisk server”. Click OK. This will download the binaries for the Asterisk Server from the HansaWorld servers and install them on your local server. The server will then be started. You should never have to use Setup Asterisk Server again after this.If you close the Local Asterisk Inspect window and reopen it, you will see the path where your server is installed.From the Operation Menu, you can also select “Update Asterisk Server Configuration” (which will dump the current configuration on the Asterisk server configuration directory and restart the Asterisk server so that the configuration is applied), Start Asterisk Server, and Stop Asterisk Server (which should both only rarely be used, for instance for external maintenance purposes).If you are running a remote server which is fully configured using Standard ERP, you should instead head to the Asterisk SIP Configuration Files maintenance in the Routines of the T elephony module.Use Paste Special in the PBX Connection to select the server you want to update, and tick Send Files to Server before running. If you do not tick this option, then the files will only be generated locally on your Standard ERP server.Note that this will only work if you have properly setup your PBX Connection and the Linux environment of your Asterisk server (see above).You can also select from the following other Maintenance Routines:!Asterisk SIP trunks.!Asterisk Users.These routines will generate respectively only the configuration files for the SIP trunks of a PBX Connection, or for its users, instead of regenerating all the files.Note that the files are only sent to the server but not applied. An administrator needs to connect manually to the Asterisk server and reload them. For instance by issuing a 'core reload' command from Asterisk's command line interface.Asterisk usersThe next step in setting up your Asterisk server is to create a number of users.This section is applicable for local and remote servers.From the T elephony module, you can create new Asterisk Users for your employees or partners.For each user, you can define:PBX Connections: One or more servers on which the user will be created and allowed to connect to. Leave blank to create the user on all PBX Connections configured.Name: A descriptive name.Username: Will be used to configure their SIP client.Password:Will be used to configure their SIP client.Group: No longer used.Caller ID number: The display number that might be shown to the party this user is calling. Note that this can easily be overridden by the configuration of a SIP client or SIP trunk. Especially when dialling out to international telephone numbers, Caller ID numbers are likely to get lost.Caller ID name: The display name that might be shown to the party this user is calling. Note that this can easilybe overridden by the configuration of a SIP client or SIP trunk.Especially when dialling out to a mobile or landline telephone number, plain text display names will be lost.Closed: A closed user will simply not be configured on the server and as such, it will not be possible to connect to the server using that user.No Queue Fallback: If an Asterisk User is marked as not being part of Queue Fallback, then that user will not be called when a queue is not staffed but is receiving a phone call.Note that after creating one (or more) Asterisk users, it is necessary to send the configuration to the server, as described above.Contact recordsThis section is applicable for all types of servers: local, remote, and existing.As of now, Asterisk users and Standard ERP users (Persons), and their contact cards are not connected and as such, Contact cards for your users will need to be filled in manually with their SIP contact details.In the SIP field of the contact record pertaining to your Asterisk user should be filled in as username@host name. Where username comes from the Asterisk User record, and hostname from the PBX Connection record.SIP TrunksThis section is applicable for local and remote servers.At this point of the configuration, you can place calls between users of your Asterisk server. T o reach out to the outside world, you will need a SIP trunk or VoIP trunk. Each country usually has several providers that can help you get started. As Asterisk is a commonly used VoIP server platform, it is easy to get help from your provider in general.A simple Internet search should allow you to find a number of SIP providers for your country.Using the information provided by your subscriber, you will be able to fill in the SIP Trunk record necessary for you to place calls to the rest of the world. A SIP provider will usually be able to sell you the usage of one, or more phone numbers that your contacts will be able to call to reach you. In some cases, your SIP provider might also allow you to place outgoing calls. Make sure to carefully select the SIP provider that is able to provide you with the capabilities you need to run your business smoothly.Setting up a SIP trunk comes with a wide array of technical possibilities, a number of which are supported inStandard ERP. We will detail some of those here but it is not possible to list all the possible technical configurations one can encounter.Code: Select a unique code for your SIP trunk.PBX Connection: Paste Special the PBX connection on which you want this SIP trunk to be terminated.Host: Fill in the host name or IP address provided by your SIP provider here. It might be that host and domain have the same value.Domain: Fill in the domain name provided by your SIP provider here. It might be that host and domain have the same value.Username: Fill in the username provided by your SIP provider here.Password: Fill in the information provided by your SIP provider here.Skip Digit for International Calls: This parameters operates similarly to that set in the PBX Connection but will apply to calls using the SIP trunk.Country Code:This parameters operates similarly to that set in PBX Connection but will apply to calls using the SIP trunk.Caller ID: The caller ID of your SIP trunk provider (optional).Allow anonymous calls: Lets the system accept anonymous calls coming from your providers.Allowed IPs: Only incoming calls coming from these IP addresses will be allowed. Please check with your SIP provider to only open the minimum number of addresses. (optional but important security point).Inbound phone numbers: A SIP provider may very well provide you several telephone numbers using the same SIP trunks. In certain cases, you will be given unique identifiers for each one of them. They should be filled in here. It might be that the usernames and passwords are the same as above.Trunk type:Set to Outbound calls only if you intend to input a separate configuration for Inbound Phone Numbers in the matrix as described just above. Set to In- and outbound calls if you do not have a separate configuration for Inbound Phone Numbers.IAX: Select this if your SIP trunk provider is providing you services using an Asterisk IAX trunk.Queues and MenusThis section is applicable for local and remote servers.Most of us are familiar with the telephony lines operated by large companies. A welcome Menu plays when you call into the support line of a company, after pushing a few digits on your phone and listening to a few more voice Menu messages, you are placed in a Queue. Thanks to Standard ERP's integration with Asterisk, your company can easily benefit from such technology.In Standard ERP's terminology, a Menu is used to select between different queues or menus; and a Queue is used to put in relation agents answering calls and external callers. Queues and Menus share a number of settings (Phone Numbers, Opening Times) and capabilities (Playing a sound upon arrival, when closed, etc.).Instructions for users to use queues can be found earlier in the document.A Queue contains the following information:Code: A unique identifier in Standard ERPQueue ID: A unique identifier in Asterisk which will be used by your employees to connect to the queue and start answering calls.SIP Trunk: The SIP trunk from where the calls will be arriving.Description: A free-text comment.Phone Number: (Optional) in the case where you want a direct number for callers to reach the queue without going through a Menu. Note: you can play a greetings message even in the case where callers go straight toa queue. You do not need a Menu to play a welcome message.Fallback number: An optional number to call in the case i) no agent is available in the queue AND ii) no one is logged in to the Asterisk server or everyone who is logged in is marked with “No Queue Fallback”.Open from/until: it is possible to define two sets of opening hours (to include the possibility of a lunch break for instance). In case only one set of opening hours is needed, use the first pair of “Open from”/”Open until”fields and leave the second pair blank.A Menu contains the following information:Code: A unique identifier.SIP Trunk: T he SIP trunk from where the calls will be arriving.Description: A free-text comment.Phone Number: The phone number for your contacts to dial in order to access the Menu. Optional in case the Menu is accessed via another Menu.Open from/until:It is possible to define two sets of opening hours (to include the possibility of a lunch break for instance). In case only one set of opening hours is needed, use the first pair of “Open from”/”Open until”fields and leave the second pair blank.Repeat every (s): The number of seconds between repeats of the message explaining to the caller his or her possible choices.A matrix finally allows you to configure the different Menus and Queues reachable from this Menu:Number: The digit to press for the user to enter the selected Queue or Menu. Note that in the case pressing the digit leads to entering a Queue, the digit need not be the same as the Queue ID defined in the Queue.Queue: Paste Special to an existing Queue (note, if you select this, you should not select a Menu as well).Menu: Paste Special to an existing Menu (note, if you select this, you should not select a Queue as well).Comment: A free-text comment as a reminder of what the selected Queue or Menu might be.Using Menus, you can cascade multiple levels of Menus. However, once a caller has joined a Queue, he or she will not be able to go back to another Queue or Menu.The last remaining part of the configuration is now to assign sound files to be played to guide your callers through your Menus and Queues.Whereas all the previous configuration was done in Registers of the T elephony module, sounds will be configured from the Settings of the T elephony module. More precisely, from the PBX Sounds setting.First, create a new PBX Sound. Then in Event, use Paste Special to select the type of Event that will trigger the sound file to play. The Event you select will affect whether you are selecting a Queue or a Menu in the following field. Available Events are:Initial Queue Message: Played as an initial greeting when a caller reaches a Queue.Line Busy: Played after 30 seconds of a caller waiting in a Queue.Menu Closed: Played whenever a caller arrives to a Menu outside of the defined opening hoursMenu Message: Played as an initial greeting when a caller enters a Menu (should also describes the options available from the Menu and the digits associated with each function).Music on Hold:Music to play while the caller is waiting in a Queue.Queue Closed: Played whenever a caller arrives to a Queue outside of the defined opening hours.Once an Event is selected, use Paste Special to select the Queue/Menu where the sound file should be used. Only one Queue or Menu can be selected. After Saving the Record, you can now attach a file to the Record following the usual way of dragging and dropping the file over the paperclip icon or into the Document Manager window which you can open by double-clicking the paperclip icon.Note: the attached sound file must be a mono.wav file, sampled at 8kHz.Remember to send the configuration to the server once done. The sound files will be copied during that stage a s well.。
迅时网关FXS配置手册
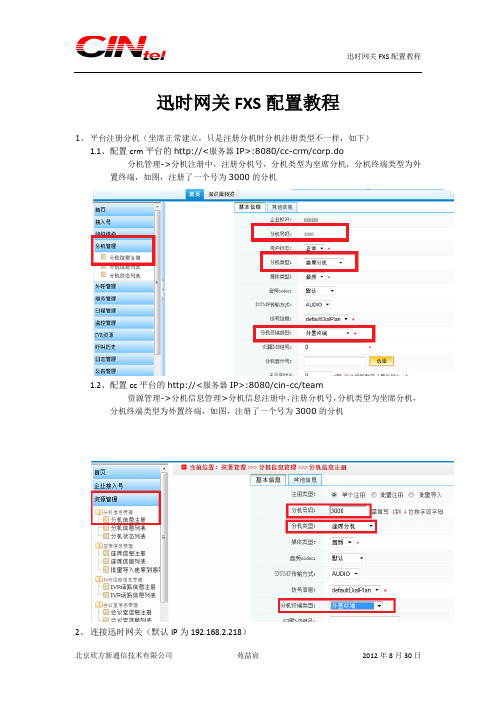
迅时网关FXS配置教程1、平台注册分机(坐席正常建立,只是注册分机时分机注册类型不一样,如下)1.1、配置crm平台的http://<服务器IP>:8080/cc-crm/corp.do分机管理->分机注册中,注册分机号,分机类型为坐席分机,分机终端类型为外置终端,如图,注册了一个号为3000的分机1.2、配置cc平台的http://<服务器IP>:8080/cin-cc/team资源管理->分机信息管理>分机信息注册中,注册分机号,分机类型为坐席分机,分机终端类型为外置终端,如图,注册了一个号为3000的分机2、连接迅时网关(默认IP为192.168.2.218)2.1、基本配置2.1.1、选择网路,将网络类型设置为静态,手动输入客户分配给迅时网关的IP地址,并配置网关地址(需要问客户网关地址,因为有些客户网关地址最后8位不是1)2.1.2、选择SIPA、配置本地端口为5060B、注册服务器、代理服务器地址均为平台服务器地址(ACD)<服务器IP>:5060;如果是双机,则为ACD服务器浮点地址。
C、备份服务器地址为平台服务器地址(ACD)<服务器IP>:5060;如果是双机,则为ACD服务器浮点地址;如果是两台单机,则填备机地址。
D、注册方式为按线路注册2.1.3、选择传真,选择第一项,方式为透传,如图2.2、线路配置2.2.1、选择用户功能A、线路号码为插入迅时网关的FXS接口B、电话号码配置长号,000002<企业号><坐席号>C、注册选项打勾D、注册密码为坐席密码,默认为111111配置完成后重启迅时网关,即可生效。
Elastix安装及经常使用功能配置(集电子传真VoIP谈天工具邮件于一体)
Elastix安装及经常使用功能配置一、Elastix系统安装二、系统大体配置三、配置四、配置五、邮件配置六、Openfire安装及配置安装环境:机械类型: 兼容机CPU :内存: 256M硬盘: 20GX100P卡两块(一块,一块)Elastix :下载Elastix光盘镜像,刻录光盘引导安装,进程比较简单,此处略注意:安装进程会格式化整个硬盘测试利用的版本是新版本存在不能发及有时接收时会犯错的问题2.1IP地址配置# netconfigIP : : : reboot2.2生成Zaptal配置文件# genzaptelconf -c no# ztcft –vvvZaptel Version: Canceller: MG2Configuration======================Channel map:Channel 01: FXS Kewlstart (Default) (Slaves: 01) Channel 02: FXS Kewlstart (Default) (Slaves: 02)2 channels configured.#zttool (查看卡的状态)2.3文件更改# vi /etc/asterisk/;usedistinctiveringdetection=yesbusydetect=yesbusycount=5(不加的话可能检测不到挂机信号)2.4文件更改(支持视频)# vi /etc/asterisk/videosupport=yesmaxcallbitrate=384allow=h261allow=h263allow=h263pallow=h264做完以上配置后,重启机械# reboot三、配置3.1登岸治理界面,常规配置IE里输入: (登岸后需及时更改密码)默许的用户名跟密码:Web interfaceUsername: adminPassword: palosantoSugarCRMUsername: adminPassword: passwordA2billUsername: adminPassword: mypasswordFlash Operator panelPassword:MysqlUsername: rootPassword:修改网络参数,DNS、网关、更改语言:更正系统时刻:3.2PBX里启用经常使用的模块选择以下模块(也能够依照自己的需要进行选择),点确认,并应用配置3.3增加分机6000,6001….系统->PBX设置->Extensions->增加SIP分机其它未列出来为默许配置,无需修改按一样的方式增加其它分机3.4系统录音(欢迎词,语音提示….)系统->PBX设置->System Recording ->上传语音文件(PCM编码,16位,8000HZ)录音命名为On_line(上班时的录音),保留再上传下班时的录音Off_line上传的语音文件放在/var/lib/asterisk/sounds/custom 目录下3.5增加上班时及下班时的IVR系统->PBX设置->IVR->Add IVR,添加以下内容,保留一样的方式增加下班时的IVR(录音时上传了音乐的话,还能够按键点歌,配置如下: )3.6增加Time Conditions系统->PBX设置->Time Conditions,设置如下,保留3.7配置Inbounds Routes(利用Zap 1)系统->PBX设置->Inbounds Routes 配置如下,保留一个VoIP效劳器已可正式利用,若是要让外面的用户也能登岸,需要映射以下端口: TCP:5060UDP:其中:TCP端口在/etc/asterisk/中概念,用户认证端口:UDP端口在/etc/asterisk/中概念,用户用户间的通话3.8其它功能呼唤等待,呼唤转移,回拔,会议,黑名单,号码查找…..待续…..四、配置4.1增加分机(5000,5001….)系统->PBX设置->Extensions->增加IAX2分机其它默许,创建后,修改5000属性如上右图所示: 保留后,一样再增加另一个分机50014.2增加虚拟(fax1,fax2…)->新建虚拟保留,再另外建一个虚拟4.3设置治理员->治理员输入治理员邮箱,点改变生效4.4系统录音(向导)依照的操作,增加向导的录音(哪个部门对应哪个号码),取名fax_guide4.5创建IVR系统->PBX设置->IVR 增加以下IVR,保留4.6配置Inbounds Routes(利用Zap 2)系统->PBX设置->Inbounds Routes 配置如下,保留,效劳器端配置完毕。
上海讯时网关安装及说明

上海讯时网关安装及说明第一章产品介绍1.1产品概述1.2产品特点1.3外观以及硬件1.4硬件性能第2章设备安装和配置2.1安装MX8到工作台2.2连接FXS电缆2.3连接电源2.4连接以太网2.5安装后的检查2.6登陆WEB-PAGE的步骤2.7配置IP地址第一章产品介绍1.1.产品概述MX8 VOIP语音网关系列是高智能、多用途的V oIP接入网关。
使用MX8网关,运营商和虚拟运营商可以通过各种宽带IP接入方式(如FTTB、HFC、ADSL) 向用户提供电话和传真业务。
MX8网关也可以与传统的PBX设备连接,为政府机关、企业及学校提供基于IP 网的、具有异地连接功能的广域虚拟交换机方案。
MX8网关也可以作为IP PBX的远程接入终端。
MX8系列有多种型号可供选择,每种型号配置不同数目的模拟电话线接口(FXS) 和模拟中继线接口(FXO) ,以满足各类用户的需要。
MX8系列语音网关的软件系统沿袭了迅时通信运营商级VoIP网关产品(MX100-AG和MX100-TG) ,从而在功能、语音品质和兼容性等方面继承和保持了迅时通信V oIP 产品的优势。
在硬件方面,MX8系列采用Motorola 时钟速度为50兆32位的中央处理器MPC852为主控制处理器,采用了TI的C5509高效数字信号处理芯片为语音和传真业务处理器。
强大的硬件处理能力,保证了MX8网关在满负载状况下依然能实现模拟语音信号与IP分组包的转换,支持语音信号的编解码(如G.711、G.729A、G.723.1) 以及回声消除等主要功能。
本手册主要介绍MX8的安装及Web配置方式,在开始介绍之前,特别提醒用户注意:修改MX8 Web配置页面中的一个或者多个参数并单击“提交”按钮后,如果有弹出“提交成功!提示:要使配置生效,请重新启动网关”,重新启动MX8以使修改生效。
MX8 VoIP语音网关提供语音提示功能,通过语音的方式提示用户该MX8网关的IP地址。
基于Twilio弹性SIP网关配置Asterisk指南说明书
Asterisk with Twilio Elastic SIP Trunking Configuration Guide This guide shows one way of configuring Asterisk to work with Twilio’s Elastic SIP Trunking product.Asterisk is a hugely flexible piece of software and it is quite possible to depart,significantly,from the instructions provided here and still bring up a fully working trunk. I’ve tried to highlight the essential concepts that you will need to follow.If you have any feedback on this or any of our other configuration guides,please do email us at s***********************************Contents:Installing AsteriskSetting up your Twilio Elastic SIP TrunkTermination URIACLCredentialsOrigination URIPhone NumbersConfiguring your Asterisksip.confpjsip.confextensions.confUsing Secure TrunkingTwilio account portalchan_sipPJSIP Channel DriverInstalling AsteriskThe first thing to do is to set up a server and install Asterisk.I installed Asterisk on an Amazon EC2instance running Redhat.Wherever you build your Asterisk,remember to configure firewall or security settings so that you can receive SIP and RTP from Twilioand any other SIP devices(like phones)you will be using.Please see https:///docs/api/sip-trunking/getting-started#whitelist for all the IP addresses you will need to whitelist.NB:If you know that you want to use TLS and SRTP on this trunk,please read Using Secure Trunking, below.There’s a pretty good guide for how to install Asterisk at /sample-device-configurations/41-asterisk/179-asterisk-13-on-ce ntos.We found that we had to install two extra packages before we could install asterisk: ncurses-devel and libuuid-devel.Setting up your Twilio Elastic SIP TrunkWe have a pretty comprehensive guide on how to configure an Elastic SIP Trunk through your Twilio account portal at https:///docs/sip-trunking/getting-started. I will highlight 5 aspects here.Termination URIThis is where you configure a unique URI that identifies your trunk.You will need to remember this when configuring your Asterisk because we need it to reference this URI in its SIP requests.The termination URI I’ve chosen here is .It’s too long to fit neatly into the text box in the screenshot.ACLYou can add an ACL that contains the public IP address of your Asterisk.This tells Twilio to ignore SIP from anywhere except for your PBX,reducing the chance of anyone making fraudulent calls on your trunk.You will need to add either an ACL or SIP credentials to your trunk.CredentialsYou can add credentials to your trunk.If you do,we will expect any server that sends SIP requests to Twilio on this trunk to authenticate using these credentials.Again,this is a way of reducing the chance of someone making fraudulent calls on your trunk.If you do not add credentials to your trunk, you will need to add an ACL.Origination URIThe easiest way to configure the Origination URI is using“sip:”followed by the public IP address of your Asterisk.In my case,that would be“sip:52.23.233.7”.Although I have used an IP address here, you can also use an FQDN.Phone NumbersIf you want to receive calls from the PSTN,across your new trunk,you will need to add a phone number to it.If someone calls this number,Twilio will contact your PBX using the Origination URI, above.Configuring your AsteriskIn this section we’re going to walk through a minimal configuration to use your Asterisk system for inbound and outbound calls over a Twilio SIP Trunk.sip.confIf you are using the default SIP driver,chan_sip,you will need to edit sip.conf.First,set up some global parameters.Because I was building on an AWS EC2instance,my asterisk server was behind NAT so I needed to account for this:[general]udpenable=yestcpenable=yespreferred_codec_only=yesdisallow=allallow=ulaw ;Twilio does G.711 onlysipdebug=yeslocalnet=172.31.0.0/16;My EC2instance had a private IP in this rangeexternaddr=52.23.233.7 ;The public IP of my EC2 instance Then, we need to build a trunk to Twilio.[twilio-trunk](!)type=peercontext=from-twilio ;Which dialplan to use for incoming calls dtmfmode=rfc4733canreinivite=noinsecure=port,invite[twilio0](twilio-trunk)host= ;Our Termination URI remotesecret=nottelling;password,if you are using credentialsdefaultuser=myuser;username,if you are using credentials[twilio1](twilio-trunk)host=54.172.60.2[twilio2](twilio-trunk)host=54.172.60.0[twilio3](twilio-trunk)host=54.172.60.1[twilio4](twilio-trunk)host=54.172.60.3In the US,Twilio has4different IP addresses that it uses for SIP signaling.We need the Asterisk server to recognize a SIP INVITE coming from any of these addresses as coming over this trunk.That means we need to build a trunk for each address.We then need to build another trunk for outgoing calls to Twilio,one that uses the Termination URI we configured earlier.When you are building multiple objects with similar configuration objects on Asterisk,using templates makes life easier.A template is denoted by putting a(!)at the end of the object name.We then use that template by putting its name in () at the end of a new object’s name.If you want to use non-US numbers on your trunk,you will need to authorize other Twilio Regional IP addresses.The full list can be found at https:///docs/api/sip-trunking/getting-started#whitelistThen, build objects for the SIP phones you will register with the Asterisk.[office-phone](!)type=friendcontext=from-phoneshost=dynamicsecret=Asterisk15dtmfmode=autodisallow=allallow=ulaw[1001](office-phone)pjsip.confIf you have installed,and are using pjsip,instead of chan_sip,you will need to edit pjsip.conf.First,we need to build a transport.Again,I had to account for the fact that my EC2 instance is behind NAT.[transport-udp-nat]type=transportprotocol=udpbind=0.0.0.0local_net=172.31.0.0/16external_media_address=52.23.233.7external_signaling_address=52.23.233.7Then, we set up our trunk. Again, I will use templates to make life easier.[twilio-trunks](!)type=endpointtransport=transport-udp-natcontext=from-twiliodisallow=allallow=ulaw[auth-out](!)type=authauth_type=userpass[twilio0](twilio-trunks)aors=twilio0-aorsoutbound_auth=twilio0-auth;if we are using credentials[twilio0-aors]type=aorcontact=sip::5060[twilio0-ident]type=identifyendpoint=twilio0match=54.172.60.0match=54.172.60.1match=54.172.60.2match=54.172.60.3[twilio0-auth](auth-out)password=nottelling;password on our credentialsusername=myuser;username on our credentialsAnd then we build objects for our SIP phones.[endpoint-basic](!)type=endpointtransport=transport-udp-natcontext=from-phonesdisallow=allallow=ulaw[auth-userpass](!)type=authauth_type=userpass[aor-single-reg](!)type=aormax_contacts=1[1001](endpoint-basic)auth=auth1001aors=1001[auth1001](auth-userpass)password=ImNotTellingYouusername=1001[1001](aor-single-reg)extensions.confThis is where we tell the Asterisk how to handle incoming calls.The examples here are for very, very basic North American dialing.We’ll start with calls coming in from the Twilio SIP trunk.We’re just going to send all incoming calls to the one SIP phone registered as1001.This is enough for testing but you will want to end up with something more complicated that this,probably.This example assumes you are using chan_sip.I f you are using PJSIP,replace the“SIP”with “PJSIP”[from-twilio]exten => _+1NXXXXXXXXX,1,Dial(SIP/1001)Then,for calls from our SIP phones,we’ll just worry about ones that are to go out over the trunk. If you are using chan_sip:[from-phones]exten => _NXXNXXXXXX,1,Set(CALLERID(all)="David" <7845551234>) same => n,Dial(SIP/twilio0/+1${EXTEN})If you are using pjsip, the second line should be:same => n,Dial(PJSIP/+1${EXTEN}@twilio0)Using Secure TrunkingTwilio account portalIn the General Settings section for your trunk, you will need to enable secure trunking.chan_sipBefore you can use secure trunking with chan_sip,you need to install srtp.Before you can install srtp, you need to install words!$cd /usr/src$sudo yum install -y wordsThe SRTP module uses words for self testing$wgethttps:///project/srtp/srtp/1.4.4/srtp-1.4.4.tgz$tar zxvf srtp-1.4.4.tgz$cd /usr/src/srtp$./configure CFLAGS=-fPIC --prefix=/usr/local/lib$makehere, you’re going to have to fix up one of the install scripts.cd testvi rtpw_test.shchange line 7 from “R TPW=rtpw” to “R TPW=./rtpw”save and exit (<esc>followed by :wq)cd ..$make runtest$make installNow,when you configure Asterisk,replace the“./configure”command with “./configure--with-srtp=/usr/local/lib”This tells asterisk to include the SRTP module and where to find the linkable libraries(note that we told the SRTP module to use /usr/local/lib when configuring it, above).Then,you can follow the instructions in https:///wiki/display/AST/Secure+Calling+Tutorial to enable TLS and SRTP on your asterisk.Using TLS with Twilio requires a couple more settings,too.On the transport object for TLS, you should settlsdontverifyserver=yesOn the peer object for the SIP trunk, you should setencryption=yesmedia_encryption=sdesPJSIP Channel DriverAsterisk ships by default with c han_sip driver and works well with Twilio.However,if you have some reason to run p jsip driver with Asterisk, please note the following:●Asterisk13.8cert2defaults to P JSIP 2.5and it does not work with Twilio forTLS/SRTP purposes. Non-encrypted calls do work.●Asterisk13.8cert2can also use the latest P JSIP driver,which at this time is2.5.5.Twilio works well with it despite the following message appearing in yourlog:Sep 27 13:03:56] ERROR[10886]: pjproject:0 <?>:tlsc0x7f217c03RFC5922(section7.2)does not allow TLS wildcard certificates. Advise your SIP provider, please!The following link is a guide to installing a non-bundled version of P JSIP.Change the version to 2.5.5 in the steps.Installing PJSIP channel driver。
- 1、下载文档前请自行甄别文档内容的完整性,平台不提供额外的编辑、内容补充、找答案等附加服务。
- 2、"仅部分预览"的文档,不可在线预览部分如存在完整性等问题,可反馈申请退款(可完整预览的文档不适用该条件!)。
- 3、如文档侵犯您的权益,请联系客服反馈,我们会尽快为您处理(人工客服工作时间:9:00-18:30)。
迅时FXO/S网关配合elastix/asterisk配置说明
前言
如果你使用迅时的FXO/S混合网关和elastix配合使用,发现FXO的呼叫无法送入到Eleastix,但是自己又苦苦思索没有办法。
也许本文可以帮助到你。
其实Joe也痛苦了很长时间,最后才找到问题的了。
也许下面的东西会让你很有认同感,当你的FXO开启来显的时候,你sip show set bug on时会经常发现asterisk会用错误的peer 去验证FXO的peer
8005>, digest has <6007>
[Sep 12 11:42:28] WARNING[8051]: chan_sip.c:8825 check_auth: username mismatch, have <8005>, digest has <6007>.
好吧。
不多废话了,我们开始迅时FXO/S网关和ELASTIX的配置吧。
步骤
1.创建1个Trunk ,名字为VOPTechVG如下图,记住type=friend.
2.建立1个拨号规则,我么假设9开始的前缀都从FXO呼出。
下图的意思是,9开始的号码,不管多少位都从VOPTECHVG的TRUNK送出
以上全部,就是从FXO呼出的设置了,一般不出问题,大家就可以正常拨打外线了。
3.呼入设置,大家可以打开INBOUND ROUTER(呼入设置选项),然后如下图设置。
Joe 这里设置为,只要有888的DID号码进来,就会进入到ELASTIX的IVR(自动欢迎音)。
大家也可以自己进行稀饭的设置,比如说到某一个分机,取决于个人的爱好啊。
4.打开文件编辑器,编辑sip_custom.conf文件。
放入下面的字节
match_auth_username=yes。
如果你不加这个。
ASTERISK会拒绝这个呼叫,是因为FXS和FXO的IP地址一样(迅时网关的FXO/S混合使用),ASTERISK会用FXS的用户名和密码去匹配FXO的用户名和密码。
5.网关的设置,先填入服务器的地址,
然后把网关的注册信息放到网关的配置界面里面。
这里是,FXO一有来电,就把888的号码送入到ELASTIX那边去了。
打完收工,大功告成。
大家如果使用中有什么问题。
可以留言啊。
另外如果大家发现,接入到IVR后,不管拨任何键都无法进入到某个分机。
这个就是DTMF没有设置好了啊。
看下图。
哦对了,预防万一,有时候把路由也写进去吧。