加密狗解决方案-anywhere usb介绍
USB加密狗复制机“打狗棒1.0”的详细使用方-2
USB加密狗复制机“打狗棒1.0”的详细使用方法?悬赏分:10 | 解决时间:2010-4-9 00:05 | 提问者:keccong请高手给出详细的操作步聚,谢谢最佳答案一. 打狗棒1.0简介.打狗棒1.0是利用80386/80486的VM86技术模拟软件狗, 来实现解密的. 进行解密时,软件先带狗运行, 用打狗棒得到软件狗的相关数据; 然后拿去软件狗, 运行打狗棒, 则软件可以无狗运行了.二. 运行环境.它运行在DOS 3.0以上版本, 注意, 不支持HIMEM.SYS和QEMM.EXE, 因此, CONFIG.SYS 的配置最好如下:FILES=30BUFFERS=30三. 安装软件.把软盘上的CANE.EXE和*.LAD拷贝到硬盘上即可(未加密).四. 运行软件.在安装软件的当前目录键入CANE /H, 然后回车, 则显示帮助信息:-------------------------HELP------------------------CANE -----Emulate the softdogCANE /Axxx -----Analyse the softdog,xxx=extend mem keptCANE /R -----Read the softdog fileCANE /W -----Write the softdog fileCANE /U -----Free memory and to dosCANE /H -----Help其中, CANE 表示模拟软件狗运行软件.CANE /Axxx 表示分析软件狗相关的数据, xxx表示为数据留出的扩展内存数(以K为单位).CANE /R 表示读已分析的软件狗的数据.CANE /W 表示把分析的软件狗的数据写到文件中.CANE /U 表示把打狗棒程序从内存中撤消.CANE /H 表示帮助.因此, A> 要解密一个软件狗, 步骤如下:⑴. 把软件狗插到打印口, 进入到打狗棒所在的目录, 键入CANE /Axxx(其中xxx为要留的以K为单位的扩展内存数),然后运行要解密的软件.⑵. 运行完毕后, 回到打狗棒所在的目录, 运行CANE /W, 把软件狗相关的数据写到当前目录下的文件中.⑶. 运行CANE /U 退出VM86模式,回到实模式下.B> 要无狗运行软件, 则在打狗棒所在的目录下运行CANE然后回车, 再运行CANE /R然后回车, 再运行原来的软件即可.五. 软件中附带UCDOS5.0单用户版的解密数据(参考数据, 对于不同用户数据不一定相同),即D和D.六. *.LAD的数据格式*.LAD文件的数据格式如下:第1,2字节: 未用第3,4,5,6: 数据长度第7字节开始(存放数据): 属性端口数据...其中属性占1个字节, 00H: 输入一字节01H: 输入一字10H: 输出一字节11H: 输出一字端口占2个字节, 为输入/输出数据的端口, 如并口数据端口为0378H数据是输入输出的数据, 如果属性为X个字节, 则占X字节,七. 程序的编译和连接在当前目录下, 键入命令行: pasm cane, 然后回车即可.注意, 必须在PATH中设置BORLANDC++的路径. 例如, 如果BORLANDC++的目录为C:\BORLANDC, 则在AUTOEXEC.BAT文件的PATH中加入C:\BORLANDC\BIN;。
加密狗使用说明
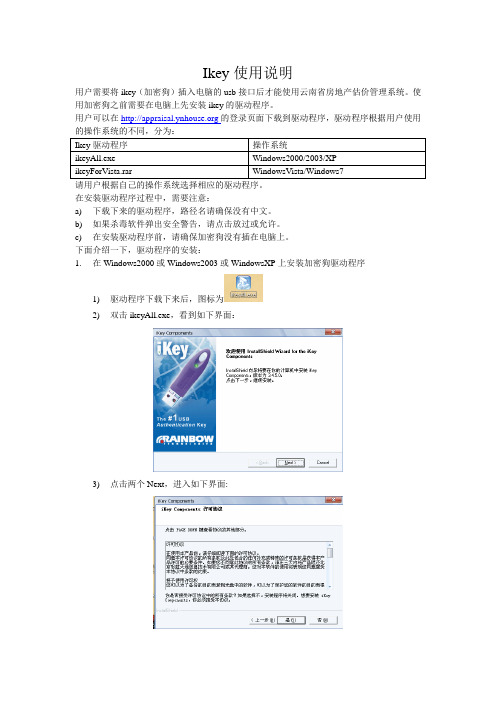
Ikey使用说明用户需要将ikey(加密狗)插入电脑的usb接口后才能使用云南省房地产估价管理系统。
使用加密狗之前需要在电脑上先安装ikey的驱动程序。
用户可以在的登录页面下载到驱动程序,驱动程序根据用户使用的操作系统的不同,分为:请用户根据自己的操作系统选择相应的驱动程序。
在安装驱动程序过程中,需要注意:a)下载下来的驱动程序,路径名请确保没有中文。
b)如果杀毒软件弹出安全警告,请点击放过或允许。
c)在安装驱动程序前,请确保加密狗没有插在电脑上。
下面介绍一下,驱动程序的安装:1.在Windows2000或Windows2003或WindowsXP上安装加密狗驱动程序1)驱动程序下载下来后,图标为2)双击ikeyAll.exe,看到如下界面:3)点击两个Next,进入如下界面:4)点击“是“,就会看到如下界面(如果这过程中杀毒软件弹出安全警告,请点击允许或放过):5)到这个界面,表示安装时成功的,如果这过程中杀毒软件弹出安全警告,请点击允许或放过。
6)将加密狗插入电脑的usb接口,过一会,就会自动跳到以下的界面:7)单击“Finish“,驱动程序就安装完成。
8)打开/Appraisal/index.jsp,如果浏览器出现下列提示:9)则右键点击提示,如下图所示:10)点击“运行加载项”,会出现下列提示:11)点击“运行”,然后刷新网页(按F5),安装完成。
2.在WindowsVista系统上安装加密狗驱动程序1)下载下来的是一个压缩包,图标为2)将IKEYforVista.rar解压缩。
3)进入IKEYforVista\IKEYDRVR-32bit-4.0.0.1017,看到如下文件夹:4)双击setup.exe安装,看到如下界面:5)点击“Next”,看到如下界面:6)点击“Next”,看到如下界面:7)点击“Yes”,看到如下界面:8)在上图界面中,如果弹出安全警告,请点击“允许”或“放过”,请耐心等待,等一下就会出现下列界面,如下图所示:9)用户将加密狗插入电脑的usb接口处,请不要点击“close”,等插入加密狗后,这个界面会自动关闭(在安装过程中如果杀毒软件弹出安全警告,请点击“允许”或“放过”),显示如下界面:10)点击“finish”,关闭该界面。
usb加密狗破解基本原理及方法介绍

数据值比较好理解,数据值是用户存储在可读写的单元中的数据,就和存储在硬盘里一样,用户可以使用Read函数读出存储单元里面的数据,也可以使用Write函数保存自己的信息到存储单元。
计数器是这样一种单元,软件开发商在其软件中使用Decrement函数可以把其值减一,当计数器和某种活动的(active)算法关联时,计数器为零则会封闭(deactive)这个算法。
对于Debug调试破解,由于软件的复杂度越来越高,编译器产生的代码也越来越多,通过反汇编等方法跟踪调式破解的复杂度已经变得越来越高,破解成本也越来越高,目前已经很少有人愿意花费大量精力进行如此复杂的破解,除非被破解的软件具有极高的价值。
目前加密锁(加密狗)的解密破解工作主要集中在应用程序与加密动态库之间的通讯拦截。这种方法成本较低,也易于实现,对待以单片机等芯片为核心的加密锁(加密狗)具有不错的解密效果。
这个新的DLL文件编写成功后,直接替换掉原来的DLL文件,这时候再运行应用软件,软件访问加密狗的操作就全部会被拦截,拦截程序永远会返回正确的数据给软件,从而实现了模拟加密狗的运行。
硬件克隆复制主要是针对国产芯片的加密狗,因为国产加密狗公司一般没有核心加密芯片的制造能力,因此有些使用了市场上通用的芯片,破解者分析出芯片电路 以及芯片里写的内容后,就可以立刻复制或克隆一个完全相同的加密狗。不过国外的加密狗就无法使用这种方法,国外加密狗硬件使用的是安全性很好的自己研制开 发的芯片,通常很难进行复制,而且现在国内加密狗也在使用进口的智能卡芯片,因此这种硬件克隆的解密方法用处越来越少。
由于加密锁(加密狗)的应用程序接口(API)基本上都是公开的,因此从网上可以很容易下载到加密狗的编程接口API、用户手册、和其它相关资料,还可以了解加密狗技术的最新进展。
戴尔微型USB加密狗用户手册说明书
Dongle Dell Micro-USB Para datos y cargaManual del usuarioNOTA: una NOTA indica información importante que le ayuda a hacerun mejor uso de su ordenador.PRECAUCIÓN: una PRECAUCIÓN indica un daño potencial al hardwareo pérdida de datos si no sigue las instrucciones.Copyright © 2014 Dell Inc. Todos los derechos reservados. Este producto está protegido por las leyes de propiedad intelectual y derechos de copia de los EE.UU. e internacionales. Dell™ y el logotipo Dell son marcas de Dell Inc. en los Estados Unidos y/u otras jurisdicciones. Todas las marcas y nombres mencionados aquí pueden ser marcas de sus respectivas compañías.2014 – 06 Rev. A00Introducción 3IntroducciónEl dongle Dell Micro-USB le permite conectar dispositivos USB comounidades USB, discos duros externos, teclados, ratones y otros a su tablet. También le permite cargar su tablet mientras los dispositivos USB están conectados.Puede conectar simultáneamente múltiples dispositivos a la tablet usando un hub USB, Dependiendo del tipo y número de dispositivos USB, puede que necesite un hub USB alimentado.NOTA: este dongle es compatible con USB 2.0.Conectar el dongleNOTA: el cable de alimentación y el adaptador no se incluyen con el dongle. Utilice el cable y adaptador de alimentación incluidos con su tablet.PRECAUCIÓN: utilice sólo el adaptador de corriente diseñado para su tablet. El uso de adaptadores de alimentación o cables no autorizados podrían dañar seriamente su tablet.1. Conecte el dongle al puerto micro-USB de su tablet.2. Conecte el adaptador de corriente al dongle.3.Conecte un dispositivo USB estándar o un hub USB al dongle.Dongle Micro-USBDispositivo USB o hub USB Cable de alimentación (Micro USB)Fuente de alimentaciónToma de corrienteSolución de problemasProblemas Posibles causas Posibles soluciones Los dispositivos USBdejan de funcionar temporalmenteal conectar o desconectar el adaptador de corriente en el dongle.Esto es algo normal y el dispositivo continuará funcionandoautomáticamente.El disco duro USB no es detectado.El adaptador decorriente no estáconectado al dongle.Conecte el adaptadorde corriente USB aldongle Dell Micro-USB.El cable USB usadopara conectar el discoduro es demasiadolargo o no es estándar.Utilice un cableUSB más corto paraconectar el disco duroal dongle o utilice uncable de más calidad.La unidad que intentautilizar requiere másenergía de la disponiblea través del dongle.Utilice un hubUSB alimentado.PRECAUCIÓN: para evitar pérdida de datos, retire con seguridad los dispositivos de almacenamiento USB antes de desconectarlosdel dongle.4 Introducción。
加密狗的重要性及使用方法
加密狗的重要性及使用方法加密狗的重要性及使用方法一、加密狗是什么?USB加密狗是目前流行的一种身份认证安全工具,大小类似U盘,可直接在电脑的USB接口插拔,我们的加密狗也是属于此类,每只狗有独立的产品识别码,独立最新加密算法,用户在登陆平台时,只有检测到特定的加密狗和准确的物理验证后,才允许正常登陆。
二、加密狗的作用以及针对性由于加密狗的特殊算法、唯一性,在用户登陆后台的同时,再次验证身份,给您的平台管理又加了一道防盗门,更好的看管您的平台。
1、加密狗互补了IP限制功能的不足。
部分点卡渠道客户没有固定IP,所以一般只能设置IP段限制,还有一部分客户在家和公司都需要管理后台,IP限制设置更没有办法锁定单独IP,针对这两部分客户的IP限制功能,加密狗具有很好的安全互补作用。
2、加密狗增强了内部管理手段。
加密狗可以随身携带,简单方便,即插即用,员工和财务只有在授权的情况下才可以登陆系统。
给您的财务管理和内部管理带来了可靠和方便。
3、加密狗防御外来侵犯如果您的机器或者局域网不小心中了木马,您的后台帐号就随时可能被嗅探或截取,但黑客因为没有硬件狗无法进行后台登陆。
所以即使您的帐号密码不慎被盗取,只要他没有加密狗,就很难实现异地登陆您的后台,也很难操纵您的机器进行后台登陆。
三、使用办法1、如果是前台加密狗,在收到我公司的加密狗后,前台用户要在前台“下载加密狗驱动程序”处下载加密狗驱动程序。
安装完毕,登陆进去后在“安全设置”里点击“绑定加密狗”,这样每次登陆时前台客户都必须要使用加密狗。
如果是后台加密狗,后台客户就要跟我公司客服人员联系,我们会把驱动程序发给您安装、在系统中设置绑定后您即可使用,同样每次登陆您都必须使用加密狗。
2、把加密狗插上电脑USB接口,然后登陆,当您登陆进入系统前台或后台后,就必须立刻把加密狗拔掉,加密狗的作业只在您登陆的时候起到验证作用,当您登陆完毕后,它就不在重复作业。
进入系统操作完毕以后,必须及时安全退出平台,下次重新正确登陆。
USB 加密锁使用问题解决
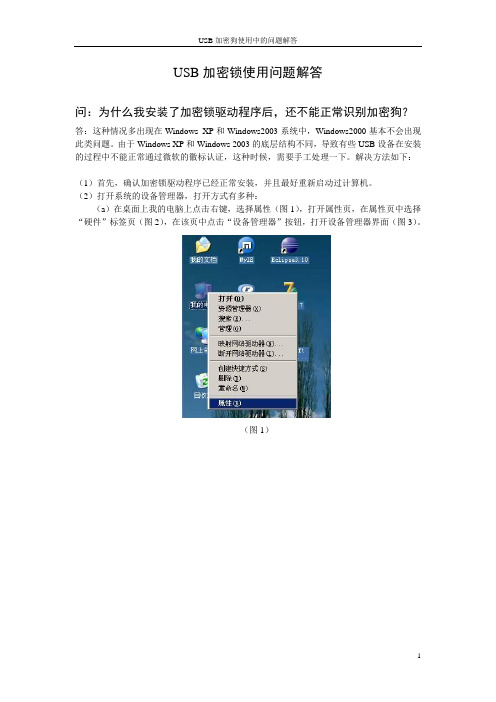
(2)打开系统的设备管理器,打开方式有多种:
(a)在桌面上我的电脑上点击右键,选择属性(图1),打开属性页,在属性页中选择“硬件”标签页(图2),在该页中点击“设备管理器”按钮,打开设备管理器界面(图3)。
(图1)
(图2)
(图3)
(图6)
(图7)
(图8)
(图9)(图10) Nhomakorabea(图11)
需要说明的,在Windows XP、Windows 2003上,USB加密锁更换了一个USB口后,就可能会出现本文所描述的问题,需要重新配置驱动,这个是系统和加密驱动底层的问题,厂商正在解决中。
(b)或者,选择“开始”菜单中的“设置”下的“控制面板”(图4),打开控制面板,打开“系统”(图5),出现“系统属性”界面,选择“硬件”标签页,点击“设备管理器”(图2),打开设备管理器界面(图3)。
(图4)
(图5)
(3)在图3的设备管理器界面中,有一个“USB Lock V1.71”的USB设备是打黄色的感叹号的,这个设备就是加密锁设备,由于安装的加密锁设备没有通过微软的徽标认证,所以设备并没有在系统中注册成功,此时需要手工加载一下驱动程序。方法如下:
(d)在图9提示未通过徽标测试界面中,点击“仍然继续”按钮,系统将继续安装并注册USB加密锁的驱动程序,安装完成将出现完成界面(图10)。
(e)完成后,在“设备管理器”界面中,“USB Lock v1.71”的黄色感叹号已经没有了,并且名称已经变成了“SenseLock SENSE3 v1.70”(图11)。表示驱动已经更新,可以正常使用了。
USB加密锁使用问题解答
问:为什么我安装了加密锁驱动程序后,还不能正常识别加密狗?
赛耐孚(SafeNet) 精灵狗UGA(GeniusDog)加密狗备份
精灵狗是使用在计算机并行口和USB口上的用于软件保护的硬件产品。
它主要是面向软件开发商、销售商和个人软件开发者开发生产的。
通过使用在计算机并行口和USB口上的用于软件保护的硬件产品和相应的软件,可以防止开发商的软件被非法发布、拷贝或使用。
精灵狗是一种经济、适用的软件加密保护方案,它成本低,性能稳定,简单易学,与操作平台及其它并口设备之间的兼容性极强,是大批量中、低价软件保护的理想选择。
加密性能好1. 内置单片机,确保硬件不可仿制。
我们知道,复制狗硬件是解密者最容易想到的一种破解方法。
在精灵狗硬件中,内置了一个单片机,单片机中的程序是用特殊方法一次性写入的,固化后的单片机程序即不可读出也不能改写。
这样就从根本上断绝了复制狗硬件的可能,从而确保了加密的安全性。
2. 数据交换随机噪声技术。
对于各种软件仿真程序,精灵狗采用了北京彩虹天地信息技术有限公司独创的数据交换随机噪声技术与之对抗。
它可以有效地抵御逻辑分析仪以及其它各种调试工具的攻击,完全禁止软件仿真程序模拟并口数据。
3.由狗完成解密算法。
彻底保证狗与软件密不可分。
4.迷宫技术。
在精灵狗函数入口和出口之间,包含了大量复杂的判断跳转代码,这此代码可以动态地改变程序语句执行次序,因而大大提升了精灵狗抵抗跟踪的能力。
UGA为该狗的USB接口产品。
精灵狗支持目前最流行的几种操作系统,包括Windows 9X/ME/NT/2000/XP和Linux(RedHat7.1 RedHat7.2 RedHat7.3)。
精灵狗开发套件2.0版相对1.0版的新增功能在精灵狗开发套件V2.0中,新增了与原并口硬件完全兼容的UGA型USB精灵狗。
新的检测工具(Checkga.EXE)或接口函数既可以对老的并口硬件,也可以对新的USB硬件进行操作。
已安装了精灵狗开发套件V1.0的开发商,如果要使用新的UGA型USB精灵狗,必须重新安装精灵狗开发套件V2.0,以得到更新的驱动程序和OBJ文件。
加密狗方式大全
加密狗方式大全一、各种加密狗的区别:强调一下软件狗的编号,该编号是金算盘的自编号。
软件狗发出时,生产部门会加密狗上贴上不干胶,不干胶上有软件狗的编号,所对应的软件版本号,有哪些模板等内容。
软件狗号如:3B/1125。
有一回我让一个同事给我报加密狗号,结果给我说了一长串,那是软件狗生产厂商在软件狗上喷的生产序列号。
二、金算盘软件能够正常识别为正式版的几个要素:1.软件狗正确的安装了相应的驱动程序。
2.软件狗正确的连接到了服务器上。
要做到这一点,软件狗是好的,打印口也是好的,软件狗插紧了。
打印口是否损坏可以找一台打印机来测试。
3.如果是网络版,还要要求网络正常连接,指定了IP,在注册表中的相应键值设置正确,相应的软件狗服务程序是否正确启动。
三、网络版注册表键值单机版由于软件狗只能插在本地,所以不用在注册表中指定软件狗所在的位置。
现在要说的是网版本。
使用网络版,现在有两种加密方式“网络锁”和“加密狗服务”。
有一个前提,使用网络版,网络中的机器必须全部指定IP。
这个问题有一个案例,某客户添加了WEB查询模块,装上IIS之后,加密狗找不到了,卸载IIS之后,又能找到加密狗了,后来一查,才知道是使用的自动获取IP。
如果要将网络版当作单机版使用,而计算机又没有联网,最好是安装一个微软的虚拟网卡。
如果软件安装之后,没有相应的键值,请手工添加。
(一)“网络锁”方式:HKEY_CURRENT_USER\Software\gasoft\NetKey=1NetKeyIp=192.168.0.1499.21以后的版本将这两个键值改在了:HKEY_LOCAL_MACHINE\SOFTWARE\gasoftNetKey如果为1则表示软件会去搜索网络锁,为0则不搜索。
如果没有加密锁的话,最好将NetKey的值改为0,否则软件搜索网络锁,启动会很慢。
NetKeyIp这个键值只是在跨网段的时候才起作用。
(二)“加密狗服务”方式:HKEY_LOCAL_MACHINE\SOFTWARE\gasoftDogServer=192.168.0.149采用“加密狗服务”方式的安装过程:首先是在服务器端选择安装“服务器安装”后,在工作站上登录服务器,找到已经安装好的金算盘文件目录,然后进入该目录下的Setup文件夹,再运行其中的Netsetup.exe 进行工作站的安装,按照安装向导完成最终的安装过程。
- 1、下载文档前请自行甄别文档内容的完整性,平台不提供额外的编辑、内容补充、找答案等附加服务。
- 2、"仅部分预览"的文档,不可在线预览部分如存在完整性等问题,可反馈申请退款(可完整预览的文档不适用该条件!)。
- 3、如文档侵犯您的权益,请联系客服反馈,我们会尽快为您处理(人工客服工作时间:9:00-18:30)。
AnywhereUSB®REMOTE I/OCONCENTRATORInstallationGuideTable of Contents Introduction (2)Cabling AnywhereUSB (2)Installing the Drivers (2)Configuring AnywhereUSB (3)Configuring the PC to Connect to an AnywhereUSB (6)Discovering AnywhereUSBs on Other Networks (7)Configuring for Firewall Support (8)Uninstalling the Drivers (8)Interpreting the Status Lights (9)Using the Configuration Utility Program (10)AnywhereUSB Permitted Device List (16)Understanding Hubs (19)Regulatory and Other Information (20)IntroductionThe AnywhereUSB® Remote I/O Concentrator is the first remote networking solution to utilize USB Over IP® technology, breaking the traditional five meter distance limitation between USB device and host. Now USB devices may be located anywhere on a wired or wireless LAN – without a locally attached host PC. Since the host PC or server may be located remotely, AnywhereUSB enables devices to be deployed in harsh or non-secure environments, making it ideal for point-of-sale, kiosks, surveillance, industrial automation, or any mission-critical enterprise application. This Ethernet-attached solution provides five USB ports to connect peripheral devices such as bar-code scanners and receipt printers, as well as Digi’s Watchport® USB Cameras and Sensors.Cabling AnywhereUSBTo connect your AnywhereUSB to a network:1. Connect a standard Ethernet network cable to your AnywhereUSB. Then connect the otherend of the Ethernet cable to a 10/100/1000 BaseT switch or hub.2. Connect one end of the power supply* into the back of your AnywhereUSB and the otherend into an AC outlet.*Power to this product may be supplied by a UL Listed Direct Plug-In Power Unit marked “Class 2” or a UL listed power supply rated with a minimum rating of 5 V dc 2.5 A if used in the U.S. and Canada or a power supply with similar rating and approved by your local safety code if it is used elsewhere. For polarity, see the following:Installing the DriversFor Windows XP, 2000 and NT4.0 UsersYou must install the drivers using an account that has administrative privileges.1. Insert the ―AWUSB v2.00‖ CD into your CD drive. If the CD does not automatically start,then open the CD folder and double click on AwSplash.exe.A welcome screen allows you to view and print this guide, install the drivers, print theReadMe file, browse the CD, and check our web site for the latest information.2. Click the Install Drivers button to start the install process. Follow the on-screeninstructions to complete the installation of your AnywhereUSB.After installing the drivers, the AnywhereUSB Configuration Utility automatically starts so that you may configure your AnywhereUSB, as described in the next section.Configuring AnywhereUSBFor initial configuration, AnywhereUSB must be connected to the same local area network as the PC that will be used to configure it. In order to configure your AnywhereUSB:1. From the Start menu launch the AnywhereUSB Configuration Utility. The utility displaysa list of discovered AnywhereUSBs on your local subnet. The new AnywhereUSB will havea default IP address of 0.0.0.0. You must configure the AnywhereUSB before it can beused by the host PC. You can identify each AnywhereUSB by its IP Address. If theAnywhereUSB is unconfigured, then the serial number can be used for identification.Unconfigured AnywhereUSBs are listed separately. For example, the AnywhereUSB withserial number SV441F086A below has not yet been configured.2. Double click on the Unconfigured AnywhereUSB entry, or select it and press the Configurebutton.3. Enter a Device Name that easily identifies the AnywhereUSB.DHCP Enabled Configuration Static IP Address Configuration 4. DHCP can be configured by selecting the Enable button. When DHCP is enabled the IPAddress, Subnet Mask, and Default Gateway fields are grayed out. Note that if you enable DHCP, you MUST have a DHCP server on you network. When enabled, the AnywhereUSB will wait for up to four DHCP requests. If a DHCP response is not received, theAnywhereUSB will default to its initial unconfigured state. Also, AnywhereUSB will look for option 26 in order to determine the MTU size (with 1500 being the default).If you do not have a DHCP server or choose not to use it, select the Disable button. Enter the IP address and Subnet Mask. You may need to contact your Network Administrator for IP address assignment. Enter the Gateway for your network. (In a network using subnets, the Gateway is the router that forwards traffic to a destination outside the subnet of the AnywhereUSB.) The MTU size is configurable between 576 and 1500 bytes, with 1500 being the default. For the changes to take effect you must click the Update button, which resets the AnywhereUSB.5. Enabling a Configuration PasswordThe AnywhereUSB can be configured to have a Configuration Password. When aConfiguration Password is configured, subsequent configuration attempts via theAnywhereUSB Concentrator Configuration Utility will require a password to be entered prior to allowing the user to configure the unit.To enable the password for a given AnywhereUSB unit, click the Set Password button and enter the desired password into the following dialog box:Once the configuration password has been set and the AnywhereUSB unit has rebooted, the Configuration Utility will display the ―Unlock‖ button for the given unit as displayed below:To configure the AnywhereUSB with a Configuration Password enabled, click the Unlock button and enter the appropriate password.Configuring the PC to Connect to an AnywhereUSB1.From the Start menu launch the AnywhereUSB Configuration Utility. The utility displaysa list of all AnywhereUSBs on your local subnet and on any subnet configured in theDiscovery List.2. Select an AnywhereUSB and press the Connect button to add the AnywhereUSB’s IPaddress to the Connection List. The host computer then attempts to connect to theAnywhereUSB. For a list of the AnywhereUSBs to which you are currently configured toconnect, from the Edit menu select Connection List.3. The Found New Hardware Wizard prompts you to search for the drivers: one time for theRemote Hub and two times for the USB Host Controllers and the USB Root Hubs. Selectthe Install software automatically (Recommended) option and click the Next button. Ifyou get the warning message indicating that the drivers have not yet passed WindowsLogo Testing, click the Continue Anyway button. Follow the on-screen instructions tocomplete the installation of the drivers.Discovering AnywhereUSBs on Other Networks To discover AnywhereUSBs on other networks, you must add their network address to the Discovery list in the Discovery List Manager dialog box.1. From the Edit menu select Discovery List.2. Add the Subnet addresses or the IP address of the individual device to the Discovery ListManager. For example, to add the Class C network 192.168.2.x, you must enter192.168.2.255. Note that your routers must be configured to pass subnet broadcasts.3. When you have completed adding the subnet address to the Discovery List, click on theClose button to save the list. The screen will refresh within a few seconds.Configuring for Firewall SupportTo access an AnywhereUSB that is behind a firewall:Your firewall must have a well known static IP address (for example 10.52.48.37).The AnywhereUSB must have an IP address on the private subnet (for example192.168.1.10).Your firewall must be configured to allow TCP/IP and UDP/IP packets to pass through port3422.The firewall must be configured to send these TCP/IP and UDP/IP packets directed to theIP Address of the AnywhereUSB (in this example: 192.168.1.10).You must manually add the address of the firewall to the Connection List.Note that you can access only one AnywhereUSB through each firewall. For more information on how to configure your firewall, refer to your firewall manual.At this point the PC will attempt to connect to the AnywhereUSB.If you would like AnywhereUSB Information to be displayed in the discovery window of the configuration utility, you may add the address of the firewall into the Discovery List. Note that AnywhereUSBs behind firewalls, as displayed in the discovery window, show the IP address of their private network.Uninstalling the DriversTo uninstall the AnywhereUSB drivers:1. From the Start menu launch the AnywhereUSB Configuration Utility.2. From the File menu select Preferences and then click on the Uninstall button. You mustreboot your PC to complete the driver removal.Interpreting the Status LightsThe AnywhereUSB has six LEDs on the front panel, the System Status LED and five hub LEDs. Each LED is capable of displaying three colors: red, green, or orange.System Status LightsOn initial power up the system status LED is orange for two seconds while the system initializes and then blinks green. If DHCP is enabled and it is first coming up, the system status light will be orange while the AnywhereUSB searches for a DHCP server. If it cannot find a DHCP server, it will return to the default configuration to allow the Configuration Utility to assign a static IP address.Hub LightsGreen hunting pattern across all LEDs Not connected to a host.Orange alternating on ports 1-3-5 and 2-4 Updating image in Flash. Do not remove powerfrom AnywhereUSB while flash is being updated.Doing so will damage your AnywhereUSB.Solid Green Hub port is powered.Green over Red hunting pattern Please call customer service.Using the Configuration Utility ProgramThe AnywhereUSB Configuration Utility displays AnywhereUSBs grouped by their subnet. The Utility automatically discovers AnywhereUSBs on your local subnet. To discover AnywhereUSBs on other networks, you must add their network address to the Discovery list.Icon Color Legend:(Green) Available for Connection(Gray, Bold Text) Connected to this computer(Gray) In use by other Host PC(Red) Firmware is being updated.AnywhereUSB IP Address has not yet been configured.Note: After the AnywhereUSB Configuration Utility has been launched it will reside in your system tray. To open the utility, double click the AnywhereUSB icon (leftmost icon in the picture below) inthe system tray. If you try to start this utility from the Start menu and it does not launch, check the system tray.Menu OptionsFile Menu: PreferencesAllows you to configure how frequently the utility queries for AnywhereUSBs on the network. You can also enable the logging of driver events to the system event log and uninstall the drivers.Edit Menu: Connection ListDisplays the IP addresses of the AnywhereUSB to which the PC will try to connect. When an IP address is added to this list, the Host PC immediately tries to connect to the AnywhereUSB. If an IP address in this list is deleted, all USB devices attached to this AnywhereUSB will be removed from this Host PC.Edit Menu: Discovery ListThis command displays a list of subnet addresses of remote networks or IP addresses of individual units where the configuration utility will search for AnywhereUSB.This command allows configuration of the TCP/IP parameters in the AnywhereUSB. In a static IP address configuration the MTU size is configurable between 576 and 1500 bytes, with 1500 being the default. Note that when DHCP is enabled the AnywhereUSB looks for DHCP option 26 in order to determine the MTU size (with 1500 being the default). You can add this IP address to the Connection List by checking the Add to Connection List check box. The Set Password and Clear Password buttons are for enabling and disabling the AnywhereUSB’s Configuration Password. The optional debug log address is for technical support use only.Command Menu: ConnectThis command allows you to add the IP address of the AnywhereUSB to the Connection List.This command retrieves event information from AnywhereUSB. Use this to gather information for Technical Support. This dialog also allows you to save and clear the event log.Command Menu: RebootThis command causes the AnywhereUSB to reboot.Command Menu: Lock / UnlockWhen an AnywhereUSB’s is password protected, the Unlock menu is required in order to open the unit’s configuration dialog. Once the correct password is entered, the AnywhereUSB transitions to an unlocked state. In order to enable the unit’s c onfiguration password again, the Lock option must be selected for the given unit(s).View Menu: Driver InformationThis command displays the version numbers of the AnywhereUSB drivers and firmware and allows you to uninstall the drivers.View Menu: Refresh (F5)This command updates the discovered AnywhereUSB list.AnywhereUSB Permitted Device ListAn option has been added to the AnywhereUSB product that will limit access to a set of select devices. This option allows an administrator to build a list of supported devices by adding specific VendorID/Product ID or Class values into the registry.The AnywhereUSB will compare the IDs of each USB device (when the USB device is connected), with the value(s) in the registry and if there is a match, the device will enumerate otherwise an ―unknown device‖ message will appear in the Notification Area.The key is located in the following location in the registry:HKEY_LOCAL_MACHINE\SYSTEM\CurrentControlSet\Services\ionhubThe new key value is ―PermittedDevices.‖ This Multi String value contains a list of devices that the AnywhereUSB will enumerate all other devices will show as ―unknown device.‖The following are some examples of values in the permitted device listFor a hub use the value ―GENERICHUB‖ (Class_09 is not supported)For a composite device use the value ―COMPOSITE‖For specific device use Vid_xxxx&Pid_yyyy where xxxx and yyyy are the vendor id and product idof the deviceFor a device class such as mass storage use Class_xx where xx is the class of deviceCOMMUNICATIONS 02HUMAN INTERFACE 03PRINTER 07STORAGE 08VENDOR SPECIFIC FFExamples:To allow a specific USB device with an embedded hub (like an Edgeport/8):PermittedDevices REG_MULTI_SZ Vid_1608&Pid_0215 GENERICHUBTo allow all Human interface devices such as mouse or keyboard:PermittedDevices REG_MULTI_SZ Class_03To allow all mice and all printersPermittedDevices REG_MULTI_SZ Class_03 Class_07The USB Device’s Vid/Pid values can be found using the provided AnywhereUSB View utility. The fields are called idVendor and idProduct. In the following example, the highlighted USB Flash Drive has the following properties:idVendor: 0x13FEidProduct: 0x1D00The following is a view of the registry with the new Key of ―PermittedDevices‖:Double clicking on the key will bring up the Edit Multi-String dialog.Understanding HubsHubs, critical components in the plug-and-play architecture, are wiring concentrators that enable the attachment of multiple devices, thus converting a single attachment point into multiple attachment points. USB architecture allows a cascaded multiple hub configuration with certain power limitations (explained later in this section). See figure 1.Each hub has an upstream port, connecting to the host, and multiple downstream ports, connecting to downstream devices, including other hubs. A hub can detect attachment and detachment of downstream devices and enable and monitor the distribution of the power to downstream devices via their integral hardware and the operating system.Each USB device reports its power requirements to the operating system, which then enables and disables the device as a function of its power requirements and the amount of available power. High-speed devices typically need to be connected to a self-powered hub, which obtains power from its external power supply and provides up to 500 mA for each downstream port. Only simple devices, such as a mouse, can be connected to a bus-powered hub, which obtains power from its upstream host and provides up to 100 mA for each downstream port.Due to the limited available power for bus-powered hubs, cascading two bus-powered hubs is an illegal topology, and devices connected to the second hub will not function. (USB specifications limit the connection of a bus-powered hub to a self-powered hub or host only.)According to the USB Specification, the maximum limit of hubs cascaded in series cannot exceed five. In other words, you may have a maximum of five hubs between any device and the host. This does NOT mean that the maximum number of hubs in a system is five. Indeed, up to seven hubs can be connected parallel at any given level. You must tally both external and embedded hubs when counting downstream hubs.Regulatory and Other Information© 2007 Digi, Digi International, the Digi logo, USB Over IP, AnywhereUSB, Watchport, Edgeport, and Hubport are either trademarks or registered trademarks of Digi International, Inc. in the United States and/or other countries. All other trademarks are the property of their respective holders. Information in this documentation is subject to change without notice and does not represent a commitment on the part of Digi International.Digi International provides this document ―as is,‖ without warranty of any kind, either expressed or implied, including, but not limited to, the particular purpose. Digi International may make improvements and/or changes to this documentation or to the product(s) and/or program(s) described in this documentation at any time.Digi International assumes no responsibility of any errors, technical inaccuracies, or typographical errors that may appear in this documentation, nor liability for any damages arising out of its use. Changes are made periodically to the information herein; these changes may be incorporated in new editions of the publication.For U.S. Government use:Any provision of this document and associated computer programs to the U.S. Government is with ―Restricted Rights.‖ Use, duplication, or disclosure by the government is subject to the restrictions set forth in, subparagraph (c) (1) (ii) of the Rights in Technical Data and Computer Software clause of DFARS 52.277-7013.For non-U.S. Government use: These programs are supplied under a license. They may be used, disclosed, and/or copied only as supplied under such license agreement. Any copy must contain the above copyright notice and restricted rights notice. Use, copying, and/or disclosure of the programs is strictly prohibited unless otherwise provided for in the license agreement.Federal Communications Commission (FCC) Regulatory Information (USA only) This equipment has been tested and found to comply with the limits for a Class B digital device, pursuant to Part 15 of the FCC Rules. These limits are designed to provide reasonable protection against harmful interference in a residential installation. This equipment generates, uses, and can radiate radio frequency energy and, if not installed and used in accordance with the instructions, may cause harmful interference to radio communications. However, there is no guarantee that interference will not occur in a particular installation. If this equipment does cause harmful interference to radio or television reception, which can be determined by turning the equipment off and on, the user is encouraged to correct the interference by one or more of the following measures:•Reorient or relocate the receivingantenna.•Increase the separation between theequipment and the receiver.•Connect the equipment into an outletthat is on a circuit different from thereceiver.•Consult the dealer or an experiencedradio/TV technician for help.Warning: The connection of a non-shielded interface cable to this equipment will invalidate the FCC Certification for this device.FCC Regulation - Part 15Declaration of Conformity (DoC)This device complies with the requirements of the Code of Federal Regulations listed below:FCC Title 47 CFR, Part 15 Class B for a digital device.Operation is subject to the following two conditions:This device may not cause harmful interference, andThis device must accept any interference received, including interference that may cause undesired operation.Department of Communication (DOC)Notice (Canada only)This Class B digital apparatus meets the requirements of the Canadian Interference-Causing Equipment Regulations.Cet appareil numérique de la Classe B respecte toutes les exigences du Règlement sur le matériel brouiller du Canada.European Community - CE MarkDeclaration of Conformity (DOC) According to ISO/IEC Guide 22 and EN 45014Manufacturer’s Name:Digi InternationalManufacturer’s Address:11001 Bren Road EastMinnetonka, MN 55343declares that the productProduct Name:AnywhereUSBModel Number(s):301-1130-01Product Options:Allconforms to the relevant EU Directives listed here:EMC Directive 89/336/EEC |Low Voltage Directive 73/23/EECAmending Directive 93/68 EECusing the relevant section of the following EU standards and other normative documents:Safety:IEC 950:1991 +A1, A2, A3, A4EN 60950:1992 + A1, A2, A3, A4EMCThe following summarizes the specifications and requirements for EN55024, EN55022 Class B & CISPR 22 Class B emission and immunity tests. If the actual test levels are higher or different than required, these levels are listed in the appropriate tables.EN 55022 Class BEuropean ContactDigi InternationalJoseph-von-Fraunhofer Str. 2344227 Dortmund, GERMANY49-231-9747-0UL/CSA Safety InformationThis device complies with the requirements of following safety standards below:UL 1950, 3rd editionCSA No. 950Quality ManagerAustin, TexasMarch 2007Digi International 11001 Bren Road EastMinnetonka, MN 55343@CorporateHeadquarters:952-912-3444877-912-3444Fax: 952-912-4952Digi Europe: +49-231-9747-0Digi Hong Kong: +852-2833-1008Digi North America: 877-912-3444。