无线鼠标说明书
戴尔WM527无线鼠标用户指南说明书
You can add Dell Universal compatible wireless devices to the receiver using Dell Universal Receiver Control Panel.
6. Turn on your mouse. NOTE: Make sure the distance between your computer and mouse is within 10 meters.
Setting up your wireless mouse │ 9
1
2
3
Device 1
Features │ 5
Bottom View
2
1
1 power button
2 laser sensor
6 │ Features
Setting up your wireless mouse
1. Remove the mouse cover. 2. Open the battery clamp.
Dell WM527 Wireless Mouse
User’s Guide
Notes, Cautions, and Warnings
NOTE: A NOTE indicates important information that helps you make better use of your Dell Wireless mouse. CAUTION: A CAUTION indicates potential damage to hardware or loss of data if instructions are not followed. WARNING: A WARNING indicates a potential for property damage, personal injury, or death.
Genius NX-7000SE 无线鼠标使用说明书

Manuals+— User Manuals Simplified.Genius NX-7000SE Wireless Mouse User GuideHome » GENIUS » Genius NX-7000SE Wireless Mouse User GuideWireless MouseMulti-language quick guideCopyright© KYE SYSTEMS CORP.Contents1 Federal Communication Commission(FCC) interferencestatement:2 Overview3 Factory Settings4 Documents / Resources4.1 ReferencesFederal Communication Commission(FCC) interference statement:This equipment has been tested and found to comply with the limits of a Class B digital device, pursuant to Part 15 of the FCC Rules.These limits are designed to provide reasonable protection against harmful interference in a residential installation. This equipment generates uses, and can radiate radio frequency energy and, if not installed and used in accordance with the instructions, may cause harmful interference to radio communications.However, there is no guarantee that interference will not occur in particular installations. If this equipment does cause harmful interference to radio or television reception, which can be determined by turning the equipment offand on, the user is encouraged to try to correct the interference by one or more of the following measures: Reorient / Relocate the receiving antenna.Increase the separation between the equipment and receiver.Connect the equipment into an outlet on a circuit different from that to which the receiver is connected.Declaration of ConformityThe following designated product:Wireless900S, ECO-8XXX Series, Micro Traveler 9000R, Ergo 8XXXX Series M/N:GM-150036/R is herewith confirmed toKYE SYSTEMS CORP.Symbol for Separate Collection in European CountriesThis symbol indicates that this product is to be collected separately.The following apply only to users in European countries:This product is designated for separate collection at an appropriate collection point.Do not dispose of as household waste.Open Battery Cover Receiver Storage Power SwitchReceiver Storage Receiver Storage* Battery life may vary based on user and computing conditionsFactory Settings1. Left Button: Provides traditional mouse functions like click, double click and drag.2. Magic-Roller: Press the “Magic-Roller” to surf the Internet and Windows documents.3. Right Button: Provides traditional mouse click functions.Remark: Product images shown on the manual are for reference ONLY.Factory Settings1. Left Button: Provides traditional mouse functions like click, double click and drag.2. Magic-Roller: Press the “Magic-Roller” to surf the Internet and Windows documents.3. Right Button: Provides traditional mouse click functions.NX-7XXX Series NX-8XXX Series MicroTraveler 900S M/N:GM-150036/RFCC ID: FSUGMZLMPATING 5V 100mA(max) KYE Systems Corp. MADE IN CHINANX-7XXXX Series NX-7XXXXX Series M/N: GK-210013/R FCC ID: FSUGMZM4 M/N: GM-230004 FCC ID: FSUGMZMH PATING 5V 50mA(max) KYE Systems Corp. MADE IN CHINA#492, Sec. 5, Chongxin Rd., Sanchong Dist., New Taipei City 241017, TaiwanTel: +886-2-2995-6645Fax: +886-2-2995-6649Email: ********************* (Tech. Support)* For actual items, refer to the physical goods contained herein.* Product storage conditions: Temperature: -20ºC~50ºCHumidity : 5%~85%.12030113400-CDocuments / ResourcesGenius NX-7000SE Wireless Mouse [pdf] User GuideNX-7000SE Wireless Mouse, NX-7000SE, Wireless MouseReferencesGenius US Website – Genius designs personal peripheral devices with a target to provide a better experience in everyone's lives. Visit Genius to find your devices with high quality, easy usage and effective cost.Каталог декларацій відповідності MTIManuals+,。
无线鼠标使用说明书

Attach the battery cover.Wireless MouseManualENGLISHRemove the battery cover.The power indicator light will become illuminated in red for a fixed period of time.* Flashes red when the battery level gets low.1Inserting the battery2Turning the power onSlide the power switch to the ON position.Click on the “Start”button on the lower left of the screen, and click on the “Settings”icon.Click on “Devices”.Insert the battery as instructed on the battery removal sheet.Power-saving modeWhen the mouse is left untouched for a fixed period of time while the power is ON, Ensure that the battery is inserted with its positive and negative ends oriented correctly.12345678910111213Change to PC1Change to PC2When only either “PC1” or “PC2” is paired, and if you turn the device selection switch to the device that is not paired, the current connection is disconnected. In this case, reconnect by turning the device selection switch back to the device that was connected.The “Windows Settings” window will appear.The “Devices” page will appear.Model: M-XGL10BB/M-XGM10BB/M-XGx10BBName and function of each partDownload "ELECOM Mouse Assistant" from the ELECOM website to use its button assignment and high-speed scrolling functions./web/mouse-assistant/4"Back" button3WheelYou can perform the "Back" operation in a web browser.5"Forward" buttonYou can perform the "Forward" operation in a web browser.6Pairing light/Power indicator light1Left button 2Right button The light underneath the wheel flashes in red when the mouse is in a pairing standby state.When the power is turned ON, the light underneath the wheel becomes illuminated in red for a fixed period of time. If flashes red when the battery level gets low.7Device selection switch8Optical sensor 9Pairing button 10Power switch 11Battery cover12Battery storage compartment 13Battery removal sheetThis product can be used with two Bluetooth devices by switching between them.Slide the device selection switch for changing device from “PC1” to “PC2”.When the device is connected, the pairing lamp is lit for about three seconds.M-XGS10BB/BBS SeriesM-XGM10BB/BBS Series M-XGL10BB/BBS Series。
罗技M590无线鼠标使用手册说明书
ContentsIntroduction (2)Safety and General Information (2)Product Inspection (3)Getting Started (4)Battery Information (5)Assembly and Disassembly (6)Attaching the Battery (6)Removing the Battery (6)Attaching and Removing the Belt Clip (7)General Radio Operations (7)Programmable Auxiliary Functions (8)Optional Accessory (8)IntroductionThank you for your purchase of the HYT TC-610 radio - the choice for professionals. TC-610 is a professional radio that with exquisite and ergonomic design, which bring user a fine operation feel. The TC-610 is customized for noisy environments such as construction sites because all TC-610 radios are approved to dust & water protection Class IP66 and endowed with large speaker.This easy-to-use radio will deliver you secure, instant and reliable communications at peak efficiency. Please read this manual carefully before use. The information presented herein will help you to derive maximum performance from your radio.MODELS COVERED IN THIS MANUALTC-610 VHF Two-way RadioTC-610 UHF Two-way RadioSafety and General InformationThe following general safety precautions as would normally apply, which should be observed during all phases of operation, service and repair of this equipment.Turn off your radio prior to entering any area with a potentially explosive atmosphere.Do not charge your battery in a potentially explosive atmosphere.Do not use any portable radio that has a damaged antenna. If a damaged antenna comes into contact with your skin, a minor burn can result.This equipment should be serviced by qualified technicians only.T o avoid possible interference with blasting operations, turn off your radio when you are near electrical blasting caps. In a blasting area or in areas such as hospital siteposted “Turn off two-way radio”; when taking an airplane, please obey the “turn off two-way radio” instruction of aircrew staff as well.For vehicles with an air bag, do not place a radio in the area over an air bag or in the air bag deployment area. Air bags inflate with great force. If a radio is placed in the airbag deployment area and the air bag inflates, the radio may be propelled with greatforce and cause serious injury to occupants of the vehicle.Do not expose the radio to direct sunlight over a long time, nor place it close to heating source.When using your radio, hold the radio in a vertical position with the microphone 3 to 4 centimeters away from your lips.If you wear a radio on your body when transmitting, ensure the radio and its antenna are at least 2.5cm away from your body.Product InspectionBefore unpacking the TC-610 portable radio, please inspect the packaging for signs of damage and report any damage to your dealer.Upon unpacking of the TC-610 portable radio, please ensure that all items shipped were received, report any missing or damaged items to your dealer.Getting Started* PTT (Push-to-Talk) KeyPress and hold down the PTT key to transmit, release it to receive.*SK1 (Side Key 1)Side Key 1 is the programmable key that can be assigned with long press function and short press function by your dealer.*SK2 (Side Key 2)Side Key 2 is the programmable key that can be assigned with long press function and short press function by your dealer.Battery InformationInitial UseNew batteries are shipped uncharged from the factory. Charge a new battery for 5 hours before initial use, and this is true to Ni-Cd, Ni-MH and Li-Ion batteries charged with slow or rapid rate charger.Applicable Battery PacksT o reduce the risk of injury, charge only the battery specified by the manufacturer. Other batteries may burst, causing bodily injury and damage.Caution:1.T o avoid risk of personal injury, do not dispose of batteries in a fire!2.Dispose of batteries according to local regulations. Do not dispose as household waste.3.Never attempt to disassemble the battery.Battery Tips1.When charging your battery, keep it at a temperature among 5 ~ 40 to ensure a fullcharge. Temperature out of the limit will significantly reduce battery life.2.When charging a battery attached to a radio, turn the radio off to ensure a full charge.3.Do not cut off the power supply or remove the battery when charging a battery.4.Never charge a battery that is wet. Please dry it with soft cloth prior to charge.5.The battery will eventually wear out. When the operating time (talk-time and standby time)is noticeably shorter than normal, it is time to buy a new battery.To Prolong Battery Life1.Battery performance will be greatly decreased at a temperature below -20 . A sparebattery is necessary in cold weather. The cold battery unable to work in this situation may work under room temperature, so keep it for later use.2.The dust on the battery contact may cause the battery cannot work or charge. Please useclean dry cloth to wipe it before attaching the battery to the radio.Battery Storage1.Fully charge a battery before you store it for a long time, to avoid battery damage due toover-discharge.2.Recharge a battery after 3 months’ storage, to avoid reducing battery capacity due to over-discharge.3.When storing your battery, keep it in a cool, dry place under room temperature. Charging the BatteryWhen the battery level is very low, please recharge the battery.Use only the charger specified by the manufacturer. The charger’s LED indicates the charging progress.Assembly and DisassemblyAttaching the BatteryHold the battery and make it close to the top of aluminum chassis, and then lightly press the bottom of the battery until a click is heard. See figure 1 and figure 2.Figure 1Figure 2Removing the BatteryPlease turn off the radio first. Then hold the top of radio unit and press belt clip to make its tilted. Lift the battery latch in the direction of the arrow. See figure 3.Figure 3Attaching and Removing the Belt ClipLoose the screw of belt clip from the main unit, fasten the belt clip to the main unit, clockwise screw down the belt clip (See figure 4 below). Loosen the screw to remove the belt clip (See figure 5 below).Figure 4 Figure 5General Radio Operations1.Turn the Radio on-off / Volume Control knob clockwise/counter-clockwise to turn on/off theradio, then radio sounds an alert tone.2.Turn the Volume Control Knob clockwise/counter-clockwise to increase/decrease thevolume.3.Turn the Channel Selector Knob to select a channel.4.Press and hold down PTT to transmit.5.Release the PTT key to receiveProgrammable Auxiliary FunctionsYour dealer may program the TK, SK1, SK2 (long or short press) keys with one of the following auxiliary functions respectively.NonePower AdjustBattery Power IndicatorSquelch OffSquelch Off MomentaryMonitorMonitor MomentaryScanVOXOptional AccessoryMulti-unit Rapid-rate Chargerdifferent countries and areas) Receive-only Earpiece (forTube EAM12EHM15D-earset with Boom MicrophoneECM12Heavy Duty, Behind-the-Head,Noise-Canceling & VOX Headset(with screw) ECM14Programming Cable (USB port)。
联想无线鼠标N3903用户手册说明书

User Manual for Lenovo wireless mouse N3903Product name產品名稱: Lenovo N3903 wireless mouseModel產品型號: N3903Package:使用方法Operating system可相容系統Windows10、Windows 8.1、Windows8、Windows 7、Windows XP、VISTASpecification規格Working Voltage工作電壓: 1.5VWorking current工作電流: ≤40mAConsumption功率P≤60mWFrequency rage頻率範圍2403~2479MHzMax output power最大功率輸出0dBmOperational specification:操作環境要求Temperature溫度:0 ~40℃humidity濕度: 40%~90% at 25℃Storage:儲存環境要求Temperature溫度:-40 ~55℃Humidity濕度:< 93% at 40℃FCC compliance statementThis equipment has been tested and found to comply with the limits for a Class B digital device, pursuant to Part 15 of the FCC Rules. These limits are designed to provide reasonable protection against harmful interference in a residential installation.This equipment generates, uses and can radiate radio frequency energy and, if not installed and used in accordance with the instructions, may cause harmful interference to radiocommunications.However, there is no guarantee that interference will not occur in a particular installation.If this equipment does not cause harmful interference to radio or television reception, which can be determined by turning the equipment off and on, the user is encouraged to try to correctthe interference by one or more of the following measures:• Reorient or relo cate the receiving antenna.• Increase the separ ation between the equipment and receiver.• Connect the equipment into an outlet on a circuit differentfrom that to which the receiver is connected.• Consult the dealer or an experienced radio/TV technician for help.This device complies with part 15 of the FCC Rules. Operation is subject to the following conditions:(1) This device may not cause harmful interference and(2) This device must accept any interference received, includinginterference that may cause undesired operation.CAUTION! Any changes or modifications not expressly approvedby the grantee of this device could void the user's authority tooperate.CAN ICES-3(B)/NMB-3(B)This device complies with Industry Canada licence-exempt RSS standard(s).Operation is subject to the following two conditions: (1) this device may not cause interference, and (2) this device must accept any interference, including interference that may cause undesired operation of the device.Le présent appareil es t conforme aux CNR d'Industrie Canada applicables aux appareils radio exempts de licence. L'exploitation est autorisée aux deux conditions suivantes : (1) l'appareil ne doit pas produire de brouillage, et (2) l'utilisateur de l'appareil doit accepter tout brouillage radioélectrique subi, même si le brouillage est susceptible d'en compromettre le fonctionnement.This equipment complies with Industry Canada radiation exposure limits set forth for an uncontrolled environment.Cet équipement est conforme à l'exposition aux rayonnements Industry Canada limites établies pour un environnement non contrôlé.NCC根據低功率電波輻射性電機管理辦法規定:第十二條經型式認證合格之低功率射頻電機,非經許可,公司、商號或使用者均不得擅自變更頻率、加大功率或變更原設計之特性及功能。
Contour Design Unimouse 无线鼠标用户手册说明书
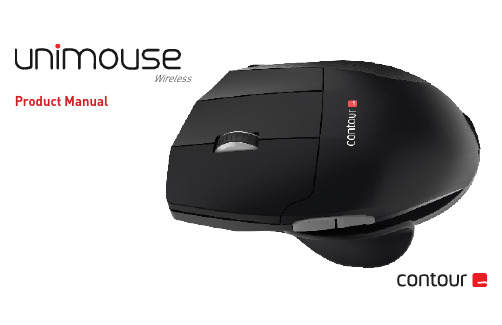
Wireless Product ManualBox Contents1. Unimouse2. Dongle (Wireless receiver)3. USB 2.0 cable adapter4. USB to Micro USB cable5.User Guide12345Unimouse FunctionsFor additional mouse features and specific Mac settings, please download our driver at /supportAuto scroll/Scroll wheelLeft clickMiddle click/Double click*Right click Base/tilt Charge portBack buttonForward button Thumb restCursor speed adjustment (DPI)Cursor speed/battery indicator (LED)* See page 4Power Switch Connecting to a ComputerThe power switch can be found on the underside of the Unimouse. Before using the Unimouse please make sure the power switch is set to the ON position. Turning off the device is only necessary for long-term storage or during travel.Plug the wireless receiver or the charging cable into the computer’s USB port. Allow your computer a few secondsto automatically install mouse drivers.Charging Middle Click to Double ClickTo charge your Unimouse remove the dongle from the extender cable and plug the Micro USB into the Unimouse. Your Unimouse will charge in 2 hours and you may continue to use your Unimouse while it charges.Unimouse comes with middle click as the defualt setting. To change the middle click function to double click, hold down the cursor speed button and the middleclick button at the same time. To switch back, repeat the same command.Middle click / Double clickCursor speed (DPI)Adjustable FeaturesThe thumb rest can be extended or collapsed to accomodate different handsizes.Slide the thumb support forward or back to accomodate variations in thumb length and grip preference.Adjust tilt for your desired mousing angle.The thumb support can be rotated in any direction to adjust to your prefered thumb position.Unimouse has 4 key points of articulation. We econourage you to explore a variety of positions while using your Unimouse. For more details regarding adjustability, please refer to the Adjustability Guide.PairingWith the Unimouse in close proximity to the dongle, hold left click, right click andthe cursor speed buttons at the same time until the LED indicator turns greenand pulses twice in succession.Left clickRight clickCursor speed (DPI)Battery LevelYour Unimouse comes pre-charged and has an expected battery life of up to 3months with average daily use.*Unimouse has a built-in rechargeable battery. To see the battery level on your device, press the cursor speed button once. The Unimouse will first display the current cursor speed (DPI), then display the current battery level.If your Unimouse is running low on battery, the center LED light will start blinking in red.To charge your battery, plug the charging cable into your Unimouse and connect it to a USB port on your computer (see page 4). The Unimouse will charge in 2 hours and you may use your Unimouse as it charges.*Battery life may vary based on user and computing conditions.100% 50% 5%Change Cursor SpeedPress the cursor speed button to cycle through cursor speeds. There are tenspeed selections ranging from slow (800 DPI) to fast (2800 DPI). Speed isindicated by the LED lights as shown.1) 800 2) 1000 3) 1200 4) 1400 5) 16006) 1800 7) 2000 8) 2200 9) 2400 10) 2800FCC StatementChanges or modifications not expressly approved by the party responsible for compliance could void the user’s authority to operate the equipment.This equipment has been tested and found to comply with the limits for a Class B digital device, pursuant to Part 15 of the FCC Rules. These limits are designed to provide reasonable protection against harmful interference in a residential installation. This equipment generates uses and can radiate radio frequency energy and, if not installed and used in accordance with the instructions, may cause harmful interference to radio communications. However , there is no guarantee that interference will not occur in a particular installation. If this equipment does cause harmful interference to radio or television reception, which can be determined by turning the equipment off and on, the user is encouraged to try to correct the interference by one or more of the following measures:- Reorient or relocate the receiving antenna.- Increase the separation between the equipment and receiver .- Connect the equipment into an outlet on a circuit different from that to which the receiver is connected.- Consult the dealer or an experienced radio/TV technician for help.This device complies with part 15 of the FCC rules. Operation is subject to the following two conditions (1) this device may not cause harmful interference, and (2) this device must accept any interference received, including interference that may cause undesired operation.IC StatementThis device complies with Industry Canada’s licence-exempt RSSs. Operation is subject to the following two conditions: (1) This device may not cause interference; and (2) This device must accept any interference, including interference that may cause undesired operation of the device.The term “IC: “ before the certification/registration number only signifies that the Industry Canada technical specifications were met. This product meets the applicable Industry Canada technical specifications.Le présent appareil est conforme aux CNR d’Industrie Canada applicable aux appareils radio exempts de licence. L’exploitation est autorisée aux deux conditions suivantes : (1) l’appareil ne doit pas produire de brouillage,et (2) l’utilisateur de l’appareil doit accepter tout brouillage radioélectrique subi, même si le brouillage est susceptible d’en compromettre le fonctionnementFor more information please visit:Contour Design, Inc. 10 Industrial DriveWindham, New Hampshire 03087, USA Phone: (603) 893-4556Email:**************************Contour Design Nordic A/S Borupvang 5B, St.DK-2750 Ballerup/Denmark Phone: +45 32 46 11 20Email:***********************Tested to comply with FCC and IC standardsWarrantyIf there is a functional defect due to faulty manufacturing, we will replace the product. This warranty does not cover damage that results from misuse of the product.Attention!If you attempt to dismantle your Unimouse, you will invalidate your warranty.。
迷你绿enso无线鼠标 (Philips SPK7344) 商品说明书
Philips 300 SeriesWireless mouse3 buttons2.4GHz Wireless Optical SensorSPK7344Anywhere wireless portabilityA comfortable and stylish mouse that adjusts to fit your palm and fits easily into your bag, this handy notebook mouse companion has wireless connection and an optical sensor that lets it work on most surfaces.Comfortable accurate control•High definition optical tracking for smooth control•Comfortable ergonomic mouse design feels great•Ambidextrous shape feels good in right or left handPhilips reliability•Keys last millions of keystrokes for durabilityFreedom without cords•Clutter-free with easy-to-connect wireless design•Set it and forget it long battery lifeIssue date 2022-05-03Version: 2.0.112 NC: 8670 001 63113EAN: 87 12581 76259 9© 2022 Koninklijke Philips N.V.All Rights reserved.Specifications are subject to change without notice.Trademarks are the property of Koninklijke Philips N.V.or their respective owners. HighlightsWireless mouse 3 buttons 2.4GHz Wireless, Optical SensorSpecificationsSmooth optical tracking High definition optical tracking for smooth controlComfortable ergonomic design Comfortable ergonomic mouse design feels greatAmbidextrous mouse design Ambidextrous shape feels good in right or left handKeystrokes for durability Keys last millions of keystrokes for durabilityEasy-to-connect Easy to connect and tangle free, the wireless design makes life more simple.Long battery lifeThe long battery life means you rarely have to replace the batteries, for long reliable use when youneed it.Technical specifications •Product Type: Wireless mouse •Design Type: Ergonomic design •Connectivity: 2.4Ghz wireless connection, 10 Meters effective wireless connection distance •Buttons: 3 Buttons •Optical Sensor Precision: 1600 dpi •Driver Requirement: Driver-free •Coating Type: Matte •Handed Type: Left and right-handedPhysical Dimensions•Dimensions (LxWxH): 101*61*33mm •Weight: 62g±5g OS/System Requirements •System Requirements: Microsoft Windows XP, Windows Vista, Windows 7, Windows 8, Windows 10 or later; Linux; Mac OS。
BenQ M302 无线光学鼠标 使用说明
BenQ M302 重要讯息长期以相同姿势使用鼠标可能造成手腕,肩膀,颈部或背部不适。
为了避免
及降低以上的伤害或不适,医学专家建议您经常性的休息片刻和放松肩膀及手腕。
无线光学鼠标使用说明
系统要求
IBM 兼容电脑,或Macintosh 系统
Windows 98/NT/2000/Me/XP 或Mac 操作系统10.0以上
适用于USB 连接口(PS/2转接头适用于PS/2连接口)包装内容BenQ M302无线光学鼠标USB 无线接收器两颗AA 碱性电池
USB 延长线
使用说明书
硬件设定与安装
1、将接收器连接到电脑
USB 界面
将接收器连接到主机的USB 连接口
系统将自动检测新硬件
USB 与PS/2 Combo (如果没有USB 连接口)
将绿色的PS/2转接头与USB 线连接
关闭电脑
将接收器连接到电脑主机,重开机2、安装电池与无线鼠标(2颗AA 电池)3、鼠标与接收器的通讯设定先按一下接收器上的连接按钮再接着按一下鼠标底部的连接按钮上述动作请在10秒钟内完成
疑难排解
确定接收器是否正确的连接到主机
检查电池安装是否正确
确认你的桌面是否是红色系列或会
反射光线的材质(类似镜子或玻璃等)鼠标无法使用。
Anko 42735687 无线鼠标球指南说明书
Manuals+— User Manuals Simplified.anko 42735687 Wireless Mouse Marble Instruction Manual Home » Anko » anko 42735687 Wireless Mouse Marble Instruction ManualContents1 anko 42735687 Wireless MouseMarble2 Safety Instructions3 Features4 Before first use5 Product Overview6 Inserting the Battery7 Connecting the USB Receiver8 Power saving mode9 Care and maintenance10 Month Warranty11 Documents / Resources11.1 Referencesanko 42735687 Wireless Mouse MarbleSafety InstructionsInserting the Battery1. Remove the battery compartment cover of the mouse and insert one 1.5 VAA battery. Please note the polaritydiagram printed inside the battery compartment. Caution! The danger of explosion if the batteries areincorrectly replaced.2. Replace the battery compartment cover again, making sure it is closed firmly.Notes on batteriesyour eyes, flush them thoroughly with lots of water and consult a physician immediately! If battery acid comes into contact with your skin, wash the affected area with lots of water and soap.If the device is not to be used for an extended period of time, then the batteries should be removed, as the device could become damaged should they leak. If the device functions weaken, replace all batteries.Batteries do not belong in household waste! Expired batteries must be disposed of in an environmentally friendly way and according to the applicable legal regulations.Batteries are very dangerous if swallowed. Please keep the batteries and the device components away from children at all times. If a battery is swallowed, seek medical attention immediately.Batteries must not be recharged or activated with other means, dismantled, thrown into fire or short-circuited.Remove the battery prior to disposing of the device.Connecting the USB Receiver1. Remove the USB receiver from its compartment inside the mouse.2. Plug the USB receiver into a free USB port on the computer. The device does not require a driver.3. The Mouse will connect automatically and can be used immediately.Power saving modeIf the mouse is not being used for 8 minutes, it switches to power-saving mode. The optical sensor is turned offto reduce power consumption to a minimum. Just move the mouse, or press any key to reactivate it.Care and maintenance1. Wipe all parts with a dry soft cloth.Month WarrantyThank you for your purchase from Kmart.Kmart Australia Ltd warrants your new product to be free from defects in materials and workmanship for the period stated above, from the date of purchase, provided that the product is used in accordance withaccompanying recommendations or instructions where provided. This warranty is in addition to your rights under the Australian Consumer Law.Kmart will provide you with your choice of a refund, repair or exchange (where possible) for this product if it becomes defective within the warranty period. Kmart will bear the reasonable expense of claiming thewarranty. This warranty will no longer apply where the defect is a result of alteration, accident, misuse, abuse or neglect.Please retain your receipt as proof of purchase and contact our Customer Service Centre on 1800 124 125 (Australia) or 0800 945 995 (New Zealand) or alternatively, via Customer Help at .au for any difficulties with your product. Warranty claims and claims for expenses incurred in returning this product can be addressed to our Customer Service Centre at 690 Springvale Rd, Mulgrave Vic 3170.Our goods come with guarantees that cannot be excluded under the Australian Consumer Law. You are entitled to a replacement or refund for a major failure and compensation for any other reasonably foreseeable loss or damage. You are also entitled to have the goods repaired or replaced if the goods fail to be ofacceptable quality and the failure does not amount to a major failure.For New Zealand customers, this warranty is in addition to statutory rights observed under New Zealand legislation.https:///.Documents / Resourcesanko 42735687 Wireless Mouse Marble [pdf] Instruction Manual42735687 Wireless Mouse Marble, 42735687, Wireless Mouse Marble, Mouse Marble, MarbleReferences.auSearch - Manuals+,。
旅行者6000光学无线鼠标说明书
TRAVELER 6000Traveler 6000 Wireless Optical Mouse▼Dates available:• Mass production: Nov., 2010• Chain store retailer MSRP: US$14.9/€14.9 • Non-chain store retailer MSRP: US$16.9/€16.9▼System Requirements: • Windows® 7/Vista/XP or Mac OSX 10.4+• Available USB Port ▼ Package Contents: • Traveler 6000 • USB receiver • AAA alkaline battery• Multi-language user’s manual▼Specification :Model NameTraveler 6000PackageInterface support USB RF frequency2.4GHzNumber of buttonsThree (left, right, middle buttonwith scroll)Resolution (dpi) 1200 dpi optical engine Battery AAA x 1 WEEE data Dimension 98 x 55 x 35mm (W*H*D) Body weight52g Box205 x 105 x 50mm ShippinginformationPCs/CTN 40 pcs CUFT/CTN 1.95 PCs/20’container19,500pcs Bar code EAN (Black) 4710268 235941 UPC (Black)************EAN (Blue)4710268 236177 UPC (Blue) ************EAN (Ruby)4710268 236184 UPC (Ruby)************Part # Diamond Black 3103-0051-101 Royal Blue3103-0051-102 Ruby Rose3103-0051-103Genius introduces a new wireless optical mouse - Traveler 6000. Simple and handy, it improves your daily working efficiency and is suitable for either hand.Featuring a precision 1200 dpi optical engine, Traveler 6000 provides great cursor movement control for browsing documents or Internet pages. The Pico receiver is ideal because of its mini size, so you can leave it your notebook when you’re moving around the office. To save on battery purchases, Traveler 6000 is designed with only one AAA battery and a power switch is added to extend the battery life.Traveler 6000 is available in three popular colors – Diamond Black, Royal Blue or Ruby Rose. For more information, contact your sales representatives. 2.4GHz TechnologyPower saving; anti-interferencePlug & forget receiverLift up storage spaceFor battery and receiver slot▼Product Features• 2.4Ghz comfort optical mouse• 1200 dpi optical sensor for smooth movement control • Plug and forget USB Pico receiver • Power switch to extend battery life • Suitable for either hand▼Characteristics Power Saving Switch Extends battery life further1200 dpi optical engine Precision with accuracyReceiver slotFor storage use▼ Recommended AccessoriesSW-G2.1 1250 SP-i170 SP-i300TRAVELER 6000。
- 1、下载文档前请自行甄别文档内容的完整性,平台不提供额外的编辑、内容补充、找答案等附加服务。
- 2、"仅部分预览"的文档,不可在线预览部分如存在完整性等问题,可反馈申请退款(可完整预览的文档不适用该条件!)。
- 3、如文档侵犯您的权益,请联系客服反馈,我们会尽快为您处理(人工客服工作时间:9:00-18:30)。
无线鼠标使用说明书
第一步:先找到接收器
接收器在泡沫袋子里面或者电池下面
第二步:将接收器插入电脑USB接口
第三步:打开鼠标开关(ON 是开off 是关)
第四步:多次点击左右按键就可以啦
注意:
1.鼠标DPI按键是微调速度(灵敏度)
2.充电需要3小时左右,充电时鼠标亮蓝色灯,充满了就不亮了。
3.放接收器的凹槽在电池下面,扣下电池即可看到,方便携带。
(不建议用完拔下接收器,容易丢失,可以插在电脑上,不取下来。
)
4.鼠标2分钟不用就会自动休眠,需要多次点击左右按键,或者重新打开开关即可唤醒鼠标,正常使用。