cozaar_pi
gfcanalysis包:Hansen等全球森林变化数据集工具说明书

Package‘gfcanalysis’October11,2023Version1.8.0Date2023-10-09Language en-usTitle Tools for Working with Hansen et al.Global Forest ChangeDatasetDepends R(>=3.5.0),raster,methodsImports sf,terra,geosphere,RCurl,plyr,ggplot2,grid,stringr,animation,rasterVisEncoding UTF-8Description Supports analyses using the Global Forest Change dataset released by Hansen et al.gfcanalysis was originally written for the Tropical Ecology Assessment and Monitoring(TEAM)Network.For additional details on the Global Forest Change dataset,see:Hansen,M.et al.2013.``High-Resolution Global Maps of21st-Century Forest Cover Change.''Science342(15November):850-53.The forest change data and more information on theproduct is available at<>. License GPL(>=3)URL https:///azvoleff/gfcanalysisBugReports https:///azvoleff/gfcanalysis/issues LazyData trueRoxygenNote7.2.3NeedsCompilation noAuthor Alex Zvoleff[aut],Matthew Cooper[cre]Maintainer Matthew Cooper<*******************>Repository CRANDate/Publication2023-10-1112:20:02UTC12animate_annual R topics documented:animate_annual (2)annual_stack (3)calc_gfc_tiles (4)calc_pixel_areas (5)check_aoi (5)download_tiles (6)extract_gfc (7)gfc_stats (8)gfc_tiles (9)plot_gfc (9)scale_by_pixel_area (10)scale_toar (10)test_poly (11)threshold_gfc (11)utm_zone (13)Index15 animate_annual Plot an animation of forest change within a given area of interest(AOI)DescriptionProduces an animation of annual forest change in the area bounded by the extent of a given AOI,or AOIs.The AOI polygon(s)is(are)also plotted on the image.The gfc_stack must be pre-calculated using the annual_stack function.The animation can be either an animated GIF(if type is set to ’gif’)or a series of’.png’files with a corresponding’.html’webpage showing a simple viewer and the forest change animation(if type is set to’html’).The HTML option is recommended as it requires no additional software to produce it.The animated GIF option will only work if the imagemagicK software package is installed beforehand(this is done outside of R).Usageanimate_annual(aoi,gfc_stack,out_dir=getwd(),out_basename="gfc_animation",site_name="",type="html",height=3,width=3,dpi=300,dataset="GFC-2022-v1.10")annual_stack3Argumentsaoi one or more AOI polygons as a SpatialPolygonsDataFrame or sf object.If there is a’label’field in the dataframe,it will be used to label the polygons inthe plots.If the AOI is not in the WGS84geographic coordinate system,it willbe reprojected to WGS84.gfc_stack a GFC product subset as a RasterStack(as output by annual_stack)out_dir folder for animation outputout_basename basename to use when naming animationfilessite_name name of the site(used in making title)type type of animation to make.Can be either"gif"or"html"height desired height of the animation GIF in incheswidth desired width of the animation GIF in inchesdpi dots per inch for the output imagedataset which version of the Hansen data to use annual_stack was runSee Alsoannual_stackannual_stack Generate an annual stack of forest change from GFC productDescriptionUses thresholded GFC data as output by threshold_gfc to make an annualized layer stack of forest change.See Details for the class codes used in the annual raster stack.The animate_annual function can be used to produce an animation of forest change from the generated layer stack.Usageannual_stack(gfc,dataset="GFC-2022-v1.10")Argumentsgfc thresholded extract of GFC product for a given AOI(see threshold_gfc) dataset which version of the Hansen data to use4calc_gfc_tilesDetailsThe output raster stack uses the following codes to describe forest change at each pixel:Nodata0Forest1Non-forest2Forest loss3Forest gain4Forest loss and gain5Water6See Alsothreshold_gfc,animate_annualcalc_gfc_tiles Calculate the GFC product tiles needed for a given AOIDescriptionIntersects an AOI with the GFC product grid to determine what tiles are need to cover the AOI.Usagecalc_gfc_tiles(aoi)Argumentsaoi an Area of Interest(AOI)as a SpatialPolygons*or sf object.If the AOI is not in the WGS84geographic coordinate system,it will be reprojected to WGS84.Valuea sf of the GFC tiles needed to cover the AOIExamplestiles<-calc_gfc_tiles(test_poly)plot(tiles)plot(test_poly,lt=2,add=TRUE)calc_pixel_areas5 calc_pixel_areas Calculates the pixel area for each line of a rasterDescriptionCalculates the pixel area for each line of a rasterUsagecalc_pixel_areas(x)Argumentsx a Raster*objectValuea vector with the area in square meters of the pixels in each line of x(vector has length equal tonrow(x))check_aoi Check if aoi is an sf or sp type object If sp,convert to sf and returnDescriptionCheck if aoi is an sf or sp type object If sp,convert to sf and returnUsagecheck_aoi(aoi)Argumentsaoi the area of interest object6download_tiles download_tiles Download a set of GFC tilesDescriptionThis functionfirst checks whether each tile in a set GFC product tiles is present locally,and that localfile sizes match thefile sizes of thefiles available on the Google server hosting the GFC product.Next,the function downloads all tiles that either are not present locally,or that are present but havefile sizes differing from thefile on the Google server.Usagedownload_tiles(tiles,output_folder,images=c("treecover2000","lossyear","gain","datamask"),dataset="GFC-2022-v1.10")Argumentstiles sf with GFC product tiles to download,as calculated by the calc_gfc_tilesfunction.output_folder the folder to save output data inimages which images to download.Can be any of’treecover2000’,’loss’,’gain’,’lossyear’,’datamask’,’first’,and’last’.dataset which version of the Hansen data to useSee Alsoextract_gfcExamples##Not run:output_folder<- H:/Data/TEAM/GFC_Producttiles<-calc_gfc_tiles(test_poly)download_tiles(tiles,output_folder)##End(Not run)extract_gfc7 extract_gfc Extracts GFC data for a given AOIDescriptionThis function extracts a dataset for a given AOI from a series of pre-downloaded GFC tiles.The download_tiles function should be used beforehand in order to download the necessary data to the specified data_folder.Note that the outputfile format isfixed as GeoTIFF with LZW com-pression.Usageextract_gfc(aoi,data_folder,to_UTM=FALSE,stack="change",dataset="GFC-2022-v1.10",...)Argumentsaoi an Area of Interest(AOI)as a sf object.If the AOI is not in WGS1984 (EPSG:4326),it will be reprojected to WGS84.data_folder folder where downloaded GFC product tiles are located(see download_tiles function.to_UTM if TRUE,then reproject the output into the UTM zone of the AOI centroid.If FALSE,retain the original WGS84projection of the GFC tiles.stack the layers to extract from the GFC product.Defaults to"change".See Details.dataset which version of the Hansen data to use...additional arguments as for writeRaster,such as filename,or overwrite. DetailsThe stack option can be"change"(the default),"first",or"last".When set to"change",the forest change layers(treecover2000,loss,gain,lossyear,and datamask)will be extracted for the given aoi.The"first"and"last"options will mosaic the2000or last year composite top of atmosphere (TOA)reflectance images(respectively).ValueRasterStack with GFC layersSee Alsodownload_tiles,annual_stack,gfc_stats8gfc_stats gfc_stats Produce a table of forest cover change statistics for a given AOIDescriptionFor a given AOI,this function produces two tables:an annual forest loss table(in hectares,by default),and a table specifying1)the total area of pixels that experienced forest gain and,2)the total area of pixels that experienced both loss and gain over the full period(from2000through the end date of the specific product you are using,depending on the chosen dataset).Note that forest gain and combined loss and gain are not available in the GFC product on an annualized e extract_gfc to extract the GFC data for the AOI,and threshold it using threshold_gfc prior to running this function.Usagegfc_stats(aoi,gfc,scale_factor=1e-04,dataset="GFC-2022-v1.10") Argumentsaoi one or more Area of Interest(AOI)polygon(s)as a SpatialPolygons*.See Details.gfc extract of GFC product for a given AOI(see extract_gfc),recoded using threshold_gfc.scale_factor how to scale the output data(from meters).Defaults to.0001for output in hectares.dataset which version of the Hansen data to useDetailsIf the aoi object is not in the coordinate system of gfc,it will be reprojected.If there is a"label"attribute,it will be used to label the output statistics.Otherwise,unique names("AOI1","AOI2", etc.)will be generated and used to label the output.If multiple AOIs share the same labels,statistics will be provided for the union of these AOIs.Valuelist with two elements"loss_table",a data.frame with statistics on forest loss,and"gain_table", with the area of forest gain,and area that experienced both loss and gain.The units of the output are hectares(when scale_factor is set to.0001).See Alsoextract_gfc,threshold_gfcgfc_tiles9 gfc_tiles Grid of tiles used for the GFC productDescriptionContains a SpatialPolygonsDataFrame with a10x10degree grid in WGS84coordinate system, covering the area from180W-180E and80N-60S,the tile system used by the GFC Product.plot_gfc Plot forest change(relative to2000)for a given yearDescriptionPlots a single layer of forest change from a layer stack output by annual_stack.Usageplot_gfc(fchg,aoi,title_string="",size_scale=1,maxpixels=50000)Argumentsfchg a forest change raster layer(a single layer of the layer stack output by annual_stack aoi one or more AOI polygons as a SpatialPolygonsDataFrame or sf object.Ifthere is a’label’field in the dataframe,it will be used to label the polygons inthe plots.If the AOI is not in WGS1984(EPSG:4326),it will be reprojected toWGS84.title_string the plot titlesize_scale a number used to scale the size of the plot textmaxpixels the maximum number of pixels from fchg to use in plottingSee Alsoannual_stack,animate_annual10scale_toar scale_by_pixel_area Scales a raster by the area of each pixel in metersDescriptionCalculates the area(in meters)of each pixel in a raster,scales the value of each pixel by the area, applies the desired scale factor,and returns the result as a eful for calculating class areas based on a classified raster in a geographic coordinate system.Assumes that raster is not rotated(latitudes of every pixel in a given row are identical).Processes block by block to support handling very large rasters.Usagescale_by_pixel_area(x,filename,datatype,pixel_areas=NULL,scale_factor=1)Argumentsx a Raster*objectfilename(optional)filename for output rasterdatatype(optional)datatype for output raster see dataType NOT YET SUPPORTED pixel_areas a vector giving the area of each cell in a single column of the raster.See calc_pixel_areas.If NULL,this vector will be calculated based on the coor-dinate system of x.scale_factor a value to scale the results byValueRasterLayer with pixel areas(in meters)scale_toar Scale thefirst or last top of atmosphere(TOA)reflectance imagesDescriptionThis function applies the scale factors provided by Hansen et al.to rescale thefirst and last TOA reflectance images from integer tofloating point.The following scale factors are used:band3,508;band4,254;band5,363;band7,423.The output datatype is FLT4S.test_poly11Usagescale_toar(x,...)Argumentsx the"first"or"last"image for a given aoi as a RasterStack(see stack option for extract_gfc)....additional arguments as for writeRaster,such as filename,or overwrite. ValueRasterStack of TOA reflectance valuesSee Alsoextract_gfctest_poly Polygon outlining TEAM site in Caxiuanã,BrazilDescriptionContains a SpatialPolygonsDataFrame with a simplified polygon of the area within the Tropical Ecology Assessment and Monitoring(TEAM)network site in Caxiuanã,Brazil.threshold_gfc Threshold the GFC productDescriptionUses the GFC data output from extract_gfc to make an thresholded layer stack withfive layers: treecover2000,loss,gain,lossyear,and datamask layers.See Details for the coding used in each layer.Note that the outputfile format isfixed as GeoTIFF with LZW compression.Usagethreshold_gfc(gfc,forest_threshold=25,...)Argumentsgfc extract of GFC product for a given AOI(see extract_gfc)forest_thresholdpercent woody vegetation to use as a threshold for mapping forest/non-forest ...additional arguments as for writeRaster,such as filename or overwrite12threshold_gfcDetailsThe output uses the following codes to describe forest change at each pixel:Band1(forest2000)Non-forest0Forest1Band2(lossyear)No loss0Loss in20011Loss in20022Loss in20033Loss in20044Loss in20055Loss in20066Loss in20077Loss in20088Loss in20099Loss in201010Loss in201111Loss in201212Loss in201313Loss in201414Note that lossyear is zero for pixels that were not forested in2000,and that the2013and2014loss layers are not available in the original2013Hansen dataset(the2013loss layer is available in the 2014and2015updates,while the2014loss layer is available in the2015update only).Band3(gain)No gain0Gain1Note that gain is zero for pixels that were forested in2000Band4(lossgain)No loss and gain0Loss and gain1Note that loss and gain is difficult to interpret from the thresholded product,as the original GFC product does not provide information on the sequence(loss then gain,or gain then loss),or the levels of canopy cover reached prior to loss(for gain then loss)or after loss(for loss then gainpixels).The layer is calculated here as:lossgain<-gain&(lossyear!=0),where loss year and gain are the original GFC gain and lossyear layers,respectively.Band5(datamask)No data0Land1Water2ValueRasterBrick with thresholded GFC product(see details above)See Alsoextract_gfcutm_zone Given a spatial object,calculate the UTM zone of the centroidDescriptionFor a line or polygon,the UTM zone of the centroid is given,after reprojecting the object into WGS-84.Usageutm_zone(x,y,proj4string=FALSE)##S4method for signature numeric,numericutm_zone(x,y,proj4string=FALSE)##S4method for signature Spatial,missingutm_zone(x,proj4string)Argumentsx a longitude(with western hemisphere longitudes negative),or a Spatial object y a latitude(with southern hemisphere latitudes negative),or missing(if x is a Spatial object)proj4string if FALSE(default)return the UTM zone as a string(for example"34S"for UTM Zone34South).If TRUE,return a proj4string using the EPSG code as aninitialization string.DetailsBased on the code on at http://bit.ly/17SdcuN.Examplesutm_zone(45,10)utm_zone(45,-10)utm_zone(45,10,proj4string=TRUE)Indexanimate_annual,2,3,4,9annual_stack,2,3,3,7,9calc_gfc_tiles,4calc_pixel_areas,5,10check_aoi,5dataType,10download_tiles,6,7extract_gfc,6,7,8,11,13gfc_stats,7,8gfc_tiles,9plot_gfc,9scale_by_pixel_area,10scale_toar,10test_poly,11threshold_gfc,3,4,8,11utm_zone,13utm_zone,numeric,numeric,logical-method(utm_zone),13utm_zone,numeric,numeric-method(utm_zone),13utm_zone,Spatial,missing,logical-method(utm_zone),13utm_zone,Spatial,missing-method(utm_zone),13writeRaster,7,1115。
R语言软件包citation的说明书

Package‘citation’March30,2023Type PackageTitle Software Citation ToolsVersion0.8.2Date2023-03-30Description A collection of functions to extract citation information from'R'pack-ages and to deal withfiles in'citationfile for-mat'(<https://citation-file-format.github.io/>),extending the functionality al-ready provided by the citation()function in the'utils'package.Imports desc,jsonlite,utils,withr,yamlSuggests covr,testthatURL https:///pik-piam/citation,https:///10.5281/zenodo.3813429BugReports https:///pik-piam/citation/issuesLicense BSD_2_clause+file LICENSEEncoding UTF-8RoxygenNote7.2.3NeedsCompilation noAuthor Jan Philipp Dietrich[aut,cre],Waldir Leoncio[aut]Maintainer Jan Philipp Dietrich<***********************>Repository CRANDate/Publication2023-03-3018:30:02UTCR topics documented:citation-package (2)cff2bibentry (2)cff2md (3)cff2r (3)12cff2bibentry cff2zenodo (5)cffReport (5)citation2zenodo (6)citation_doi (7)package2zenodo (7)r2cff (8)read_cff (9)scanRepos (10)Index11 citation-package citation:Software Citation ToolsDescriptionA collection of functions to extract citation information from’R’packages and to deal withfiles in’citationfile format’(https://citation-file-format.github.io/),extending the functional-ity already provided by the citation()function in the’utils’package.Author(s)Maintainer:Jan Philipp Dietrich<***********************>Authors:•Waldir Leoncio<*********************.no>See AlsoUseful links:•https:///pik-piam/citation•doi:10.5281/zenodo.3813429•Report bugs at https:///pik-piam/citation/issuescff2bibentry cff2bibentryDescriptionConverter citationfile format to bibentryUsagecff2bibentry(x)cff2md3Argumentsx path to citationfile or read in citation in citationfile formatAuthor(s)Jan Philipp Dietrichcff2md cff2mdDescriptionCreates a summary of the CFF content in markdown format.This can be useful for instance tocreate software reports.Usagecff2md(x)Argumentsx path to citationfile or read in citation in citationfile formatAuthor(s)Jan Philipp Dietrichcff2r Convert from CFF into RDescriptionConverts a CFFfile into DESCRIPTIONUsagecff2r(cffFile="CITATION.cff",export=FALSE,...)ArgumentscffFile Path and name of the CFFfileexport if‘TRUE‘,the output is saved as DESCRIPTION(plus an extension to avoidoverwriting)...when export=TRUE,the user can pass additional arguments to the exportDESCRIPTION function.More information in the Details section.4cff2rDetailsCFF is a standard format for the citation of software proposed by Stephan Druskat et.al.(seereferences below).CFF-compliantfiles are stored infiles named CITATION.cff.CITATION.cfffiles are plain textfiles with human-and machine-readable citation information forsoftware.Code developers can include them in their repositories to let others know how to correctlycite their software.When export=TRUE,the user can use the following arguments to customize the outputfile:outname The name of the exportedfileoverwrite Defaults to FALSE.If TRUE,will replace any homonymousfile present on the export pathoutpath By default,thefile is saved to a temporary directory.One may provide a different path here.For example,outpath="."will save to the current working directoryValueA CFFfile converted to a DESCRIPTIONfile.Author(s)Waldir LeoncioReferencesDruskat S.,Spaaks J.H.,Chue Hong N.,Haines R.,Baker J.(2019).Citation File Format(CFF)(version1.1.0).DOI:/10.5281/zenodo.1003149https:///blog/2017-12-12-standard-format-citation-files https://citation-file-format.github.io https:///citation-file-format/citation-file-format/blob/master/README.md https://citation-file-format.github.io/cff-initializer-javascript/See Alsor2cffExamples##Not run:#Printing converted file onto R sessioncitation_file<-system.file("CFF-CITATION.cff",package="citation")cff2r(citation_file)#Saving converted file to temporary folder on systemtempFolder<-tempdir()cff2r(citation_file,export=TRUE,outname="converted-desc",overwrite=TRUE,outpath=tempFolder)#Making sure the file is indeed therecat(readLines(file.path(tempFolder,"converted-desc")),sep="\n")cff2zenodo5 ##End(Not run)cff2zenodo cff2zenodoDescriptionConverter citationfile format to.zenodo.json metadatafile for proper metadata input to Zenodo. Usagecff2zenodo(x)Argumentsx path to citationfile or read in citation in citationfile format.If a path is provided the.zenodo.json information will be written directly to a.zenodo.jsonfile inthe corresponding folder.Otherwise the metadata will be just returned by thefunction.ValueThe metadata information that should be provided to Zenodo in JSON format.Author(s)Jan Philipp DietrichcffReport cffReportDescriptionCreates a report in markdown format for a provided list of repositories and or CITATION.cfffiles. UsagecffReport(repos,file=NULL,sortBy="title")Argumentsrepos character vector of repository urls or links to CITATION.cfffiles to be scanned file character string naming afile the report should be written to.If NULL the report will be directly returned by the function.sortBy category by which the report should sort its entries6citation2zenodo Valuethe report in markdown formatAuthor(s)Jan Philipp Dietrichcitation2zenodo citation2zenodoDescriptionConverts an object of class citation into a.zenodo.jsonfile.Thisfile is an(officially unsupported) method to provide ZENODO with metadata information about the package and will overwrite the information ZENODO would otherwise auto-generate from the repository.Usagecitation2zenodo(cit,folder=NULL)Argumentscit an object of class citation as returned for instance by the function citation,or the name of a R package to be used as source.folder a folder thefile should be written to.If NULL the content is instead printed.Author(s)Jan Philipp DietrichExamplescit<-citation_doi("citation")citation2zenodo(cit)citation_doi7 citation_doi citation_doiDescriptionExtension of the standard citation function which also extracts DOI information from the URLfield in the DESCRIPTIONfile,if available.Usagecitation_doi(package)Argumentspackage a character string with the name of a single package.Author(s)Jan Philipp DietrichExamplescitation_doi("citation")package2zenodo package2zenodoDescriptionCreates a.zenodo.json for a R package.Thisfile is an(officially unsupported)method to provide ZENODO with metadata information about the package and will overwrite the information ZEN-ODO would otherwise auto-generate from the repository.Usagepackage2zenodo(package=".")Argumentspackage either the path to the main folder of a package(containing a DESCRIPTIONfile) or the name of the package.If a path is provided the.zenodo.jsonfile will bedirectly added to the folder.Otherwise the content of such afile is just returned.8r2cffValueThe metadata information that should be provided to Zenodo in JSON format.Author(s)Jan Philipp DietrichExamplespackage2zenodo("citation")r2cff Convert from R DESCRIPTION into CFFDescriptionConverts an R package DESCRIPTIONfile to Citation File FormatUsager2cff(descriptionFile="DESCRIPTION",export=FALSE)ArgumentsdescriptionFileeither the path to a DESCIPTIONfile,the path to a main folder of a package(containing a DESCRIPTIONfile)or the name of a package.export if‘TRUE‘,the output is saved as CITATION.cff in the folder of the DESCRIP-TIONfile.DetailsCFF is a standard format for the citation of software proposed by Stephan Druskat et.al.(see references below).CFF-compliantfiles are stored infiles named CITATION.cff.CITATION.cfffiles are plain textfiles with human-and machine-readable citation information for software.Code developers can include them in their repositories to let others know how to correctly cite their software.ValueThe package’s DESCRIPTIONfile converted to CFFAuthor(s)Waldir Leoncio,Jan Philipp Dietrichread_cff9 ReferencesDruskat S.,Spaaks J.H.,Chue Hong N.,Haines R.,Baker J.(2019).Citation File Format(CFF)(version1.1.0).DOI:/10.5281/zenodo.1003149https:///blog/2017-12-12-standard-format-citation-files https://citation-file-format.github.io https:///citation-file-format/citation-file-format/blob/master/README.md https://citation-file-format.github.io/cff-initializer-javascript/See Alsocff2rExamplesr2cff("citation")read_cff read_cffDescriptionRead a citationfile formatfile(https://citation-file-format.github.io/)Usageread_cff(file)Argumentsfile path to the citationfileAuthor(s)Jan Philipp Dietrich10scanRepos scanRepos scan repositoriesDescriptionScan repositories for existing CITATION.cff informationUsagescanRepos(repos)Argumentsrepos character vector of repository urls or links to CITATION.cfffiles to be scannedValueA list with CITATION.cff information collected from the provided repositoriesAuthor(s)Jan Philipp DietrichSee Alsoread_cffExamplesscanRepos(c("https:///magpiemodel/magpie","https:///remindmodel/remind"))Indexcff2bibentry,2cff2md,3cff2r,3cff2zenodo,5cffReport,5citation,6citation(citation-package),2citation-package,2citation2zenodo,6citation_doi,7package2zenodo,7r2cff,8read_cff,9scanRepos,1011。
HILook PanoVu Mini Series IR Network PTZ Camera 产品

HiLook PTZ -P332ZI -DE3 PanoVu Mini Series IR Network PTZ Camera, with the integrationdesign, is able to capture 360° images with the panoramic cameras as well as close -up images with the PTZ camera.System Functions● 3-ch panoramic images in differentdirections and 1-ch close -up image● PTZ linkage● Up to 10 m IR radiusPanoramic Camera● Three 1/2.8" progressive scan CMOS● 3-ch 1920 × 1080@30fps resolution● Horizontal FOV: 128.5° × 3PTZ Camera● 1/2.8" progressive scan CMOS● Up to 1920 × 1080@30fps resolution● 4× optical zoom, 8× digital zoomAvailable Model● PTZ-P332ZI-DE312 VDC & PoE (802.3 at, class 4)Dimensions Unit: mm Φ 148133Φ 183Φ 83.5Accessories DS-1294ZJ-TRL Wall Mounting BracketDS-1271ZJ-PT10 Pendant Mounting BracketPanoramic CameraImage Sensor Three 1/2.8" progressive scan CMOSMin. Illumination Color: 0.05 Lux @(F2.0, AGC ON) B/W: 0.01 Lux @(F2.0, AGC ON) 0 Lux with IRShutter Time 50 Hz: 1/25 s to 1/30,000 s60 Hz: 1/30 s to 1/30,000 sDay & Night IR Cut FilterGain Auto/ManualWDR Digital WDRSmart Image Enhancement HLC/BLC/3D DNR/Regional ExposureWhite Balance Auto/Manual/ATW (Auto-Tracking White Balance)/Indoor/Outdoor/FluorescentLamp/Sodium LampPrivacy Mask 4 × 3 programmable privacy masksFocal Length 2 mmAperture Range F2.0FOV Horizontal field of view: 128.5° × 3 Vertical field of view: 75.7°Diagonal field of view: 144°PTZ CameraImage Sensor 1/2.8" progressive scan CMOSMin. Illumination Color: 0.05 Lux @(F2.0, AGC ON) B/W: 0.01 Lux @(F2.0, AGC ON) 0 Lux with IRShutter Time 50 Hz: 1/25 s to 1/30,000 s60 Hz: 1/30 s to 1/30,000 sDay & Night IR Cut FilterGain Auto/ManualWDR Digital WDRSmart Image Enhancement HLC/BLC/3D DNR/Regional Exposure/Regional FocusWhite Balance Auto/Manual/ATW (Auto-Tracking White Balance)/Indoor/Outdoor/FluorescentLamp/Sodium LampPrivacy Mask 8 programmable privacy masksDigital Zoom 8×Focus Mode Semi-automatic/ManualFocal Length 2.8 mm to 12 mm, 4× optical zoomZoom Speed Approx.5.4 s (optical, wide - tele)FOV Horizontal field of view: 120° to 56.6° (wide - tele) Vertical field of view: 61.8° to 31.7° (wide - tele) Diagonal field of view: 149° to 65° (wide - tele)Min. Working Distance 10 mm to 1500 mm (wide - tele)Aperture Range F2.0 to F2.4Pan and Tilt Range Pan: 0° to 350°; Tilt: 0° to 90°Pan and Tilt Speed Pan speed: 0.1°/s to 30°/s (configurable), preset speed: 30°/sTilt speed: 0.1°/s to 30°/s (configurable), preset speed: 30°/s Proportional Zoom SupportPreset Number 300Power-off Memory SupportPTZ Status Display SupportPreset Freezing SupportScheduled Task Preset/Dome Reboot/Dome AdjustDual-VCA SupportSmart Event Detection Audio Exception Detection, Intrusion Detection, Line Crossing Detection SystemIR Up to 10 m IR (radius)PTZ Linkage SupportSVC SupportROI Main stream supports eight fixed areas.Video Compression Main stream: H.265/H.264/MJPEGH.264: Main Profile/High ProfileVideo Bitrate 32 Kbps to 8192 KbpsAudio Compression G.711alaw/G.711ulaw/G.722.1/G.726/MP2L2Audio Bitrate G.711alaw/G.711ulaw: 64 Kbps G.722.1/G.726: 16 KbpsMP212: 32 Kbps/64 Kbps/128 KbpsResolution Main stream:50 Hz: 25 fps (1920 × 1080, 1280 × 720, 704 × 576, 640 × 480, 352 × 288) 60 Hz: 30 fps (1920 × 1080, 1280 × 720, 704 × 480, 640 × 480, 352 × 240)Basic Event Detection Motion Detection, Video Tampering Detection, ExceptionNetworkSmart Record ANR (Automatic Network Replenishment)Network Storage Built-in memory card slot, support Micro SD/SDHC/SDXC, up to 256 GBProtocols IPv4/IPv6, HTTP, HTTPS, 802.1x, Qos, FTP, SMTP, UPnP, SNMP, DNS, DDNS, NTP, RTSP,RTCP, RTP, TCP/IP, DHCP, PPPoE, BonjourAPI Open-ended, support ONVIF, ISAPI, and CGI, support HIKVISION SDK and Third-PartyManagement PlatformSimultaneous Live View Up to 4 × 4 channelsUser/Host Up to 32 users3 levels: Administrator, Operator and UserSecurity Measures User authentication (ID and PW), Host authentication (MAC address); HTTPSencryption; IEEE 802.1x port-based network access control; IP address filtering Client iVMS-4200, iVMS-4500, iVMS-5200, Hik-ConnectWeb Browser IE 8 to 11, Chrome 31.0 to 44, Firefox 30.0 to 51InterfaceNetwork Interface 1 RJ45 10 M/100 M EthernetAudio Interface 1-ch audio input and 1-ch audio outputGeneralPower12 VDC, 2.0 A & PoE (802.3 at), 42.5 to 57 VDC, 0.6 A, class 4Max.24 W (Max. 6 W for IR)Working Temperature -10°C to 50°C (14°F to 122°F)Working Humidity ≤ 90%Protection Level TVS 2000V Lightning Protection, Surge Protection and Voltage Transient Protection Material PC + ABS & Aluminum alloyDimensions Φ 183 mm × 133 mm (Φ 7.20" × 5.24")Weight Approx. 0.9 kg (1.98 lb)。
毒死蜱的禁限用与替代产品的选择

第6期
申继忠:毒死蜱的禁限用与替代布要取消毒死蜱的登记并禁用毒死 蜱[4,5]。
但是,目前为止美国联邦环保署尚未对毒死蜱 的未来做出任何决定。2021 年 4 月 29 日来自食品 安全中心(Center for Food safety)的最新消息称,旧金 山第九巡回上诉法院于当天下令环境保护署(EPA) 禁止所有对大脑有害的杀虫剂毒死蜱的食品作物使 用,或者只保留对工人和儿童安全的使用。预计美 国环保署在 2022 年全部评审完成之后才会有新的 决议。 1.3 加拿大[6]
·12·
世界农药
第 43 卷
⑸ 2014 年:修订人类健康风险评估 2014 年,作为登记审查过程的一部分,环保署 完成了对所有毒死蜱用途的人类健康风险评估的修 订。根据收到的新信息,包括公众意见,更新了 2011 年 6 月的初步人类健康风险评估结论。环保署考虑 到多种来源的暴露,包括食物和水的暴露、吸入和 皮肤接触暴露等;考虑到所有人口,包括婴儿、儿 童和育龄妇女;还纳入了 2012 年喷雾飘移暴露评估 的信息,以及限制喷雾飘移的新措施。 ⑹ 2016 年:再次修订人类健康风险评估 在收到公众对 2014 年风险评估的意见和农药 法(FIFRA)科学咨询小组的反馈后,EPA 于 2016 年 再次修订了毒死蜱的人类健康风险评估。 ⑺ 2017-2019 年:拒绝撤销最大残留限量的申请 2017 年 3 月,一项要求环保署撤销毒死蜱的所 有食品中最大残留限量规定并取消毒死蜱的所有登 记的请愿书被美国环保署驳回。环保署认为,尽管 经过几年的研究,解释神经发育影响的研究仍然没 有结论,在完成登记审查的剩余时间内,仍有必要 做进一步的科学评估。作为正在进行的登记审查的 一部分,环保署将继续审查有关毒死蜱对神经发育 的影响。 2018 年 8 月 9 日,美国旧金山第九巡回上诉法 院命令美国环保署在 60 d 内禁止使用毒死蜱。 9 月 份,司法部要求由 11 名法官组成的陪审团复审。法 院在 2019 年 3 月 26 日听取口头辩论后,于 2019 年 4 月 19 日命令环保署在 90 d 内就其拒绝 2017 年 3 月这份请愿书发布完整的最终决定。 ⑻ 2020 年:生态风险评估草案和修订的人类 健康风险评估 2020 年 9 月,环保署发布了以下评估报告:① 毒死蜱登记审查的生态风险评估草案;② 用于毒死 蜱登记审查的人类健康风险评估第 3 次修订案;③
缩醛磷脂能量

缩醛磷脂能量下载温馨提示:该文档是我店铺精心编制而成,希望大家下载以后,能够帮助大家解决实际的问题。
文档下载后可定制随意修改,请根据实际需要进行相应的调整和使用,谢谢!并且,本店铺为大家提供各种各样类型的实用资料,如教育随笔、日记赏析、句子摘抄、古诗大全、经典美文、话题作文、工作总结、词语解析、文案摘录、其他资料等等,如想了解不同资料格式和写法,敬请关注!Download tips: This document is carefully compiled by the editor. I hope that after you download them, they can help yousolve practical problems. The document can be customized and modified after downloading, please adjust and use it according to actual needs, thank you!In addition, our shop provides you with various types of practical materials, such as educational essays, diary appreciation, sentence excerpts, ancient poems, classic articles, topic composition, work summary, word parsing, copy excerpts,other materials and so on, want to know different data formats and writing methods, please pay attention!缩醛磷脂是一种重要的生物分子,在细胞膜的结构和功能中起着关键作用。
Zaltrap (ziv-aflibercept) 产品说明书

Zaltrap® (ziv‐aflibercept)(Intravenous)Document Number: IC‐0161 Last Review Date: 03/02/2023Date of Origin: 02/07/2013Dates Reviewed: 12/2013, 03/2014, 06/2014, 09/2014, 12/2014, 03/2015, 05/2015, 08/2015, 11/2015,02/2016, 05/2016, 08/2016, 11/2016, 02/2017, 05/2017, 08/2017, 11/2017, 2/2018, 5/2018, 09/2018, 12/2018, 03/2019, 06/2019, 9/2019, 12/2019, 03/2020, 06/2020, 09/2020, 03/2022, 03/2023I.Length of AuthorizationCoverage will be provided for 6 months and may be renewed.II.Dosing LimitsA.Quantity Limit (max daily dose) [NDC Unit]:∙Zaltrap 100 mg/4 mL injection: 2 vials per 28 days∙Zaltrap 200 mg/8 mL injection: 4 vials per 28 daysB.Max Units (per dose and over time) [HCPCS Unit]:∙500 billable units every 14 daysIII.Initial Approval Criteria 1Coverage is provided in the following conditions:∙Patient is at least 18 years of age; ANDUniversal Criteria 1∙Patient does not have recent history of severe hemorrhage; AND∙Ziv-aflibercept will be not administered for at least 4 weeks following major surgery; AND ∙Patient does not have a surgical wound that has not fully healed; ANDColorectal Cancer (CRC) † 1,2,6∙Patient has metastatic disease that is resistant to or has progressed following an oxaliplatin-containing regimen (e.g., FOLFOX, CapeOX) †; ANDo Used in combination with FOLFIRI (fluorouracil, leucovorin, and irinotecan); OR∙Used as primary treatment for patients with unresectable metastases and previous adjuvant FOLFOX (fluorouracil, leucovorin, and oxaliplatin) or CapeOX (capecitabine and oxaliplatin) within the past 12 months; ANDo Used in combination with irinotecan or FOLFIRI; OR∙Used as subsequent therapy for progression of advanced or metastatic disease in patients not previously treated with irinotecan-based therapy; ANDo Used in combination with irinotecan or FOLFIRIAppendiceal Adenocarcinoma ‡ 2∙Used as subsequent therapy for progression of advanced or metastatic disease in patients not previously treated with irinotecan-based therapy; AND∙Used in combination with irinotecan or FOLFIRI† FDA-labeled indication(s); ‡ Compendia Recommended Indication(s); ФOrphan DrugIV.Renewal Criteria 1,2Coverage may be renewed based upon the following criteria:∙Patient continues to meet the universal and indication-specific criteria as identified in section III; AND∙Disease response with treatment as defined by stabilization of disease or decrease in size or spread of tumor; AND∙Absence of unacceptable toxicity from the drug. Examples of unacceptable toxicity include: hemorrhage, gastrointestinal perforation, fistula formation, uncontrolled hypertension,hypertensive crisis, hypertensive encephalopathy, wound healing complications, arterialthromboembolic events, proteinuria (≥2 g/24 hours), nephrotic syndrome, thromboticmicroangiopathy (TMA), neutropenic complications, reversible posteriorleukoencephalopathy syndrome (RPLS), severe diarrhea/dehydration, etc.V.Dosage/Administration 1,2All indications Administer 4 mg/kg of actual body weight as an intravenous (IV) infusionevery two weeks, until disease progression or unacceptable toxicity.VI.Billing Code/Availability InformationHCPCS Code:∙J9400 – Injection, ziv-aflibercept, 1 mg; 1 billable unit = 1 mgNDC(s):∙Zaltrap 100 mg/4 mL solution, single-dose vial: 00024-5840-xx∙Zaltrap 200 mg/8 mL solution, single-dose vial: 00024-5841-xxVII.References1.Zaltrap [package insert]. Bridgewater, NJ; Sanofi-Aventis U.S. LLC; December 2020.Accessed February 2023.2.Referenced with permission from the NCCN Drugs & Biologics Compendium (NCCNCompendium®) ziv-aflibercept. National Comprehensive Cancer Network, 2023. The NCCNCompendium® is a derivative work of the NCCN Guidelines®. NATIONALCOMPREHENSIVE CANCER NETWORK®, NCCN®, and NCCN GUIDELINES® aretrademarks owned by the National Comprehensive Cancer Network, Inc. To view the mostrecent and complete version of the Compendium, go online to . Accessed February2023.3.Fahrenbruch R, Kintzel P, Bott AM, et al. Dose Rounding of Biologic and CytotoxicAnticancer Agents: A Position Statement of the Hematology/Oncology PharmacyAssociation. J Oncol Pract. 2018 Mar;14(3):e130-e136.4.Hematology/Oncology Pharmacy Association (2019). Intravenous Cancer Drug Waste IssueBrief. Retrieved from /images/hopa/advocacy/Issue-Briefs/Drug_Waste_2019.pdf5.Bach PB, Conti RM, Muller RJ, et al. Overspending driven by oversized single dose vials ofcancer drugs. BMJ. 2016 Feb 29;352:i788.6.Tabernero J, Paccard C, Chiron M, et al. Placental growth factor and the angiogenicenvironment based on analysis of baseline plasma biomarkers from the VELOUR trial.Journal of Clinical Oncology35, no. 4_suppl(February 01, 2017)592-592. DOI:10.1200/JCO.2017.35.4_suppl.5927.Sanofi. A Multinational, Randomized, Double-blind Study, Comparing the Efficacy ofAflibercept Once Every 2 Weeks Versus Placebo in Patients With Metastatic ColorectalCancer (MCRC) Treated With Irinotecan / 5-FU Combination (FOLFIRI) After Failure of anOxaliplatin Based Regimen. Available from:https:///ct2/show/NCT00561470?term=NCT00561470&draw=2&rank=1. Identifier: NCT00561470. Accessed January 2020.8.Referenced with permission from the NCCN Clinical Practice Guidelines in Oncology: ColonCancer. Version 3.2022. National Comprehensive Cancer Network, 2023. The NCCNCompendium® is a derivative work of the NCCN Guidelines®. NATIONALCOMPREHENSIVE CANCER NETWORK®, NCCN®, and NCCN GUIDELINES® aretrademarks owned by the National Comprehensive Cancer Network, Inc. To view the mostrecent and complete version of the Compendium, go online to . Accessed February2023.Appendix 1 – Covered Diagnosis Codes1010C18.0 Malignant neoplasm of cecumC18.1 Malignant neoplasm of appendixC18.2 Malignant neoplasm of ascending colonC18.3 Malignant neoplasm of hepatic flexureC18.4 Malignant neoplasm of transverse colonC18.5 Malignant neoplasm of splenic flexureC18.6 Malignant neoplasm of descending colonC18.7 Malignant neoplasm of sigmoid colonC18.8 Malignant neoplasm of overlapping sites of large intestinesC18.9 Malignant neoplasm of colon, unspecifiedC19 Malignant neoplasm of rectosigmoid junctionC20 Malignant neoplasm of rectumC21.8 Malignant neoplasm of overlapping sites of rectum, anus and anal canalC78.00 Secondary malignant neoplasm of unspecified lungC78.01 Secondary malignant neoplasm of right lungC78.02 Secondary malignant neoplasm of left lungC78.6 Secondary malignant neoplasm of retroperitoneum and peritoneumC78.7 Secondary malignant neoplasm of liver and intrahepatic bile ductZ85.038 Personal history of other malignant neoplasm of large intestineAppendix 2 – Centers for Medicare and Medicaid Services (CMS)Medicare coverage for outpatient (Part B) drugs is outlined in the Medicare Benefit Policy Manual (Pub. 100-2), Chapter 15, §50 Drugs and Biologicals. In addition, National Coverage Determination (NCD), Local Coverage Determinations (LCDs), and Local Coverage Articles (LCAs) may exist and compliance with these policies is required where applicable. They can be found at:https:///medicare-coverage-database/search.aspx. Additional indications may be covered at the discretion of the health plan.Medicare Part B Covered Diagnosis Codes (applicable to existing NCD/LCD/LCA): N/AJurisdiction Applicable State/US Territory ContractorE (1) CA, HI, NV, AS, GU, CNMI Noridian Healthcare Solutions, LLCF (2 & 3) AK, WA, OR, ID, ND, SD, MT, WY, UT, AZ Noridian Healthcare Solutions, LLC5 KS, NE, IA, MO Wisconsin Physicians Service Insurance Corp (WPS)6 MN, WI, IL National Government Services, Inc. (NGS)Jurisdiction Applicable State/US Territory ContractorH (4 & 7) LA, AR, MS, TX, OK, CO, NM Novitas Solutions, Inc.8 MI, IN Wisconsin Physicians Service Insurance Corp (WPS) N (9) FL, PR, VI First Coast Service Options, Inc.J (10) TN, GA, AL Palmetto GBA, LLCM (11) NC, SC, WV, VA (excluding below) Palmetto GBA, LLCL (12) DE, MD, PA, NJ, DC (includes Arlington &Novitas Solutions, Inc.Fairfax counties and the city of Alexandria in VA)K (13 & 14) NY, CT, MA, RI, VT, ME, NH National Government Services, Inc. (NGS)15 KY, OH CGS Administrators, LLC。
AVVIO RAPIDO Router mobili 5G 安装指南说明书
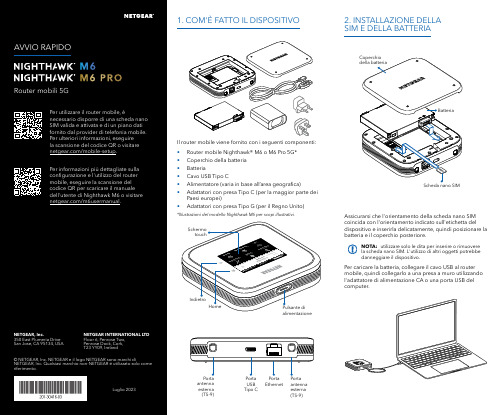
Per caricare la batteria, collegare il cavo USB al router mobile, quindi collegarlo a una presa a muro utilizzando l'adattatore di alimentazione CA o una porta USB del computer.Assicurarsi che l'orientamento della scheda nano SIM coincida con l'orientamento indicato sull'etichetta del dispositivo e inserirla delicatamente, quindi posizionare la batteria e il coperchio posteriore.NOTA: utilizzare solo le dita per inserire o rimuovere la scheda nano SIM. L'utilizzo di altri oggetti potrebbe danneggiare il dispositivo.1. COM'È FATTO IL DISPOSITIVO2. INSTALLAZIONE DELLA SIM E DELLA BATTERIAIl router mobile viene fornito con i seguenti componenti:• Router mobile Nighthawk® M6 o M6 Pro 5G*• Coperchio della batteria • Batteria• Cavo USB Tipo C• Alimentatore (varia in base all’area geografica)• Adattatori con presa Tipo C (per la maggior parte dei Paesi europei)•Adattatori con presa Tipo G (per il Regno Unito)*Illustrazioni del modello Nighthawk M6 per scopi illustrativi.antenna esterna (TS-9)antenna esterna (TS-9)USB Tipo CEthernetCONFORMITÀ NORMATIVA E NOTE LEGALIPer informazioni sulla conformità alle normative, compresala Dichiarazione di conformità UE, visitare il sito Web https:///it/about/regulatory/.Prima di collegare l'alimentazione, consultare il documento relativo alla conformità normativa.Può essere applicato solo ai dispositivi da 6 GHz: utilizzare il dispositivo solo in un ambiente al chiuso. L'utilizzo di dispositivi a 6 GHz è vietato su piattaforme petrolifere, automobili, treni, barche e aerei, tuttavia il suo utilizzo è consentito su aerei di grandi dimensioni quando volano sopra i 3000 metri di altezza. L'utilizzo di trasmettitori nella banda 5.925‑7.125 GHz è vietato per il controllo o le comunicazioni con sistemi aerei senza equipaggio.SUPPORTO E COMMUNITYDalla pagina del portale di amministrazione Web, fare clic sull'icona con i tre puntini nell'angolo in alto a destra per accedere ai file della guida e del supporto.Per ulteriori informazioni, visitare il sito netgear.it/support per accedere al manuale dell'utente completo e per scaricare gli aggiornamenti del firmware.È possibile trovare utili consigli anche nella Community NETGEAR, alla pagina /it.GESTIONE DELLE IMPOSTAZIONI TRAMITE L'APP NETGEAR MOBILEUtilizzare l'app NETGEAR Mobile per modificare il nome della rete Wi-Fi e la password. È possibile utilizzarla anche per riprodurre e condividere contenutimultimediali e accedere alle funzioni avanzate del router mobile.1. Accertarsi che il dispositivo mobile sia connesso a Internet.2. Eseguire la scansione del codice QR per scaricare l'appNETGEAR Mobile.Connessione con il nome e la password della rete Wi-Fi 1. Aprire il programma di gestione della rete Wi‑Fi deldispositivo.2. Individuare il nome della rete Wi‑Fi del router mobile(NTGR_XXXX) e stabilire una connessione.3. Only Connessione tramite EthernetPer prolungare la durata della batteria, l'opzione Ethernet è disattivata per impostazione predefinita. Per attivarla, toccare Power Manager (Risparmio energia) e passare a Performance Mode (Modalità performance).4. CONNESSIONE A INTERNETÈ possibile connettersi a Internet utilizzando il codice QR del router mobile da uno smartphone oppure selezionando manualmente il nome della rete Wi‑Fi del router e immettendo la password.Connessione tramite codice QR da uno smartphone 1. Toccare l'icona del codice QR sulla schermata inizialedello schermo LCD del router mobile.NOTA: quando è inattivo, lo schermo touch si oscura per risparmiare energia. Premere brevemente e rilasciare il pulsante di alimentazione per riattivare lo schermo.3. CONFIGURAZIONE DEL ROUTER MOBILETenere premuto il pulsante di accensione per due secondi, quindi seguire le istruzioni visualizzate sullo schermo per impostare un nome per la rete Wi‑Fi e una password univoci.La personalizzazione delle impostazioni Wi‑Fi consente di proteggere la rete Wi‑Fi del router mobile.Impostazioni APNIl router mobile legge i dati dalla scheda SIM e determina automaticamente le impostazioni APN (Access Point Name) corrette con i piani dati della maggior parte degli operatori. Tuttavia, se si utilizza un router mobile sbloccato con un operatore o un piano meno comune, potrebbe essere necessario immettere manualmente le impostazioni APN.Se viene visualizzata la schermata APN Setup Required (Configurazione APN richiesta), i dati APN dell’operatore non sono presenti nel nostro database ed è necessario inserirli manualmente. Immettere i valori fornitidall’operatore nei campi corrispondenti, quindi toccare Save (Salva) per completare la configurazione.NOTA: l’operatore determina le proprie informazioni APN e deve fornire le informazioni per il proprio piano dati. Si consiglia di contattare il proprio operatore per le impostazioni APN corrette e di utilizzare solo l’APN suggerito per il piano specifico.Schermata inizialeAl termine della configurazione, il router visualizza la schermata iniziale:Wi‑FiPotenza Carica Rete Codice QR connessione rapida Wi‑FiNome e Wi‑FiIcona del codice QR。
万和燃气灶使用说明书

MANUAL DE INSTRUCCIONES | HORNOSINSTALACIÓN, USO Y MANTENIMIENTOINSTALACIÓNARTEFACTO APROBADO PARA USO DIMICILIARIO.arImportante:(!) Previo a la instalación, asegurarse de que las condiciones de naturaleza y presión del gas son compatibles con los ajustes del artefacto.(!) La instalación y conexión debe realizarse de acuerdo con las normas de instalación vigentes, poniendo atención a las disposiciones aplicables en cuanto a la ventilación.(!) El mobiliario donde se coloque el horno debe ser de fácil acceso ante un eventual trabajo del Servicio Técnico Oficial sobre el artefacto.Todos los trabajos de instalación deberán llevarse a cabo por un profesional matriculado, y en un todo de acuerdo con lo establecido en las disposiciones y normas vigentes.Para cualquier operación de instalación, mantenimiento o limpieza del artefacto, se debe interrumpir la conexión con la red eléctrica, desconectando la ficha del tomacorriente, o cortando el suministro eléctrico desde el tablero de alimentación.(!) Es importante garantizar una correcta aislación térmica para evitar el calentamiento excesivo de las paredes, sobre todo si el material del nicho es de madera, o aglomerado. En tal caso, se recomienda utilizar cartón aislante.Procedimiento:Recomendaciones previas:• Verifique que el alojamiento previsto cumpla con las medidas requeridas y posea la ventilación definida (Figura 2).• Prevea la ubicación del tomacorriente con conexión a tierra. Debe estar conectado fuera del nicho y preferentemente del lado izquierdo del observador (Figura 4), de manera que se pueda desconectar fácilmente en caso de una remoción o reparación.• El cable de alimentación eléctrica se debe ubicar de modo tal que no alcance en ningún punto una temperatura que supere en 50ºC la temperatura ambiente.• El cable de alimentación no debe ser sustituido ni reparado por el cliente. Para ello debe recurrirse a un electricista matriculado.•La conexión a la red de gas deberá realizarse por medio de un tubo metálico rígido o bien por medio de untubo flexible de acero inoxidable de pared continua, el cual deberá estar certificado por un organismo reconocido por ENARGAS . El tubo de entrada del gas en cocinas y anafes se presenta con una rosca ½” gas macho.• Antes de conectar el artefacto, es aconsejable soplar las cañerías para desalojar posibles cuerpos extraños.•El adhesivo que une el aislante al mueble debe resistir temperaturas no inferiores a 90 ºC, para evitar deformaciones o desencoladuras del revestimiento.• Los muebles adyacentes a los nichos deben poder soportar una temperatura de 65º C por sobre la temperatura del ambiente (IRAM 2092-2-6).1- Instale un caño flexible de cobre o acero inoxidable con rosca G 1/2" (aprobado por ENARGAS ) a la cupla prevista para la conexión de gas de red, previamente colocando fijador al terminal macho del caño y procediendo luego a enroscar el mismo a la cupla.2- Presente el horno en el nicho sin arrimar del todo, para poder conectar el extremo restante de caño al barral, ajustando la tuerca junto a la arandela de sello provista con el caño.3- Verifique en todas las conexiones que no haya perdida de gas, mediante una solución jabonosa, nunca con el uso de llamas.4- Para la ventilación, conectar un caño galvanizado de 3" (75 mm) con salida al exterior, como se indica en la Figura 3.5- Arrime el horno a su posición final y verifique el artefacto cuente con la suficiente ventilación, tal como se indica en la Figura 2, ya que esta es esencial para la circulación de aire fresco en torno al artefacto. Por último, conecte la ficha eléctrica al tomacorriente y verifique el correcto funcionamiento del equipo.Cambio de tipo de gas: gas natural a gas licuado.El artefacto viene preparado de fábrica para su utilización con gas natural . Parautilizarlo con gas licuado , es necesario reemplazar el inyector del quemador del horno,regular el aire primario del quemador y mínimo en la válvula. Antes de efectuar esteprocedimiento, desconecte el cable de alimentación eléctrica.Procedimiento:• En la parte posterior de la cocina, quitar los tornillos del portapicos y retirarlo parar realizar el cambio de inyector.• Desenroscar el inyector y sustituirlo por el que corresponde al nuevo tipo de gas, según la tabla 1.Regulación del mínimo de la válvula1- Encender el quemador del horno girando la perilla hasta la posición de mínimo.2- Retirar la perilla y con un destornillador de punta plana, actuar en sentido horario sobre el tornillo de regulación ubicado en la parte externa de la varilla de la válvula hasta obtener una llama lo más corta y estable posible.3- Colocar nuevamente la perilla.Horno empotrable 900Horno empotrable 550Horno empotrable 900Horno empotrado 550Figura 1: tamaño del artefactoFigura 2: tamaño del nichoV I S T A F R O N T A LV I S T A S U P E R I O RMedidas expresadas en milímetrosFigura 3:Figura 4Distancia máx.al tomacorriente:Ø 1,30 mm Gas Natural Ø 1,50 mm Horno 550Horno 900Tabla 1: inyectores Gas Licuado Ø 1,0 mm Ø 1,1 mm Gas Natural Horno 550Horno 900Tabla 2: consumos Gas Licuado 2468 Kcal/h 2,870 Kw 3285 Kcal/h 3,820 Kw 2822 Kcal/h 3,282 Kw 3415 Kcal/h 3,972 Kw AG iMANTENIMIENTOPRECAUCIONES Y RECOMENDACIONES PREVIAS(!) La utilización prolongada del artefacto puede necesitar una ventilación complementaria, ya sea abriendo una ventana o por ventilación mecánica.(!) No está previsto que el artefacto sea utilizado por personas (incluídos niños) con capacidades físicas, sensoriales o mentales reducidas, o con falta de experiencia y conocimiento, excepto que se le haya dado instrucción o supervisión referida al uso del aparato por una persona responsable de su seguridad.Encendido: para encender el horno mediante el encendido electrónico, oprima y gire la perilla de la válvula en sentido anti-horario hasta la posición de máximo . Presione el interruptor de encendido y luego pulse la perilla firmemente para accionar el dispositivo de seguridad y el quemador se encenderá automáticamente. Mantenga la perilla presionada durante 10 a 15 segundos. Al soltarla compruebe si el quemador permanece encendido.Para encender el horno en forma manual , oprima y gire la perilla de la válvula en sentido anti-horario hasta la posición de máximo . Pulse esta perilla firmemente para accionar eldispositivo de seguridad. Encienda un fósforo y acérquelo al orificio ubicado en el piso del horno. Al tomar llama el quemador, mantenga la perilla presionada durante 10 a 15 segundos. Al soltarla compruebe si el quemador permanece encendido.• Para su seguridad, el horno Luxor Gas presenta en sus llaves un dispositivo que requiere que las perillas deban ser oprimidas para sacarlas de la posición de cerrado, evitando que por descuidos y travesuras infantiles se produzcan aperturas involuntarias.• Durante la operación de encendido del quemador, este dispositivo no deberá accionarse por más de 15 segundos. Si durante este tiempo el quemador no se enciende, dejar de actuar sobre el dispositivo, abrir la puerta del horno y esperar al menos 1 minuto antes de reencender.• En caso de una extinción accidental de las llamas del quemador, cerrar el mando del mismo y no intentar reencender éste durante por lo menos 5 minutos.• En caso de no permanecer encendido el quemador, cierre el pasaje de gas al horno girando la perilla mencionada a la posición cerrado y repita la operación. • Las superficies del horno se encuentran calientes durante el uso normal. Mantenga alejados de ellas a los niños.Encendido de luz: colocando el interruptor correspondiente a esta función en posición ON , encenderá la luz del o del horno.Los hornos Luxor Gas son aptos para cocinar hasta 5 niveles distintos. Para lograr un buen rendimiento, se recomienda precalentar el horno durante 10 minutos, antes de la cocción. Centrando los alimentos sobre la superficie de cocción y con una separación mínima entre los mismos de 4 cm., se obtiene resultados óptimos.La puerta de cristal brinda un cierre hermético a través de un burlete siliconado, y por su encastre en los laterales del horno, evita las fugas de calor hacia los costados.Encendido de la luz del horno.Las cocinas Luxor Gas vienen equipadas con luz en el horno. Para encenderla, colocar el interruptor correspondiente en posición ON .Uso del horno convector.Algunos modelos de cocinas Luxor Gas (ver Fig. 8) incorporan en sus hornos el sistema de convección que permite modificar el flujo de calor proveniente delquemador del horno para lograr una cocción uniforme de varios alimentos deforma simultánea y en menor tiempo. Es un componente ideal para la cocción de carnes o galletas.! A l utilizar el sistema convector se trabaja un 20% más rápido que en hornos convencionales, por este motivo la temperatura puede disminuir-se 20º o 25ºC a la indicada en las recetas y reducir a un tercio el tiempo de cocción recomendado.! Al introducir diversas bandejas en el horno, asegurarse de que ladistancia entre las mismas sea de 2,5 cm., de igual manera respecto a lasparedes del artefacto, para facilitar una circulación apropiada del aire.! Utilizar ba n dejas con bordes bajos o sin bordes sin emplear papel aluminio o tapas para no bloquear el flujo del aire, permitiendo que pueda llegar correctamente a los alimentos.Procedimiento:1- Distribuya los alimentos teniendo presente las precauciones indicadas en el manual.2- Precalentar el horno 20 minutos antes de la cocción. Distribuir los alimentos en el interior y colocar el interruptor del sistema convector en posición ON (ver Fig. 9). 3- Finalizado el proceso de cocción, cerrar la válvula del quemador del horno y posicionar el interruptor correspondiente en modo OFF.Limpieza del artefacto(!) Antes de realizar cualquier tarea sobre el artefacto, desconéctelo de la red eléctrica.Al momento de la limpieza, es conveniente seguir los consejos detallados a continuación:• El artefacto debe estar tibio o frío.• Para limpieza exterior o interior del horno, no utilice material abrasivo, líquidos cáusticos (lavandina, limpia hornos, etc.), esponjas metálicas ni limpiadores a vapor.• Use un trapo humedecido y jabón o detergente.• Enjuague las distintas piezas con agua limpia y séquelas.Limpieza del visor del hornoEs aconsejable limpiar el cristal interno de la puerta del horno con agua tibia y detergente, enjuagando con un paño húmedo, después de cada cocción. Cuando se desee realizar una limpieza más profunda, puede retirar fácilmente el cristal interno y aún la puerta completa, para realizar dicha tarea en un lugar más cómodo. El cristal interno se retira quitando los dos tornillos que sujetan las trabas.(!) Evite el uso de agua en exceso, ya que puede dañar las placas de aislación internas en la puerta del horno.Quitar la puerta del horno.1- Abra la puerta del horno completamente.2- Suba los enganches "A" hasta que calcen en las ranuras del brazo "B".3- Cierre levemente la puerta, aproximadamente unos 30º , retírela hacia afuera y levemente hacia arriba, de ese modo la bisagra se desprenderá y la puerta quedará libre.Rearmado.1- Verifique que los enganches "A" se encuentren en las ranuras del brazo superior "B".2- Introduzca los extremos del brazo superior "B" en las ranuras del frente de horno.3- Baje levemente la puerta hasta insertar los extremos de la pieza "C" en las ranuras interiores del frente de horno. Verifique que la traba calce en su alojamiento.4- Abra totalmente la puerta y destrabe los enganches "A". La puerta debe abrir y cerrar libremente.• Es de importancia que conserve este manual para poder consultarlo en todo momento. En caso de venta, cesión o de mudanza, este documento debe permanecer junto al artefacto para informar al nuevo propietario sobre su funcionamiento y sobre las advertencias correspondientes.• Antes de emplear el horno para cocción por primera vez, precalentarlo al máximo en lapsos de 30 minutos (con una adecuada ventilación del lugar) hasta eliminar los olores del artefacto. • Controle periódicamente la cañería de ventilación de sus artefactos. Los gases de combustión que no salen al exterior son peligrosos para la salud.• No intente localizar pérdidas de gas mediante el uso de llamas de ningún tipo. Sólo hágalo con agua jabonosa. Las burbujas indicarán el escape.• Antes de encender cualquier quemador o artefacto, es conveniente comprobar por la posición de las llaves o por el olfato si se ha producido alguna perdida de gas. Si ha ocurrido, cierre la llave respectiva, suprima toda llama, no encienda ni apague artefactos eléctricos y ventile el ambiente.(!)Si es necesaria alguna reparación en el artefacto, deberá ser realizada exclusivamente por el servicio técnico perteneciente a Luxor Gas. De ninguna manera intervenga o manipule por cuenta propia el artefacto u otras partes de la instalación.Estimado cliente:Parasolicitarinformacióntécnica,adquirirrepuestososolicitarServicioTécnico,puedecontactarseporlasiguientevía:E-mail:****************************.arFigura 8: hornos convectoresFigura 9: interruptor del sistema convector Horno convectorHorno convectorCOCINA 500。
- 1、下载文档前请自行甄别文档内容的完整性,平台不提供额外的编辑、内容补充、找答案等附加服务。
- 2、"仅部分预览"的文档,不可在线预览部分如存在完整性等问题,可反馈申请退款(可完整预览的文档不适用该条件!)。
- 3、如文档侵犯您的权益,请联系客服反馈,我们会尽快为您处理(人工客服工作时间:9:00-18:30)。
Non-Steroidal Anti-Inflammatory Drugs (NSAIDs) Including Selective Cyclooxygenase-2 Inhibitors (COX-2 Inhibitors) 7.4 Dual Blockade of the Renin-Angiotensin System (RAS) 8 USE IN SPECIFIC POPULATIONS 8.1 Pregnancy 8.3 Nursing Mothers 8.4 Pediatric Use 8.5 Geriatric Use 8.6 Race 8.7 Renal Impairment 8.8 Hepatic Impairment 10 OVERDOSAGE 11 DESCRIPTION 12 CLINICAL PHARMACOLOGY 12.1 Mechanism of Action 12.2 Pharmacodynamics 12.3 Pharmacokinetics 13 NONCLINICAL TOXICOLOGY 13.1 Carcinogenesis, Mutagenesis, Impairment of Fertility 14 CLINICAL STUDIES 14.1 Hypertension 14.2 Hypertensive Patients with Left Ventricular Hypertrophy 14.3 Nephropathy in Type 2 Diabetic Patients 16 HOW SUPPLIED/STORAGE AND HANDLING 17 PATIENT COUNSELING INFORMATION *Sections or subsections omitted from the full prescribing information are not listed.
Lithium: Risk of lithium toxicity. (7.2) NSAIDs: Increased risk of renal impairment and reduced diuretic, natriuretic, and antihypertensive effects. (7.3) Dual inhibition of the renin-angiotensin system: Increased risk of renal impairment, hypotension, syncope, and hyperkalemia. (7.4) ----------------------- USE IN SPECIFIC POPULATIONS ---------------------- COZAAR is not recommended in pediatric patients less than 6 years of age or in pediatric patients with glomerular filtration rate less than 30 mL/min/1.73 m2. (2.1, 8.4) Hepatic Impairment: Recommended starting dose 25 mg once daily. (2.4, 8.8, 12.3) See 17 for PATIENT COUNSELING INFORMATION and FDAapproved patient labeling. Revised: 12/2015
HIGHLIGHTS OF PRESCRIBING INFORMATION These highlights do not include all the information needed to use COZAAR safely and effectively. See full prescribing information for COZAAR. COZAAR® (losartan potassium) tablets, for oral use Initial U.S. Approval: 1995 WARNING: FETAL TOXICITY See full prescribing information for complete boxed warning. When pregnancy is detected, discontinue COZAAR as soon as possible. Drugs that act directly on the renin-angiotensin system can cause injury and death to the developing fetus. (5.1) ----------------------------INDICATIONS AND USAGE ---------------------------COZAAR is an angiotensin II receptor blocker (ARB) indicated for: Treatment of hypertension, to lower blood pressure in adults and children greater than 6 years old. Lowering blood pressure reduces the risk of fatal and nonfatal cardiovascular events, primarily strokes and myocardial infarctions. (1.1) Reduction of the risk of stroke in patients with hypertension and left ventricular hypertrophy. There is evidence that this benefit does not apply to Black patients. (1.2) Treatment of diabetic nephropathy with an elevated serum creatinine and proteinuria in patients with type 2 diabetes and a history of hypertension. (1.3) ----------------------- DOSAGE AND ADMINISTRATION ----------------------Hypertension Usual adult dose: 50 mg once daily. (2.1) Usual pediatric starting dose: 0.7 mg per kg once daily (up to 50 mg). (2.1) Hypertensive Patients with Left Ventricular Hypertrophy Usual starting dose: 50 mg once daily. (2.2) Add hydrochlorothiazide 12.5 mg and/or increase COZAAR to 100 mg followed by an increase to hydrochlorothiazide 25 mg if further blood pressure response is needed. (2.2, 14.2) Nephropathy in Type 2 Diabetic Patients Usual dose: 50 mg once daily. (2.3) Increase dose to 100 mg once daily if further blood pressure response is needed. (2.3) FULL PRESCRIBING INFORMATION: CONTENTS* WARNING: FETAL TOXICITY 1 INDICATIONS AND USAGE 1.1 Hypertension 1.2 Hypertensive Patients with Left Ventricular Hypertrophy 1.3 Nephropathy in Type 2 Diabetic Patients 2 DOSAGE AND ADMINISTRATION 2.1 Hypertension 2.2 Hypertensive Patients with Left Ventricular Hypertrophy 2.3 Nephropathy in Type 2 Diabetic Patients 2.4 Dosage Modifications in Patients with Hepatic Impairment 2.5 Preparation of Suspension (for 200 mL of a 2.5 mg/mL suspension) 3 DOSAGE FORMS AND STRENGTHS 4 CONTRAINDICATIONS 5 WARNINGS AND PRECAUTIONS 5.1 Fetal Toxicity 5.2 Hypotension in Volume- or Salt-Depleted Patients 5.3 Renal Function Deterioration 5.4 Hyperkalemia 6 ADVERSE REACTIONS 6.1 Clinical Trials Experience 6.2 Postmarketing Experience 7 DRUG INTERACTIONS 7.1 Agents Increasing Serum Potassium 7.2 Lithium