at_a_glance_c45-578384
指纹门禁系统管理系统设计

南京工程学院自动化学院本科毕业设计(论文)题目:指纹门禁系统管理系统设计专业:班级:学号:学生姓名:指导教师:起迄日期:设计地点:Graduation Design (Thesis)Fingerprint door system management system designBySupervised bySchool of AutomationNanjing Institute of TechnologyJuly, 2010摘要如今保险箱已经进入了各行各业,大量用于银行、宾馆、家庭等场合,而门锁是决定保险箱安全系数的最重要的因素。
随着科技的进步,指纹识别技术己经开始走入了我们的日常生活之中。
由于指纹具有唯一性和不变性,因此将指纹识别的应用,将大大提高安全性和可靠性。
指纹门禁系统硬件主要由指纹识别模块、微控器、液晶显示器、键盘、指纹识别模块的电源管理、存储器、日历/时钟芯片、电压检测、电控锁等部分组成。
软件主要由与指纹识别模块的通讯程序模块、指纹识别模块返回代码识别程序模块、开门模块程序模块、关门程序模块、显示程序模块、键盘识别程序模块、按I2C总线协议对时钟芯片和串行E2PROM的读/写程序模块等模块组成。
在本次指纹门禁系统管理系统的开发过程中,重点开发了门禁控制器中央模块及接口硬件设计,以及在AT89C52上对指纹模块SM-60的软件驱动子系统的开发工作,实现了相应的软硬件功能。
综上所述,论文开发了一套集多种功能于一体的门禁系统,可用于小区或楼宇的智能化工程。
该系统的开发为楼宇或小区的科学管理,以及建设适宜人居环境具有一定积极意义。
关键词:指纹门禁;单片机;I2C总线;AT89C52ABSTRACTNow safe already entered the professions, for Banks, hotels, families, etc and locks are safe safety coefficient of the most important factors. With the progress of science and technology, fingerprint identification technology has started to our daily life. Because, so will the fingerprint identification of application, will greatly improve the safety and reliability.Fingerprint door system hardware consists mainly of fingerprint module, micro control device, LCD monitor and keyboard, fingerprint module power management, memory, and calendar/clock chip, voltage detection, electronic lock components. Software with fingerprint module mainly by the communication program modules, fingerprint module return code identification procedures module, open and close program modules module, display module program modules, keyboard keys number identification procedures, according to the module of I2C bus protocols and serial E2PROM chips clock the read/write program module modules.In the fingerprint door system management system in the development process, the key development the central door controller interface module and hardware design, as well as on fingerprint module in AT89C52 SM - 60 software development work driving subsystem, the corresponding software and hardware function.To sum up, this paper developed a set of functions in one of the entrance guard system, can be used for residential building intelligence engineering or. This system development for building or residential construction of scientific management, and suitable for living environment has certain positive significance.Keywords: fingerprint door; microcontroller; AT89C52; I2C bus目录第一章绪论 (1)1.1引言 (1)1.2研究背景及意义 (1)1.3本文的结构 (2)第二章系统硬件设计 (3)2.1系统的硬件结构 (3)2.1.1 系统硬件设计综述 (3)2.1.2 硬件系统元器件概述 (4)2.2主控芯片硬件设计 (5)2.2.1 AT89C52介绍 (5)2.2.2 主要功能特性 (5)2.2.3 管脚说明 (6)2.2.4 主控芯片模块设计 (8)2.3指纹识别模块的硬件设计 (9)2.3.1 指纹识别模块 (9)2.3.2 电平信号转换 (10)2.3.3 稳压器 (11)2.3.4 数据接收设置 (12)2.4LCD液晶显示器模块硬件设计 (13)2.4.1 LCD模块 (13)2.4.2 接口电路设计 (14)2.5时钟/日历芯片模块硬件设计 (15)2.5.1 时钟/日历芯片元器件 (15)2.5.2 接口电路设计 (16)2.6E2PROM的读写程序模块硬件设计 (17)2.6.1 元器件参数 (17)2.6.2 元器件工作分配 (18)2.6.3 接口电路设计 (19)2.7键盘输入模块的硬件设计 (20)2.8电机正反转电路设计 (21)2.9紧急复位电路设计 (22)第三章系统软件设计 (24)3.1系统软件结构 (24)3.1.1 系统功能 (24)3.1.2 系统职能模块 (24)3.1.3 系统软件流程 (25)3.2显示程序软件设计 (26)3.2.1 显示器的读写时序及初始化 (26)3.2.2 显示程序设计 (27)3.3键盘输入模块软件设计 (29)3.4串行E2PROM的读/写程序模块软件设计 (31)3.4.1 I2C总线协议 (31)3.4.2 I2C总线写入程序 (31)3.4.3 I2C总线读程序 (32)3.5时钟/日历模块软件设计 (35)总结 (39)结论 (39)感悟 (39)致谢 (40)参考文献 (41)附录A: 系统硬件图 (42)附录B: 系统程序 (44)附录C: 系统调试图 (51)附件毕业论文光盘资料第一章绪论1.1 引言智能门禁系统是一种新型现代化安全管理系统,集自动识别技术和现代安全管理措施为主体,涉及电子、机械、光学、计算机技术、通讯技术、生物技术等诸多新技术。
Atmel CryptoAuthentication

Application Note Single-Wire and I2C Interfaces Seamless DebuggingUsing Saleae Logic AnalyzerATSHA204A, ATECC108A, and ATECC508A Prerequisites●Hardware PrerequisitesAtmel® AT88CK490 or AT88CK590 Demo-Evaluation Board orAtmel AT88CK101-() KitSaleae Logic Analyzer●Software PrerequisitesAtmel Crypto Evaluation Studio (ACES)IntroductionThe purpose of this document is to help the user gain a better understanding of how to use the Atmel CryptoAuthentication™ ATSHA204A, ATECC108A, and ATECC508A devices (crypto device) with the Saleae Logic Analyzer. The Saleae Logic Analyzer is a powerful tool to debug and evaluate the commands coming to and from these devices. The tool supports both the standard I2C and the Atmel Single-Wire Interface (SWI) protocols.The goal of this application note is to:●Understand the bus interfaces of the crypto device using the Saleae LogicAnalyzer.●Develop and debug with the crypto device using the Saleae Logic Analyzer. SummaryThe Saleae Logic Analyzer provides an in depth tool to quickly develop and debug integration of the crypto device into a customer’s system. The bus decoding allows for easy understanding of all bus traffic to the crypto device. By reducing the development time, the Saleae Logic Analyzer greatly reduces the cost of adding the crypto device.CryptoAuthentication for Single-Wire and I 2C Interfaces Seamless Debugging Using SaleaeLogic Analyzer [APPLICATION NOTE]Atmel-8847B-CryptoAuth-SWI-I2C-Seamless-Debugging-Saleae-Logic-Analyzer-ApplicationNote_08201521.Saleae Logic AnalyzerOn load of the analyzer, either 8 or 16 channels will display depending on the analyzer used. Protocol specific settings are located on the far right under the heading, Analyzers .Figure 1-1.Channels and Protocol SettingsThe crypto device supports either a Single-Wire Interface (SWI) or I 2C Interface depending on the P/N. ●SWI — Supported through the use of a DLL library. Use version 1.1.16 or greater. This version comes with support on Win, LNX, and IOS.●I 2C — Supported by the use of the built-in I 2C interface that is included in the Saleae download.3CryptoAuthentication for Single-Wire and I 2C Interfaces Seamless Debugging Using SaleaeLogic Analyzer [APPLICATION NOTE]Atmel-8847B-CryptoAuth-SWI-I2C-Seamless-Debugging-Saleae-Logic-Analyzer-ApplicationNote_0820152.Single-Wire Interface (SWI)Use the SWI DLL library version 1.1.16 or greater.1.Copy the DLL into the Saleae LLC\Analyzers directory on the user’s PC. Once the driver has been copied to the correct folder, the Atmel SWI option will appear and be listed in the Analyzer drop-down options. The SWI Analyzer has three display modes:Token Byte Packet (as described in the datasheet)Figure 2-1.Atmel SWI Option2.Select the Atmel SWI Analyzer from the list. 3.After selecting Atmel SWI Analyzer , rename the channel when prompted, 4.Select the Falling Edge Trigger option and start sampling. Using ACES, select a command and send it to the device. For an overview of the ACES tool, please see “Using ACES Application Note”. This will cause the bus to become active and the Analyzer will trigger on the first falling edge and data line.In the screen shot below, the Wake command has been captured followed by Wake Status Read. The Wake command is a special token designed to wake the device and reset the watchdog timer.Figure 2-2.Wake Command Followed by Wake Status ReadEnlargement ofthe Analyzerpull-down options.CryptoAuthentication for Single-Wire and I 2C Interfaces Seamless Debugging Using SaleaeLogic Analyzer [APPLICATION NOTE]Atmel-8847B-CryptoAuth-SWI-I2C-Seamless-Debugging-Saleae-Logic-Analyzer-ApplicationNote_0820154The token view displays each logic bit which is made up of seven bits on the wire. Each group of seven bits is encoded either as a Logic 1 or Logic 0 as follows:●A Logic 1 is one low bit followed by six high bits. ● A Logic 0 is one low bit followed by one high bit, then by one low bit, and then by four high bits.Figure 2-3.Token View Figure 2-4.Logic BitsThe byte view builds on the token view by combining eight tokens into a single byte. This view allows for easy matching of information on the data bus to the command set defined in the datasheet. The byte view istransmitted with the less significant bit first.Figure 2-5.BytesThe packet view further builds on the byte view by ordering the data into logic packets based on the datasheet definition. This allow for quick and easy review of the commands without the need to reference the datasheet.Figure 2-6.Packets0x880x045CryptoAuthentication for Single-Wire and I 2C Interfaces Seamless Debugging Using SaleaeLogic Analyzer [APPLICATION NOTE]Atmel-8847B-CryptoAuth-SWI-I2C-Seamless-Debugging-Saleae-Logic-Analyzer-ApplicationNote_0820153.I 2C InterfaceThe crypto device supports an I 2C interface that is directly supported by the Saleae tool.1.To configure the Analyzer for I 2C , select the I2C option from the Analyzer drop-down list and follow the configuration guide.Figure 3-1.I2C Analyzer Option 2.Select the clock and data channels that will be used for the I2C bus. Different encoding options can also be selected. The crypto device uses the default 8-bit encoding.Figure 3-2.Clock and Data Channels Enlargement ofthe Analyzerpull-down options.CryptoAuthentication for Single-Wire and I 2C Interfaces Seamless Debugging Using SaleaeLogic Analyzer [APPLICATION NOTE]Atmel-8847B-CryptoAuth-SWI-I2C-Seamless-Debugging-Saleae-Logic-Analyzer-ApplicationNote_0820156 3.Next, the Update Channel Names dialog box will be prompted to rename the channels to reflect SCL andSDA. This is an optional step, but helps when analyzing more then one bus at a time.Figure 3-3.Update Channel Names 4.Now that the analyzer is configured, set-up the trigger settings. The Saleae has a One Shot trigger thatcan be triggered on either the falling or rising edge of the SCL channel. The bus is normally held high;therefore, setting a falling edge trigger is recommended.Figure 3-4.Trigger Settings7CryptoAuthentication for Single-Wire and I 2C Interfaces Seamless Debugging Using SaleaeLogic Analyzer [APPLICATION NOTE]Atmel-8847B-CryptoAuth-SWI-I2C-Seamless-Debugging-Saleae-Logic-Analyzer-ApplicationNote_0820155.Once the analyzer has been started, execute a command in order to generate data on the bus.Figure 3-5.Execute a Command After the Analyzer has been triggered, it will collect the waveform information and display it in the viewer. The first token shown is the ATSHA204 Wake.Figure 3-6.First Token — ATSHA204 WakeThe Wake command is a special command that is required to wake-up the device. The command consists of a I 2C Start event followed by a long period of Logic 0 on the SDA line, then followed a Stop event.Figure 3-7.Wake CommandCryptoAuthentication for Single-Wire and I 2C Interfaces Seamless Debugging Using SaleaeLogic Analyzer [APPLICATION NOTE]Atmel-8847B-CryptoAuth-SWI-I2C-Seamless-Debugging-Saleae-Logic-Analyzer-ApplicationNote_0820158After a Wake command, an optional Read can be performed to read the status of the crypto device as shown in the waveform below. After the Read command is issued, the device will send four bytes of data (1-count, 1-data, and 2-CRC).Figure 3-8.Read WaveformThe Saleae tool supports a variety of display options for the I 2C interface including Binary, Hex, and ASCII to help quickly and easily evaluate the data. It can be selected by clicking the Configuration button next to the analyzer of interest on the right.Figure 3-9.Display Options4.Revision HistoryX X X X X XAtmel Corporation 1600 Technology Drive, San Jose, CA 95110 USA T: (+1)(408) 441.0311F: (+1)(408) 436.4200| © 2015 Atmel Corporation. / Rev.: Atmel-8847B-CryptoAuth-SWI-I2C-Seamless-Debugging-Saleae-Logic-Analyzer-ApplicationNote_082015.Atmel ®, Atmel logo and combinations thereof, Enabling Unlimited Possibilities ®, CryptoAuthentication ™, and others are registered trademarks or trademarks of Atmel Corporation in U.S. and other countries. Other terms and product names may be trademarks of others.DISCLAIMER: The information in this document is provided in connection with Atmel products. No license, express or implied, by estoppel or otherwise, to any intellectual property right is granted by this document or in connection with the sale of Atmel products. EXCEPT AS SET FORTH IN THE ATMEL TERMS AND CONDITIONS OF SALES LOCATED ON THE ATMEL WEBSITE, ATMEL ASSUMES NO LIABILITY WHATSOEVER AND DISCLAIMS ANY EXPRESS, IMPLIED OR STATUTORY WARRANTY RELATING TO ITS PRODUCTS INCLUDING, BUT NOT LIMITED TO, THE IMPLIED WARRANTY OF MERCHANTABILITY, FITNESS FOR A PARTICULAR PURPOSE, OR NON-INFRINGEMENT. IN NO EVENT SHALL ATMEL BE LIABLE FOR ANY DIRECT, INDIRECT, CONSEQUENTIAL, PUNITIVE, SPECIAL OR INCIDENTAL DAMAGES (INCLUDING, WITHOUT LIMITATION, DAMAGES FOR LOSS AND PROFITS, BUSINESS INTERRUPTION, OR LOSS OF INFORMATION) ARISING OUT OF THE USE OR INABILITY TO USE THIS DOCUMENT, EVEN IF ATMEL HAS BEEN ADVISED OF THE POSSIBILITY OF SUCH DAMAGES. Atmel makes no representations or warranties with respect to the accuracy or completeness of the contents of this document and reserves the right to make changes to specifications and products descriptions at any time without notice. Atmel does not make any commitment to update the information contained herein. Unless specifically provided otherwise, Atmel products are not suitable for, and shall not be used in, automotive applications. Atmel products are not intended,authorized, or warranted for use as components in applications intended to support or sustain life.SAFETY-CRITICAL, MILITARY, AND AUTOMOTIVE APPLICATIONS DISCLAIMER: Atmel products are not designed for and will not be used in connection with any applications where the failure of such products would reasonably be expected to result in significant personal injury or death (“Safety-Critical Applications”) without an Atmel officer's specific written consent. Safety-Critical Applications include, without limitation, life support devices and systems, equipment or systems for the operation of nuclear facilities and weapons systems.Atmel products are not designed nor intended for use in military or aerospace applications or environments unless specifically designated by Atmel as military-grade. Atmel products are not designed nor intended for use in automotive applications unless specifically designated by Atmel as automotive-grade.。
Leviton ATLAS-X1 Cat 6A Component-Rated UTP QUICKP

Page 1 of 2APPLICATIONThe ATLAS-X1 Cat 6A Component-Rated UTP QUICKPORT Jack supports 10GBASE-T networks. The jack is part of a complete ATLAS-X1 Cat 6A UTP system, ideal for the most demanding mission-critical network applications. The connector supports emerging technologies and will easily adapt to network trends.SPECIFICATIONThe jack shall meet or exceed the requirements for channel and component-level electrical transmission performance as described in ANSI/TIA-568.2-D (Cat 6A), ISO/IEC11801-1 (Class E A ), and EN 50173-1 (Class E A ). The jack shall be compliant with ANSI/TIA-1096-A, c(UL)us Listed, and be independently verified for electrical transmission performance and power delivery. The jack body shall be made of die-cast zinc and all plastic components shall be made of high-impact, fire-retardant plastic rated UL 94V-0. The jack shall support tool-free termination and re-termination and shall not require a specialized termination tool. The jack wiring shall be universal to accommodate T568A and T568B wiring schemes. The jack shall be available in 13 colors; more than established by the ANSI/TIA-606-C standard. The jack shall be offered in standard and shuttered styles and select jacks shall be supplied with interchangeable icons. The jack shall be compliant with IEEE 802.3 PoE Type 1, 2, 3, 4 (100 watts max).DESIGN CONSIDERATIONS• Use in any QUICKPORT™ housing to support Cat 6A UTP connectivity in surface-mount, flush-mount, or modular furniture outlets and field-configurable panels• Can be used in conjunction with other QUICKPORT snap-in modules for voice/data/video applications over UTP , coax, and fiber• To identify ports, use different colored modules andicons for each application (full selection of ANSI/TIA-606 compatible colors, 13 available)• Robust housing and shutter protects the jack in harsh environmentsATLAS-X1™ Cat 6A Component-Rated UTP QUICKPORT™ Jack6AUJK-xx6, ICONS-ICxFEATURES• Independently tested and guaranteed to exceed all component, permanent link, and channel margins• Patented Retention Force Technology™ (RFT) protects against tine damage and increases system longevity • For Power over Ethernet, RFT maintains contact force between plug and jack, preventing arcing from intermittent disconnects• Unique design supports tool-free termination andre-termination and requires no specialized termination tool • Short jack design supports a wider range of applications (e.g. shallow boxes, enclosures, bend radius, etc.)• Terminates from 26 to 22 AWG solid or stranded conductors for use on various cable types• Robust IDCs can withstand 20 re-termination cycles and jack contacts are tested for 750 plug-mating cycles to ensure system longevity• Available in 13 ANSI/TIA-606-C compatible colors • Tested and approved for use in air-handling spaces (plenum rating) in accordance with UL Standard 2043• Select jacks available with interchangeable icons (voice, data, A/V, blank) for easy ID• Jack with internal shutter protects against dust and debris • Solid metal body dissipates 53% more heat than plastic, minimizing damage from excess heat in PoE applications • Tine geometry prevents arcing damage where plug and jack make contactSTANDARDS & REGULATIONS• ANSI/TIA-568.2-D (Cat 6A)• ISO/IEC 11801-1 (Cat 6A)• EN 50173-1 (Cat 6A)• ANSI/TIA-1096-A (formerly FCC Part 68)• IEC 60603-7 (includes IEC 60512-5-2)• IEC 60512-99-002• IEEE 802.3 PoE Type 1, 2, 3, 4 (100 watts max)• Cisco UPOE, UPOE+ (90 watts max)• Power over HDBaseT™ PoH (95 watts max)• c(UL)us Listed (UL 1863)• UL 2043 Plenum Certified • RoHS 3• ETL verified to meet the IEC 60512-99-002 standard for support of IEEE 802.3 Type 4 PoE (100 watt) applicationsCOUNTRY OF ORIGINUSA and Mexico (Contact Customer Service for details)6AUJK-xx6, ICONS-ICxUSANetwork Solutions Headquarters +1 (800) 722 2082 *******************Leviton Berk-Tek Cable : +1 (800) 237 5835 ************************Asia Pacific+852 3620 2602********************Canada+1 (800) 461 2002**********************Europe+44 (0) 1592 772124 **********************Latin AmericaMX: +52 (55) 2128 6286 LATAM: +52 (55) 2333 5963 *********************Middle East & Africa +971 (4) 247 9800 *******************NETWORK SOLUTIONS PRODUCTS ARE AVAILABLE WORLDWIDE IN OVER 100 COUNTRIES. VISIT US ONLINE AT /NS TO LEARN MORE.Page 2 of 2For further support information, visit /ns/support6AUJK-xx6, ICONS-ICx6AUJK-xx6, ICONS-ICxMECHANICAL SPECIFICATIONSDimensions:See belowMaterials: Jack Body: Die-cast zincSpring-Wire Contacts: High quality, copper-based alloy, plated with 50 microinches of gold for lowest contact resistance andmaximum life Temp. (Storage):Temp. (Installation): Temp. (Operating):Humidity (Max.):WARRANTY INFORMATIONFor Leviton product warranties, go to /ns/warrantyPART NUMBERDescriptionStandard Jack Jack with Shutter GREENPACK™12-Pack Standard Jack ATLAS-X1™ Cat 6A Component-Rated UTP QUICKPORT™ Jack, white 6AUJK-RW66AUJK-SW66AUJK-CW6ATLAS-X1 Cat 6A Component-Rated UTP QUICKPORT Jack, light almond 6AUJK-RT66AUJK-ST6—ATLAS-X1 Cat 6A Component-Rated UTP QUICKPORT Jack, ivory 6AUJK-RI66AUJK-SI6—ATLAS-X1 Cat 6A Component-Rated UTP QUICKPORT Jack, yellow 6AUJK-RY66AUJK-SY6—ATLAS-X1 Cat 6A Component-Rated UTP QUICKPORT Jack, orange 6AUJK-RO66AUJK-SO6—ATLAS-X1 Cat 6A Component-Rated UTP QUICKPORT Jack, crimson 6AUJK-RC66AUJK-SC6—ATLAS-X1 Cat 6A Component-Rated UTP QUICKPORT Jack, dark red 6AUJK-RR66AUJK-SR6—ATLAS-X1 Cat 6A Component-Rated UTP QUICKPORT Jack, purple 6AUJK-RP66AUJK-SP6—ATLAS-X1 Cat 6A Component-Rated UTP QUICKPORT Jack, blue 6AUJK-RL66AUJK-SL66AUJK-CL6ATLAS-X1 Cat 6A Component-Rated UTP QUICKPORT Jack, green 6AUJK-RV66AUJK-SV6—ATLAS-X1 Cat 6A Component-Rated UTP QUICKPORT Jack, gray 6AUJK-RG66AUJK-SG6—ATLAS-X1 Cat 6A Component-Rated UTP QUICKPORT Jack, black6AUJK-RE66AUJK-SE66AUJK-CE6ATLAS-X1 Cat 6A Component-Rated UTP QUICKPORT Jack, brown6AUJK-RB66AUJK-SB6—Green (V)Blue (L)Purple (P)Crimson (C)Dark Red (R)Orange (O)Yellow (Y)Black (E)Gray (G)Ivory (I)Light Almond (T)Brown (B)Color-matched icons (ICONS-ICx) can be ordered separately in 72-quantity packs.x = icon color。
ARTISAN技术集团设备购买与售卖说明书

ErrataTitle & Document Type:Manual Part Number:Revision Date:HP References in this ManualThis manual may contain references to HP or Hewlett-Packard. Please note that Hewlett-Packard's former test and measurement, semiconductor products an d chemical analysisbusinesses are now part of Agilent Technologies. We have made no changes to thismanual copy. The HP XXXX referred to in this document is now the Agilent XXXX.For example, model number HP8648A is now model number Agilent 8648A.About this ManualWe’ve added this manual to the Agilent website in an effort to help you support yourproduct. This manual provides the best information we could find. It may be incomplete or contain dated information, and the scan quality may not be ideal. If we find a bettercopy in the future, we will add it to the Agilent website.Support for Your ProductAgilent no longer sells or supports this product. You will find any other availableproduct information on the Agilent Test & Measurement website:Search for the model number of this product, and the resulting product page will guideyou to any available information. Our service centers may be able to perform calibrationif no repair parts are needed, but no other support from Agilent is available.3562A Programming Manual03562-90031October 1985Artisan Technology Group - Quality Instrumentation ... Guaranteed | (888) 88-SOURCE | Artisan Technology Group - Quality Instrumentation ... Guaranteed | (888) 88-SOURCE | Artisan Technology Group - Quality Instrumentation ... Guaranteed | (888) 88-SOURCE | Artisan Technology Group - Quality Instrumentation ... Guaranteed | (888) 88-SOURCE | Artisan Technology Group - Quality Instrumentation ... Guaranteed | (888) 88-SOURCE | Artisan Technology Group - Quality Instrumentation ... Guaranteed | (888) 88-SOURCE | Artisan Technology Group - Quality Instrumentation ... Guaranteed | (888) 88-SOURCE | Artisan Technology Group - Quality Instrumentation ... Guaranteed | (888) 88-SOURCE | Artisan Technology Group - Quality Instrumentation ... Guaranteed | (888) 88-SOURCE | 。
ARTISAN TECHNOLOGY GROUP 设备购买和维修服务说明

MPT SERIESFax (406) 587-4911INTERNAL JUMPER SELECTIONSensor Type: Factory default is for operation with Thermistors, RTD, or LM335. If you are using an AD590, move the jumper from “ALL OTHERS” to “AD590”. An AD590 must be biased by at least +8V. If V+ exceeds +8V, it can be used for bias. Use pin 10 for the other AD590 connection, and do not connect pin 9. (See the Quick Connection diagram on page 3.)Sensor Current: The resistance of the sensor you choose, in conjunction with the sensor current, must produce a voltage between 0 V and 5 V in order to be used in the control loop. The 10 µA and 100 µA sensor currents are used with thermistors. The 1 mA sensor current is used with the LM335 IC Sensor and 500 or 1000Ω RTDs. The 10mA bias current (available on Rev. E) is for 100Ω RTDs.The voltage produced by your sensor is given by: V = R SENSOR * I SENSORCurrent Limit: Factory default is 0 A for the Current Limit Trimpot. Rotate this Trimpot clockwise to the desired maximum output current. The following charts detail the current limit settings available for each unit. PRODUCT REVISION CURRENT LIMIT TRIMPOT POSITIONSRev. G (Introduced 10/2014.)Tick Marks012345678 MPT25000A0.312A0.625A0.937A 1.25A 1.56A 1.87A 2.19A 2.5A MPT50000A0.4A1A 1.6A 2.2A 2.8A 3.75A 4.3A5A MPT100000A1A 2.5A 3.75A5A 6.25A7.75A8.75A10ARev. E (Introduced 9/2003.) &Rev. F(introduced 3/2005.)012345678910 MPT25000A250mA500mA750mA1A 1.25A 1.5A 1.75A2A 2.25A 2.5A MPT50000A500mA1A 1.5A2A 2.5A3A 3.5A4A 4.5A5A MPT100000A1A2A3A4A5A6A7A8A9A10ARev. D(Each setting represents a 20% increment of full scale current.)12345 MPT25000.5A1A 1.5A2A 2.5A MPT50001A2A3A4A5A MPT100002A4A6A8A10AProportional Gain: Measure resistance across the two test points labeled above to determine the gain setting. Factory default is a gain of 25.For MPT2500, Resistance = Gain * 4000; Default 100kΩFor MPT5000, Resistance = Gain * 2000; Default 51kΩFor MPT10000, Resistance = Gain * 1000; Default 25kΩMPT2500-00400-K © 2014 Wavelength Electronics, Inc. 6MPT2500-00400-K © 2014 Wavelength Electronics, Inc. 7A BCBBFIGURE AFIGURE B* All Other Tolerances are +/-5%MPT SERIES SELECTION GUIDE FIGMPT-2500 2.5 A Temperature Controller A MPT-5000 5 A Temperature Controller A MPT-1000010 A Temperature Controller B OPTIONAL ACCESSORIES AVAILABLE FOR SYSTEMDEVELOPMENT:CKT-202A connector kit includes the appropriate 15 pin D-sub connector, hood and hardware.WCB-101A Cable Kit includes one meter of cable soldered to a mating connector on one end and unterminated on the other.Precision thermistors for various temperature ranges areoffered with detailed R-T charts for quick system integration.MODEL R @ 25°C10 µA RANGE100 µA RANGETCS-605 5 k Ω- 55°C to - 2°C -20°C to +33°C TCS-61010 k Ω- 45°C to +13°C -8°C to +50°C TCS-10K510 k Ω- 45°C to +13°C -8°C to +50°C TCS-62020 k Ω- 35°C to +28°C +6°C to +69°C TCS-65050 k Ω- 18°C to +49°C +25°C to +92°CTCS-651100 k Ω- 6°Cto+67°C+41°Cto+114°CMPT2500-00400-K © 2014 Wavelength Electronics, Inc. 10Connector Kit CKT-202Cable KitWCB-101CAT-203 MPT I/O CABLECABL E #1CABL E #2RED/BLACK 2GREEN WHITE/BLACK WHITE BLUE WHITEBLACK BLUE ORANGE REDGREEN/BLACK ORANGE 1115131412109784563BLACK RED WIRE COLOR PIN 1GREEN 1111211211222CABLE #21Modulation Input Modulation GND (for pin 6)Temp Setpoint Monitor V+Temp MonitorMonitor GND (for 11 & 12)GND (For pins 7 & 8)V+Sensor +Sensor - (GND)TEC+TEC+TEC-TEC-FUNCTIONGND (For pins 7 & 8)WCB-101 MPT I/O CABLEArtisan Technology Group - Quality Instrumentation ... Guaranteed | (888) 88-SOURCE | 。
ARTISAN TECHNOLOGY GROUP 设备购买、维修与售卖说明书

Agilent 81689A / 81689B / 81649A Compact Tunable Laser Modules Technical SpecificationsFebruary 2002The 81689A, 81689B, 81649A compact tunable lasermodules offer superior performance now also in the compactmodule class. As they are tunable with continuous outputpower, they are the most flexible stimulus for the test ofoptical amplifiers, DWDM components as well as for the testof complete DWDM systems.Compact tunable lasers for C-and L-bandThe Agilent 81689A and 81689B modules operate in the C-band from 1525 nm to 1575 nm, whereas the Agilent 81649A covers the L-band from 1570 nm to 1620 nm.Test of optical amplifiersA variable amount of the compact, yet fully remote controlled Agilent 81689A, 81689B and 81649A tunable laser modules, in combination with the 81682A and 81642A high power Tunable Laser, is the ideal solution to characterize optical amplifiers for use in DWDM applications. The 81689A, 81689B and 81649A compact tunable laser modules provide the high stimulus power needed to test today's optical amplifiers. Together with the 81651A optical attenuator module, an output power dynamic range of more than60 dB can be achieved. Even without the attenuator module the power can be attenuated by 9dB (10dB for 81689B) e.g. to equalize power levels of several sources. Polarization Maintaining Fiber for the test of integrated optical devicesThe 81689A, 81689B and 81649A modules are ideally constructed to characterize integrated optical devices. Their optional Panda PMF output ports provide a well defined state of polarization to ensure constant measurement conditions on waveguidedevices. A PMF cable easily connectsan external optical modulator.The 81689A, 81689B and 81649A isavailable with both, standard single-mode fiber and Panda type PMF.Compact module for DWDMmulti-channel testThe 81689A, 81689B and 81489Aallow a realistic multi-channel test bedfor DWDM transmission systems to beset up.Their flexibility make them thepreferred choice for tests of DWDMtransmission system during installationand maintenance phases.Compact spare for DFBmodules in ITU gridsThe 81689B for the first time solvesthe sparing nightmare for users ofDWDM combs. In combination with acomb of 81662A DFB lasers the81689B can replace any DFB between1525nm and 1575nm without powerpenalty.Remote control & PnPsoftware drivers for easyprocess automationIts continuous, mode-hop free tuningmakes it quick and easy to set even themost complex configurations to thetarget wavelengths and power levels,just by dialing or using the vernier keys.A 8163B mainframe can host2 compact tunable laser modules. Thisallows for the most compact C- and L-band stimulus solution available today.Each 8164B mainframe can host up tofour units of the 81689A, 81689B or81649A in its upper slots.The 8166B is most interesting for highchannel count solutions. Up to17 compact tunable laser modules canbe hosted here.The 81649A, 81689A and 81689B areproduced to ISO 9001 internationalquality system standard as part ofAgilent's commitment to continuallyincreasing customer satisfactionthrough improved quality control.Specifications describe theinstrument's warranted performance.They are verified at the end of a 2 mlong patchcord and are valid afterwarm-up and for the stated outputpower and wavelength ranges.Each specification is assured bythoroughly analyzing all measurementuncertainties. Supplementaryperformance characteristics describethe instrument’s non-warranted typicalperformance.Every instrument is delivered with acommercial certificate of calibrationand a detailed test report.For further details on specifications,see the Definition of Terms in AppendixC of the Compact Tunable Laser User'sGuide.81689A, 81689B, 81649A Compact Tunable Laser for Multi-channel test applicationsAgilent 81689A Agilent 81689B Agilent 81649A Wavelength range1525 nm to 1575 nm1525 nm to 1575 nm1570 nm to 1620 nm Wavelength resolution0.01 nm, 1.25 GHz at 1550 nm0.01 nm, 1.25 GHz at 1550 nm0.01 nm, 1.17 GHz at 1595 nm Absolute wavelength accuracy (typ.) [1]±0.3 nm±0.3 nm±0.3 nmRelative wavelength accuracy [1]±0.3 nm±0.15 nm±0.15 nmWavelength repeatability [1]±0.05 nm±0.05 nm±0.05 nmWavelength stability(typ., over 24 h at constant temperature)[1] (typ., over 1 h at constant temperature)[1]±0.02 nm±0.01 nm±0.005 nm±0.01 nm±0.005 nmTuning speed (typ.)<10 sec/ 50 nm<10 sec/ 50 nm<10 sec/ 50 nmLinewidth (typ.) [2]with Coherence Control ON (typ.) [2]20 MHz---< 20MHz>100MHz< 20MHz>100MHzOutput power (continuous power on duringtuning)≥ 6 dBm (1525 –1575nm)≥ 10 dBm (1525 –1575nm)≥ 6 dBm (1570 –1620nm) Minimum output power–3 dBm0 dBm–3 dBmPower stability (at constant temperature) [3]±0.03 dB over 1 hour,typ. ±0.06 dB over 24 hours ±0.015 dB over 1 hour,typ. ±0.0075 dB over 1 hour,typ. ±0.05 dB over 24 hours±0.015 dB over 1 hour,typ. ±0.0075 dB over 1 hour,typ. ±0.05 dB over 24 hoursPower repeatability (typ.) [3]±0.02 dB±0.02 dB±0.02 dB Power linearity±0.1dB±0.1dB±0.1dB Power flatness versus wavelength±0.3 dB±0.2 dB±0.2 dBSide-mode suppression ratio (typ.) [2]> 40 dB(1525 – 1575 nm at 0 dBm)> 45 dB(1525 – 1575 nm at ≥ 3 dBm)> 45 dB(1570 – 1620 nm at ≥ 0 dBm)Signal to source spontaneous emission ratio (typ.) [4]≥ 39 dB/ nm(1525 –1575 nm at 6 dBm)≥ 44 dB/ nm(1525 –1575 nm at 10 dBm)≥ 42 dB/ nm(1570 – 1620 nm at 6 dBm)Relative intensity noise (RIN, typ.)< -137 dB/Hz(100 MHz – 2.5 GHz, at +3 dBm)< -137 dB/Hz(100 MHz – 2.5 GHz, at +7 dBm)< -137 dB/Hz(100 MHz – 2.5 GHz, at +3 dBm)Dimensions75 mm H, 32 mm W, 335 mm D(2.8" x 1.3" x 13.2")75 mm H, 32 mm W, 335 mm D(2.8" x 1.3" x 13.2")75 mm H, 32 mm W, 335 mm D(2.8" x 1.3" x 13.2")Weight 1 kg 1 kg 1 kg[1]At CW operation. Measured with wavelength meter based on wavelength in vacuum.[2]Measured by heterodyning method.[3]500 ms after changing power.[4]Measured with optical spectrum analyzer at 1 nm resolution bandwidth.Listed optionsOption 021: standard single mode fiber,straight contact output connectorOption 022: standard single mode fiber,angled contact output connectorOption 071: polarization maintainingfiber, straight contact output connectorOption 072: polarization maintainingfiber, angled contact output connectorSupplementary performance characteristics ModulationInternal digital modulation50% duty cycle, 200 Hz to 300 kHz.>45% duty cycle, 300 kHz to 1 MHz. Modulation output (via Mainframe): TTL reference signal.External digital modulation> 45% duty cycle, fall time< 300 ns, 200 Hz to 1 MHz. Modulation input (via Mainframe):TTL signal.External analog modulation≥ ±15% modulation depth,5 kHz to 1 MHz.Modulation input: 5 Vp-p Coherence control(81649A/81689B)For measurements on components with 2 m long patchcords and connectors with 14 dB return loss, the effective linewidth results in a typical power stability of< ±0.025 dB over1 minute by reducing interference effects in the test setup.GeneralOutput isolation (typ.):38 dBReturn loss (typ.):55 dB (options 022, 072)40 dB (options 021, 071)Polarization maintaining fiber (Options071, 072)Fiber type: Panda.Orientation: TE mode in slow axis,in line with connector key.Extinction ratio: 16 dB typ.Laser class:Class IIIb according to FDA 21 CFR1040.10, Class 3A according to IEC 825- 1; 1993.Recommended re-calibration period:2 years.Warm-up time:< 40 min,immediate operation after boot-up.EnvironmentalStorage temperature:–20 °C to +70 °C (81689A)–40 °C to +70 °C (81689B, 81649A)Operating temperature:15 °C to 35 °CHumidity:< 80 % R.H. at 15 °C to 35 °CSpecifications are valid in non-condensingconditions.Laser Safety InformationAll laser sources specified by this datasheet are classified as Class 1Maccording to IEC 60825-1 (2001).All laser sources comply with 21 CFR1040.10 except for deviations pursuantto Laser Notice No. 50, dated 2001-July-26This page intentially left blankAgilent Technologies’Test and Measurement Support,Services, and AssistanceAgilent Technologies aims to maximize the value you receive, while minimizing your risk and problems. We strive to ensure that you get the test and measurement capabilities you paid for and obtain the support you need. Our extensive support resources and services can help you choose the right Agilent products for your applications and apply them successfully. Every instrument and system we sell has a global warranty. Support is available for at least five years beyond the production life of the product. Two concepts underlie Agilent's overall support policy: "Our Promise" and "Your Advantage."Our PromiseOur Promise means your Agilent test and measurement equipment will meet its advertised performance and functionality. When you are choosing new equipment, we will help you with product information, including realistic performance specifications and practical recommendations from experienced test engineers. When you use Agilent equipment, we can verify that it works properly, help with product operation, and provide basic measurement assistance for the use of specified capabilities, at no extra cost upon request. Many self-help tools are available.Your AdvantageYour Advantage means that Agilent offers a wide range of additional expert test and measurement services, which you can purchase according to your unique technical and business needs. Solve problems efficiently and gain a competitive edge by contracting with us for calibration, extra-cost upgrades, out-of-warranty repairs, and on-site education and training, as well as design, system integration, project management, and other professional engineering services. Experienced Agilent engineers and technicians worldwide can help you maximize your productivity, optimize the return on investment of your Agilent instruments and systems, and obtain dependable measurement accuracy for the life of those products.By internet, phone, or fax, get assistance with all your test & measurement needsOnline assistance:Related Agilent Literature:/coms/lightwaveAgilent 8163A Lightwave MultimeterPhone or Fax Agilent 8164A Lightwave Measurement SystemUnited States:Agilent 8166A Lightwave Multichannel System(tel)180****4844Technical Specificationsp/n 5988-1568ENCanada:(tel)187****4414Agilent 81662A DFB Laser(fax) (905) 206 4120Agilent 81663A DFB LaserAgilent Fabry Perot LaserTechnical SpecificationsEurope:p/n 5988-1570EN(tel) (31 20) 547 2323(fax) (31 20) 547 2390Agilent Power Sensor ModulesJapan:Agilent Optical Heads(tel) (81) 426 56 7832Agilent Return Loss Modules(fax) (81) 426 56 7840Technical Specificationsp/n 5988-1569ENLatin America:(tel) (305) 269 7500(fax) (305) 269 7599Agilent 8163A/B Lightwave MultimeterAgilent 8164A/B Lightwave Measurement SystemAustralia:Agilent 8166A/B Lightwave Multichannel System(tel) 1 800 629 485 Configuration Guide(fax) (61 3) 9210 5947p/n 5988-1571ENNew Zealand:Agilent 8163B Lightwave Multimeter(tel) 0 800 738 378Agilent 8164B Lightwave Measurement System(fax) 64 4 495 8950Agilent 8166B Lightwave Multichannel SystemTechnical SpecificationsAsia Pacific:p/n 5988-3924EN(tel) (852) 3197 7777(fax) (852) 2506 9284Product specifications and descriptions in this document subject to change without notice.Copyright © 2001 Agilent TechnologiesFebruary 12 20025988-3675EN。
Q-SYS NC Series Cameras 2 Hardware User Manual
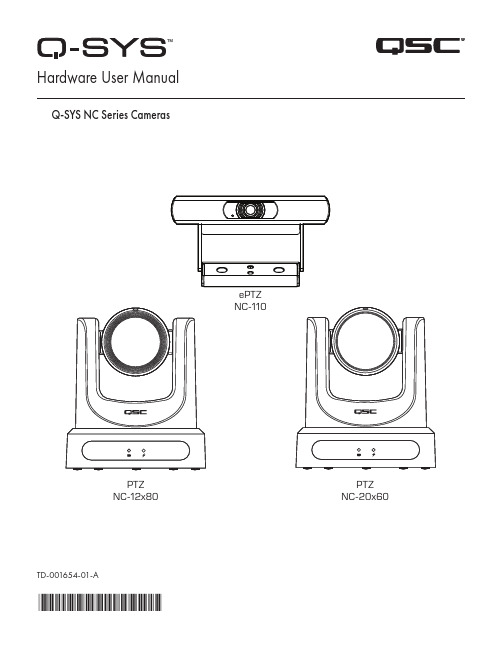
TD-001654-01-A*TD-001654-01*ePTZ NC-110PTZ NC-12x80PTZNC-20x60 Hardware User ManualQ-SYS NC Series CamerasEXPLANATION OF TERMS AND SYMBOLSThe term “WARNING!” indicates instructions regarding personal safety. If the instructions are not followed, the result may be bodily injury or death.The term “CAUTION!” indicates instructions regarding possible damage to physical equipment. If these instructions are not followed, it may result in damage to the equipment that may not be covered under the warranty.The term “IMPORTANT!” indicates instructions or information that are vital to the successful completion of the procedure.The term "NOTE" is used to indicate additional useful information.The intent of the lightning flash with an arrowhead symbol within an equilateral triangle is to alert the user to the presence of un-insulated "dangerous" voltage within the product's enclosure that may be of sufficient magnitude to constitute a risk of electric shock to humans.The intent of the exclamation point within an equilateral triangle is to alert the user to the presence of important safety,operating, and maintenance instructions in this manual.IMPORTANT SAFETY INSTRUCTIONS1. Read these instructions.2. Keep these instructions.3. Heed all warnings.4. Follow all instructions.5. Install in accordance with the manufacturer's instructions.6. Refer all servicing to qualified service personnel.7. Adhere to all applicable local codes.Maintenance and RepairsWARNING!: Advanced technology, e.g., the use of modern materials and powerful electronics, requires specially adapted maintenance and repair methods. To avoid the danger of subsequent damage to the apparatus, injuries to persons, and/or the creation of additional safety hazards, all maintenance or repair work on the apparatus should be performed only by a QSC authorized service station or an authorized QSC International Distributor. QSC is not responsible for any injury, harm, or related damages arising from any failure of the customer, owner, or user of the apparatus to facilitate those repairs. FCC StatementNote: This equipment has been tested and found to comply with the limits for a Class A digital device, pursuant to Part 15 of the FCC Rules.These limits are designed to provide reasonable protection against harmful interference when the equipment is operated in a commercial environment. This equipment generates, uses, and can radiate radio frequency energy and, if not installed and used in accordance with the instruction manual, may cause harmful interference to radio communications. Operation of this equipment in a residential area is likely to cause harmful interference in which case the user will be required to correct the interference at his own expense.Expected Product Life Cycle: 10 years, Storage Temperature range: –-20°C to +60°C, Relative Humidity: range of 5 —85% RH non-condensing.WarrantyFor a copy of the QSC Limited Warranty, visit the QSC, LLC., website at .RoHS StatementThe QSC Q-SYS NC Series: NC-110, NC-12x80, and NC-20x60 are in compliance with European Directive 2015/863/EU – Restriction of Hazardous Substances (RoHS2).What's in the BoxNC-12x80, NC-20x60 PTZ CamerasNC-110 ePTZ CameraIntroductionThe QSC Q-SYS™ NC Series comprises three camera models: NC-12x80, NC-20x60, and NC-110. These cameras send IP streams across a Q-LAN network to certain Q-SYS Core processors and peripherals, which bridge this IP signal to a USB signal for host computers to use in software applications.Connections and Controls (NC-12x80 and NC-20x60 PTZ) Front Panel1. Status LED (Green)• Off indicates the camera is in standby mode; network streams are off.• On indicates the camera is streaming video over the network.• Blinking indicates the ID mode is on.2. Power LED (Blue)• On indicates the camera has power applied.• Off indicates the camera has no power applied.Connections and Controls (NC-12x80 and NC-20x60 PTZ) (continued)Rear Panel56781. Product Label• Identifies product model: NC-12x80 or NC-20x60• Identifies the product serial number • Identifies the product MAC address2. ID Button: Press to identify this product in Q-SYS Designer Software and Q-SYS Configurator. The green STATUS LED on the frontpanel blinks when in ID mode. Press again to turn off.3. Factory Reset pin-hole: Use a paperclip or similarly sized object to insert. Press and hold the reset button for 5 seconds. This resetsall parameters to the factory defaults.4. Kensington™ Lock Slot: for use with a security cable (not supplied).5. DC 12 V: Connect an external power supply (not included). Supply must be rated at 12VDC 1A, EIAJ-04, center pin positive,outside barrel negative. Use only a class 2/LPS power supply.6. LAN/PoE: RJ-45 connector for Q-SYS Gigabit Ethernet and Power over Ethernet. Cat5e cabling or better required.7. 3G-SDI: 3G-SDI output via various video formats. Video formats can be changed via Q-SYS Designer Software or a Q-SYS UserControl Interface (UCI). Maximum video format is 1080p60.8. HDMI: HDMI® 1.4b output via various video formats. Video formats can be changed via Q-SYS Designer Software or a Q-SYSUCI. Maximum video format is 4K30. Note: NC Series PTZ Cameras support the usage of either HDMI or SDI, but not both simultaneously.Installation — NC-12x80 & NC-20x60 PTZInstall the Wall Mount Bracket1. Select a location on the wall or other vertical surface where the camera is tobe mounted. Make sure the surface is strong enough to hold the weight of the camera and bracket.2. Use the short side (1) of the bracket as a template to mark the location of thefour mounting holes (2) onto the wall.3. If the camera cables are installed inside the wall, run the cables through thelarge hole (3) in the short side of the bracket.4. Using appropriate screws (4), as necessary, attach the bracket to the wall.Tighten the attaching hardware. (Screws not supplied.)Bottom plate of Camera Mount the Camera on the Wall Bracket1. Align hole A on the bottom of the camera with the alignment pin A on thewall bracket. Place the camera onto the bracket so the alignment pin isinserted into the alignment hole on the camera and the rubber feet (C) on the bottom of the camera are inserted into the two slots (C).2. Install the larger screw (B) up through the wall bracket into the threaded holeon the bottom of the camera. Use a Phillips screwdriver to loosely tighten the screw.3. Install three smaller screws D, E, and F up through the wall bracket into thebottom of the camera. Tighten the screws using a Phillips screwdriver. 4. Tighten the larger screw installed earlier.5. If the camera cables are not installed in the wall, run the cables up throughthe oval hole (5) in the longer part of the bracket.6. Attach the cables to the appropriate connectors on the back of the cameraper installation requirements.7. Secure the cables to the bracket so that there is no strain placed on theconnectors.Connections and Controls (NC-110 ePTZ)Front Panel1. LED• Blinking Green: ID Mode• Solid Blue: Power On; Not Streaming• Solid Green: Streaming• Off: Camera is in Privacy Mode2. Included Camera Mount: This product can be configured for monitor-mounting or surface-mounting.3. Surface Mounting Screw Holes4. Universal Mounting Adapter: This can be used when connecting the NC-110 to a different mount.Rear Panel1. Factory Reset Pinhole: Use a paperclip or similarly sized object to insert. Press and hold the reset button for 5 seconds. This resetsall parameters to the factory defaults.2. ID Button: Press to identify this product in Q-SYS Designer and Configurator. The STATUS LED on the front panel blinks green whenin ID mode. Press again to turn off.3. LAN/PoE: RJ-45 connector for Q-SYS Gigabit Ethernet and Power over Ethernet. Cat5e cabling or better required.Installation (NC-110 ePTZ)Mounting Above a MonitorBend the bracket at the indicated pivot points shown to allow the optimal fit to the selected monitor. Mounting to a WallUsing the Existing Bracket for a Third-Party Mount1/4-20 UNC ThreadAttach the third-party mount to one of the 1 /4 -20 mounting holes on the included bracket. Removing the Existing Bracket for a Third-Party Mount1. On the bottom side of the camera, remove the two screws on the bracket.Remove 2 x Screws2.Slide the bracket off the camera.3. Mount the camera to the third-party mount.// DO NOT REMOVE \\Screws in block or camera1/4-20 UNC ThreadUse on various camera mounting bracketsInstalling Privacy Cover1. Peel adhesive.2. Center and attach to top of camera.3. Press firmly to affix adhesive.Dimension Drawings NC-12x80 & NC-20x60 PTZPTZ With Lens CapNC-110 ePTZQSC Self Help PortalRead knowledge base articles and discussions, download software and firmware, view product documents and training videos, and create support cases.https:///selfhelpportal/s/Customer SupportRefer to the Contact Us page on the QSC website for Technical Support and Customer Care, including their phone numbers and hours of operation.https:///contact-us/© 2021 QSC, LLC. All rights reserved. QSC, the QSC logo, Q-SYS, and the Q-SYS logo are registered trademarks of QSC, LLC, in the U.S. Patent and Trademark office and other countries. Q-LAN and Q-SYS Designer are trademarks of QSC, LLC. Patents may apply or be pending.All other trademarks are the property of their respective owners.。
alcatel设备型号

1641SM 1651SM 1661SM3AL34729BC**3AL34730BC**3AL34962BC**3AL35927BC**3AL35928BC**3AL39299BC**3AL35962AA**3AL35963AA**3AL35964AA**3AL35965AA**MB4-13AL97273AA**DE1B283AL97079AA** DE1B323AL97198AA**ISA-ES1 8FE 3AL97165AB**ISA-ES1 3FE3AL97194AB**1650SMC SYNTH4EQUICO 3AL78836AA**PQ2/EQC 3AL78836AB**MATRIXN 3AL78848BA**MATRIXE 3AL81072AA**S-16.1ND 3AL78895CA**I-16.1ND 3AL80881AA**CO-163AL81434AA**ISA-ES1 8FE 3AL98128AA**ISA-ES1 8FX3AL98150AA**ISA-ES163AL81915AA**ES16B 3AL81915BA**ETH-ATX 3AL80404AA**GETH-AG 3AL80411AB**P4S1N 3AL78821BA**A2S13AL78818AA**CONGI 3AL78830AD**S-64.2E 3AL91884AA**CO-648DG15432AA**1662SMC SYNTH163AL98038AD**1670SM 1641SX 1664SXFLCSERV 3AG24103AA**FLCCONGI3AG24102AA**阿尔卡特1664SM1666SRADM1642EM 1660SMOMSNDXCMX640GE3AL81429AA**MX320GE3AG24173AA**P4S64X 3AG24161AB**P16S1S43AL89540AA**P16S163AL81295AA**1692MS 1696MS1686WM_SHELF 3AL74806AB**LB_OMDX16_100_C 3AL85503AE**WB_OXA_P_15103AL74981BB**WB_OXA_P20_15103AL74981CB**WB_OXA_P_15103AL74981BB**WB_OXA_P20_15103AL74981CB**EXP3AL74811AA**SMEC23AL87083AA**SMEC33AL87084AA**WLA_SHELF 3AL74846AB**SER_PLUS3AL36266AC**WLA_TS16_1_22~363AL85527****WLA_RS16_13AL85528AA**WLA_TFEC16_22~363AL85560****WLA_RFEC_163AL85561AA**1626LMTRBD1121OTN 1830PSS 11STAR18DG59249AA**1686WM 1678MCC ASONCWDMDWDML-16.2 AGG.64 FC/PC enhanced L16.2接口群路盘(FC/PC光接头)L-16.2 JE1 AGG.64 FC/PC enhanced JE1型L16.2接口群路盘(FC/PC光接头)L-16.2 JE2 AGG.64 FC/PC enhanced JE2型L16.2接口群路盘(FC/PC光接头)L-16.2 MONODIR.REGEN. FC/PC L16.2接口单向中继盘(FC/PC光接头)L-16.2 JE-1 MO.RE.FC/PC (1900PS/NM)JE1 型L16.2接口单向中继盘(FC/PC光接头1900ps/nm色散容限)L-16.2 JE-2 MO.RE.FC/PC (3000PS/NM)JE2 型L16.2接口单向中继盘(FC/PC光接头3000ps/nm色散容限)BOOSTER+10 dB FC/PC10dB后置光放大大器BOOSTER+13 dB FC/PC13dB后置光放大大器BOOSTER+15 dB FC/PC15dB后置光放大大器BOOSTER+17 dB FC/PC17dB后置光放大大器主控板28*2M板32*2M板8FE以太网板2电口+1光口以太网板1660SM R4 EC1660SM R4监控板1660SM R5 EC1660SM R5监控板1660SM R4 SC1660SM R4矩阵板1660SM R5 SC1660SM R5矩阵板1660SM&1662SMC 2.5G Service Card1660SM&1662SMC 通用 2.5G双槽位板1660SM&1662SMC 2.5G Service Card1660SM&1662SMC 通用 2.5G双槽位板1660SM&1662SMC 2.5G Service Card1660SM&1662SMC 通用 2.5G双槽位板(不含模块)1660SM&1662SMC 8*FE ETH Service Card8FE以太网板1660SM&1662SMC 8*FE ETH Service Card8光口以太网板1660SM&1662SMC 2.5G ETH Service Card 2.5G以太网处理板1660SM&1662SMC 2.5G ETH Service Card 2.5G以太网处理板1660SM&1662SMC 2.5G ETH Access Card 2.5G以太网接口板1660SM&1662SMC 2.5G ETH Access Card 2.5G以太网接口板1660SM&1662SMC 155M Service Card4*155M处理板(不含模块)1660SM&1662SMC 155M Access Card2*155M接口板(不含模块)CONTROL AND GENERAL INTERFACE 电源板STM 64 PORT XFP S-64.2 FC1660SM R5 10G光板STM 64 PORT XFP Pluggable1660SM R5 10G光板(不含光模块)1662SMC COMPACT ADM16 1662SMC综合板1678MCC EC1678MCC主控板1678MCC EC1678MCC主控板1678MCC SC1678MCC矩阵板1678MCC SC1678MCC矩阵板1678MCC 10G Service Card4*10G光板(不含模块)1678MCC 155M/622M Service Card16*155M/622M处理板(不含模块)1678MCC 2.5G Service Card16*2.5G处理板(不含模块)MASTER SHELF 1686 WMLB MUL TIPLEXER/DEMUL TIPLEXER (16 ch)BOOSTER double stage (17 dBm) SPV 1510BOOSTER double stage (20 dBm) SPV 1510PREAMPLIFIERdouble stage (17 dBm) SPV1510PREAMPLIFIERdouble stage (20 dBm)SPV1510OPTICAL EXPANSION COUPLERSMECSMEC3SLA VE SHELF 1686 WMSERIALIZER PLUSS–16.1/TX 192.2~193.6 WLA 6400OTU(波长转换板)发盘(不带FEC)RX WDM S16_1 WLA OTU(波长转换板)收盘(不带FEC)S–16.1 LH WLA TX 192.2~193.6 – 12800OTU(波长转换板)发盘(FEC)S–16.1 LH WLA RX OTU(波长转换板)收盘(FEC)OTU OTU11G Single Port TunableOTUAnyRate (1 client)。
- 1、下载文档前请自行甄别文档内容的完整性,平台不提供额外的编辑、内容补充、找答案等附加服务。
- 2、"仅部分预览"的文档,不可在线预览部分如存在完整性等问题,可反馈申请退款(可完整预览的文档不适用该条件!)。
- 3、如文档侵犯您的权益,请联系客服反馈,我们会尽快为您处理(人工客服工作时间:9:00-18:30)。
FCoE Devices
To implement FCoE and unified fabric, at least two devices are required: a lossless Ethernet switch that can forward Fibre Channel frames and a multifunction server adapter that supports the LAN and SAN. Cisco has offered FCoE and unified fabric capability on the Cisco Nexus® 5000 Series Switches since June 2008. The Cisco Nexus 5000 Series consists of lossless, line-rate 10 Gigabit Ethernet switches that optionally support FCoE and unified fabric on every port. To integrate with installed SANs, native Fibre Channel ports are available for connection to Fibre Channel storage, Fibre Channel host bus adapters (HBAs), and Fibre Channel switches. The foundation of the Cisco Nexus 5000 Series as true 10 Gigabit Ethernet LAN switches allows them to be deployed across a data center’s access layer for all purposes. Cisco® NX-OS Software supports both the LAN and SAN for a single data center operating environment. A powerful new feature of FCoE networks is support for Ethernet pass-through switches. An Ethernet pass-through switch forwards Fibre Channel frames as an upper layer protocol. These switches must be lossless, but they require no knowledge of Fibre Channel technology as long as an FCoE-aware switch exists upstream in the I/O flow.
Figure 1. Enabling Technologies for Fibre Channel over Ethernet
At-A-Glance
Why Is FCoE Evolutionary?
FCoE is evolutionary in that it is compatible with the installed base of Fibre Channel as well as being the next step in capability. FCoE can be implemented in stages nondisruptively on installed SANs. FCoE simply tunnels a full Fibre Channel frame onto Ethernet. With the strategy of frame encapsulation and de-encapsulation, frames are moved, without overhead, between FCoE and Fibre Channel ports to allow connection to installed Fibre Channel. In support of FCoE, all the Fibre Channel network services, nomenclature, behaviors, and network tools remain intact. SAN administrators manage Fibre Channel flows in a manner very similar to that used today. This sort of evolutionary transition has occurred before. In the mid 1990s, the SCSI protocol implemented over a bus architecture was the standard for block attached storage. However, storage assets coupled with individual servers used capacity inefficiently, so a networking model for storage was created, along with the capability to consolidate storage. Because valuable and robust driver and firmware technology needed to be preserved, not reinvented, the SCSI protocol became the upper-layer protocol of the Fibre Channel networking model. Thus, a new physical infrastructure was created for SCSI with significant investment in creation of a robust networking model. This process is being repeated today but with the difficult work of network model creation done, and the porting of SCSI and Fibre Channel now occurring over proven 10 Gigabit Ethernet.
© 2010 Cisco and/or its affiliates. All rights reserved. Cisco, the Cisco logo, and Cisco Systems are registered trademarks or trademarks of Cisco and/or its affiliates in the United States and certain other countries. All other trademarks mentioned in this document or Website are the property of their respective owners. The use of the word partner does not imply a partnership relationship between Cisco and any other re Channel over Ethernet
Thus, specialized Fibre Channel networks can begin to match the economics of Layer 2 Ethernet networks. Cisco Nexus 4000 Series Switches are the first such lossless Ethernet switches capable of participating in Fibre Channel and FCoE networks. The Cisco Nexus 4000 Series is a blade server switch compatible with IBM BladeCenter series H and HT. Converged network adapters (CNAs) support both LAN plus SCSI and Fibre Channel operating system stacks and can place 10 Gigabit Ethernet LAN and FCoE traffic on the network wire. A CNA can function as just a LAN network controller or a network interface card (NIC) but also have the additional capability of FCoE. A 10 Gigabit Ethernet CNA typically replaces multiple adapters per server and generally simplifies server physical I/O requirements. Fibre Channel HBA industry leaders QLogic and Emulex market CNAs, with NIC volume leaders preparing offerings for the future. CNA market participation shows how unified fabric and FCoE together provide more competitive choices to users. Figure 2 illustrates the benefits of FCoE.