win7下vs+ivf+mpi配置
MPICH2在Windows环境下Visual_Studio_2010的环境搭建

MPICH2在Windows系统Visual Studio 2010的环境搭建本机运行环境:机器型号:联想G450处理器:Pentium(R)Dual-Core CPU T4200 @ 2.00GHz运行内存(RAM):2GB操作系统:Windows 7(32位)程序开发环境:Visual Studio 2008MPI版本:mpich2-1.3.2p1-win-ia32安装程序MPI的编译和运行对于简单的程序,可以使用专门的编译命令。
对于大的项目,最好使用标准的Makefile。
MPICH提供的编译命令有mpicc和mpif77,它们分别是C和Fortran的编译命令: mpicc -o first first.cmpif77 -o first firstf.f对于编译得到的目标程序,运行的命令为:mpirun –arch xxx –np yyy first其中xxx为machines.<arch>的<arch>,yyy为申请的进程数目。
MPICH的安装和配置文中使用的MPICH2安装文件是mpich2-1.4-win-ia32(/mpi/mpich),在Windows下安装MPICH2比较简单,但是要有Microsoft .NET Framework的支持。
安装基本上只要单击“Next”即可。
在安装过程中会提示输入进程管理器的密码,这个密码被用来访问所有的程序,这里使用的密码为admin。
如果是多台机器执行mpi,那么这多台机器上必须配置相同的mpi用户,就是新用户的用户名和密码必须相同。
安装完成后,安装目录下的include子目录包含了编程所需要的所有头文件,lib子目录包含了相应的程序库,而子目录bin则包含了MPI在Windows下面必须的运行程序。
运行时需要的动态链接库被安装在了Windows系统目录中。
在Windows平台下可以使用Microsoft Visual Studio来开发MPI程序。
MPI配置

1、建一个项目如下:点击OK2、打开项目之后,插入两个S7-300站3、硬件组态第一个S7-300站,如下:双击该CPU4、双击机架里第二槽CPU 315-2 DP单击属性点击OK5、点击Properties(属性),选定MPI网,创建MPI节点地址。
我把它设成”4”。
设定MPI的网络节点选MPI网点击OK点击OK 即完成对MPI节点的设置。
6、保存并编译S7-300站里的PLC 里。
7、现在对第二个S7-300站进行MPI 节点的设定。
8、硬件插入之后,双击CPU315-2DP双击双击该PLC9、单击Propertie(属性)单击属性点击OK10、选定MPI网,设定MPI节点号。
我设定为“6”。
点击的设定。
1112、做完上面的对的步骤。
即完成了对MPI 的硬件和参数的配置。
下面用紫色的MPI 线把两个PLC 连接起来。
注意,一定把九针头插在在MPI/DP 口上。
13、先选定MPI(1)如下图:选定MPI 网设定MPI 网络节点点击OK14、把鼠标放在Optionsdefine Globel Data 单击打开。
15、打开之后如图双击该区域先选定PLC单击OK再插入第二个plc双击该区域MB100表示为起始字节。
10选定PLC之后单击OK上面已经配完了对两个PLC的映像区域的设定下面把这个全局数据表,进行保存并编译之后下载点击编译说明配成了点击关闭点击OK下载完成之后MPI网络已经建立。
win7-32位系统下abaqus6.9安装intel visual fortran11历程和setenv调用故障的解决

win7-32位系统下abaqus6.9安装intel visual fortran11历程和setenv调用故障的解决2013-04-04 21:52:44| 分类:默认分类| 标签:|字号大中小订阅本人菜鸟一枚。
由于要学习abaqus的子程序使用方法,所以要在电脑上安装ivf(intel visual fortran)才行。
根据网上的教程,我鼓捣了三四天才顺利装上。
其间遇到了一些问题,网上很难找到答案。
为了避免大家再受到相同的折磨,现将安装日志记录如下。
1. 需要的软件。
abaqus的子程序是用fortran语言编写的,要调用必须安装ivf。
但是ivf只有程序编译功能(胡乱解释),需要依靠microsoft visual studio软件进行连接。
所以要首先安装vs(visual studio)。
2.软件版本。
win7-32位系统,abaqus6.9(版本较老,懒得换)。
vs2008中文版(有的网友说中文版的不行,但是我的经历证明是可以的)需要在ivf之前安装,abaqus安装次序无所谓。
ivf11.1.038版本,必须在vs2008之后安装。
3.设置。
网上有两种方法,一种需要改环境变量,另一种不需要,本人较驽钝,选第二种。
打开abaqus安装文件夹C:\SIMULIA\Abaqus\Commands(看自己的安装路径了),找到abq691.bat 文件,右键选择“编辑”。
在原有文字之前加上@call "C:\Program Files\Intel\Compiler\11.1\038\bin\ia32\ifortvars_ia32.bat",包括引号在内哦。
4.开始菜单——〉所有程序——〉abaqus6.9——〉abaqus verification,进行安装验证,完成后会自动生成并打开验证结果文件,各项都是“PASS”,表示安装成功。
5.经验教训。
软件版本不对是不行的。
vsFTP服务及其配置

vsFTP的运行模式
一种是独立(standalone)运行模式,另外一种 是xinetd(eXtended Internet Services Daemon, 即:扩展的Internet服务守护进程)模式。两种模 式运行机制是不同的,独立运行模式适合专业的 FTP服务器,且FTP总是一直有人访问,占用资源 比较大,如果FTP服务器总是有人访问和登入建 议采用这种模式。如果FTP服务器访问人数比较 少,建议您用xinetd模式。xinetd模式的运行方式 一直监听端口,当客户端(Client)有FTP连接请 求时,首先会将连接传至xinetd,xinetd再将此要 求传至vsftpd,启动相应的vsftp服务进程(即: vsftpd)。以下的内容主要是介绍独立模式下的 vsftpd启动和配置方式。
可以从Fedora 8安装光盘DVD中的Packages目录 下找出名为vsftpdd-2.0.5-19.fc8.i386.rpm的文件, 然后输入以下指令,系统即将自动完成vsFTP服 务器的安装:
[root@Candy root]#rpm –ivh vsftpd-2.0.519.fc8.i386.rpm
图12-1 “服务状态设置”设置画面
测试vsftpd是否已经启动
可用telnet检验vsftpd是否已经启动: [root@Candy root]# telnet 127.0.0.1 21
Trying 127.0.0.1... Connected to 127.0.0.1. Escape character is '^]'. 220 (vsFTPd 2.0.5)
intelvisualfortran在visualstudio中如何正常的使用openmp并行程序
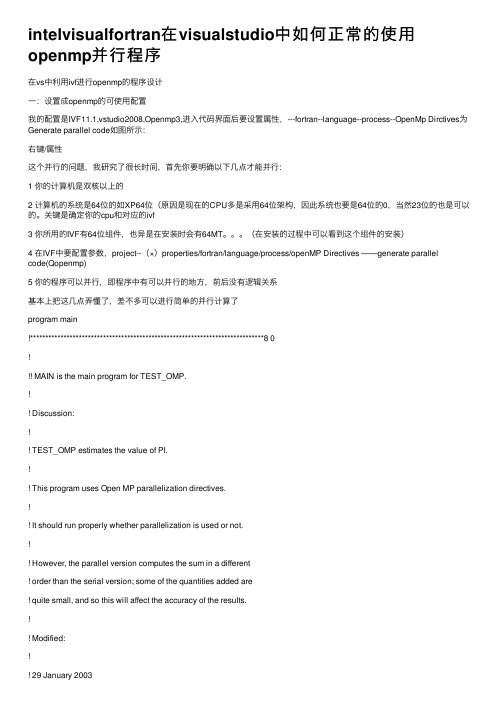
intelvisualfortran在visualstudio中如何正常的使⽤openmp并⾏程序在vs中利⽤ivf进⾏openmp的程序设计⼀:设置成openmp的可使⽤配置我的配置是IVF11.1,vstudio2008,Openmp3,进⼊代码界⾯后要设置属性,---fortran--language--process--OpenMp Dirctives为Generate parallel code如图所⽰:右键/属性这个并⾏的问题,我研究了很长时间,⾸先你要明确以下⼏点才能并⾏:1 你的计算机是双核以上的2 计算机的系统是64位的如XP64位(原因是现在的CPU多是采⽤64位架构,因此系统也要是64位的0,当然23位的也是可以的。
关键是确定你的cpu和对应的ivf3 你所⽤的IVF有64位组件,也异是在安装时会有64MT。
(在安装的过程中可以看到这个组件的安装)4 在IVF中要配置参数,project--(×)properties/fortran/language/process/openMP Directives ——generate parallelcode(Qopenmp)5 你的程序可以并⾏,即程序中有可以并⾏的地⽅,前后没有逻辑关系基本上把这⼏点弄懂了,差不多可以进⾏简单的并⾏计算了program main!*****************************************************************************8 0!!! MAIN is the main program for TEST_OMP.!! Discussion:!! TEST_OMP estimates the value of PI.!! This program uses Open MP parallelization directives.!! It should run properly whether parallelization is used or not.!! However, the parallel version computes the sum in a different! order than the serial version; some of the quantities added are! quite small, and so this will affect the accuracy of the results.!! Modified:! Author:!! John Burkardt!! A FORTRAN 90 module may be available:!! use omp_lib!! A FORTRAN 77 include file may be available:!! include 'omp_lib.h'!implicit noneinteger, parameter :: r4_logn_max = 9integer idinteger nthreadsinteger omp_get_num_procsinteger omp_get_num_threadsinteger omp_get_thread_numcall timestamp ( )write ( *, '(a)' ) ' 'write ( *, '(a)' ) 'TEST_OMP'write ( *, '(a)' ) ' FORTRAN90 version'write ( *, '(a)' ) ' 'write ( *, '(a)' ) ' Estimate the value of PI by summing a series.'write ( *, '(a)' ) ' 'write ( *, '(a)' ) ' This program includes Open MP directives, which' write ( *, '(a)' ) ' may be used to run the program in parallel.' write ( *, '(a)' ) ' 'write ( *, '(a)' ) ' The number of processors available:'write ( *, '(a,i8)' ) ' OMP_GET_NUM_PROCS () = ', omp_get_num_procs ( ) nthreads = 4write ( *, '(a)' ) ' 'write ( *, '(a,i8,a)' ) ' Call OMP_SET_NUM_THREADS, and request ', &nthreads, ' threads.'! Note that the call to OMP_GET_NUM_THREADS will always return 1! if called outside a parallel region!!!$OMP parallel private ( id )id = omp_get_thread_num ( )write ( *, '(a,i3)' ) ' This is process ', idif ( id == 0 ) thenwrite ( *, '(a)' ) ' 'write ( *, '(a)' ) ' Calling OMP_GET_NUM_THREADS inside a 'write ( *, '(a)' ) ' parallel region, we get the number of'write ( *, '(a,i3)' ) ' threads is ', omp_get_num_threads ( )write ( *, '(a)' ) ' 'end if!$OMP end parallelcall r4_test ( r4_logn_max )write ( *, '(a)' ) ' 'write ( *, '(a)' ) 'TEST_OMP'write ( *, '(a)' ) ' Normal end of execution.'write ( *, '(a)' ) ' 'call timestamp ( )stopendsubroutine r4_test ( logn_max )!*****************************************************************************8 0!!! R4_TEST estimates the value of PI using single precision.!! Discussion:!! PI is estimated using N terms. N is increased from 10^2 to 10^LOGN_MAX.! The calculation is repeated using both sequential and Open MP enabled code. ! Wall clock time is measured by calling SYSTEM_CLOCK.!! 06 January 2003!! Author:!! John Burkardt!implicit noneinteger clock_maxinteger clock_rateinteger clock_startinteger clock_stopreal errorreal estimateinteger logninteger logn_maxcharacter ( len = 3 ) modeinteger nreal r4_pireal timewrite ( *, '(a)' ) ' 'write ( *, '(a)' ) 'R4_TEST:'write ( *, '(a)' ) ' Estimate the value of PI,'write ( *, '(a)' ) ' using single precision arithmetic.'write ( *, '(a)' ) ' 'write ( *, '(a)' ) ' N = number of terms computed and added;' write ( *, '(a)' ) ' 'write ( *, '(a)' ) ' ESTIMATE = the computed estimate of PI;' write ( *, '(a)' ) ' 'write ( *, '(a)' ) ' ERROR = ( the computed estimate - PI );'write ( *, '(a)' ) ' 'write ( *, '(a)' ) ' TIME = elapsed wall clock time;'write ( *, '(a)' ) ' 'write ( *, '(a)' ) ' Note that you can''t increase N forever, because:'write ( *, '(a)' ) ' B) maximum integer size is a problem.'write ( *, '(a)' ) ' 'write ( *, '(a,i12)' ) ' The maximum integer:' , huge ( n )write ( *, '(a)' ) ' 'write ( *, '(a)' ) ' 'write ( *, '(a)' ) ' N Mode Estimate Error Time' write ( *, '(a)' ) ' 'n = 1do logn = 2, logn_maxmode = 'OMP'call system_clock ( clock_start, clock_rate, clock_max )call r4_pi_est_omp ( n, estimate )call system_clock ( clock_stop, clock_rate, clock_max )time = real ( clock_stop - clock_start ) / real ( clock_rate )error = abs ( estimate - r4_pi ( ) )write ( *, '( i12, 2x, a3, 2x, f14.10, 2x, g14.6, 2x, g14.6 )' ) &n, mode, estimate, error, timen = n * 10end doreturnendsubroutine r4_pi_est_omp ( n, estimate )!*****************************************************************************8 0 !!! R4_PI_EST_OMP estimates the value of PI, using Open MP.!! Discussion:!! The calculation is based on the formula for the indefinite integral:!! Integral 1 / ( 1 + X**2 ) dx = Arctan ( X )!! Hence, the definite integral!! Integral ( 0 <= X <= 1 ) 1 / ( 1 + X**2 ) dx!! A standard way to approximate an integral uses the midpoint rule.! If we create N equally spaced intervals of width 1/N, then the! midpoint of the I-th interval is!! X(I) = (2*I-1)/(2*N).!! The approximation for the integral is then:!! Sum ( 1 <= I <= N ) (1/N) * 1 / ( 1 + X(I)**2 )!! In order to compute PI, we multiply this by 4; we also can pull out! the factor of 1/N, so that the formula you see in the program looks like: !! ( 4 / N ) * Sum ( 1 <= I <= N ) 1 / ( 1 + X(I)**2 )!! Until roundoff becomes an issue, greater accuracy can be achieved by ! increasing the value of N. !! Modified:!! 06 January 2003!! Author:!! John Burkardt!! Parameters:!! Input, integer N, the number of terms to add up.!! Output, real ESTIMATE, the estimated value of pi.!implicit nonereal hinteger nreal sum2real xh = 1.0E+00 / real ( 2 * n )sum2 = 0.0E+00!!$OMP parallel do private(x) shared(h) reduction(+: sum2)!do i = 1, nx = h * real ( 2 * i - 1 )sum2 = sum2 + 1.0E+00 / ( 1.0E+00 + x**2 )end doestimate = 4.0E+00 * sum2 / real ( n )returnendfunction r4_pi ( )!*****************************************************************************8 0 !!! R4_PI returns the value of pi.!! Modified:!! 02 February 2000!! Author:!! John Burkardt!! Parameters:!! Output, real R4_PI, the value of pi.!implicit noner4_pi = 3.14159265358979323846264338327950288419716939937510E+00 returnendsubroutine timestamp ( )!*****************************************************************************8 0!!! TIMESTAMP prints the current YMDHMS date as a time stamp.!! Example:!! May 31 2001 9:45:54.872 AM!! Modified:!! 31 May 2001!! Author:!! John Burkardt!! Parameters:!! None!implicit nonecharacter ( len = 8 ) ampminteger dcharacter ( len = 8 ) dateinteger hinteger minteger mmcharacter ( len = 9 ), parameter, dimension(12) :: month = (/ &'January ', 'February ', 'March ', 'April ', &'May ', 'June ', 'July ', 'August ', &integer ninteger scharacter ( len = 10 ) timeinteger values(8)integer ycharacter ( len = 5 ) zonecall date_and_time ( date, time, zone, values ) y = values(1)m = values(2)d = values(3)h = values(5)n = values(6)s = values(7)mm = values(8)if ( h < 12 ) thenampm = 'AM'else if ( h == 12 ) thenif ( n == 0 .and. s == 0 ) thenampm = 'Noon'elseampm = 'PM'end ifelseh = h - 12if ( h < 12 ) thenampm = 'PM'else if ( h == 12 ) thenif ( n == 0 .and. s == 0 ) thenampm = 'Midnight'elseampm = 'AM'end ifend ifend iftrim ( month(m) ), d, y, h, ':', n, ':', s, '.', mm, trim ( ampm ) returnend!===================================== COPY上⾯的程序,可以完全运⾏成功,运⾏界⾯如下:。
Windows平台Compaq Visual Fortran 6.6 并行编程环境的配置

各版本MPICH2下载地址:/research/projects/mpich2/index.php*如果下不来换搜狗浏览器外网加速下。
如果本机上没有安装过Microsoft .NET .Framework,安装mpich2时,会提示安装,2.0版本以上的都行,然后把mpich2-1.2.1装上。
在Windows下安装此程序,其默认安装目录为C:\ProgramFiles\MPICH2。
安装成功后,在此目录下有四个子目录,分别为bin,example,include和lib。
其中bin目录下有两个执行文件:smpd.exe和mpiexec.exe。
在“我的电脑”环境变量设置中将bin目录写入路径path变量,这样就可以在任何地方执行此目录下的文件了。
*1、准备工作(1) 将{MPICH_root} \Include和{MPICH_root} \Lib目录下的所有文件分别拷贝到{Microsoft Visual Studio}\Df98\Include和{Microsoft Visual Studio}\Df98\Lib 目录下;(2) 将{MPICH_root}\Bin加入到系统的PATH环境变量中。
如:将路径C:\Program Files\MPICH2\include添加到环境变量path 中。
右击“我的电脑”->“属性”->“高级”选项卡->环境变量->双击PATH,添加C:\Program Files\MPICH2\include。
(3)打开CVF,在Tools->Options->Directories的Include files和Library files中分别添加mpich2的include和lib路径。
2、编译、链接MPI应用程序为了方便使用Visual Fortran 6.x编译器进行并行程序编译链接,在第一次使用其编译程序前,可以增加一个Fortran项目环境:(1) 点击菜单File->New...;(2) 在Projects标签中选择Fortran Console Application,然后在右侧输入新项目名称,点OK;(3) 在接下来的对话框中选择An empty project,点击Finish;(4) 在接下来的对话框中直接点击OK;(5) 点击菜单Project->Settings...,进行下面操作:I、在setting for中,选择Win32 debug;II、选择Fortran标签,在Category一栏中选择“External Procedures”,在“Argument Passing”一栏中选择“C, By Reference”;在“String Length Argument”一栏中选择“After All Args”;III、在C/C++ 标签,在Category一栏中选择“Preprocessor”,将“C:\mpich2\include”添加到“Additional include directories”中。
win7-64位系统下opencv-2.4.9的安装以及在visual studio2010中配置
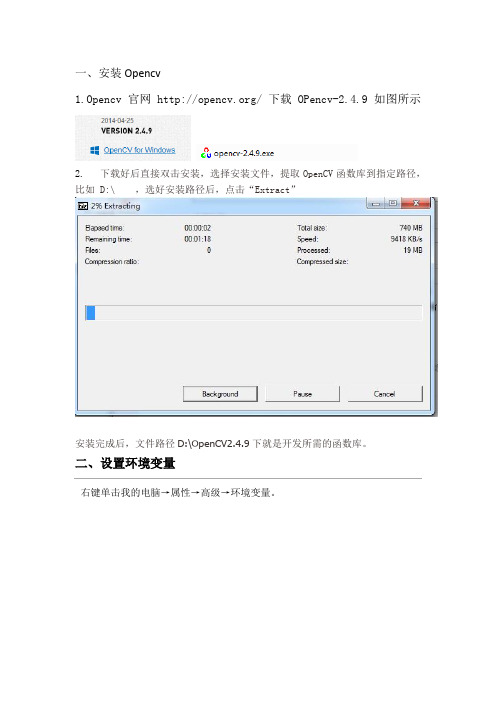
一、安装Opencv1.Opencv官网/ 下载OPencv-2.4.9如图所示2.下载好后直接双击安装,选择安装文件,提取OpenCV函数库到指定路径,比如 D:\ ,选好安装路径后,点击“Extract”安装完成后,文件路径D:\OpenCV2.4.9下就是开发所需的函数库。
二、设置环境变量右键单击我的电脑→属性→高级→环境变量。
1.用户变量设置设置PATH选中PATH,单击编辑。
在PATH的末尾添加以下路径:C:\ProgramFiles\OpenCV244\opencv\build\x86\vc10\bin。
注意:1、要在该路径前添加英文分号;,以与前面的路径隔开,但该路径末尾不可加英文分号;,除非还要在其后添加路径;2、可根据自己的情况,将其改为你的opencv\build\x86\vc10\bin文件夹所在的路径;3、如果是64位系统,可将opencv\build\x86\vc10\bin改为opencv\build\x64\vc10\bin。
2.新建OpenCV变量单击新建,在弹出的对话框中,将变量名和变量值分别设置为OpenCV和C:\Program Files\OpenCV244\opencv\build。
注意:1、变量名可以自己定义;2、变量值可修改为你的opencv\build文件夹所在的路径。
3.系统变量设置设置PATH选中PATH,单击编辑。
在PATH的末尾添加以下路径:C:\ProgramFiles\OpenCV244\opencv\build\x86\vc10\bin。
注意:1、要在该路径前添加英文分号;,以与前面的路径隔开,但该路径末尾不可加英文分号;,除非还要在其后添加路径;2、可根据自己的情况,将其改为你的opencv\build\x86\vc10\bin文件夹所在的路径;3、如果是64位系统,可将opencv\build\x86\vc10\bin改为opencv\build\x64\vc10\bin。
Win764位VS2010PCL1.6.0和1.8.0配置步骤
Win764位VS2010PCL1.6.0和1.8.0配置步骤刚接触PCL两个月,在群主和群友的帮助下完成了PCL1.6.0 和1.8.0的配置,这里记录了我配置过程中的问题,可能很小白,不足之处希望各位见谅指正。
Win7 64位下PCL1.6.0+VS2010+cmake+QT参考文章(附软件安装包,很全面):https:///a/1190000003988970软件准备:cmake开发工具;/download/PCL官网:/downloads/windows.html安装PCL 1.6.0 allinone msvc2010 win64.exe;单独安装openni;PDB文件复制到PCL bin 目录下; C:\Program Files (x86)\PCL 1.6.0\bin测试:测试代码网址:http://www./documentation/tutorials/project_inliers.php C:\Program Files(x86)\Microsoft Visual Studio 10.0\VC\bin下的cvtres.exe改名(cvtres1.exe)Generate;打开project_inliers.sln;但是在运行时出现错误:fatal error LNK1104: 无法打开文件“C:\Qt\4.8.0\lib\QtGuid4.lib”,这主要是因为VTK库里面依赖函数的关系不对应,我的QT版本是Qt4.8.6所以必须修改这些依赖函数。
解决方法是打开路径C:\Program Files\PCL1.6.0\3rdParty\VTK\lib\vtk-5.8下的三个文件:VTKConfigQt.cmakeVTKTargets-debug.cmakeVTKTargets-release.cmake将其中的路径C:\Qt\4.8.0替换成你现有版本的Qt路径,例如我的是:C:\Qt\4.8.6由于安装在C盘文件拒绝访问:右击文件,属性——安全——编辑——users——修改上面几个步骤运行无误后,右击seg设为启动项目;编译运行即可:CMakeLists.txt:cmake_minimum_required(VERSION2.8 FATAL_ERROR)project(cluster)find_package(PCL 1.2 REQUIRED)include_directories(${PCL_INCLUDE_DIRS})link_directories(${PCL_LIBRARY_DIRS})add_definitions(${PCL_DEFINITIONS})add_executable (cluster cluster.cpp)target_link_libraries (cluster${PCL_LIBRARIES})Win7 64位下PCL1.8.0+VS2013+cmake+QT5.5.1需要准备的文件:安装pcl-1.8.0-allinonel;注意在安装openni时选择你PCL安装路径的C:\Program Files\PCL1.8.0\3rdParty\OpenNI2下;PDB文件复制到PCL bin 目录下; C:\Program Files (x86)\PCL 1.6.0\bin属性表放在C:\Program Files\PCL 1.8.0下(网上教程有这么做,但不知道什么作用)配置环境变量;C:\Program Files\PCL1.8.0\bin;C:\Program Files\PCL1.8.0\3rdParty\FLANN\bin;C:\Program Files\PCL1.8.0\3rdParty\Qhull\bin;C:\Program Files\PCL1.8.0\3rdParty\OpenNI2\Tools;C:\Program Files\PCL1.8.0\3rdParty\VTK\bin;C:\Qt\Qt5.5.1\5.5\msvc2013_64\bin;经群友帮助替换C:\Program Files\PCL1.8.0\cmake文件夹下这两个文件然后用cmake编译,运行sln,步骤同1.6.0一样。
- 1、下载文档前请自行甄别文档内容的完整性,平台不提供额外的编辑、内容补充、找答案等附加服务。
- 2、"仅部分预览"的文档,不可在线预览部分如存在完整性等问题,可反馈申请退款(可完整预览的文档不适用该条件!)。
- 3、如文档侵犯您的权益,请联系客服反馈,我们会尽快为您处理(人工客服工作时间:9:00-18:30)。
Win7/win8系统下visual studio+intel visual fortran 的安装
&
windows 下mpi配置
第一部分所需组件:
虚拟光驱daemon tools(免费的lite版就可以)或者Ultra iso
Visual studio 2012.iso 安装文件更新补丁文件patch_KB2781514.exe,没有补丁,装完Visual Studio之后点击更新程序提示进行更新也可以。
Intel visual fortran composer XE 2013 及注册.lic文件
Mpi实现(32位机和64位机选用)
第二部分软件安装
先安装Visual studio 2012再安装Intel visual fortran,最后安装mpich2。
Visual studio 2012的安装,
1、安装虚拟光驱daemon tools
图略。
2、载入VisualStudio2012镜像
3、载入之后再磁盘窗口可以看到下图
4、点击进入,双击运行安装程序
5、接下来就是30分钟左右的等待时间(vs的确很庞大。
)
6、安装完vs2012之后,在开始菜单找到程序运行,第一次运行默
认环境设置选择C++,如图
7、这时,右下角会出现更新提示,点击进行更新
8、这两个更新是比较慢的,可以省略这一步,直接安装前面提到
的补丁patch_KB2781514.exe
直接双击安装,大概5分钟装完。
9、至此VS2012安装完毕,注意补丁是必须的。
IVF的安装
1、直接双击安装文件安装,
2、下一步,下一步,直到Activation,选择choose alternative activation
2、然后use a license file,将intel_2013.lic文件选入,下一步
3、怕麻烦就选full installation,那样的话会花费一些C盘内存。
或者
选custom installation
4、如果选择custom istallation ,参照下图
5、至此,IVF安装完成。
第三部分Mpi配置
1、Mpich2安装
32位系统以及64位系统分别选择相应安装程序,一路next,记住一个”behappy”
2、安装完mpich2文件后,安装目录mpich2文件下会有bin、include、lib三个后面要用到的文件夹
3、以管理员身份运行cmd.exe
开始 搜索cmd.exe ,以管理员身份运行
键入命令smpd – status 查看smpd安装与否
如果显示未安装则
键入命令smpd –install –phrase behappy
再次键入smpd –status就可以看到已经安装在运行了,
4、接下来可以测试一下并行程序cpi.exe (圆周率计算程序,在mpich2安装目录下的examples文件里,这台机子是D\Program Files\mpich2\examples\cpi.exe) :
开始-→所有程序-→mpich2-→ wmpiexec.exe
找到cpi.exe,调整线程为4(本机处理器为i3-2330m,双核四线程),勾选在独立窗口运行,点execute运行。
弹出登陆界面如下
用户名及密码必须是有效的系统管理员账户名及密码,可以在控制面板看到本机的管理员账户为diablo,
则填入账户和密码,register进行注册(因而必须为管理员账户设置密码!)。
注册之后,便看到程序在运行了。
这时说明mpi环境搭建成功!
5、配置ivf
打开Visual Studio 2012,新建一个名为mpitest的项目,位置最好也别在C盘。
在打开的mpitest项目界面,选择项目-->属性,打开mpitest项目属
性页
将mpich2\include的路径加入到Fortran-General-Additional Include Directories,对于64位机还要将平台选为x64(如果没有x64选项则点击配置管理器新建一个x64)
点击Linker-General,将mpich2\lib 的路径加入到Additional Library Directories.
点击Linker-Input ,将”fmpich2.lib”键入Additional Dependencies
点击确定,至此设置完毕!
6、并行hello.f90 程序测试:
如图,右键source文件夹 新建文件,文件名为hello,位置最好不要放在c盘。
将hello程序代码复制进入新建的文件,代码如下:
program mpihello
include "mpif.h "
character*(MPI_MAX_PROCESSOR_NAME) processor_name
integer myid,numprocs,namelen,rc,ierr
call MPI_INIT(ierr)
call MPI_COMM_RANK(MPI_COMM_WORLD,myid,ierr)
call MPI_COMM_SIZE(MPI_COMM_WORLD,numprocs,ierr)
call MPI_GET_PROCESSOR_NAME(processor_name,namelen,ierr)
write(*,10) myid,numprocs,processor_name
10 format ("HELLO WORLD !Process ",i2,"of",i1,"on",20A)
call MPI_FINALIZE(rc)
end program mpihello
点击生成 编译:这样该项目所在位置的子文件夹debug下就能
找到mpitest.obj文件
点击启动:这时能在debug子文件夹下看到mpitest.exe,可以提交给mpiexec.exe运行
开始-→所有程序-→mpich2-→ wmpiexec.exe-→找到mpitest.exe
第四部分建议
暂时没研究怎么永久保存ivf的mpi相关的项目配置,当重新建立一个项目时,是需要再次进行项目配置的。
所以,建议新建一个
mpiproject的项目,将相应mpich2文件的路径设置好并保存项目。
以后每次运行并行程序时都打开这个项目,再放入文件,这样可以避免反复的设置。