Introducton to Mechanical Ventilation
机械工程专业英语-交流与沟通EnglishCommunicationforMechanicalEngineers教学课件作者康兰Preface
Better prepare yourself to work in an increasingly diverse and international workplace;
为能在一个越来越多样化及国际化的工作环境中工作而更好地做好准备; Prepare的用法: (1)v.准备,配制 1.prepare sth 准备某事 2. prepare for sth 为某事而准备 3. prepare sb for sth 使某人为某事做好准备 例:we have prepared for the text。 4. prepare sb to do sth 让某人准备做某事 (2). preparation 准备,预备,准备工作 短语:make preparations for sth 为某事做准备 Under preparations 在准备中 (3). prepared adj. 准备好,有所准备 Be prepared to do sth 愿意做某事
机械工程专业英语 --交流与沟通
What do we learn? 我们学习什么?
Part 1: Introduction to Mechanical Engineering
机械工程导论
Part 2: Machine Elements and Mechanisms
机械零件及机构
Part 3: Communication Skills in Mechanical Engineering
机械工程专业英语 --交流与沟通
The following topics maybe used as a guide. 以下主题可以作为指南。
Topic 4: Introduce an example of the advanced technology used in mechanical engineering. … …All topics related to mechanical engineering are welcome.
机械工程英语课文翻译
机械工程英语课文翻译Introduction在机械工程领域中,掌握英语是非常重要的技能。
本篇文章将介绍一篇机械工程英语课文的翻译,旨在帮助读者提升英语水平和理解机械工程领域的专业术语。
原文原文标题:Introduction to Mechanical Engineering原文内容:Mechanical engineering is a broad field that encompasses various aspects of engineering. It deals with the design, analysis, manufacturing, and maintenance of mechanical systems. Mechanical engineers are responsible for creating and improving the machines and systems that enable different industries to function efficiently.The field of mechanical engineering has a long history, dating back to ancient civilizations such as the Greeks and Egyptians. However, it wasn’t until the Industrial Revolution in the 18th century that mechanical engineering became a distinct discipline. This period saw the rise of factories and the need for efficient machines to drive industrial processes.Modern mechanical engineers work on a wide range of projects, from designing and constructing buildings to developing advanced robotics and aerospace systems. They utilize their knowledge of physics, mathematics, and materials science to analyze and solve complex engineering problems.翻译翻译标题:机械工程导论机械工程是一个包含各个工程学科的广泛领域。
非计划拔出胸腔引流管应急预案脚本

非计划拔出胸腔引流管应急预案脚本英文回答:Non-planned removal of a chest tube can be apotentially serious situation that requires immediate action. In order to handle this emergency, it is important to have a well-prepared script that outlines the necessary steps to be taken. Here is an example of an emergency plan script for the non-planned removal of a chest tube:Introduction:Hello, my name is [Your Name] and I am a healthcare professional. Today, I will guide you through the emergency plan for the non-planned removal of a chest tube. This plan is designed to ensure the safety and well-being of the patient while addressing the issue at hand.Assessment:The first step in this emergency situation is to assess the patient's condition. Check for any signs of distress or complications such as difficulty breathing, excessive bleeding, or changes in vital signs. If the patient is stable and not experiencing any immediate life-threatening issues, proceed to the next step.Securing the Airway:The next priority is to secure the patient's airway. This can be done by providing supplemental oxygen and monitoring their oxygen saturation levels. If the patientis experiencing difficulty breathing, consider providing respiratory support such as bag-valve-mask ventilation or initiating mechanical ventilation if necessary.Controlling Bleeding:If there is excessive bleeding at the site where the chest tube was removed, apply direct pressure to the area using a sterile dressing or gauze. If the bleeding persists or is severe, consider activating the emergency responseteam and preparing for a potential blood transfusion.Replacing the Chest Tube:Once the patient is stabilized and bleeding is under control, the next step is to replace the chest tube. This should be done by a trained healthcare professional, following sterile technique and using appropriate equipment. It is important to ensure that the new chest tube is correctly inserted and secured to prevent any further complications.Monitoring and Follow-up:After the replacement of the chest tube, closelymonitor the patient for any signs of complications or changes in their condition. This includes assessing their respiratory status, vital signs, and chest X-rays toconfirm proper tube placement. It is also important to provide adequate pain management and ensure the patient's comfort throughout the process.Documentation and Communication:Finally, document all the actions taken during this emergency situation, including the assessment findings, interventions performed, and the patient's response. Communicate this information to the healthcare team involved in the patient's care to ensure continuity and coordination of further treatment.中文回答:非计划拔出胸腔引流管可能是一种潜在严重的情况,需要立即采取行动。
机械工程专业外文资料翻译

英文原文名《Englsih for die mould Design and Manufacturing》中文译名《模具设计与制造专业英语》文原文版出处:北京大学出版社2006年3月第一版译文成绩:中等指导教师(导师组长)签名:译文:1.3 弯曲模弯曲是一种最常见的成型操作。
我们只需要看看汽车的组件或设备,或在一个回形针,或文件柜——有多少部分是由弯曲成型的。
弯曲不仅用于法兰形式,接缝,起皱,还传授部分刚度(通过增加其惯性矩)。
弯曲使用的术语如图1-19所示。
弯曲过程中,外层纤维材料被拉伸,同时内部纤维收到压缩。
由于泊松比,外部区域部分的宽度(弯曲长度L)越小,在内部区域就比原来的宽度更大。
1.3.1 简单弯曲手工弯曲线时,需要一个由拇指和手指应用于线自然弯曲。
通常一个弯曲的半径是主要使其弯曲的工具。
一个支柱可以是固定和弯曲材料的一种工具,就像在管弯曲,线弯曲,pan-brake弯曲(图1-20),和夹紧垫模具。
1.3.2 弯曲限额最小弯曲半径随合金及其回火而变化;大多数退火薄金属可以承受的弯曲半径等于材料不开裂的厚度。
更多的韧性金属可以很容易地通过一个180º弯曲而弯曲,比如卷边弯曲操作。
然而,当板料弯曲,其总长度包括弯曲的长度大于原料。
这个长度变化必须经过生产工程师和模具设计师的深思熟虑,因为为了剪切坯料必须已知剪切坯料的长度。
在平焊位置,一块金属板的中性轴和中心线一致。
但在弯曲的位置,中性轴已经转移到距离内半径0.33到0.40 t的一个位置(图1-21).确定改进型坯料长度的关系如图1-21给出,从半径为r + t / 3的象限圆的周长计算中计算中性轴的长度。
在开发复杂的部分的长度时,先把它划分成一系列的直线,弯曲和弧。
三角法可以用来计算未知的尺寸,但要保持三角形的支架平行维度,因为斜边的弯曲角度和延长支架的长度可以很容易在蓝图尺寸上添加或减少。
弯曲的金属的长度可以从以下经验关系计算:AB = 2π(IR+kt)360B = 弯曲余量(中性轴)A = 弯曲角度IR =内弯曲半径t = 金属厚度0.33(IR < 2t)k =0.50(IR > 2t)1.3.3 弯曲工具影响一个弯曲工具的设计和最终工作的各种因素是工具材料的厚度,任何在这个厚度的变化,硬度和回火,弯曲的位置和弯曲程度,纹理方向和可能相互影响几个形状的耦合,因此不可能确定一个最终结果,直到一个工具的调试阶段完成。
在家通风消毒作文英语

在家通风消毒作文英语Title: Ventilation and Disinfection at Home。
Introduction:In recent times, the importance of maintaining a clean and healthy living environment has been emphasized more than ever. One effective way to achieve this is through proper ventilation and disinfection at home. In this essay, we will explore the significance of these practices, their benefits, and provide practical tips for implementing them effectively.Body:1. The Importance of Ventilation:Proper ventilation is crucial for maintaining a healthy indoor environment. It helps to remove pollutants, allergens, and stale air, ensuring a constant supply offresh air. By allowing air circulation, ventilation helps to reduce the risk of respiratory problems and improves overall well-being. Moreover, it aids in controlling humidity levels, preventing the growth of mold and mildew.2. Benefits of Ventilation:a) Improved Air Quality: Ventilation helps to remove pollutants such as dust, pet dander, and volatile organic compounds (VOCs), which can be harmful to our health. Fresh air circulation reduces the concentration of these pollutants, improving indoor air quality.b) Enhanced Comfort: Proper ventilation ensures a comfortable living environment by regulating temperature and humidity levels. It prevents the accumulation of excess heat, moisture, or odors, creating a pleasant atmosphere.c) Health Benefits: Good ventilation reduces the risk of respiratory infections, allergies, and asthma. It also helps to eliminate or reduce the presence of harmful gases, such as carbon monoxide, which can be emitted by applianceslike gas stoves or heaters.3. Effective Ventilation Techniques:a) Natural Ventilation: Opening windows and doors to allow fresh air to enter and circulate throughout the house is a simple yet effective method. Cross-ventilation can be achieved by strategically placing windows on opposite sides of the room.b) Mechanical Ventilation: Utilizing mechanical systems such as exhaust fans, air purifiers, or air conditioning units with proper filtration can help in maintaining a constant supply of fresh air and removing pollutants.4. The Significance of Disinfection:Disinfection plays a vital role in preventing the spread of infectious diseases and maintaining a germ-free environment. It involves killing or inactivating harmful microorganisms, including bacteria, viruses, and fungi. Regular disinfection helps to reduce the risk of infectionsand promotes overall well-being.5. Benefits of Disinfection:a) Disease Prevention: Disinfection helps to eliminate or reduce the presence of disease-causing pathogens, minimizing the risk of infections. This is particularly crucial during times of outbreaks or pandemics.b) Improved Hygiene: Proper disinfection practices contribute to maintaining cleanliness and hygiene standards in our homes. This is especially important in areas prone to contamination, such as kitchens, bathrooms, and frequently touched surfaces.c) Peace of Mind: Regular disinfection provides a sense of security and peace of mind, knowing that our living environment is safe and free from harmful pathogens.6. Effective Disinfection Techniques:a) Cleaning: Regular cleaning with soap and water helpsto remove dirt and debris from surfaces. This is an essential first step before disinfection.b) Disinfectant Products: Using appropriatedisinfectant products, such as bleach, alcohol-based solutions, or hydrogen peroxide, can effectively kill or inactivate pathogens. Follow the instructions on the product labels for proper usage and safety precautions.c) Target High-Touch Surfaces: Pay special attention to frequently touched surfaces, such as doorknobs, light switches, countertops, and electronic devices. These areas are more likely to harbor germs and should be disinfected regularly.Conclusion:Maintaining proper ventilation and practicing regular disinfection at home are essential for creating a clean and healthy living environment. These practices offer numerous benefits, including improved air quality, enhanced comfort, disease prevention, and peace of mind. By implementingeffective ventilation techniques and following proper disinfection practices, we can ensure the well-being of ourselves and our loved ones. Let us prioritize these practices to create a safe and healthy home environment.。
专业外语增加翻译部分
LESSON 1IntroductionMine ventilation involves the control of the atmospheric environment. This requires control of the air quality and air movement to satisfy the requirements for the health, safety and comfort of mine workers. Minimum standards are set out in the various states mines regulation. Some are descriptive, specifying the standards required (eg. Victoria), and some are prescriptive, detailing exactly how the standards are to be achieved (eg. W.A.).说明矿山通风涉及到对大气环境的控制。
这需要控制空气的质量和运动,以满足矿工的健康、安全和舒适性要求。
许多州的矿山条例中都提出了(关于空气的质量和运动方面的)最低标准。
有些是叙述性的,指明必需的标准(例如,维多利亚加拿大港市)。
有些是说明性的,详细严密地叙述如何达到这些标准(例如)Purposes of Mine VentilationProperly engineered control of the mine atmosphere is required to:provide fresh air (oxygen) for men to breatheprovide a source of oxygen for internal combustion engines in machinerydilute atmospheric contaminants to acceptable levelsmaintain temperature and humidity within acceptable limitsremove atmospheric contaminants from the mine.矿山通风的目标从工程技术来讲,正确控制矿山空气需要:提供新鲜的空气(氧气)工,供人呼吸提供氧气来源,供给各种机械上的内燃机。
mech_vent

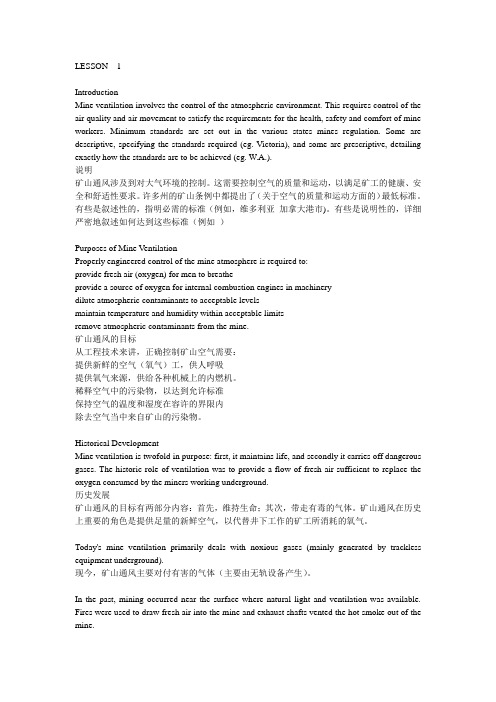
Delivers
spontaneous breath:
Ventilator
delivers full set volume or pressure & I-time
Mode
of ventilation provides the most support
Mechanical Ventilation ARDS Status Asthmaticus Inotropes Shock Sepsis Meningococcus
PICU chapters at
/Rotations/picu/picu.html
Draw-backs
Ventilator Determines
Pressure required
Pressure Ventilation
Preset
Advantages
PIP PEEP Rate I-time FiO2 Tidal volume given
Provides more support at lower PIP for poorly compliant lungs Minute ventilation not guaranteed
Pulmonary Disease: Obstructive
Airway obstruction causing increase resistance to airflow: e.g. asthma Optimize expiratory time by minimizing minute ventilation Bag slowly after intubation Don’t increase ventilator rate for increased CO2
SMC电池充电器用户手册说明书

SMC BATTERY CHARGERUSER’S MANUALSMC1INDEX1 INDEX (1)2 INTRODUCTION (2)2.1 INTRODUCTION AND REFERENCES (2)2.2 GLOSSARY (2)2.3 DATA LABEL (2)2.4 HOW TO USE THE USER'S MANUAL (2)2.5 RESPONSIBILITY DISCLAIMER (3)3 SMC BATTERY CHARGER – DESCRIPTION (3)3.1 SMC BATTERY CHARGER – INTRODUCTION (3)3.2 TECHNICAL DATA (3)3.2.1 PHYSICAL FEATURES (3)3.2.2 TECHNICAL DESCRIPTION (3)4 INSTALLATION OF THE CHARGER (4)4.1 ELECTRICAL INSTALLATION OF THE CHARGER (4)4.1.1 VEHICLE BLOCK FUNCTION (4)4.2 MAIN SUPPLY VOLTAGE PRESET (5)5 OPERATIONS (5)5.1 HOW TO CONNECT THE CHARGER (5)5.2 START OF THE CHARGE (5)5.3 CHARGE OPERATIONS (5)5.3.1 CHARGE CYCLE (6)5.4 END OF CHARGE (6)5.5 EMERGENCY STOP (7)6 TROUBLE SHOOTING (7)7 TECHNICAL DOCUMENTS (7)2 INTRODUCTION2.1 INTRODUCTION AND REFERENCESThis manual includes instructions and suggestions for the users of ENERGIC Plus SMC battery chargers.The code and the version of this manual are written on the bottom of each page. If you need more copies please specify Code and Version.Before starting to use your ENERGIC Plus SMC battery charger please read these instructions carefully.2.2GLOSSARYAttention: Read this section before proceeding!Here you'll find an explanation of the technical terms used in the manual. WUIa curve = CHARGE CURVE - Described in the DIN 41774 norm;2.3DATA LABELA data label is located on the back side of the cabinet. It contains the following data:•CE make;•Model;•Serial number;•Weight;•Input voltage;•Maximum input current (A);•Maximum power consumption (KVA);•Input frequency;•Voltage of the battery (output voltage);•Maximum output current (output current).2.4HOW TO USE THE USER'S MANUALThis manual includes all the information for the final user of ENERGIC Plus SMC battery chargers.Installation and maintenance operations can be done by qualified personnel only.The user’s manual is an important part of the charger, therefore it must be kept in good condition for the lifetime of the charger. It should be kept in a dry and clean place, always available to the users.To indicate important instructions, in this manual the following pictures are used:“Caution: ”This operation can be dangerous for the user.This operation is important for the good working of the charger.During this operation there is a risk of an electrical shock.2.5RESPONSIBILITY DISCLAIMERThe manufacturer of ENERGIC Plus SMC battery chargers will not be responsible for damages caused by the chargers in these situations:•The charger is not installed properly by a qualified electrician;•The charger is not used according to the instructions included in this manual;•The charger is not connected to the correct input supply (see technical label on the box);•The charger has been modified without the authorization of the manufacturer;•Non-original or wrong spare parts are used in the charger;3SMC BATTERY CHARGER – DESCRIPTION3.1SMC BATTERY CHARGER – INTRODUCTIONENERGIC Plus SMC battery chargers have been designed to charge Pb batteries.These units can convert the AC main supply in a DC output at the correct voltage, in order to charge the battery cells.These chargers have been designed and optimized to be used with electric vehichles and to be mounted on board.3.2TECHNICAL DATA3.2.1PHYSICAL FEATURESMass: 5 - 40 Kg depending on the model (see data label on box);Main supply cable: Grey multiple cable;Battery connection cables:Red cable / marked with symbol +;Black cable / marked with symbol - ;Motor blocking signal:Grey bipolar cable.3.2.2TECHNICAL DESCRIPTIONThese are the principal devices included in the charger, available to the user:•External box;•Control electronic board;•Main switch 0-1;•No.2Cables for battery connection;•No.1Cable for main supply connection;•No.1Cable for vehicle block during the charge.Inside the charger there are the following devices, not available to the user:•Power transformer;•Rectifier;•Microprocessor controlled electronic card with power relais;•Output fuse;•Plugs for voltage setting;•Motor blocking relay.4INSTALLATION OF THE CHARGERConditions of use:-Operating temperature:5°C to 45°C;-Storage temperature:-20°C to 60°C;-Relative humidity:less than 75%;Attention:The charger can be installed by qualified personnel only.Attention:This unit operates on 230 V AC +/- 10%, 50Hz.Check that the unit’s operating voltage is identical to your local power supply.Check that the unit’s maximum input power is available from your power supply.Attention:To prevent fire or shock hazard, do not expose the unit to rain or moisture.Do not use the unit in presence of flammable gas, because it can generate sparks.Attention:To avoid electrical shock, do not open the cabinet. Refer servicing to qualified personnel only.Attention:Allow adequate air circulation to prevent internal heat buildup.Do not place the unit near materials that may block the ventilation slots.Do not install the unit near heat sources such as radiators or air ducts, or in aplace subject to direct sunlight, excessive dust, mechanical vibration or shock.Please take care about positioning and fixing of the charger inside the vehicle;these must assure a correct air flow and a portection against every kind of phisicalor electrical damage.4.1ELECTRICAL INSTALLATION OF THE CHARGER•Check the efficiency of earth circuitry (yellow/green wire);•Connect the charger to the battery using an adequate connector;•Check the condition of the main supply plug;4.1.1MOTOR BLOCKING FUNCTIONAttention:These settings can be done by qualified personnel only.For more information please contact the manufacturer.ENERGIC Plus SMC battery chargers are equipped with a relay that can be used to block the vehicle motor when the charger is connect to the main supply and the main switch is ON.This safety function will prevent the user to start the vehicle while it's being charged.In order to ensure a safe operation, it's mandatory to implement this function. This can be accomplished by connecting the two control wires (grey bipolar cable) in series with the control circuitry of the vehicle.4.2MAIN SUPPLY VOLTAGE PRESETAttention:These settings can be done by qualified personnel only.For more information please contact the manufacturer.•Disconnect the charger from main supply and battery;•Open the cabinet;•Find the plugs for tension setting;•Disconnect the wire A from the original plug (position 2);•Connect the wire A to the desired position. Check the table to find the correct position;•Close the cabinet;•Connect the charger to main supply.5OPERATION5.1HOW TO CONNECT THE CHARGER•Set the main switch to position “0”;•Connect the charger to the main supply.5.2START OF THE CHARGEThe charger can be turned on only when the battery and the main supply are correctly connected.Set the main switch to position “1”; the light inside the switch and the led “CHARGE ON” will lights on.After 5 seconds the charge start and the first green LED (which corresponds to the first charge phase) lights on (see chapter 5.3.1).Attention:ENERGIC Plus SMC chargers are programmed to do a complete cycle of charge, however it’s recommended to survey the operations when the batterymust remain connected to the charger for more than 12 hours (example: week-ends)5.3CHARGE OPERATIONSAttention:The operations described in this chapter are done by ENERGIC Plus SMC chargers automaticly.5.3.1CHARGE CYCLEThe current of charge follows the WUa curve, as described in the DIN 41774 Norm, while the LED “CHARGE ON” remains on.2° PHASE U1° PHASE WThe charging cycle is divided in 2 phases (with reference to the front panel of the charger).1° Phase: W[Constant Power]When the charge starts, the battery voltage is around 2.00 V/cell and the current reaches the maximum value. During this phase the current decreases and the voltage increases, up to the threshold value (2,5 V/cell). At this point, the charge passes to the next phase.This phase has a security timer of 8 hours. If the battery don't reaches the threshold value in 8 hours the charger pass automatically to the the next phase. This function prevent the risk of overheat of the battery.2° Phase: U[Constant Voltage]The charge continues at constant voltage, while the current decreases. This phase continue for 4 hours. At the end the cycle is complete.The front panel show another phase, but this feature isn't implemented in this model.5.4END OF CHARGEWhen the battery is completely charged the charger is turned off.The LED “CHARGE ON” turns off and the 3° phase led remains on.Attention:Before disconnecting the battery, check it is not being charged. If it is charging (led “CHARGE ON” light on), turn off the charger using the main switch, toavoid sparks between connectors.5.5 EMERGENCY STOPIf the charge is not normally completed within20hours,the electronic control stops the charger automatically.In this case the led “CHARGE ON” is off and the 3° phase led is blinking.This condition isn't normal and is strictly recommended to find the source of the problem. Please see to the following chapter or contact the manufacturer.6TROUBLE SHOOTINGAttention: The operations described in this chapter can be done by qualified personnel only.•When the main supply is connected, nothing happens on the control panel:•The main switch may be in position "0", or else the main supply is not present;•Check the connections between main supply and charger;•Verify that the power available on the main supply is sufficient for the charger;•Verify fuses of the main supply;•Check the connection between battery and charger;•Check the output fuse;•Contact the manufacturer;•Charge current is too high:•Check the battery cells for short circuits;•The main supply voltage is too high, then it’s necessary to reset the charger. See chapter4.2;•If the battery is old, it's voltage increases slowly, and this can cause a high final charge current. Keep the battery under supervision against overheats during the charge;•Contact the manufacturer;•Charge current is too low:•The main supply voltage is too low, then it’s necessary to reset the charger. See chapter 4.2;•Contact the manufacturer;•Check the output fuse;•The lamp inside the main switch is allways off:•The main switch may be in position "0", or else the main supply is not present;•Check the connections between main supply and charger;•Verify that the power available on the main supply is sufficient for the charger;7TECHNICAL DOCUMENTSThis manual includes the following technical documents:ELECTRIC DIAGRAM。