iphone的简单控件
收藏!这40个好玩又实用的小组件,让你的iPhone变得超酷炫
收藏!这40个好玩⼜实⽤的⼩组件,让你的iPhone变得超酷炫每⼀次 iOS 系统更新时都会给我们带来⼀些眼前⼀亮的功能,⽐如 iOS 12 的《快捷指令》、iOS 13 的深⾊模式,⽽在近⽇正式发布的 iOS 14 上,让⼈「眼前⼀亮」的功能,就是⼩组件了。
⼩组件就如同 iPhone 的新配⾊⼀般,是 iOS 14 的⼀⼤标志,但⼩组件⼜和 iPhone 的新配⾊不同,它不⽌能宣扬个性,更能提⾼我们的⼯作⽣活效率。
如何玩转⼩组件?看完这篇你就全懂了!懒⼈⽬录⼩组件可以做什么?专属搭配,⼩组件还能这么玩推荐 40 个超好⽤的⼩组件⼩组件可以做什么?如果你使⽤过 Android ⼿机,在看到⼩组件后可能会有⼀种似曾相识的感觉。
那 iOS ⼩组件和Android 的屏幕⼯具⼀样么?当然不是。
iOS 14 开发⽂档对⼩组件的定义是这样的:「提炼app 的关键信息,让使⽤者可以在 iPhone、iPad 和 Mac 上⼀⽬了然,有⽤且优雅」。
换句话说,iOS 14 上的⼩组件是「提炼 app 关键信息给我们看」的,它的重点不在操作,⽐如我们点击「提醒事项」⼩组件上的具体事项,它会跳转到《提醒事项》app 中,⽽不能在主屏幕上直接完成事项。
iOS 14 中的⼩组件更像是⼀个信息展⽰窗⼝(或者是⼀个放⼤的应⽤图标)。
⽽ Android ⼿机上的屏幕⼯具是可以进⾏操作的,即使不进⼊ app,我们也可以在桌⾯上进⾏操作,不论是添加任务,还是确认完成项⽬。
▲Android ⼿机屏幕⼯具在 iOS 14 上,天⽓的⼩组件就是显⽰⼀个地⽅的天⽓情况,地图的⼩组件就是显⽰你所在位置的地图,备忘录的⼩组件就是你的备忘录列表。
⼩组件不是⼀个简略版的 app,也不是 app 的快捷打开⽅式,它是⼀个全天候动态显⽰重要信息的窗⼝,这个「⼀⽬了然」的⼩组件,让⼿机主页变得更加统⼀精致。
当然了,虽然苹果对⼩组件有着完整的定义和美好的愿景,但不能进⾏太多交互的设计,对⽐iOS 13 的⼩组件,实⽤性低了不少。
推荐几个Cydia必备插件,以经过多次越狱测试,完美兼容
Activator (你懂得,便捷让你的IPHONE发挥到极致)afc2服务补丁(兼容USB等)ALLMAIL (Email插件)Appstore加速补丁(下载速度加快)AppSync for IOS 5.0+ (XX补丁)AskToCall拨号确认(防勿打)Barrel中文包(3D增强立体感)Barrel-3d翻页(主程序)BatteryDoctor (电池维护最新版)BiteSMS (短信管理)BBsettings (通知中心拓展widget)BlurriedNCBackground (通知中心背景模糊设置)Calendar for notification (在通知菜单里添加日历)CameraLocker (锁屏界面固定相机显示,不需双击HOME调出)CyDelete (桌面删除DEB软件)Direct Closer Pro (让你双击Home呼出后台的时候直接让后台程序显示关闭“-”的工具)FaceBreak汉化版(3G打视频电话补丁、突破WIFI限制,达到网络互通的目的)FaceGoo (照片应用程序,变脸,非常有趣)FastSnap音量键拍照(可使用后摄像头自拍)Five lcon Dock (在Dock可放入5个程序图标)Five-Column (横盘图标数量变5个)FolderEnhancer (可以使你建立的文件可以放得下几百个图标文件)GPower Pro (电源多功能插件、包括:关机、注销、重启多项功能)Gridlock (使你的图标可以随意摆放,愿意放哪就放哪。
几乎是美化必备的插件)iFile (修改系统文件必备程序)inlinecandiaete (输入法选字条不在跟随键盘)insomnia pro (保持3G和Wifi锁屏不掉线)iphoneDelivery (短信回执)ischeduler (全自动飞行,自动启动程序,自动短信)KuaiDial (归属地显示)KuaiDiAl (归属地数据库)KuaiDial (短信管理功能)Lockscrenn (Clock Hide 汉化包)Lockscrenn (Clock Hide 让你隐藏锁屏状态栏下得时间日期)Lockscreen (multitasking 允许您在锁屏双击Home调出后台)Multifl0w (中文包)Multifl0w (华丽多任务管理)MultilconMover (非常棒的软件,有了它,你就可以批量转移图标到其他页面了)NetMeterWidget (流量统计)SBSettings (官方开关中文补丁)SBSettings (主程序)Seepfx (汉化包)Seepfx华丽锁屏(这个是锁屏效果.很好看.有多种效果. 不可缺少的插)WeFinder (可以通过远程控制您的手机进行在线锁机、在线数据管理、跟踪手机、无声拍照等,让您的手机绝对安全)Weatherlcon (汉化包)Weatherlcon (任务栏天气插件)WeeStats Widget (在通知中心添加快熟关闭后台、重启、注销、释放内存等)WidgerTask for Notification (将你的后台移动到通知中心,无需双击HOME了)winterboard (中文包) winterboard (主题工具) 百度输入法。
Storyboard的简单使用
Storyboard的简单使用之前做的例子,我们经常会用到.xib文件,在其中我们可以进行界面的设计。
不过如果想切换视图,我们就得自己写很多代码。
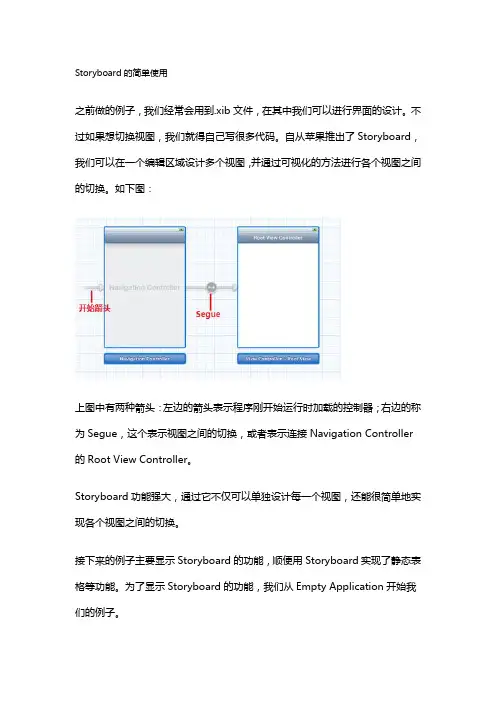
自从苹果推出了Storyboard,我们可以在一个编辑区域设计多个视图,并通过可视化的方法进行各个视图之间的切换。
如下图:上图中有两种箭头:左边的箭头表示程序刚开始运行时加载的控制器;右边的称为Segue,这个表示视图之间的切换,或者表示连接Navigation Controller 的Root View Controller。
Storyboard功能强大,通过它不仅可以单独设计每一个视图,还能很简单地实现各个视图之间的切换。
接下来的例子主要显示Storyboard的功能,顺便用Storyboard实现了静态表格等功能。
为了显示Storyboard的功能,我们从Empty Application开始我们的例子。
1、运行Xcode 4.2,新建一个Empty Application,名称为Storyboard Test:2、打开AppDelegate.m,找到didFinishLaunchingWithOptions方法,删除其中代码,使得只有return YES;语句。
3、创建一个Storyboard:在菜单栏依次选择File —New —New File,在弹出的窗口,左边选择iOS 组中的User Interface,右边选择Storyboard:之后单击Next,选择Device Family为iPhone,单击Next,输入名称MainStoryboard,并设好Group:单击Create,这样就创建了一个Storyboard。
4、配置程序,使得从MainStoryboard启动:先单击左边带蓝色图标的Storyboard Test,然后选择Summary,接下来在Main Storyboard中选择MainStoryboard:这样,当运行程序时,就从MainStoryboard加载内容了。
iOS APP开发工具大盘点
iOS APP开发工具大盘点随着iphone5的持续走俏,其操作平台iOS 和开发语言Objective-C都跟着沾了光。
iOS 6还未推出就广受瞩目,Objective-C更是成为市场占有率第3的开发语言。
目前基于iOS的APP应用有着巨大的市场潜力,多家知名控件厂商也相继推出了支持创建iOS平台的应用程序的新控件,接下来慧都就为您一一盘点那些能够开发出iphone、ipad应用程序的控件。
1、DevExpress作为界面控件的龙头老大,DevExpress在早在两年前的DXperience11.2版本中就推出了支持创建iOS应用程序的相关控件,让用户无需学习Xcode和Objective C,使用Visual Studio和技术便能实现针对iOS开发APP。
在DXperience 12.1中实现了功能的全面提升。
优化触摸屏界面,利用现有的库,实现了iOS中的大多数的交互功能,支持内容的滚动,缩放,拖拽,并修改了界面元素,使它更适合于用户的指尖大小,从而获得更好的触摸屏体验效果。
DXperience中的所有控件都支持创建iOS的应用程序,共有16类的子控件,包括Data Grid、Charting等,全面支持iphone、ipad应用程序开发。
2、ComponentOneComponentOne Studio for iPhone是ComponentOne推出的专门应用于iPhone Web应用开发的控件,内含12个子控件,包括可以创建iphone用户熟悉按钮的Buttons控件,可以创建三维动画视觉导航的CoverFlow控件等等。
可以使用现有的技术将Web应用程序应用到iOS中。
它非常易用且严格遵循iOS的UX用户体验标准,只需要拖放控件和使用编辑器就可以创建用户体验优秀的iOS应用程序。
它支持底部内容滚动和自定义屏幕大小的功能,所以能够同时支持创建iphone、ipad应用。
3、infragisticsNetAdvantage Ultimate中有四个专门针对移动开发的工具集:包括Ignite UI (前身为NetAdvantage for jQuery),NUCliOS, Iguana UI Community Pack,和 NetAdvantage for Windows Phone。
iphone 越狱插件开发教程

iphone 越狱插件开发教程iPhone系统的越狱插件开发是一项有挑战性的任务,但是一旦掌握了基本的知识和技能,就能够为你的iPhone设备带来更多的功能和自定义选项。
在本文中,我将为你介绍一些iPhone越狱插件开发的基本概念和步骤。
首先,你需要明确iPhone越狱插件开发的目的和动机。
越狱插件可以让你在iPhone系统中添加和定制更多的功能,比如更改主题、添加快捷方式、增强通知等等。
在进行开发之前,请确保你对iPhone越狱和系统安全性有一定的了解。
接下来,你需要了解越狱插件的结构和基本原理。
iPhone的越狱插件通常是通过在系统中注入代码来实现的。
这些代码可以通过Cydia等越狱工具进行安装和管理。
插件可以借助MobileSubstrate等工具来实现对系统的修改和扩展。
在进行具体开发之前,你还需要掌握Objective-C编程语言和iOS开发的基础知识。
Objective-C是iPhone系统的主要编程语言,你可以通过学习Objective-C语法、使用Xcode开发工具和阅读相关文档来提高自己的开发能力。
一旦你具备了基础知识,就可以开始着手开发自己的越狱插件了。
首先,你需要选择一个合适的开发框架或库。
Cydia Substrate是一个常用的开发工具,它可以帮助你在系统级别进行代码注入和修改。
另外,你还可以考虑使用其他开发工具,比如Theos、Logos等。
在选择开发工具之后,你需要确定你的插件的功能和目标。
你可以选择加入新的特性、增强现有功能或者修改系统行为。
根据你的目标,你需要编写相应的代码来实现功能。
你可以使用Objective-C语言来编写插件代码,并且可以调用系统或第三方库提供的函数和方法。
在编写代码之前,我们需要先了解一些重要的概念和API。
例如,你需要了解如何使用Hook技术来截取和修改系统函数的调用,如何使用通知中心来增强系统的通知功能,如何使用沙盒机制来访问和修改应用程序的数据等等。
ios jxcategoryview用法
标题:iOS JXCategoryView用法详解1. 介绍JXCategoryView及其作用在iOS开发中,JXCategoryView是一个非常常用的控件,用于实现页面切换、导航栏等功能。
它能够快速、方便地实现各种样式的页面切换效果,为用户提供良好的交互体验。
下面将详细介绍JXCategoryView的用法。
2. JXCategoryView的基本用法要使用JXCategoryView,首先需要在工程中引入JXCategoryView 库,并在需要的地方进行相关初始化操作。
通常情况下,我们可以通过代码创建JXCategoryView,并设置其各种属性,包括样式、宽高、位置等。
接下来,可以将JXCategoryView添加到页面上,并设置相关的数据源和代理。
3. JXCategoryView的样式定制JXCategoryView支持多种样式的定制,包括文字样式、指示器样式、滚动样式等。
通过设置相应的属性,可以实现文字的大小、颜色、字体等的定制,还可以设置指示器的样式、颜色、位置等。
还可以通过设置滚动样式的属性,实现页面切换时的滚动效果。
4. JXCategoryView的数据源和代理在使用JXCategoryView时,通常需要设置其数据源和代理。
数据源用于提供JXCategoryView所需的数据,包括标题、图片、样式等。
代理则用于监听JXCategoryView的各种事件,包括页面切换、点击事件等。
通过设置数据源和代理,可以实现更加灵活和个性化的功能。
5. JXCategoryView的进阶用法除了基本的使用方法,JXCategoryView还支持一些进阶的用法。
可以通过自定义JXCategoryView的子类,实现更加个性化的样式和功能。
还可以结合其他控件,如UIScrollView、UICollectionView等,实现更加复杂的页面切换效果。
通过进阶的用法,可以实现更加丰富和独特的功能。
iOS组件及应用
开发环境及开发工具
• 在Xcode 4.1之前,还有一个配套使用的工具
Interface Builder,它是Xcode套件的一部分,用来设 计窗体和视图,通过它可以“所见即所得”地拖 曳控件并定义事件等,其数据以XML的形式被存储 在xib文件中。在Xcode 4.1 之后,Interface Builder 成为了Xcode的一部分,与Xcode集成在一起。
b)标签控件和按钮控件 按扭控件
Detail Disclosure。细节展示按钮 ,主要用于表视图中的
细节展示。 Info Light和Info Dark。这两个是信息按钮 (样式与细节
展示按钮一样),表示有一些信息需要展示,或者可以设置 内容。
Add Contact。添加联系人按钮 。 State Config下拉列表中有4种状态,分别是Default(默认)状 态、Highlighted(高亮)状态、Selected(选择)状态和 Disabled(不可用)状态 。
下方,如图3-10所示。 双击按钮,输入文本“OK”。现在按 钮的状态是默认状态,我们可以运行一下,看看效果。 为 了美观,往往还要通过属性检查器优化一下按钮。打开其 属性检查器,单击Type下拉列表,其中各选项的含义如下所 示。
Custom。自定义类型。如果我们不喜欢圆角按钮,可 以使用该类型。
System。系统默认属性,表示该按钮没有边框,在iOS 7之 前按钮默认为圆角矩形。
公司的域名(如com.51work6),这类似于Java中的包命名。
• Bundle Identifier。捆绑标识符(很重要)。该标识符由Product Name+
Company Identifier构成。因为在App Store发布应用的时候会用到它, 所以它的命名不可重复。
ios开发中uitextfield详解 简书
ios开发中UITextField详解一、介绍1.1 UITextField的作用UITextField是iOS开发中常用的控件之一,用于接收用户的输入。
它具有丰富的功能和属性,可以通过设置不同的属性来实现各种输入框的需求。
1.2 UITextField的使用场景UITextField可用于登入界面、注册界面、搜索界面等需要用户输入信息的场景中。
它可以接收用户的文本输入,并且可以对用户的输入进行验证和处理。
二、UITextField的基本属性2.1 placeholderplaceholder属性用于设置UITextField的占位文字,在用户未输入内容时显示,一般用于提示用户应该输入的内容。
2.2 texttext属性用于获取或设置UITextField中显示的文本内容。
2.3 delegatedelegate属性用于设置UITextField的代理对象,通过代理方法可以监听用户输入、编辑文本等事件,并进行相应的处理。
2.4 keyboardTypekeyboardType属性用于设置键盘的类型,可以指定为普通文本、数字、电流新箱位置区域、URL等不同类型的键盘。
2.5 secureTextEntrysecureTextEntry属性用于设置UITextField的输入内容是否需要被隐藏,一般用于密码输入框。
2.6 clearButtonModeclearButtonMode属性用于设置清除按钮的显示模式,可以指定为一直显示、编辑时显示或者永不显示。
2.7 returnKeyTypereturnKeyType属性用于设置return键的类型,可以指定为完成、搜索、前往等不同类型的键。
三、UITextField的代理方法3.1 textFieldShouldBeginEditing该代理方法在UITextField开始编辑时调用,返回值决定是否允许进入编辑状态。
3.2 textFieldDidBeginEditing该代理方法在UITextField开始编辑时调用,可以在此处理UI调整等操作。
iOS设备上SafariViewController的使用
iOS设备上SafariViewController的使用SafariViewController是iOS上一种控件,用于在应用程序中嵌入Safari浏览器的功能。
它提供了一种简单且一致的方式,让用户在应用程序中查看网页内容,而无需切换到独立的Safari浏览器应用。
在本文中,将详细介绍iOS设备上SafariViewController的使用,包括如何集成SafariViewController到应用程序中以及常见的使用场景和技巧。
通过学习本文,你将能够充分利用SafariViewController提供的功能,提升应用程序的用户体验。
一、集成SafariViewController到应用程序中SafariViewController是在iOS9中引入的新功能,可以通过以下步骤将其集成到应用程序中:1. 导入SafariServices框架:在Xcode项目中,选择你的应用程序目标,打开"Build Phases"选项卡,展开"Link Binary With Libraries"部分,点击"+"按钮,选择"SafariServices.framework"并添加到你的项目中。
2. 导入头文件:在需要使用SafariViewController的类文件中,导入头文件< SafariServices/SafariServices.h>。
3. 创建SafariViewController实例:在需要展示网页内容的地方,创建一个SFSafariViewController实例,并设置其URL属性,指定要展示的网页链接。
4. 显示SafariViewController:调用presentViewController:animated:completion:方法,将SafariViewController实例显示在当前的视图层次结构中。
iPhone iOS平台视觉规范 说明书
iPhone iOS平台视觉规范说明书目录1.创建优秀的用户界面 (7)2.视图VIEW (5)2.1状态栏STATUS BAR (5)2.2导航栏NAVIGATION BAR (6)2.3页签栏TAB BAR (9)2.4工具栏TOOL BAR (7)2.6分类表格视图TABLE VIEWS .......................................................... 错误!未定义书签。
3.控件CONTROL (14)3.1控制类CONTROLS (14)3.2按钮类BUTTONS ........................................................................... 错误!未定义书签。
3.3选择器类PICKERS (16)3.4搜索类SEARCH (17)3.5提示类ALERTS ............................................................................... 错误!未定义书签。
3.6文本域类TEXT FIELDS (20)4.界面INTERFACE (20)4.1启动图像SPLASH (20)4.2登录页面LOGIN PAGE (22)4.3说明页面TEXT PAGE (24)5.图形GRAPHICS (26)5.1应用程序图标APPLICATION ICON (26)5.2系统图标STANDARD ICON (27)5.3自定义图标CUSTOM ICON (29)6.截图SCREENSHOTS (32)7.命名NAMING RULES (33)8.平台特点 (33)1.引言IntroductioniPhone OS平台应用的视觉设计应遵循相应的平台特性与设计规范,保持不同应用产品在同一平台的整体性与一致性。
此文档作为iPhone OS平台应用开发的视觉基础规范,整体全面的介绍了常用系统控件,规范了演变后的自绘视图尺寸及标准,为视觉设计提供了很好的参考和借鉴。
- 1、下载文档前请自行甄别文档内容的完整性,平台不提供额外的编辑、内容补充、找答案等附加服务。
- 2、"仅部分预览"的文档,不可在线预览部分如存在完整性等问题,可反馈申请退款(可完整预览的文档不适用该条件!)。
- 3、如文档侵犯您的权益,请联系客服反馈,我们会尽快为您处理(人工客服工作时间:9:00-18:30)。
Button:自定义Button:UIButton *btn1=[UIButton buttonWithType:UIButtonTypeDetailDisclosure];[btn1 addTarget:self action:@selector(buttonPressed:) forControlEvents:UIControlEventTouchUpInside];[btn1 setFrame:CGRectMake(80, 60, 100, 60)];//[btn1 setTitle:@"Btn Press" forState:UIControlStateNormal];[self.view addSubview:btn1];self.detailDisclosure=btn1;自定义View:UIView *tempView=[[[UIView alloc]init]autorelease];self.view=tempView;self.view.backgroundColor=[UIColor whiteColor];[tempView release];自定义Label:UILabel *label=[[UILabel alloc]initWithFrame:CGRectMake(40,20, 200, 30)];label.backgroundColor=[UIColor redColor];=label;[self.view addSubview:label];[label release];TextField:键盘释放:-(BOOL)textFieldShouldReturn:(id)textField{[textField resignFirstResponder];return YES;}//-(IBAction)Tap:(id)sender{[NameField resignFirstResponder];[NumberField resignFirstResponder];}Slider 的方法运算:-(IBAction)sliderChange:(id)sender{UISlider *slider=(UISlider *)sender;int progressAsInt=(int)(slider.value+0.5);NSString *newText=[[NSStringalloc]initWithFormat:@"%d",progressAsInt];self.sliderLabel.text=newText;[newText release];}SegmentControl的方法:kSwitchesSegmentIndex=0-(IBAction)toggleControls:(id)sender{if([sender selectedSegmentIndex]==kSwitchesSegmentIndex){ LeftSwitch.hidden=NO;RightSwitch.hidden=NO;dosomethingButton.hidden=YES;}else{LeftSwitch.hidden=YES;RightSwitch.hidden=YES;dosomethingButton.hidden=NO;}}Switch的方法:-(IBAction)SwitchChanged:(id)sender{UISwitch *whichSwitch=(UISwitch *)sender;BOOL setting=whichSwitch.isOn;[LeftSwitch setOn:setting animated:YES];[RightSwitch setOn:setting animated:YES];}datepicker:@property(nonatomic,retain)NSDate *date;-(void)setDate:(NADate *)date animated:(BOOL)animated; 在标签上现实时间的方法代码:@property (nonatomic,retain)IBOutlet UIDatePicker *picker;@property (nonatomic,retain)IBOutlet UILabel *info;- (IBAction)getDateTime{NSDateFormatter *dateFormatter = [[[NSDateFormatter alloc] init] autorelease];[dateFormatter setTimeStyle:NSDateFormatterShortStyle];[dateFormatter setDateStyle:NSDateFormatterMediumStyle];.text = [dateFormatter stringFromDate:self.picker.date];}custom pickers:2种协议:UIPickerViewDelegate && UIPickerViewDataSource1.UIPickerViewDelegate为了功能UIPickerView必须采取下列方法之一:- (NSString *)pickerView:(UIPickerView *)pickerViewtitleForRow:(NSInteger)rowforComponent:(NSInteger)component;- (UIView *)pickerView:(UIPickerView *)pickerViewviewForRow:(NSInteger)rowforComponent:(NSInteger)componentreusingView:(UIView *)view;第一个根本要求采取实施标题查找方法第二种方法实际上返回一个子视图,允许更多的定制。
2.UIPickerViewDataSource- (NSInteger)numberOfComponentsInPickerView:(UIPickerView *)pickerView;- (NSInteger)pickerView:(UIPickerView *)pickerViewnumberOfRowsInComponent:(NSInteger)component;第一种方法告诉看法应该有多少个组件(车轮)第二种方法告诉多少行,每一个给定组件(车轮上的一些事情的选择器)ProgressBar:@property(nontoxic)float progress;方法内容:-(IBAction)update:(id)sender {if(sender == self.increase) {self.progressBar.progress += .01;}else if(sender == self.decrease) {self.progressBar.progress -= .01;}}ActivityIndicators:@property(nonatomic, retain) IBOutlet UIActivityIndicatorView *throbber; @property(nonatomic, retain) IBOutlet UIButton *start;@property(nonatomic, retain) IBOutlet UIButton *stop; UIActivityIndicatorView包括三种:1.方法启动throbber:- (void)startAnimating;2.方法停止throbber:- (void)stopAnimating;3.检查看它是否正在运行:- (BOOL)isAnimating;方法调用:- (IBAction)update:(id)sender{if(self.start == sender) {[self.throbber startAnimating];}else if(self.stop == sender) {[self.throbber stopAnimating];}}Images:UIImageViews用于在屏幕上显示的图像或动画图像序列1.如果你想要做的动画,你可以把一个循环数组UIImages通过以下方法..@property(nontoxic,copy)NSArray *animationImages; e these methods to start/stop animation...- (void)startAnimating;- (void)stopAnimating;3. You can also check the animation status using...- (BOOL)isAnimating;4.you can set the image in code using the image property...@property(nonatomic, retain) UIImage *image;//@property(nonatomic, retain) IBOutlet UIImageView *megaman;@property(nonatomic, retain) IBOutlet UISwitch *animate;方法:- (IBAction)change{if(self.animate.isOn) {[self.megaman startAnimating]; }else {[self.megaman stopAnimating];}}#pragma mark - View lifecycle- (void)viewDidLoad{[super viewDidLoad];UIImage *mega1=[UIImage imageNamed:@"megaman1.png"];UIImage *mega2=[UIImage imageNamed:@"megaman2.png"];UIImage *mega3=[UIImage imageNamed:@"megaman3.png"];self.megaman.animationDuration=.4;//时间间隔self.megaman.animationImages=[NSArray arrayWithObjects:mega1,mega2,mega3,mega2,nil];//图片变换TabBar一、在总的view上显示点击的总次数和在总的view上显示-(IBAction)addBeer{NSLog(@"Adding beer");TabBarrAppDelegate *del = ((TabBarrAppDelegate *)([[UIApplication sharedApplication] delegate]));[del.cart addObject:@"Case of Beer"];del.cartTab.badgeValue = [NSString stringWithFormat:@"%d", [del.cart count]];}二、在AppDelegate上加总的第三个view时加上.h@property (nonatomic,retain)UITabBarItem *cartTab;@property (nonatomic,retain)NSMutableArray *cart;.mself.cartTab=viewController3.tabBarItem;self.cart=[NSMutableArray array];[self.window addSubview:self.tabBarController.view];三、如果不是继承的tableview而是自己拖到view上的要重新加载数据就是刷新-(void)viewWillAppear:(BOOL)animated{[self.tableview reloadData];[super viewWillAppear:YES];}四、获取文件路径、写进文件-(NSString *)getFilePath{NSArray *array=[NSArray arrayWithObjects:NSHomeDirectory(),@"Document",@"cart.plist", nil];NSString *path=[NSString pathWithComponents:array];return path;}或NSString *path=[[NSBundle mainBundle]pathForResource:@"Presidents"ofType:@"plist"];/- (void)applicationDidEnterBackground:(UIApplication *)application{/*Use this method to release shared resources, save user data, invalidate timers, and store enough application state information to restore your application to its current state in case it is terminated later.If your application supports background execution, this method is called instead of applicationWillTerminate: when the user quits.*/BOOL result = [self.cart writeToFile:[self getFilePath] atomically:YES];if (!result) {NSLog(@"Unable to save data");}//catr是总图上tableview的数组}tableView加载plist文件的代码- (void)viewDidLoad{// Do any additional setup after loading the view from its nib.NSString *path=[[NSBundle mainBundle]pathForResource:@"Presidents"ofType:@"plist"];//获取属性路径NSData *data;//数据对象用来存放未编码的归档文件NSKeyedUnarchiver *unarchiver;//实际存储归档文件的对象data=[[NSData alloc]initWithContentsOfFile:path];unarchiver=[[NSKeyedUnarchiver alloc]initForReadingWithData:data];NSMutableArray *array=[unarchiver decodeObjectForKey:@"Presidents"];//从归档文件中解码数组数据self.list=array;[unarchiver finishDecoding]; //结束解码过程[unarchiver release];[data release];[super viewDidLoad];}或- (void)viewDidLoad{[super viewDidLoad];NSString *path=[[NSBundle mainBundle]pathForResource:@"sortednames"ofType:@"plist"];NSDictionary *dict=[[NSDictionary alloc]initWithContentsOfFile:path];s=dict;[dict release];NSArray *array=[[names allKeys]sortedArrayUsingSelector:@selector(compare:)];self.keys=array;// Do any additional setup after loading the view, typically from a nib.}将值写入文件(plist文件)(在Appdelegate.m中)-(NSString *)getFilePath{NSArray *segments=[NSArrayarrayWithObjects:NSHomeDirectory(),@"Documents",@"person.plist"nil];return [NSString pathWithComponents:segments];}- (void)applicationDidEnterBackground:(UIApplication *)application{Person *person=[[[Person alloc]init]autorelease];person.firstName=self.viewController.firstName.text;stName=stName.text;person.age=[self.viewController.age.text intValue];NSLog(@"%@ %@ %d",person.firstName,stName,person.age);BOOL status=[NSKeyedArchiver archiveRootObject:person toFile:[self getFilePath]];if (!status) {NSLog(@"Error saving person");}}//或着BOOL result = [self.cart writeToFile:[self getFilePath] atomically:YES];if (!result) { ! NSLog(@"Unable to save data");- (void)applicationDidBecomeActive:(UIApplication *)application{Person *person=[NSKeyedUnarchiver unarchiveObjectWithFile:[self getFilePath]];if (person) {self.viewController.firstName.text=person.firstName;stName.text=stName;self.viewController.age.text=[NSString stringWithFormat:@"%d",person.age];}}在导航栏上加按钮(并且按钮是有方法的的)- (void)viewDidLoad{[super viewDidLoad];UIBarButtonItem *cancelButton=[[UIBarButtonItem alloc]initWithTitle:@"Cancel"style:UIBarButtonItemStylePlain target:self action:@selector(cancel:)];self.navigationItem.leftBarButtonItem=cancelButton;[cancelButton release];UIBarButtonItem *saveButton=[[UIBarButtonItem alloc]initWithTitle:@"Save"style:UIBarButtonItemStylePlain target:self action:@selector(cancel:)];self.navigationItem.rightBarButtonItem=saveButton;[saveButton release];}在点击某行cell是弹出警告框的代码- (void)tableView:(UITableView *)tableViewdidSelectRowAtIndexPath:(NSIndexPath *)indexPath{NSUInteger row = [indexPath row];NSString *rowValue = [listData objectAtIndex:row];NSString *message = [[NSString alloc] initWithFormat:@"You selected %@", rowValue];UIAlertView *alert = [[UIAlertView alloc] initWithTitle:@"Row Selected!"message:messagedelegate:nilcancelButtonTitle:@"Yes I Did"otherButtonTitles:nil];[alert show];[message release];[alert release];}将值写入文件(txt文件)-(NSString *)getFilePath{NSArray *path=[NSArrayarrayWithObjects:NSHomeDirectory(),@"Documents",@"name.txt",nil];return [NSString pathWithComponents:path];}//将textfield的值放在name.txt中路径-(BOOL)textFieldShouldReturn:(UITextField *)textField{BOOL result=[Field.text writeToFile:[self getFilePath]atomically:YESencoding:NSASCIIStringEncodingerror:NULL];if (!result) {NSLog(@"Unable to write data");}[textField resignFirstResponder];return YES;}//写进name.txt文件或:[array writeToFile:[self dataFilePath] atomically:YES];- (void)viewWillAppear:(BOOL)animated{[super viewWillAppear:animated];NSString *data=[NSString stringWithContentsOfFile:[self getFilePath]encoding:NSASCIIStringEncoding error:NULL];if (data) {Field.text=data;}}//从name.txt文件中读取报警表(Alerts)-(void)alertView:(UIAlertView *)alertView clickedButtonAtIndex:(NSInteger)buttonIndex{self.result.text=[NSString stringWithFormat:@"You selected:'%@'",[alertView buttonTitleAtIndex:buttonIndex]];}-(IBAction)buttonPress:(id)sender{if (sender==self.button1) {UIAlertView*alert=[[[UIAlertView alloc]initWithTitle:@"Error"message:@"Unable to reach server"delegate:nilcancelButtonTitle:@"OK"otherButtonTitles:nil]autorelease];[alert show];}else if(sender==self.button2){UIAlertView*alert=[[[UIAlertView alloc]initWithTitle:@"Submit Score"message:@"We'd like to submit your high score to the global scoreboard"delegate:selfcancelButtonTitle:@"Cancel"otherButtonTitles:@"OK",nil]autorelease];[alert show];}}警告表(Action Sheets)- (void)actionSheet:(UIActionSheet *)actionSheet clickedButtonAtIndex:(NSInteger)buttonIndex { self.result.text = [NSString stringWithFormat:@"You selected: '%@'", [actionSheet buttonTitleAtIndex:buttonIndex]];}-(IBAction)buttonPress:(id)sender{if (sender == self.button1) {UIActionSheet *sheet = [[[UIActionSheet alloc] initWithTitle:@"Send Picture To:"delegate:selfcancelButtonTitle:@"Cancel"destructiveButtonTitle:nilotherButtonTitles:@"Flickr", @"Picasa", @"Twitpic", nil] autorelease];[sheet showInView:self.view];}else if (sender == self.button2) {UIActionSheet *sheet = [[[UIActionSheet alloc] initWithTitle:nildelegate:selfcancelButtonTitle:@"Cancel"destructiveButtonTitle:@"Delete Photo"otherButtonTitles: nil] autorelease];[sheet showInView:self.view];}}模态表(Modal Views)- (IBAction)displaySecondary:(id)sender{if (sender==self.slide) {self.secondaryView.modalTransitionStyle=UIModalTransitionStyleCoverVertical;}else if(sender==self.flip){self.secondaryView.modalTransitionStyle=UIModalTransitionStyleFlipHorizontal;}else if(sender==self.fade){self.secondaryView.modalTransitionStyle=UIModalTransitionStyleCrossDissolve;}else if(sender==self.curl){self.secondaryView.modalTransitionStyle=UIModalTransitionStylePartialCurl;}[self presentModalViewController:self.secondaryView animated:YES];}//点击不同的button出现不同的效果-(IBAction)dismiss{[self dismissModalViewControllerAnimated:YES];}//点击第二张view上的button取消效果。