ai更换硬盘方法
如何更换电脑硬盘

如何更换电脑硬盘电脑硬盘作为存储设备的核心部件之一,在长期使用后可能会出现各种问题,或者容量不足无法满足需求。
在这种情况下,更换电脑硬盘是一个解决方案。
本文将向您介绍如何更换电脑硬盘,让您轻松应对硬盘问题。
1.备份数据在更换电脑硬盘之前,最重要的是备份您的重要数据。
由于更换硬盘将导致数据丢失,确保提前保存至外部存储设备、云盘或备份工具中,以免造成不必要的损失。
2.选择适合的硬盘在选择新的电脑硬盘时,要考虑自己的需求和预算。
硬盘分为机械硬盘(HDD)和固态硬盘(SSD),后者速度更快且寿命更长,但价格相对更高。
根据自己的实际情况选择合适的硬盘类型和容量。
3.准备工具和材料更换硬盘需要一些基本的工具和材料,例如螺丝刀、硬盘托架(如果需要)、数据线和电源线。
在开始操作前,确保自己已准备好这些必要的工具。
4.关闭电脑并断开电源在更换硬盘之前,必须关闭电脑并拔掉电源插头。
这样可以确保操作的安全性,并避免电击等危险。
5.打开电脑主机找到电脑主机的侧板,并使用螺丝刀拆下它。
不同品牌和型号的电脑,侧板拆卸的方式可能不同,您可以查阅相应的说明书或者在网上搜索详细的步骤。
6.拆下旧硬盘在打开电脑主机后,您会看到原来的硬盘。
首先,找到连接硬盘的数据线和电源线,轻轻拔出它们。
然后,找到固定硬盘的螺丝,将其解开,将旧硬盘取出。
7.安装新硬盘将新硬盘插入硬盘托架(如需要),然后连接数据线和电源线。
确保连接牢固,不会松动。
如果没有硬盘托架,可以直接将硬盘固定在电脑主机的相应位置上。
8.重新组装电脑主机在安装新硬盘后,重新装上电脑主机的侧板,并用螺丝刀将其固定好。
确保侧板牢固地安装在主机上,以免影响电脑的正常运行。
9.重新连接电源并启动电脑将电源插头重新插入电源插座,并确保所有电线连接正确。
然后按下电源按钮,启动电脑。
如果一切正常,电脑应该能够正常启动,并识别到新安装的硬盘。
10.重新安装操作系统和恢复数据如果您更换硬盘是为了提升性能或容量,您可能需要重新安装操作系统。
KRC4机器人更换硬盘

Person in charge : Pan Xiao Gang ,Zhang Ming ,LI Dong, Wang Pu
KRC4机器人如何更换新的硬 盘
工具
1、硬盘1个 2、KUKA专用U盘1个 3、自用U盘1个
STEP
1、从kuka服务器上拷贝kss28HF5_image 拷贝C 和D 复制到kuka 专用U盘里 的image下 ,覆盖原来的数据
了
12、再重启机器人-热启动 13、激活-Project active(需要登陆Safety maintenance 权限)—点active-点YES
14 重启机器人-热启动—重启后,会出现如下的 RDC和HARD disk不一致,选择 hard disk,激活后,机器人KCP会出现了机器人的名字,HD65 RB200_100(举例子)
2、修改kuka专用U盘的KSR_Configurator.exe的文件的内容: (1)改为silent mode静音模式(2)点Restore WIM from USB Stick,然后保存
3、用另一个自用U盘从服务器上拷贝DAI_RobotsetupManager文件
4、关机,然后拔掉现场机器人硬盘的数据线,连上新的硬盘,插入KUKA专用U盘
9、重启机器人—热启动,有时候不需要重启,可以找到服务器的S盘。
10、安装Project—点restore 如果restore不了,就restore from 找到S盘相关ROBOT点OK
11、安装基础包/工艺包:安装后可以通过additional software 查看安装的情况: 首先安装基础包,再安装工艺包—一般点基础包,安装后,工艺包也一起被安装
5,余灯都灭了。
7、关机—开机前插入自己的那个U盘-----再开机,
更换电脑硬盘步骤和注意事项

更换电脑硬盘步骤和注意事项电脑硬盘是电脑中存储数据的核心部件之一,随着科技的进步,硬盘的容量、速度和稳定性也得到了极大的提升。
然而,即使是最好的硬盘也难免会出现故障或需要升级的情况。
本文将介绍更换电脑硬盘的步骤和注意事项,帮助我们更好地进行硬盘替换工作。
一、备份重要数据在更换电脑硬盘之前,首先要做的就是备份重要的数据。
因为更换硬盘会导致原有数据全部丢失,所以在开始操作之前一定要确保关键数据已经备份到安全的存储介质中,如外部硬盘或云盘。
二、选择适合的硬盘在选择新的硬盘时,需要考虑硬盘的类型、容量和接口等因素。
根据个人需求和预算选择合适的硬盘型号,比如传统的机械硬盘(HDD)或固态硬盘(SSD),以及所需的容量大小。
同时,还要注意新硬盘的接口类型,确保与电脑主板兼容。
三、准备工具和材料在更换硬盘之前,需要准备好一些工具和材料。
一般来说,需要以下物品:螺丝刀、硬盘托架、数据连接线、电源连接线等。
确保这些工具和材料可以顺利进行硬盘更换。
四、断电并拆卸旧硬盘在操作之前,必须断电以确保个人安全。
然后,打开电脑主机,并找到硬盘所在位置。
使用螺丝刀拆卸固定硬盘的螺丝,并轻轻取出旧硬盘。
要小心操作,避免对电脑其他部件造成损坏。
五、安装新硬盘将新硬盘插入硬盘托架,并使用螺丝将硬盘固定在电脑主机内。
确保硬盘连接口和数据连接线的对应,并插入正确位置。
接下来,连接硬盘的电源线和数据线,确保连接牢固。
最后,将电脑主机盖板盖好。
六、安装操作系统新硬盘安装完成后,需要安装操作系统。
可以使用系统安装盘或者制作好的启动盘,按照提示进行操作系统的安装。
在安装过程中需要选择硬盘的分区和格式化方式,可以根据个人需求进行设置。
七、重装软件和恢复数据在操作系统安装完成后,需要重新安装之前使用的软件。
同时,可以使用之前备份的数据来恢复个人文件和设置,确保一切正常。
注意事项:1. 电脑内部有高压电流,请在操作之前断开电源,并确保自己的安全。
2. 选择合适的硬盘型号和容量,满足个人需求和预算,并确保接口与主板兼容。
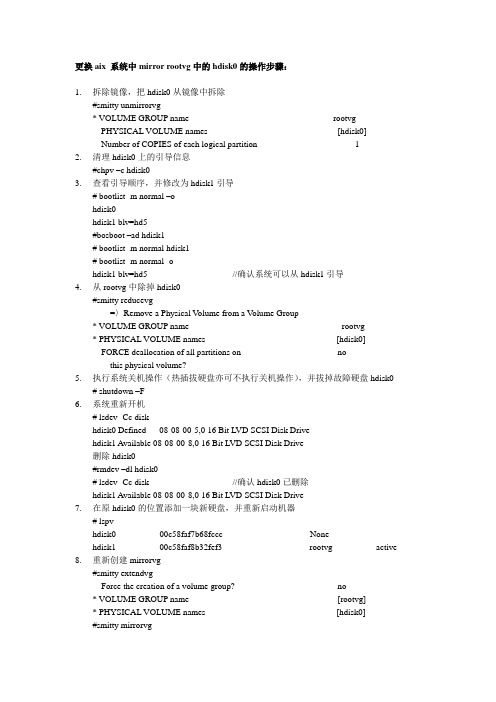
mirror rootvg 更换硬盘的步骤
更换aix 系统中mirror rootvg中的hdisk0的操作步骤:1.拆除镜像,把hdisk0从镜像中拆除#smitty unmirrorvg* VOLUME GROUP name rootvgPHYSICAL VOLUME names [hdisk0]Number of COPIES of each logical partition 12.清理hdisk0上的引导信息#chpv –c hdisk03.查看引导顺序,并修改为hdisk1引导# bootlist -m normal –ohdisk0hdisk1 blv=hd5#bosboot –ad hdisk1# bootlist -m normal hdisk1# bootlist -m normal -ohdisk1 blv=hd5 //确认系统可以从hdisk1引导4.从rootvg中除掉hdisk0#smitty reducevg=〉Remove a Physical V olume from a V olume Group* VOLUME GROUP name rootvg* PHYSICAL VOLUME names [hdisk0]FORCE deallocation of all partitions on nothis physical volume?5.执行系统关机操作(热插拔硬盘亦可不执行关机操作),并拔掉故障硬盘hdisk0# shutdown –F6.系统重新开机# lsdev -Cc diskhdisk0 Defined 08-08-00-5,0 16 Bit LVD SCSI Disk Drivehdisk1 Available 08-08-00-8,0 16 Bit LVD SCSI Disk Drive删除hdisk0#rmdev –dl hdisk0# lsdev -Cc disk //确认hdisk0已删除hdisk1 Available 08-08-00-8,0 16 Bit LVD SCSI Disk Drive7.在原hdisk0的位置添加一块新硬盘,并重新启动机器# lspvhdisk0 00c58faf7b68fccc Nonehdisk1 00c58faf8b32fef3 rootvg active 8.重新创建mirrorvg#smitty extendvgForce the creation of a volume group? no* VOLUME GROUP name [rootvg]* PHYSICAL VOLUME names [hdisk0]#smitty mirrorvg* VOLUME GROUP name rootvgMirror sync mode [Foreground]PHYSICAL VOLUME names [hdisk0 hdisk1]Number of COPIES of each logical 2partitionKeep Quorum Checking On? noCreate Exact LV Mapping? no# bootlist -m normal -ohdisk1 blv=hd5# bosboot -ad hdisk0bosboot: Boot image is 25166 512 byte blocks.# bootlist -m normal hdisk0 hdisk1# bootlist -m normal -ohdisk0 blv=hd5hdisk1 blv=hd5dump设备说明:如果系统有一个专有的dump设备,需要在留下的那块硬盘上建立一个新的dump设备并且重新指定基本的dump设备到留下硬盘的一个逻辑卷,例如完成“unmirrorvg”命令后,你将看到:# lspv -l hdisk0Dumplv现在你可以地用“migratepv”命令把“dumplv”从hdisk0移到hdisk1:# migratepv -l dumplv hdisk0 hdisk1然后再执行reducevg命令热插拔硬盘的操作步骤:移出热插拔磁盘:1.以root用户身份登录进入系统;2.在命令行输入“ smi tty ”3.选择 System Storage Management (Physical and Logical Storage)4.选择 Removable Disk Management5.选择 Remove a Disk6.从屏幕列示中选择要移出的硬盘然后按下回车键7.按照屏幕上的指导来移出硬盘;8.当你被询问“Are you sure?” , 按下回车键. 你选择的硬盘的电源显示灯将保持亮的状态;9.物理上移出硬盘;10.按下 F10 退出smit菜单.加回热插拔磁盘1.物理安装硬盘到硬盘槽里;2.以root用户身份登录进入系统3.在命令行输入“ smit ”4.选择 Devices5.选择 Install/Configure Devices Added After IPL 并且按下回车键.。
华硕AI Recorvery 6.0硬盘保护功能实战安装手册

AI Recovery 6.0安装及使用说明
进入“分区隔离”,可以对硬盘上的所有分区进行管理,并设置每个分区的保护方式和恢复频率。
19
技术部
Intel Confidential – NDA user only
AI Recovery 6.0安装及使用说明
“设置分区”可以指定数据分区(非系统分区)跟随的操作系统,防止多系统相互写入和修改,当 然也可以共享给所有系统共同使用。
AIห้องสมุดไป่ตู้Recovery程序主界面
17
技术部
Intel Confidential – NDA user only
AI Recovery 6.0安装及使用说明
分区保存和分区恢复都比较好理解,只有常规设置和分 区隔离需要特别说明。
18
技术部
Intel Confidential – NDA user only
AI Recovery 6.0安装及使用说明
找到主机配送的ASUS AI Recovery光盘,注意不是驱动光盘。 技术部
Intel Confidential – NDA user only
7
AI Recovery 6.0安装及使用说明
点击打开带有AI RECORVERY V6.0标签的光盘 技术部
20
技术部
Intel Confidential – NDA user only
AI Recovery 6.0安装及使用说明
数据分区的保护方式,会多一项跟随系统,这样可以做到数据的相互独立完整。
21
技术部
Intel Confidential – NDA user only
AI Recovery 6.0安装及使用说明
EVA4400更换硬盘步骤
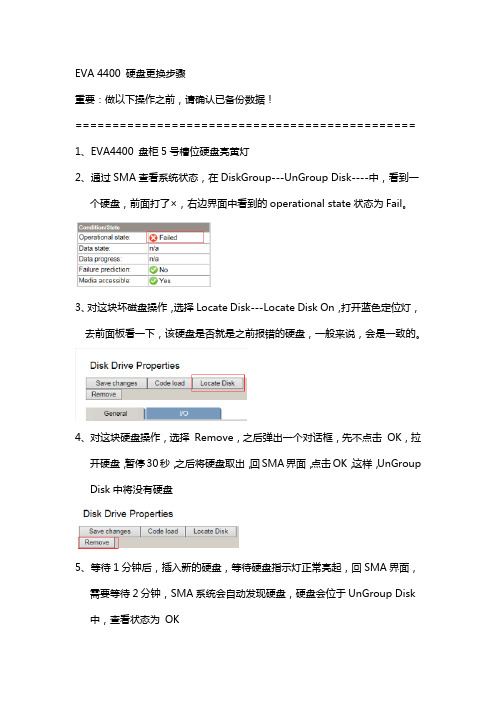
EVA 4400 硬盘更换步骤重要:做以下操作之前,请确认已备份数据!==============================================1、EVA4400 盘柜5号槽位硬盘亮黄灯2、通过SMA查看系统状态,在DiskGroup---UnGroup Disk----中,看到一个硬盘,前面打了×,右边界面中看到的operational state状态为Fail。
3、对这块坏磁盘操作,选择Locate Disk---Locate Disk On,打开蓝色定位灯,去前面板看一下,该硬盘是否就是之前报错的硬盘,一般来说,会是一致的。
4、对这块硬盘操作,选择Remove,之后弹出一个对话框,先不点击OK,拉开硬盘,暂停30秒,之后将硬盘取出,回SMA界面,点击OK,这样,UnGroup Disk中将没有硬盘5、等待1分钟后,插入新的硬盘,等待硬盘指示灯正常亮起,回SMA界面,需要等待2分钟,SMA系统会自动发现硬盘,硬盘会位于UnGroup Disk 中,查看状态为OK6、选择DiskGroup---Default Disk Group--Add Disks,在弹出的输入框输入数字1,因为我们本次只增加一块硬盘,之后点击确认。
7、观察状态,UnGroup Disk中的硬盘数再次为0,而Defalut Disk Group中会增加一块新的硬盘,同时,Defalut Disk Group会自动重分布数据,在Deafalut Disk Group界面,将会出现重分布进度,等到100%,数据重分布完成。
============================================== 注意:如果硬盘刚坏不久,阵列会先进行数据重构,重构也有进度显示,并且,该故障磁盘也不会出现在UnGroup Disk中,这个时候应该等待重构完成,故障磁盘自动进入UnGroupDisk,再次进行上述操作,如果重构完成,故障磁盘没进入UnGroup Disk,尝试手动分配故障磁盘到UnGroup Disk中。
更换AIX硬盘步骤

POWER6 informationReplacing the disk drive using AIXUse this procedure to remove and replace a disk drive concurrently with the AIX® operating system.1.Access the unit by:a.Open the front rack door.b.Loosen the thumbscrew (A) on the right side of the cover.c.Slide the cover to the right and remove it from the system unitslot (B).2.Remove the disk drive as a resource:a.Log in as root user or use CE Login.b.At the command line, type diag and press Enter.c.Press Enter to continue.d.On the Function Selection display, select Task Selection.e.Select Hot Plug Task.f.Select RAID Hot Plug Devices.g.Select the adapter that is connected to the array that contains thedisk drive you want to replace and press Enter.h.Select Commit.i.On the Identify and Remove Resources display, select Identify.j.Select the disk drive you want to remove and press Enter.The disk drive slot enters the identify state. The concurrent maintenancelight for the slot begins flashing. The following figures show the locationsof the concurrent maintenance lights A. Verify that the flashing lightcorresponds to the location for the disk drive you want to remove, andpress Enter.The disk drive slot exits the identify state.Note: If the disk drive slot is not in the Remove state, contact your nextlevel of support.k.On the Identify and Remove Resources display, select Remove.A list of the disk drives that you can remove is shown. If the disk drive youwant to remove does not appear on the list, ask your system administratorto put the disk drive in the failed state before continuing with thisprocedure. For information, see AIX System Management Guide:Operating System and Devices.l.Select the disk drive you want to remove and press Enter.The disk drive slot enters the remove state and power is removed from theslot. The concurrent maintenance light for the slot begins flashing rapidly.3.Remove the disk drive by:a.Unlock the disk drive handle by squeezing it and pulling it out towardyou as shown.b.Support the bottom of the disk drive as you slide it out of the systemor expansion unit. Do not hold the disk drive by the handle.The concurrent maintenance light for the slot turns off when you removethe disk drive.4.5.Install the bezel on the new disk drive:a.Find the package that contains the new disk drive.Attention: Disk drives are fragile. Handle with care.b.Remove the disk drive from its static protective package.c.Unlock the handle of the replacement disk drive by squeezing andpulling it out toward you. If the handle is not all the way out, the disk drivewill not slide into the system.d.Attach the disk drive bezel (A) to the replacement disk drive asshown.e.Press in and then tighten the thumbscrew (B) to secure the bezel tothe disk drive.6.Install the disk drive:a.Support the bottom of the disk drive as you align it with the guiderails in the system unit. Do not hold the disk drive by the handle.b.Slide the disk drive into the system until it stops.c.Push the disk drive handle in until it locks.Note: It is important to ensure that when installing a disk drive, that thedrive is fully seated and all the way into the system.7.Add the new disk drive as a resource:a.Press Enter.The disk drive slot exits the Remove state and enters the Normal state.b.Exit to the RAID Hot-Plug Devices menu. Press the F3 or ESC 3 key toreturnc.Exit to the Task selection display.d.Select Log Repair Action.e.Select the disk drive that you replaced and then press Enter.f.Select Commit after you have made your selection and then pressEnter.g.Exit to the command line.8.To rebuild data on the replacement disk drive, refer to the information for thecontroller to which the disk drive is attached:∙If the disk drive is attached to a PCI-X SCSI RAID controller, see the PCI−X SCSI RAID Controller Reference Guide for AIX.∙If the disk drive is attached to a PCI SCSI RAID adapter (feature code 2498), see the PCI 4−Channel Ultra3 SCSI RAID Adapter ReferenceGuide.For more information, see the AIX System Management Guide: OperatingSystem and Devices.9.Go to Verifying a repair. This completes this procedure.Parent topic:Disk driveSend feedback | Rate this pageLast updated: Wed, May 01, 2013。
AIX-RAID5更换硬盘步骤
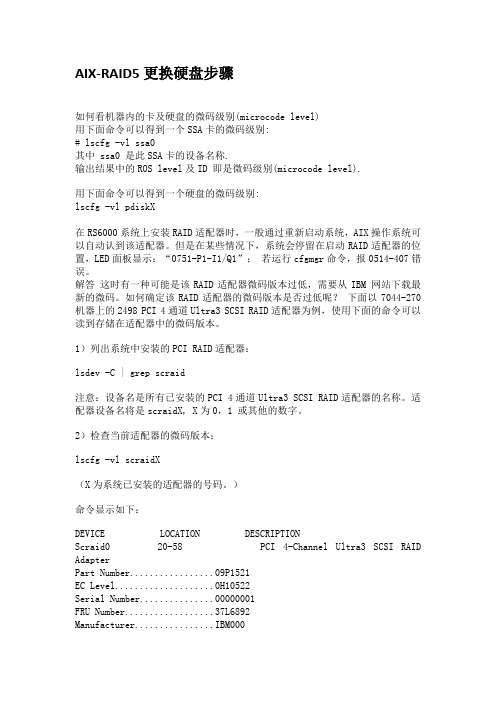
AIX-RAID5更换硬盘步骤如何看机器内的卡及硬盘的微码级别(microcode level)用下面命令可以得到一个SSA卡的微码级别:# lscfg -vl ssa0其中 ssa0 是此SSA卡的设备名称.输出结果中的ROS level及ID 即是微码级别(microcode level).用下面命令可以得到一个硬盘的微码级别:lscfg -vl pdiskX在RS6000系统上安装RAID适配器时,一般通过重新启动系统,AIX操作系统可以自动认到该适配器。
但是在某些情况下,系统会停留在启动RAID适配器的位置,LED面板显示:“0751-P1-I1/Q1”;若运行cfgmgr命令,报0514-407错误。
解答这时有一种可能是该RAID适配器微码版本过低,需要从IBM 网站下载最新的微码。
如何确定该RAID适配器的微码版本是否过低呢?下面以7044-270机器上的2498 PCI 4通道Ultra3 SCSI RAID适配器为例,使用下面的命令可以读到存储在适配器中的微码版本。
1)列出系统中安装的PCI RAID适配器:lsdev -C | grep scraid注意:设备名是所有已安装的PCI 4通道Ultra3 SCSI RAID适配器的名称。
适配器设备名将是scraidX, X为0,1 或其他的数字。
2)检查当前适配器的微码版本:lscfg -vl scraidX(X为系统已安装的适配器的号码。
)命令显示如下:DEVICE LOCATION DESCRIPTIONScraid0 20-58 PCI 4-Channel Ultra3 SCSI RAID AdapterPart Number.................09P1521EC Level....................0H10522Serial Number (00000001)FRU Number..................37L6892 Manufacturer................IBM000Displayable Message.........UL3RAIDDiagnostic Level (03)Device Driver Level (03)Loadable Microcode Level....4.20.01ROS Level and ID............4.00.26Device Specific.(YL)........P2-I9如果FRU Number是37L6892并且当前适配器微码版本(Loadable Microcode Level)是4.20.01,不同与适配器微码最新版本4.70.11,则需要升级微码。
- 1、下载文档前请自行甄别文档内容的完整性,平台不提供额外的编辑、内容补充、找答案等附加服务。
- 2、"仅部分预览"的文档,不可在线预览部分如存在完整性等问题,可反馈申请退款(可完整预览的文档不适用该条件!)。
- 3、如文档侵犯您的权益,请联系客服反馈,我们会尽快为您处理(人工客服工作时间:9:00-18:30)。
当主机硬盘丢失
#lsvg -lp rootvg 结果
rootvg:
PV_NAME PV STATE TOTAL PPs FREE PPs FREE DISTRIBUTION hdisk0 active 542 0 00..00..00..00..00 hdisk1 missing 542 0 00..00..00..00..00
#chpv -va hdisk1 看看能不能找回来
如果找不回来,则必须尽早予以跟换,跟换前必须做好备份!
先查看机器是否有磁带机,若无则
1、外置磁带机连接
#cfgmgr -v
#lsdev -Cc tape 看一下 rmt0是不是avaiable
2、内置磁带机则直接备份
#smitty mksysb
3、查看硬盘的S/N,P/N号
#lscfg –vl hdisk*
查看物理卷
lspv
查看逻辑卷组
lsvg
查看在用的逻辑卷组
lsvg –o
# lsvg -o
#sysdumpdev –l
4、查看所有硬盘(包括逻辑盘)的状态
# lsdev -Cc disk
查看7133磁盘柜硬盘状态
#lsdev –Cc pdisk
5、把HDISK0从ROOTVG中不做MIRROW
#unmirrorvg rootvg hdisk0 (长时间40分钟)
查看物理卷
#lspv
这时HDISK0不在和HDISK1为MIRROR
把hdisk0从rootvg中去除
#reducevg rootvg hdisk0 (长时间0分2钟)
在HDISK1上创建boot image
#bosboot –ad hdisk1
改变启动设备的顺序
#bootlist –m normal hdisk1 cd0
删除HDISK0
#rmdev –l hdisk0 –d
#lspv
#lscfg –vl hdisk0
以上2条命令不会显示HDISK0的相关信息
(如果无法unmirrorvg 和 rmdev 的话,就只能直接关机换盘了。
)
6、关机后将对应的硬盘予以跟换,如果是热插拔的则可以热跟换。
#shutdown –F
7、开机
lspv
发现多出HDISK4,而我们需要的是HDISK0
删除HDISK4
#rmdev –l hdisk4 –d
#cfgmgr
#chdev –l hdiskN –a pv=yes (pvID无时使用)
#lspv
发现多出HDISK0,HDISK4,可能是我前面删除HDISK0,没有做cfgmgr的原因删除HDISK4,HDISK0
#rmdev –l hdisk4 –d
#rmdev –l hdisk0 –d
#cfgmgr
#lspv
好了,HDISK0出现了
8、把HDISK0加到ROOTVG中并做镜像
#extendvg –f rootvg hdisk0
(由于之前直接换的盘,则ODM库可能坏
执行#synclvodm rootvg ,synclvodm是同步或者重建LVCB,ODM,VGDA。
或执行#redefinevg -d hdisk0 rootvg,换好的硬盘就能加入 rootvg了)
做MIRROR
#mirrorvg –c 2 rootvg
查看PV
#lspv
OK
如果新盘无法认出来,lsdev –Cc disk 显示Miss盘的信息时,可能是以下原因:
# unmirrorvg -c 1 rootvg 0007899aba16f713
用这个命令执行有问题,只能够用rmlvcopy hd5 1 hdis0来执行,把hdisk0上面的哪个copy删除掉
rmlvcopy hd5 1 hdis0
rmlvcopy hd6 1 hdis0
rmlvcopy hd8 1 hdis0
rmlvcopy hd4 1 hdis0
rmlvcopy hd2 1 hdis0
rmlvcopy hd9var 1 hdis0
rmlvcopy hd3 1 hdis0
rmlvcopy hd1 1 hdis0
做完这个操作后,系统正常
用lsvg -l rootvg看系统,系统正常
用lsvg -p rootvg
看到hdisk0还在,用reducevg rootvg 0007899aba16f713(原来hdisk0的pvid) 再次用lsvg -p rootvg查看,hdisk0已经不在了,ok,到现在为止,问题,解决
后面的问题就是做系统mirror
在之前的操作可以先试试以下的命令:
1.用rmlvcopy命令删除lv的镜像,可以删除一个(我做实验的时候,只删除一个lv,然
后就可以用unmirrorvg了),也可以一个一个全部删除。
2. 用unmirrorvg rootvg pvid 不要加hdisk参数,加pvid参数,这时候应该可以删
除,得到pvid的方法: lsvg -p rootvg就可以看到rootvg里这两块硬盘的pvid。
3. 用reducevg rootvg pvid 从卷组里删除这块硬盘
在HDISK0,HDISK1上创建boot image
#bosboot –ad hdisk0
#bosboot –ad hdisk1
改变启动设备的顺序
#bootlist –m normal hdisk0 hdisk1 cd0。