KASPERSKY 管理控制台8.0 安装手册
kaspersky embedded systems security 管理员指南说明书
Kaspersky Embedded Systems Security管理员指南应用程序版本:2.2.0.605尊敬的用户:感谢您选择Kaspersky Lab 作为您的安全软件提供商。
我们希望本文档能帮助您使用我们的产品。
注意!本文档是AO Kaspersky Lab(以下简称Kaspersky Lab)的资产。
本文档的所有权利受俄罗斯联邦版权法和国际条约保护。
根据适用法律,非法复制和分发本文档或部分文档需承担民事、行政或刑事责任。
未经Kaspersky Lab 的书面许可,不得对任何材料进行任何类型的复制或分发,包括译本形式。
本文档和与之相关的图形图像只能用于信息参考、非商业和个人目的。
Kaspersky Lab 保留在没有事先通知的情况下修改本文档的权利。
对于本文档所用第三方所有的任何材料的内容、质量、相关性或准确性,或与使用此类文档相关的任何潜在损害,Kaspersky Lab 不承担任何责任。
本文档使用的注册商标和服务标志属于各自的所有者。
文档修订日期:2018.12.06© 2018 年 AO Kaspersky Lab 版权所有。
保留所有权利。
https://https://内容关于本指南 (10)本文内容 (10)文档约定 (12)有关Kaspersky Embedded Systems Security 2.2 的信息来源 (13)独立检索信息源 (13)在论坛上讨论Kaspersky Lab 应用程序 (14)Kaspersky Embedded Systems Security 2.2 (15)关于Kaspersky Embedded Systems Security 2.2 (15)新增功能 (17)分发包 (18)硬件和软件需求 (19)安装和卸载应用程序 (21)Kaspersky Embedded Systems Security 2.2 软件组件以及它们在Windows Installer 服务中对应的代码 (21)Kaspersky Embedded Systems Security 2.2 软件组件 (22)软件组件的“管理工具”集 (23)安装Kaspersky Embedded Systems Security 2.2 后系统的更改 (24)Kaspersky Embedded Systems Security 2.2 进程 (27)Windows Installer 服务的安装和卸载设置及命令行选项 (27)Kaspersky Embedded Systems Security 2.2 安装和卸载日志 (31)安装计划 (32)选择管理工具 (32)选择安装类型 (33)使用向导安装和卸载应用程序 (34)使用安装向导安装 (35)Kaspersky Embedded Systems Security 2.2 安装 (35)Kaspersky Embedded Systems Security 2.2 控制台安装 (37)在其他计算机上安装应用程序控制台以后的高级设置 (38)在安装Kaspersky Embedded Systems Security 2.2 后执行的操作 (40)修改组件集和恢复Kaspersky Embedded Systems Security 2.2 (42)使用安装向导卸载 (43)Kaspersky Embedded Systems Security 2.2 卸载 (43)Kaspersky Embedded Systems Security 2.2 控制台卸载 (44)从命令行安装和卸载应用程序 (45)关于从命令行安装和卸载Kaspersky Embedded Systems Security 2.2 (45)在安装Kaspersky Embedded Systems Security 2.2 后执行的操作 (47)添加/删除组件。
卡巴斯基开放空间加强版安装说明
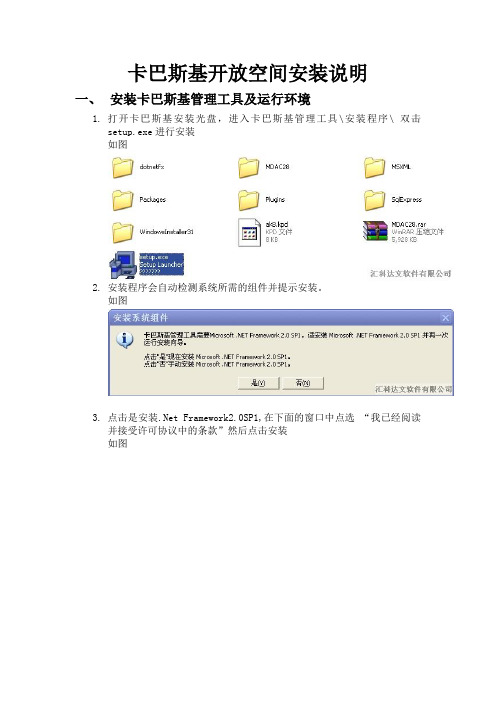
卡巴斯基开放空间安装说明一、安装卡巴斯基管理工具及运行环境1.打开卡巴斯基安装光盘,进入卡巴斯基管理工具\安装程序\ 双击setup.exe进行安装如图2.安装程序会自动检测系统所需的组件并提示安装。
如图3.点击是安装.Net Framework2.0SP1,在下面的窗口中点选“我已经阅读并接受许可协议中的条款”然后点击安装如图4.安装完成后点击退出如图5.安装完成后再次双击刚才的setup.exe继续安装,在弹出的对话框中点击下一步如图6.在窗体上点选自定义然后点击下一步如图7.在弹出的窗体中继续点击下一步如图8.在窗体中按默认设置点击下一步如图9.根据学校网络情况选择合适的机器数目,然后点击下一步如图10.选择本地系统账户,然后点下一步如图11.选择Microsoft SQL Server(SQL Express) 点击下一步如图12.在窗体中选择安装Microsoft SQL Server 2005 Express Edition(推荐)然后点击下一步,如图13.在窗体中点击下一步系统会检测所需的组件并自动安装如图14.安装完成后,在新窗体中选择Microsoft Windows验证模式点击下一步如图15.在窗体中点击下一步如图16.在窗口中点击下一步如有防火墙请开放13000 14000 15000这三个端口如图17.在窗口中选择安装控制台机器的固定IP然后点击下一步如图18.安装完成后,点击完成运行控制台如图二、运行控制台并制作安装包1.在弹出的窗体中点击下一步如图2.在窗体中选择从许可文件加载并点击下一步,然后选择光盘中的许可文件再点击下一步。
如图3.在窗体中点击下一步,然后在对话框中选择是。
如图4.在设置邮件服务时如果没有,可以直接点击下一步如图5.然后系统会自动创建常用的任务和策略如图6.在更新界面中直接点击下一步让系统在后台更新。
如图7.在完成窗体中,去掉开始部署的选项点击完成.如图8.设置完成后首先给管理服务器所在的机器安装卡巴斯基,在树形菜单中选择管理组再点选客户端机器如图9.选中本机然后鼠标右键,点选安装应用程序如图10.然后在窗体中点击下一步,在程序列表里面选择与系统相匹配的卡巴斯基版本如图11.选择授权许可文件,点击下一步如图继续点击下一步如图12.在窗体中选择提示用户操作,点击下一步.如图13.这个窗体默认即可,系统会自动删除与卡巴斯基不兼容的程序如图14.在窗体中点击下一步,开始安装卡巴斯基。
卡巴斯基管理工具指南
目录1.备份8.0管理工具的数据 (2)2.安装9.0管理工具 (6)2.1 KSC9.0管理工具的安装 (6)2.2快速启动向导的设置 (17)3.还原之前备份好的8.0管理工具 (25)4.安装6.0加强版管理插件 (29)管理工具8.0升级9.0操作说明1.备份8.0管理工具的数据在升级9.0之前,先备份管理工具8.0的数据。
Step1: 打开计算机【开始】菜单,在【所有程序】找到【卡巴斯基管理工具】目录,点开,这里可以找到【卡巴斯基实验室备份工具】Step2:打开卡巴斯基实验室备份工具,这里会出现一个向导,点击{下一步}Step3: 选择备份管理服务器数据,点击{下一步}Step4:可以自己修改备份文件夹的名称和路径,这里是默认生成的,自己创建的文件夹不要用中文命名,文件夹最好是放在根目录下。
选择{下一步}Step5:等待备份完成即可,点击完成即可完成备份。
下面备份已完成2.安装9.0管理工具管理工具的安装主要分为 9.0管理工具的安装、快速启动向导的设置2.1 KSC9.0管理工具的安装Step1: 打开管理服务器的安装文件夹,进去找到[Server]这个目录,找到[setup]应用程序, 双击[setup]安装Step2: 这里会出一个安装向导,点击{下一个}Step3:勾选中接受授权许可协议条款,点击{下一个}Step4: 选择网络的安装类型,这里选择自定义安装Step5: 选择安装插件、安装目录(没有特殊要求,推荐只安装管理服务器,安装目录以根据自己的要求更改,一般默认即可)状态验证服务器—启用不Cisco NAC的联动,需要Cisco NAC移动设备支持—启用管理卡巴斯基Mobile Security Enterprise EditionStep6: 选择网络规模。
不同的网络规模对应的默认设置是不一样的。
Step7: 选择卡巴斯基管理服务器服务账户,默认即可,选择{下一步}Step8:选择数据库服务器的类型,推荐使用Microsoft SQLserverStep9:选择安装MS SQL server 数据库,如果服务器有现有的数据库可以选择现有的数据库Step10: 选择SQL身份验证模式,一般选择Microsoft windows验证模式即可。
Server Administrator Version 8.0.1 安装指南说明书
Server AdministratorVersion 8.0.1 Installation GuideNotes, Cautions, and WarningsNOTE: A NOTE indicates important information that helps you make better use of your computer.CAUTION: A CAUTION indicates either potential damage to hardware or loss of data and tells you how to avoid the problem.WARNING: A WARNING indicates a potential for property damage, personal injury, or death. CopyrightCopyright © 2014 Dell Inc. All rights reserved. This product is protected by U.S. and international copyright and intellectual property laws. Dell™ and the Dell logo are trademarks of Dell Inc. in the United States and/or other jurisdictions. All other marks and names mentioned herein may be trademarks of their respective companies.2014 - 09Rev. A00Contents1 Introduction (4)What Is New In This Release (4)Software Availability (4)Systems Management Software (4)Security Features (5)Other Documents You Might Need (5)2 Installing Systems Management Software On Citrix XenServer (7)During The installation Of XenServer (7)On A Running System (7)XenServer Upgrade (8)Post Installation Tasks (8)Accessing Server Administrator on XenServer (9)3 Frequently Asked Questions (10)What ports do systems management applications use? (10)When I run virtual media on the DRAC controller over a Wide Area Network (WAN) with lowbandwidth and latency, launching Systems Management Install directly on the virtual mediafailed, what do I do? (10)Do I need to uninstall the Adaptec Fast Console application installed on the system beforeinstalling the Server Administrator Storage Management Service? (10)1 IntroductionThis topic provides information on:•Installing Server Administrator on managed systems.•Installing and using the Remote Enablement feature.•Managing remote systems using Server Administrator Web Server.•Configuring the system before and during a deployment.NOTE: If you are installing management station and managed system software on the same system, install identical software versions to avoid system conflicts.What Is New In This ReleaseThe release highlights of Server Administrator are:•Added support for the following operating system:–Citrix XenServer 6.2 SP1•Added support for 13G servers — R730, R730 XD, R630, and T630.• A link to the complete overview of OpenManage products which provides more information on what is available in the Systems Management Tools and Documentation (SMTD) DVD, what is embedded in the server, and what can be downloaded from /supportSoftware AvailabilityThe Server Administrator software can be installed from:•Systems Management Tools and Documentation DVD•Support site — For more information, see /support.Systems Management SoftwareSystems management software is a suite of applications that enables you to manage the systems with proactive monitoring, notification, and remote access.Systems management software comprises of two DVDs:•Systems Management Tools and Documentation•Server Update UtilityNOTE: For more information on these DVDs, see Systems Management Tools And Documentation <Version Number> Installation Guide.4Security FeaturesSystems management software components provide these security features:•User ID and password configuration through the web-based interface or the command line interface (CLI), in most cases.•SSL encryption (Auto Negotiate and 128-bit or higher).NOTE: Telnet does not support SSL encryption.•Session time-out configuration (in minutes) through the web-based interface.•Port configuration to allow systems management software to connect to a remote device through firewalls.NOTE: For information about ports that the various systems management components use, see the User Guide for that component.For information about the Security Management, see the Server Administrator User’s Guide at / openmanagemanuals.Other Documents You Might NeedIn addition to this guide, for more information, access the following guides.•The Lifecycle Controller 2 Version 1.00.00 User's Guide provides information on using the Lifecycle Controller.•The Management Console User’s Guide provides information about installing, configuring, and using Management Console.•The Systems Build and Update Utility User’s Guide provides information on using the Systems Build and Update Utility.•The Systems Software Support Matrix provides information about the various systems, the operating systems supported by these systems, and the systems management components that can be installed on these systems.•The Server Administrator User's Guide describes the installation and use of Server Administrator.•The Server Administrator SNMP Reference Guide documents the SNMP management information base (MIB).•The Server Administrator CIM Reference Guide documents the Common Information Model (CIM) provider, which is an extension of the standard management object format (MOF) file. This guide explains the supported classes of management objects.•The Server Administrator Messages Reference Guide lists the messages that are displayed on the Server Administrator home page Alert log, or on the operating system’s event viewer. This guide explains the text, severity, and cause of each alert message that the Server Administrator displays.•The Server Administrator Command Line Interface Guide documents the complete command line interface for Server Administrator, including an explanation of CLI commands to view system status, access logs, create reports, configure various component parameters, and set critical thresholds.•The Remote Access Controller 5 User’s Guide provides complete information about installing and configuring a DRAC 5 controller and using DRAC 5 to remotely access an inoperable system.•The Integrated Remote Access Controller User's Guide provides complete information about configuring and using an integrated Remote Access Controller to remotely manage and monitor the system and its shared resources through a network.•The Update Packages User's Guide provides information about obtaining and using the Update Packages for Windows and Linux as part of the system update strategy.5•The Server Update Utility User's Guide provides information on using the Server Update Utility.•The Systems Management Tools and Documentation DVD contains readme files for applicationsfound on the media.NOTE: If the product does not perform as expected or you do not understand a procedure described in this guide, see Getting Help in the system’s Hardware Owner’s Manual.62 Installing Systems Management Software On Citrix XenServerThe Server Administrator is installed on Citrix XenServer using the Supplemental Pack. The Supplemental Pack for Citrix XenServer can be installed in two ways:•During the installation of XenServer•On a running systemDuring The installation Of XenServerTo install the Supplemental Pack for Citrix XenServer during the installation of XenServer:1.Start the installation of XenServer as usual and follow the instructions on the screen.2.One of the early questions during the installation process of XenServer is if you want to install anySupplemental Packs; click Yes and continue with the installation process.3.After the base XenServer image is installed (5-10 minutes depending on the speed of the system), youare prompted to insert the Supplemental Pack CD. Eject the XenServer installation CD from theoptical drive, insert the Supplemental Pack CD and click OK. The message OpenManageSupplemental Pack was found is displayed. To confirm installation, click Use and click OK.NOTE: If you have more than one Supplemental Pack, (either the Linux Supplemental Pack from Citrix or other third-party applications) you can install them in any order, although it isrecommended that you install the Supplemental Pack last.4.After completing the Supplemental Pack installation (2-5 minutes, depending on the speed of thesystem), you are prompted to install other Supplemental Packs. If you do not want to install other supplemental packs, click Skip and press <Enter>. The XenServer is installed successfully.NOTE: When installing RPM packages, to avoid warnings concerning the RPM–GPG key, import the key with a command similar to the following:rpm --import<OM DVD mountpoint>SYSMGMT/srvadmin/linux/RPM-GPG-KEYOn A Running SystemTo install the Supplemental Pack for Citrix XenServer 6.0 on a running system:1.Burn the Supplemental Pack ISO file to a CD/DVD or download the ISO file to the server.If you are downloading the ISO file, mount it on a temporary directory as follows:$ mount -o loop <openmanange-supplemental-pack-filename>.iso /mnt7If you burned the ISO file to a CD/DVD, insert it in the optical drive and run:$ mount /dev/cdrom /mnt2.Install the supplemental pack:$ cd /mnt$ ./install.shOR$ xe-install-supplemental-pack <openmanange-supplemental-pack-filename>.isoNOTE: If a previous version of Server Administrator is already installed on the system, then thecommand to upgrade it to version 7.0 is ./install.sh.After the installation or upgrade, execute the following post-installation configuration script of Remote Enablement feature$ cd /opt/dell/srvadmin/etc$ ./autoconf_cim_component.sh -p 5986NOTE: The Distributed Web Server (DWS) connection does not work properly, if you haveinstalled the sblim-sfcb RPM from SUSE Linux Enterprise Server 11 SP3 operating system DVD.To resolve the connection issue, you must install the sblim-sfcb RPM either from SUSE LinuxEnterprise Server 11 SP2 operating system DVD or from the Systems Management Tools andDocumentation DVD.3.When the installation is complete, unmount the ISO file or CD:$ cd ..$ umount /mntCAUTION: Removal of the Supplemental Pack or any RPMs is not supported by your serviceprovider or Citrix and it is not recommended. Manual removal of any RPM leaves the system in an inconsistent state which could make any potential issue debugging effort difficult orimpossible. A future Supplemental Pack release supports removal of the Supplemental Pack.XenServer UpgradeIf the XenServer image is upgraded to a newer XenServer update or release, the Supplemental Pack must be reinstalled since the new XenServer image is placed on a different partition from the original. In this case, follow the same installation instructions as before. However, any systems management configuration settings saved on the server is lost.NOTE: If you are connecting to a XenServer 6.2 SP1 managed node using server administrator web server, use port 5986 in the format Hostname:Port Number, or IP address:Port Number.Post Installation TasksAfter the installation or upgrade of Server Administrator:1.Execute the post installation configuration scripts of Remote Enablement feature:$ cd /opt/dell/srvadmin/etc$ ./autoconf_cim_component.sh -p 5986$ service iptables save8or$ /etc/init.d/iptables save2.Restart openwsman and sfcb services:$ /etc/init.d/openwsmand restart$ /etc/init.d/sfcb restartNOTE: In case the openwsman services do not start properly, you may need to reboot theserver.3.Open the port 5986:$ iptables -I RH-Firewall-1-INPUT -p tcp --destination-port 5986 -j ACCEPT 4.Start the Server Administrator services:$ sh srvadmin-services startAccessing Server Administrator on XenServerTo manage Server Administrator on XenServer using the Server Administrator Web Server interface:1.Install only the Server Administrator Web Server interface on another system.NOTE: Ensure that the version of the Server Administrator Web Server interface is greater orequal to the version of the Server Instrumentation installed.2.Run the Server Administrator Web Server interface.The Managed System Login screen is displayed.3.On the Managed System Login screen, type the following credentials of the XenServer system youwant to access, and then click Submit.•Hotname / IP address: — Is the hostname or IP address of the management station. Type the hostname or IP address in the format Hostname:Port Number, or IP address:Port Number.•Username:•Password:The Server Administrator screen is displayed.93 Frequently Asked QuestionsWhat ports do systems management applications use?The default port used by Server Administrator is 1311. These ports are configurable. For port information of a particular component, see the User Guide of that respective component.When I run virtual media on the DRAC controller over a Wide Area Network (WAN) with low bandwidth and latency, launching Systems Management Install directly on the virtual media failed, what do I do?Copy the web install package to the local system and then launch systems management Install.Do I need to uninstall the Adaptec Fast Console application installed on the system before installing the Server Administrator Storage Management Service?Yes, if you already have Adaptec Fast Console installed on the system, you must uninstall this application before installing the Server Administrator Storage Management Service.10。
卡巴斯基终端安全软件说明书
Kaspersky Endpoint Security for Windows 11.3.0© 2022 AO Kaspersky Lab目录常见问题回答新闻Kaspersky Endpoint Security for Windows 分发包硬件和软件要求取决于操作系统类型的可用应用程序功能比较根据管理工具比较应用程序功能与其他 Kaspersky 应用程序的兼容性安装和删除程序通过 Kaspersky Security Center 部署应用程序的标准安装创建安装包更新安装包中的数据库创建远程安装任务使用向导安装应用程序通过命令行安装程序使用系统中心配置管理器远程安装应用程序setup.ini 文件安装设置说明更改应用程序组件从以前版本的应用程序升级删除程序通过 Kaspersky Security Center 卸载使用向导卸载应用程序通过命令行删除程序应用程序授权许可关于最终用户授权许可协议关于授权许可关于授权许可证书关于订阅关于授权许可密钥关于激活码关于密钥文件关于数据提供激活应用程序通过 Kaspersky Security Center 激活应用程序使用激活向导激活程序通过命令行激活程序查看授权许可信息购买授权许可续费订阅通过本地界面管理应用程序程序界面任务栏通知区域中的程序图标简化的应用程序界面配置应用程序界面的显示启动和停止应用程序应用程序的自动启动暂停和恢复计算机保护和控制扫描计算机开始或停止扫描任务更改安全级别更改对受感染文件执行的操作生成要扫描的对象列表选择要扫描的文件类型优化文件扫描扫描复合文件使用扫描方法使用扫描技术选择扫描任务运行模式使用不同用户帐户启动扫描任务扫描连接到计算机的可移动驱动器后台扫描更新数据库和程序软件模块添加更新源选择更新数据库区域配置从共享文件夹更新选择更新任务运行模式在不同用户帐户权限下开始更新任务配置应用程序模块更新开始和停止更新任务最近更新回滚配置代理服务器使用处理活动威胁处理活动威胁列表对活动威胁列表中的文件启动自定义扫描任务删除活动威胁列表中的记录卡巴斯基安全网络关于使用卡巴斯基安全网络时的数据提供启用和禁用卡巴斯基安全网络为保护组件启用和禁用云模式检查与卡巴斯基安全网络的连接在卡巴斯基安全网络中检查文件信誉行为检测启用和禁用行为检测选择在检测到恶意软件活动时要执行的操作防止共享文件夹被外部加密启用和禁用共享文件夹对外部加密的防护选择在检测到共享文件夹外部加密时采取的操作配置共享文件夹对外部加密的防护的排除项地址漏洞利用防御启用和禁用漏洞利用防御选择在检测到漏洞时执行的操作启用和禁用系统进程内存保护主机入侵防御音频和视频设备控制限制启用和禁用主机入侵防御管理应用程序信任组配置将应用程序分配到受信任组的设置修改信任组选择在 Kaspersky Endpoint Security 启动之前启动的应用程序受信任组管理应用程序权限更改信任组和应用程序组的应用程序权限修改应用程序权限禁用从卡巴斯基安全网络数据库下载和更新应用程序权限禁用继承父进程限制从应用程序权限中排除特定应用程序操作删除有关未使用的应用程序的信息保护操作系统资源和身份数据添加受保护资源的类别添加受保护资源禁用资源保护修复引擎文件恢复限制启用和禁用修复引擎文件威胁防护启用和禁用文件威胁防护自动暂停文件威胁防护更改安全级别更改“文件威胁防护”组件对受感染文件执行的操作构成“文件威胁防护”组件的保护范围在“文件威胁防护”组件的运行中使用启发式分析在“文件威胁防护”组件的运行中使用扫描技术优化文件扫描扫描复合文件更改扫描模式Web 威胁防护启用和禁用 Web 威胁防护更改 Web 流量安全等级更改要对恶意 Web 流量对象采取的操作使用“Web 威胁防护”来根据钓鱼和恶意网址数据库检查链接在“Web 威胁防护”组件的运行中使用启发式分析创建受信任网址列表邮件威胁防护启用和禁用邮件威胁防护更改邮件安全级别更改对受感染电子邮件采取的操作构成“邮件威胁防护”组件的保护范围扫描附加于电子邮件中的复合文件筛选电子邮件附件扫描 Microsoft O ice Outlook 中的电子邮件配置在 Outlook 中的邮件扫描使用 Kaspersky Security Center 配置邮件扫描网络威胁防护启用和禁用网络威胁防护编辑用于阻止进攻计算机的设置配置排除在阻止外的地址MAC 欺骗防护Firewall启用或禁用防火墙更改网络连接状态管理网络数据包规则创建和编辑网络数据包规则启用或禁用网络数据包规则更改网络数据包规则的防火墙操作更改网络数据包规则的优先级管理应用程序网络规则创建和编辑应用程序网络规则启用和禁用应用程序网络规则更改应用程序网络规则的防火墙操作更改应用程序网络规则的优先级网络监控器BadUSB 攻击防护启用和禁用 BadUSB 攻击防护。
V800和V810 VERIS威力巴

V800 和 V810 VERIS 威力巴®安装和维护手册176-CN请阅读并保存本手册目录安全须知 (3)产品信息 (3)第 1 节:适用范围 (3)第 2 节:收货检验第 3 节:安全预防 (3)第 4 节:安装前的准备 ...................................................................3-5安装位置 (3)安装方向 (4)水平管道 (4)垂直管道 (5)差压变送器/现场显示仪位置 (5)安装图示和材料清单 (5)第 5 节:安装步骤..........................................................................5-8准备管道 (5)将下法兰座焊接到管道上 (6)插入探头 (7)安装仪表阀或阀组 (7)安装完毕的 V500 和 V510 (8)第 6 节:定期维护 (9)产品有限担保和保修 (11)2设计、材料、重量及性能等级为近似值,如有变更,恕不另行通知。
有关最新信息,请访问armstrong 。
3设计、材料、重量及性能等级为近似值,如有变更,恕不另行通知。
有关最新信息,请访问 armstrong 。
第 1 节 适用范围以下说明是 V800 型和 V810 型威力巴®流量探头的安装步骤。
这些安装步骤适用于所有工业流量测量的应用,包括液体、蒸汽和气体,并对在水平和垂直管道上安装探头提出了不同要求。
第 2 节 收货检验进行收货检验步骤时应执行以下任务:• 检查收到的物品并与产品装箱单进行核对。
• 检查探头铭牌上的型号、序列号和工位号。
• 核实实际管道直径,对比产品铭牌上的管道内径。
• 检查检测杆表面有无损伤。
有损伤的检测杆可能会造成测量误差。
第 3 节 安全预防安装威力巴®流量探头前应执行以下步骤:• 检查流量探头铭牌上的最大允许操作范围。
sybyl8.0 安装 最详细的教程
sybyl8.0 安装最详细的教程本人做好了一个sybyl8.0在ubunt u10.04中的安装教程。
本想一帖子的形式发出来的。
可是图片太多。
排版不方便。
做成了pdf传新浪共享里了。
本教程从系统分区—到安装双系统(win7和ubuntu)—到安装sybyl8.0下面把文字贴出来,如果觉得有用就去下载、、、、、、Sybyl8.0安装详细教程制作者xcool前言大家好,本人菜菜,经过几天的不懈努力,几经折腾,终于在ubuntu系统中安装好了sybyl8.0。
在网上查了好多资料,没有一个教程讲述了从系统分区到安装系统再到安装sybyl的详细过程。
由于本人安装过程之辛苦,于是萌生了想写一篇教程给那些想安装sybyl的朋友想法。
事先声明,本人菜鸟,错误多,忘高手莫见笑。
闲话少说,下面开始、、、、、、、系统分区现在大家一般都是win7的系统吧(什么?还是XP、、、、、、、、兄弟,你OUT了,呵呵),而sybyl8.0要安装在linux 系统里(注:sybyl-x版本的是安装在windows里的)。
我们总不能为了安装我们可爱的sybyl而干掉windows而安装linux吧。
对于用惯了windows的朋友来说一下转变过来用liunx那是相当的不习惯。
那怎么办呢?有没有鱼与熊掌兼得的方法呢。
很高兴地告诉大家,还真的有——即安装双系统。
什么叫做双系统,简单来说就是一台电脑安装两个系统,在开机时选择所要进入的系统就可以进入相应的系统了。
也许有人要问了,要是我已经进入了一个一个系统了,现在要换另一个系统那怎么办,那只能重启了。
要安装双系统,前提条件就是首先你的有一个单系统了——即我们的win7系统(呵呵,废话)。
其次安装系统需要空间,即我们的硬盘空间,由于windows系统和linux系统的文件格式不一样,windows一般是FAT32或NTFS,而linux一般是EXT3或EXT4。
那怎么办呢?这就得对我们的硬盘从新分区了,其实也就是利用软件割一部分空间出来安装我们的linux。
卡巴斯基linux手册

1) 运行脚本/opt/kaspersky/klnagent/lib/bin/setup/postinstall.pl进入卡巴网络代理快速配置向导,按提示进行操作:
2) 需要进行如下配置
a. 指定的DNS名称或管理服务器的IP地址。
b. 指定管理服务器的端口号或使用默认端口号(14000)。
c. 指定管理服务器或使用默认端口号(13000)的SSL端口号。
d. SSL连接的定义,是否应该用于数据传输。默认情况下,启用SSL连接。
4、 安装卡巴反病毒程序(rpm -ivh /root/kav4fs-8.0.0-136.i386\ \(2\).rpm)
1) 运行脚本/opt/kaspersky/kav4fs/bin/kav4fs-setup.pl进入卡巴反病毒程序的快速配置向导,按提示进行操作:
2) 需要进行如下配置
a. 审查许可协议
b. 选择区域设置的
c. 安装授权(输入路径,如果授权加载不成功,可以通过管理工具推送授权)
d. 设置代理服务器
e. 下载病毒库
f. 预订更新时间
g. 配置实时保护(编译内核,需要提供内核路径,并配置gcc编译环境,不编译,实时保护无法开启)
h. Samba服务器的设置实时保护
依次是:区域、访问权限(添加帐户)、设置(设置扫描和保护)、处理动作(发现病毒如何处理)、排除区域
和普通的windows 病毒扫描任务一样,需要设置后面三项:扫描区域、扫描设置、扫描时间。
和普通的windows 病毒库升级任务一样,需要设置后面三项:更新源(选择到管理服务器更新)、更新类型(只更新病毒库)、更新时间。
系统环境配置(本人使用suse linux 11):
- 1、下载文档前请自行甄别文档内容的完整性,平台不提供额外的编辑、内容补充、找答案等附加服务。
- 2、"仅部分预览"的文档,不可在线预览部分如存在完整性等问题,可反馈申请退款(可完整预览的文档不适用该条件!)。
- 3、如文档侵犯您的权益,请联系客服反馈,我们会尽快为您处理(人工客服工作时间:9:00-18:30)。
Kaspersky管理控制台8.0安装手册1、找到kaspersky管理工具的安装程序包,运行setup.exe
2、如果是第一次运行安装程序,那么卡巴会默认先安装
3、按照步骤点击“是”安装完成后,会提示(如图)
4、然后请继续运行setup.exe程序,开始管理工具的安装流程
这步请选择“自定义”
这步默认安装设置
这步选择最后一项“网络中多于1000台计算机”
以下三图的选项请看截图
这步就是开始安装上图中所显示的程序,接下来还会安装SQL程序,安装完成后,请看下图
这里是程序默认的共享文件路径,可以做修改,根据客户需求进行设置,如果客户无需求,请默认程序路径
程序默认的连接端口,请勿修改
管理服务器地址,不选,默认原
始选项
这里点多了,跳过了一步,这一个截图就是开始安装卡巴斯基管理工具
开启后,会弹出“快速启动向导”操作步骤请看图到这一步已经完成安装,点击完成,开启管理控制台
这步请选择“稍后添加授权许可”
这一步如果用户的网络比较复杂,也就是说划分的VLAN比较多,可能搜索就会慢点,但是请耐心等待这步的完成。
这步看客户有没得需求,这个设
置的目的是,卡巴斯基可以定时
的给客户设置的邮箱发送各种报
告信息
开始配置策略和任务
这个就是我们卡巴斯基的管理控制台界面了,到这里安装就算完成了。
具体的策略和任务的设置,就需要了解客户需求在来配置了。
如果电脑已经连接到外网,那么
卡巴管控会自己到外网去下载最
新的病毒库数据,这不可以直接
选择“下一步”跳过,它会再后台自动运行
设置完成后,请取消“开始部署”
默认是勾选了的。