[VIP专享]HVR高清数字硬盘录像机 英文版使用说明
SONY 高清晰度数字摄录一体机 HVR-V1C 操作指南
请先阅读本章节操作本摄像机之前,请先通读本手册,并妥善保存以备今后参考。
为减少发生火灾或触电的危险,请勿让本装置淋雨或受潮。
耳机的过高音压会导致听力受损。
切勿将电池暴露在阳光、火等过热的地方。
请只使用指定类型的电池进行更换。
否则,可能造成着火或人员受伤。
注意特定频率的电磁场可能会影响此设备的图像和声音。
本产品标有CE标志,表明它符合欧盟委员会颁布的EMC指令(89/336/EEC)和低电压指令(73/23/EEC)。
符合这些指令即符合以下欧洲标准:•EN60065:产品安全(仅限随机提供的交流适配器)•EN55103-1:电磁干扰(发射)•EN55103-2:电磁敏感度(不敏感性)本产品适用于以下电磁环境中:E1(住宅)、E2(商业及轻工业)、E3(市区户外)以及E4(受控EMC环境,如:电视演播室)。
可以在本摄像机中使用的磁带类型本摄像机能够以HDV、DVCAM和DV 格式进行录制。
以HDV/DV格式进行录制时,建议使用小型DV磁带。
以DVCAM格式进行录制时,建议使用小型DVCAM磁带。
带有磁带内存的小型DV磁带与本摄像机不兼容(第111页)。
HDV标准•可使用DV格式的磁带录制和播放数字高清晰(HD)视频信号。
•HDV信号以MPEG2格式进行压缩,BS (广播卫星)数字、陆地数字HDTV广播和蓝光光盘录像机中采用此格式。
可以在本摄像机中使用的“Memory Stick”类型您可以使用带有或标记的“Memory Stick Duo”(第115页)。
“Memory Stick Duo”(该尺寸可用于本摄像机。
)“Memory Stick”(无法在本摄像机中使用。
)b注意•无法使用“Memory Stick Duo”以外的任何其它类型的记忆卡。
•“Memory Stick PRO”和“Memory Stick PRO Duo”只能用于“Memory Stick PRO”兼容设备。
•切勿在“Memory Stick Duo”或Memory Stick Duo适配器上贴标签或类似物。
SONY HVR-HD1000C数字高清摄录一体机 说明书

记录指示灯
寻像器单元上装有大型、清晰的Photo LCD plus™ 监 视屏,可方便地观看拍摄场景
寻像器单元上装有一个大型、
可任意旋转的 2.7 英寸型液晶
屏,在使用 HVR-HD1000C 摄
录一体机在较低的位置,或 普通 LCD 屏 在三角架上进行拍摄时,可方
清晰的 LCD plus 屏
便地观看拍摄场景。导演和客户也可以通过它方便地审阅摄像师拍
摄的镜头。这个液晶屏使用 211,200 点的宽银幕 Clear Photo LCD
plus 装置,可提供合适的亮度和高等级的彩色还原。
摄像机控制环
HVR-HD1000C 的镜头部分上安装有一个 特殊的摄像机控制环。可将下列 任何一个功能指派至控制环上, 使用者就可方便地进行调整。
* 聚焦(默认) * 变焦 * 亮度 * 快门 * 视频:1/4~1/10000 秒 * 照片:1/4~1/500 秒 * AE(自动曝光)切换 * WB(白平衡)切换
带 T* 涂层
可以适应多种拍摄环境。T* 镜头涂层能够抑制多余的
反射光线,使画面再现真实的色彩,增加图像的专业
效果。
不带 T* 涂层
超级光学防抖系统
HVR-HD1000C 的 Super SteadyShot™ (光学) 图像防抖系统使用 移动光学镜头的方法, 在不损失图像质量的情 况下保持图像的稳定性。 镜头本身可以水平/垂直 转换,以便对偏振光轴 进行实时补偿。
肩扛式 HDV 数字高清摄录一体机
HVR-HD1000C
暂定版
为了满足用户对摄像设备的灵活性与专业性不断增长的需要,Sony 又推出了新型的肩扛式数字高清摄 录一体机 HVR-HD1000C。
HVR-HD1000C 数字高清摄录一体机采用了肩扛式设计,使用与其它专业摄录一体机同样的黑色磨砂 机身,非常适合于各具特色的事件拍摄,如婚礼仪式、企业活动与体育赛事等。
智能硬盘录像机NVR英文版操作说明书
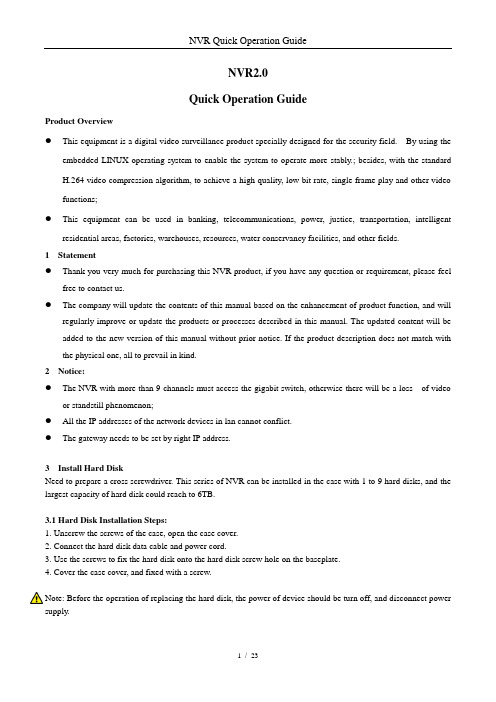
NVR2.0Quick Operation GuideProduct Overview●This equipment is a digital video surveillance product specially designed for the security field. By using theembedded LINUX operating system to enable the system to operate more stably.; besides, with the standardH.264 video compression algorithm, to achieve a high quality, low bit rate, single frame play and other videofunctions;●This equipment can be used in banking, telecommunications, power, justice, transportation, intelligentresidential areas, factories, warehouses, resources, water conservancy facilities, and other fields.1 Statement●Thank you very much for purchasing this NVR product, if you have any question or requirement, please feelfree to contact us.●The company will update the contents of this manual based on the enhancement of product function, and willregularly improve or update the products or processes described in this manual. The updated content will be added to the new version of this manual without prior notice. If the product description does not match with the physical one, all to prevail in kind.2 Notice:●The NVR with more than 9 channels must access the gigabit switch, otherwise there will be a loss of videoor standstill phenomenon;●All the IP addresses of the network devices in lan cannot conflict.●The gateway needs to be set by right IP address.3 Install Hard DiskNeed to prepare a cross screwdriver. This series of NVR can be installed in the case with 1 to 9 hard disks, and the largest capacity of hard disk could reach to 6TB.3.1 Hard Disk Installation Steps:1. Unscrew the screws of the case, open the case cover.2. Connect the hard disk data cable and power cord.3. Use the screws to fix the hard disk onto the hard disk screw hole on the baseplate.4. Cover the case cover, and fixed with a screw.Note: Before the operation of replacing the hard disk, the power of device should be turn off, and disconnect power supply.4.1 Host Operation4.1.1 Boot the hostInsert the power line, press the power switch on backboard, and then press the switch button on the front panel to boot the recorder. The video output is the default for the multi- image output mode. If the boot time be in the time of recording which preset before, the system will automatically start the timing recording function.Note: Please use the right power which matching the network digital video recorder, do not use the other type or brand of power instead of the original one.4.1.2 Login SystemAfter normal boot, click the icon, or click the right mouse button, there is a shortcut menu,Select Start - login.Input user name admin and initial password 888888 in the dialogue box.1. Login: click the "Login" button, the user can login; click the "Log out" button, can log out the current user.2. Restart: click the "R eboot" button, the device automatically restart;3. Shut down: click the "S hutdown" button, the device automatically shut down;4.1.3 ShutdownTo shutdown, press the power button of the rear panel to shutdown the device.Click [Start] than [Shutdown], choose [yes], and then turn off the power switch(the user should need to have Shutdown authority ).Tips: It is recommended to use this method when shutdown to prevent damage to equipment during power outages.4.2 Display Setup4.2.1Click the icon on the interface:1. Split screen mode settings: split the screen into1, 4, 9, 16, 25, 36 parts, oretc. Choose your choiceaccording to the number of NVR channels.2. Turning patrol interval settings: set theturning interval time; after switching split screen,click " Open Turning Patrol " and the previewscreens can automatically be showed turn by turnand turning pages for the rest channel images.4.2.2 PTZ4.2.2.1 PTZ Control1. PTZThe camera of PTZ could be controlled to move to 8 directions: up, down,left, right, upper left, upper right, upper right and lower right; magnificationand reduction of the times; enlargement and narrowing of the focal length;the enlargement of the aperture and the Narrow; tilt speed setting, lights, wipers, fan and other functions. As the figure shown on the right:2. Preset Position●Firstly, rotate the camera to the position that need set, and then doubleclick the corresponding No.●The blank area that besides the corresponding serial number couldbe set to be the name of preset position , click "Setting" , then it can be set successfully. If you need to change the preset position, you can move the camera directly to the desired location and click "Setting" button againto save, then the preset point will be updated, the max preset position number is limited by the camera.●Click the "Clear" button clear the preset position.●Select the serial number, click "Change to", camera will move to thecorresponding preset position.3. Cruise●Enter the cruise setting interface:●Double click the blank areas that beside the corresponding No. to select the preset point name, then click “Setting” and pop-up window, enter the cruise name, click "Add cruise", and select the preset point in the drop-down boxto set cruise speed and residence time, and the max cruise path number is determined by the camera. Select the cruise control point, click"Delete cruise", you can delete the added cruise point. After save the setting successfully, click "Call" can be turned on the cruise, click "Stop" canturn off cruise.4.3 PlaybackLeft click mouse, click [Playback] icon, enter the interface shown as below:●Channel Selection: select the channels that need to be playback, the image could be retrieved automatically, itwill be highlighted by blue color in the right side calendar bard.●Date Selection: select the date that needs to be playback, the background of the selected date becomes red, asin December 1, 2015●Playback Video: Click the date by mouse, it will appear the color bar of the 24 hours below the date. The colorbar will show in defferent color according to the different recording mode. Use the mouse roller to magnify and adjust the time unit scales on the 24 hours time axis. Degrees are: 2 hours, 1 hour, half an hour, 5 minutes,1 minute; when the mouse center point moves to the color bar of the time axis, it will automatically appearaccurate time prompt, accurate to second. Double click on the color bar of time axis can make playback play fastly. Adjust the scale according to the requiement of accuracy of playback, so that the playback time will be positioned more accurately.1. Pause / Play: pause / play the current playback screen.2. Stop: stop the current playback3. Forward/Backward: forward/backward play the current video4. Single Frame: Click one time, then play a frame.5. Forward Jump/Backward Jump: forward / backward to skip 30 seconds to play6. Slow-forward: slow playback speed (respectively: 1/2, 1/4, 1/8, 1/16 times).7. Fast-forward: to speed up the playback speed (respectively: 2, 4, 8, 16 times).8. Split Screen / Switch: adjust the playback preview screen (respectively: 1, 4, 6, 8, 9, 16 split screen for option),click on previous page, the next page, can do screen switch while doing multi-channels playback.9. Capture: you can take a snapshot of playback of any channel.10. Backup: you can do video backup for any channel playback, backup time can be accurate to seconds. See 7.3 [video backup]11. Mute / Adjustment: mute the playback audio, drag the bar to adjust the volume.4.4 File backupClick [file backup] icon by the left mouse button, and enter the interface as shown below:Insert USB external storage devices, click refresh can detect USB device. It supports I8 and A VI formats for the backup file, and AVI is recommended, as this format can check the backup file by using document management, and also can be played by computer player. Image backup can save the snapshot backup to mobile devices.●Precise backup: the backup time can be arbitrarily selected, the minimum back time can be one second video;file capacity can be viewed immediately;●Fast backup: high speed transmission, save backup time;●Accuracy backup: backup video files can be reviewed in NVR local document management folder, to ensurethe accuracy of the backup video.4.5 Channel Setting4.5.1Click [Channel Setting] icon by mouse left button to enter the interface shown as below:Click “Search ”,NVR will search out all the IPC in the same LAN, search time is about 10-15 seconds, all the IPC IP addresses will be listed, enter user name and password, click save after setting successfully and exit. Image will come out in 1-60 seconds.1. Click search to search out the IPC IP address in the same LAN;2. Double click the IP address in the A zone or select the IP address and click “Details”, it will show IPC networkparameter, some IP cameras have private protocol with NVR, which can amend IP address directly;3. B zone is IP cameras channel number setting area;4. C zone shows the detail information of IP camera, and some parameters can be amended in here, input camerauser name and password, save it after finishing setting.4.5.2.1Click Channel Setting→ Channel Parameter→ Display SettingA ZoneB ZoneC ZoneClick Channel Setting→Channel Parameter, choose channel, its preview image will come out1.Click Local Channel Name can define local channel’s name2.Click Show Channel Name can define channel’s name3.Click Show Time/Date can modify time and date format4.Click Image Setting →Setting button can adjust the parameter of channel interface such as brightness,contrast, saturation, chroma , click “Save”, then exit4.5.2.2 Click Channel Setting →Channel Parameter →Encoding Setting1. Encoding Setting: can choose main stream, sub streamMain Stream: double click single channel screen or 4ch split interface image is shown by main stream, playback image is shown by main stream alsoSub Stream: 9、16、25、36 channel split interface image is shown by sub stream, and IE or mobile app remote access image is shown by sub stream also.2.Stream Type: Composite Stream and Video Stream are for optional, when audio is needed please choose Composite Stream, or else there’s no audio when playback video.3. Resolution: NVR will get IP camera’s main、sub stream automatically, please manual adjust resolution when you are not satisfy with it4. Bit-rates’ Type: can set up variable bit rate and constant bit rate5. Bit-rates’ Upper Limit: after choosing encoding setting’s main stream bit rate upper limit, stream will in selected value, change will not too big6. Frame Rate: suggest selecting 25/307. Video Quality: suggest selecting highestWhen connect IP cameras with the same brand, set up No.1 channel, you may click “copy to” all channels, click “save” and exit.4.5.2.3 Click Channel Setting →Channel Parameter →Motion Detection1.Firstly, choose the channel need to be set and detect mode(Front-end detect and NVR local detect)2.Enable Motion Detection: tick the small squares in front of the enable motion detection3.Device Detect Area: Click Area Setting, enter the interface. Choose motion detect area, according to differentIPC, can set up different area number, usually is 4, hold the left mouse button, drag to motion detect area, hold right mouse button, can cancel the selectedmotion detect area, click Save.4.Sensitivity: set up motion detect sensitivity,Medium is suggested.5.Schedule Plan: Click Schedule Plan setting,enter below interface, anytime could be set,default setting is 7x24 hours.6.Linkage: Click Linkage, enter below interface●Linkage way introduction:●Audio Alarm: after ticked, when motion detection trigger the alarm, the buzzer on the main board will ring●Alarm on Monitor: after ticked, when motion detection trigger the alarm, screen right bottom will appear amovement state red people icon●Email Link age: the switch of email linkage, after ticked, please set up on Network Parameter → Emailparameter settingThe first three lines: email address, password, confirm password: add sender's email address and password, please click attachment, or email can't receive capture picture.Recipient: maximum support three recipientsSending Interval: capture picture sending time intervalSMTP Server、SMTP Port: Provided by mail service, please check sender's email setting, for example, email should input: , port: 25●Upload to Center: ticked, can check alarm information and action on client software and IE browser●Alarm Output: ticked, when motion detection trigger the alarm, alarm output will ring●Local Preview: ticked, when motion detection trigger the alarm, will trigger relevant channel preview●Local Record: ticked, when motion detection trigger the alarm, will trigger relevant channel record, please besure correspond to relevant channel, or will disorder the recording●Local Picture Capture: ticked, when motion detection triggers the alarm, will trigger relevant channel capturepicture7. Connect same model IPC on NVR, set up first channel, can click “Copy to” all channel, copy first channel’s setting to others channel, click “Save”, then exit.4.5.2.4 Click Channel Setting →Channel Parameter →Video Lost1. Choose the channel need to be set2. Enable Video Lost: ticked the small squares in front of the enable motion lost, schedule time and linkage pleaserefer to 4.5.2.3 setting3. Connect same model IPC to NVR, set up first channel, then can click “Copy to” all channels, it will copy first channel’s setting to other channels, click “Save”, then exit.4.5.2.5 Click Channel Setting →Channel Parameter →Mask Alarm1. Choose setting channel2. Enable Video Lost: tick the small squares in front of the enable video lost, adjust proper sensitivity, delimit mask area, when someone mask the delimit mask area intentionally, will trigger the alarm3. Schedule time and Linkage processing setting please refer to4.5.2.34. Connect same model IPC on NVR, set up first channel, can click Copy to all channel, copy first channel’s setting to other channels, click “Save”, then exit.4.5.2.6 Click Channel Setting →Channel Parameter →Video Tampering1. Choose setting channel, tick Enable Video Mask, set up mask area, click Save, then exit, can mask the delimitmask area, also can’t see the mask area in the recording file2. Connect same model IPC on NVR, s et up first channel, click “Copy to” all channel, copy first channel’s setting to other channels, click “Save”, then exit4.5.3 Click Channel Setting →Channel Connection →Record SettingClick Channel Setting icon, click Record Setting, default already set up Schedule Record, 24 hours record, can set up different time period record on each channel based on user demand, after set up can copy to other channels, click “Save”, then exit.4.5.4 Click Channel Setting → Channel Connection → Channel Grouping1. StructureDivide channels into groups, click add a new group and define its name, tick group in the B area, tick IPC channel in A area add them into group, multiple groups could be set up under structure, click “Save” after set up finished, then exit. Click Structure in real time preview, choose group, double click mouse left button can browse channel group.2. Preview TourDivide channels into groups, click add a new group and define its name, tick group in the B area tour, tick IPC channel in A area and add them into group, can set up multiple groups under tour , click “Save” after set up finished, then exit. Click Structure in real time preview, choose group, double click mouse left button can browse channel group. Set up all channel group, clickcan turn on TourB AreaA Area A AreaB Area4.5.5.1 Click Channel Setting →Intelligent Detection→Detection ModeAccording to IPC and NVR’s function, choose detection mode. IPC is front-end detection mode, NVR is local detection mode。
海康威视硬盘录像机说明书
第 3 页 共 98 页
海康威视网络硬盘录像机使用手册 V2.1
4.4 云台控制..................................................................................................................................................................................50 4.5 手动录像..................................................................................................................................................................................51 4.6 回放..........................................................................................................................................................................................51 4.7 录像资料备份..........................................................................................................................................................................54 5 参数设置 ...............................................................................................................................................................................................56 5.1 基本设置..................................................................................................................................................................................56
索尼HVR-HD1000U数字高清HDV摄像机说明说明书

/HDVHVR-HD1000UDigital High Definition HDVCamcorderA new camcorder has been created to meet the growing demand from users who are lookingfor mobility and professional appearance.The HVR-HD1000U features a shoulder-mount design and black matte body similar to that of professional camcorders; making it perfect for weddings,corporate communications,colleges, universities and sporting events where appearance makes a difference.Premium design characteristics and high-definition HDV TM1080i recording are the main features of this new one-piece shoulder camcorder,ideal for working videographers on a budget.A built-in down-converter creates DV material,perfect for standard DVD productions.Plus,a special still photo mode is ideal for producing DVD cases and making wedding photo albums. Whether you are recording weddings and corporate communications orhelping students make a documentary,the HVR-HD1000U is the bestchoice on the market today as an entry level professional camcorder.DV non-linear editing system,while retaining an HD master on the tape for future use.Furthermore,the HVR-HD1000U offers a DV recording mode (4:3 or 16:9*4),which canprovide a recording time of approximately 120 minutes in LP mode.*51/2.9-inch ClearVid CMOS Sensor TMThe next generation of Sony imaging sensor,the ClearVid CMOS Sensor used in the HVR-HD1000U camcorder,is quite unique and dif-ferent from current CMOS technology .The ClearVid CMOS Sensor uses a unique pixel layout rotated 45 degrees to provide high resolution and high sensitivity .This pixel layout technology is also used in higher end professional camcorders.The ClearVid CMOS Sensor,coupled with an Enhanced Imaging Processor TM(EIP),generates stunning images.Moreover,thanks to theCMOS technology ,bright objects do not cause vertical smear.Optical 10x zoom byCarl Zeiss Vario-Sonner T *TM lensThe HVR-HD1000U camcorder can adapt to a wide range of shooting situations and features aCarl Zeiss V ario-Sonner T *lens with 10x optical zoom,as featured on higher end professional HDV camcorders.The T *lens coating suppresses unwanted reflections and faithfully reproduces colors forprofessional-looking results.High-quality Imaging SystemSuper SteadyShot ®(Optical) Image StabilizerThe Super SteadyShot (Optical) feature of the HVR-HD1000U is an image stabilizer using an active optical lens method that functions without any deterioration in image quality .The lens itself shifts vertically and horizontally to compensate for the polarized light axis inreal time.HD can be Recorded on DigitalMasterprofessional tape as well as consumer MiniDV .Video and television technology,as well as viewer preferences,are moving from standard definition(SD) to high definition (HD) - just like black and white television moved to color in the past.HD has almost twice the number of scanning lines available than SD.This means you can see much sharper detail and finer image quality when your work is viewed on a HD display monitor.The HVR-HD1000U adopts the HDV format for HD recording.The HDV format allows you to shoot approximate 63 minutes of HD video on a miniDV cassette tape*1.There are two standards of HDV format.One is HDV720p and the other is HDV1080i,which has 1,080 scanning lines and is used by most broadcasters already using HD.Sony has adopted the HDV1080i standard for all its HDV products.*2*1 When the PHDVM-63DM DigitalMaster mini cassette tape is used.The PHDVM-63DM is Sony’s recommended tape for HDV recording.The recording data rate of HDV 1080i format is almost the same as that of DV format.*2 This brochure refers to the HDV1080i specification as the HDV format.Full Compatibility with your Current DV SystemThe HVR-HD1000U offers benefits for SD productions,as well as HD.It is easy to use HDV recordings for your current DV editing work.The HVR-HD1000U has a down-conversion feature that outputsconverted DV signals through the i.LINK connector*3to your current*3 i.LINK is a trademark of Sony used only to designate that a product contains an IEEE 1394 connector.Not all products with an i.LINK connector will necessarily communicate with each other.For information on compatibility ,operating conditions,and proper connection,pleaserefer to the documentation supplied with any device with an i.LINK connector.For information on devices that include an i.LINK connection,please contact your nearest Sony office.*4 Squeezed recording.*5 When a DVM80PRL standard miniDV cassette tape is used.If you record in LP mode,pictures may appear mosaic-like or sound may be interrupted when you play back the tape on other camcorders or VCRs.*6 Letter box mode is not available from the i.LINK connector.HDV - the Accessible HD Recording FormatHVR-DR60 Brings HDV to IT WorkflowsThe optional external HVR-DR60 Hard Disk Recording Unit gives you a hybrid operation,where video and audio are recorded simultaneously to hard disk drive (HDD) and tape.The HDV or DV images are recorded as movie files in the HDD for quick nonlinear editing,enabling theoperator to archive the source tape as soon as the shoot is finished.Picture QualitySqueezeLetter Box*Edge CropHVR-DR60(Hard Disk Recording Unit)with T *coatingwithout T *coating ClearVid CMOS SensorVertical smear3Ergonomically Designed HandleThe ergonomically designed handle of the HVR-HD1000U camcorder contains a convenient record button and zoom control,essential for low position shooting.There are two cold shoes on the front and rear of the handle.You can attach two accessories like the HVL-LBP Battery Video Light and HVR-DR60 Hard DiskRecording Unit.Shoulder-mount designThe HVR-HD1000U is lightweight and easy to use even for beginners,it provides a professional camcorder shoulder-mount design allows for easy balance and stable operation.Rec indicator lightAdjustable shoulder pad• Memory Stick Duo slot • USB connector• LANC connector• Headphone jackProfessional DesignWide Clear Photo LCD plus TM Monitor onfreely rotating 2.7-inch*This also makes it easy for a director or The LCD uses 211,200Camera Control Ringis located on the lens unit of Any one of the following functions can be assigned to the ring for easy adjustment:* Focus (default)* Zoom * Brightness* Shutter* Video: 1/4~1/10000 sec.* Photo: 1/4~1/500 sec.* AE Shift * WB Shift4Conventional LCD deviceClear Photo LCD plusStereo shotgun microphone (stereo mini plug)Video/Audio output connectors123,200 dots Color EVF*viewable area measured diagonallyPhoto ModeIn Photo mode of the HVR-HD1000U camcorder,you can take 6.1-megapixel,2848 x 2136-quality ,4:3-aspect images.Capturing from recorded videoIn case you missed the perfect timing for your still photo while videotaping,you can capture and save still frames from recorded video by just pressing the photo button of the HVR-HD1000U camcorder during playback.HDV footage will give you a 1.2-megapixel,1440 x 810 pixel still image of that magic moment.Diverse Range of Photo-creation FunctionsWhile the HVR-HD1000U doesn’t contain all the features you’d find in a higher end professional camcorders,such as DVCAM recording/playback,XLR audio connectors,and TC preset menu,it does boast a diverse range of photo-creation functions.These photo-creation functions are available at the touch of a button.You can store high-quality still images on Memory Stick Duo TM media*8,and then use them to design DVD cases,website content,news,etc.*8 Memory Stick Duo media is not supplied.Dual RecYou can take 4.6-megapixel (16:9-aspect) photos while you are shooting HDV video simply by pressing the photo button.Long Operating Time With infoLITHIUM TM L Series BatteryThe HVR-HD1000U camcorder uses standard infoLITHIUM L series batteries,like the DSR-PD170,HVR-Z1U,and HVR-V1U.With the NP-F970,amaximum operating time of approximately 10 hours can be achieved thanks to the power management system and low power consumption of the ClearVid CMOS Sensor.Smooth Slow RecThe Smooth Slow Rec function of the HVR-HD1000U camcorder enables slow-motion playback by capturing images at four times faster than the normal field rate (240 fields/s).In this mode,Other FeaturesSuper NightShot FunctionThe Super NightShot function of theHVR-HD1000U camcorderuses a built-in infrared light emitter that allows you to record an object in zero lux light levels.It also enables night-time monitoring and surveillance .quad-speed images are captured for three seconds,stored in the built-in buffer memory,and then recorded to tape (in either HDV or DV format) as slow-motion pictures lasting 12 seconds.*7*7 When using this function,the resolution of the camera image is decreased.Sounds can not be recorded while shooting in this mode.5OFFONNP-F970 (optional)Memory Stick DuoPhoto AlbumDVD/Tape3A LANC remote controller0.7x wide conversion lensPHDVM-63DMProfessional Tape for HDV,NP-F570/770/970 infoLITHIUM L seriesVMC-IL4408A/ VMC-IL4615/4635i.LINK cableVCL-HG1737C1.7x tele conversion lens。
HVR产品说明书
DVR NVR HVR产品使用说明书安装操作手册注意事项:请勿将重物至于本设备上;请勿让任何固体或液体,掉入或渗入设备内;请定期用刷子对电路板、接插件、机箱风机、机箱等进行除尘,在进行机体清洁工作前,请关闭电源并拔掉电源;请勿自行对本设备进行拆卸、维修或更换零件。
使用环境:请在0℃~40℃的温度下放置和使用本产品,避免阳光直射,或靠近热源;请勿将本设备安装在潮湿的环境;请勿将本设备暴露在多烟、多尘的环境;避免强烈的碰撞,请勿摔落机器;请保持本产品的水平安装,安装在稳定的场所,注意防止本产品坠落;请安装在通风良好的场所,切勿堵塞本产品的通风口;仅可在额定输入输出范围内使用。
目录第一章产品介绍 (5)1.1 产品概述 (5)1.2 产品主要功能 (5)第二章开箱检查和线缆连接 (7)2.1 开箱检查 (7)2.2 硬盘安装 (7)2.3 在机架中安装 (8)2.4 前面板 (8)2.5 后面板 (8)2.6 音视频输入输出连接 (9)2.6.1 视频输入的连接 (9)2.6.2 视频输出设备的选择和连接 (9)2.6.3 音频信号的输入 (9)2.6.4 音频输出 (10)2.7 报警输入输出连接 (10)2.7.1 报警输入端口说明 (11)2.7.2 报警输出端口说明 (11)2.7.3 报警输出端继电器参数 (11)2.8 球机连接 (12)第三章基本操作 (13)3.1 开机 (13)3.2 关机 (14)3.3 登录 (14)3.4 预览 (15)3.5 桌面快捷菜单 (15)3.5.1 主菜单 (15)3.5.2 录像回放 (16)3.5.3 录像控制 (17)3.5.4 报警输出 (18)3.5.5 云台控制 (18)3.5.6 图像颜色 (24)3.5.7 输出调节 (24)3.5.8 关闭系统 (25)3.5.9 页面切换 (25)第四章主菜单 (26)4.1 主菜单导航 (26)4.2 录像功能 (28)4.2.1 录像设置 (28)4.2.2 图片存储 (29)4.2.3录像回放 (30)4.2.4 录像备份 (30)4.3 报警功能 (32)4.3.1 移动侦测 (32)4.3.2 视频遮挡 (35)4.3.3 视频丢失 (36)4.3.4 报警输入 (38)4.3.5 报警输出 (39)4.3.6 异常处理 (39)4.4 系统设置 (39)4.4.1 普通设置 (40)4.4.2 编码设置 (41)4.4.3 网络设置 (43)4.4.4 网络服务 (44)4.4.5 输出模式 (51)4.4.6 云台设置/RS485设备 (53)4.4.7 串口设置 (55)4.4.8 轮巡设置 (55)4.4.9 通道管理 (56)4.5 管理工具 (61)4.5.1 硬盘管理 (61)4.5.2 用户管理 (62)4.5.3 在线用户 (65)4.5.4 输出调节 (66)4.5.5 自动维护 (66)4.5.6 恢复默认 (66)4.5.7 系统升级 (67)4.5.8 设备信息 (67)4.6 系统信息 (68)4.6.1 硬盘信息 (68)4.6.2 码流统计 (68)4.6.3 日志信息 (69)4.6.4 版本信息 (70)4.7 关闭系统 (71)第五章常见问题解答及使用维护 (72)5.1 常见问题解答 (72)5.2 使用维护 (78)附录1.遥控器操作 (79)附录2.鼠标操作 (80)附录3.硬盘的容量计算 (81)附录4.技术参数...................................................................................................................... 错误!未定义书签。
SONIC HVR-M35C HVR-M25AC HVR-M15AC高清晰度数字磁带录像机 说明书

高清晰度数字磁带录像机HVR-M35C HVR-M25AC HVR-M15AC3HDV 1080i 技术规范HDV 格式的HDV 1080i 技术规范*2,包括1,080行有效扫描线(隔行扫描系统),和1,440水平像素。
它采用MPEG-2压缩格式(视频用MP@H-14),8比特数字分量记录,采样率为4:2:0。
HDV 1080i 规范可提供高质量图像,能够使用在高清电视界面制作中。
在HDV 格式中,逐行记录格式也可以被定义为HDV 1080i 规格中的其中一种。
在这种称为HDV 真正逐行的格式中,1080p 图像以24、25或30帧/秒的形式被记录下来。
HVR-M35C/M25AC/M15AC 可让使用者重放使用摄录一体机记录的,具有这种格式的1080p 图像,也可以通过i.LINK 输入进行记录1080p 图像。
HDV 格式HDV 1080i 技术规格的记录模式HVR-M35C, HVR-M25AC 和HVR-M15AC 录像机性能兼容现有DVCAM 磁带和新型的DV 磁带作为现有DV 格式家族的成员,HDV 格式在开发伊始就以兼容所有级别的DV 磁带作为标准。
这使得操作者可以在需要高质量的应用中使用高级别的磁带,或在力求经济的应用中使用家用级磁带。
针对高质量应用,Sony 开发了DigitalMaster TM 高级磁带,它可以兼容包括HDV 、DVCAM 和DV 在内的多种格式。
长时间记录HDV 格式采用与DV 格式相同的磁迹间距和带速,从而可以提供相同的记录时间—DigitalMaster 标准磁带记录时长达到276分钟,DigitalMaster 小型磁带记录时长为63分钟。
可切换录制和重放-HDV1080i/DVCAM/DV SP 及60i/50iHVR-M35C/M25AC/M15AC 可支持HDV 1080i 、DVCAM 格式及DV*记录,并可以根据您的制作需要,在标清或高清记录时提供充分的灵活性。
数字硬盘录像机使用说明书

数字硬盘录像机使用说明书数字硬盘录像机使用说明书一、开机与关机1、开机插上电源线,按下后面板的电源开关,电源指示灯亮,录像机开机,开机后视频输出默认为多画面输出模式,若开机启动时间再录像设定时间内,系统将自动启动定时录像功能,相应通道录像指示灯亮。
2、进入系统菜单正常开机后,按Enter确认键(或单击鼠标左键)弹出登录对话框,用户在输入框中输入用户名和密码。
出厂时有4个用户admin,888888,666666及隐藏的default,前三个出厂密码与用户名相同。
admin,888888出厂时默认属于高权限用户,而666666出厂默认属于低权限用户,仅有监视、回放、备份等权限。
(为安全起见请及时更改默认密码)3、关机A进入【主菜单】>【关闭系统】中选择【关闭机器】(关机时建议使用此方法,以避免意外断电时对DVR造成的损害。
)B 关机时,按下后面板的电源开关即可关闭电源。
4、断电回复当录像机处于录像、定时录像、报警录像工作状态下,若系统电源被切断或被强行关机,重新来电后,录像机将自动保存断电前的录像,并且自动恢复到断电前的工作状态继续工作。
5、更换硬盘摄像机纽扣电池更换硬盘摄像机的纽扣电池建议选用相同型号的电池。
定期检查系统时间,一般每年更换一次电池以保证系统时间的准确性。
二、录像操作1、预览设备正常登陆后,直接进入预览画面。
在每个预览画面上有叠加的日期、时间、通道名称,屏幕下方有一行表示每个通道的录像及报警状态图标。
2、手动录像提示:手动录像要求用户具有“录像操作权”,在进行这项操作前请确认硬盘录像机内已经安装且已经正确格式化硬盘。
2.1进入手动录像操作界面单击鼠标右键或在【主菜单】>【高级选项】>【录像控制】中可进入手动录像操作界面。
在预览模式下按前面板【录像/●】兼或遥控器上的【录像】键可进入手动录像操作界面。
2.2开启/关闭某个或某些通道要开启/关闭某个通道的录像,首先查看该通道录像状态。
- 1、下载文档前请自行甄别文档内容的完整性,平台不提供额外的编辑、内容补充、找答案等附加服务。
- 2、"仅部分预览"的文档,不可在线预览部分如存在完整性等问题,可反馈申请退款(可完整预览的文档不适用该条件!)。
- 3、如文档侵犯您的权益,请联系客服反馈,我们会尽快为您处理(人工客服工作时间:9:00-18:30)。
4.4.9 Digital Manager
Channel manage including : Digital channel, Channel status, Channel mode:
Digital Channels:
【Channel】select channel title;
【Enable】Open digital channel, tick enable, then can do related settings;【Time Synchronization】Tick it means the time of this channel and device is the same.
【Connection Mode】can be singe connect or multi-ink, multi-link modes can connect to several devices, device will be tour displayed one by one, tour interval can be set, no less then 10s;
【Delete】If the user want to change device, select the existing device, click delete will be ok.
【Add】click add will come out below page to add new device:
【Configur Name】device is with default config title, user can revise it as you like;
【Device Type】3types: IPC、DVR、HVR,user can choose as what you like, default is IPC;
【Protocol】Default is TCP
【Remote access】User can input remote channel title from the device that you
want to connect remotely;
【Stream】Default is main stream, do not support extra-stream at present;【Device address】IP address of device.
【Port】Default is 34567;
【User name】Default is admin
Remark: click 【search】will show all the devices that searched out, user can choose any of the device that you like.
Channel Status:
Channel status is to show the status of all the digital channel, including Max Resolution, This Resulution, Connection Status.
For example: The channel status for 4+2 mode is as below:
Below page shows: channel D01 connected with device, and it was online. Channel D02 & D03 connected with devices but offline, channel D04 with NO device connected.
Below page means: Under all digital channel mode, only one channel with device connected but not online.
Remark: when This Resolution is over Max Resolution, when preview it, will show a red X, as beow:
Under all digital channel mode, Max resolution of channel 3 is D1, if it was connected to
a device with resolution over D1 ( such as 960H), you will see below pic:
Channel Type:
can shift the mode as they like.。