Toshiba 话机操作手册
SEMP 简易中文操作说明

SEMP TOSHIBA简易中文操作说明电话机的安装位置:电话机的通话质量与周围环境有很大的关系。
由于电话机的主、手机之间的信号是直线传播的,夹在主、手机之间的障碍物将会直接导致通话质量的下降,缩短通话的距离。
主机周围的金属柜和金属墙面对电话机也会产生影响。
另外,主机的摆放位置还应尽量远离其他电器设备,如电视机,DVD,电脑,音箱,微波炉以及其他的电话机等,以免产生干扰和杂音。
模拟信号的电话,环境对电话的影响会更加明显。
准备工作:接线:主机插上电话线和适配器(又叫做变压器、充电器、火牛),手机装好电池,充好电。
(新电池第一次使用请连续充电12小时以上)注:适配器是为主机提供工作电源,要一直插在主机上,不能断电,断电后无绳电话机将不能使用。
如果以后要更换新的电池,注意电池的正负极不能接反,否则可能损坏话机。
对码:使用前,主、手机要先对码,只有对码成功,主、手机之间才能实现无线连接。
操作:将装好电池的手机放在主机上,放上的瞬间,主机灯变亮,同时手机发出一声“哔”的声音,说明对码成功。
如果手机没有“哔”的声音发出,说明对码没成功,需重复以上操作。
如果多次重复对码都不成功,就将主机适配器拔下,手机上的电池取下,稍后重新连接适配器,装上电池。
再继续对码操作。
使用操作:音频拨号:待机状态下,持续按住FLASH/PROG键两秒,手机上的红灯闪亮,再按*键。
(话机默认的拨号方式是音频拨号)脉冲拨号:待机状态下,持续按住FLASH/PROG键两秒,手机上的红灯闪亮,再按#键。
(注意:现国内已基本淘汰脉冲拨号方式,如果设为此方式,可能拨不出电话)拨打电话:在手机非充电状态下,先按手机的TALK键(按下之后,手机、主机亮红灯,手机听筒内有“嗡嗡~~”信号音),然后拨号,拨号完成之后,号码即自动拨出。
通话完毕,按TALK键挂断。
接听电话:来电时,手机响铃,如果手机放在主机上充电,提机即自动接通;如果手机不在充电,按手机上的TALK键接听。
东芝CV180调试手册

外,外人不得入内。要确实进行锁门管理非清莫入。主要是为了防止误动作或开玩笑 等造成系统的异常。
4
12)在超出规格书上记载的周围环境条件等状态下,禁止进行作业。 13)在进行其他个别作业施工时,请遵守其他使用说明书上记载的禁止事项·注意事项。
3)在交换零部件之际,禁止纯正部件以外的使用。必须使用指定用品。 4)在电梯控制盘方面,对于使用于调整保养的必要开关部以外的盘内部件,由于电源处于投
入状态,因此禁止任意接触。有触电的危险。 5)禁止没有检查资格者(持有建筑基准法上规定的检查资格的人员,或者接受了指导具有同
等机能的人员)的人员进行维修保养·调整作业。 6)禁止带电作业。
[本体警告表示标签的确认]
在指定处(参考别的使用说明书[使用操作时的注意事项 (6E1M0969)]) 请确认本体警告 标签的贴付。
如果,标签遗失,由于污损而看不清楚时,请向本公司售后服务部门联系。
3
一般禁止·注意事项
为了维护制品·利用者·作业者的安全性,将作业时的注意事项例举于以下。请掌握和 遵守其内容。
使用说明书体系图
控制系统操作时的注意事项
系统调整程序
: 6E6MA000
试运转程序
ቤተ መጻሕፍቲ ባይዱ
: 6E6M001
高速运转程序
: 6E6MA002
乘感调整程序书
: 6E6MA003
故障判断
: 6E6MA004
调整保养指示书
: 6E6MA005
2
安全上的注意事项
为了防止对管理和使用者及他人造成危害和财产的损害与未然,安全正确地使用商品。 在装置的本体以及其使用说明书上,记载有重要的内容。请将以下内容(表示·图记号)充分 理解后,再阅读本文,并遵守其记载事项。
TOSHIBA E 中文手册
★在使用本产品之前请务必认真阅读本资料中的"操作及安全方面的注意事项"。
★本资料中所记载的技术信息仅用于说明产品代表性的动作、应用,而并非是使用时本公司及第三方的工业所有权及其他权利的保证或实施权的许诺。
★记载内容可能在不事先通知的情况下进行更改,使用时请向东芝电子管器件株式会社咨询。
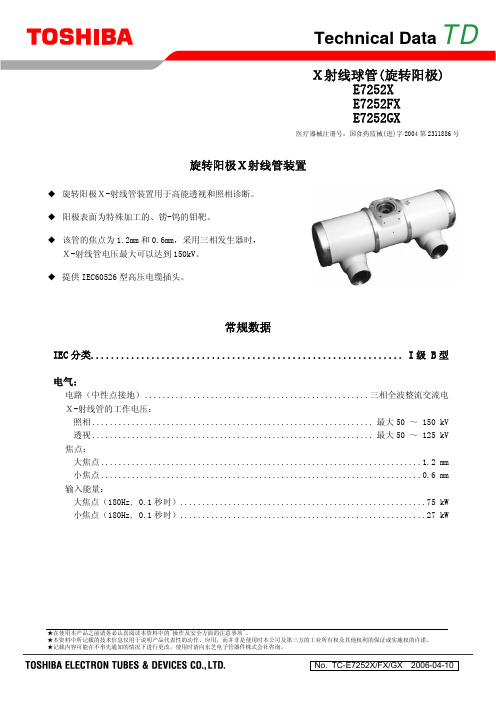
Technical Data TD旋转阳极X射线管装置◆ 旋转阳极X-射线管装置用于高能透视和照相诊断。
◆ 阳极表面为特殊加工的、铹-钨的钼靶。
◆ 该管的焦点为1.2mm 和0.6mm,采用三相发生器时,X-射线管电压最大可以达到150kV。
◆ 提供IEC60526型高压电缆插头。
常规数据IEC 分类..............................................................I 级 B 型电气:电路(中性点接地)...................................................三相全波整流交流电 X-射线管的工作电压:照相................................................................最大50 ~ 150 kV透视................................................................最大50 ~ 125 kV 焦点:大焦点.........................................................................1.2 mm 小焦点.........................................................................0.6 mm 输入能量:大焦点(180Hz, 0.1秒时)........................................................75 kW 小焦点(180Hz, 0.1秒时)........................................................27 kWX射线球管(旋转阳极)E7252X E7252FX E7252GX医疗器械注册号:国食药监械(进)字2004第2311886号E7252X, E7252FX, E7252GX发动机额定值:XS-AL状态 起动 运行电源 (Hz) 180 2)60 180 2)60输入功率 (W) 1100 910 83 83电压 (V) 220 130 60 40电流 (A) 5.7 7.8 1.6 2.3最小增速 1)(s) 1.2 0.8 - -电容器 (μF) 6 44 6 44最小制动时间 2)(s) 3 / 90 V (DC)定子阻抗公共端-主线圈之间的电阻值..................................................... 9.4 Ω 公共端-辅助线圈之间的电阻值...................................................28.3 ΩXS-R状态 起动 运行电源 (Hz) 180 3)50/60 180 3)50/60输入功率 (W) 2300 1450 300 80电压 (V) 460 240 130 58电流 (A) 5.4 6.5 2.0 1.5最小增速1)(s) 1.0 0.6 - -电容器 (μF) 3 24 3 24最小制动时间 2)(s) 1.5 / 90 V (DC) 3)定子阻抗公共端-主线圈之间的电阻值.................................................... 27.5 Ω 公共端-辅助线圈之间的电阻值...................................................58.0 Ω注: 1)从每分钟3000min-1(3600 min-1)的普通转速到每分钟10800转的高转速,提速时间 为所载提速时间(从0到高速)的2/3,其内容已在马达规格中载明。
东芝Strata CT系统安装开通必备资料

东芝Strata CT数字电话系统安装调试基本培训目录:1系统基本编程项目2 Strata CT长途限制(TR)3 VM语音信箱的设定4 Strata CT LCR 最经济路由5 Strata CT新增功能介绍6 帐码功能的设定7专线编程8 ISDN 编程1、系统基本编程项目系统初始化将CPU上面的后备电池跳线跳至ON的位置、注意两个CPU板(包括A板和B板都要将电池备份开关跳到ON状态,否则一旦关机数据将全部没了!注意!(1)首次安装系统时,对于所有的初始化程序必须使用密码3625,此后则应在00-1或00-2中分配密码,系统密码(1级和2级)始终默认为0000,无论程序01-1和00-2的设置如何,始终可以使用工程师密码3625进入编程模式。
(2)进入软件编程模式,在话机的休闲状态下,在键盘上按*#*#1*2*3输入[spkr] + 4 位安全码(3625)+ [hold]初始状态的密码为0000[spkr] + 91 + [hold][spkr] + 9 key1,3,5,7,9 灯点亮[hold],(91-9全部初始化须重复执行两遍!)(3)然后在程序03中定义RRCS音频寄发器通道数,注意RRCS是插在001槽上,如果是12路的RRCS则输入94,输完按HOLD确认,并关机15秒方可,完了以后才能音频发号。
(4)如果系统已经安装完了,只是需要增加板块,则只要按以下编程即可:91-1-key1,key2(5)统在005端口(因为第一端口编号是000故005端口实际上是第六套电路其分机号码为205,接线为水晶头的中间两芯)编程编程槽位:101 or 102( 如果 101 槽安装了 RSIU) DKU编程的方法:设定数据的不同方法:在每个程序的步骤3(图1-2)中输入数据时,可使用两种不同的方法:按拨号键盘上的按钮,或者按LED 按钮。
许多程序是多维的,需要用到这两种输入方法。
简单程序:如程序00 之类的简单程序,只需要通过拨号键盘指定数据。
东芝CIX40电话系统用户指南说明书

(in order of appearance)Overview of the DP5000 Series Telephone Auto-Attendant (AA) and Voicemail (VM) ProgrammingCONFIDENTIALTie National, LLC2V olume ControlR ing Tone Volume:When phone is idle and handset is on-hook, press and hold Volume Up or Volume Down .H andset Volume:During a call, press and hold Volume Up or Volume Down . Volume will return to default when the call is hung up.S peaker Volume:Press Speaker , pressand hold Volume Up or VolumeDown to adjust levels. Press Speaker to exit.(Ask your carrier for local and long distance dialing patterns.)External Call•Lift handset and dial 9 + 1 + area code + telephone number .Internal Call•Lift handset and dial the 3-digit extension.Immediately dial the external orinternal call without lifting the handset fi rst.• Calls can be moved to handset bypicking up the handset.• Calls can be moved from handsetto Speaker by pressing Speaker while on the call and replacing the handset.To hang up, either return thehandset onto the receiver, or when in speakerphone mode, simply press Speaker once more while the handset is in the cradle.H old:1. While on a call, press Hold .2.To return to the call, press the held line’s (fl ashing) button from any phone.E xclusive Hold:1. While on a call, press Hold twice.2. To return to the call, press the held line’s (fl ashing) buttonfrom the phone set that put the call on Exclusive Hold.Microphone/Mute Button:The Microphone/Mute button toggles between Microphone and Mute.• When lit, the microphone is enabled. • When off, the microphone is disabled(muted).Speaker(under handset)HandsetMessage Waiting Button Microphone/Mute ButtonSpeaker ButtonVolume Control LCD DisplaySoft KeysTilt Stand Speed Dial Button Redial ButtonConference/TransferButton Hold Button Status LED Key strip(labels may vary)Programmed Feature Buttons MicrophoneA B CD E F G H I J K L M N O P Q D ialing:Speaker Phone:E nding the Call:all:H oldM aking a CallM icrophone/Muteton:T elephone LayoutL egendCONFIDENTIALTie National, LLC3S toring a Speed Dial Number:1. Press #66.2. Enter the 3 digit SpeedDial number to assign to the telephone number • 200-999 for systemwide speed dial,• 100-139 for personalspeed dial use.3. Dial 9 + 1 + area code+ telephone number of telephone number to save to speed dial.4. Press # to save.(System wide speed dial must be programmed from extension 200.)C alling Using Speed Dial:1. Lift handset.2. Press Spdial .3. Enter the assigned 3-digitSpeed Dial number.R etrieving MessagesRetrieving Messages:When blinking, a new voicemail message is waiting.• Press the Messages button to retrieve the voicemailand follow the prompts.(Standard arrangement will blink extensions 200, 201, 202, and 206 for messages left in the General Mailbox.)To access voicemail when the Messages button is not lit:• Dial access code 250 and follow the prompts.R etrieving Message Remotely:1. Call the main telephone number.2. If the call is answered by someone on site, ask to betransferred to extension 250.3. When greetings begin press * and the mailboxnumber then #.4. Enter the Security Code then #.(The default security code is 997)5. Follow the prompts.S peedDialRetrieving Messages Remotely The default Security Code is 997.Tie National, LLC recommends that you change this to protect your privacy.Setting Time and DateS etting the Time:The telephone set uses HHMMSS format in Military Time (for example, 8:10 AM would be referenced as 081000 versus 8:10 PM, which would refl ect 201000).1. Press #652.2. Enter the HHMMSS followed by # to save.3. Press the Speaker button to disconnect.S etting the Date:The telephone set uses YYMMDD format (for example January 02, 2013 would be refl ected as 130102).1. Press #651.2. Enter the YYMMDD followed by # to save.3. Press the Speaker button to disconnect.C onference/TransferC onference/Transfer:1. While on a call, press Cnf/Trn then dial theextension to transfer the call to and hang up. The call will be transferred.(When transferring to an external telephone number: • two lines will be tied up: the outbound call and theincoming call,• the call must connect prior to hanging up for thetransfer,• to dial an external number, follow the dialing patternshown under Making a Call on page 2.)2. To announce the call, wait for the receiving partyto answer the phone, and introduce the call prior to hanging up.3. To conference all parties together, press Cnf/Trninstead of hanging up.Please note that Time and Date must be changed from extension 200.CONFIDENTIALTie National, LLC4C aller ID History:1. Press the Caller ID Historybutton2. Use Volume Up to view the nextrecord and Volume Down to view the previous record.3. To end the history view, press theCaller ID History button again.Missed call history is available only from extension 200 however connected calls can be viewed from the extension that received the call.Codes:ANS - Answered RED - Redirected ABN - AbandonedD o Not Disturb (DND):Available only if the DND button is programmed on the telephone.•Press the DND button to turn on/off functionality.All incoming calls to this phone will be routed to voicemail.D ay Mode:Press Day/Night and then the number1 from the keypad. The Status LED will shut off.B usy Mode:Press Day/Night and then the number 2 from the keypad. The Status LED will blink.N ight Mode:Press Day/Night and then the number 3 from the keypad. The Status LED will remain lit.Programmed features are labeled on the key strip. See an Example key strip on the Telephone Layout image on page 2.B ox Directory :Each 3-digit number represents the AA or VM Box number assigned.Voicemail (VM) -• 200, General Delivery.•203, First Manager.205, Second Manager.Auto-Attendant (AA) -• 901, Location/Directions.• 902, Hours.• 791, Busy Mode.• 991, Day Mode. •891, Night Mode.Steps to record AA and VM Box Greetings:1. Lift handset and dial 250.2. Bypass the security code prompt by pressing #.3. When the message begins, press *.4.Enter the AA Box or VM Box number when prompted for the User ID for the message to be recorded followed by #.5. Enter your Security Code .(The default security code is 997)6. Press 3 to Manage the user mailbox.7. Press 1 for Greetings.8. Press 1 for Greeting One.♒9. Press 2 to begin Recording.10. Press # to Stop Recording.11. Press 9 to save the Recording.♒ To set up the main recorded greetings, select 1 for Greeting One on each mailbox. Alternate greetings can also be recorded. Contact our Help Desk for Assistance.Skip this step if recording from extension 204 or 207M odesC aller ID HistoryD o Not Disturb (DND)B ox DirectorySteps to Record AA and VM Box GreetingsSee Call Flows to view the effect of each mode within the Voicemail Programming.CONFIDENTIALTie National, LLC5P re-Recorded AA and VM Box Greetings Voicemail (VM) -• 200, General Delivery“You have reached the general delivery mailbox. Please record your name, phone number and a brief message and one of our representatives will contact you as soon as possible. Thank you and have a great day.”• 203, First Manager / 205, Second Manager“The party you are trying to reach is not available. Please leave a detailed message for a returned call. Thank you.”prior to this date, please contact our Help Desk if you should require a call fl ow for your programming.Some locations may have selected slight variations or customization of the programming and may not match exactly what is shown here. For questions as to how a specifi c location is programmed, please contact TIE’s Help Desk.G reeting Call Flows Overview The following pages refl ect the most recent programming with the respective implementation date. If your installation was Greeting Call Flows for Installations as of February 10, 2014P ackage A.3:Rings the incoming ring group before entering into the call fl ow and hearing the greetings for the shown AA or VM boxes.P ackage B.3:Incoming calls are automatically received by the recorded auto-attendant greetings for the shown AA or VM boxes. Pressing 0 or remaining on the line will send callers to the incoming ring group.P ackage C.3:All calls will ring incoming ring group. No auto-attendant or voicemail.P re-Recorded AA and VM Box Greetings Provided on Initial Install:Each 3-digit number represents the AA or VM Box number assigned.♦ Recording will refl ect the action of the programmed Greeting Call Flow Package.Default Incoming Ring Group (can be changed upon request): Rings extensions 200, 201, 202 and 206. After 12 seconds, these are joined by extensions 203 and 205.Auto-Attendant (AA) - • 901, Location/Directions“Location information has not yet been recorded. Please hold to be reconnected with our main menu.”• 902, Hours“Hours of operation have not yet been recorded. Please hold to be reconnected with our main menu.”• 791, Busy Mode“Thank you for calling. We are experiencing a high call volume right now. Please dial 0 or stay on the line to leave a message. Press 1 to hear our location. Press 2 to hear our hours or press 3 to be connected with a manager. Thank you and have a great day.• 991, Day Mode“Thank you for calling. Please listen carefully to the following options. Please press 0 or stay on the line to (leave a message for a representative/speak to a live representative)♦. Please press 1 to hear our location, press 2 for our hours of operation, or press 3 to speak with a manager. Thank you and have a great day.”• 891, Night Mode“Thank you for calling. We are currently closed. Please dial 0 or stay on the line to leave a message. Please press 1 for our location, press 2 to hear our hours, or press 3 to leave a message for a manager. Thank you and have a great day.”CONFIDENTIALTie National, LLC6.3G reeting Call Flow: Package A.3*Unanswered is equivalent to 16 seconds, or approximately 4 rings.The shown call fl ow refl ects what the calling party can expect to hear upon calling into the main telephone number.CONFIDENTIALTie National, LLC7B.3*Unanswered is equivalent to 16 seconds, or approximately 4 rings.The shown call fl ow refl ects what the calling party can expect to hear upon calling into the main telephone number.CONFIDENTIALTie National, LLC8C .3Please visit our website for User Guides, Videos, and to register for our Product Training Webinars.Please contact our Help Desk is you need any assistance.Tie National, LLC 630.301.7444C ontact UsYour Nationwide Technology Partner。
东芝2006基本操作手册
前言 1
商标
y Windows XP 的官方名称是 Microsoft Windows XP 操作系统。 y Windows Vista 的官方名称是 Microsoft Windows Vista 操作系统。 y Windows 7 的官方名称是 Microsoft Windows 7 操作系统。 y Windows 8 的官方名称是 Microsoft Windows 8 操作系统。 y Windows Server 2003 的官方名称是 Microsoft Windows Server 2003 操作系统。 y Windows Server 2003 R2 的官方名称是 Microsoft Windows Server 2003 R2 操作系统。 y Windows Server 2008 的官方名称是 Microsoft Windows Server 2008 操作系统。 y Windows Server 2008 R2 的官方名称是 Microsoft Windows Server 2008 R2 操作系统。 y Windows Server 2012 的官方名称是 Microsoft Windows Server 2012 操作系统。 y Microsoft、 Windows、 Windows NT 和其它微软产品的商标和产品名称是微软公司在美国和其他国家的商标。 y Adobe、 Acrobat、 Reader 和 PostScript 是 Adobe 系统公司在美国和其他国家的商标或注册商标。 y Mozilla、 Firefox 和 Firefox 标识是 Mozilla 基金会在美国和其他国家的商标或注册商标。 y 本手册或软件中的其他公司名称和产品名称分别是其相应公司的商标。
东芝 TS608电话 说明书

东芝cv180基本操作指令

cv180基本操作指令41 2 3 O 代表不闪耀数码管 0 代表闪耀数码管以上四个键代表操作盘上的4个按键。
<一>查看故障代码:按1号键显示O0,然后按2号键显示到O8,然后按3号键查看,数码管同时显示两个亮点的就是故障代码。
<二>消除故障:按1号键显示O0,然后按2号键显示到OE,接着按3号键确认,然后再按3号键确认,显示OE再按3号键确认,然后再按2号键,再按确认,再继续按2号键,再按确认。
一直清除三次,按到最后一个OE,确认后,按4号键,显示CL。
清除成功,按4号键恢复到主界面。
<三>登记内呼指令:1:按1号键显示00,然后按3号键显示到O0,接着按2号键,显示O1,然后按3号键确认2:接着开始写地址:首先接着上一步,数码管会显示0000,接着开始输入4920,输入4,然后按3号键确认,以此类推,输入完4920后按3号键确认。
接着屏幕自动显示4.9.2.0地址输入成功,接着按2号键,显示O4,按3号键确认,然后继续按2号键,显示41,按3号键确认,接着输入OB,按确认,写入到六楼的地址:2O,按确认显示P-,再一次按确认,OK电梯就去了六楼。
<四>查看指令:按1号键显示00-->按3号键显示到O0-->按2号键输入O2-->按3号键确认-->输入21-->按3号键确认,这样就可以查看电梯当前的指令了。
东芝电梯OBM操作方法与地址!菜单(MODE键两下即可进入菜单):MODE 00 是打地址用的。
第一个零是牵引(结合数字键‘NUM ’0---F确认’STB‘有效)。
自第二各零开始结合数字键‘NUM ’打入四位地址码,每打入一位地址码STB一下。
MODE 01 是打字节(高低位)用的MODE 02 是用来查看所打的地址是否正确的MODE 04 是改参数用的MODE 05 是看参数用的MODE 08 是看故障用的MODE 0b 是改日历用的MODE 0E 是清故障用的MODE 10 是写保护(压PRST可安全退出)东芝电梯基本操作要领一、机房控制柜平面图(正面):1 2 3主板:MPU 5 6 4接口板:FIO操作板:A2 A7 A10 A11 HDC NC1 2 3 4 5 6 7 8 9二、机房检修操作:1、将控制柜操作板上8号扭子开关朝上,此时为机房检修状态。
- 1、下载文档前请自行甄别文档内容的完整性,平台不提供额外的编辑、内容补充、找答案等附加服务。
- 2、"仅部分预览"的文档,不可在线预览部分如存在完整性等问题,可反馈申请退款(可完整预览的文档不适用该条件!)。
- 3、如文档侵犯您的权益,请联系客服反馈,我们会尽快为您处理(人工客服工作时间:9:00-18:30)。
摘机->>Redial键 或 *0 ->>通话 摘机->>通话 直接代接:摘机->>按振铃的分机DSS键(闪烁状态)->>通话 组内代接:摘机->&g#5 ->>拔振铃的分机号码->>通话 通话中->>按Cnf/Trn键->>分机号码->>与分机通话或挂机 通话中->>按要转移到的分机DSS键->>与分机通话或挂机 通话中->>按HOLD键->>挂机(对应指示灯闪烁) 摘机->>按闪烁Line键或Intercom键->>取回呼叫,通话
存储:摘机->>#66->>3位个人速拔号(100-199,可用数量依编程而定)->>电话 打 简易拔号( 简易拔号(分机 电 号码(如为外线,前面+9)->>#->>提示音后挂机 速拔) 速拔) 话 拔打:摘机->>Spdial 键 或 *->>3位个人速拔号->>通话
简易拔号( 简易拔号(系统 拔打:摘机->>Spdial 键 或 *->>3位系统速拔号->>通话 速拔) 速拔) 可用系统速拔号依系统编程而定 重拔 应答电话
转移电话
无应答转移:摘机->> #6031+目的号码 + #+定时器+ # 遇忙无应答转移:摘机->> #6041 + 目的号码 + # +定时器 + # 取消转移:摘机->> #6051 设置:摘机->> #6091 取消:摘机->> #6092
免打扰
Toshiba CTX
功能
呼叫分机 呼叫外线 呼叫外线(PW) 呼叫外线(PW)
CTX/ Toshiba CTX/CIX 数字话机简明操作手册
功能
呼叫分机 呼叫外线
操作方式
直接拔分机号码 或 摘机->>拔分机号码 或 按Intercom 键->>拔分机号码 摘机->>9 或 按Line键->>拔外线号码->>通话
呼叫外线(PW) 呼叫外线(PW) 摘机->>#46->>输入帐号->>9 或 按Line键->>拔外线号码->>通话
接 电 话
代接电话
转接电话
通 话 功 能
保留电话 取回保留
多方通话(电话 通话中->>按Cnf/Trn键->>拔号码->>通话->>按Cnf/Trn键->>三方通话 多方通话( 会议) 会议) ->>按Cnf/Trn键->>拔号码->>通话->>按Cnf/Trn键->>四方通话(类推可更多方)
无条件转移:摘机->> #6011->>目的号码 ->> # 遇忙转移:摘机->> #6021->>目的号码 ->> # 其 它 功 能
打 简易拔号( 简易拔号(分机速 电 拔) 话
简易拔号( 简易拔号(系统速 拔) 重拔
接 电 话
应答电话 代接电话 转接电话
保留电话 通 取回保留 话 功 多方通话( 能 多方通话(电话会 议)
其 它 功 能
转移电话
免打扰
CTX/ Toshiba CTX/CIX 普通话机简明操作手册
操作方式
摘机->>拔分机号码 摘机->>9->>拔外线号码->>通话 摘机->>#46->>输入帐号->>9->>拔外线号码->>通话 存储:摘机->>#66->>3位个人速拔号(100-199,可用数量依编程而定)->> 电话号码(如为外线,前面+9)->>#->>提示音后挂机 拔打:摘机->> *->>3位个人速拔号->>通话 拔打:摘机->> *->>3位系统速拔号->>通话 可用系统速拔号依系统编程而定 摘机->> *0 ->>通话 摘机->>通话 组内代接:摘机->>#5#34->>通话 代接指定分机:摘机->>#5#5 ->>拔振铃的分机号码->>通话 通话中->>flash键 或 拍叉簧(小于0.5秒)->>分机号码->>与分机通话或挂机 通话中->>Flash键 或 拍叉簧(小于0.5秒)->> #33 ->> # ->>挂机 摘机->>#32->># 通话中->>flash键 ->>拔号码->>通话->>flash键 ->>三方通话 ->>flash键 ->>拔号码->>通话->>flash键 ->>四方通话(类推可更多方) 注:如话机机无flash键,可用拍叉簧代替(小于0.5秒) 如话机机无flash键 可用拍叉簧代替(小于0 flash 无条件转移:摘机->> #6011->>目的号码 ->> # 遇忙转移:摘机->> #6021->>目的号码 ->> # 无应答转移:摘机->> #6031+目的号码 + #+定时器+ # 遇忙无应答转移:摘机->> #6041 + 目的号码 + # +定时器 + # 取消转移:摘机->> #6051 设置:摘机->> #6091 取消:摘机->> #6092