SmartPlantReview使用手册(中文)
Merrithew Pilates 设备移动指南说明书

Things to Remember When…Moving Pilates EquipmentIt is worth remembering that a successful move of your Pilates equipment is one where your equipment arrives undamaged and you accomplish the move unhurt. With that in mind, this tip sheet is divided into safety tips for moving and packing tips for shipping Reformers and other large Merrithew equipment pieces.Moving Pilates Equipment SafelyWhen rearranging or relocating your Merrithew equipment,it’s important to keep your back safe to avoid potential injury. Here are some tips to help make the process smooth and risk-free.• Check the move path for objects or floor irregularities that could put an abrupt stop to a loaded move or damageyour equipment.• Avoid using a Reformer with easy-roll wheels as a trolleyand loading it up with accessories.• When lifting keep your back straight and bend your knees. Grip firmly and lift slowly.• If using an elevator, confirm beforehand that the equipment will fit into the space available. If using stairs, check that both ends of the stairwell offer clear passage.• When loading the equipment into a vehicle, make sureit will fit before you lift it.• When in doubt ask for help! Do not attempt to lift heavy equipment on your own.NOTE: If extra space is required when moving a Reformer, the feet, wooden standing platform and pulley posts can be removed. Removing the carriage out of the rails will make the load lighter.It is recommended when possible to use professional movers and leave the sometimes tricky heavy lifting to them.Moving Your Reformer Damage-Free and Parts Loss-Free Here are useful packing tips to keep your Reformer safe andall its small bits present and accounted for:• Remove carriage from the rails keeping carriage parallelwith the rails until the carriage fully clears the rails.NOTE: carriage removal is a two-person job.• Remove the floating rollers and shoulder rests from the carriage.• Wrap the carriage in a protective covering such as a blanketor bubble wrap.• Affix a sign to the top of the carriage that says… “Do not put anything on the carriage top”. Any weight left on the carriagetop will permanently indent the underlying EVA foam beneaththe vinyl covering.• Store carriage on its side.• Remove feet, shoulder rests, traditional gearbar, carriagestopper, pulley posts and floating rollers and put items in a bag labeled “Important Reformer Parts”. Make a clear mental note where the parts bag has been stored for the move.• Wrap rails and wooden standing platform in bubble wrap toprotect them from scrapes and gouges.• If using professional movers make it abundantly clear to themthat the pieces of equipment they are moving are veryimportant to you!• If upon arrival at your new location you find you need a bitmore room to get around a tight corner, the feet and thewooden standing platform can be removed to gain a bit more clearance. Tipping the Reformer on its side to negotiate acorner should also be tried.• Any small scratches or abrasions to the black, powder coated,front and back support ends of the Reformer can be effectively hidden by using a black Markal steel marker.• Should you need to reference an assembly manual, the various manuals for each piece of equipment can be viewed at: /support/equipment-manuals-assemblyWhen moving other large pieces of Pilates equipment takethe precaution to protect sensitive areas with bubble wrap suchas padded vinyl surfaces, Cadillac vertical poles, Stability Chairand Ladder Barrel side panels etc.Questions about equipment maintenance?Need a quote on replacement parts?Contact our Customer Care Department1.800.910.0001 ext. 288 (North America)1.416.482.4050 ext. 288 (International)**************************PM-4K-2™/®TrademarkorregisteredtrademarkofMerrithewCorporation,usedunderlicense.Allrightsreserved.For more information contact our Customer Service1.800.910.0001 ext. 288 | 0800.328.5676 ext. 288 (UK) | 416.482.4050 ext. 288 (Customer Care) *****************************|。
SPS Smart Manual Profiler 说明书
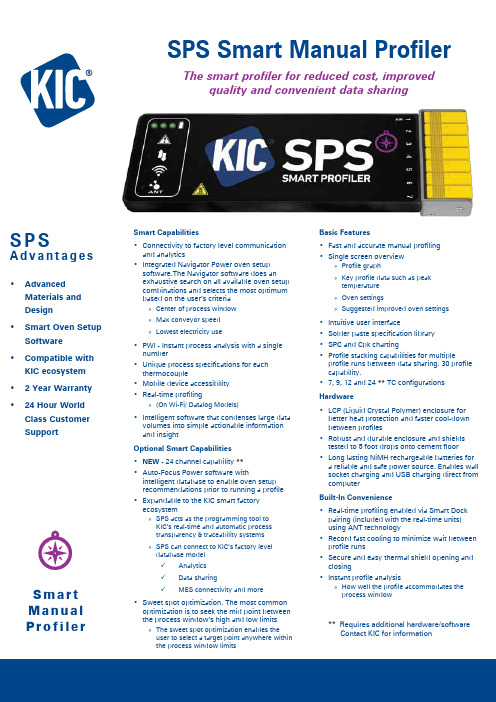
S P SA d v a n t a g e s• AdvancedMaterials and Design• Smart Oven SetupSoftware • Compatible withKIC ecosystem • 2 Year Warranty • 24 Hour WorldClass Customer SupportS m a r t M a n u a l Pr o f i l e rM Ov SmarSPS Smart Manual ProfilerThe smart profiler for reduced cost, improvedquality and convenient data sharingSmart Capabilities• Connectivity to factory level communication and analytics • Integrated Navigator Power oven setup software.The Navigator software does an exhaustive search on all available oven setup combinations and selects the most optimum based on the user’s criteria»Center of process window »Max conveyor speed »Lowest electricity use• PWI - Instant process analysis with a single number • Unique process specifications for each thermocouple • Mobile device accessibility • Real-time profiling»(On Wi-Fi/ Datalog Models)• Intelligent software that condenses large data volumes into simple actionable information and insightOptional Smart Capabilities• NEW - 24 channel capability **• Auto-Focus Power software withintelligent database to enable oven setup recommendations prior to running a profile • Expandable to the KIC smart factory ecosystem»SPS acts as the programming tool to KIC’s real-time and automatic process transparency & traceability systems »SPS can connect to KIC’s factory level database model9Analytics 9Data sharing9MES connectivity and more• Sweet spot optimization. The most common optimization is to seek the mid point between the process window’s high and low limits»The sweet spot optimization enables the user to select a target point anywhere within the process window limitsBasic Features• Fast and accurate manual profiling • Single screen overview»Profile graph»Key profile data such as peak temperature »Oven settings»Suggested improved oven settings• Intuitive user interface• Solder paste specification library • SPC and Cpk charting• Profile stacking capabilities for multipleprofile runs between data sharing. 30 profile capability.• 7, 9, 12 and 24 ** TC configurationsHardware• LCP (Liquid Crystal Polymer) enclosure for better heat protection and faster cool-down between profiles • Robust and durable enclosure and shields tested to 5 foot drops onto cement floor • Long lasting NiMH rechargeable batteries for a reliable and safe power source. Enables wall socket charging and USB charging direct from computerBuilt-In Convenience• Real-time profiling enabled via Smart Dock pairing (included with the real-time units) using ANT technology • Record fast cooling to minimize wait between profile runs • Secure and easy thermal shield opening and closing • Instant profile analysis»How well the profile accommodates the process window** Requires additional hardware/software Contact KIC for informationSPS Smart Profiler Kit Contents Smart Profiler Software on USB Flash Drive Smart Dock (Wi-Fi - ANT)*USB Software Protection DongleUSB Cable (A-Male/Micro-B)Electronic User Manual Thermal Shield*Electronic Hardware Guide Gloves Getting Started Guide Thermocouples*Calibration CertificateScissors Carrying Case Power Supply * These items may vary according to specific models ordered.Accuracy: ...........................±0.5°C Resolution: .........................0.1°C Internal Operating Temp: ..0°C to 85°CSample Rate: ......................0.002 to 50 per secondData Points: ........................72K per channelTemperature Range: ..........-150°C to 1050°C PC Connection: B 2.0 (Std-A/Micro-B)Power: ..............................Internal rechargeable NiMH batteryUSB cable connected to PC or power supply10 minute fast recharge for a single profileWi-Fi: ...................................2.4 GHzANT: ....................................2.4 GHz Thermocouple Compatibility:7, 9, 12 Channel Unit: ..Type K, StandardDimensions (L x W x H mm):7-Channel Unit: ............188.0 x 60.0 x 17.0 9-Channel Unit: ............188.0 x 75.0 x 17.0 12-Channel Unit: ..........188.0 x 98.0 x 17.0Thermal Shields: ................See Temperature Tolerance Table below for specifications.Vacuum compatibility: ......1.12kPa (8.40 torr) up to 45 minutesNote: The SPS Smart Profiler software, Profiling Software 2G, may interface directly with some oven controllers, eliminating the need for manual setpoint data entry. Please consult your oven supplier for availability.Accuracy based on factory calibration.Making Ovens SmarterTC #1TC #2TC #3Profiling Reduced to a Single NumberThe PWI measures the profile’s fit to the process window in a mathematical and objective manner by using a single number. This aids in optimizing the process by comparing and ranking alternative profiles in terms of their fit to the available process window. The lower the PWI, the more efficient and stable the process! (See the PWI data sheet for a detailed explanation)Copyright © KIC. All rights reserved. Patents pending. Specifications subject to change without notice . KIC and KIC Thermal Profiling are divisions of and registered trademarks and tradenames of Embedded Designs Inc. RPI i4.0, SPS, Smart Dock, X 5, KIC Start 2, K 2, KIC Explorer, SlimKIC 2000, KIC 24/7, KIC 24/7 Wave, KIC Vision, KIC Navigator Power, KIC Auto-Focus, KIC Auto-Focus Power, KIC RPM, KIC Carrier, Wave Surfer, KIC MVP, RPI, Process Window Index, PWI, the Lead Free Capable symbol, KIC ON BOARD and the KIC logo are trademarks or registered trademarks of KIC. All other trademarks and tradenames are the property of their respective holders.Corporate Headquarters16120 West Bernardo Drive • San Diego, CA 92127 USA +1(858)673-6050 Phone • +1(858)673-0085 FAX *****************•****************European Regional Office************************•***********************Asian Regional Office**********************•********************* All KIC products are designed to give maximum value and fast payback by streamlining your thermal process. Investment in a KIC product is a step toward total process control and quality management. All KIC products come with a no questions asked, 30-day money back guarantee.Minimum System RequirementsDual Core / 1 GHz Processor PC with 2 GB RAM 2 GB available storageVideo 1024 x 768 resolution / 16-bit1 available USB port (for data download or Smart Dock)1 available USB port (for software protection dongle)Visit our website at /support-download/os-compatibility-chart for product compatibility with Windows operating systems.Rev 2206BDatalogger Model: data are downloaded to the computer through a USB cable after the run.Wi-Fi Model: data are sent via Wi-Fi to the computer in real-timeduring the run. Data are also stored internally for USB download after the run.。
罗克韦尔 PanelView Plus 6 Compact 终端 说明书

未经罗克韦尔自动化公司书面许可,任何单位或个人不得复制本手册之全部或部分内容。
在整本手册中,我们在必要的地方使用了以下注释,来提醒您注意相关的安全事宜。
警告:标识在危险环境下可能导致爆炸,进而导致人员伤亡、物品损坏或经济损失的 操作或情况。
Allen-Bradley、 Rockwell Software、 Rockwell Automation、 PanelView、 FactoryTalk、 RSLinx、 CompactLogix、 ControlLogix、 SLC、 MicroLogix、 PLC-5 和 RSView 是罗克韦尔自动化有限公司的商标。 不属于罗克韦尔自动化的商标是其各自所属公司的财产。
注意:标识可能会导致人员伤亡、财产损坏或经济损失的操作或情况的信息。注意符号 可帮助您确定危险情况,避免发生危险,并了解可能的后果。
重要信息 标识对成功应用和了解产品有重要作用的信息。
标签可能位于设备上或设备内,用于提供特定警示。
电击危险:位于设备 ( 例如,驱动器或电机 ) 表面或内部的标签,提醒人们可能存在危险 电压。
章节 3
访问配置模式 . . . . . . . . . . . . . . . . . . . . . . . . . . . . . . . . . . . . . . . . . . . . . . . . . . 33 终端设置 . . . . . . . . . . . . . . . . . . . . . . . . . . . . . . . . . . . . . . . . . . . . . . . . . . . . . . . 36 加载和运行应用程序 . . . . . . . . . . . . . . . . . . . . . . . . . . . . . . . . . . . . . . . . . . . 38 启动选项 . . . . . . . . . . . . . . . . . . . . . . . . . . . . . . . . . . . . . . . . . . . . . . . . . . . . . . . 39 桌面访问 . . . . . . . . . . . . . . . . . . . . . . . . . . . . . . . . . . . . . . . . . . . . . . . . . . . . . . . 42 通信设置 . . . . . . . . . . . . . . . . . . . . . . . . . . . . . . . . . . . . . . . . . . . . . . . . . . . . . . . 46 以太网连接. . . . . . . . . . . . . . . . . . . . . . . . . . . . . . . . . . . . . . . . . . . . . . . . . . . . . 48 文件管理 . . . . . . . . . . . . . . . . . . . . . . . . . . . . . . . . . . . . . . . . . . . . . . . . . . . . . . . 52 显示屏设置. . . . . . . . . . . . . . . . . . . . . . . . . . . . . . . . . . . . . . . . . . . . . . . . . . . . . 55 输入设备设置 . . . . . . . . . . . . . . . . . . . . . . . . . . . . . . . . . . . . . . . . . . . . . . . . . . 57 配置打印选项 . . . . . . . . . . . . . . . . . . . . . . . . . . . . . . . . . . . . . . . . . . . . . . . . . . 60 检查应用程序文件的完整性 . . . . . . . . . . . . . . . . . . . . . . . . . . . . . . . . . . . 62 配置诊断 . . . . . . . . . . . . . . . . . . . . . . . . . . . . . . . . . . . . . . . . . . . . . . . . . . . . . . . 63 查看和清除系统事件日志 . . . . . . . . . . . . . . . . . . . . . . . . . . . . . . . . . . . . . . 64 系统信息 . . . . . . . . . . . . . . . . . . . . . . . . . . . . . . . . . . . . . . . . . . . . . . . . . . . . . . . 64 启用或禁用报警显示画面 . . . . . . . . . . . . . . . . . . . . . . . . . . . . . . . . . . . . . . 66 时间和日期设置. . . . . . . . . . . . . . . . . . . . . . . . . . . . . . . . . . . . . . . . . . . . . . . . 67 区域设置 . . . . . . . . . . . . . . . . . . . . . . . . . . . . . . . . . . . . . . . . . . . . . . . . . . . . . . . 69 字体链接 . . . . . . . . . . . . . . . . . . . . . . . . . . . . . . . . . . . . . . . . . . . . . . . . . . . . . . . 72
SmartPlant Review 使用手册 (中文版)

SmartPlant Review(SPR)使用手册Version 4.0中国石化北京石油化工工程公司PDS开发组二零零零年十一月目 录1.序言………………………………………………………………………………………1 1.1 功能简介………………………………………………………………………………11.2 特点…………………………………………………………………………………11.3 文件类型………………………………………………………………………………12. 窗口布置…………………………………………………………………………………2 2.1 单窗口布置……………………………………………………………………………22.2 三窗口布置……………………………………………………………………………22.3 四窗口布置……………………………………………………………………………22.4 恢复窗口尺寸…………………………………………………………………………23. 常用工具…………………………………………………………………………………2 3.1 渲染图和框架图的转换………………………………………………………………2 3.2 Fit View to Model……………………………………………………………………3 3.3 Fit View to Volume…………………………………………………………………3 3.4 定义视图中心…………………………………………………………………………3 3.5 视图的放大和缩小……………………………………………………………………3 3.6 快速定位控制…………………………………………………………………………4 3.7 视角控制………………………………………………………………………………44.标注………………………………………………………………………………………5 4.1 放置、编辑和删除标注………………………………………………………………54.2 查找标注………………………………………………………………………………74.3 显示标注………………………………………………………………………………85.查找对象…………………………………………………………………………………96. 移动定位控制……………………………………………………………………………13 6.1 移动类型………………………………………………………………………………136.2 鼠标拖放模式…………………………………………………………………………146.3 定位模式………………………………………………………………………………156.4 方位模式……………………………………………………………………………167. 显示组设置………………………………………………………………………………177.1 编辑显示组定义………………………………………………………………………187.2 显示组的控制…………………………………………………………………………187.3 显示组的位置…………………………………………………………………………197.4 分配材质………………………………………………………………………………217.5 创建、自动定义和删除………………………………………………………………217.6 Reverse Dim…………………………………………………………………………228. 引入与导出………………………………………………………………………………228.1引入……………………………………………………………………………………228.2 导出…………………………………………………………………………………239. 举例………………………………………………………………………………………23SmartPlant Review 使用手册1. 序言:1.1功能简介SmartPlant Review是一种基于Windows界面的浏览器,可以打开PDS(模型和数据),MicroStation,AutoCAD和 .SAT等格式的图形文件,而不需要进行任何的转换工作。
SMART指标设计快速指南说明书

Rapid Guide to Designing SMART IndicatorsIndiKit is all about indicators that enable us to measure the change our work has achieved. While IndiKit contains hundreds of indicators across different sectors, your project might require you to come up with other indicators. This mini-guide was written to help you in doing so.In your logframes and M&E systems, you will usually need three main types of indicators:output indicators ▪demonstrate the immediate benefits of your activities,such as increased knowledge, new skills or deliveryof certain services and products% of trained farmers who passed theprovided testoutcome indicators ▪show the short- and medium-term effects of theproject’s outputs, such as adoption of a newbehaviour or improved access to food% of targeted farmers cultivatingvitamin A rich orange fleshed sweetpotatoesimpact indicators ▪show the long-term effects the project achieved orcontributed to, such as reduced prevalence of certainhealth problems% of children aged 24–71 monthsexperiencing night blindness(symptom of vitamin A deficiency)Each indicator should tell how a person can recognize that the intended change happened (i.e. output / outcome / impact was achieved). For example, if an outcome is “Improved access to safe water”, the indicator can be “% of target households living less than 30 minutes walk from the nearest source of drinking water”. While outputs and outcomes can include directions for progress(such as “improved …” or “reduced …”), these should not be included in any indicators. Some donors also require indicators to be phrased in a neutral manner, without including specific targets. The indicators’ baseline and target values are then provided separately (for example: “baseline: 32%, endline: 60%”). When deciding on the target values, consult your M&E Officer or technical advisor on what can realistically be achieved with the resources and strategy you have. Indicators can measure qualitative changes even when they are reported in quantitative terms. For example, the indicator “% of teachers using at least 4 out of 7 promoted teaching methods” measures the teaching quality. Similarly, the indicator “% of women of reproductive age reporting to be satisfied with the quality of services provided by the supported health facilities“ is reported in percentages even though it provides qualitative data. These qualitative insights are an essential part of our M&E and should be included in every project design. When it is difficult to measure the change directly, we often use proxy indicators that measure the change indirectly, through another phenomenon. For example, instead of measuring household income (which is a sensitive and hard to measure topic), we measure the monetary value of household consumption. If you use an indicator consisting of several sub-indicators (i.e. a composite indicator), ensure that they are all measurable. When you develop new indicators, always check whether they are SMART:S pecific ▪From the way the indicator is phrased, is it clear what exactly will be achieved?▪Avoid using words with an unclear meaning, such as “improved”, “effective” or “capacity”(for example, “% of households who improved their agricultural production”)M easurable ▪Are you sure that it is possible to collect data for such an indicator? (for example, “volume of soil lost due to erosion” is close to impossible to measure)▪If the data is prone to seasonal changes, can you collect it at the same time of year?▪Do you have the expertise, time and staff to collect the required data? (for example, measuring the prevalence of undernutrition requires specific expertise + up to 3 weeks of time)A chievable ▪Is it realistic to expect the indicator’s targets to be achieved with the time, HR resources and funding you have? (for example, reduce chronic undernutrition within a two-year project)▪Overly ambitious targets can make even a great project look like a failure if they are not met.T ime-bound ▪Is it clearly specified by when the indicator will be achieved? (e.g. by the end of 2021; this information is often provided for a list of several indicators – not for each individually)> Do you have a suggestion for improving this Rapid Guide’s content? Send it to us please!> Would you like this Rapid Guide to be available in a different language? Get in touch with us!。
SmartPlantReview使用手册(中文)

SmartPlant Review Version 4.0使用手册目录1.序言 (1)1.1 功能简介 (1)1.2 特点 (1)1.3 文件类型 (1)2. 窗口布置 (2)2.1 单窗口布置 (2)2.2 三窗口布置 (2)2.3 四窗口布置 (2)2.4 恢复窗口尺寸 (2)3. 常用工具 (2)3.1 渲染图和框架图的转换 (2)3.2 Fit View to Model (3)3.3 Fit View to Volume (3)3.4 定义视图中心 (3)3.5 视图的放大和缩小 (3)3.6 快速定位控制 (4)3.7 视角控制 (4)4.标注 (5)4.1 放置、编辑和删除标注 (5)4.2 查找标注 (7)4.3 显示标注 (8)5.查找对象 (9)6. 移动定位控制 (13)6.1 移动类型 (13)6.2 鼠标拖放模式 (14)6.3 定位模式 (15)6.4 方位模式 (16)7. 显示组设置 (17)7.1 编辑显示组定义 (18)7.2 显示组的控制 (18)7.3 显示组的位置 (19)7.4 分配材质 (21)7.5 创建、自动定义和删除 (21)7.6 Reverse Dim (22)8. 引入与导出 (22)8.1 引入 (22)8.2 导出 (23)9. 举例 (23)SmartPlant Review 使用手册1. 序言:1.1 功能简介SmartPlant Review 是一种基于 Windows 界面的浏览器,可以打开 PDS(模型和数据) ,MicroStation,AutoCAD 和 .SAT 等格式的图形文件,而不需要进行任何的转换工作。
它提供了一种智能链接,可以实现交互式地浏览大型复杂的 3D 模型。
用此工具,可以深入地浏览和分析工程设计、建筑结构和进行工厂的日常维护。
SmartPlant Review 不仅能够提供清晰而简明的可视化通信,查阅 DesignReview 留下的各种标记,查找模型中符合某些条件的对象,创建各种反馈信息:如标记、标签、意见及注释等相关数据,实现漫游检查和校审功能;而且还可以实现进度浏览和冲突碰撞检查,将检查者的思路和意图反馈给 PDS 设计者。
smart reverb 说明书

m a n u a ls m a r t :r e v e r b s mart:re ve rbm a n u a ls m a r t :r e v e r b Welcome to smart:reverb3Install 4Authorization 5User Interface6Global Reverb Controls 7Global Reverb Controls 8Custom-tailored Reverb 9The Reverb Matrix 10The Particle Display 11The Temporal Shaper 12The Spectral Shaper Grid 13Pre-Filter EQ14Settings 15contentso v e r v i e wc o n t e n tsm a n u a ls m a r t :r e v e r b w e l c o m e t o s m a r t :r e v e r bWelcome to smart:reverbBecause no two audio tracks are the same, smart:reverb’s processing focuses on the individuality of each signal. With a single click, the plug-in quickly analyzes the source material to create each reverb from scratch. By custom-fitting the reverb to the spectral and temporal characteristics of the input signal, typical problems such as disturbing resonances or muddy reverb tails are avoided from the very beginning.Simultaneously, smart:reverb computes a matrix that provides a range of styles for the reverb at hand—each of them tailored to the input signal. Guided by descriptive properties, users can quickly find the style that best suits their creative visions without having to search through hundreds of presets.For maximum control, the plug-in provides an interactive view of the reverb’s anatomy. A detailed interface makes it easy to manipulate the deep-structure of the reverb by modifying its frequency and time-dependent decay rate as well as the reverb’s spread or density evolvement over time.smart:reverb is a source-adaptive reverb plug-in. It delivers custom-tailored reverb by adjusting its processing to the individual characteristics of the input material. In addition, smart:reverb creates an intuitively navigable reverb matrix for quickly finding the right sound.m a n u a ls m a r t :r e v e r b m i n i m u m r e q u i r e m e n t s | W i n d o w s | O S Xi n s t a l l Mac OSXTo start the installation process, please open the disk image sonible_smartreverb.dmg . This will mount the image and open a finder window showingthe content of the installation package.To install smart:reverb on your system, run theinstallation file smartreverb_installer.pkg .The installer will now guide you through the necessary steps to install smart:reverb on your computer. smart:reverb will automatically be installed in the default locations for audio plug-ins.Default folders:Audio Unit/Library/Audio/Plug-Ins/Components/VST/Library/Audio/Plug-Ins/VST/System requirementsInstallWindows To start the installation process, extract the downloaded zip-file sonible_smartreverb.zip onto your hard disk and run the installer.The installer will now guide you through thenecessary steps to install smart:reverb on your computer.During installation, you can select which version(s)of smart:reverb you want installed. You can also select custom installation folders for the VST version or simply use the default folder suggested by the installer.The VST3 and AAX versions of the plug-in will be automatically installed in their respective default folders.Default folders:VST3 (on a 64 bit operating system):..\Program Files\Common Files\VST3\..\Program Files(x86)\Common Files\VST3\AAX (on a 64 bit operating system)..\Program Files\Common Files\Avid\Audio\Plug-Ins ..\Program Files(x86)\Common Files\Avid\Audio\CPU RAMOperating systemsIntel Core Duo, i52GBWindows 10 (64 bit)Mac OSX 10.7+m a n u a ls m a r t :r e v e r b l i c e n s i n g s y s t e m | u n l o c k i n g | t r i a l v e r s i o na u t h o r i z a t i o n AuthorizationUnlockingIf you purchased a license for smart:reverb online, you will receive your license key via email.Machine-based unlockingWhen opening smart:reverb for the first time, a notification window will be displayed asking you to unlock smart:reverb with a valid license key.Please make sure that your computer is connected to the internet before starting the registration process.Enter your license key and click "register." The plug-in will now communicate with our server to check if the license is valid. If it is – enjoy!iLokIf you transferred your license to an iLok, simply attach the iLok to your computer. The plug-in will then be automatically registered – enjoy!If you don’t receive the email within minutes please check your junk folder first before contacting our support (*******************).Trial versionTo run smart:reverb in demo-mode, simply click "try" and you will then be able to use smart:reverb for a couple of days without any limitations. (Please refer to our website to find out more about the current demo period of smart:reverb)When the demo period expires, you will need to purchase a full license in order to continue using the plug-in.Licensing systemYou can select between two licensing systems: machine-based or iLok (USB dongle).By creating a user account on and registering your products – if they are not already visible in your Dashboard – you can manage your plug-in activations.Machine-basedEach license key allows you to install smart:reverb on two computers with unique system IDs. These system IDs are registered during license activation.The same license can be used by multiple users, but each user has to individually unlock the full version of smart:reverb under their account.In the case of a system-ID being changed (e.g. replacement of the hard drive), you can revoke/activate the plug-in next to the respective system-ID in the Dashboard of your sonible user account.iLokIf you want to transfer one activation to your iLok, first make sure the plug-in is registered in your sonible user account. Click on the button "transfer to iLok" next to the plug-in in your Dashboard and follow the instructions.Note: 1st gen iLok dongles and the iLok Cloud arecurrently not supported.m a n u a ls m a r t :r e v e r bu s e r i n t e r f a c e User InterfaceLearning section Learn and recall a tailored reverb for your track.Reverb ControlSet the reverb time and pre-delay.EffectsFreeze the current reverb tail or enable an infinite reverb time to create sound layers.Filter SectionApply a pre-filter EQ to quickly adapt the spectral shape of your signal.o v e r v i e wSettingsAccess the settings page.Particle Display Monitor the reverb’s anatomy and its current activity in different frequency bands. Once the learning process is finished, you can also freely adjust the decay rates in different bands using the inter-active spectral shaper grid.Temporal ShaperMonitor the reverb’s decay, spread and density evolvement over time. Once the learning process is finished, you can freely adjust the temporal behavior using the interactive shaper lines.Reverb Character Manually fine-tune the width, clarity and color of your reverb.Reverb MatrixTo intuitively browse through different reverb styles use the reverb matrix as an XY pad.State handlingSave different states of parameter settings for easy A/B comparison or to store personal presets.m a n u a ls m a r t :r e v e r bWidthLimit or expand the perceived width of the reverb effect within the stereo field.ColorDetermine if the reverb should have a darker or brighter sound.ClarityUnmask direct signal components to increase the transparency of the reverb effect.o v e r v i e wg l o b a l r e v e r b c o n t r o l s The left-hand section of the user interface provides you with all the necessary controls to start the learning process for a new reverb and to modify all global reverb parameters.Profile & Learning Although smart:reverb can be used without applying its source-adaptive features, it’s highly recommended to always start off with the learning process. This adapts the processing of smart:reverb to your audio material and enables all detailed reverb controls. Please refer to page 9 for more details on the learning process.Reverb MatrixThe Reverb Matrix is a parameter space covering different reverb styles. Guided by the semantic descriptors, you can easily navigate via the XY pad. By moving across the XY pad, you can see how the reverb’s anatomy inside the Particle Display (see page 11) and the Temporal Shaper (see page 12) changes in real-time. Please refer to page 10 for more details on the Reverb Matrix.Global Reverb Controls13542m a n u a ls m a r t :r e v e r b Reverb TimeSet the reverberation time. This is the length of time over which the reverb tail has decayed by 60dB. Please note, changing the reverberation time will scale (extend or shorten) your current reverb effect and its internal temporal and spectral structure accordingly.Pre-DelaySet a pre-delay. The pre-delay refers to the length of time between the original dry sound and the audible onset of early reflections.Dry / WetMix the dry (direct) and wet (reverberated) signal. When using smart:reverb as an insert effect, you typically want to use a mix of both signals. When using smart:reverb as a send effect, you may stick to 100% wet signal since the output will later be mixed with the dry signal inside the mixer of your DAW.If you want to change the two parameters proportionately (so that they always sum up to 100%), enable the chain symbol.FreezeClick on Freeze to capture the current reverb tail. This will create a layered sound of the reverb effect.InfiniteClick on Infinite for an infinite reverb time. This setting will overrule the current settings of the reverberation time. Disable to return to your previously set reverberation time.Global Reverb Controls5678956789m a n u a ls m a r t :r e v e r b c u s t o m -t a i l o r e d r e v e r b1. Select a ProfileA profile calibrates the processing of smart:re-verb to a specific sound source. You can always start the learning process with the "Universal" profile and switch to a more specific profile later. 2. Start the audio playback & begin learning smart:reverb needs incoming audio material for the learning process. Once the playback started, click the green record button. A pulsating pause icon and a progress bar inside the profile dropdown indicate that smart:reverb is actively analyzing.3. Done!When the learning process is finished, smart:re-verb will automatically set all learned parameters, the Reverb Matrix is adjusted to your signal (see page 10) and the Spectral Shaper Grid (see page 13) as well as the Temporal Shaper (see page 12) are enabled.With the learning process complete, the thumb ofthe Reverb Matrix and the smart state button will turn green. This indicates that the current reverb settings lie within the custom parameter space computed for your signal.LearningClick the record button to start or pause learning. While learning, a pause symbol will be displayed instead of the record button.Profile dropdownExpand the dropdown menu to select a profile that best matches your audio material.Smart State buttonThis button indicates whether you are currently in a smart state (the button is GREEN ) or if one or multiple parameters have been manually modified (the button turns BLACK).Although it’s simply impossible to automatically generate something as subjective as a perfectly sounding reverb effect, the intelligent processing of smart:reverb ensures that every reverb computed by the plug-in fits to the spectral and temporal characteristics of your input signal. This way, problems such as disturbing resonances, muddy reverb tails or reverbs that just don’t fit are avoided right from the start.Custom-tailored Reverbm a n u a ls m a r t :r e v e r b t h e r e v e r b m a t r i xFinding the right reverb for a track can be a time-consuming and challenging task and often involves searching through dozens of presets. To keep you in the creative flow, smart:reverb comes with a new way of finding the right style of reverb: the Reverb Matrix.The Reverb Matrix is a parameter space covering different reverb styles. Using XY pad functionality and semantic descriptors, it can be easily and efficiently explored to find the reverb style that matches your creative vision.IntimateAn intimate reverb gives your sound a warm and personal touch. It’s great if you work with soft vocals or solo instruments, since it makes your signal sound like it’s been recorded at a relatively small, slightly homey location.RichA rich reverb creates a full and multi-layeredsound. Go for rich if you want to fully immerse your signal in a dense and vibrant reverb, for example when working with synth pads or orchestral sounds.NaturalA natural reverb sounds as if the reverberated signal was recorded in a real environment as the reverb effect is very cohesive and unobtrusive. This reverb will give your signal finishing touches without changing its character too much. It works very well when working with acoustic instruments or clean vocals.ArtificialAn artificial reverb does not try to simulate an actual room but rather plays with different reverb characteristics. Use an artificial sounding reverb if you want to intentionally change the character of a signal and make the reverb audible as a distinct creative effect.The Reverb Matrixm a n u a ls m a r t :r e v e r b t h e p a r t i c l e d i s p l a yThe Particle DisplayThe Particle Display shows your reverb’s anatomy and the current reverb activity in different frequency bands. The reverb particles indicate the energy, density and structure of the reverb. The horizontal axis represents the reverb time (the right end of this axis shows the current reverb time) while the vertical axis represents different frequency bands:When there is no audio playback, the Particle Display shows the static structure of the reverb. Large, opaque particles indicate a lot of potential reverb energy while small, more transparent particles indicate low reverb levels.When a signal is running through, the reverb particles are triggered by the incoming signal. The level and size of the particles show the dynamicspectral behavior of the reverb components.m a n u a ls m a r t :r e v e r b t h e t e m p o r a l s h a p e rThe Temporal ShaperDecayThe Decay curve shows how the reverb’s energy decreases or increases over time.SpreadThe Spread curve shows the reverb’s stereo spread over time. This parameter is similar to the global Width parameter, but allows control of the spread’s temporal progression.You can restrict the affected frequency range by dragging the line inside the spectral display.DensityThe Density curve shows the density evolvement of the reverb.The Temporal Shaper allows you to monitor the temporal evolvement of your reverb’s Decay (green), Spread (yellow) and Density (pink). Once smart:reverb hascreated a custom Reverb Matrix for the current signal, you can freely shape the three temporal curves using interactive thumbs and lines.m a n u a ls m a r t :r e v e r b Once smart:reverb has generated a custom Reverb Matrix for the current signal (see page 9), the Spectral Shaper Grid is enabled. This grid lets you control the decay shape of the reverb over frequency ranges and time using interactive thumbs and lines.Moving a thumb to the left decreases the decay time of the reverb within the respective time frame and frequency band. You can also select the decay line between two points to move both frequency bands.While changing the Decay lines, you will also see how the reverb’s anatomy (Particle Plot) is changing.If you manually change the reverb’s anatomy by using the Spectral Shaper Grid or the Temporal Shaper, you leave the computed parameter space: the thumb inside the Reverb Matrix then changes into a white circle and the smart state button turns black.To return to the automatically generated reverb settings you can simply click on the smart state button or move the thumb inside the Reverb Matrix.The Spectral Shaper Gridt h e s p e c t r a l s h a p e rm a n u a ls m a r t :r e v e r b p o s t -fi l t e r e qPre-Filter EQThe Pre-Filter EQ, allows you to shape the wet signal using two thumbs. Choose from five filter types (bell, high and low pass, high and low shelf). Set the frequency and gain by dragging the thumbs or entering a precise value in the text box. You can change the Q value by scrolling or holding ALT while dragging verti-cally. Deactivate a filter by clicking on the pink and yellow icon.You can also change frequency and gain values as well as turn filters on or off when the filter is collapsed.m a n u a ls m a r t :r e v e r b SettingsAll of these parameters are global settings. This means that they will be applied to ALL instances of smart:reverb (in all your projects).To visit the settings page, click the little cogwheel in the upper right corner of the plug-in.Use 100% wet signal per defaultEnable if you want to change the default balance of dry/wet to 0/100.Show tooltipsDisable to hide show tooltips when hovering over selected control elements.Use OpenGL:Enable for GPU powered graphics processing. It is recommended to only disable this switch in case of graphics problems, since the system load may significantly increase without OpenGL.Share anonymous user data:Enable to share fully anonymous user data with sonible and help us improve smart:reverb.Plug-in informationH ere you can find the name and version of your plug-in. You can start the welcome tour by clicking on "show tutorial".Update notice When a new release of the plug-in is available, you‘llreceive a notification on the smart:reverb settings page. Click on the blue label to download the latest version of the plug-in.License informationThis will display your license state and number (when not licensed via iLok).s e t t i n g s11223344556677m a n u a ls m a r t :r e v e r b sonible GmbH Haydngasse 10/18010 Graz Austriaphone: +43 316 912288*******************All specifications are subject to change without notice.©2020, sonible GmbH. All rights reserved.Engineered & designed by sonible in Austria./smartreverb。
SmartPlant Review
SmartPlant Review一.简介SmartPlant Review 是一种基于Wintel 平台的简单易用的设计检查工具。
SmartPlant Review 容易使用,易于控制。
用户可以用键盘、鼠标及游戏杆来控制模型文件的显示方式。
由于简单易用,因此它适用从工程设计人员,施工人员到总工,项目负责人等不同类型人员使用。
由于它可被安装到从笔计本计算机到大型图形工作站等不同平台上,因此它可以广泛的被应用从设计院到施工现场等不同场所。
SmartPlant Review 提供一种可视化的工程设计模型检查平台。
用户可以在不需要任何CAD平台的情况下,检查工程设计模型及其相关的工程数据,同时可以对工程模型及数据进行批注。
它全面的支持Intergraph 的工厂设计系统 (PDS)模型、Microstation文件、AutoCAD文件及SAT格式的文件。
为了满足用户对性能的要求,SmartPlant支持多线程、支持OpenGL图形渲染。
同时它用MS Access97及 MS Access 2000存放项目数据。
使用用户的协调、审核、评估、会审意见容易保存及备份。
使用SmartPlant,用户可以使用公制或英制单位对模型进行测量。
结果可以以多种不同的方式表示并可以根据需要永久的保存和显示。
用户还可以以多种不同的方式对模型进行标注,如标签。
并且这些标注数据可以反回到设计者供修改设计时进行参考。
同时用户还可以使用文本和其它数据(使用”拖放”将模型元素和任何的文件相关联)对模型进行标注。
它还可以用ODBC将模型和文件关联,用户甚至可以使用SmartPlant Review 的数据关联功能将其用做一个小型的文件管理系统。
SmartPlant Review 非常适合用于大型的工程模型。
使用SmartPlant Review 显示集的功能,用户可以以不同的方式来显示和移动模型的任意指定部分。
大大的方便大型工程模的查看及批注。
- 1、下载文档前请自行甄别文档内容的完整性,平台不提供额外的编辑、内容补充、找答案等附加服务。
- 2、"仅部分预览"的文档,不可在线预览部分如存在完整性等问题,可反馈申请退款(可完整预览的文档不适用该条件!)。
- 3、如文档侵犯您的权益,请联系客服反馈,我们会尽快为您处理(人工客服工作时间:9:00-18:30)。
SmartPlant Review Version 4.0使用手册目录1.序言 (1)1.1 功能简介 (1)1.2 特点 (1)1.3 文件类型 (1)2. 窗口布置 (2)2.1 单窗口布置 (2)2.2 三窗口布置 (2)2.3 四窗口布置 (2)2.4 恢复窗口尺寸 (2)3. 常用工具 (2)3.1 渲染图和框架图的转换 (2)3.2 Fit View to Model (3)3.3 Fit View to Volume (3)3.4 定义视图中心 (3)3.5 视图的放大和缩小 (3)3.6 快速定位控制 (4)3.7 视角控制 (4)4.标注 (5)4.1 放置、编辑和删除标注 (5)4.2 查找标注 (7)4.3 显示标注 (8)5.查找对象 (9)6. 移动定位控制 (13)6.1 移动类型 (13)6.2 鼠标拖放模式 (14)6.3 定位模式 (15)6.4 方位模式 (16)7. 显示组设置 (17)7.1 编辑显示组定义 (18)7.2 显示组的控制 (18)7.3 显示组的位置 (19)7.4 分配材质 (21)7.5 创建、自动定义和删除 (21)7.6 Reverse Dim (22)8. 引入与导出 (22)8.1 引入 (22)8.2 导出 (23)9. 举例 (23)SmartPlant Review 使用手册1. 序言:1.1 功能简介SmartPlant Review 是一种基于 Windows 界面的浏览器,可以打开 PDS(模型和数据) ,MicroStation,AutoCAD 和 .SAT 等格式的图形文件,而不需要进行任何的转换工作。
它提供了一种智能链接,可以实现交互式地浏览大型复杂的 3D 模型。
用此工具,可以深入地浏览和分析工程设计、建筑结构和进行工厂的日常维护。
SmartPlant Review 不仅能够提供清晰而简明的可视化通信,查阅 DesignReview 留下的各种标记,查找模型中符合某些条件的对象,创建各种反馈信息:如标记、标签、意见及注释等相关数据,实现漫游检查和校审功能;而且还可以实现进度浏览和冲突碰撞检查,将检查者的思路和意图反馈给 PDS 设计者。
对提高工作效率,缩短工程时间,增强准确性起到了积极的作用。
1.2 特点SmartPlant Review功能十分强大,可以浏览基于.dgn, .dwg, .dxf 和.sat 格式的3D 图形文件。
利用漫游和审核功能,工厂模型可以存在于整个产品生命周期——从概念化设计阶段到退役阶段。
SmartPlant Review 提供了一系列工具用于可视化模拟分析和 API 完全客户化,如:施工模拟、立体浏览、高质量图象建立、动画、高级着色等等。
1.3 文件类型:针对同一个模型,SmartPlant Review 用到的几种文件类型如下:.dgn 进入SmartPlant Review的M icroStation 设计文件格式。
.dri 进入SmartPlant Review的主要方式。
label data 和设计文件一一对应,必须用.dri 文件指定标签文件和设计文件的对照关系。
tagseed.txt 预先定制的标注模板文件。
.mat 包含材质分配的文本文件格式。
.pal 包含定义材质的调色板文件格式。
.rgb 带有颜色文件格式的I ntergraph 图象文件格式。
.pvi 由P lant Design 创建的文件类型。
.vfa 包含模型视图参数的设计文件格式。
.vue SmartPlant Review 所创建的,能快速阅读和控制数据的文件格式。
.dwg AutoCAD 设计文件格式。
.dxf AutoCAD 设计文件格式。
.sat 可将智能3D对象与相关数据互换的文件格式。
2. 窗口布置SmartPlant Review 提供了三种窗口布置模式:单窗口布置、三窗口布置和四窗口布置。
从菜单栏单击Window>Pane Layout ,会出现下列子菜单:2.1 单窗口布置在工具条上单击“Single Pane Layout”图标按钮,或从菜单栏单击Window>Pane Layout>Single选项,窗口布置将只显示M ain (主视图)窗口。
这种显示方式在全屏浏览时非常有用。
2.2 三窗口布置在工具条上单击“Three Pane Layout”图标按钮,或从菜单栏单击Window>Pane Layout>Three 选项,窗口布置不仅显示M ain (主视图)窗口,还将显示P lan (平面图)窗口和E levation (立面图) 窗口。
2.3 四窗口布置在工具条上单击“Four Pane Layout”图标按钮,或从菜单栏单击 Window>Pane Layout>Four 选项,窗口布置不仅显示 Main (主视图)窗口、Plan (平面图)窗口和 Elevation (立面图)窗口, 还将显示Text (文本)窗口。
2.4 恢复窗口尺寸在工具条上单击“Restore Pane Layout ”图标按钮,或从菜单栏单击 Window>PaneLayout>Restore 选项,将恢复系统默认的窗口尺寸。
当选择菜单栏 Accessories>Set Windows Size 选项时,可根据相应提示重新设置 Main 、Plan 和 Elevation 窗口的尺寸,一旦改变任一项尺寸值,比如将 Main 窗口的高度改变,则整个 SmartPlant Review 的窗体尺寸将会作相应调整。
此时选择 Restore 选项,窗口设置将恢复到系统默认的原始窗体 样式。
3. 常用工具介绍:3.1 渲染图和框架图的转换在工具条上单击“Shaded/Wireframe”图标按钮,或从菜单栏单击V iew>Display>Wireframe 或Full S hading 选项,用于实现模型在M ain 窗口的显示方式:渲染图(Shaded )和框架图(Wireframe )的转换。
Plan 窗口和E levation 窗口的任何图象都不能被渲染。
框架图显示速度快;渲染图显示速度比框架图要慢,但看起来更直观,更形象。
系统默认的显示方式为框架图。
3.2 Fit View to Model在工具条上单击“Fit View to Model”图标按钮,或从菜单栏单击View>Fit>View to Model 选项,用于显示整个模型。
该命令可以调整模型在M ain 窗口中的尺寸,从而显示整个模型。
如同A utoCAD 中的Z oom All 命令和M icrostation 中的F it View 命令。
选中此项,Main 窗口中的模型将作调整,Plan 窗口和E levation 窗口中的视角也作相应改变。
3.3 Fit View to Volume在工具条上单击“Fit View to Volume”图标按钮,或从菜单栏单击V iew>Fit> V iew t o V olume 选项,用于显示所选定范围内的模型。
该命令可以调整模型在M ain 窗口中的尺寸,从而显示一定范围内的模型。
如同A utoCAD 中的Zoom Window 命令和M icrostation 中的W indow Area 命令。
选中此项,会出现提示信息,要求你输入两点定义选择范围,输入两点后,Main 窗口中的模型将作调整,Plan 窗口和Elevation窗口中的视角也作相应改变。
3.4 定义视图中心在工具条上单击“Center View”图标按钮,或从菜单栏单击View>Place>View by Center Point 选项,用于定义一新的视图中心。
选中此项,会出现提示信息,要求你输入一新中心点,在视图上选择一点后,模型在窗口中的位置将作相应调整。
此选项对于查看模型的局部细节非常有用。
3.5 视图的放大和缩小在工具条上单击“Zoom In By 2”图标按钮,或从菜单栏单击 View> Zoom In >2.0 选项,视图将放大2倍。
在工具条上单击“Zoom Out By 2”图标按钮,或从菜单栏单击 View> Zoom Out >2.0 选项,视图将缩小2倍。
在工具条上单击“Zoom In By 1.5”图标按钮,或从菜单栏单击 View> Zoom In >1.5 选项,视图将放大1.5倍。
在工具条上单击“Zoom Out By 1.5”图标按钮,或从菜单栏单击V iew> Zoom Out >1.5 选项,视图将缩小1.5倍。
注:3.2~3.5 的工具对于M ain、Plan 和E levation 三个窗口都适用。
3.6 快速定位控制从菜单栏单击V iew>Toolbars>Position C ontrol 选项,SmartPlant R eview 窗体上会出现定位控制工具:此选项可以动态地显示移动的位置。
View 显示对应于V iew D ependent 和V iew D ependent, L evel 方位模式的b earing 和e levation 设置信息。
Bearing 指针显示的是当前视角的 Bearing 方位。
elevation 指针显示的是当前视角的elevation 方位。
可以利用鼠标左键拖动 bearing 和 elevation 指针或直接在 bearing 和elevation 文本框中键入b earing 和e levation 值来改变bearing和e levation 设置。
Motion 显示对应于V iew Independent 方位模式的b earing 和e levation 设置信息。
Bearing 指针显示的是和B earing 相关的向前方位。
elevation 指针显示的是和 elevation 相关的向前方位。
在View Independent 方位模式下,这两个指针使你向前运动。
可以利用键盘的方位键(↑,↓,←,→)或鼠标右键拖动 bearing 和 elevation 指针来改变 bearing 和 elevation 设置。
Eye 显示当前视角原点的位置。
可以在 North、East 和 Elevation 域中键入新值来改变视角原点的位置。
Center 显示当前视角中心点的位置。
可以在 North、East 和 Elevation 域中键入新值来改变视角中心点的位置。
3.7 视角控制从菜单栏单击V iew>Toolbars>Perspective Agnle 选项,SmartPlant Review 窗体上会出现视角控制工具:此选项用于增加或减小视角区域。